ASRock 970 Pro Quick Installation Guide
ASRock 970 Pro Manual
 |
View all ASRock 970 Pro manuals
Add to My Manuals
Save this manual to your list of manuals |
ASRock 970 Pro manual content summary:
- ASRock 970 Pro | Quick Installation Guide - Page 1
, transmitted, or translated in any language, in any form or by any means, except duplication of documentation by the purchaser for backup purpose, without written consent of ASRock Inc. Products and corporate names appearing in this guide may or may not be registered trademarks or copyrights of - ASRock 970 Pro | Quick Installation Guide - Page 2
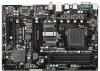
AMD 770 Chipset LAN PHY PCIE1 970 Pro ErP/EuP Ready Super I/O AUDIO CODEC IR1 1 HD_AUDIO1 1 PCIE2 RoHS CMOS BATTERY PCIE3 PCI Express 2.0 Support 6-Core CPU PCI1 AMD SB710 Chipset PCI2 PS2_USB_PW4 USB10_11 1 1 PS2_USB_PW3 USB8_9 1 1 8Mb BIOS ATX12V1) 3 AM3+ CPU Socket 4 CPU - ASRock 970 Pro | Quick Installation Guide - Page 3
LED indications. LAN Port LED Indications Activity/Link LED SPEED LED Status Description Status Description ACT/LINK SPEED LED LED Off No Link Off 10Mbps connection Blinking Data streams simultaneously", and click "ok". Then reboot your system. English 3 ASRock 970 Pro Motherboard - ASRock 970 Pro | Quick Installation Guide - Page 4
specific information about the model you are using. www.asrock.com/support/index.asp 1.1 Package Contents ASRock 970 Pro Motherboard (ATX Form Factor: 12.0-in x 8.2-in, 30.5 cm x 20.8 cm) ASRock 970 Pro Quick Installation Guide ASRock 970 Pro Support CD 2 x Serial ATA (SATA) Data Cables (Optional - ASRock 970 Pro | Quick Installation Guide - Page 5
Platform CPU Chipset Memory Expansion Slot Audio LAN Rear Panel I/O Connector - ATX Form Factor: 12.0-in x 8.2-in, 30.5 cm x 20.8 cm - All Solid Capacitor design - Support for Socket AM3+ processors - Support for AM3 processors: AMD PhenomTM II X6 / X4 / X3 / X2 (except 920 / 940) / Athlon II X4 - ASRock 970 Pro | Quick Installation Guide - Page 6
Legal BIOS - Supports "Plug and Play" - ACPI 1.1 Compliance Wake Up Events - Supports jumperfree - SMBIOS 2.3.1 Support - CPU VID Voltage Multi-adjustment Support CD - Drivers, Utilities, AntiVirus Software (Trial Version), AMD OverDriveTM Utility, CyberLink MediaEspresso 6.5 Trial, ASRock - ASRock 970 Pro | Quick Installation Guide - Page 7
drive, floppy disk or hard drive, then you can update your BIOS only in a few clicks without preparing an additional floppy diskette or other complicated flash utility. Please be noted that the USB flash drive or hard drive must use FAT32/ 16/12 file system. 7 ASRock 970 Pro Motherboard English - ASRock 970 Pro | Quick Installation Guide - Page 8
driver, it makes your iPhone charged much quickly from your computer and up to 40% faster than before. ASRock APP Charger allows you to quickly charge many Apple devices simultaneously and even supports the CPU and the heatsink when you install the PC system. 8 ASRock 970 Pro Motherboard English - ASRock 970 Pro | Quick Installation Guide - Page 9
2. Installation This is an ATX form factor (12.0-in x 8.2-in, 30.5 cm peripherals, and/or components. 1. Unplug the power cord from the wall socket before touching any component. 2. To avoid damaging the motherboard components due to may damage the motherboard. 9 ASRock 970 Pro Motherboard English - ASRock 970 Pro | Quick Installation Guide - Page 10
4: Match The CPU Golden Triangle Push Down And Lock To The Socket Corner Small The Socket Lever Triangle 2.2 Installation of CPU Fan and Heatsink After you install installation, please kindly refer to the instruction manuals of the CPU fan and the heatsink. English 10 ASRock 970 Pro Motherboard - ASRock 970 Pro | Quick Installation Guide - Page 11
DDR3 (Double Data Rate 3) DIMM slots, and supports Dual Channel Memory Technology. For dual channel configuration, you always need to install identical (the same brand, speed, size and chip-type) DDR3 DIMM pair to install them on DDR3_A2 and DDR3_B2 slots. English 11 ASRock 970 Pro Motherboard - ASRock 970 Pro | Quick Installation Guide - Page 12
the DIMM into the slot until the retaining clips at both ends fully snap back in place and the DIMM is properly seated. English 12 ASRock 970 Pro Motherboard - ASRock 970 Pro | Quick Installation Guide - Page 13
firmly until the card is completely seated on the slot. Step 5. Fasten the card to the chassis with screws. Step 6. Replace the system cover. 13 ASRock 970 Pro Motherboard English - ASRock 970 Pro | Quick Installation Guide - Page 14
clear the data in CMOS. The data in CMOS includes system setup information such as system password, date, time, and system setup parameters. To clear and reset the system parameters to default setup, please turn off the computer and unplug the power cord from the power 14 ASRock 970 Pro Motherboard - ASRock 970 Pro | Quick Installation Guide - Page 15
not clear the CMOS right after you update the BIOS. If you need to clear the CMOS when you just finish updating the BIOS, you must boot up the system first, on this motherboard. Each USB 2.0 header can support two USB 2.0 ports. English (9-pin USB6_7) (see p.2 No. 23) 15 ASRock 970 Pro Motherboard - ASRock 970 Pro | Quick Installation Guide - Page 16
supports Jack Sensing, but the panel wire on the chassis must support HDA to function correctly. Please follow the instruction in our manual and chassis manual them for AC'97 audio panel. E. Enter BIOS Setup Utility. Enter Advanced Settings, and then select Chipset ASRock 970 Pro Motherboard - ASRock 970 Pro | Quick Installation Guide - Page 17
pin. Though this motherboard provides 4-Pin CPU fan (Quiet Fan) support, the 3-Pin CPU fan still can work successfully even without the fan speed control function. If you plan to connect the 3-Pin CPU fan 1 and Pin 13. 20-Pin ATX Power Supply Installation 1 ASRock 970 Pro Motherboard 24 13 17 - ASRock 970 Pro | Quick Installation Guide - Page 18
Power Supply Installation 5 8 2.7 Driver Installation Guide To install the drivers to your system, please insert the support CD to your optical drive first. Then, the drivers compatible to your system can be without RAID functions, please follow below steps. English 18 ASRock 970 Pro Motherboard - ASRock 970 Pro | Quick Installation Guide - Page 19
Plug functions (AHCI mode) STEP 1: Set Up BIOS. A. Enter BIOS SETUP UTILITY Advanced screen Storage Configuration. B. Set the "SATA Operation Mode" option to [AHCI]. STEP 2: Install Windows® 7 / 7 64-bit / VistaTM / VistaTM 64-bit OS on your system. English 19 ASRock 970 Pro Motherboard - ASRock 970 Pro | Quick Installation Guide - Page 20
enable Untied Overclocking function, please enter "Overclock Mode" option of BIOS setup to set the selection from [Auto] to [CPU, PCIE, Async.]. Therefore, CPU FSB is untied during overclocking, but from the "BIN" folder in the Support CD to display the menus. 20 ASRock 970 Pro Motherboard English - ASRock 970 Pro | Quick Installation Guide - Page 21
970 Pro 970 Pro 970 Pro 970 Pro 21 ASRock 970 Pro Motherboard - ASRock 970 Pro | Quick Installation Guide - Page 22
'' ™ 22 ASRock 970 Pro Motherboard - ASRock 970 Pro | Quick Installation Guide - Page 23
23 ASRock 970 Pro Motherboard - ASRock 970 Pro | Quick Installation Guide - Page 24
® ® ® ® ® ® 24 ASRock 970 Pro Motherboard - ASRock 970 Pro | Quick Installation Guide - Page 25
® 25 ASRock 970 Pro Motherboard - ASRock 970 Pro | Quick Installation Guide - Page 26
1_2 +5V 2_3 +5VSB 1_2 +5V 2_3 +5VSB 1_2 +5V 2_3 +5VSB 1_2 +5V 2_3 +5VSB 1_2 2_3 26 ASRock 970 Pro Motherboard - ASRock 970 Pro | Quick Installation Guide - Page 27
SATAII_3 SATAII_5 SATAII_1 SATAII_2 USB_PWR P-11 P+11 GND DUMMY 1 GND P+10 P-10 USB_PWR USB_PWR P-9 P+9 GND DUMMY 1 GND P+8 P-8 USB_PWR USB_PWR P-7 P+7 GND DUMMY 1 GND P+6 P-6 USB_PWR IRTX +5V DUMMY 1 GND IRRX ASRock 970 Pro Motherboard SATAII_4 SATAII_6 27 - ASRock 970 Pro | Quick Installation Guide - Page 28
GND PRESENCE# MIC_RET OUT_RET 1 OUT2_L J_SENSE OUT2_R MIC2_R MIC2_L ® ® ® ® 28 ASRock 970 Pro Motherboard - ASRock 970 Pro | Quick Installation Guide - Page 29
PLED+ PLEDPWRBTN# GND 1 DUMMY RESET# GND HDLEDHDLED+ 1 SPEAKER DUMMY DUMMY +5V GND +12V CHA_FAN_SPEED PWR_FAN_SPEED +12V GND 1 PLED- PLED+ PLED+ FAN_SPEED_CONTROL 4 CPU_FAN_SPEED 3 +12V 2 GND 1 12 24 1 13 29 ASRock 970 Pro Motherboard - ASRock 970 Pro | Quick Installation Guide - Page 30
1 4 5 8 12 24 1 13 1 4 5 8 30 ASRock 970 Pro Motherboard - ASRock 970 Pro | Quick Installation Guide - Page 31
® ® 31 ASRock 970 Pro Motherboard - ASRock 970 Pro | Quick Installation Guide - Page 32
X O O O X O O O O: X: O O O O 32 ASRock 970 Pro Motherboard
-
 1
1 -
 2
2 -
 3
3 -
 4
4 -
 5
5 -
 6
6 -
 7
7 -
8
-
9
-
10
-
11
-
12
-
13
-
14
-
15
-
16
-
17
-
18
-
19
-
20
-
21
-
22
-
23
-
24
-
25
-
26
-
27
-
28
-
29
-
30
-
31
-
32
 |
 |

1
ASRock
970 Pro
Motherboard
English
English
English
English
English
Copyright Notice:
Copyright Notice:
Copyright Notice:
Copyright Notice:
Copyright Notice:
No part of this installation guide may be reproduced, transcribed, transmitted, or trans-
lated in any language, in any form or by any means, except duplication of documen-
tation by the purchaser for backup purpose, without written consent of ASRock Inc.
Products and corporate names appearing in this guide may or may not be registered
trademarks or copyrights of their respective companies, and are used only for identifica-
tion or explanation and to the owners’ benefit, without intent to infringe.
Disclaimer:
Disclaimer:
Disclaimer:
Disclaimer:
Disclaimer:
Specifications and information contained in this guide are furnished for informational
use only and subject to change without notice, and should not be constructed as a
commitment by ASRock. ASRock assumes no responsibility for any errors or omissions
that may appear in this guide.
With respect to the contents of this guide, ASRock does not provide warranty of any kind,
either expressed or implied, including but not limited to the implied warranties or
conditions of merchantability or fitness for a particular purpose. In no event shall
ASRock, its directors, officers, employees, or agents be liable for any indirect, special,
incidental, or consequential damages (including damages for loss of profits, loss of
business, loss of data, interruption of business and the like), even if ASRock has been
advised of the possibility of such damages arising from any defect or error in the guide
or product.
This device complies with Part 15 of the FCC Rules. Operation is subject to the
following two conditions:
(1)
this device may not cause harmful interference, and
(2)
this device must accept any interference received, including interference that
may cause undesired operation.
Published August 2012
Copyright
©
2012 ASRock INC. All rights reserved.
CALIFORNIA, USA ONLY
The Lithium battery adopted on this motherboard contains Perchlorate, a toxic
substance controlled in Perchlorate Best Management Practices (BMP) regulations
passed by the California Legislature. When you discard the Lithium battery in
California, USA, please follow the related regulations in advance.
“Perchlorate Material-special handling may apply, see
www
.dtsc.ca.gov/hazardouswa
ste/perchlorate”
ASRock Website: http://www.asrock.com