ASRock 970DE3/U3S3 Quick Installation Guide
ASRock 970DE3/U3S3 Manual
 |
View all ASRock 970DE3/U3S3 manuals
Add to My Manuals
Save this manual to your list of manuals |
ASRock 970DE3/U3S3 manual content summary:
- ASRock 970DE3/U3S3 | Quick Installation Guide - Page 1
for backup purpose, without written consent of ASRock Inc. Products and corporate names appearing in this guide may or may not be registered trademarks or ASRock Website: http://www.asrock.com Published March 2012 Copyright©2012 ASRock INC. All rights reserved. 1 ASRock 970DE3/U3S3 Motherboard - ASRock 970DE3/U3S3 | Quick Installation Guide - Page 2
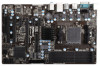
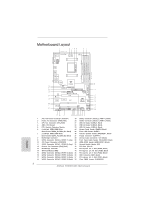
AM3+ 140W CPU PS2 Mouse PS2 Keyboard ATX12V1 DDR3 1866 COM1 DDR3_B1 (64 bit, 240-FpinSBmo8d0ul0e) DDR3_B2 (64 bit, 240-pin module) Support 8-Core CPU DDR3_A2 (64 bit, 240-pin module) DDR3_A1 (64 bit, 240-FpinSBmo8d0ul0e) SOCKET AM3b USB 2.0 T: USB2 B: USB3 USB 3.0 T: USB0 B: USB1 USB - ASRock 970DE3/U3S3 | Quick Installation Guide - Page 3
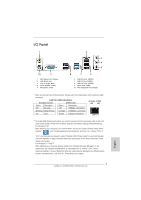
LAN Port ** To enable Multi-Streaming function, you need to connect a front panel audio cable to the front panel audio header. Please refer to below steps for the software setting of Multi-Streaming. For Windows ", and click "ok". Then reboot your system. English 3 ASRock 970DE3/U3S3 Motherboard - ASRock 970DE3/U3S3 | Quick Installation Guide - Page 4
ASRock 970DE3/U3S3 Motherboard (ATX Form Factor: 12.0-in x 7.5-in, 30.5 cm x 19.1 cm) ASRock 970DE3/U3S3 Quick Installation Guide ASRock 970DE3/U3S3 Support CD 2 x Serial ATA (SATA) Data Cables (Optional) 1 x I/O Panel Shield ASRock Reminds You... To get better performance in Windows® 7 / 7 64-bit - ASRock 970DE3/U3S3 | Quick Installation Guide - Page 5
1.2 Specifications Platform CPU Chipset Memory Expansion Slot Audio LAN Rear Panel I/O - ATX Form Factor: 12.0-in x 7.5-in, 30.5 cm x 19.1 cm - All Solid Capacitor design - Support for Socket AM3+ processors - Support for Socket AM3 processors: AMD PhenomTM II X6 / X4 / X3 / X2 (except 920 / 940) - ASRock 970DE3/U3S3 | Quick Installation Guide - Page 6
Boot - ASRock Instant Flash (see CAUTION 7) - ASRock OC DNA (see CAUTION 8) - ASRock APP Charger (see CAUTION 9) - ASRock SmartView (see CAUTION 10) - ASRock XFast USB (see CAUTION 11) - ASRock XFast LAN (see CAUTION 12) - ASRock XFast RAM (see CAUTION 13) English 6 ASRock 970DE3/U3S3 Motherboard - ASRock 970DE3/U3S3 | Quick Installation Guide - Page 7
Boot Failure Guard (B.F.G.) Hardware - CPU Temperature Sensing Monitor - Chassis Temperature Sensing - CPU/Chassis/Power Fan Tachometer - CPU Quiet Fan - CPU/Chassis/Power Fan Multi-Speed Control - Voltage Monitoring: +12V, +5V, +3.3V, Vcore OS - Microsoft® Windows® 7 / 7 64-bit / VistaTM - ASRock 970DE3/U3S3 | Quick Installation Guide - Page 8
the operating system limitation, the actual memory size may be less than 4GB for the reservation for system usage under Windows® 7 / VistaTM / XP. For Windows® 64-bit OS with 64-bit CPU, there is no such limitation. 5. It is a user-friendly ASRock overclocking tool which allows you to surveil your - ASRock 970DE3/U3S3 | Quick Installation Guide - Page 9
HD video and download files simultaneously. Real-Time Analysis of Your Data: With the status window, you can easily recognize which data streams you are currently transferring. 13. ASRock XFast RAM fully utilizes the memory space that cannot be used under Windows® OS 32-bit CPU. ASRock XFast RAM - ASRock 970DE3/U3S3 | Quick Installation Guide - Page 10
or damage the CPU. 15. While CPU overheat is detected, the system will automatically shutdown. Before you resume the system, please check if the CPU fan on the motherboard functions properly and checking with the power supply manufacturer for more details. 10 ASRock 970DE3/U3S3 Motherboard English - ASRock 970DE3/U3S3 | Quick Installation Guide - Page 11
wall socket before touching any component. 2. To avoid damaging the motherboard components due to static electricity, NEVER place your motherboard the motherboard to the chassis, please do not over-tighten the screws! Doing so may damage the motherboard. 11 ASRock 970DE3/U3S3 Motherboard English - ASRock 970DE3/U3S3 | Quick Installation Guide - Page 12
heatsink are securely fastened and in good contact with each other. Then connect the CPU fan to the CPU FAN connector (CPU_FAN1, see Page 2, No. 3). For proper installation, please kindly refer to the instruction manuals of the CPU fan and the heatsink. English 12 ASRock 970DE3/U3S3 Motherboard - ASRock 970DE3/U3S3 | Quick Installation Guide - Page 13
is not allowed to install a DDR or DDR2 memory module into DDR3 slot; otherwise, this motherboard and DIMM may be damaged. 6. If you adopt DDR3 1866/1600 memory modules on this motherboard, it is recommended to install them on DDR3_A2 and DDR3_ B2 slots. 13 ASRock 970DE3/U3S3 Motherboard English - ASRock 970DE3/U3S3 | Quick Installation Guide - Page 14
permanent damage to the motherboard and the DIMM if you force the DIMM into the slot at incorrect orientation. Step 3. Firmly insert the DIMM into the slot until the retaining clips at both ends fully snap back in place and the DIMM is properly seated. 14 ASRock 970DE3/U3S3 Motherboard English - ASRock 970DE3/U3S3 | Quick Installation Guide - Page 15
cards that have the 32-bit PCI interface. PCIE Slots: PCIE1 / PCIE2 / PCIE4 (PCIE x1 slot; Black) is used for PCI Express cards with x1 lane width cards, such as Gigabit LAN card and SATA2 card. the chassis with screws. Step 6. Replace the system cover. 15 ASRock 970DE3/U3S3 Motherboard English - ASRock 970DE3/U3S3 | Quick Installation Guide - Page 16
the BIOS, you must boot up the system first, and then shut it down before you do the clear-CMOS action. Please be noted that the password, date, time, user default profile, 1394 GUID and MAC address will be cleared only if the CMOS battery is removed. English 16 ASRock 970DE3/U3S3 Motherboard - ASRock 970DE3/U3S3 | Quick Installation Guide - Page 17
the motherboard connect the black end to the IDE devices 80-conductor ATA 66/100/133 cable Note: Please refer to the instruction of your support SATA data cables for internal storage devices. The current SATA3 interface allows up to 6.0 Gb/s data transfer rate. 17 ASRock 970DE3/U3S3 Motherboard - ASRock 970DE3/U3S3 | Quick Installation Guide - Page 18
GND CD-R English Front Panel Audio Header (9-pin HD_AUDIO1) (see p.2 No. 29) GND PRESENCE# MIC_RET OUT_RET 1 OUT2_L J_SENSE OUT2_R MIC2_R MIC2_L This is an interface for the front panel audio cable that allows convenient connection and control of audio devices. 18 ASRock 970DE3/U3S3 Motherboard - ASRock 970DE3/U3S3 | Quick Installation Guide - Page 19
in S1 sleep state. The LED is off when the system is in S3/S4 sleep state or powered off (S5). HDLED (Hard Drive Activity LED): Connect to the hard drive activity LED on the chassis front panel. The LED is on when the hard drive is reading or writing data. English 19 ASRock 970DE3/U3S3 Motherboard - ASRock 970DE3/U3S3 | Quick Installation Guide - Page 20
panel support, the 3-Pin CPU fan still can work successfully even without the fan speed control function. If you plan to connect the 3-Pin CPU fan to the CPU fan connector on this motherboard, please connect it to Pin 1-3. Pin 1-3 Connected 3-Pin Fan Installation English 20 ASRock 970DE3/U3S3 - ASRock 970DE3/U3S3 | Quick Installation Guide - Page 21
adopt a traditional 20-pin ATX power supply. To use the 20-pin ATX power supply, please plug your power supply along with Pin 1 and Pin 13. 20-Pin ATX Power Supply Installation 1 13 ATX 12V Power Connector (8-pin ATX12V1 HDMI VGA card to this header. English 21 ASRock 970DE3/U3S3 Motherboard - ASRock 970DE3/U3S3 | Quick Installation Guide - Page 22
SETUP UTILITY Advanced screen Storage Configuration. B. Set the "SATA Operation Mode" option to [IDE] for SATA2 ports. Set the "Onboard SATA3 Operation Mode" option to [IDE] for SATA3 ports. STEP 2: Install Windows® XP / XP 64-bit OS on your system. English 22 ASRock 970DE3/U3S3 Motherboard - ASRock 970DE3/U3S3 | Quick Installation Guide - Page 23
" option to [AHCI] for SATA3 ports. STEP 2: Install Windows® 7 / 7 64-bit / VistaTM / VistaTM 64-bit OS on your system. 2.10 Untied Overclocking Technology This motherboard supports Untied Overclocking Technology, which means during overclocking, FSB enjoys better margin due to fixed PCI / PCIE - ASRock 970DE3/U3S3 | Quick Installation Guide - Page 24
information about BIOS Setup, please refer to the User Manual (PDF file) contained in the Support CD. 4. Software Support CD information This motherboard supports various Microsoft® Windows® operating systems: 7 / 7 64-bit / VistaTM / VistaTM 64-bit / XP / XP Media Center / XP 64-bit. The Support CD - ASRock 970DE3/U3S3 | Quick Installation Guide - Page 25
ASRock 970DE3/U3S3 Motherboard (ATX-Formfaktor: 30.5 cm x 19.1 cm; 12.0 Zoll x 7.5 Zoll) ASRock 970DE3/U3S3 Schnellinstallationsanleitung ASRock 970DE3/U3S3 Support-CD Zwei Serial ATA (SATA) -Datenkabel (optional) Ein I/O Shield ASRock erinnert... Zur besseren Leistung unter Windows® 7 / 7, 64 Bit - ASRock 970DE3/U3S3 | Quick Installation Guide - Page 26
TruStudioTM - PCIE x1 Gigabit LAN 10/100/1000 Mb/s - Realtek RTL8111E - Unterstützt Wake-On-LAN - Unterstützt LAN-Kabelerkennung - Unterstützt energieeffizientes Ethernet 802.3az - Unterstützt PXE I/O Panel - 1 x PS/2-Mausanschluss - 1 x PS/2-Tastaturanschluss ASRock 970DE3/U3S3 Motherboard Deutsch - ASRock 970DE3/U3S3 | Quick Installation Guide - Page 27
), AMD OverDriveTM-Dienstprogramm, CyberLink MediaEspresso 6.5-Testversion, ASRock MAGIX-Multimedia-Suite - OEM - ASRock OC Tuner (siehe VORSICHT 5) - ASRock Intelligent Energy Saver (Intelligente Energiesparfunktion) (siehe VORSICHT 6) - ASRock Sofortstart 27 ASRock 970DE3/U3S3 Motherboard Deutsch - ASRock 970DE3/U3S3 | Quick Installation Guide - Page 28
VORSICHT 9) - ASRock SmartView (siehe VORSICHT 10) - ASRock XFast USB (siehe VORSICHT 11) - ASRock XFast LAN (siehe VORSICHT 12) - ASRock XFast RAM (siehe VORSICHT 13) - Hybrid Booster: - Schrittloser CPU-Frequenz-Kontrolle (siehe VORSICHT 14) - ASRock U-COP (siehe VORSICHT 15) - Boot Failure Guard - ASRock 970DE3/U3S3 | Quick Installation Guide - Page 29
Unter Windows® OS mit 64-Bit-CPU besteht diese Einschränkung nicht. 5. Es ist ein benutzerfreundlicher ASRock Ü BIOS. Weitere Bedienungshinweise zum Intelligent Energy Saver finden Sie auf unseren Internetseiten. ASRock-Internetseite: http://www.asrock.com 29 ASRock 970DE3/U3S3 Motherboard - ASRock 970DE3/U3S3 | Quick Installation Guide - Page 30
; der Ladevorgang wird sogar dann fortgesetzt, wenn der PC den Ruhezustand (S1), Suspend to RAM-Modus (S3) oder Tiefschlafmodus (S4) aufruft oder ausgeschaltet wird (S5). Nach der Installation des APP Charger-Treibers können Sie im Handumdrehen das 30 ASRock 970DE3/U3S3 Motherboard Deutsch - ASRock 970DE3/U3S3 | Quick Installation Guide - Page 31
aufregender macht. ASRock-Motherboards werden exklusiv mit der SmartView-Software geliefert, die auch dafur sorgt, dass Sie immer mit Ihren Freunden in Verbindung bleiben. Die SmartView-Funktionen konnen Sie mit den Windows®-Betriebssystemen 7 / 7, 64 Bit / VistaTM / VistaTM 64 Bit und dem Internet - ASRock 970DE3/U3S3 | Quick Installation Guide - Page 32
ausgeschaltet sind. Um dem EuP-Standard zu entsprechen, sind ein EuPfähiges Motherboard und eine EuP-fähige Stromversorgung erforderlich. Gemäß einer Empfehlung von Intel muss eine wir Ihnen, weitere Details beim Hersteller der Stromversorgung abzufragen. 32 ASRock 970DE3/U3S3 Motherboard Deutsch - ASRock 970DE3/U3S3 | Quick Installation Guide - Page 33
Sie nicht, den Jumper wieder zu entfernen, nachdem das CMOS gelöscht wurde. Wenn Sie den CMOSInhalt gleich nach dem Aktualisieren des BIOS löschen müssen, müssen Sie zuerst das System starten und dann wieder ausschalten, bevor Sie den CMOS-Inhalt löschen. Deutsch 33 ASRock 970DE3/U3S3 Motherboard - ASRock 970DE3/U3S3 | Quick Installation Guide - Page 34
) (39-pin IDE1, siehe S.2 - No. 36) Blauer Anschluss Schwarzer Anschluss zum Motherboard zur Festplatte 80-adriges ATA 66/100/133 Kabel Hinweis: Details entnehmen Sie bitte den Datenübertragungsrate bis 3,0 Gb/s. SATAII_1 SATAII_3 (PORT 0) (PORT 2) Deutsch 34 ASRock 970DE3/U3S3 Motherboard - ASRock 970DE3/U3S3 | Quick Installation Guide - Page 35
am Motherboard. Pro USB 2.0Anschlussleiste werden zwei USB 2.0-Ports unterstützt. Deutsch Infrarot-Modul-Header (5-pin IR1) (siehe S.2 - No. 31) IRTX +5VSB DUMMY 1 GND IRRX Dieser Header unterstützt ein optionales, drahtloses Sendeund Empfangs-Infrarotmodul. 35 ASRock 970DE3/U3S3 Motherboard - ASRock 970DE3/U3S3 | Quick Installation Guide - Page 36
64 Bit: Wählen Sie im Realtek-Bedienfeld die „FrontMic" (Vorderes Mikrofon)Registerkarte. Passen Sie die „Recording Volume" (Aufnahmelautstärke) an. System Panel-Header (9-pin PANEL1) (siehe S.2 - No. 24) Dieser Header unterstützt mehrere Funktion der Systemvorderseite. 36 ASRock 970DE3/U3S3 - ASRock 970DE3/U3S3 | Quick Installation Guide - Page 37
leuchtet, wenn das System in Betrieb ist. Die LED blinkt im S1-Zustand. Im S3-/S4- oder S5-Zustand (ausgeschaltet) leuchtet die LED nicht. 37 ASRock 970DE3/U3S3 Motherboard - ASRock 970DE3/U3S3 | Quick Installation Guide - Page 38
Sie einen dreipoligen CPU-Lüfter an den CPU-Lüferanschluss dieses Motherboards anschließen mö ATX-Netzteils 1 13 ATX 12V Anschluss (8-pin ATX12V1) (siehe S.2 - No. 1) 5 1 8 4 Bitte schließen Sie an diesen Anschluss die ATX 12V Stromversorgung an. Deutsch 38 ASRock 970DE3/U3S3 Motherboard - ASRock 970DE3/U3S3 | Quick Installation Guide - Page 39
, kann sie noch arbeiten, wenn Sie einen traditionellen 4-Pin ATX 12V Energieversorgung adoptieren. Um die 4-Pin ATX Energieversorgung zu verwenden, stecken Sie bitte Ihre Energieversorgung zusammen mit dem der HDMI-VGA-Karte mit diesem Anschluss. Deutsch 39 ASRock 970DE3/U3S3 Motherboard - ASRock 970DE3/U3S3 | Quick Installation Guide - Page 40
Informationen zum BIOS-Setup, siehe bitte das Benutzerhandbuch (PDF Datei) auf der Support CD. 3. Software Support CD information Dieses Motherboard unterstützt eine Reiche von Microsoft® Windows® Betriebssystemen: 7 / 7 64-Bit / VistaTM / VistaTM 64-Bit / XP / XP Media Center / XP 64-Bit. Die Ihrem - ASRock 970DE3/U3S3 | Quick Installation Guide - Page 41
ATX: 12.0 pouces x 7.5 pouces, 30.5 cm x 19.1 cm) Guide d'installation rapide ASRock 970DE3/U3S3 CD de soutien ASRock 970DE3/U3S3 Deux câbles de données de série ATA (SATA) (en option) Un I/O Panel Shield ASRock vous rappelle... Pour bénéficier des meilleures performances sous Windows® 7 / 7 64 bits - ASRock 970DE3/U3S3 | Quick Installation Guide - Page 42
THX TruStudioTM - PCIE x1 Gigabit LAN 10/100/1000 Mb/s - Realtek RTL8111E - Supporte du Wake-On-LAN - Prise en charge de la détection de câble LAN - Prend en charge la norme Energy Efficient Ethernet (Ethernet à efficacité énergétique) 802.3az - Support de PXE ASRock 970DE3/U3S3 Motherboard Français - ASRock 970DE3/U3S3 | Quick Installation Guide - Page 43
3 x En-tête USB 2.0 (prendre en charge 6 ports USB 2.0 supplémentaires) - 8Mb AMI Legal BIOS - Support du "Plug and Play" - Compatible pour événements de réveil ACPI 1.1 - Gestion jumperless - Support SMBIOS 2.3.1 - CPU, VCCM, NB Tension Multi-ajustement Français 43 ASRock 970DE3/U3S3 Motherboard - ASRock 970DE3/U3S3 | Quick Installation Guide - Page 44
6) - ASRock l'Instant Boot - ASRock Instant Flash (voir ATTENTION 7) - ASRock OC DNA (voir ATTENTION 8) - Chargeur ASRock APP (voir ATTENTION 9) - ASRock SmartView (voir ATTENTION 10) - ASRock XFast USB (voir ATTENTION 11) - ASRock XFast LAN (voir ATTENTION 12) - ASRock XFast RAM (voir - ASRock 970DE3/U3S3 | Quick Installation Guide - Page 45
, la taille mémoire réelle réservée au système pourra être inférieure à 4 Go sous Windows® 7 / VistaTM / XP. Avec Windows® OS avec CPU 64 bits, il n'y a pas ce genre de limitation. 5. Il s'agit d'un usage facile ASRock overclocking outil qui vous permet de surveiller votre système en fonction de la - ASRock 970DE3/U3S3 | Quick Installation Guide - Page 46
Veille (S1), Suspension à la RAM (S3), hibernation (S4) ou hors tension (S5). Lorsque le pilote du chargeur APP est installé, vous découvrez un mode de mise en charge tout à fait inédit. Site web ASRock : http://www.asrock.com/Feature/AppCharger/index.asp 46 ASRock 970DE3/U3S3 Motherboard Français - ASRock 970DE3/U3S3 | Quick Installation Guide - Page 47
Windows® 7 / 7 64 bits / VistaTM ou VistaTM 64 bits, et que la version de votre navigateur est IE8. Site web ASRock : http://www.asrock.com/Feature/SmartView/index.asp 11. ASRock XFast USB thermique entre le CPU le dissipateur lors de l'installation du PC. 47 ASRock 970DE3/U3S3 Motherboard Français - ASRock 970DE3/U3S3 | Quick Installation Guide - Page 48
de courant. Pour choisir une alimentation électrique conforme à la norme EuP, nous vous recommandons de consulter votre fournisseur de courant pour plus de détails. 48 ASRock 970DE3/U3S3 Motherboard Français - ASRock 970DE3/U3S3 | Quick Installation Guide - Page 49
diatement après avoir mis à jour le BIOS. Si vous avez besoin d'effacer le CMOS après avoir mis à jour le BIOS, vous devez allumer en premier le syst de l'utilisateur, 1394 GUID et l'adresse MAC seront effacés seulement si la batterie du CMOS est enlevée. Français 49 ASRock 970DE3/U3S3 Motherboard - ASRock 970DE3/U3S3 | Quick Installation Guide - Page 50
mère vers le disque dur Câble ATA 66/100/133 80 conducteurs Note: Veuillez vous reporter aux instructions du fabricant de votre IDE périphérique pour les détails. Connecteurs Série ATAII (SATAII_1 (PORT 0): Gb/s. SATAII_1 SATAII_3 (PORT 0) (PORT 2) Français 50 ASRock 970DE3/U3S3 Motherboard - ASRock 970DE3/U3S3 | Quick Installation Guide - Page 51
quatre ports USB 2.0 par défaut sur le panneau E/S, il y a troi embases USB 2.0 sur cette carte mère. Chaque embase USB 2.0 peut prendre en charge 2 ports USB 2.0. Cet en-tête supporte un module infrarouge optionnel de transfert et de réception sans fil. Français 51 ASRock 970DE3/U3S3 Motherboard - ASRock 970DE3/U3S3 | Quick Installation Guide - Page 52
prendre en charge le HDA pour fonctionner correctement. Veuillez suivre les instructions dans notre manuel et le manuel de châssis afin installer votre ). Pour les systèmes d'exploitation Windows® 7 / 7 64 bits / VistaTM / VistaTM 64 bits : Allez sur l'onglet "FrontMic" ASRock 970DE3/U3S3 Motherboard - ASRock 970DE3/U3S3 | Quick Installation Guide - Page 53
. Il LED è acceso quando il sistema è in funzione. Il LED continua a lampeggiare in stato S1. Il LED è spento in stato S3/S4 o S5 (spegnimento). 53 ASRock 970DE3/U3S3 Motherboard - ASRock 970DE3/U3S3 | Quick Installation Guide - Page 54
un support de (Ventilateur silencieux ventilateur de CPU à 4 broches , le ventilateur de CPU à ATX 1 13 Connecteur ATX 12V (ATX12V1 br.8) (voir p.2 No. 1) 5 1 8 4 Veuillez connecter une unité d'alimentation électrique ATX 12V sur ce connecteur. Français 54 ASRock 970DE3/U3S3 Motherboard - ASRock 970DE3/U3S3 | Quick Installation Guide - Page 55
broches connecteur d'alimentation ATX 12V, il peut toujours travailler si vous adoptez une approche traditionnelle à 4 broches ATX 12V alimentation. Pour utiliser l'alimentation des 4 broches ATX, branchez votre la carte VGA HDMI sur ce connecteur. Français 55 ASRock 970DE3/U3S3 Motherboard - ASRock 970DE3/U3S3 | Quick Installation Guide - Page 56
ées sur le BIOS, veuillez consulter le Guide de l'utilisateur (fichier PDF) dans le CD technique. 3. Informations sur le CD de support Cette carte mère supporte divers systèmes d'exploitation Microsoft® Windows®: 7 / 7 64 bits / VistaTM / VistaTM 64 bits / XP / XP Media Center / XP 64 bits. Le CD - ASRock 970DE3/U3S3 | Quick Installation Guide - Page 57
64-bit / VistaTM / VistaTM 64-bit, si consiglia di impostare l'opzione BIOS in Storage Configuration (Configurazione di archiviazione) sulla modalità AHCI. Per l'impostazione BIOS, fare riferimento a "User Manual" (Manuale dell'utente) nel CD di supporto per dettagli. 57 ASRock 970DE3/U3S3 Motherboard - ASRock 970DE3/U3S3 | Quick Installation Guide - Page 58
la tecnologia overclocking "slegata" (vedi ATTENZIONE 1) - Supporta la tecnologia Hyper-Transport 3.0 (HT 3.0) - Northbridge: AMD 770 - Southbridge: AMD SB710 - Supporto tecnologia Dual Channel Memory (vedi ATTENZIONE 2) - 4 x slot DDR3 DIMM - Supporto DDR3 1866(OC)/1600(OC)/1333/1066/800 non-ECC - ASRock 970DE3/U3S3 | Quick Installation Guide - Page 59
- Supporta jumperfree - Supporta SMBIOS 2.3.1 - Regolazione multi-voltaggio CPU, VCCM, NB - Driver, utilità, software antivirus (Versione dimostrativa), Utilità AMD OverDriveTM, CyberLink MediaEspresso 6.5 Trial, Suite multimediale ASRock MAGIX - OEM Italiano 59 ASRock 970DE3/U3S3 Motherboard - ASRock 970DE3/U3S3 | Quick Installation Guide - Page 60
- ASRock Instant Boot - ASRock Instant Flash (vedi ATTENZIONE 7) - ASRock OC DNA (vedi ATTENZIONE 8) - Caricatore ASRock APP Charger (vedi ATTENZIONE 9) - ASRock SmartView (vedi ATTENZIONE 10) - ASRock XFast USB (vedi ATTENZIONE 11) - ASRock XFast LAN (vedi ATTENZIONE 12) - ASRock XFast RAM - ASRock 970DE3/U3S3 | Quick Installation Guide - Page 61
o meno, dipende dagli AM3/AM3+ CPU utilizzati. Se si desidera adottare il modulo di memoria DDR3 1866/1600 su questa scheda madre, fare riferimento all'elenco delle memorie supportate nel nostro sito web per scoprire quali sono i moduli compatibili. Sito web ASRock http://www.asrock.com 4. A causa - ASRock 970DE3/U3S3 | Quick Installation Guide - Page 62
accede alla modalità di Standby (S1), Sospensione su RAM (S3), Ibernazione (S4) o Spegnimento (S5). Una volta installato il driver APP Charger si otterranno prodigi e comodità mai avuti prima. Sito ASRock: http://www.asrock.com/Feature/AppCharger/index.asp 62 ASRock 970DE3/U3S3 Motherboard Italiano - ASRock 970DE3/U3S3 | Quick Installation Guide - Page 63
SmartView, assicurarsi che la versione del sistema operativo sia Windows® 7 / 7 64 bit / VistaTM / VistaTM 64 bit e che la versione del browser sia IE8. Sito ASRock: http://www.asrock.com/Feature/SmartView/index.asp 11. ASRock XFast USB può accelerare le prestazioni del dispositivo d'archiviazione - ASRock 970DE3/U3S3 | Quick Installation Guide - Page 64
% con un consumo di corrente di 100 mA. Per la scelta di un'alimentatore predisposto EuP consigliamo di verificare ulteriori dettagli con il produttore. 64 ASRock 970DE3/U3S3 Motherboard Italiano - ASRock 970DE3/U3S3 | Quick Installation Guide - Page 65
CMOS subito dopo avere aggiornato il BIOS. Se si deve azzerare la CMOS quando si è completato l'aggiornamento del BIOS, è necessario per prima cosa avviare predefinito, 1394 GUID e indirizzo MAC saranno cancellati solo se è rimossa la batteria della CMOS. Italiano 65 ASRock 970DE3/U3S3 Motherboard - ASRock 970DE3/U3S3 | Quick Installation Guide - Page 66
di immagazzinamento interni. ATAII (SATAII) supportano cavi SATA per dispositivi di memoria interni. L'interfaccia SATAII attuale permette velocità di trasferimento dati fino a 3.0 Gb/s. Italiano 66 ASRock 970DE3/U3S3 Motherboard - ASRock 970DE3/U3S3 | Quick Installation Guide - Page 67
USB USB 2.0. Ciascuna intestazione USB 2.0 supporta due porte USB 2.0. Collettore modulo infrarossi (5-pin IR1) (vedi p.2 Nr. 31) IRTX +5VSB DUMMY 1 GND IRRX Questo collettore supporta moduli ad infrarossi optional per la trasmissione e la ricezione senza fili. 67 ASRock 970DE3/U3S3 Motherboard - ASRock 970DE3/U3S3 | Quick Installation Guide - Page 68
operi in modo corretto. Attenersi alle istruzioni del nostro manuale e del manuale del telaio per installare il sistema. 2. Se si (Microfono frontale). Sistema operativo Windows® 7 / 7 64-bit / VistaTM / VistaTM 64-bit: Andare alla scheda "FrontMic" frontale. 68 ASRock 970DE3/U3S3 Motherboard - ASRock 970DE3/U3S3 | Quick Installation Guide - Page 69
LED è acceso quando il sistema è in funzione. Il LED continua a lampeggiare in stato S1. Il LED è spento in stato S3/S4 o S5 (spegnimento). Italiano 69 ASRock 970DE3/U3S3 Motherboard - ASRock 970DE3/U3S3 | Quick Installation Guide - Page 70
l'alimentatore ATX a 20 pin, collegare l'alimentatore con il Pin 1 e il Pin 13. Installazione dell'alimentatore ATX a 20 pin 1 13 Connettore ATX 12 V (8-pin ATX12V1) (vedi p.2 Nr. 1) 5 1 8 4 Collegare un alimentatore ATX 12 V a questo connettore. Italiano 70 ASRock 970DE3/U3S3 Motherboard - ASRock 970DE3/U3S3 | Quick Installation Guide - Page 71
elettrico 8-pin ATX 12V, l'unita' puo' ancora essere funzionante se viene utilizzata una fornitura elettrica tradizionale a 4-pin ATX 12V. Per usare tale fornitura elettrica 4-pin ATX 12V, prego HDMI_SPDIF della scheda VGA HDMI a questo header. Italiano 71 ASRock 970DE3/U3S3 Motherboard - ASRock 970DE3/U3S3 | Quick Installation Guide - Page 72
il Setup del BIOS, fare riferimento al Manuale dell'Utente (PDF file) contenuto nel cd di supporto. 3. Software di supporto e informazioni su CD Questa scheda madre supporta vari sistemi operativi Microsoft® Windows®: 7 / 7 64-bit / VistaTM / VistaTM 64-bit / XP / XP Media Center / XP 64-bit. Il CD - ASRock 970DE3/U3S3 | Quick Installation Guide - Page 73
64 bits / VistaTM / VistaTM 64 bits, es recomendable establecer la opción del BIOS de la configuración de almacenamiento en el modo AHCI. Para obtener detalles sobre la configuración del BIOS, consulte el "Manual del usuario" que se encuentra en nuestro CD de soporte. 73 ASRock 970DE3/U3S3 Motherboard - ASRock 970DE3/U3S3 | Quick Installation Guide - Page 74
ALC662 Audio Codec) - Compatible con THX TruStudioTM - PCIE x1 Gigabit LAN 10/100/1000 Mb/s - Realtek RTL8111E - Soporta Wake-On-LAN - Admite detección de conexión de cable LAN - Compatible con Ethernet 802.3az de bajo consumo energético - Admite PXE Español 74 ASRock 970DE3/U3S3 Motherboard - ASRock 970DE3/U3S3 | Quick Installation Guide - Page 75
de panel frontal - 3 x Cabezal USB 2.0 (admite 6 puertos USB 2.0 adicionales) - 8Mb AMI BIOS - AMI legal BIOS - Soporta "Plug and Play" - ACPI 1.1 compliance wake up events - Soporta "jumper free setup" - Soporta SMBIOS 2.3.1 - Múltiple ajuste de CPU, VCCM, NB Voltage Español 75 ASRock 970DE3/U3S3 - ASRock 970DE3/U3S3 | Quick Installation Guide - Page 76
(vea ATENCIÓN 6) - ASRock Instant Boot - ASRock Instant Flash (vea ATENCIÓN 7) - ASRock OC DNA (vea ATENCIÓN 8) - ASRock APP Charger (vea ATENCIÓN 9) - ASRock SmartView (vea ATENCIÓN 10) - ASRock XFast USB (vea ATENCIÓN 11) - ASRock XFast LAN (vea ATENCIÓN 12) - ASRock XFast RAM (vea ATENCI - ASRock 970DE3/U3S3 | Quick Installation Guide - Page 77
y overclock sus dispositivos de hardware para obtener el mejor funcionamiento del sistema bajo el entorno de Windows®. Por favor visite nuestro sitio web para los procedimientos de operación de Sintonizador de ASRock OC. Sitio web de ASRock: http://www.asrock.com 77 ASRock 970DE3/U3S3 Motherboard - ASRock 970DE3/U3S3 | Quick Installation Guide - Page 78
creado sólo funcionará en placas base similares, por lo que sólo podrá compartirlo con usuarios que cuenten con la misma placa base que usted. 78 ASRock 970DE3/U3S3 Motherboard Español - ASRock 970DE3/U3S3 | Quick Installation Guide - Page 79
de que la versión de su sistema operativo es Windows® 7 / 7 64 bits / VistaTM / VistaTM 64 bits y que la versión de su explorador es IE8. Sitio Web de ASRock: http://www.asrock.com/Feature/SmartView/index.asp 11. ASRock XFast USB puede aumentar el rendimiento de los dispositivos de almacenamiento - ASRock 970DE3/U3S3 | Quick Installation Guide - Page 80
va a apagarse automaticamente. Antes de reanudar el sistema, compruebe si el ventilador de la CPU de la placa base funciona apropiadamente y desconecte el cable de alimentación, a continuación, vuelva de la fuente de alimentación para obtener más detalles. 80 ASRock 970DE3/U3S3 Motherboard Español - ASRock 970DE3/U3S3 | Quick Installation Guide - Page 81
CMOS justamente después de actualizar el BIOS. Si necesita borrar la memoria CMOS justamente después de actualizar el BIOS, debe iniciar primero el sistema y, del usuario, el GUID 1394 y la dirección MAC solamente se borrará si la batería CMOS se quita. Español 81 ASRock 970DE3/U3S3 Motherboard - ASRock 970DE3/U3S3 | Quick Installation Guide - Page 82
cables SATA para dispositivos de almacenamiento internos. La interfaz SATAII actual permite una velocidad de transferencia de 3.0 Gb/s. SATAII_1 SATAII_3 (PORT 0) (PORT 2) Español 82 ASRock 970DE3/U3S3 Motherboard - ASRock 970DE3/U3S3 | Quick Installation Guide - Page 83
USB 2.0 predeterminados en el panel de E/S, hay tres bases de conexiones USB 2.0 en esta placa base. Cada una de estas bases de conexiones admite dos puertos USB 2.0. Este cabezal soporta un módulo infrarrojos de transmisión y recepción wireless opcional. Español 83 ASRock 970DE3/U3S3 Motherboard - ASRock 970DE3/U3S3 | Quick Installation Guide - Page 84
" (Micrófono frontal). En sistemas operativos Windows® 7 / 7 64-bit / VistaTM / VistaTM 64-bit: Acceda a la ficha "FrontMic" (Micrófono frontal) del panel de control Realtek. Ajuste la posición del a los contactos positivos y negativos antes de conectar los cables. 84 ASRock 970DE3/U3S3 Motherboard - ASRock 970DE3/U3S3 | Quick Installation Guide - Page 85
. PLED (LED de alimentación del sistema): Conecte el indicador de estado de alimentación situado en el panel frontal del chasis. El LED se enciende cuando el sistema esté en funcionamiento. El LED parpadea cuando apagará en los estados S3/S4 o S5 (apagado). Español 85 ASRock 970DE3/U3S3 Motherboard - ASRock 970DE3/U3S3 | Quick Installation Guide - Page 86
si utiliza una fuente de alimentación ATX de 20 pins tradicional. Para usar una fuente de alimentación ATX de 20 pins, por favor, conecte su fuente de alimentación usando los Pins 1 y 13. Instalación de una Fuente de Alimentación ATX de 20 Pins 1 13 Español 86 ASRock 970DE3/U3S3 Motherboard - ASRock 970DE3/U3S3 | Quick Installation Guide - Page 87
4 Tenga en cuenta que es necesario conectar este conector a una toma de corriente con el enchufe ATX 12V, de modo que proporcione suficiente electricidad. De lo contrario no se podrá encender. Aunque esta de la tarjeta VGA HDMI a esta cabecera. Español 87 ASRock 970DE3/U3S3 Motherboard - ASRock 970DE3/U3S3 | Quick Installation Guide - Page 88
el panel del ordenador. Para información detallada sobre como configurar la BIOS, por favor refiérase al Manual del Usuario (archivo PDF) contenido en el CD. 3. Información de Software Support CD Esta placa-base soporta diversos tipos de sistema operativo Windows®: 7 / 7 64 bits / VistaTM / VistaTM 64 - ASRock 970DE3/U3S3 | Quick Installation Guide - Page 89
.asrock.com/support/index.asp 1.1 ASRock 970DE3/U3S3 ATX: 12,0 x 7,5 30,5 x 19,1 см) ASRock 970DE3/U3S3 ASRock 970DE3/U3S3 2 x Serial ATA (SATA 1 x I/O ASRock Windows® 7 / 7 64-bit / VistaTM / VistaTM 64-bit BIOS Storage Configuration AHCI BIOS 89 ASRock 970DE3/U3S3 Motherboard - ASRock 970DE3/U3S3 | Quick Installation Guide - Page 90
- PCIE x 1 Gigabit LAN 10/100/1000 Mb/s - Realtek RTL8111E Wake-On-LAN Ethernet 802.3az PXE I/O Panel 1 x PS/2 панели - 1 x PS/2 - 1 x COM 1 - 4 x порта USB 2.0 - 2 x порта USB 3.0 1 x RJ-45 LAN ACT/LINK SPEED) 90 ASRock 970DE3/U3S3 Motherboard - ASRock 970DE3/U3S3 | Quick Installation Guide - Page 91
- ASRock Instant Boot - ASRock Instant Flash 7) - ASRock OC DNA 8) - ASRock APP Charger 9) - ASRock SmartView 10) - ASRock XFast USB 11) - ASRock XFast LAN 12) - ASRock XFast RAM 13) - Hybrid Booster: 14) - ASRock U-COP 15 Boot Failure Guard (B.F.G) 91 ASRock 970DE3/U3S3 Motherboard - ASRock 970DE3/U3S3 | Quick Installation Guide - Page 92
Power 12V, +5V, +3.3V, Vcore Microsoft® Windows® 7 / 7 64-bit / VistaTM 64 VistaTM / XP / XP Media Center / XP 64-bit ные - FCC, CE, WHQL ErP/EuP Ready ErP/EuP 16) http://www.asrock.com BIOS Untied Overclocking 92 ASRock 970DE3/U3S3 Motherboard - ASRock 970DE3/U3S3 | Quick Installation Guide - Page 93
Memory Technology 13). 3 1866/1600 AM3/AM3 DDR3 1866/1600 ASRock http://www.asrock.com 4 4 Windows® 7 / VistaTM / XP Windows® OS с 64-bit 5 ASRock Windows ASRock ASRock: http: // www.asrock.com 6 Cool 'n' Quiet BIOS ASRock: http://www.asrock.com 93 ASRock 970DE3/U3S3 Motherboard - ASRock 970DE3/U3S3 | Quick Installation Guide - Page 94
%. ASRock APP Charger Apple S1 S3 S4 S5 APP Charger ASRock: http://www.asrock.com/Feature/AppCharger/index.asp 10. SmartView IE Facebook ASRock SmartView SmartView Windows® 7/7, 64 VistaTM/VistaTM, 64 IE8 ASRock: http://www.asrock.com/Feature/SmartView/index.asp 94 ASRock 970DE3/U3S3 - ASRock 970DE3/U3S3 | Quick Installation Guide - Page 95
11 ASRock XFast USB USB 12. ASRock XFast LAN Youtube 13 32 Windows®. ASRock XFast RAM Adobe Photoshop 5 ASRock XFast RAM SSD 14 15 95 ASRock 970DE3/U3S3 Motherboard - ASRock 970DE3/U3S3 | Quick Installation Guide - Page 96
16. EuP Energy Using Product EuP 1 EuP Intel EuP 50 5V 100 EuP. 96 ASRock 970DE3/U3S3 Motherboard - ASRock 970DE3/U3S3 | Quick Installation Guide - Page 97
1.3 short open 3 1 и 2 CMOS (CLRCMOS1, 3 2, п. 38) CMOS CLRCMOS1 CMOS 15 5 2 и 3 CLRCMOS1 CMOS BIOS CMOS BIOS CMOS 1394 GUID и MAC CMOS. 97 ASRock 970DE3/U3S3 Motherboard - ASRock 970DE3/U3S3 | Quick Installation Guide - Page 98
(PORT 3 2, п. 17) (SATAII_5 (PORT 4 2, п. 16) (SATAII_6 (PORT 5 2, п. 15) SATAII_6 (PORT 5) SATAII_5 (PORT 4) SATAII_2 SATAII_4 (PORT 1) (PORT 3) Serial ATAII SATAII SATA 3,0 SATAII_1 SATAII_3 (PORT 0) (PORT 2) 98 ASRock 970DE3/U3S3 Motherboard - ASRock 970DE3/U3S3 | Quick Installation Guide - Page 99
(PORT 7 2, п. 9) SATA3_2 (PORT 7) SATA3_1 (PORT 6) Serial ATA (SATA USB 2.0 (9 USB4_5 2, п. 22) (9 USB6_7 2, п. 21) (9 USB8_9 2, п. Serial ATA3 SATA3 SATA 6,0 SATA / SATAII / SATA3 SATA3 USB 2.0 USB 2.0 USB 2.0 USB 2.0. 99 ASRock 970DE3/U3S3 Motherboard - ASRock 970DE3/U3S3 | Quick Installation Guide - Page 100
(RIN OUT2_R Audio_L (LIN OUT2_L. C Ground (GND Ground (GND). D MIC_RET и OUT_RET HD AC'97 E Windows® XP / XP 64 Mixer Recorder FrontMic Windows® 7 / 7 64-бита, VistaTM / VistaTM 64 FrontMic Realtek Recording Volume 9 PANEL1 2, п. 24) 100 ASRock 970DE3/U3S3 Motherboard - ASRock 970DE3/U3S3 | Quick Installation Guide - Page 101
PWRBTN RESET PLED S1 S3 или S4 S5). HDLED 4 SPEAKER1 2, п. 26) Power LED (3 PLED1 2, п. 25) 1 PLEDPLED+ PLED+ Power LED S1 S3/S4 или S5 101 ASRock 970DE3/U3S3 Motherboard - ASRock 970DE3/U3S3 | Quick Installation Guide - Page 102
+12V GND 4 CPU_FAN1 2, п. 3) FAN_SPEED_CONTROL CPU_FAN_SPEED +12V GND 1 2 3 4 4 3 3 1-3. 1-3 3 ATX (24 ATXPWR1 2, п. 10) 12 24 ATX. 1 13 12 24 ивает 24 ATX 20 ATX 20 ATX 1 13. 20 ATX 1 13 102 ASRock 970DE3/U3S3 Motherboard - ASRock 970DE3/U3S3 | Quick Installation Guide - Page 103
12V-ATX (8 ATX12V1 2, п. 1) 5 1 8 4 ATX 12 ATX с 8 12V ATX с 4-Pin 12V ATX с 4-Pin 1 5. 5 1 ATX С 4-Pin 12V 8 4 HDMI_SPDIF (2 HDMI_SPDIF1 2, п. 30) HDMI_SPDIF VGA-карту HDMI HDMI HDMI_SPDIF на VGAкарте HDMI. 103 ASRock 970DE3/U3S3 Motherboard - ASRock 970DE3/U3S3 | Quick Installation Guide - Page 104
POST Ctrl> + + - ASRock 970DE3/U3S3 | Quick Installation Guide - Page 105
970DE3/U3S3 Anakart (ATX Form Faktörü: 12,0-inç x 7,5-inç, 30,5 cm x 19,1 cm) ASRock 970DE3/U3S3 Hızlı Takma Kılavuzu ASRock 970DE3/U3S3 Destek CD'si 2 x Seri ATA (SATA) Veri Kablosu (İsteğe Bağlı) 1 x G/Ç Panel Kalkanı ASRock Size Şunu Hatırlatır... Windows® 7 / 7 64-bit / VistaTM / VistaTM 64-bit - ASRock 970DE3/U3S3 | Quick Installation Guide - Page 106
ğini destekler - LAN Kablo Algılama'yı destekler - Enerji Verimli Ethernet 802.3az desteği - PXE destekler G/З Paneli - 1 x PS/2 Fare Portu - 1 x PS/2 Klavye Portu - 1 x Seri Portu: COM1 - 4 x Kullanıma Hazır USB 2.0 Portu - 2 x Kullanıma Hazır USB 3.0 Portu ASRock 970DE3/U3S3 Motherboard Türkçe - ASRock 970DE3/U3S3 | Quick Installation Guide - Page 107
kleme - ASRock Anında Flash (bkz. DİKKAT 7) - ASRock OC DNA (bkz. DİKKAT 8) - ASRock APP Charger (bkz. DİKKAT 9) - ASRock SmartView (bkz. DİKKAT 10) - ASRock XFast USB (bkz. DİKKAT 11) - ASRock XFast LAN (bkz. DİKKAT 12) - ASRock XFast RAM (bkz. DİKKAT 13) Türkçe 107 ASRock 970DE3/U3S3 Motherboard - ASRock 970DE3/U3S3 | Quick Installation Guide - Page 108
64-bit / XP / XP Media Center / XP 64-bit uyumlu Sertifikalar - FCC, CE, WHQL - ErP/EuP Hazır (ErP/EuP hazır güç kaynağı gerekli) (bkz. DİKKAT 16) * Ayrıntılı ürün bilgileri için lütfen web sitemizi ziyaret edin: http://www.asrock.com UYARI Lütfen, ayarı BIOS'da ayarlama, Untied Overclocking - ASRock 970DE3/U3S3 | Quick Installation Guide - Page 109
kaydedin, sonra BIOS'unuzu yalnızca birkaç tıklatma ile ek bir disket veya diğer karmaşık flash yardımcı programlarını hazırlamadan güncelleyebilirsiniz. Lütfen USB flash sürücünün veya sabit diskin FAT32/16/12 dosya sistemi kullanması gerektiğini unutmayın. 109 ASRock 970DE3/U3S3 Motherboard Türkçe - ASRock 970DE3/U3S3 | Quick Installation Guide - Page 110
ğini kullanmak için, lütfen işletim sistemi sürümünüzün Windows® 7 / 7 64 bit / VistaTM / VistaTM 64 bit olduğundan ve tarayıcı sürümünüzün IE8 olduğundan emin olun. ASRock websitesi: http://www.asrock.com/Feature/SmartView/index.asp 11. ASRock XFast USB, USB bellek aygıtı performansını arttırabilir - ASRock 970DE3/U3S3 | Quick Installation Guide - Page 111
13. Windows® 32-bit işletim sistemi CPU'su altında kullanılamayan bellek alanından tamamen yararlanır. ASRock XFast RAM webde sörfü şimdiye kadar olmadığı kadar hızlandırırken önceden ziyaret edilen web sitelerinin yüklenme süresini kısaltır. Ayrıca Adobe Photoshop'ın hızını 5 kat arttırır. ASRock - ASRock 970DE3/U3S3 | Quick Installation Guide - Page 112
ıcı şapkası kullanın. Ancak, BIOS'u güncelledikten hemen sonra lütfen CMOS'u temizlemeyin. BIOS'u güncellemeyi tamamladığınızda CMOS'u lan profili, 1394 GUID ve MAC adresinin yalnızca CMOS pili çıkarıldığında temizleneceğini lütfen aklınızda bulundurunuz. Türkçe 112 ASRock 970DE3/U3S3 Motherboard - ASRock 970DE3/U3S3 | Quick Installation Guide - Page 113
iki Seri ATA3 (SATA3) konektör, dahili depolama cihazları için SATA veri kablolarını destekler. Geçerli SATA3 arayüzü 6,0 Gb/sn veri aktarım hızına izin verir. 113 ASRock 970DE3/U3S3 Motherboard Türkçe - ASRock 970DE3/U3S3 | Quick Installation Guide - Page 114
destekler. Bu konektör, CD-ROM, DVDROM, TV tuner kartı veya MPEG kartı gibi ses kaynaklarından stereo ses girişi almanızı sağlar. Bu, panel ses kablosu için uygun bağlantı sağlayan ve ses cihazlarını kontrol etmeyi sağlayan bir arayüzdür. CD-L GND GND CD-R Türkçe 114 ASRock 970DE3/U3S3 Motherboard - ASRock 970DE3/U3S3 | Quick Installation Guide - Page 115
in Windows® XP / XP 64-bit İS için: "Karıştırıcı"yı seçin. "Kaydedici"yi seçin. Sonra "Ön Mikrofon"u tıklatın. Windows® 7 / 7 64-bit / VistaTM / VistaTM 64-bit İS sabit disk çalışma LED'ini ön panele bağlayın. Sabit disk veri okurken veya yazarken LED yanar. 115 ASRock 970DE3/U3S3 Motherboard Türkçe - ASRock 970DE3/U3S3 | Quick Installation Guide - Page 116
. Kasa ön panel modülünüzü bu ba CPU fan hızı kontrol işlevi olmadan bile hala başarılı bir şekilde çalışabilir. 3-Pinli CPU fanı bu konektördeki CPU fan konektörüne bağlamayı planlıyorsanız, lütfen Pin 1-3'e bağlayın. Pin 1-3 Bağlı 3-Pinli Fanı Takma Türkçe 116 ASRock 970DE3/U3S3 Motherboard - ASRock 970DE3/U3S3 | Quick Installation Guide - Page 117
20-Pinli ATX Güç Kaynağını Takma 1 13 ATX 12V Güç Konektörü (8-pinli ATX12V1) (bkz. s.2 No. 1) 5 1 8 4 Lütfen bir ATX 12V güç kaynağını bu konektöre bağlayın. Bu anakart 8-pinli ATX 12V güç VGA kartının HDMI_SPDIF konektörünü bu fişe bağlayın. Türkçe 117 ASRock 970DE3/U3S3 Motherboard - ASRock 970DE3/U3S3 | Quick Installation Guide - Page 118
. Ana Menü otomatik olarak görüntülenmezse, menüleri görüntülemek için Destek CD'sinin "BIN" klasöründeki "ASSETUP. EXE" dosyasını bulun ve çift tıklatın. 118 ASRock 970DE3/U3S3 Motherboard Türkçe - ASRock 970DE3/U3S3 | Quick Installation Guide - Page 119
.com/support/index.asp 1.1 ASRock 970DE3/U3S3 ATX 12.0" x 7.5", 30.5 x 19.1 cm) ASRock 970DE3/U3S3 ASRock 970DE3/U3S3 지원 CD 시리얼 ATA (SATA 2 I/O 차폐 1 개 ASRock Windows® 7 / 7 64-비트 / VistaTM / VistaTM 64 Storage Configuration BIOS 옵션을 AHCI BIOS CD 119 ASRock 970DE3/U3S3 Motherboard 한국어 - ASRock 970DE3/U3S3 | Quick Installation Guide - Page 120
개의 PCI Express 2.0 x1 슬롯 - 2 개의 PCI 슬롯 - 5.1 CH HD Audio (Realtek ALC662 Audio Codec) - THX TruStudioTM 지원 - PCIE x1 Gigabit LAN 10/100/1000 Mb/s - Realtek RTL8111E LAN 802.3az 지원 - PXE 지원 I/O Panel - 1 개 PS/2 1 개 PS/2 1 COM1 - 4 USB 2.0 포트 - 2 USB 3.0 포트 ASRock 970DE3/U3S3 Motherboard 한 국 어 - ASRock 970DE3/U3S3 | Quick Installation Guide - Page 121
RAID 10 및 JBOD NCQ, AHCI 2 개 의 SATA3 6.0Gb/s ATA133 IDE 커넥터 1 2 개의 IDE 1 1 개 - HDMI_SPDIF 헤더 1 LED 헤더 1 개 - CPU 24 핀 ATX 8 핀 ATX 12V USB 2.0 헤더 3 개 (6 USB 2.0 2개 ) - 8Mb AMI BIOS - AMI ACPI 1.1 SMBIOS 2.3.1 지원 - CPU, VCCM, NB AMD OverDriveTM, CyberLink MediaEspresso 6.5 ASRock MAGIX - ASRock 970DE3/U3S3 | Quick Installation Guide - Page 122
계 - CPU 소음팬 - CPU 12V,+5V,+3.3V,Vcore OS Windows® 7/7 64 비트 /VistaTM/ VistaTM 64 비트 /XP/XP Media Center/XP 64 인증서 - FCC, CE, WHQL - ErP/EuP 지원 (ErP/EuP ( 주의 16 참조 ) http://www.asrock.com BIOS Untied Overclocking Technology 한 국 어 122 ASRock 970DE3/U3S3 Motherboard - ASRock 970DE3/U3S3 | Quick Installation Guide - Page 123
Energy Saver CPU Intelligent Energy Saver BIOS Intelligent Energy Saver ASRock http://www.asrock.com 7. ASRock Instant Flash ROM BIOS BIOS MS-DOS 나 Windows BIOS POST 중에 BIOS F6 F2 ASRock Instant Flash USB BIOS BIOS USB FAT32/16/12 123 ASRock 970DE3/U3S3 Motherboard 한국어 - ASRock 970DE3/U3S3 | Quick Installation Guide - Page 124
7 64 비트 / VistaTM / VistaTM 64 IE8 ASRock http://www.asrock.com/ Feature/SmartView/index.asp 11. ASRock XFast USB 는 USB 12. ASRock XFast LAN LAN Youtube HD 13. Windows® OS 32-bit CPU ASRock XFast RAM Adobe Photoshop 속도를 5 ASRock XFast RAM SSD 또는 HDD 124 ASRock 970DE3/U3S3 Motherboard - ASRock 970DE3/U3S3 | Quick Installation Guide - Page 125
14 CPU CPU 15 CPU PC CPU 16. EuP 는 Energy Using Product EuP AC 1.00W EuP EuP EuP Intel EuP 5V 100 mA 50 EuP 125 ASRock 970DE3/U3S3 Motherboard 한 국 어 - ASRock 970DE3/U3S3 | Quick Installation Guide - Page 126
1.3 3 1-2 점퍼 CMOS 초기화 (CLRCMOS1, 3 2 38 세팅 CMOS 삭제 참고 : CLRCMOS1 CMOS 15 CLRCMOS1 의 핀 2 와 핀 3 을 5 BIOS CMOS BIOS CMOS CMOS CMOS 1394 GUID, MAC 한 국 어 126 ASRock 970DE3/U3S3 Motherboard - ASRock 970DE3/U3S3 | Quick Installation Guide - Page 127
SATAII_5 (PORT 4): 2 16 SATAII_6 (PORT 5): 2 15 SATAII_6 (PORT 5) SATAII_5 (PORT 4) SATAII_2 SATAII_4 (PORT 1) (PORT 3) SATAII_1 SATAII_3 (PORT 0) (PORT 2) 6 ATAII (SATA SATA SATA SATAII 3.0 Gb/s 한국어 127 ASRock 970DE3/U3S3 Motherboard - ASRock 970DE3/U3S3 | Quick Installation Guide - Page 128
GND DUMMY 1 GND P+6 P-6 USB_PWR USB_PWR P-9 P+9 GND DUMMY 1 GND P+8 P-8 USB_PWR IRTX +5VSB DUMMY 1 GND IRRX 2 ATA3 (SATA3 SATA SATA SATA3 6.0 Gb/s SATA SATA / SATAII / SATA3 SATA3 I/O 4 USB 2.0 USB 2.0 헤더가 3 USB 2.0 헤더 는 2 개의 USB 2.0 한 국 어 128 ASRock 970DE3/U3S3 Motherboard - ASRock 970DE3/U3S3 | Quick Installation Guide - Page 129
) 을 Ground (GND D. MIC_RET 및 OUT_RET 는 HD 이들을 AC'97 E. Windows® XP / XP 64 비트 OS "Mixer Recorder "FrontMic Windows® 7 / 7 64 비트 / VistaTM / VistaTM 64 비트 OS 의 경 우: Realtek FrontMic Recording Volume (9 핀 PANEL1) (2 24 한국어 129 ASRock 970DE3/U3S3 Motherboard - ASRock 970DE3/U3S3 | Quick Installation Guide - Page 130
PWRBTN RESET PLED LED LED S1 LED S3/S4 S5 LED HDLED LED LED LED LED LED (4 핀 SPEAKER 1) (2 26 전원 LED 헤더 핀 PLED1) (2 25 1 PLEDPLED+ PLED+ 3 LED LED S1 LED S3/S4 S5 LED 한 국 어 130 ASRock 970DE3/U3S3 Motherboard - ASRock 970DE3/U3S3 | Quick Installation Guide - Page 131
4 핀 CPU 3 핀 CPU CPU 3 핀 CPU 1-3 1-3 3 ATX (24 핀 ATXPWR1) (2 10 12 24 ATX 1 13 24 핀 ATX 12 24 종래의 20 핀 ATX 20 핀 ATX Pin 1 과 Pin 13 ATX 12V (8 핀 ATX12V1) (2 1 20 핀 ATX 1 13 5 1 8 4 ATX 12V 한국어 131 ASRock 970DE3/U3S3 Motherboard - ASRock 970DE3/U3S3 | Quick Installation Guide - Page 132
8- 핀 ATX 12V 4- 핀 ATX 12V 용하여 4- 핀 ATX 1 과 핀 5 5 1 4- 핀 ATX 12V 8 4 HDMI_SPDIF 헤더 (2 핀 HDMI_SPDIF1) (2 30 HDMI VGA 카드에 SPDIF HDMI_SPDIF HDMI 디지털 TV LCD HDMI VGA 카드의 HDMI_SPDIF 한 국 어 132 ASRock 970DE3/U3S3 Motherboard - ASRock 970DE3/U3S3 | Quick Installation Guide - Page 133
2 POST F2> 또는 ++ - ASRock 970DE3/U3S3 | Quick Installation Guide - Page 134
Web www.asrock.com/support/index.asp 1.1 ASRock 970DE3/U3S3 ATX 12.0-in x 7.5-in, 30.5 cm x 19.1 cm) ASRock 970DE3/U3S3 ASRock 970DE3/U3S3 CD 2 x ATA (SATA 1 x I/O ASRock Windows® 7 / 7 64-bit / VistaTM / VistaTM 64-bit BIOS AHCI B I O S C D 134 ASRock 970DE3/U3S3 Motherboard 日本語 - ASRock 970DE3/U3S3 | Quick Installation Guide - Page 135
.1 cm Socket AM3 Socket AM3 AMD PhenomTM II X6 / X4 / X3 / X2(920 / 940 Athlon II X4 / X3 / X2 / Sempron 8-Core CPU 140W まで CPU ACC AMD OverDriveTM AMD 社 Cool 'n' QuietTM FSB 2600 MHz (5.2 GT/s) - Untied Overclocking 1 Hyper-Transport 3.0 (HT 3.0 AMD 770 AMD SB710 DDR3 2 DDR3 DIMM - ASRock 970DE3/U3S3 | Quick Installation Guide - Page 136
1 x 1 - IR x 1 - HDMI_SPDIF x 1 - 電源 LED x 1 - CPU 24 ピン ATX 8 ピン 12V CD USB 2.0 USB 2.0 用 6 x 3 - 8Mb AMI Legal BIOS ACPI 1.1 jumperfree SMBIOS 2.3.1 CPU、VCCM、NB AMD OverDriveTM、CyberLink MediaEspresso 6.5 ASRock MAGIX Multimedia Suite - OEM 日本語 136 ASRock 970DE3/U3S3 Motherboard - ASRock 970DE3/U3S3 | Quick Installation Guide - Page 137
- CPU - CPU 12V, +5V, +3.3V, Vcore OS - Microsoft® Windows® 7/7 64-bit/VistaTM/VistaTM 64-bit/XP/XP Media Center/XP 64-bit compliant 認証 - FCC, CE, Microsoft® WHQL - ErP/EuP 対応(ErP/EuP ( 注意 16 を参照 ) http://www.asrock.com BIOS 日本語 137 ASRock 970DE3/U3S3 Motherboard - ASRock 970DE3/U3S3 | Quick Installation Guide - Page 138
Untied Overclocking 2 Dual Channel Memory Technology る為に 13 3. 1866/1600MHz AM3/AM3+ CPU DDR3 1866/1600 WEB ASRock Web サイト http://www.asrock.com 4. Windows® 7 / VistaTM / XP 4GB 64 ビット CPU の Windows® OS 5 ASRock Windows ASRock - ASRock 970DE3/U3S3 | Quick Installation Guide - Page 139
APP ASRock の Web http://www.asrock.com/Feature/ AppCharger/index.asp 10 SmartView Facebook IE ASRock SmartView SmartView OS Windows® 7 / 7 64 bit / VistaTM / VistaTM 64 bit IE8 ASRock http://www.asrock.com/Feature/ SmartView/index.asp 11. ASRock XFast USB は USB 139 ASRock 970DE3/U3S3 - ASRock 970DE3/U3S3 | Quick Installation Guide - Page 140
ASRock XFast LAN LAN Youtube HD 13. Windows 32 ビット CPU ASRock XFast RAM Adobe Photoshop 5 ASRock XFast RAM SSD または HDD 14 CPU CPU 15. CPU CPU PC CPU 16. Energy Using Product EuP EuP AC 1.00W EuP EuP EuP Intel EuP 5v 100 mA 50 EuP 140 ASRock 970DE3/U3S3 Motherboard - ASRock 970DE3/U3S3 | Quick Installation Guide - Page 141
1.3 1-2 CMOS CLRCMOS1 38 参照) 設定 説明 CMOS の消去 注 : CLRCMOS1 CMOS 15 CLRCMOS1 のピン 2 とピン 3 を 5 BIOS CMOS BIOS CMOS CMOS 1394 GUID と MAC CMOS 日本語 141 ASRock 970DE3/U3S3 Motherboard - ASRock 970DE3/U3S3 | Quick Installation Guide - Page 142
5) SATAII_5 (PORT 4) SATAII_2 SATAII_4 (PORT 1) (PORT 3) これら 6 ATAII (SATAII SATA SATAII 3.0 Gb/s です。 SATAII_1 SATAII_3 (PORT 0) (PORT 2) SATA3_2 (PORT 7) SATA3_1 (PORT 6) これら 2 ATA3 (SATA3 SATA SATA3 6.0 Gb/s です。 日本語 142 ASRock 970DE3/U3S3 Motherboard - ASRock 970DE3/U3S3 | Quick Installation Guide - Page 143
1 GND IRRX CD1 CD-L GND GND CD-R 9 ピン HD_AUDIO1 29 を参照 GND PRESENCE# MIC_RET OUT_RET 1 OUT2_L J_SENSE OUT2_R MIC2_R MIC2_L SATA SATA /SATAII / SATA3 SATA3 I/O 4 つの USB 2.0 3 つの USB 2.0 USB 2.0 2 つの USB 2.0 CDROM、DVD-ROM、TV MPEG 日本語 143 ASRock 970DE3/U3S3 Motherboard - ASRock 970DE3/U3S3 | Quick Installation Guide - Page 144
と OUT_RET AC'97 E. Windows® XP / XP 64-bit OS の場合 : "Mixer Recorder FrontMic Windows® 7 / 7 64-bit / VistaTM / VistaTM 64-bit OS の場合 : Realtek FrontMic Recording Volume 9 ピン PANEL1 24 を参照 日本語 144 PWRBTN RESET ASRock 970DE3/U3S3 Motherboard - ASRock 970DE3/U3S3 | Quick Installation Guide - Page 145
LED LED 4 ピン SPEAKER1 26 を参照 電源 LED 3 ピン PLED1 25 を参照 1 PLEDPLED+ PLED+ 4 ピン CHA_FAN1 12 を参照 (4 ピン PWR_FAN1 2 を参照 FAN_SPEED_CONTROL PWR_FAN_SPEED +12V GND LED LED S1 LED S3/S4 S5 LED 日本語 145 ASRock 970DE3/U3S3 Motherboard - ASRock 970DE3/U3S3 | Quick Installation Guide - Page 146
12 24 ATX 1 13 24 ピン ATX 12 24 従来の 20 ピン ATX 20 ピン ATX 1 13 20 ピン ATX 1 13 ATX 12V 8 ピン ATX12V1 1 を参照 5 1 8 4 CPU に Vcore ATX 12V 8-pin ATX 12V 4-pin ATX 12V 4-pin ATX Pin 1 と Pin 5 5 1 4-Pin ATX 12V 8 4 日本語 146 ASRock 970DE3/U3S3 Motherboard - ASRock 970DE3/U3S3 | Quick Installation Guide - Page 147
HDMI_SPDIF ヘッダ (2- ピン HDMI_SPDIF1 30 を参照 HDMI_SPDIF SPDIF HDMI VGA HDMI TV LCD HDMI VGA HDMI_SPDIF 日本語 147 ASRock 970DE3/U3S3 Motherboard - ASRock 970DE3/U3S3 | Quick Installation Guide - Page 148
BIOS 情報 BIOS POST F2 Del BIOS POST BIOS POST Ctrl〉+〈Alt〉+〈Delete BIOS BIOS CD PDF 3 CD 情報 Microsoft® Windows® 7 / 7 64-bit / VistaTM / VistaTM 64bit / XP / XP Media Center / XP 64-bit CD CD CDROM CD AUTORUN AUTORUN CD 内の BIN ASSETUP.EXE 148 ASRock 970DE3/U3S3 Motherboard - ASRock 970DE3/U3S3 | Quick Installation Guide - Page 149
com/support/index.asp 1.1 華擎 970DE3/U3S3 主板 (ATX 規格 : 12.0 英吋 X 7.5 英吋 , 30.5 厘米 X 19.1 厘米 ) 華擎 970DE3/U3S3 970DE3/U3S3 Serial ATA(SATA I/O 擋板 ASRock 為了在 Windows® 7 / 7 64-bit / VistaTM / VistaTM 64-bit BIOS中將Storage Configuration AHCI BIOS User Manual 149 ASRock 970DE3/U3S3 Motherboard - ASRock 970DE3/U3S3 | Quick Installation Guide - Page 150
1.2 LAN 功能 Rear Panel I/O 150 - ATX 規格 : 12.0 英吋 X 7.5 英吋 , 30.5 厘米 X 19.1 Socket AM3 Socket AM3 AMD PhenomTM II X6 / X4 / X3 / X2(920/940 除外 ) / Athlon II X4 / X3 / X2 / Sempron CPU 就緒 - Digi 140W 的 CPU - 通過 ACC AMD OverDriveTM AMD Cool 'n' Quiet FSB 2600 MHz (5.2 GT/s 1 - ASRock 970DE3/U3S3 | Quick Installation Guide - Page 151
BIOS Plug and Play,PnP) - ACPI 1.1 jumperfree SMBIOS 2.3.1 - CPU, VCCM, NB AMD OverDriveTM, CyberLink MediaEspresso 6.5 MAGIX OEM 5 Intelligent Energy Saver 6 Instant Flash 7 OC DNA 8 APP Charger 9 SmartView 10 XFast USB 11 XFast LAN 12 XFast RAM 13) 151 ASRock 970DE3/U3S3 - ASRock 970DE3/U3S3 | Quick Installation Guide - Page 152
Guard (B.F.G - CPU - CPU - CPU - CPU 12V, +5V, +3.3V 操作系統 - Microsoft® Windows® 7/7 64 位元 /VistaTM/VistaTM 64 位元 /XP/XP Media Center/XP 64 認證 - FCC, CE, WHQL - 支持 ErP/EuP ErP/EuP 16) http://www.asrock.com BIOS 簡體中文 152 ASRock 970DE3/U3S3 Motherboard - ASRock 970DE3/U3S3 | Quick Installation Guide - Page 153
警告 ! 1 23 頁的"Untied Overclocking Technology 2 13 3. 1866/1600MHz AM3/AM3+ CPU DDR3 1866/1600 http://www.asrock.com 4 Windows® 7 / VistaTM / XP 4GB。對於 Windows 64 位元 CPU 5 Windows http://www.asrock.com 6 Intelligent Energy Saver C P U Intelligent Energy Saver BIOS Cool 'n' Quiet - ASRock 970DE3/U3S3 | Quick Installation Guide - Page 154
10. S m a r t V i e w 是 I n t e r n e t I E F a c e b o o k Internet SmartView SmartView Windows® 7/7 64 位元 /VistaTM/VistaTM 64 IE8 http://www.asrock.com/Feature/SmartView/index.asp 11. 華擎 XFast USB USB 12. 華擎 XFast LAN Youtube 13. 華擎 XFast RAM Windows 32-bit CPU XFast RAM Adobe - ASRock 970DE3/U3S3 | Quick Installation Guide - Page 155
1.3 3 1 和針腳 2 CMOS (CLRCMOS1, 3 2 頁第 38 項 ) 設定 默認設置 清除 CMOS 注意: C L R C M O S1 C M O S 15 C L R C M O S1 2 和插針 3 短接 5 B I O S C M O S B I O S C M O S C M O S C M O S 1394 GUID 和 MAC 簡體中文 155 ASRock 970DE3/U3S3 Motherboard - ASRock 970DE3/U3S3 | Quick Installation Guide - Page 156
ATA3 接口 (SATA3_1 (PORT 6): 見第 2 頁第 11 項 ) (SATA3_2 (PORT 7): 見第 2 頁第 9 項 ) SATA3_2 (PORT 7) SATA3_1 (PORT 6) Serial ATAII (SATAII Serial (SATA SATAII 3.0Gb/s Serial ATA3 (SATA3 Serial (SATA SATA3 6.0Gb/s 156 ASRock 970DE3/U3S3 Motherboard 簡體中文 - ASRock 970DE3/U3S3 | Quick Installation Guide - Page 157
GND DUMMY 1 GND P+6 P-6 USB_PWR USB_PWR P-9 P+9 GND DUMMY 1 GND P+8 P-8 USB_PWR IRTX +5VSB DUMMY 1 GND IRRX CD1 GND PRESENCE# MIC_RET OUT_RET 1 OUT2_L J_SENSE OUT2_R MIC2_R MIC2_L I/O USB 2.0 USB 2.0 USB 2.0 USB 2.0 接口。 CD-ROM,DVD-ROM, TV MPEG 簡體中文 157 ASRock 970DE3/U3S3 Motherboard - ASRock 970DE3/U3S3 | Quick Installation Guide - Page 158
和 OUT_RET 僅用于 HD AC'97 E Windows® XP / XP 64 Mixer"。選擇"Recorder FrontMic"。 在 Windows® 7 / 7 64 位元 / VistaTM / VistaTM 64 Realtek FrontMic"。調節"Recording Volume"。 (9 針 PANEL1) ( 見第 2 頁第 24 項 ) 158 PWRBTN RESET PLED S1 S3/S4 S5 HD LED ASRock 970DE3/U3S3 Motherboard 簡體中文 - ASRock 970DE3/U3S3 | Quick Installation Guide - Page 159
S5 LED CPU (4 針 CPU_FAN1) ( 見第 2 頁第 3 項 ) FAN_SPEED_CONTROL CPU_FAN_SPEED +12V GND 1 2 3 4 請將 CPU 4-Pin CPU 風扇 (Quiet Fan 3-Pin CPU 3-Pin CPU CPU Pin 1-3。 Pin 1-3 連接 3-Pin ATX (24 針 ATXPWR1) ( 見第 2 頁第 10 項 ) 12 24 1 13 請將 ATX 簡體中文 159 ASRock 970DE3/U3S3 Motherboard - ASRock 970DE3/U3S3 | Quick Installation Guide - Page 160
針 ATX12V1) ( 見第 2 頁第 1 項 ) 5 1 8 4 ATX 12V 8-pin ATX 12V 4-pin ATX 12V 4-pin ATX 12V Pin 1 和 Pin 5 插上電 源接頭。 5 1 4-Pin ATX 12V 8 4 HDMI_SPDIF 接頭 (2 針 HDMI_SPDIF1) ( 見第 2 頁第 30 項 ) HDMI_SPDIF SPDIF HDMI HDMI HDMI 顯卡的 HDMI_SPDIF 簡體中文 160 ASRock 970DE3/U3S3 Motherboard - ASRock 970DE3/U3S3 | Quick Installation Guide - Page 161
2. BIOS 信息 Flash Memory 存儲了 BIOS POST F2> 或 < D e l B I O S P O S T P O S T B I O S Ctrl>++ - ASRock 970DE3/U3S3 | Quick Installation Guide - Page 162
SJ/T 11364-2006 10 年。 圖一 部件名稱 鉛 (Pb) 鎘 (Cd) 汞 (Hg Cr(VI PBB PBDE) X O O O O O X O O O O O O SJ/T 11363-2006 X SJ/T 11363-2006 2002/95/EC 簡體中文 162 ASRock 970DE3/U3S3 Motherboard - ASRock 970DE3/U3S3 | Quick Installation Guide - Page 163
://www.asrock.com www.asrock.com/support/index.asp 1.1 華擎 970DE3/U3S3 主機板 (ATX 規格 : 12.0 英吋 x 7.5 英吋 , 30.5 公分 x 19.1 公分 ) 華擎 970DE3/U3S3 970DE3/U3S3 Serial ATA(SATA I/O 擋板 ASRock提醒您... 若要在Windows® 7 / 7 64位元 / VistaTM / VistaTM 64 BIOS選項設為AHCI BIOS 163 ASRock 970DE3/U3S3 Motherboard 繁體中文 - ASRock 970DE3/U3S3 | Quick Installation Guide - Page 164
) - 3 x PCI Express 2.0 x1 插槽 - 2 x PCI 插槽 - 5.1 Realtek ALC662 THX TruStudioTM - PCIE x1 Gigabit LAN 10/100/1000 Mb/s - Realtek RTL8111E Wake-On-LAN Energy Efficient Ethernet 802.3az PXE) I/O 界面 - 1 個 PS/2 1 個 PS/2 1 COM1 - 4 USB 2.0 接口 - 2 USB 3.0 接口 ASRock 970DE3/U3S3 Motherboard 繁體中文 - ASRock 970DE3/U3S3 | Quick Installation Guide - Page 165
- ACPI 1.1 jumperfree SMBIOS 2.3.1 - CPU,VCCM,NB AMD OverDriveTM,CyberLink MediaEspresso 6.5 MAGIX OEM - 華擎 OC Tuner 5 Intelligent Energy Saver 6 Instant Flash 7 OC DNA 8 APP Charger 9 SmartView 10 XFast USB 11 XFast LAN 12 XFast RAM 13) 165 ASRock 970DE3/U3S3 Motherboard 繁體中文 - ASRock 970DE3/U3S3 | Quick Installation Guide - Page 166
(B.F.G - CPU - CPU - CPU - CPU 12V, +5V, +3.3V 操作系統 - Microsoft® Windows® 7/7 64 位元 /VistaTM/VistaTM 64 位元 /XP/XP Media Center/XP 64 位元 認證 - FCC, CE, WHQL - 支援 ErP/EuP ErP/EuP 16) http://www.asrock.com BIOS 繁體中文 166 ASRock 970DE3/U3S3 Motherboard - ASRock 970DE3/U3S3 | Quick Installation Guide - Page 167
頁的"Untied Overclocking Technology 2 13 3. 1866/1600MHz AM3/AM3+ CPU DDR3 1866/1600 http://www.asrock.com 4 Windows® 7 / VistaTM / XP 4GB。對於 Windows 64 位元 CPU 5 W i n d o w s ASRock OC Tuner http://www.asrock.com 6. Intelligent Energy Saver C P U Intelligent Energy Saver BIOS Cool - ASRock 970DE3/U3S3 | Quick Installation Guide - Page 168
USB USB 12. 華擎 XFast LAN Youtube 13. 華擎 XFast RAM Windows 32-bit CPU XFast RAM Adobe Photoshop XFast RAM SSD 或 HDD 14 CPU CPU 15 CPU CPU PC CPU 16. EuP, 全稱 Energy Using Product EuP 1.00W EuP EuP EuP Intel EuP 100mA 5Vsb 50 EuP 168 ASRock 970DE3/U3S3 Motherboard - ASRock 970DE3/U3S3 | Quick Installation Guide - Page 169
1.3 3 1 和針腳 2 CMOS (CLRCMOS1, 3 2 頁第 38 項 ) 設定 默認設置 清除 CMOS 註: C L R C M O S1 C M O S 15 CLRCMOS1 的 pin2 及 pin3 短路 5 BIOS CMOS BIOS CMOS CMOS C M O S 1394 GUID 及 MAC 繁體中文 169 ASRock 970DE3/U3S3 Motherboard - ASRock 970DE3/U3S3 | Quick Installation Guide - Page 170
SATA SATAII 3.0Gb/s SATAII_1 SATAII_3 (PORT 0) (PORT 2) Serial ATA3 接口 (SATA3_1 (PORT 6): 見第 2 頁第 11 項 ) (SATA3_2 (PORT 7): 見第 2 頁第 9 項 ) SATA3_2 (PORT 7) SATA3_1 (PORT 6) Serial ATA3 (SATA3 SATA SATA3 6.0Gb/s 170 ASRock 970DE3/U3S3 Motherboard 繁體中文 - ASRock 970DE3/U3S3 | Quick Installation Guide - Page 171
P-9 P+9 GND DUMMY 1 GND P+8 P-8 USB_PWR IRTX +5VSB DUMMY 1 GND IRRX CD1 I/O USB 2.0 USB 2.0 USB 2.0 USB 2.0 接口。 CD-ROM,DVD-ROM, T V T u n e r 或 M P E G CD-L GND GND CD-R GND PRESENCE# MIC_RET OUT_RET 1 OUT2_L J_SENSE OUT2_R MIC2_R MIC2_L 繁體中文 171 ASRock 970DE3/U3S3 Motherboard - ASRock 970DE3/U3S3 | Quick Installation Guide - Page 172
和 OUT_RET 僅用於 HD AC'97 E Windows® XP / XP 64 Mixer Recorder FrontMic"。 在 Windows® 7 / 7 64 位元 / VistaTM / VistaTM 64 Realtek FrontMic Recording Volume"。 (9 針 PANEL1) ( 見第 2 頁第 24 項 ) 172 PWRBTN RESET PLED S1 S3/S4 S5 HD LED ASRock 970DE3/U3S3 Motherboard 繁體中文 - ASRock 970DE3/U3S3 | Quick Installation Guide - Page 173
S5 LED CPU (4 針 CPU_FAN1) ( 見第 2 頁第 3 項 ) FAN_SPEED_CONTROL CPU_FAN_SPEED +12V GND 請將 CPU 1 2 3 4 4-Pin CPU 風扇 (Quiet Fan 3-Pin CPU 3-Pin CPU CPU Pin 1-3。 Pin 1-3 連接 3-Pin ATX (24 針 ATXPWR1) ( 見第 2 頁第 10 項 ) 12 24 請將 ATX 1 13 繁體中文 173 ASRock 970DE3/U3S3 Motherboard - ASRock 970DE3/U3S3 | Quick Installation Guide - Page 174
(8 針 ATX12V1) ( 見第 2 頁第 1 項 ) 5 1 8 4 ATX 12V 8-pin ATX 12V 4-pin ATX 12V 4-pin ATX 12V 5 1 順著 Pin 1 和 Pin 5 4-Pin ATX 12V 8 4 HDMI_SPDIF 接頭 (2 針 HDMI_SPDIF1) ( 見第 2 頁第 30 項 ) HDMI_SPDIF SPDIF H D M I HDMI HDMI HDMI_SPDIF 繁體中文 174 ASRock 970DE3/U3S3 Motherboard - ASRock 970DE3/U3S3 | Quick Installation Guide - Page 175
2. BIOS 訊息 Flash Memory BIOS POST F2> 或 + + - ASRock 970DE3/U3S3 | Quick Installation Guide - Page 176
www.asrock.com 1.1 Isi Paket Papan Induk 970DE3/U3S3 ASRock (Faktor Form ATX: 12.0-in x 7.5-in, 30.5 cm x 19.1 cm) Pemimpin Instalasi Cepat 970DE3/U3S3 ASRock Support CD 970DE3/U3S3 ASRock 2 x Kabel satu serial Data ATA (SATA) (bebas-pilih) 1 x Satu Pelindung I/O 176 ASRock 970DE3/U3S3 Motherboard - ASRock 970DE3/U3S3 | Quick Installation Guide - Page 177
CH HD Audio (Realtek ALC662 Audio Codec) - Menggunakan THX TruStudioTM - PCIE x1 Gigabit LAN 10/100/1000 Mb/s - Realtek RTL8111E - Menggunakan Wake-On-LAN - Mendukung Deteksi Kabel LAN - Mendukung Energy Efficient Ethernet 802.3az - Mendukung PXE Bahasa Indonesia 177 ASRock 970DE3/U3S3 Motherboard - ASRock 970DE3/U3S3 | Quick Installation Guide - Page 178
- Menggunakan jumperfree - Penyokong AMBIOS 2.3.1 - Penyesuaian berbagai tegangan CPU, VCCM, NB - Penggerak, kegunaan, Software AntiVirus (Versi Cobaan), AMD OverDriveTM, CyberLink MediaEspresso 6.5 Trial, ASRock MAGIX Multimedia Suite - OEM Bahasa Indonesia 178 ASRock 970DE3/U3S3 Motherboard - ASRock 970DE3/U3S3 | Quick Installation Guide - Page 179
susunan BIOS, penggunaan Untied Overclocking Technology, atau pemakaian perlengkapan overclocking lain. Overclocking barangkali mengganggu stabilitas sistem Anda, atau menimbulkan kerusakan terhadap komponen dan alat sistem Anda. Anda seharusnya. Bahasa Indonesia 179 ASRock 970DE3/U3S3 Motherboard
-
 1
1 -
 2
2 -
 3
3 -
 4
4 -
 5
5 -
 6
6 -
 7
7 -
8
-
9
-
10
-
11
-
12
-
13
-
14
-
15
-
16
-
17
-
18
-
19
-
20
-
21
-
22
-
23
-
24
-
25
-
26
-
27
-
28
-
29
-
30
-
31
-
32
-
33
-
34
-
35
-
36
-
37
-
38
-
39
-
40
-
41
-
42
-
43
-
44
-
45
-
46
-
47
-
48
-
49
-
50
-
51
-
52
-
53
-
54
-
55
-
56
-
57
-
58
-
59
-
60
-
61
-
62
-
63
-
64
-
65
-
66
-
67
-
68
-
69
-
70
-
71
-
72
-
73
-
74
-
75
-
76
-
77
-
78
-
79
-
80
-
81
-
82
-
83
-
84
-
85
-
86
-
87
-
88
-
89
-
90
-
91
-
92
-
93
-
94
-
95
-
96
-
97
-
98
-
99
-
100
-
101
-
102
-
103
-
104
-
105
-
106
-
107
-
108
-
109
-
110
-
111
-
112
-
113
-
114
-
115
-
116
-
117
-
118
-
119
-
120
-
121
-
122
-
123
-
124
-
125
-
126
-
127
-
128
-
129
-
130
-
131
-
132
-
133
-
134
-
135
-
136
-
137
-
138
-
139
-
140
-
141
-
142
-
143
-
144
-
145
-
146
-
147
-
148
-
149
-
150
-
151
-
152
-
153
-
154
-
155
-
156
-
157
-
158
-
159
-
160
-
161
-
162
-
163
-
164
-
165
-
166
-
167
-
168
-
169
-
170
-
171
-
172
-
173
-
174
-
175
-
176
-
177
-
178
-
179
 |
 |
1
ASRock
970DE3/U3S3
Motherboard
English
Copyright Notice:
No part of this installation guide may be reproduced, transcribed, transmitted, or trans-
lated in any language, in any form or by any means, except duplication of documentation
by the purchaser for backup purpose, without written consent of ASRock Inc.
Products and corporate names appearing in this guide may or may not be registered
trademarks or copyrights of their respective companies, and are used only for identi
fi
ca-
tion or explanation and to the owners’ bene
fi
t, without intent to infringe.
Disclaimer:
Speci
fi
cations and information contained in this guide are furnished for informational use
only and subject to change without notice, and should not be constructed as a commit-
ment by ASRock. ASRock assumes no responsibility for any errors or omissions that may
appear in this guide.
With respect to the contents of this guide, ASRock does not provide warranty of any kind,
either expressed or implied, including but not limited to the implied warranties or condi-
tions of merchantability or
fi
tness for a particular purpose. In no event shall ASRock, its
directors, of
fi
cers, employees, or agents be liable for any indirect, special, incidental, or
consequential damages (including damages for loss of pro
fi
ts, loss of business, loss of
data, interruption of business and the like), even if ASRock has been advised of the pos-
sibility of such damages arising from any defect or error in the guide or product.
This device complies with Part 15 of the FCC Rules. Operation is subject to the following
two conditions:
(1) this device may not cause harmful interference, and
(2) this device must accept any interference received, including interference that
may cause undesired operation.
CALIFORNIA, USA ONLY
The Lithium battery adopted on this motherboard contains Perchlorate, a toxic substance
controlled in Perchlorate Best Management Practices (BMP) regulations passed by the
California Legislature. When you discard the Lithium battery in California, USA, please
follow the related regulations in advance.
“Perchlorate Material-special handling may apply, see
www.dtsc.ca.gov/hazardouswaste/perchlorate”
ASRock Website: http://www.asrock.com
Published March 2012
Copyright
©
2012 ASRock INC. All rights reserved.