ASRock A55 Pro3 Quick Installation Guide
ASRock A55 Pro3 Manual
 |
View all ASRock A55 Pro3 manuals
Add to My Manuals
Save this manual to your list of manuals |
ASRock A55 Pro3 manual content summary:
- ASRock A55 Pro3 | Quick Installation Guide - Page 1
of ASRock Inc. Products and corporate names appearing in this guide profits, loss of business, loss of data, interruption of business and the like), even if ASRock ASRock Website: http://www.asrock.com Published August 2011 Copyright©2011 ASRock INC. All rights reserved. 1 ASRock A55 Pro3 Motherboard - ASRock A55 Pro3 | Quick Installation Guide - Page 2
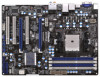
1 32 31 CHA_FAN2 CHA_FAN3 PCIE1 A55 Pro3 Dual Graphics PCIE2 USB 3.0 CMOS BATTERY PCI1 ErP/EuP Ready XFast USB PCIE3 RoHS PCI2 CLRCMOS1 1 1 PCI3 COM1 IR1 1 USB6_7 1 1 CIR1 USB8_9 1 AMD A55 FCH (Hudson-D2) Chipset 32Mb BIOS USB10_11 1 CHA_FAN1 SATA3_1 SATA3_2 SATA3 - ASRock A55 Pro3 | Quick Installation Guide - Page 3
ports. ** There are two LED next to the LAN port. Please refer to the table below for the LAN port LED indications. LAN Port LED Indications Activity/Link . 5) (No. 4) Side Speaker (No. 7) 2 V -- -- -- 4 V V -- -- 6 V V V -- 8 V V V V 3 ASRock A55 Pro3 Motherboard English - ASRock A55 Pro3 | Quick Installation Guide - Page 4
HDA Primary output" to use Rear Speaker, Central/Bass, and Front Speaker, or select "Realtek HDA Audio 2nd output" to use front panel audio. English 4 ASRock A55 Pro3 Motherboard - ASRock A55 Pro3 | Quick Installation Guide - Page 5
specific information about the model you are using. www.asrock.com/support/index.asp 1.1 Package Contents ASRock A55 Pro3 Motherboard (ATX Form Factor: 12.0-in x 8.6-in, 30.5 cm x 21.8 cm) ASRock A55 Pro3 Quick Installation Guide ASRock A55 Pro3 Support CD 2 x Serial ATA (SATA) Data Cables (Optional - ASRock A55 Pro3 | Quick Installation Guide - Page 6
Platform CPU Chipset Memory Expansion Slot Graphics - ATX Form Factor: 12.0-in x 8.6-in, 30.5 cm x 21.8 cm - All Solid Capacitor design - Support for Socket FM1 100W processors - V4 + 1 Power Phase Design - Supports AMD's Cool 'n' QuietTM Technology - UMI-Link GEN2 - AMD A55 FCH (Hudson-D2) - Dual - ASRock A55 Pro3 | Quick Installation Guide - Page 7
- 1 x CIR header - 1 x COM port header - 1 x HDMI_SPDIF header - 1 x Power LED header - CPU/Chassis/Power FAN connector - 24 pin ATX power connector - 8 pin 12V power connector - Front panel audio connector - 3 x USB 2.0 headers (support 6 USB 2.0 ports) English 7 ASRock A55 Pro3 Motherboard - ASRock A55 Pro3 | Quick Installation Guide - Page 8
third-party overclocking tools. Overclocking may affect your system stability, or even cause damage to the components and devices of your system. It should be done at your own risk and expense. We are not responsible for possible damage caused by overclocking. English 8 ASRock A55 Pro3 Motherboard - ASRock A55 Pro3 | Quick Installation Guide - Page 9
reduce the number of output phases to improve efficiency when the CPU cores are idle without sacrificing computing performance. Please visit our website for the operation procedures of ASRock Extreme Tuning Utility (AXTU). ASRock website: http://www.asrock.com 9 ASRock A55 Pro3 Motherboard English - ASRock A55 Pro3 | Quick Installation Guide - Page 10
audio devices, such like MP3 player or mobile phone to your PC, even when the PC is turned off (or in ACPI S5 mode)! This motherboard also provides a free 3.5mm audio cable (optional) that ensures users the most convenient computing environment. 10 ASRock A55 Pro3 Motherboard English - ASRock A55 Pro3 | Quick Installation Guide - Page 11
, the EuP ready power supply must meet the standard of 5v standby power ef ciency is higher than 50% under 100 mA current consumption. For EuP ready power supply selection, we recommend you checking with the power supply manufacturer for more details. 11 ASRock A55 Pro3 Motherboard English - ASRock A55 Pro3 | Quick Installation Guide - Page 12
, place it on a grounded antistatic pad or in the bag that comes with the component. 5. When placing screws into the screw holes to secure the motherboard to the chassis, please do not over-tighten the screws! Doing so may damage the motherboard. 12 ASRock A55 Pro3 Motherboard English - ASRock A55 Pro3 | Quick Installation Guide - Page 13
and in good contact with each other. Then connect the CPU fan to the CPU FAN connector (CPU_FAN1, see Page 2, No. 5 or CPU_FAN2, see Page 2, No. 6). For proper installation, please kindly refer to the instruction manuals of the CPU fan and the heatsink. English 13 ASRock A55 Pro3 Motherboard - ASRock A55 Pro3 | Quick Installation Guide - Page 14
motherboard provides four 240-pin DDR3 (Double Data Rate 3) DIMM slots, and supports two motherboard and DIMM may be damaged. 5. If you adopt DDR3 2400/1866/1600 memory modules on this motherboard, it is recommended to install them on DDR3_A2 and DDR3_B2 slots. English 14 ASRock A55 Pro3 Motherboard - ASRock A55 Pro3 | Quick Installation Guide - Page 15
sure to disconnect power supply before motherboard and the DIMM if you force the DIMM into the slot at incorrect orientation. Step 3. Firmly insert the DIMM into the slot until the retaining clips at both ends fully snap back in place and the DIMM is properly seated. 15 ASRock A55 Pro3 Motherboard - ASRock A55 Pro3 | Quick Installation Guide - Page 16
for PCI Express cards with x1 lane width cards, such as Gigabit LAN card and SATA2 card. PCIE2 (PCIE x16 slot; Blue) is width graphics cards, or used to install PCI Express graphics cards to support CrossFireXTM function. PCIE3 (PCIE x16 slot; Blue) is used for ASRock A55 Pro3 Motherboard English - ASRock A55 Pro3 | Quick Installation Guide - Page 17
in the future, please refer to AMD graphics card manuals for detailed installation guide. Step 1. Insert one Radeon graphics card into PCIE2 slot and the other Radeon graphics card to PCIE3 slot. Make sure that the cards are properly seated on the slots. English 17 ASRock A55 Pro3 Motherboard - ASRock A55 Pro3 | Quick Installation Guide - Page 18
two Radeon graphics cards by installing CrossFire Bridge on CrossFire Bridge Interconnects on the top of Radeon graphics cards. (CrossFire Bridge is provided with the graphics card you purchase, not bundled with this motherboard to the DVI to D-Sub adapter.) English 18 ASRock A55 Pro3 Motherboard - ASRock A55 Pro3 | Quick Installation Guide - Page 19
6. Double-click "ATI Catalyst Control Center". Click "View", select "CrossFireXTM", and then check the item "Enable CrossFireXTM". Select "2 GPUs" and click "Apply" (if you install two Radeon graphics cards). English 19 ASRock A55 Pro3 Motherboard - ASRock A55 Pro3 | Quick Installation Guide - Page 20
registered trademark of AMD Technologies Inc., and is used only for identification or explanation and to the owners' benefit, without intent to infringe. * For further information of AMD CrossFireXTM technology, please check AMD website for updates and details. 20 ASRock A55 Pro3 Motherboard English - ASRock A55 Pro3 | Quick Installation Guide - Page 21
the onboard VGA driver from our support CD to your system for both the onboard VGA and the discrete graphics card. Step 6. Restart your computer. Right-click the desktop. Click "AMD VISION Engine Control Center" to enter AMD VISION Engine Control Center. English 21 ASRock A55 Pro3 Motherboard - ASRock A55 Pro3 | Quick Installation Guide - Page 22
trademark of AMD Technologies Inc., and is used only for identification or explanation and to the owners' benefit, without intent to infringe. * For further information of AMD Dual Graphics technology, please check AMD website for up dates and details. 22 ASRock A55 Pro3 Motherboard English - ASRock A55 Pro3 | Quick Installation Guide - Page 23
driver yet, please install onboard VGA driver from our support CD to your system and restart your computer. When you playback HDCP-protected video from Blu-ray (BD) or HD-DVD disc, the content will be displayed only in one of the two monitors instead of both monitors. 23 ASRock A55 Pro3 Motherboard - ASRock A55 Pro3 | Quick Installation Guide - Page 24
UEFI setup, the default value of "Share Memory", [Auto], will disable D-Sub function when the add-on VGA card is inserted to this motherboard. 4. Install the onboard VGA driver and the add-on PCI Express VGA card driver icon identified by the number one to six. 24 ASRock A55 Pro3 Motherboard English - ASRock A55 Pro3 | Quick Installation Guide - Page 25
to the increase in manufacturers employing HDCP in their equipment, it is highly recommended that the HDTV or LCD monitor you purchase is compatible. 25 ASRock A55 Pro3 Motherboard English - ASRock A55 Pro3 | Quick Installation Guide - Page 26
The Multi-Angle CIR Receiver does not support Hot-Plug function. Please install it before you boot the system. * ASRock Smart Remote is only supported by some of ASRock motherboards. Please refer to ASRock website for the motherboard support list: http://www.asrock.com 26 ASRock A55 Pro3 Motherboard - ASRock A55 Pro3 | Quick Installation Guide - Page 27
updating the BIOS, you must boot up the system rst, and then shut it down before you do the clear-CMOS action. Please be noted that the password, date, time, user default pro le, 1394 GUID and MAC address will be cleared only if the CMOS battery is removed. English 27 ASRock A55 Pro3 Motherboard - ASRock A55 Pro3 | Quick Installation Guide - Page 28
or the SATAII / SATA3 connector on this motherboard. USB 2.0 Headers (9-pin USB6_7) (see p.2 No. 26) (9-pin USB8_9) (see p.2 No. 25) (9-pin USB10_11) (see p.2 No. 23) three USB 2.0 headers on this motherboard. Each USB 2.0 header can support two USB 2.0 ports. ASRock A55 Pro3 Motherboard English - ASRock A55 Pro3 | Quick Installation Guide - Page 29
this header according to the pin assignments below. Note the positive and negative pins before connecting the cables. PWRBTN (Power Switch): Connect to the power switch on the chassis front panel. You may configure the way to turn off your system using the power switch. 29 ASRock A55 Pro3 Motherboard - ASRock A55 Pro3 | Quick Installation Guide - Page 30
state or S5 state (power off). Please connect the fan cables to the fan connectors and match the black wire to the ground pin. CHA_FAN1/2/3 fan speed can be controlled through UEFI or AXTU. English (3-pin CHA_FAN3) (see p.2 No. 10) (3-pin PWR_FAN1) (see p.2 No. 1) 30 ASRock A55 Pro3 Motherboard - ASRock A55 Pro3 | Quick Installation Guide - Page 31
power supply. To use the 4 8 4-pin ATX power supply, please plug your power supply along with Pin 1 and Pin 5. 4-Pin ATX 12V Power Supply Installation 1 5 Serial port Header (9-pin COM1) (see p.2 No.29) This COM1 header supports a serial port module. English 31 ASRock A55 Pro3 Motherboard - ASRock A55 Pro3 | Quick Installation Guide - Page 32
pin HDMI_SPDIF1) (see p.2 No. 31) 1 GND SPDIFOUT HDMI_SPDIF header, providing SPDIF audio output to HDMI VGA card, allows the system to connect HDMI Digital TV/ projector/LCD devices. Please connect the HDMI_SPDIF connector of HDMI VGA card to this header. English 32 ASRock A55 Pro3 Motherboard - ASRock A55 Pro3 | Quick Installation Guide - Page 33
UEFI SETUP UTILITY Advanced screen Storage Configuration. B. Set the "SATA Mode" option to [IDE] for SATA2_1 to SATA2_5 ports. Set the "SATA3 Configuration" option to [IDE] for SATA3_1 and SATA3_2 ports. STEP 2: Install Windows® XP / XP 64-bit OS on your system. 33 ASRock A55 Pro3 Motherboard - ASRock A55 Pro3 | Quick Installation Guide - Page 34
/ SATA2 / SATA3 HDDs with NCQ and Hot Plug functions (AHCI mode) STEP 1: Set up UEFI. A. Enter UEFI SETUP UTILITY Advanced screen Storage Configuration. B. Set the "SATA Mode" option to [AHCI] for 7 64-bit / VistaTM / VistaTM 64-bit OS on your system. English 34 ASRock A55 Pro3 Motherboard - ASRock A55 Pro3 | Quick Installation Guide - Page 35
detailed information about BIOS Setup, please refer to the User Manual (PDF file) contained in the Support CD. 4. Software Support CD information This motherboard supports various Microsoft® .EXE" from the BIN folder in the Support CD to display the menus. 35 ASRock A55 Pro3 Motherboard English - ASRock A55 Pro3 | Quick Installation Guide - Page 36
benötigen, besuchen Sie bitte unsere Webseite: www.asrock.com/support/index.asp 1.1 Kartoninhalt ASRock A55 Pro3 Motherboard (ATX-Formfaktor: 30.5 cm x 21.8 cm; 12.0 Zoll x 8.6 Zoll) ASRock A55 Pro3 Schnellinstallationsanleitung ASRock A55 Pro3 Support-CD Zwei Serial ATA (SATA) -Datenkabel (optional - ASRock A55 Pro3 | Quick Installation Guide - Page 37
ätze Onboard-VGA - ATX-Formfaktor: 30.5 cm x 21.8 cm; 12.0 Zoll x 8.6 Zoll - Alle Feste Kondensatordesign - Unterstützt Sockel-FM1-100-W-Prozessoren - V4 + 1-Stromphasendesign - Unterstützt Cool 'n' QuietTM-Technologie von AMD - UMI-Link-GEN2 - AMD A55 FCH (Hudson-D2) - Unterstützung von - ASRock A55 Pro3 | Quick Installation Guide - Page 38
- PCIE x1 Gigabit LAN 10/100/1000 Mb/s - Realtek RTL8111E - Unterstützt Wake-On-LAN - Unterstützt LAN-Kabelerkennung - Unterstützt energieef - 1 x Betriebs-LED-Header - CPU/Gehäuse/Stromlüfter-Anschluss - 24-pin ATX-Netz-Header - 8-pin anschluss für 12V-ATX-Netzteil ASRock A55 Pro3 Motherboard - ASRock A55 Pro3 | Quick Installation Guide - Page 39
äß Ökodesign-Richtlinie (ErP/EuP) (Stromversorgung gemäß Ökodesign-Richtlinie (ErP/EuP) erforderlich) (siehe VORSICHT 15) * Für die ausführliche Produktinformation, besuchen Sie bitte unsere Website: http://www.asrock.com Deutsch 39 ASRock A55 Pro3 Motherboard - ASRock A55 Pro3 | Quick Installation Guide - Page 40
ät der CPU-Kerne die Anzahl an Ausgangsphasen zur Steigerung der Effi zienz reduzieren - ohne die Rechenleistung zu beeinträchtigen. Hinweise zur Bedienung der ASRock Extreme Tuning Utility (AXTU) fi nden Sie auf unserer Webseite. ASRock-Webseite: http:// www.asrock.com 40 ASRock A55 Pro3 Motherboard - ASRock A55 Pro3 | Quick Installation Guide - Page 41
Internet Explorer ab Version 8 nutzen. ASRock-Website: http:// www.asrock.com/Feature/SmartView/index.asp 11. ASRocks XFast USB dient der Steigerung der Leistungsfähigkeit Ihrer USB-Speichergeräte. Die Leistung kann je nach Eigenschaften des Gerätes variieren. 41 ASRock A55 Pro3 Motherboard Deutsch - ASRock A55 Pro3 | Quick Installation Guide - Page 42
12. ASRock XFast LAN bietet einen schnelleren Internetzugang mit den nachfolgenden Vorteilen. LAN-Anwendungspriorisierung: neu starten, prüfen Sie bitte, ob der CPU-Lüfter am Motherboard richtig funktioniert, und stecken Sie bitte den Stromkabelstecker aus . 42 ASRock A55 Pro3 Motherboard Deutsch - ASRock A55 Pro3 | Quick Installation Guide - Page 43
diesen beiden Pins. Jumper Einstellun Beschreibung CMOS löschen (CLRCMOS1, 3-Pin jumper) BIOS-Aktualisierung löschen. Wenn Sie das CMOS nach Abschluss der BIOS- Profil, 1394 GUID und MAC-Adresse nur gelöscht werden, wenn die CMOS-Batterie entfernt wird. Deutsch 43 ASRock A55 Pro3 Motherboard - ASRock A55 Pro3 | Quick Installation Guide - Page 44
Jumperkappen auf die Pins der Anschlussleisten. Wenn Sie die Jumperkappen auf die Anschlüsse setzen, wird das Motherboard permanent beschädigt finden sich drei USB 2.0Anschlussleisten am Motherboard. Pro USB 2.0Anschlussleiste werden zwei USB 2.0-Ports unterstützt. ASRock A55 Pro3 Motherboard Deutsch - ASRock A55 Pro3 | Quick Installation Guide - Page 45
Modul-Header (5-pin IR1) (siehe S.2 - No. 28) IRTX +5VSB DUMMY 1 GND IRRX Consumer Infrared-Modul-Header (4-pin CIR1) (siehe S.2 - No. 27) 1 GND IRTX IRRX ATX+5VSB Dieser Sie „Recorder" (Rekorder). Klicken Sie dann auf „FrontMic" (Vorderes Mikrofon). 45 ASRock A55 Pro3 Motherboard Deutsch - ASRock A55 Pro3 | Quick Installation Guide - Page 46
Anschließen des Frontblendenmoduls Ihres Gehäuses an diesem Header sicher, dass die Kabel- und Pinbelegung korrekt übereinstimmen. Gehäuselautsprecher-Header (4-pin SPEAKER1) (siehe S.2 - No. 15) Schließen Sie den Gehäuselautsprecher an diesen Header an. 46 ASRock A55 Pro3 Motherboard Deutsch - ASRock A55 Pro3 | Quick Installation Guide - Page 47
CPU-Lüfter an den CPU-Lüferanschluss dieses Motherboards anschließen möchten, verbinden Sie ihn bitte mit den Pins 1 - 3. Pins 1-3 anschließen Lüfter mit dreipoligem Anschluss installieren (3-pin CPU_FAN2) (siehe S.2 - No. 6) GND +12V CPU_FAN_SPEED Deutsch 47 ASRock A55 Pro3 Motherboard - ASRock A55 Pro3 | Quick Installation Guide - Page 48
zusammen mit dem Pin 1 und Pin 5 ein. 4 8 Installation der 4-Pin ATX 12V Energieversorgung 1 5 COM-Anschluss-Header (9-pin COM1) (siehe S.2 - No. 29) Dieser COM-AnschlussHeader wird verwendet, um ein COM-Anschlussmodul zu unterstützen. Deutsch 48 ASRock A55 Pro3 Motherboard - ASRock A55 Pro3 | Quick Installation Guide - Page 49
HDMI_SPDIF-Anschluss (2-pin HDMI_SPDIF1) (siehe S.2 - No. 31) 1 GND SPDIFOUT Der HDMI_SPDIF-Anschluss stellt einen SPDIFAudioausgang für eine HDMIVGA-Karte zur das System. Bitte verbinden Sie den HDMI_SPDIF-Anschluss der HDMI-VGA-Karte mit diesem Anschluss. Deutsch 49 ASRock A55 Pro3 Motherboard - ASRock A55 Pro3 | Quick Installation Guide - Page 50
der Support-CD, um die Menüs aufzurufen. Das Setup-Programm soll es Ihnen so leicht wie möglich machen. Es ist menügesteuert, d.h. Sie können in den verschiedenen Untermenüs Ihre Auswahl treffen und die Programme werden dann automatisch installiert. 50 ASRock A55 Pro3 Motherboard Deutsch - ASRock A55 Pro3 | Quick Installation Guide - Page 51
sous Windows® 7 / 7 64 bits / VistaTM / VistaTM 64 bits, il est recommandé de paramétrer l'option BIOS dans Configuration de stockage en mode AHCI. Pour plus de détails sur l'installation BIOS, référez-vous au "Mode d'emploi" sur votre CD de support. 51 ASRock A55 Pro3 Motherboard Français - ASRock A55 Pro3 | Quick Installation Guide - Page 52
- Facteur de forme ATX: 12.0 pouces x 8.6 pouces, 30.5 cm x 21.8 cm - Accessoires de Carte mère - Support des unités centrales Socket FM1 100W - Conception V4 + 1 Power Phase - Supporte la technologie Cool 'n' QuietTM d'AMD - UMI-Link GEN2 - AMD A55 FCH (Hudson-D2) - Compatible avec la Technologie - ASRock A55 Pro3 | Quick Installation Guide - Page 53
THX TruStudioTM - PCIE x1 Gigabit LAN 10/100/1000 Mb/s - Realtek RTL8111E - Supporte du Wake-On-LAN - Prise en charge de la détection de câble LAN - Prend en charge la norme -tête de port COM - 1 x Connecteur HDMI_SPDIF - 1 x Connecteur de LED d'alimentation 53 ASRock A55 Pro3 Motherboard Français - ASRock A55 Pro3 | Quick Installation Guide - Page 54
ventilateur de CPU/Châssis/Ventilateur - br. 24 connecteur d'alimentation ATX - br. 8 connecteur d'alimentation 12V ATX - Connecteur audio panneau avant - 3 x En-tête USB 2.0 (prendre en charge 6 ports USB 2.0 supplémentaires) BIOS - 32Mb AMI UEFI Legal BIOS avec support GUI - Support du - ASRock A55 Pro3 | Quick Installation Guide - Page 55
l'entrée microphone, cette carte mère supporte les deux modes stéréo et mono. Pour la sortie audio, cette carte mère supporte les modes 2-canaux, 4-canaux, 6-canaux et 8-canaux. Veuillez vous référer au tableau en page 3 pour effectuer la bonne connexion. 55 ASRock A55 Pro3 Motherboard Français - ASRock A55 Pro3 | Quick Installation Guide - Page 56
cores du CPU ne teste de arranque POST ou premir a tecla para exibir o menu de configuração do BIOS para aceder ao ASRock Instant Flash. Execute esta ferramenta para guardar o novo ficheiro de BIOS ASRock : http://www.asrock.com/Feature/SmartView/index.asp 56 ASRock A55 Pro3 Motherboard Français - ASRock A55 Pro3 | Quick Installation Guide - Page 57
. ASRock XFast LAN fournit un accès Internet plus rapide, avec les avantages suivants. Priorisation d'application LAN : beaucoup dans les environnements informatiques. 14. Lorsqu'une surchauffe du CPU est détectée, le système s'arrête automatiquement. Avant de ASRock A55 Pro3 Motherboard Français - ASRock A55 Pro3 | Quick Installation Guide - Page 58
après avoir mis à jour le BIOS. Si vous avez besoin d'effacer le CMOS après avoir mis à jour le BIOS, vous devez allumer en premier le profil par défaut de l'utilisateur, 1394 GUID et l'adresse MAC seront effacés seulement si la batterie du CMOS est enlevée. Français 58 ASRock A55 Pro3 Motherboard - ASRock A55 Pro3 | Quick Installation Guide - Page 59
ports USB 2.0 par défaut sur le panneau E/S, il y a trois embases USB 2.0 sur cette carte mère. Chaque embase USB 2.0 peut prendre en charge 2 ports USB 2.0. 59 ASRock A55 Pro3 Motherboard - ASRock A55 Pro3 | Quick Installation Guide - Page 60
+5VSB DUMMY 1 GND IRRX Cet en-tête supporte un module infrarouge optionnel de transfert et de réception No. 27) 1 GND IRTX IRRX ATX+5VSB Cette barrette peut être utilis pour fonctionner correctement. Veuillez suivre les instructions dans notre manuel et le manuel de ch ASRock A55 Pro3 Motherboard - ASRock A55 Pro3 | Quick Installation Guide - Page 61
-tête du haut-parleur Veuillez connecter le de châssis haut-parleur de châssis sur (SPEAKER1 br. 4) (voir p.2 No. 15) cet en-tête. 61 ASRock A55 Pro3 Motherboard Français - ASRock A55 Pro3 | Quick Installation Guide - Page 62
le ventilateur de CPU à 3 broches au connecteur du ventilateur de CPU sur cette carte mère, veuillez le connecter aux broches 1-3. Installation de ventilateur à 3 broches Broches 1-3 connectées (CPU_FAN2 br. 3) (voir p.2 No. 6) GND +12V CPU_FAN_SPEED Français 62 ASRock A55 Pro3 Motherboard - ASRock A55 Pro3 | Quick Installation Guide - Page 63
votre alimentation avec la broche 1 et la broche 5. 4 8 En-tête de port COM (COM1 br.9) (voir p.2 No. 29) 4-Installation d'alimentation à 4 broches ATX 12V 1 5 Cette en-tête de port COM est utilisée pour prendre en charge un module de port COM. Français 63 ASRock A55 Pro3 Motherboard - ASRock A55 Pro3 | Quick Installation Guide - Page 64
Connecteur HDMI_SPDIF (HDMI_SPDIF1 2-pin) (voir p.2 No. 31) 1 GND SPDIFOUT Connecteur HDMI_SPDIF, fournissant une sortie audio SPDIF vers la carte VGA HDMI, périphérique LCD. Veuillez brancher le connecteur HDMI_SPDIF de la carte VGA HDMI sur ce connecteur. Français 64 ASRock A55 Pro3 Motherboard - ASRock A55 Pro3 | Quick Installation Guide - Page 65
presser ou pendant le POST (Power-OnSelf-Test) pour entrer dans le BIOS; sinon, le POST continue ses tests de routine. Si vous désirez entrer dans le BIOS après le POST, veuillez redémarrer le système et double-cliquez dessus pour afficher les menus. 65 ASRock A55 Pro3 Motherboard Français - ASRock A55 Pro3 | Quick Installation Guide - Page 66
/ VistaTM / VistaTM 64-bit, si consiglia di impostare l'opzione BIOS in Storage Configuration (Configurazione di archiviazione) sulla modalità AHCI. Per l'impostazione BIOS, fare riferimento a "User Manual" (Manuale dell'utente) nel CD di supporto per dettagli. 66 ASRock A55 Pro3 Motherboard Italiano - ASRock A55 Pro3 | Quick Installation Guide - Page 67
VGA su scheda - ATX Form Factor: 12.0-in x 8.6-in, 30.5 cm x 21.8 cm - Design condensatore compatto - Supporto per processori socket FM1 100W - Struttura di fase con alimentazione V4 + 1 - Supporto tecnologia AMD Cool 'n' QuietTM - UMI-Link GEN2 - AMD A55 FCH (Hudson-D2) - Supporto tecnologia Dual - ASRock A55 Pro3 | Quick Installation Guide - Page 68
/Chassis/Alimentazione ventola - 24-pin collettore alimentazione ATX - 8-pin connettore ATX 12V - Connettore audio sul pannello frontale - 3 x Collettore USB 2.0 (supporta 6 porte USB 2.0) - 32Mb AMI UEFI Legal BIOS con interfaccia di supporto - Supporta "Plug and Play" ASRock A55 Pro3 Motherboard - ASRock A55 Pro3 | Quick Installation Guide - Page 69
velocita per la ventola del CPU/Chassis/ Alimentazione - Ventola CPU/Chassis silenziosa - Ventola CPU/chassis con controllo di varie velocità - Voltaggio: +12V, +5V, +3.3V, Vcore informazioni, prego visitare il nostro sito internet: http://www.asrock.com Italiano 69 ASRock A55 Pro3 Motherboard - ASRock A55 Pro3 | Quick Installation Guide - Page 70
per migliorare l'effi cienza quando i core CPU sono inattivi senza sacrifi care le prestazioni di computazione. Vistare il nostro per informazioni sulle procedure operative dell'utilità AXT (ASRock Extreme Tuning Utility). Sito ASRock: http://www.asrock.com 70 ASRock A55 Pro3 Motherboard Italiano - ASRock A55 Pro3 | Quick Installation Guide - Page 71
il tasto nel menu BIOS per accedere ad ASRock Instant Flash. Avviare questo strumento e salvare il nuovo file BIOS nell'unità Flash USB, dischetto Touch, ASRock ha preparato una soluzione meravigliosa: ASRock APP Charger. Basta installare il driver APP Charger ASRock A55 Pro3 Motherboard Italiano - ASRock A55 Pro3 | Quick Installation Guide - Page 72
sistema si chiude automaticamente. Prima di riavviare il sistema, assicurarsi che la ventolina CPU della scheda madre funzioni correttamente; scollegare e ricollegare il cavo d'alimentazione. Per migliorare di verificare ulteriori dettagli con il produttore. 72 ASRock A55 Pro3 Motherboard Italiano - ASRock A55 Pro3 | Quick Installation Guide - Page 73
BIOS, è necessario per prima cosa avviare il sistema e poi spegnerlo prima di eseguire l'azzeramento della CMOS. Notare che password, data, ore, profilo utente predefinito, 1394 GUID e indirizzo MAC saranno cancellati solo se è rimossa la batteria della CMOS. Italiano 73 ASRock A55 Pro3 Motherboard - ASRock A55 Pro3 | Quick Installation Guide - Page 74
SATA3 su questa cartolina base. Collettore USB 2.0 (9-pin USB6_7) (vedi p.2 Nr. 26) Oltre alle quattro porte USB 2.0 predefinite nel pannello I/O, la scheda madre dispone di tre intestazioni USB 2.0. Ciascuna intestazione USB 2.0 supporta due porte USB 2.0. 74 ASRock A55 Pro3 Motherboard Italiano - ASRock A55 Pro3 | Quick Installation Guide - Page 75
pin IR1) (vedi p.2 Nr. 28) IRTX +5VSB DUMMY 1 GND IRRX Connettore modulo infrarosso consumer (4-pin CIR1) (vedi p.2 Nr. 27) 1 GND IRTX IRRX ATX modo corretto. Attenersi alle istruzioni del nostro manuale e del manuale del telaio per installare il sistema. 2. 75 ASRock A55 Pro3 Motherboard - ASRock A55 Pro3 | Quick Installation Guide - Page 76
il modulo del pannello frontale a questo header, assicurarsi che l'assegnazione dei fili e dei pin sia fatta corrispondere in modo appropriato. Collettore casse telaio (4-pin SPEAKER1) (vedi p.2 Nr. 15) Collegare le casse del telaio a questo collettore. 76 ASRock A55 Pro3 Motherboard Italiano - ASRock A55 Pro3 | Quick Installation Guide - Page 77
Se si intende collegare la ventola CPU a 3 piedini al connettore della ventola CPU su questa scheda madre, collegarla ai piedini 1-3. Piedini 1-3 collegati Installazione della ventola a 3 piedini (3-pin CPU_FAN2) (vedi p.2 Nr. 6) GND +12V CPU_FAN_SPEED Italiano 77 ASRock A55 Pro3 Motherboard - ASRock A55 Pro3 | Quick Installation Guide - Page 78
pin ATX 12V. Per usare tale fornitura elettrica 4-pin ATX 12V, prego collegare la presa elettrica 4 8 al Pin 1 e Pin 5. Collettore porta COM (9-pin COM1) (vedi p.2 Nr. 29) Installazione elettrica 4-Pin ATX 12V della scheda VGA HDMI a questo header. Italiano 78 ASRock A55 Pro3 Motherboard - ASRock A55 Pro3 | Quick Installation Guide - Page 79
Power-On-Self-Test (POST) della Setup utility del BIOS; altrimenti, POST continua con i suoi test di routine. Per entrare il BIOS CD di supporto a corredo della scheda madre contiene i driver e utilità necessari a potenziare le caratteristiche della scheda. ASRock A55 Pro3 Motherboard Italiano - ASRock A55 Pro3 | Quick Installation Guide - Page 80
/ VistaTM / VistaTM 64 bits, es recomendable establecer la opción del BIOS de la configuración de almacenamiento en el modo AHCI. Para obtener detalles sobre la configuración del BIOS, consulte el "Manual del usuario" que se encuentra en nuestro CD de soporte. 80 ASRock A55 Pro3 Motherboard Español - ASRock A55 Pro3 | Quick Installation Guide - Page 81
VGA OnBoard - Factor forma ATX: 30,5 cm x 21,8 cm, 12,0" x 8,6" - Todo diseño de Capacitor Sólido - Admite procesadores de 100 W para zócalo FM1 - Diseño de fases de potencia V4 + 1 - Con soporte para tecnología Cool 'n' QuietTM de AMD - UMI-Link GEN2 - AMD A55 FCH (Hudson-D2) - Soporte de Tecnolog - ASRock A55 Pro3 | Quick Installation Guide - Page 82
puertos USB 2.0 predeterminados - 1 x Conector eSATA2 - 2 x puertos USB 3.0 predeterminados - 1 x Puerto LAN RJ-45 con LED (LED de ACCIÓN/ ENLACE y LED de VELOCIDAD) - Conexión de audio: Altavoz LED de encendido - Conector de ventilador de CPU / chasis / alimentacion ASRock A55 Pro3 Motherboard - ASRock A55 Pro3 | Quick Installation Guide - Page 83
pin cabezal de alimentación ATX - 8-pin conector de ATX 12V power - Conector de audio de panel frontal - 3 x Cabezal USB 2.0 (admite 6 puertos USB 2.0 adicionales) BIOS - 32Mb AMI BIOS legal UEFI CPU y el chasis Español - Monitor de Voltaje: +12V, asrock.com 83 ASRock A55 Pro3 Motherboard - ASRock A55 Pro3 | Quick Installation Guide - Page 84
reloj, incluido el ajuste del BIOS, aplicando la tecnología de aumento CPU de 64-bit, no existe dicha limitación. 4. El tamaño de la memoria compartido máximo es definido por el vendedor del chipset y está conforme al cambio. Por favor compruebe el Web site de AMD ASRock A55 Pro3 Motherboard Español - ASRock A55 Pro3 | Quick Installation Guide - Page 85
la versión de su sistema operativo es Windows® 7 / 7 64 bits / VistaTM / VistaTM 64 bits y que la versión de su explorador es IE8. Sitio Web de ASRock: http://www.asrock.com/Feature/SmartView/index.asp 85 ASRock A55 Pro3 Motherboard Español - ASRock A55 Pro3 | Quick Installation Guide - Page 86
ASRock XFast LAN proporciona un acceso a Internet más rápido, que incluye las ventajas que se indican a continuación. Priorización de aplicaciones LAN más práctico. 14. Cuando la temperatura de CPU está sobre-elevada, el sistema va a apagarse automaticamente. Antes ASRock A55 Pro3 Motherboard Español - ASRock A55 Pro3 | Quick Installation Guide - Page 87
pins, el jumper está "Open". La ilustración muesta un jumper de 3 pins cuyo pin 1 y pin 2 están "Short". Jumper Setting Limpiar CMOS (CLRCMOS1, jumper de 3 pins del usuario, el GUID 1394 y la dirección MAC solamente se borrará si la batería CMOS se quita. Español 87 ASRock A55 Pro3 Motherboard - ASRock A55 Pro3 | Quick Installation Guide - Page 88
SATAII / SATA3 o el conectador de SATAII / SATA3 en esta placa base. Cabezal USB 2.0 (9-pin USB6_7) (vea p.2, N. 26) (9-pin USB8_9) (vea p.2, N. 25) USB_PWR P-9 P+9 GND DUMMY 1 GND P+8 P-8 USB_PWR Además de bases de conexiones admite dos puertos USB 2.0. Español 88 ASRock A55 Pro3 Motherboard - ASRock A55 Pro3 | Quick Installation Guide - Page 89
módulo de infrarrojos para el consumidor (4-pin CIR1) (vea p.2, N. 27) 1 GND IRTX IRRX ATX+5VSB Este cabezal soporta un módulo operar correctamente. Por favor, siga las instrucciones en nuestro manual y en el manual de chasis para instalar su sistema. 2. Si utiliza el ASRock A55 Pro3 Motherboard - ASRock A55 Pro3 | Quick Installation Guide - Page 90
Cabezal de panel de sistema (9-pin PANEL1) (vea p.2, N. 16) Este cabezar acomoda varias dunciones de de contactos coincidan correctamente. Cabezal del altavoz del chasis (4-pin SPEAKER1) (vea p.2, N. 15) Conecte el altavoz del chasis a su cabezal. Español 90 ASRock A55 Pro3 Motherboard - ASRock A55 Pro3 | Quick Installation Guide - Page 91
del ventilador de la CPU (4-pin CPU_FAN1) (vea p.2, N. 5) FAN_SPEED_CONTROL CPU_FAN_SPEED +12V GND 1 2 3 4 Conecte el cable del ventilador de la CPU a este conector y Instalación del ventilador de 3 contactos (3-pin CPU_FAN2) (vea p.2, N. 6) GND +12V CPU_FAN_SPEED 91 ASRock A55 Pro3 Motherboard - ASRock A55 Pro3 | Quick Installation Guide - Page 92
por favor conecte su fuente de energía junto con Pin 1 y Pin 5. 4 8 Instalación de Fuente de Energía de 4-Pin ATX 12V 1 5 Cabezal del puerto COM (9-pin COM1) (vea p.2, N. 29) Este cabezal del puerto COM se utiliza para admitir un módulo de puerto COM. Español 92 ASRock A55 Pro3 Motherboard - ASRock A55 Pro3 | Quick Installation Guide - Page 93
al sistema conectarse a dispositivos de TV Digital HDMI / proyectores / Dispositivos LCD. Conecte el conector HDMI_SPDIF de la tarjeta VGA HDMI a esta cabecera. Español 93 ASRock A55 Pro3 Motherboard - ASRock A55 Pro3 | Quick Installation Guide - Page 94
información detallada sobre como configurar la BIOS, por favor refiérase al Manual del Usuario (archivo PDF) contenido en el CD. 3. Información de Software Support CD Esta placa-base soporta diversos tipos de el archivo "ASSETUP.EXE" para iniciar la instalación. 94 ASRock A55 Pro3 Motherboard Español - ASRock A55 Pro3 | Quick Installation Guide - Page 95
www.asrock.com/support/index.asp 1.1 ASRock A55 Pro3 ATX: 12,0 x 8,6 30,5 x 21,8 см) ASRock A55 Pro3 ASRock A55 Pro3 2 x Serial ATA (SATA 1 x I/O ASRock Windows® 7 / 7 64-bit / VistaTM / VistaTM 64-bit BIOS Storage Configuration AHCI BIOS 95 ASRock A55 Pro3 Motherboard - ASRock A55 Pro3 | Quick Installation Guide - Page 96
1.2 ATX: 12,0 x 8,6 30,5 x 21,8 Socket FM1 с 100 V4 + 1 Power Phase Design AMD Cool 'n' QuietTM - UMI-Link GEN2 - AMD A55 FCH (Hudson-D2 Dual Channel DDR3 Memory Technology 1) - 4 x DDR3 DIMM DDR3 2400+(OC)/1866/1600/1333/1066/800 не- ECC 2) - Mакс. 32 3) - 2 x PCI Express - ASRock A55 Pro3 | Quick Installation Guide - Page 97
x RJ-45 LAN ACT/LINK SPEED) Power LED CPU/Chassis/Power FAN - 24 ATX - 8 ATX 12 В - 3 x USB 2.0 6 USB 2.0 BIOS - 32Mb AMI UEFI Legal BIOS rpaфичеckoro интеpфeйca Plug and Play" - ACPI 1.1 SMBIOS 2.3.1 DRAM, VDDP, VDDR, SB 97 ASRock A55 Pro3 Motherboard - ASRock A55 Pro3 | Quick Installation Guide - Page 98
/Chassis/Power FAN 12V, +5V, +3.3V, Vcore Microsoft® Windows® 7 / 7 64-bit / VistaTM 64 VistaTM / XP SP3 / XP 64-bit ные - FCC, CE, WHQL ErP/EuP Ready ErP/EuP 15) ты http://www.asrock.com BIOS Untied Overclocking 98 ASRock A55 Pro3 Motherboard - ASRock A55 Pro3 | Quick Installation Guide - Page 99
ASRock http://www.asrock.com 3 4 Windows® 7 / VistaTM / XP Windows® OS с 64-bit 4 AMD ASRock Extreme Tuning Utility (AXTU Hardware Monitor Fan Control and IES Hardware Monitor Fan Control IES ASRock Extreme Tuning Utility (AXTU ASRock: http://www.asrock.com 99 ASRock A55 Pro3 Motherboard - ASRock A55 Pro3 | Quick Installation Guide - Page 100
www.asrock.com/Feature/AppCharger/index.asp 10. SmartView IE Facebook ASRock SmartView SmartView Windows® 7/7, 64 VistaTM/VistaTM, 64 IE8 ASRock: http://www.asrock.com/Feature/SmartView/index.asp 11 ASRock XFast USB USB 12. ASRock XFast LAN Youtube 100 ASRock A55 Pro3 Motherboard - ASRock A55 Pro3 | Quick Installation Guide - Page 101
13 ASRock MP3 ACPI S5 3,5 14 15. EuP Energy Using Product EuP 1 EuP Intel EuP 50 5V 100 EuP. 101 ASRock A55 Pro3 Motherboard - ASRock A55 Pro3 | Quick Installation Guide - Page 102
1.3 short open 3 1 и 2 CMOS (CLRCMOS1, 3 2, п. 30) CMOS CLRCMOS1 CMOS 15 5 2 и 3 CLRCMOS1 CMOS BIOS CMOS BIOS CMOS 1394 GUID и MAC CMOS. 102 ASRock A55 Pro3 Motherboard - ASRock A55 Pro3 | Quick Installation Guide - Page 103
ATA3 SATA3 SATA 6,0 Serial ATA (SATA USB 2.0 (9 USB6_7 2, п. 26) (9 USB8_9 2, п. 25) SATA / SATAII / SATA3 SATAII / SATA3 USB 2.0 USB 2.0 USB 2.0 USB 2.0. USB_PWR P-9 P+9 GND DUMMY 1 GND P+8 P-8 USB_PWR ASRock A55 Pro3 Motherboard 103 - ASRock A55 Pro3 | Quick Installation Guide - Page 104
п. 28) IRTX +5VSB DUMMY 1 GND IRRX (4 CIR1 2, п. 27) 1 GND IRTX IRRX ATX+5VSB 9 HD_AUDIO1) (см. cтр. 2, п.32) GND PRESENCE# MIC_RET OUT_RET 1 OUT2_L J_SENSE OUT2_R MIC2_R 7 / 7 64-бита, VistaTM / VistaTM 64 FrontMic Realtek Recording Volume 104 ASRock A55 Pro3 Motherboard - ASRock A55 Pro3 | Quick Installation Guide - Page 105
9 PANEL1 2, п. 16) PWRBTN RESET PLED S1 S3 или S4 S5). HDLED 4 SPEAKER1 2, п. 15) 105 ASRock A55 Pro3 Motherboard - ASRock A55 Pro3 | Quick Installation Guide - Page 106
GND +12V CHA_FAN_SPEED 2, п. 39) (3 CHA_FAN3 2, п. 10) (3 PWR_FAN1 2, п. 1) 4 CPU_FAN1 2, п. 5) FAN_SPEED_CONTROL CPU_FAN_SPEED +12V GND 1 2 3 4 4 3 3 1-3. 1-3 3 (3 CPU_FAN2 2, п. 6) GND +12V CPU_FAN_SPEED 106 ASRock A55 Pro3 Motherboard - ASRock A55 Pro3 | Quick Installation Guide - Page 107
12 ATX с 8 12V ATX с 4-Pin 12V ATX с 4-Pin 1 5. 4 8 COM 9 COM1 2, п. 29) ATX С 4-Pin 12V 1 5 COM COM. HDMI_SPDIF (2 HDMI_SPDIF1 2, п. 31) 1 GND SPDIFOUT HDMI_SPDIF VGA-карту HDMI HDMI HDMI_SPDIF на VGAкарте HDMI. ASRock A55 Pro3 Motherboard - ASRock A55 Pro3 | Quick Installation Guide - Page 108
Setup POST Ctrl> + + - ASRock A55 Pro3 | Quick Installation Guide - Page 109
özel bilgiler için lütfen web sitemizi ziyaret edin. www.asrock.com/support/index.asp 1.1 Paket İçindekiler ASRock A55 Pro3 Anakart (ATX Form Faktörü: 12,0-inç x 8,6-inç, 30,5 cm x 21,8 cm) ASRock A55 Pro3 Hızlı Takma Kılavuzu ASRock A55 Pro3 Destek CD'si 2 x Seri ATA (SATA) Veri Kablosu (İste - ASRock A55 Pro3 | Quick Installation Guide - Page 110
şletme Yuvası Grafikler - ATX Form Faktörü: 12,0-inç x 8,6-inç, 30,5 cm x 21,8 cm - Tüm Katı Kapasitör tasarımı - Yuva Tipi FM1 100W İşlemcileri destekler - V4 + 1 Gьз Fazэ Tasarэmэ - AMD'nin Cool 'n' QuietTM Teknolojisini Destekler - UMI-Bağlantısı GEN2 - AMD A55 FCH (Hudson-D2) - Çift Kanallı DDR3 - ASRock A55 Pro3 | Quick Installation Guide - Page 111
Konektцrь - 2 x Kullanэma Hazэr USB 3.0 Portu - 1 x RJ-45 LAN Portu, LED'li (AKT/LЭNK LED'i ve HIZ LED) - HD CPU/Kasa/Güç FAN konektörü - 24 pin ATX güç konektörü - 8 pin 12V güç konektörü - Ön panel ses konektörü - 3 x USB 2.0 fiş (6 USB 2.0 portu destekler) Türkçe 111 ASRock A55 Pro3 Motherboard - ASRock A55 Pro3 | Quick Installation Guide - Page 112
bileşenlerini ve cihazlarına zarar verebilir. Bu risk size aittir ve zararı siz ödersiniz. Aşırı hızlandırmadan kaynaklanan olası zarardan sorumlu değiliz. Türkçe 112 ASRock A55 Pro3 Motherboard - ASRock A55 Pro3 | Quick Installation Guide - Page 113
ye kaydedin, sonra BIOS'unuzu yalnızca birkaç tıklatma ile ek bir disket veya diğer karmaşık flash yardımcı programlarını hazırlamadan güncelleyebilirsiniz. Lütfen USB flash sürücünün veya sabit diskin FAT32/16/12 dosya sistemi kullanması gerektiğini unutmayın. 113 ASRock A55 Pro3 Motherboard Türkçe - ASRock A55 Pro3 | Quick Installation Guide - Page 114
kapatılır. Sistemi devam ettirmeden önce, lütfen anakarttaki CPU fanının düzgün çalıştığını kontrol edin ve güç kablosunu çıkarın, sonra geri takın. Isı geçişini artırmak için, PC sistemini yüklediğinizde CPU ile ısı emici arasına ısı macunu sürmeyi unutmayın. 114 ASRock A55 Pro3 Motherboard Türkçe - ASRock A55 Pro3 | Quick Installation Guide - Page 115
güç etkinliği %50'den yüksektir standardını karşılaması gerekir. EuP hazır güç kaynağı seçimi için, daha fazla ayrıntı için güç kaynağı üreticisine başvurmanızı öneririz. 115 ASRock A55 Pro3 Motherboard Türkçe - ASRock A55 Pro3 | Quick Installation Guide - Page 116
pinli jumper gösterilmektedir. Jumper CMOS'u temizleme (CLRCMOS1, 3-pinli BIOS'u güncelledikten hemen sonra lütfen CMOS'u temizlemeyin. BIOS lan profili, 1394 GUID ve MAC adresinin yalnızca CMOS pili çıkarıldığında temizleneceğini lütfen aklınızda bulundurunuz. Türkçe 116 ASRock A55 Pro3 Motherboard - ASRock A55 Pro3 | Quick Installation Guide - Page 117
pinli USB6_7) (bkz. s.2 No. 26) (9-pinli USB8_9) (bkz. s.2 No. 25) USB_PWR P-9 P+9 GND DUMMY 1 GND P+8 P-8 USB_PWR G/Ç panelindeki varsayılan dört USB 2.0 portundan başka, bu anakartta üç USB 2.0 fişi bulunur. Her USB 2.0 fişi iki USB 2.0 portunu destekler. Türkçe 117 ASRock A55 Pro3 Motherboard - ASRock A55 Pro3 | Quick Installation Guide - Page 118
ülü Fişi (5-pinli IR1) (bkz. s.2 No. 28) IRTX +5VSB DUMMY 1 GND IRRX Kullanıcı Kızılötesi Modül Bağlantısı (4-pinli CIR1) (bkz. s.2 No. 27) 1 GND IRTX IRRX ATX+5VSB Bu fiş, Kontrol panelinde "Ön Mikrofon" Sekmesine gidin. "Kayıt Ses Seviyesi"ni ayarlayın. Türkçe 118 ASRock A55 Pro3 Motherboard - ASRock A55 Pro3 | Quick Installation Guide - Page 119
levini barındırır. Kasa üzerindeki güç anahtarını, sıfırlama anahtarını ve sistem durumu göstergesini aşağıdaki pin atamalarına göre bu bağlantıya bağlayın. Kabloları bağlamadan önce pozitif ve negatif /S4 durumunda veya S5 durumun da (güç kapalı) kapalıdır. 119 ASRock A55 Pro3 Motherboard Türkçe - ASRock A55 Pro3 | Quick Installation Guide - Page 120
24-pinli ATX güç konektörü sağlasa da 12 24 geleneksel bir 20-pinli ATX güç kaynağı bağlarsanız da çalışabilir. 20-pinli ATX güç kaynağını kullanmak için, lütfen güç kaynağınızı Pin 1 ve Pin 13'le birlikte takın. 20-Pinli ATX Güç Kaynağını Takma 1 13 Türkçe 120 ASRock A55 Pro3 Motherboard - ASRock A55 Pro3 | Quick Installation Guide - Page 121
şi (2-pinli HDMI_SPDIF1) (bkz. s.2 No. 31) 1 GND SPDIFOUT HDMI_SPDIF fişi, SPDIF ses çıkışını HDMI VGA kartına sağlar, sistemin HDMI Dijital TV/projektör/LCD cihazlarını bağlamasına izin verir. Lütfen HDMI VGA kartının HDMI_SPDIF konektörünü bu fişe bağlayın. Türkçe 121 ASRock A55 Pro3 Motherboard - ASRock A55 Pro3 | Quick Installation Guide - Page 122
Güç Sınaması (POST) sırasında BIOS Ayarları yardımcı programına girmek için veya tuşuna basın; aksi halde, POST test rutinlerine devam eder. BIOS Ayarlarına POST'tan sonra girmek istiyorsanız, öründeki "ASSETUP.EXE" dosyasını bulun ve çift tıklatın. 122 ASRock A55 Pro3 Motherboard Türkçe - ASRock A55 Pro3 | Quick Installation Guide - Page 123
www.asrock.com/support/index.asp 1.1 ASRock A55 Pro3 ATX 12.0" x 8.6", 30.5 x 21.8 cm) ASRock A55 Pro3 ASRock A55 Pro3 지원 CD 시리얼 ATA (SATA 2 I/O 차폐 1 개 ASRock Windows® 7 / 7 64-비트 / VistaTM / VistaTM 64 Storage Configuration BIOS 옵션을 AHCI BIOS CD 123 ASRock A55 Pro3 Motherboard 한국어 - ASRock A55 Pro3 | Quick Installation Guide - Page 124
1.2 설명서 플랫폼 CPU VGA 124 - ATX 12.0" x 8.6", 30.5 x 21.8 cm FM1 100W V4 + 1 AMD 의 Cool 'n' QuietTM UMI-Link GEN2 - AMD A55 FCH (Hudson-D2 1 참조 ) - DDR3 DIMM 슬롯 4 개 - DDR3 2400+(OC)/1866/1600/1333/1066/800 비 -ECC 2 32GB ( 주의 3 참조 ) - 2 개의 PCI Express 2.0 x16 슬롯 (x16 PCIE2; x4 PCIE3) - 1 - ASRock A55 Pro3 | Quick Installation Guide - Page 125
RAID (RAID 0, RAID 1 및 RAID 10), NCQ, AHCI 2 개 의 SATA3 6.0Gb/s 1 1 개 - COM 1 개 - HDMI_SPDIF 헤더 1 LED 헤더 1 개 - CPU 24 핀 ATX 8 핀 ATX 12V USB 2.0 헤더 3 개 (6 USB 2.0 2개 ) - 32Mb GUI AMI UEFI 적합형 BIOS ACPI 1.1 SMBIOS 2.3.1 지원 - DRAM, VDDP, VDDR, SB 한 국 어 125 ASRock A55 Pro3 Motherboard - ASRock A55 Pro3 | Quick Installation Guide - Page 126
CPU - CPU 계 - CPU - CPU 12V,+5V,+3.3V,Vcore OS Windows® 7/7 64 비트 /VistaTM/ VistaTM 64 비트 /XP SP3/XP 64 인증서 - FCC, CE, WHQL - ErP/EuP 지원 (ErP/EuP ( 주의 15 참조 ) http://www.asrock.com BIOS Untied Overclocking Technology 한 국 어 126 ASRock A55 Pro3 Motherboard - ASRock A55 Pro3 | Quick Installation Guide - Page 127
IES IES (Intelligent Energy Saver CPU ASRock 의 AXTU (Extreme Tuning Utility ASRock http://www.asrock.com 8. ASRock Instant Flash ROM BIOS BIOS MS-DOS 나 Windows BIOS POST 중에 BIOS F6 F2 ASRock Instant Flash USB BIOS BIOS USB FAT32/16/12 127 ASRock A55 Pro3 Motherboard 한국어 - ASRock A55 Pro3 | Quick Installation Guide - Page 128
OS 버전이 Windows® 7 / 7 64 비트 / VistaTM / VistaTM 64 IE8 ASRock http://www.asrock.com/ Feature/SmartView/index.asp 11. ASRock XFast USB 는 USB 12. ASRock XFast LAN LAN Youtube HD 13. ASRock On/Off Play MP3 PC PC ACPI S5 3.5 mm 14 CPU PC CPU 128 ASRock A55 Pro3 Motherboard 한 국 어 - ASRock A55 Pro3 | Quick Installation Guide - Page 129
15. EuP 는 Energy Using Product EuP AC 1.00W EuP EuP EuP Intel EuP 5V 100 mA 50 EuP 129 ASRock A55 Pro3 Motherboard 한 국 어 - ASRock A55 Pro3 | Quick Installation Guide - Page 130
1.3 3 1-2 점퍼 CMOS 초기화 (CLRCMOS1, 3 2 30 세팅 CMOS 삭제 참고 : CLRCMOS1 CMOS 15 CLRCMOS1 의 핀 2 와 핀 3 을 5 BIOS CMOS BIOS CMOS CMOS CMOS 1394 GUID, MAC 한 국 어 130 ASRock A55 Pro3 Motherboard - ASRock A55 Pro3 | Quick Installation Guide - Page 131
: 2 13 2 ATA3 (SATA3 SATA SATA SATA3 6.0 Gb/s 시리얼 ATA(SATA SATA SATA / SATAII / SATA3 SATAII / SATA3 USB 2.0 헤더 (9 핀 USB6_7) (2 26 I/O 4 USB 2.0 USB 2.0 헤더가 3 USB 2.0 헤더 는 2 개의 USB 2.0 SATA3_1 SATA3_2 한국어 131 ASRock A55 Pro3 Motherboard - ASRock A55 Pro3 | Quick Installation Guide - Page 132
P+10 P-10 USB_PWR IRTX +5VSB DUMMY 1 GND IRRX 1 GND IRTX IRRX ATX+5VSB (9 핀 HD_AUDIO1) ( 2 32 GND PRESENCE# MIC_RET OUT_RET 1 OUT2_L J_SENSE FrontMic Windows® 7 / 7 64 비트 / VistaTM / VistaTM 64 비트 OS 의 경 우: Realtek FrontMic Recording Volume ASRock A55 Pro3 Motherboard 한 국 어 - ASRock A55 Pro3 | Quick Installation Guide - Page 133
/S4 S5 LED HDLED LED LED LED LED LED (4 핀 SPEAKER 1) (2 15 전원 LED 헤더 핀 PLED1) (2 14 1 PLEDPLED+ PLED+ 3 LED LED S1 LED S3/S4 S5 LED 133 ASRock A55 Pro3 Motherboard 한국어 - ASRock A55 Pro3 | Quick Installation Guide - Page 134
3 4 CPU 4 핀 CPU 3 핀 CPU CPU 3 핀 CPU 1-3 1-3 3 (3 핀 CPU_FAN2) (2 6 GND +12V CPU_FAN_SPEED ATX (24 핀 ATXPWR1) (2 9 12 24 ATX 1 13 24 핀 ATX 12 24 종래의 20 핀 ATX 20 핀 ATX Pin 1 과 Pin 13 20 핀 ATX 1 13 한 국 어 134 ASRock A55 Pro3 Motherboard - ASRock A55 Pro3 | Quick Installation Guide - Page 135
ATX 12V (8 핀 ATX12V1) (2 2 4 8 1 5 ATX 12V 8- 핀 ATX 12V 4- 핀 ATX 12V 용하여 4- 핀 ATX 1 과 핀 5 4 8 (9 핀 COM1) (2 29 4- 핀 ATX 12V 1 5 한국어 135 ASRock A55 Pro3 Motherboard - ASRock A55 Pro3 | Quick Installation Guide - Page 136
HDMI_SPDIF 헤더 (2 핀 HDMI_SPDIF1) (2 31 1 GND SPDIFOUT HDMI VGA 카드에 SPDIF HDMI_SPDIF HDMI 디지털 TV LCD HDMI VGA 카드의 HDMI_SPDIF 한 국 어 136 ASRock A55 Pro3 Motherboard - ASRock A55 Pro3 | Quick Installation Guide - Page 137
2 POST F2> 또는 ++ - ASRock A55 Pro3 | Quick Installation Guide - Page 138
www.asrock.com Web www.asrock.com/support/index.asp 1.1 ASRock A55 Pro3 ATX 12.0-in x 8.6-in, 30.5 cm x 21.8 cm) ASRock A55 Pro3 ASRock A55 Pro3 CD 2 x ATA (SATA 1 x I/O ASRock Windows® 7 / 7 64-bit / VistaTM / VistaTM 64-bit BIOS AHCI B I O S C D 138 ASRock A55 Pro3 Motherboard - ASRock A55 Pro3 | Quick Installation Guide - Page 139
1.2 仕様 CPU - ATX 12.0-in x 8.6-in, 30.5 cm x 21.8 cm Socket FM1 100W Processors V4 + 1 AMD 社 Cool 'n' QuietTM UMI-Link GEN2 - AMD A55 FCH (Hudson-D2 DDR3 ( 注意 1 DDR3 DIMM x 4 - DDR3 2400+(OC)/1866/1600/1333/1066/800 non-ECC, un-buffered 2 32GB ( 注意 3 2 x PCI Express 2.0 x16 ( - ASRock A55 Pro3 | Quick Installation Guide - Page 140
-to-Use USB 3.0 ポート x 2 - LED(ACT/LINK LED および SPEED LED)付き RJ-45 LAN ポート x 1 6 参照 ) - ASMedia ASM1061 SATA3 6.0Gb x 2 ハード NCQ, AHCI および LED x 1 - CPU 24 ピン ATX 8 ピン 12V USB 2.0 USB 2.0 用 6 x 3 - 32Mb AMI UEFI Legal BIOS(GUI ACPI 1.1 jumperfree 日本語 140 ASRock A55 Pro3 Motherboard - ASRock A55 Pro3 | Quick Installation Guide - Page 141
CPU - CPU - CPU - CPU 12V, +5V, +3.3V, Vcore OS - Microsoft® Windows® 7/7 64-bit/VistaTM/VistaTM 64-bit/XP SP3/XP 64-bit compliant 認証 - FCC, CE, Microsoft® WHQL - ErP/EuP 対応(ErP/EuP ( 注意 15 を参照 ) http://www.asrock.com BIOS 日本語 141 ASRock A55 Pro3 Motherboard - ASRock A55 Pro3 | Quick Installation Guide - Page 142
OS AMD 社の WEB xvYCC Windows® 7 64-bit / 7 EDID で 12bpc HBR は Windows® 7 64-bit / 7 / VistaTM 64-bit / VistaTM 2 4 6 8 3 ASRock Extreme Tuning Utility (AXTU IES IES CPU ASRock Extreme Tuning Utility (AXTU Web ASRock Web サイト :http://www.asrock.com 日本語 142 ASRock A55 Pro3 Motherboard - ASRock A55 Pro3 | Quick Installation Guide - Page 143
SmartView SmartView OS Windows® 7 / 7 64 bit / VistaTM / VistaTM 64 bit IE8 ASRock http://www.asrock.com/Feature/ SmartView/index.asp 11. ASRock XFast USB は USB 12. ASRock XFast LAN LAN Youtube HD ます。 日本語 143 ASRock A55 Pro3 Motherboard - ASRock A55 Pro3 | Quick Installation Guide - Page 144
13. ASRock PC ACPI S5 MP3 PC 3.5mm 14. CPU CPU 冷 PC ル時に、CPU です。 15. Energy Using Product EuP EuP に従っ AC 1.00W EuP EuP EuP 対応 Intel EuP 5v 100 mA で 50 EuP 日本語 144 ASRock A55 Pro3 Motherboard - ASRock A55 Pro3 | Quick Installation Guide - Page 145
1.3 1-2 CMOS CLRCMOS1 30 参照) 設定 説明 CMOS の消去 注 : CLRCMOS1 CMOS 15 CLRCMOS1 のピン 2 とピン 3 を 5 BIOS CMOS BIOS CMOS CMOS 1394 GUID と MAC CMOS 日本語 145 ASRock A55 Pro3 Motherboard - ASRock A55 Pro3 | Quick Installation Guide - Page 146
(SATA3 SATA SATA3 6.0 Gb/s です。 SATA SATA /SATAII / SATA3 SATAII / SATA3 USB 2.0 ヘッダ (9 ピン USB6_7 26 を参照 (9 ピン USB8_9 25 を参照 USB_PWR P-9 P+9 GND DUMMY 1 GND P+8 P-8 USB_PWR I/O 4 つの USB 2.0 3 つの USB 2.0 USB 2.0 2 つの USB 2.0 日本語 146 ASRock A55 Pro3 Motherboard - ASRock A55 Pro3 | Quick Installation Guide - Page 147
IRTX +5VSB DUMMY 1 GND IRRX 4 ピン CIR1 27 を参照 1 GND IRTX IRRX ATX+5VSB 9 ピン HD_AUDIO1 32 を参照 GND PRESENCE# MIC_RET OUT_RET 1 OUT2_L J_SENSE OUT2_R MIC2_R -bit / VistaTM / VistaTM 64-bit OS の場合 : Realtek FrontMic Recording Volume 147 ASRock A55 Pro3 Motherboard 日本語 - ASRock A55 Pro3 | Quick Installation Guide - Page 148
または S4 S5 LED HDLED LED LED LED LED LED 4 ピン SPEAKER1 15 を参照 電源 LED 3 ピン PLED1 14 を参照 1 PLEDPLED+ PLED+ LED LED S1 LED S3/S4 S5 LED 148 ASRock A55 Pro3 Motherboard 日本語 - ASRock A55 Pro3 | Quick Installation Guide - Page 149
+12V GND CPU 1 2 3 4 4 ピン CPU 3 ピン CPU 3 ピン CPU CPU 1-3 1-3 3 (3 ピン CPU_FAN2 6 を参照 GND +12V CPU_FAN_SPEED ATX 24 ピン ATXPWR1 9 を参照 12 24 ATX 1 13 24 ピン ATX 従来の 20 ピン ATX 12 24 20 ピン ATX 1 13 20 ピン ATX 1 13 日本語 149 ASRock A55 Pro3 Motherboard - ASRock A55 Pro3 | Quick Installation Guide - Page 150
ATX 12V 8 ピン ATX12V1 2 を参照 4 8 1 5 CPU に Vcore ATX 12V 8-pin ATX 12V 4-pin ATX 12V 4-pin ATX Pin 1 と Pin 5 4 8 9 ピン COM1 29 を参照 4-Pin ATX 12V 1 5 この COM1 日本語 150 ASRock A55 Pro3 Motherboard - ASRock A55 Pro3 | Quick Installation Guide - Page 151
HDMI_SPDIF ヘッダ (2- ピン HDMI_SPDIF1 31 を参照 1 GND SPDIFOUT HDMI_SPDIF SPDIF HDMI VGA HDMI TV LCD HDMI VGA HDMI_SPDIF 日本語 151 ASRock A55 Pro3 Motherboard - ASRock A55 Pro3 | Quick Installation Guide - Page 152
2.BIOS 情報 BIOS POST F2 Del BIOS POST BIOS POST Ctrl〉+〈Alt〉+〈Delete BIOS BIOS CD PDF 3 CD 情報 Microsoft® Windows® 7 / 7 64-bit / VistaTM / VistaTM 64-bit / XP SP3 / XP 64-bit CD CD CDROM CD AUTORUN AUTORUN CD 内 の BIN ASSETUP.EXE 152 ASRock A55 Pro3 Motherboard 日本語 - ASRock A55 Pro3 | Quick Installation Guide - Page 153
www.asrock.com/support/index.asp 1.1 華擎 A55 Pro3 主板 (ATX 規格 : 12.0 英吋 X 8.6 英吋 , 30.5 厘米 X 21.8 厘米 ) 華擎 A55 Pro3 A55 Pro3 Serial ATA(SATA I/O 擋板 ASRock 為了在 Windows® 7 / 7 64-bit / VistaTM / VistaTM 64-bit BIOS中將Storage Configuration AHCI BIOS User Manual 153 ASRock A55 Pro3 Motherboard - ASRock A55 Pro3 | Quick Installation Guide - Page 154
1.2 LAN 功能 154 - ATX 規格 : 12.0 英吋 X 8.6 英吋 , 30.5 厘米 X 21.8 FM1 100W V4 + 1 AMD Cool 'n' Quiet UMI-Link GEN2 - AMD A55 FCH (Hudson-D2 DDR3 1 4 個 DDR3 DIMM DDR3 2400+( 超頻 )/1866/1600/1333/1066 /800 non-ECC、un-buffered 2 32GB 3) - 2 x PCI Express 2.0 x16 插槽 (PCIE2 @ x16 模式 ; PCIE3 - ASRock A55 Pro3 | Quick Installation Guide - Page 155
CPU 24 針 ATX 8 針 12V 3 x USB 2.0 6 USB 2.0 接口 ) - 32Mb AMI BIOS - AMI UEFI Legal BIOS,支持 GUI Plug and Play,PnP) - ACPI 1.1 jumperfree DRAM、VDDP、VDDR、SB AMD Live! Explorer, AMD Fusion, CyberLink MediaEspresso 6.5 CyberLink DVD Suite - OEM MAGIX OEM) 155 ASRock A55 Pro3 Motherboard 簡體中文 - ASRock A55 Pro3 | Quick Installation Guide - Page 156
- ASRock U-COP 14) - CPU - CPU - CPU - CPU 12V, +5V, +3.3V 操作系統 - Microsoft® Windows® 7/7 64 位元 /VistaTM/VistaTM 64 位元 / XP SP3/XP 64 認證 - FCC, CE, WHQL - 支持 ErP/EuP ErP/EuP 15) http://www.asrock.com BIOS 簡體中文 156 ASRock A55 Pro3 Motherboard - ASRock A55 Pro3 | Quick Installation Guide - Page 157
Instant Flash Flash ROM 的 BIOS BIOS MS-DOS 或 Windows B I O S F6> 鍵或在 B I O S F2 Instant Flash B I O S U B I O S U FAT32/64 9 i P h o n e / i P a d / i P o d touch APP Charger APP Charger iPhone 40%。華擎 APP Charger S1 S3 S4 S5 APP Charger 157 ASRock A55 Pro3 Motherboard 簡體中文 - ASRock A55 Pro3 | Quick Installation Guide - Page 158
.asrock.com/Feature/SmartView/index.asp 11、華擎 XFast USB USB 12、華擎 XFast LAN Youtube 13 M P3 P C P C A C P I S5 3.5m m 14 CPU C P U PC CPU 15、EuP, 全稱 Energy Using Product E u P 1.00W EuP EuP E u P I n t e l E u P 100m A 5V s b 50 E u P 158 ASRock A55 Pro3 Motherboard - ASRock A55 Pro3 | Quick Installation Guide - Page 159
1.3 3 1 和針腳 2 CMOS (CLRCMOS1, 3 2 頁第 30 項 ) 設定 默認設置 清除 CMOS 注意: C L R C M O S1 C M O S 15 C L R C M O S1 2 和插針 3 短接 5 B I O S C M O S B I O S C M O S C M O S C M O S 1394 GUID 和 MAC 簡體中文 159 ASRock A55 Pro3 Motherboard - ASRock A55 Pro3 | Quick Installation Guide - Page 160
2.0 (9 針 USB6_7) ( 見第 2 頁第 26 項 ) (9 針 USB8_9) ( 見第 2 頁第 25 項 ) (9 針 USB10_11) ( 見第 2 頁第 23 項 ) USB_PWR P-9 P+9 GND DUMMY 1 GND P+8 P-8 USB_PWR USB_PWR P-11 P+11 GND DUMMY 1 GND P+10 P-10 USB_PWR I/O USB 2.0 USB 2.0 USB 2.0 USB 2.0 接口。 簡體中文 160 ASRock A55 Pro3 Motherboard - ASRock A55 Pro3 | Quick Installation Guide - Page 161
( 見第 2 頁第 27 項 ) IRTX +5VSB DUMMY 1 GND IRRX 1 GND IRTX IRRX ATX+5VSB (9 針 HD_AUDIO1) ( 見第 2 頁第 32 項 ) GND PRESENCE# MIC_RET OUT_RET 1 VistaTM / VistaTM 64 統中 : 在 Realtek FrontMic"。調節"Recording Volume"。 (9 針 PANEL1) ( 見第 2 頁第 16 項 ) 簡體中文 161 ASRock A55 Pro3 Motherboard - ASRock A55 Pro3 | Quick Installation Guide - Page 162
PLED1) ( 見第 2 頁第 14 項 ) (4 針 CHA_FAN1) ( 見第 2 頁第 22 項 ) (3 針 CHA_FAN2) ( 見第 2 頁第 39 項 ) (3 針 CHA_FAN3) ( 見第 2 頁第 10 項 ) 1 PLEDPLED+ PLED+ LED S1 LED S3/S4 或 S5 LED FAN_SPEED_CONTROL GND +12V CHA_FAN_SPEED (3 針 PWR_FAN1) ( 見第 2 頁第 1 項 ) 簡體中文 162 ASRock A55 Pro3 Motherboard - ASRock A55 Pro3 | Quick Installation Guide - Page 163
20-pin ATX Pin 1 和 Pin 13 20-Pin ATX 1 13 ATX 12V 接頭 (8 針 ATX12V1) ( 見第 2 頁第 2 項 ) 4 8 1 5 ATX 12V 8-pin ATX 12V 4-pin ATX 12V 4-pin ATX 12V Pin 1 和 Pin 5 插上電 源接頭。 4 8 4-Pin ATX 12V 1 5 (9 針 COM1) ( 見第 2 頁第 29 項 ) 這個 COM1 簡體中文 163 ASRock A55 Pro3 Motherboard - ASRock A55 Pro3 | Quick Installation Guide - Page 164
HDMI_SPDIF 接頭 (2 針 HDMI_SPDIF1) ( 見第 2 頁第 31 項 ) 1 GND SPDIFOUT HDMI_SPDIF SPDIF HDMI HDMI HDMI 顯卡的 HDMI_SPDIF 簡體中文 164 ASRock A55 Pro3 Motherboard - ASRock A55 Pro3 | Quick Installation Guide - Page 165
2. BIOS 信息 Flash Memory 存儲了 BIOS POST F2> 或 < D e l B I O S P O S T P O S T B I O S Ctrl>++ - ASRock A55 Pro3 | Quick Installation Guide - Page 166
SJ/T 11364-2006 10 年。 圖一 部件名稱 鉛 (Pb) 鎘 (Cd) 汞 (Hg Cr(VI PBB PBDE) X O O O O O X O O O O O O SJ/T 11363-2006 X SJ/T 11363-2006 2002/95/EC 簡體中文 166 ASRock A55 Pro3 Motherboard - ASRock A55 Pro3 | Quick Installation Guide - Page 167
BIOS CPU http://www.asrock.com www.asrock.com/support/index.asp 1.1 華擎 A55 Pro3 主機板 (ATX 規格 : 12.0 英吋 x 8.6 英吋 , 30.5 公分 x 21.8 公分 ) 華擎 A55 Pro3 A55 Pro3 Serial ATA(SATA I/O 擋板 ASRock提醒您... 若要在Windows® 7 / 7 64位元 / VistaTM / VistaTM 64 BIOS選項設為AHCI BIOS 167 ASRock A55 Pro3 Motherboard - ASRock A55 Pro3 | Quick Installation Guide - Page 168
- 支援 HDMI, 可支援 Auto Lip Sync、Deep Color (12bpc)、 xvYCC 與 HBR HDMI 5 HDMI 1.4a 3D AMD Steady VideoTM HDMI HDCP 功能 - HDMI 1080p BD) / HD-DVD 光碟 - 7.1 Realtek ALC892 THX TruStudioTM - PCIE x1 Gigabit LAN 10/100/1000 Mb/s - Realtek RTL8111E Wake-On-LAN ASRock A55 Pro3 Motherboard 繁體中文 - ASRock A55 Pro3 | Quick Installation Guide - Page 169
CPU 24 針 ATX 8 針 12V 3 x USB 2.0 6 USB 2.0 接口 ) - 32Mb AMI BIOS - AMI UEFI Legal BIOS ( 支援 GUI Plug and Play,PnP) - ACPI 1.1 jumperfree DRAM、VDDP、VDDR、SB AMD Live! Explorer,AMD Fusion,CyberLink MediaEspresso 6.5 CyberLink DVD Suite - OEM MAGIX OEM) 169 ASRock A55 Pro3 Motherboard 繁體中文 - ASRock A55 Pro3 | Quick Installation Guide - Page 170
- ASRock U-COP 14) 硬體監控 - CPU - CPU - CPU - CPU 12V, +5V, +3.3V 操作系統 - Microsoft® Windows® 7/7 64 位元 /VistaTM/VistaTM 64 位元 / XP SP3/XP 64 位元 認證 - FCC, CE, WHQL - 支援 ErP/EuP ErP/EuP 15) http://www.asrock.com BIOS 繁體中文 170 ASRock A55 Pro3 Motherboard - ASRock A55 Pro3 | Quick Installation Guide - Page 171
www.asrock.com 8、 華擎 Instant Flash Flash ROM 的 BIOS BIOS MS-DOS 或 Windows BIOS F6 BIOS F2 Instant Flash B I O S B I O S FAT32/64 9 i P h o n e / i P a d / i P o d touch APP Charger APP Charger iPhone 40%。華擎 APP Charger S1 S3 S4 S5 APP Charger 171 ASRock A55 Pro3 Motherboard - ASRock A55 Pro3 | Quick Installation Guide - Page 172
.asrock.com/Feature/SmartView/ index.asp 11、華擎 XFast USB 可提升 USB 12、華擎 XFast LAN Youtube 13、華擎 On/Off Play PC 的 MP3 PC ACPI S5 3.5m m 14 C P U C P U PC CPU 15、EuP, 全稱 Energy Using Product EuP 1.00W EuP EuP EuP Intel EuP 100mA 5Vsb 50 EuP 172 ASRock A55 Pro3 Motherboard - ASRock A55 Pro3 | Quick Installation Guide - Page 173
1.3 3 1 和針腳 2 CMOS (CLRCMOS1, 3 2 頁第 30 項 ) 設定 默認設置 清除 CMOS 註: C L R C M O S1 C M O S 15 CLRCMOS1 的 pin2 及 pin3 短路 5 BIOS CMOS BIOS CMOS CMOS C M O S 1394 GUID 及 MAC 繁體中文 173 ASRock A55 Pro3 Motherboard - ASRock A55 Pro3 | Quick Installation Guide - Page 174
2.0 (9 針 USB6_7) ( 見第 2 頁第 26 項 ) (9 針 USB8_9) ( 見第 2 頁第 25 項 ) (9 針 USB10_11) ( 見第 2 頁第 23 項 ) USB_PWR P-9 P+9 GND DUMMY 1 GND P+8 P-8 USB_PWR USB_PWR P-11 P+11 GND DUMMY 1 GND P+10 P-10 USB_PWR I/O USB 2.0 USB 2.0 USB 2.0 USB 2.0 接口。 繁體中文 174 ASRock A55 Pro3 Motherboard - ASRock A55 Pro3 | Quick Installation Guide - Page 175
( 見第 2 頁第 27 項 ) IRTX +5VSB DUMMY 1 GND IRRX 1 GND IRTX IRRX ATX+5VSB (9 針 HD_AUDIO1) ( 見第 2 頁第 32 項 ) GND PRESENCE# MIC_RET OUT_RET 1 VistaTM / VistaTM 64 統中 : 在 Realtek FrontMic Recording Volume"。 (9 針 PANEL1) ( 見第 2 頁第 16 項 ) 繁體中文 175 ASRock A55 Pro3 Motherboard - ASRock A55 Pro3 | Quick Installation Guide - Page 176
針 PLED1) ( 見第 2 頁第 14 項 ) (4 針 CHA_FAN1) ( 見第 2 頁第 22 項 ) (3 針 CHA_FAN2) ( 見第 2 頁第 39 項 ) (3 針 CHA_FAN3) ( 見第 2 頁第 10 項 ) (3 針 PWR_FAN1) ( 見第 2 頁第 1 項 ) 1 PLEDPLED+ PLED+ LED S1 LED S3/S4 或 S5 LED FAN_SPEED_CONTROL GND +12V CHA_FAN_SPEED 繁體中文 176 ASRock A55 Pro3 Motherboard - ASRock A55 Pro3 | Quick Installation Guide - Page 177
1 13 24-pin ATX 12 24 20-pin ATX 20-pin ATX 著 Pin 1 和 Pin 13 20-Pin ATX 1 13 ATX 12V (8 針 ATX12V1) ( 見第 2 頁第 2 項 ) 4 8 1 5 ATX 12V 8-pin ATX 12V 4-pin ATX 12V 4-pin ATX 12V 4 8 順著 Pin 1 和 Pin 5 4-Pin ATX 12V 1 5 繁體中文 177 ASRock A55 Pro3 Motherboard - ASRock A55 Pro3 | Quick Installation Guide - Page 178
序列埠 (9 針 COM1) ( 見第 2 頁第 29 項 ) HDMI_SPDIF 接頭 (2 針 HDMI_SPDIF1) ( 見第 2 頁第 31 項 ) COM1 1 GND SPDIFOUT HDMI_SPDIF SPDIF H D M I HDMI HDMI HDMI_SPDIF 繁體中文 178 ASRock A55 Pro3 Motherboard - ASRock A55 Pro3 | Quick Installation Guide - Page 179
2. BIOS 訊息 Flash Memory BIOS POST F2> 或 + + - ASRock A55 Pro3 | Quick Installation Guide - Page 180
ASRock http://www.asrock.com 1.1 Isi Paket Papan Induk A55 Pro3 ASRock (Faktor Form ATX: 12.0-in x 8.6-in, 30.5 cm x 21.8 cm) Pemimpin Instalasi Cepat A55 Pro3 ASRock Support CD A55 Pro3 ASRock 2 x Kabel satu serial Data ATA (SATA) (bebas-pilih) 1 x Satu Pelindung I/O 180 ASRock A55 Pro3 Motherboard - ASRock A55 Pro3 | Quick Installation Guide - Page 181
CPU Grup Chip Ingatan Alur Ekspansi Diagram Audio - Faktor Form ATX: 12.0-in x 8.6-in, 30.5 cm x 21.8 cm - Desain All Solid Capacitor - Menggunakan Stopkontak FM1 100W processor - V4 + 1 Power Phase Design - Dapat digunakan AM's Cool 'n' QuietTM Technology - UMI-Link GEN2 - AMD A55 FCH (Hudson-D2 - ASRock A55 Pro3 | Quick Installation Guide - Page 182
pin ATX - Penghubung power 8 pin 12V - Penghubung audio panel dapan - 3 x USB 2.0 header (menggunakan 6 port USB 2.0) - 32Mb AMI Legal BIOS - AMI UEFI Legal BIOS dengan dukungan GUI - Menggunakan "Plug and Play" - ACPI 1.1 Compliance Wake Up Events Bahasa Indonesia 182 ASRock A55 Pro3 Motherboard - ASRock A55 Pro3 | Quick Installation Guide - Page 183
susunan BIOS, penggunaan Untied Overclocking Technology, atau pemakaian perlengkapan overclocking lain. Overclocking barangkali mengganggu stabilitas sistem Anda, atau menimbulkan kerusakan terhadap komponen dan alat sistem Anda. Anda seharusnya. Bahasa Indonesia 183 ASRock A55 Pro3 Motherboard - ASRock A55 Pro3 | Quick Installation Guide - Page 184
Installing OS on a HDD Larger Than 2TB in AHCI Mode This motherboard is adopting UEFI BIOS that allows Windows® OS to be installed on a large size HDD > to launch boot menu at system POST and choose the item "UEFI:xxx" to boot. 4. Start Windows® installation. 184 ASRock A55 Pro3 Motherboard English - ASRock A55 Pro3 | Quick Installation Guide - Page 185
Than 2TB in RAID Mode This motherboard is adopting UEFI BIOS that allows Windows® OS to be Manual. Choose UEFI : Built - in EFI Shell. 5. Key in drvcfg, for example you will see below: Drv[4E] Ctrl[B5] Lang[eng] 6. Key in dh [Drv number], for example: key in dh 4E. 185 ASRock A55 Pro3 Motherboard - ASRock A55 Pro3 | Quick Installation Guide - Page 186
to set up Raid Drive. 9. Choose Logical Drive Create Menu to create a Raid Drive. 10. Choose Usable Physical Drive List to select Raid HDD. 186 ASRock A55 Pro3 Motherboard English - ASRock A55 Pro3 | Quick Installation Guide - Page 187
. After set up Raid size, please click Start to Create. 14. Press to exit Utility. 15. During reboot, please press to enter Boot Manual. Choose UEFI: SCSI CD/DVD Drive. * This option only shows on Windows® 7 64-bit and VistaTM 64-bit OS. 187 ASRock A55 Pro3 Motherboard English - ASRock A55 Pro3 | Quick Installation Guide - Page 188
problem. Below steps are Microsoft® suggested solution: A. Disable System Restore. a. Type "systempropertiesprotection" in the Start Menu. Then press "Enter". b. De-select Local Disks for System Restore. Then Click "Turn System Restore Off" to confirm. Then Press "Ok". 188 ASRock A55 Pro3 Motherboard - ASRock A55 Pro3 | Quick Installation Guide - Page 189
B. Disable "Volume Shadow Copy" service. a. Type "computer management" in the Start Menu, then press "Enter". b. Go to "Services and Applications>Services"; Then double click "Volume Shadow Copy". c. Set "Startup type" to "Disable" then Click "OK". 189 ASRock A55 Pro3 Motherboard English - ASRock A55 Pro3 | Quick Installation Guide - Page 190
please start to install motherboard drivers and utilities. Windows® 7 64-bit: A. Please request the hotfix KB2505454 thru this link: http://support.microsoft.com/kb/2505454/ by itself. E. Please start to install motherboard drivers and utilities. 17. Finish. 190 ASRock A55 Pro3 Motherboard English
-
 1
1 -
 2
2 -
 3
3 -
 4
4 -
 5
5 -
 6
6 -
 7
7 -
8
-
9
-
10
-
11
-
12
-
13
-
14
-
15
-
16
-
17
-
18
-
19
-
20
-
21
-
22
-
23
-
24
-
25
-
26
-
27
-
28
-
29
-
30
-
31
-
32
-
33
-
34
-
35
-
36
-
37
-
38
-
39
-
40
-
41
-
42
-
43
-
44
-
45
-
46
-
47
-
48
-
49
-
50
-
51
-
52
-
53
-
54
-
55
-
56
-
57
-
58
-
59
-
60
-
61
-
62
-
63
-
64
-
65
-
66
-
67
-
68
-
69
-
70
-
71
-
72
-
73
-
74
-
75
-
76
-
77
-
78
-
79
-
80
-
81
-
82
-
83
-
84
-
85
-
86
-
87
-
88
-
89
-
90
-
91
-
92
-
93
-
94
-
95
-
96
-
97
-
98
-
99
-
100
-
101
-
102
-
103
-
104
-
105
-
106
-
107
-
108
-
109
-
110
-
111
-
112
-
113
-
114
-
115
-
116
-
117
-
118
-
119
-
120
-
121
-
122
-
123
-
124
-
125
-
126
-
127
-
128
-
129
-
130
-
131
-
132
-
133
-
134
-
135
-
136
-
137
-
138
-
139
-
140
-
141
-
142
-
143
-
144
-
145
-
146
-
147
-
148
-
149
-
150
-
151
-
152
-
153
-
154
-
155
-
156
-
157
-
158
-
159
-
160
-
161
-
162
-
163
-
164
-
165
-
166
-
167
-
168
-
169
-
170
-
171
-
172
-
173
-
174
-
175
-
176
-
177
-
178
-
179
-
180
-
181
-
182
-
183
-
184
-
185
-
186
-
187
-
188
-
189
-
190
 |
 |

1
ASRock
A55 Pro3
Motherboard
English
Copyright Notice:
No part of this installation guide may be reproduced, transcribed, transmitted, or trans-
lated in any language, in any form or by any means, except duplication of documentation
by the purchaser for backup purpose, without written consent of ASRock Inc.
Products and corporate names appearing in this guide may or may not be registered
trademarks or copyrights of their respective companies, and are used only for identi
fi
ca-
tion or explanation and to the owners’ bene
fi
t, without intent to infringe.
Disclaimer:
Speci
fi
cations and information contained in this guide are furnished for informational use
only and subject to change without notice, and should not be constructed as a commit-
ment by ASRock. ASRock assumes no responsibility for any errors or omissions that may
appear in this guide.
With respect to the contents of this guide, ASRock does not provide warranty of any kind,
either expressed or implied, including but not limited to the implied warranties or condi-
tions of merchantability or
fi
tness for a particular purpose. In no event shall ASRock, its
directors, of
fi
cers, employees, or agents be liable for any indirect, special, incidental, or
consequential damages (including damages for loss of pro
fi
ts, loss of business, loss of
data, interruption of business and the like), even if ASRock has been advised of the pos-
sibility of such damages arising from any defect or error in the guide or product.
This device complies with Part 15 of the FCC Rules. Operation is subject to the following
two conditions:
(1) this device may not cause harmful interference, and
(2) this device must accept any interference received, including interference that
may cause undesired operation.
CALIFORNIA, USA ONLY
The Lithium battery adopted on this motherboard contains Perchlorate, a toxic substance
controlled in Perchlorate Best Management Practices (BMP) regulations passed by the
California Legislature. When you discard the Lithium battery in California, USA, please
follow the related regulations in advance.
“Perchlorate Material-special handling may apply, see
www.dtsc.ca.gov/hazardouswaste/perchlorate”
ASRock Website: http://www.asrock.com
Published August 2011
Copyright
©
2011 ASRock INC. All rights reserved.