ASRock A75M-HVS Quick Installation Guide
ASRock A75M-HVS Manual
 |
View all ASRock A75M-HVS manuals
Add to My Manuals
Save this manual to your list of manuals |
ASRock A75M-HVS manual content summary:
- ASRock A75M-HVS | Quick Installation Guide - Page 1
for backup purpose, without written consent of ASRock Inc. Products and corporate names appearing in this guide may or may not be registered trademarks or " ASRock Website: http://www.asrock.com Published June 2011 Copyright©2011 ASRock INC. All rights reserved. 1 ASRock A75M-HVS Motherboard English - ASRock A75M-HVS | Quick Installation Guide - Page 2
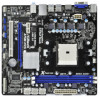
HDMI 1.4a SOCKET FM1 HDMI1 DX11 30 29 28 27 26 Top: LINE IN Center: FRONT Bottom: MIC IN USB 3.0 T: USB2 B: USB3 USB 3.0 T: USB4 B: USB5 USB 2.0 T: USB0 B: USB1 LAN AUDIO CODEC RJ-45 LAN RoHS Dual Graphics ErP/EuP Ready SATA3 6Gb/s USB 3.0 PWR_FAN1 32Mb BIOS PCIE1 A75M-HVS PCIE2 AMD - ASRock A75M-HVS | Quick Installation Guide - Page 3
Audio Deck" tool on your system. Please follow below instructions according to the OS you install. For Windows® XP / XP 64-bit OS: Please click "VIA HD Audio to install the USB Keyboard/Mouse cable to USB 2.0 ports (USB01) instead of USB 3.0 ports. English 3 ASRock A75M-HVS Motherboard - ASRock A75M-HVS | Quick Installation Guide - Page 4
Shield ASRock Reminds You... To get better performance in Windows® 7 / 7 64-bit / VistaTM / VistaTM 64bit, it is recommended to set the BIOS option in Storage Configuration to AHCI mode. For the BIOS setup, please refer to the "User Manual" in our support CD for details. 4 ASRock A75M-HVS Motherboard - ASRock A75M-HVS | Quick Installation Guide - Page 5
video - Supports HDCP function with HDMI port - Supports Full HD 1080p Blu-ray (BD) / HD-DVD playback with HDMI port - 5.1 CH HD Audio (VIA® VT1705 Audio Codec) - Supports THX TruStudioTM - PCIE x1 Gigabit LAN 10/100/1000 Mb/s - Realtek RTL8111E - Supports Wake-On-LAN 5 ASRock A75M-HVS Motherboard - ASRock A75M-HVS | Quick Installation Guide - Page 6
Suite (CyberLink DVD Suite - OEM and Trial) - ASRock Extreme Tuning Utility (AXTU) (see CAUTION 6) - ASRock Instant Boot - ASRock Instant Flash (see CAUTION 7) - ASRock APP Charger (see CAUTION 8) - ASRock SmartView (see CAUTION 9) - ASRock XFast USB (see CAUTION 10) ASRock A75M-HVS Motherboard - ASRock A75M-HVS | Quick Installation Guide - Page 7
third-party overclocking tools. Overclocking may affect your system stability, or even cause damage to the components and devices of your system. It should be done at your own risk and expense. We are not responsible for possible damage caused by overclocking. English 7 ASRock A75M-HVS Motherboard - ASRock A75M-HVS | Quick Installation Guide - Page 8
to your USB flash drive, floppy disk or hard drive, then you can update your BIOS only in a few clicks without preparing an additional floppy diskette or other complicated flash utility. Please be noted that the USB flash drive or hard drive must use FAT32/16/12 file system. 8 ASRock A75M-HVS Motherboard - ASRock A75M-HVS | Quick Installation Guide - Page 9
is Windows® 7 / 7 64 bit / VistaTM / VistaTM 64 bit, and your browser version is IE8. ASRock website: http://www.asrock.com/Feature/SmartView/index.asp 10. ASRock XFast USB can boost USB storage you checking with the power supply manufacturer for more details. 9 ASRock A75M-HVS Motherboard English - ASRock A75M-HVS | Quick Installation Guide - Page 10
wall socket before touching any component. 2. To avoid damaging the motherboard components due to static electricity, NEVER place your motherboard the motherboard to the chassis, please do not over-tighten the screws! Doing so may damage the motherboard. 10 ASRock A75M-HVS Motherboard English - ASRock A75M-HVS | Quick Installation Guide - Page 11
the heatsink are securely fastened and in good contact with each other. Then connect the CPU fan to the CPU FAN connector (CPU_FAN1, see Page 2, No. 4). For proper installation, please kindly refer to the instruction manuals of the CPU fan and the heatsink. English 11 ASRock A75M-HVS Motherboard - ASRock A75M-HVS | Quick Installation Guide - Page 12
cause permanent damage to the motherboard and the DIMM if you force the DIMM into the slot at incorrect orientation. Step 3. Firmly insert the DIMM into the slot until the retaining clips at both ends fully snap back in place and the DIMM is properly seated. 12 ASRock A75M-HVS Motherboard English - ASRock A75M-HVS | Quick Installation Guide - Page 13
(PCIE x1 slot; White) is used for PCI Express cards with x1 lane width cards, such as Gigabit LAN card and SATA2 card. PCIE2 (PCIE x16 slot; Blue) is used for PCI Express x16 lane width graphics to the chassis with screws. Step 6. Replace the system cover. 13 ASRock A75M-HVS Motherboard English - ASRock A75M-HVS | Quick Installation Guide - Page 14
HD 65XX/64XX graphics processor and a motherboard based on an AMD A75 FCH (Hudson-D3) integrated chipset, all operating in a Windows® 7 environment. Please refer to below PCI Express graphics card support list for AMD Dual Graphics. For the future update of more compatible PCI Express graphics cards - ASRock A75M-HVS | Quick Installation Guide - Page 15
trademark of AMD Technologies Inc., and is used only for identification or explanation and to the owners' benefit, without intent to infringe. * For further information of AMD Dual Graphics technology, please check AMD website for up dates and details. 15 ASRock A75M-HVS Motherboard English - ASRock A75M-HVS | Quick Installation Guide - Page 16
our support CD to your system already, you can freely enjoy the benefits of dual monitor function after your system boots. If you haven't installed onboard VGA driver yet, please install onboard VGA driver from our support CD to your system and restart your computer. 16 ASRock A75M-HVS Motherboard - ASRock A75M-HVS | Quick Installation Guide - Page 17
select "Attached", if necessary. F. Set the "Screen Resolution" and "Color Quality" as appropriate for the second monitor. Click "Apply" or "OK" to apply these new values. G. Repeat steps C through E for the diaplay icon identified by the number one to four. 17 ASRock A75M-HVS Motherboard English - ASRock A75M-HVS | Quick Installation Guide - Page 18
a secure connection to a compliant display. Due to the increase in manufacturers employing HDCP in their equipment, it is highly recommended that the HDTV or LCD monitor you purchase is compatible. 18 ASRock A75M-HVS Motherboard English - ASRock A75M-HVS | Quick Installation Guide - Page 19
The Multi-Angle CIR Receiver does not support Hot-Plug function. Please install it before you boot the system. * ASRock Smart Remote is only supported by some of ASRock motherboards. Please refer to ASRock website for the motherboard support list: http://www.asrock.com 19 ASRock A75M-HVS Motherboard - ASRock A75M-HVS | Quick Installation Guide - Page 20
updating the BIOS, you must boot up the system first, and then shut it down before you do the clear-CMOS action. Please be noted that the password, date, time, user default profile, 1394 GUID and MAC address will be cleared only if the CMOS battery is removed. English 20 ASRock A75M-HVS Motherboard - ASRock A75M-HVS | Quick Installation Guide - Page 21
P-9 P+9 GND DUMMY Besides two default USB 2.0 ports on the I/O panel, there are three USB 2.0 headers on this motherboard. Each USB 2.0 header can support two USB 2.0 ports. 1 GND P+8 P-8 USB_PWR USB_PWR P-11 P+11 GND DUMMY 1 GND P+10 P-10 USB_PWR 21 ASRock A75M-HVS Motherboard English - ASRock A75M-HVS | Quick Installation Guide - Page 22
panel. You may configure the way to turn off your system using the power switch. RESET (Reset Switch): Connect to the reset switch on the chassis front panel. Press the reset switch to restart the computer if the computer freezes and fails to perform a normal restart. 22 ASRock A75M-HVS Motherboard - ASRock A75M-HVS | Quick Installation Guide - Page 23
reset switch CPU fan to the CPU fan connector on this motherboard, please connect it to Pin 1-3. Pin 1-3 Connected 3-Pin Fan Installation ATX Power Connector (24-pin ATXPWR1) (see p.2 No. 6) 12 24 Please connect an ATX power supply to this connector. English 1 13 23 ASRock A75M-HVS Motherboard - ASRock A75M-HVS | Quick Installation Guide - Page 24
5 1 8 4 Please connect an ATX 12V power supply to this connector. Though this motherboard provides 8-pin ATX 12V power connector, it can still work if you adopt a traditional 4- pin COM1) (see p.2 No.16) This COM1 header supports a serial port module. English 24 ASRock A75M-HVS Motherboard - ASRock A75M-HVS | Quick Installation Guide - Page 25
. Using SATA3 HDDs without NCQ and Hot Plug functions (IDE mode) STEP 1: Set up UEFI. A. Enter UEFI SETUP UTILITY Advanced screen Storage Configuration. B. Set the "SATA Mode" option to [IDE]. STEP 2: Install Windows® XP / XP 64-bit OS on your system. English 25 ASRock A75M-HVS Motherboard - ASRock A75M-HVS | Quick Installation Guide - Page 26
functions (AHCI mode) STEP 1: Set up UEFI. A. Enter UEFI SETUP UTILITY Advanced screen Storage Configuration. B. Set the "SATA Mode" option to [AHCI]. STEP 2: Install Windows® 7 / 7 64-bit / VistaTM / VistaTM 64-bit OS on your system. English 26 ASRock A75M-HVS Motherboard - ASRock A75M-HVS | Quick Installation Guide - Page 27
User Manual (PDF file) contained in the Support CD. 4. Software Support CD information This motherboard supports various Microsoft® Windows® operating systems: 7 / 7 64-bit / VistaTM / VistaTM 64-bit / XP SP3 / XP 64-bit. The Support CD that came with the motherboard contains necessary drivers and - ASRock A75M-HVS | Quick Installation Guide - Page 28
ASRock A75M-HVS Motherboard (Micro ATX-Formfaktor: 22.6 cm x 21.6 cm; 8.9 Zoll x 8.5 Zoll) ASRock A75M-HVS Schnellinstallationsanleitung ASRock A75M-HVS Support-CD Zwei Serial ATA (SATA) -Datenkabel (optional) Ein I/O Shield ASRock erinnert... Zur besseren Leistung unter Windows® 7 / 7, 64 - ASRock A75M-HVS | Quick Installation Guide - Page 29
für automatische Reduzierung von Bildschwankungen bei Heim-/Online-Videos - Unterstützt HDCP-Funktion mit HDMI-Port - Unterstutzt 1080p Blu-ray (BD) / HD-DVD-Wiedergabe mit HDMI-Port - 5.1 CH HD Audio (VIA® VT1705 Audio Codec) - Unterstützt THX TruStudioTM 29 ASRock A75M-HVS Motherboard Deutsch - ASRock A75M-HVS | Quick Installation Guide - Page 30
2.0-Anschlüsse (Unterstützung 6 zusätzlicher USB 2.0-Anschlüsse) - 32Mb AMIs Legal BIOS UEFI mit GUI-Unterstützung - Unterstützung für "Plug and Play" - ACPI 1.1-Weckfunktionen - JumperFree-Modus - SMBIOS 2.3.1 - DRAM, VDDP, SB Stromspannung Multianpassung Deutsch 30 ASRock A75M-HVS Motherboard - ASRock A75M-HVS | Quick Installation Guide - Page 31
äte Ihres Systems beschädigen. Es geschieht dann auf eigene Gefahr und auf Ihre Kosten. Wir übernehmen keine Verantwortung für mögliche Schäden, die aufgrund von Overclocking verursacht wurden. Deutsch 31 ASRock A75M-HVS Motherboard - ASRock A75M-HVS | Quick Installation Guide - Page 32
BIOS mit nur wenigen Klickvorgängen ohne Bereitstellung einer zusätzlichen Diskette oder eines anderen komplizierten Flash-Programms aktualisieren. Achten Sie darauf, dass das USB-Flash-Laufwerk oder die Festplatte das Dateisystem FAT32/16/12 benutzen muss. 32 ASRock A75M-HVS Motherboard Deutsch - ASRock A75M-HVS | Quick Installation Guide - Page 33
üfen Sie bitte, ob der CPU-Lüfter am Motherboard richtig funktioniert, und stecken Sie bitte den Stromkabelstecker aus und dann wieder ein. Um die Wärmeableitung zu verbessern, bitte nicht vergessen, etwas Wärmeleitpaste zwischen CPU und Kühlkörper zu sprühen. 33 ASRock A75M-HVS Motherboard Deutsch - ASRock A75M-HVS | Quick Installation Guide - Page 34
ausgeschaltet sind. Um dem EuP-Standard zu entsprechen, sind ein EuP-fähiges Motherboard und eine EuP-fähige Stromversorgung erforderlich. Gemäß einer Empfehlung von Intel muss eine wir Ihnen, weitere Details beim Hersteller der Stromversorgung abzufragen. 34 ASRock A75M-HVS Motherboard Deutsch - ASRock A75M-HVS | Quick Installation Guide - Page 35
Unterlage, oder zurück in die Tüte, mit der die Komponente geliefert wurde. 5. Wenn Sie das Motherboard mit den Schrauben an dem Computergehäuse befestigen, überziehen Sie bitte die Schrauben nicht! Das Motherboard kann sonst beschädigt werden. Deutsch 35 ASRock A75M-HVS Motherboard - ASRock A75M-HVS | Quick Installation Guide - Page 36
befestigt sind und einen guten Kontakt zueinander haben. Verbinden Sie dann den CPU-Lüfter mit dem CPU-LÜFTER-Anschluss (CPU_FAN1, siehe Seite 2, Nr. 4). Beziehen Sie sich für eine richtige Installation auf die Handbücher des CPU-Lüfters und des Kühlkörpers. Deutsch 36 ASRock A75M-HVS Motherboard - ASRock A75M-HVS | Quick Installation Guide - Page 37
2.3 Installation der Speichermodule (DIMM) Das A75M-HVS Motherboard bietet zwei 240polige DDR3 (Double Data Rate 3) DIMM-Steckplätze und unterstützt Zweikanal-Speichertechnologie. Es müssen Enden des Moduls einschnappen und das DIMM-Modul fest an Ort und Stelle sitzt. 37 ASRock A75M-HVS Motherboard - ASRock A75M-HVS | Quick Installation Guide - Page 38
zu sorgen. Derzeit wird AMD duale Grafikkarten-Technologie nur vom Betriebssystem Windows® 7 unterstützt und ist für das Betriebssystem Windows® VistaTM / XP nicht verfügbar. Detaillierte Bedienschritte und kompatible PCI Express-Grafikkarten sind auf Seite 14. 38 ASRock A75M-HVS Motherboard Deutsch - ASRock A75M-HVS | Quick Installation Guide - Page 39
Installieren Sie den Mehrwinkel-CIREmpfänger am vorderen USB-Port. Falls der Mehrwinkel-CIR-Empfänger die ASRock Smart Remote wird nur von einigen ASRock-Motherboards unterstützt. Eine Liste dieser Motherboards finden Sie auf der ASRock-Webseite: http://www.asrock.com 39 ASRock A75M-HVS Motherboard - ASRock A75M-HVS | Quick Installation Guide - Page 40
müssen, fahren Sie zuerst das System hoch. Fahren Sie es dann vor der CMOS-Löschung herunter. Bitte beachten Sie, dass Kennwort, Datum, Uhrzeit, benutzerdefiniertes Profil, 1394 GUID und MAC-Adresse nur gelöscht werden, wenn die CMOS-Batterie entfernt wird. Deutsch 40 ASRock A75M-HVS Motherboard - ASRock A75M-HVS | Quick Installation Guide - Page 41
ßen können. USB 2.0-Header (9-pol. USB6_7) (siehe S.2 - No. 21) Zusätzlich zu den zwei üblichen USB 2.0-Ports an den I/O-Anschlüssen befinden sich drei USB 2.0Anschlussleisten am Motherboard. Pro USB 2.0Anschlussleiste werden zwei USB 2.0-Ports unterstützt. Deutsch 41 ASRock A75M-HVS Motherboard - ASRock A75M-HVS | Quick Installation Guide - Page 42
, ermöglicht Ihnen eine bequeme Anschlussmöglichkeit und Kontrolle über Audio-Geräte. 1. High Definition Audio unterstützt Jack Sensing (automatische Erkennung falsch angeschlossener Geräte), üsse müssen nicht an die AC'97-Audioleiste angeschlossen werden. Deutsch 42 ASRock A75M-HVS Motherboard - ASRock A75M-HVS | Quick Installation Guide - Page 43
Dieser Header unterstützt mehrere Funktion der Systemvorderseite. Schließen Sie die Ein-/Austaste, die Reset-Taste und die Systemstatusanzeige am Gehäuse an diesen Header an; befolgen Sie dabei die ) Schließen Sie den Gehäuselautsprecher an diesen Header an. Deutsch 43 ASRock A75M-HVS Motherboard - ASRock A75M-HVS | Quick Installation Guide - Page 44
werden; auch ohne Geschwindigkeitsregulierung. Wenn Sie einen dreipoligen CPU-Lüfter an den CPU-Lüferanschluss dieses Motherboards anschließen möchten, verbinden Sie ihn bitte 1 8 4 Bitte schließen Sie an diesen Anschluss die ATX 12V Stromversorgung an. Deutsch 44 ASRock A75M-HVS Motherboard - ASRock A75M-HVS | Quick Installation Guide - Page 45
ATX 12V Energieversorgung COM-Anschluss-Header (9-pin COM1) (siehe S.2 - No. 16) 8 4 Dieser COM-AnschlussHeader wird verwendet, um ein COM-Anschlussmodul zu unterstützen. Deutsch 45 ASRock A75M-HVS Motherboard - ASRock A75M-HVS | Quick Installation Guide - Page 46
Guide 2.11 Windows® 7 / 7 64-Bit / VistaTM / VistaTM 64-Bit / XP / XP 64-Bit ohne RAID-Funktionalität installieren Wenn Sie Windows® 7 / 7 64-Bit / VistaTM / VistaTM 64-Bit / XP / XP 64 ]. SCHRITT 2: Installieren Sie Windows® XP / XP 64-Bit in Ihrem System. Deutsch 46 ASRock A75M-HVS Motherboard - ASRock A75M-HVS | Quick Installation Guide - Page 47
figurieren Sie UEFI. A. Rufen Sie im UEFI-DIENSTPROGRAMM den Bildschirm → „Erweitert" und → „Storage-Konfiguration" auf. B. Stellen Sie "SATA Mode" auf [AHCI]. SCHRITT 2: Installieren Sie Windows® 7 / 7 64-Bit / VistaTM / VistaTM 64-Bit in Ihrem System. Deutsch 47 ASRock A75M-HVS Motherboard - ASRock A75M-HVS | Quick Installation Guide - Page 48
der Support-CD, um die Menüs aufzurufen. Das Setup-Programm soll es Ihnen so leicht wie möglich machen. Es ist menügesteuert, d.h. Sie können in den verschiedenen Untermenüs Ihre Auswahl treffen und die Programme werden dann automatisch installiert. 48 ASRock A75M-HVS Motherboard Deutsch - ASRock A75M-HVS | Quick Installation Guide - Page 49
performances sous Windows® 7 / 7 64 bits / VistaTM / VistaTM 64 bits, il est recommandé de paramétrer l'option BIOS dans Configuration de stockage en mode AHCI. Pour plus de détails sur l'installation BIOS, référez-vous au "Mode d'emploi" sur votre CD de support. 49 ASRock A75M-HVS Motherboard Fran - ASRock A75M-HVS | Quick Installation Guide - Page 50
AMD Steady VideoTM: Nouvelle fonctionnalité de traitement post-vidéo pour réduction automatique des tremblements dans les clips vidéo en ligne/maison - Prise en charge de la fonction HDCP avec port HDMI - Supporter 1080p Blu-ray(BD)/ lecteur de HD-DVD avec port HDMI ASRock A75M-HVS Motherboard - ASRock A75M-HVS | Quick Installation Guide - Page 51
Connecteur audio panneau avant - 3 x En-tête USB 2.0 (prendre en charge 6 ports USB 2.0 supplémentaires) - 32Mb AMI UEFI Legal BIOS avec support GUI - Support du "Plug and Play" - Compatible pour événements de réveil ACPI 1.1 - Gestion jumperless - Support SMBIOS 2.3.1 51 ASRock A75M-HVS Motherboard - ASRock A75M-HVS | Quick Installation Guide - Page 52
ventilateur CPU/boîtier à plusieurs vitesses - Monitoring de la tension: +12V, +5V, +3.3V, Vcore OS - Microsoft® Windows® 7 / 7 64-bit / VistaTM / VistaTM 64-bit / XP SP3 / XP 64-bit pas responsables des dommages possibles causés par l'overclocking. Français 52 ASRock A75M-HVS Motherboard - ASRock A75M-HVS | Quick Installation Guide - Page 53
du CPU ne sont pas utilisées, sans diminuer les performances de l'ordinateur. Veuillez visiter notre site Web pour plus d'informations sur l'utilisation des fonctions de l'utilitaire ASRock Extreme Tuning Utility (AXTU). Site Web de ASRock : http://www.asrock.com 53 ASRock A75M-HVS Motherboard Fran - ASRock A75M-HVS | Quick Installation Guide - Page 54
Windows®. Com este utilitário, poderá premir a tecla durante o teste de arranque POST ou premir a tecla para exibir o menu de configuração do BIOS para aceder ao ASRock de la pâte thermique entre le CPU le dissipateur lors de l'installation du PC. 54 ASRock A75M-HVS Motherboard Français - ASRock A75M-HVS | Quick Installation Guide - Page 55
de courant. Pour choisir une alimentation électrique conforme à la norme EuP, nous vous recommandons de consulter votre fournisseur de courant pour plus de détails. 55 ASRock A75M-HVS Motherboard Français - ASRock A75M-HVS | Quick Installation Guide - Page 56
de composant, placez-le sur un support antistatique ou dans son sachet d'origine. 5. Lorsque vous placez les vis dans les orifices pour vis pour fixer la carte mère sur le châssis, ne serrez pas trop les vis ! Vous risquez sinon d'endommager la carte mère. 56 ASRock A75M-HVS Motherboard Français - ASRock A75M-HVS | Quick Installation Guide - Page 57
l'un avec l'autre. Ensuite, connectez le ventilateur du CPU à la prise du VENTILATEUR DU CPU (CPU_FAN1, reportezvous en page 2, No. 4). Pour une bonne installation, veuillez vous référer aux manuels d'instruction sur le ventilateur du CPU et le dissipateur. Français 57 ASRock A75M-HVS Motherboard - ASRock A75M-HVS | Quick Installation Guide - Page 58
de mémoire non identiques, le système ne sera pas en mesure d'activer la technologie Dual Channel Memory. Installation d'un module DIMM Ayez bien le soin de débrancher l'alimentation avant d'ajouter ou complètement et que le module DIMM soit inséré correctement. 58 ASRock A75M-HVS Motherboard - ASRock A75M-HVS | Quick Installation Guide - Page 59
AMD Dual Graphics n'est prise en charge que par l'OS Windows® 7, et n'est pas disponible avec l'OS Windows® VistaTM / XP. Pour la procédure de fonctionnement détaillée et la liste des cartes graphiques PCI Express compatibles, veuillez vous référer à la page 14. 59 ASRock A75M-HVS Motherboard - ASRock A75M-HVS | Quick Installation Guide - Page 60
en charge. Veuillez l'installer avant de démarrer le système. * La télécommande ASRock n'est prise en charge que par certaines cartes mères of ASRock. Pour la liste des cartes mères prises en charge, veuillez vous reporter au site web ASRock : 60 http://www.asrock.com ASRock A75M-HVS Motherboard - ASRock A75M-HVS | Quick Installation Guide - Page 61
ème, puis l'éteindre avant de continuer avec l'opération d'effacement du CMOS. Veuillez noter que le mot de passe, la date, l'heure, le profil par défaut de l'utilisateur, 1394 GUID et l'adresse MAC seront effacés seulement si la batterie du CMOS est enlevée. Français 61 ASRock A75M-HVS Motherboard - ASRock A75M-HVS | Quick Installation Guide - Page 62
de périphériques d'impression. En-tête USB 2.0 (USB6_7 br.9) (voir p.2 No. 21) A côté des deux ports USB 2.0 par défaut sur le panneau E/S, il y a trois embases USB 2.0 sur cette carte mère. Chaque embase USB 2.0 peut prendre en charge 2 ports USB 2.0. Français 62 ASRock A75M-HVS Motherboard - ASRock A75M-HVS | Quick Installation Guide - Page 63
te supporte un instructions dans notre manuel et le manuel de châssis afin installer votre système. 2. Si vous utilisez le panneau audio AC'97, installez-le sur l'adaptateur audio audio HD. Vous n'avez pas besoin de les connecter pour le panneau audio AC'97. Français 63 ASRock A75M-HVS Motherboard - ASRock A75M-HVS | Quick Installation Guide - Page 64
figurer la façon de mettre votre système hors tension avec l'interrupteur d'alimentation. RESET (Interrupteur de réinitialisation): Connectez ici le connecteur de réinitialisation sur le panneau avant du connecter le haut-parleur de châssis sur cet en-tête. Français 64 ASRock A75M-HVS Motherboard - ASRock A75M-HVS | Quick Installation Guide - Page 65
de terre. Bien que cette carte mère offre un support de (Ventilateur silencieux ventilateur de CPU à 4 broches , le ventilateur de CPU à 3 broches peut bien fonctionner même sans la connecter une unité d'alimentation électrique ATX 12V sur ce connecteur. Français 65 ASRock A75M-HVS Motherboard - ASRock A75M-HVS | Quick Installation Guide - Page 66
) 4-Installation d'alimentation à 4 broches ATX 12V 8 4 Cette en-tête de port COM est utilisée pour prendre en charge un module de port COM. Français 66 ASRock A75M-HVS Motherboard - ASRock A75M-HVS | Quick Installation Guide - Page 67
figurez le UEFI. A. Entrez dans UTILITAIRE DE CONFIGURATION UEFI → écran Avancé → Configuration Storage. B. Réglez «SATA Mode « sur [IDE]. ETAPE 2: Installer le système d'exploitation Windows® XP / XP 64-bit sur votre système. 67 ASRock A75M-HVS Motherboard Français - ASRock A75M-HVS | Quick Installation Guide - Page 68
figurez le UEFI. A. Entrez dans UTILITAIRE DE CONFIGURATION UEFI → écran Avancé → Configuration Storage. B. Réglez «SATA Mode « sur [AHCI]. ETAPE 2: Installer le système d'exploitation Windows® 7 / 7 64-bit / VistaTM / VistaTM 64-bit sur votre système. 68 ASRock A75M-HVS Motherboard Français - ASRock A75M-HVS | Quick Installation Guide - Page 69
BIOS, veuillez consulter le Guide de l'utilisateur (fichier PDF) dans le CD technique. 4. Informations sur le CD de support Cette carte mère supporte divers systèmes d'exploitation Microsoft® Windows®: 7 / 7 64 bits / VistaTM / VistaTM 64 bits / XP SP3 / XP 64 69 ASRock A75M-HVS Motherboard Français - ASRock A75M-HVS | Quick Installation Guide - Page 70
7 64-bit / VistaTM / VistaTM 64-bit, si consiglia di impostare l'opzione BIOS in Storage Configuration (Configurazione di archiviazione) sulla modalità AHCI. Per l'impostazione BIOS, fare riferimento a "User Manual" (Manuale dell'utente) nel CD di supporto per dettagli. 70 ASRock A75M-HVS Motherboard - ASRock A75M-HVS | Quick Installation Guide - Page 71
la riduzione automatica delle vibrazioni nei video a casa/on-line - Supporto della funzione HDCP con le porte HDMI - Supporto 1080p Blu-ray (BD) / HD-DVD riproduzione con le porte HDMI - 5.1 Audio HD CH (VIA® VT1705 Audio Codec) - Supporto THX TruStudioTM Italiano 71 ASRock A75M-HVS Motherboard - ASRock A75M-HVS | Quick Installation Guide - Page 72
SMBIOS 2.3.1 - Regolazione multi-voltaggio DRAM, VDDP, SB - Driver, utilità, software antivirus (Versione dimostrativa), AMD Live! Explorer, AMD Fusion, CyberLink MediaEspresso 6.5 Trial, Suite software ASRock (Suite CyberLink DVD) (OEM e Versione demo) Italiano 72 ASRock A75M-HVS Motherboard - ASRock A75M-HVS | Quick Installation Guide - Page 73
componenti ed alle periferiche del sistema. La procedura è eseguita a proprio rischio ed a proprie spese. Noi non possiamo essere ritenuti responsabili per possibili danni provocati dall'overclocking. Italiano 73 ASRock A75M-HVS Motherboard - ASRock A75M-HVS | Quick Installation Guide - Page 74
per migliorare l'effi cienza quando i core CPU sono inattivi senza sacrifi care le prestazioni di computazione. Vistare il nostro per informazioni sulle procedure operative dell'utilità AXT (ASRock Extreme Tuning Utility). Sito ASRock: http://www.asrock.com 74 ASRock A75M-HVS Motherboard Italiano - ASRock A75M-HVS | Quick Installation Guide - Page 75
CPU della scheda madre funzioni correttamente; scollegare e ricollegare il cavo d'alimentazione. Per migliorare la dissipazione del calore, ricordare di applicare l'apposita pasta siliconica tra il processore e il dissipatore quando si installa il sistema. 75 ASRock A75M-HVS Motherboard Italiano - ASRock A75M-HVS | Quick Installation Guide - Page 76
un consumo di corrente di 100 mA. Per la scelta di un'alimentatore predisposto EuP consigliamo di verificare ulteriori dettagli con il produttore. 76 ASRock A75M-HVS Motherboard Italiano - ASRock A75M-HVS | Quick Installation Guide - Page 77
componente. 5. Nell'usare i giraviti per fissare la scheda madre al telaio non serrare eccessivamente le viti! Altrimenti si rischia di danneggiare la scheda madre. 77 ASRock A75M-HVS Motherboard Italiano - ASRock A75M-HVS | Quick Installation Guide - Page 78
aderenza tra i due. Quindi collegare la ventolina CPU al connettore PU FAN (CPU_FAN1, fare riferimento a pagina 2, Numero 4). Per eseguire un'installazione appropriata, fare riferimento al manuale d'istruzioni della ventolina CPU e del dispersore di calore. Italiano 78 ASRock A75M-HVS Motherboard - ASRock A75M-HVS | Quick Installation Guide - Page 79
) La motherboard A75M-HVS dispone di due slot DIMM DDR3 (Double Data Rate 3) a 240 pin e supporta la tecnologia Dual Channel Memory. Per attivare la configurazione Dual Channel Memory bisogna installare estremità e fino ad installare correttamente la DIMM nella sua sede. 79 ASRock A75M-HVS Motherboard - ASRock A75M-HVS | Quick Installation Guide - Page 80
AMD Dual Graphics è supportata solamente dal sistema operativo Windows® 7, e non è disponibile con il sistema operativo Windows® VistaTM / XP. Per le procedure di installazione dettagliate e per conoscere le schede grafiche PCI Express compatibili, fare riferimento alla pagina 14. 80 ASRock A75M-HVS - ASRock A75M-HVS | Quick Installation Guide - Page 81
Installare il ricevitore CIR multiangolazione sulla porta USB frontale. Se il ricevitore CIR multi- ASRock Smart Remote è supportato solo da alcune schede madre ASRock. Fare riferimento al sito ASRock per l'elenco delle schede madre supportare: http://www.asrock.com 81 ASRock A75M-HVS Motherboard - ASRock A75M-HVS | Quick Installation Guide - Page 82
BIOS, è necessario per prima cosa avviare il sistema e poi spegnerlo prima di eseguire l'azzeramento della CMOS. Notare che password, data, ore, profilo utente predefinito, 1394 GUID e indirizzo MAC saranno cancellati solo se è rimossa la batteria della CMOS. Italiano 82 ASRock A75M-HVS Motherboard - ASRock A75M-HVS | Quick Installation Guide - Page 83
# comodità, dispositivi di stampa. Collettore USB 2.0 (9-pin USB6_7) (vedi p.2 Nr. 21) Oltre alle due porte USB 2.0 predefinite nel pannello I/O, la scheda madre dispone di tre intestazioni USB 2.0. Ciascuna intestazione USB 2.0 supporta due porte USB 2.0. Italiano 83 ASRock A75M-HVS Motherboard - ASRock A75M-HVS | Quick Installation Guide - Page 84
manuale e del manuale del telaio per installare il sistema. 2. Se si utilizza un pannello audio AC'97, installarlo nell'intestazione audio (GND). D. MIC_RET e OUT_RET sono solo per il pannello audio HD. Non è necessario collegarli per il pannello audio AC'97. Italiano 84 ASRock A75M-HVS Motherboard - ASRock A75M-HVS | Quick Installation Guide - Page 85
d'alimentazione si può configurare il modo in cui si spegne il sistema. RESET (interruttore di ripristino): Va collegato all'interruttore di ripristino del pannello frontale del telaio (vedi p.2 Nr. 13) Collegare le casse del telaio a questo collettore. Italiano 85 ASRock A75M-HVS Motherboard - ASRock A75M-HVS | Quick Installation Guide - Page 86
Sebbene la presente scheda madre disponga di un supporto per ventola CPU a 4 piedini (ventola silenziosa), la ventola CPU a 3 piedini è in grado di funzionare anche senza la Nr. 1) 5 1 8 4 Collegare un alimentatore ATX 12 V a questo connettore. Italiano 86 ASRock A75M-HVS Motherboard - ASRock A75M-HVS | Quick Installation Guide - Page 87
sistema vengono rilevati automaticamente ed elencati nella pagina del driver del CD in dotazione. Per l'installazione dei driver necessari, procedere in base ad un ordine dall'alto verso il basso. In tal modo, i driver installati funzioneranno correttamente. Italiano 87 ASRock A75M-HVS Motherboard - ASRock A75M-HVS | Quick Installation Guide - Page 88
NCQ e Hot Plug 1° PASSO: Configurare il UEFI. A.Entrare in UTILIT → UEFI SETUP → Avanzate → Configurazione Storage. B.Impostare "SATA Mode" su [IDE]. Passo 2: Installazione di Windows® 7 / 7 64-bit / VistaTM / VistaTM 64-bit sul sistema. 88 ASRock A75M-HVS Motherboard Italiano - ASRock A75M-HVS | Quick Installation Guide - Page 89
di Windows® 7 / 7 64-bit / VistaTM / VistaTM 64-bit sul sistema. 3. Informazioni sul BIOS La Flash Memory sulla scheda madre contiene le Setup Utility. Quando si avvia il computer, premi o durante il Power-On-Self-Test (POST) della Setup utility del BIOS; altrimenti, POST continua - ASRock A75M-HVS | Quick Installation Guide - Page 90
/ VistaTM / VistaTM 64 bits, es recomendable establecer la opción del BIOS de la configuración de almacenamiento en el modo AHCI. Para obtener detalles sobre la configuración del BIOS, consulte el "Manual del usuario" que se encuentra en nuestro CD de soporte. 90 ASRock A75M-HVS Motherboard Español - ASRock A75M-HVS | Quick Installation Guide - Page 91
ática de oscila ciones en vídeo doméstico y en línea - Admite la función HDCP con puertos HDMI - Apoya la reproducción de Blu-rayo de 1080p (BD) / HD-DVD con puertos HDMI - Sonido HD de 5.1 Canales (Códec de sonido VIA® VT1705) - Compatible con THX TruStudioTM 91 ASRock A75M-HVS Motherboard Español - ASRock A75M-HVS | Quick Installation Guide - Page 92
8-pin conector de ATX 12V power - Conector de audio de panel frontal - 3 x Cabezal USB 2.0 (admite 6 puertos USB 2.0 adicionales) - 32Mb AMI BIOS legal UEFI AMI compatible con GUI - Soporta "Plug and Play" - ACPI 1.1 compliance wake up events - Soporta "jumper free setup" ASRock A75M-HVS Motherboard - ASRock A75M-HVS | Quick Installation Guide - Page 93
del ventilador de la CPU y el chasis - Monitor de Voltaje: +12V, +5V, +3.3V, Vcore OS - En conformidad con Microsoft® Windows® 7 / 7 64 bits / VistaTM / VistaTM 64 bits / XP SP3 / XP 64 bits Certificaciones - el aumento de la velocidad del reloj. Español 93 ASRock A75M-HVS Motherboard - ASRock A75M-HVS | Quick Installation Guide - Page 94
efi ciencia cuando los núcleos de la CPU están inactivos sin que el rendimiento de cálculo disminuya. Visite nuestro sitio Web para obtener los procedimientos de funcionamiento de ASRock Extreme Tuning Utility (AXTU). Sitio Web de ASRock: http://www.asrock.com 94 ASRock A75M-HVS Motherboard Español - ASRock A75M-HVS | Quick Installation Guide - Page 95
es Windows® 7 / 7 64 bits / VistaTM / VistaTM 64 bits y que la versión de su explorador es IE8. Sitio Web de ASRock: http://www.asrock.com/Feature/SmartView/index.asp 10. ASRock XFast USB puede el disipador de calor cuando usted instala el sistema de PC. 95 ASRock A75M-HVS Motherboard Español - ASRock A75M-HVS | Quick Installation Guide - Page 96
una fuente de alimentación que cumpla la directiva EuP, le recomendamos que consulte con el fabricante de la fuente de alimentación para obtener más detalles. 96 ASRock A75M-HVS Motherboard Español - ASRock A75M-HVS | Quick Installation Guide - Page 97
los tornillos en sus agujeros para fijar la placa madre en el chasis, no los apriete demasiado. Eso podría dañar la placa madre. 97 ASRock A75M-HVS Motherboard Español - ASRock A75M-HVS | Quick Installation Guide - Page 98
seguridad y hacen buen contacto entre sí. Conecte entonces el ventilador de la CPU al conector CPU FAN (CPU_FAN1, consulte Página 2, N. 4). Para realizar la instalación correctamente, consulte el manual de instrucciones del ventilador de la CPU y el radiador. Español 98 ASRock A75M-HVS Motherboard - ASRock A75M-HVS | Quick Installation Guide - Page 99
A75M-HVS proporciona dos ranuras DIMM DDR3 (Double Data Rate 3, es decir, Tasa doble de datos) de 240 contactos y es compatible con la Tecnología de memoria de canal dual. Para la configuración de canal dual en su sitio y la DIMM se haya asentado apropiadamente. 99 ASRock A75M-HVS Motherboard Español - ASRock A75M-HVS | Quick Installation Guide - Page 100
altas. En la actualidad, la tecnología AMD gráfica dual sólo es compatible con Windows® 7 OS, y no está disponible en Windows® VistaTM / XP. Para más información acerca de procedimientos de uso y tarjetas gráficas PCI Express compatibles, consulte la página 14. 100 ASRock A75M-HVS Motherboard Español - ASRock A75M-HVS | Quick Installation Guide - Page 101
Instale el receptor CIR multiángulo en el puerto USB frontal. Si el receptor CIR multiángulo no puede ASRock solamente es compatible con algunas placas base de ASRock. Consulte el sitio Web de ASRock para obtener una lista de placas bases compatibles. http://www.asrock.com ASRock A75M-HVS Motherboard - ASRock A75M-HVS | Quick Installation Guide - Page 102
borre la memoria CMOS justamente después de actualizar el BIOS. Si necesita borrar la memoria CMOS justamente después de actualizar el BIOS, debe iniciar del usuario, el GUID 1394 y la dirección MAC solamente se borrará si la batería CMOS se quita. Español 102 ASRock A75M-HVS Motherboard - ASRock A75M-HVS | Quick Installation Guide - Page 103
de impresión. Cabezal USB 2.0 (9-pin USB6_7) (vea p.2, N. 21) Además de dos puertos USB 2.0 predeterminados en el panel de E/S, hay tres bases de conexiones USB 2.0 en esta placa base. Cada una de estas bases de conexiones admite dos puertos USB 2.0. Español 103 ASRock A75M-HVS Motherboard - ASRock A75M-HVS | Quick Installation Guide - Page 104
Audio. 1. El Audio de Alta Definición soporta la detección de conector, pero el cable de panel en el chasis debe soportar HDA para operar correctamente. Por favor, siga las instrucciones en nuestro manual y en el manual á conectarlos al panel de sonido AC'97. Español 104 ASRock A75M-HVS Motherboard - ASRock A75M-HVS | Quick Installation Guide - Page 105
módulo del panel frontal del chasis a esta cabecera, asegúrese de que las asignaciones de cables y las asignaciones de contactos coincidan correctamente. Español 105 ASRock A75M-HVS Motherboard - ASRock A75M-HVS | Quick Installation Guide - Page 106
de masa. Conector del ventilador de la CPU (4-pin CPU_FAN1) (vea p.2, N. 4) FAN_SPEED_CONTROL CPU_FAN_SPEED +12V GND 1 2 3 4 Conecte el cable del ventilador de la CPU a este conector y haga coincidir el de una Fuente de Alimentación ATX de 20 Pins 1 13 Español 106 ASRock A75M-HVS Motherboard - ASRock A75M-HVS | Quick Installation Guide - Page 107
8 4 Cabezal del puerto COM (9-pin COM1) (vea p.2, N. 16) Este cabezal del puerto COM se utiliza para admitir un módulo de puerto COM. Español 107 ASRock A75M-HVS Motherboard - ASRock A75M-HVS | Quick Installation Guide - Page 108
Guide 2.11 Instalación de Windows® 7 / 7 64 bits / VistaTM / VistaTM 64 bits / XP / XP 64 bits sin Funciones RAID Si desea instalar Windows® 7 / 7 64-bit / VistaTM / VistaTM 64-bit / XP / XP 64-bit en sus HDDs operativo Windows® XP / XP 64 bits en su sistema. 108 ASRock A75M-HVS Motherboard Español - ASRock A75M-HVS | Quick Installation Guide - Page 109
. A. Entre a la Utilidad de configuración de UEFI → pantalla de Avanzada → Configuración Storage. B. Configure la "SATA Mode" a [AHCI]. PASO 2: Instale el sistema operativo Windows® 7 / 7 64 bits / VistaTM / VistaTM 64 bits en su sistema. 109 ASRock A75M-HVS Motherboard Español - ASRock A75M-HVS | Quick Installation Guide - Page 110
el botón Reset en el panel del ordenador. Para información detallada sobre como configurar la BIOS, por favor refiérase al Manual del Usuario (archivo PDF) contenido en el CD. 4. Información de Software Support CD Esta placa-base soporta diversos tipos de sistema operativo Windows®: 7 / 7 64 bits - ASRock A75M-HVS | Quick Installation Guide - Page 111
.asrock.com/support/index.asp 1.1 ASRock A75M-HVS Micro ATX: 8,9 x 8,5 22,6 x 21,6 см) ASRock A75M-HVS ASRock A75M-HVS 2 x Serial ATA (SATA 1 x I/O ASRock Windows® 7 / 7 64-bit / VistaTM / VistaTM 64-bit BIOS Storage Configuration AHCI BIOS 111 ASRock A75M-HVS Motherboard - ASRock A75M-HVS | Quick Installation Guide - Page 112
Rate Audio HDMI HDMI 5 Blu-ray Stereoscopic 3D HDMI 1.4a AMD Steady VideoTM HDCP HDMI Blu-луч 1080p HD-DVD HDMI - 5.1 CH HD Аудио HD VIA® VT1705 THX TruStudioTM - PCIE x 1 Gigabit LAN 10/100/1000 Mb/s - Realtek RTL8111E Wake-On-LAN Ethernet 802.3az PXE ASRock A75M-HVS Motherboard - ASRock A75M-HVS | Quick Installation Guide - Page 113
6.5 ASRock (CyberLink DVD Suite) (OEM - ASRock Extreme Tuning Utility (AXTU 6) - ASRock Instant Boot - ASRock Instant Flash 7) - ASRock APP Charger 8) - ASRock SmartView 9) - ASRock XFast USB 10) - Hybrid Booster: - ASRock U-COP 11) 113 ASRock A75M-HVS Motherboard - ASRock A75M-HVS | Quick Installation Guide - Page 114
/Chassis/Power FAN 12V, +5V, +3.3V, Vcore Microsoft® Windows® 7 / 7 64-bit / VistaTM 64 VistaTM / XP SP3 / XP 64-bit ные - FCC, CE, WHQL ErP/EuP Ready ErP/EuP 12) ты http://www.asrock.com BIOS Untied Overclocking 114 ASRock A75M-HVS Motherboard - ASRock A75M-HVS | Quick Installation Guide - Page 115
/ 7 Deep Color EDID (12 HBR Windows® 7 64-бит / 7 / VistaTM 64бит / VistaTM. 6 ASRock Extreme Tuning Utility (AXTU Hardware Monitor Fan Control and IES Hardware Monitor Fan Control IES ASRock Extreme Tuning Utility (AXTU ASRock: http://www.asrock.com 115 ASRock A75M-HVS Motherboard - ASRock A75M-HVS | Quick Installation Guide - Page 116
APP Charger ASRock: http://www.asrock.com/Feature/AppCharger/index.asp 9. SmartView IE Facebook ASRock SmartView SmartView Windows® 7/7, 64 VistaTM/VistaTM, 64 IE8 ASRock: http://www.asrock.com/Feature/SmartView/index.asp 10 ASRock XFast USB USB 11 116 ASRock A75M-HVS Motherboard - ASRock A75M-HVS | Quick Installation Guide - Page 117
12. EuP Energy Using Product EuP 1 EuP Intel EuP 50 5V 100 EuP 117 ASRock A75M-HVS Motherboard - ASRock A75M-HVS | Quick Installation Guide - Page 118
2 Micro ATX (8,9 x 8,5 22,6 x 21,6 1 2 3 4 5 118 ASRock A75M-HVS Motherboard - ASRock A75M-HVS | Quick Installation Guide - Page 119
2.1 Шаг 1. Шаг 2. Шаг 3. 90o Шаг 4. 90 ШАГ 1 ШАГ 2, ШАГ 3 ШАГ 4 2.2 CPU_FAN1 2 4 119 ASRock A75M-HVS Motherboard - ASRock A75M-HVS | Quick Installation Guide - Page 120
2.3 DIMM) A75M-HVS 240 DDR3 (Double Data Rate 3) DIMM Dual Channel Memory Technology DDR3 DIMM 1 DDR / DDR2 DDR3 2 Dual Channel Memory Technology DIMM DIMM Шаг 1 DIMM Шаг 2 DIMM notch break notch break DIMM Шаг 3 DIMM 120 ASRock A75M-HVS Motherboard - ASRock A75M-HVS | Quick Installation Guide - Page 121
. PCI PCI 32- PCI. PCIE: PCIE1 (PCIE x1 PCI Express x1, Gigabit LAN. PCIE2 PCIE x16 PCI Express x16. Шаг 1 Шаг 2 Шаг 3 Шаг 4 2.5 AMD AMD AMD AMD A75 FCH (Hudson-D3 AMD Windows® 7 Windows® VistaTM / XP 14. 121 ASRock A75M-HVS Motherboard - ASRock A75M-HVS | Quick Installation Guide - Page 122
2. USB USB 2.0 1-5 CIR USB 2.0 (9 CIR (4 USB_PWR PP+ GND DUMMY Шаг 3. CIR USB CIR MCE USB. GND IRTX IRRX ATX+5VSB 3 CIR 1 USB CIR CIR USB. 2. CIR USB USB CIR 3 ASRock Smart ASRock. ASRock: http://www.asrock. 122 com ASRock A75M-HVS Motherboard - ASRock A75M-HVS | Quick Installation Guide - Page 123
2.7 short open 3 1 и 2 CMOS (CLRCMOS1, 3 2, п. 18) CMOS CLRCMOS1 CMOS 15 5 2 и 3 CLRCMOS1 CMOS BIOS CMOS BIOS CMOS 1394 GUID и MAC CMOS. 123 ASRock A75M-HVS Motherboard - ASRock A75M-HVS | Quick Installation Guide - Page 124
п.15) AFD# ERROR# PINIT# SLIN# GND 1 SPD7 SPD6 ACK# SPD5 BUSY SPD4 PE SPD3 SLCT SPD2 SPD1 SPD0 STB# USB 2.0 (9 USB6_7 2, п. 21) (9 USB8_9 2, п. 23) USB_PWR P-9 P+9 GND DUMMY 1 GND P+8 P-8 USB_PWR USB 2.0 USB 2.0 USB 2.0 USB 2.0. 124 ASRock A75M-HVS Motherboard - ASRock A75M-HVS | Quick Installation Guide - Page 125
# MIC_RET OUT_RET 1 OUT2_L J_SENSE OUT2_R MIC2_R MIC2_L 1 High Definition Audio Jack Sensing p HDA 2 AC'97 A Mic_IN (MIC MIC2_L. B Audio_R (RIN OUT2_R Audio_L (LIN OUT2_L. C Ground (GND Ground (GND). D MIC_RET и OUT_RET HD AC'97 125 ASRock A75M-HVS Motherboard - ASRock A75M-HVS | Quick Installation Guide - Page 126
9 PANEL1 2, п. 17) PWRBTN RESET PLED S1 S3 или S4 S5). HDLED 4 SPEAKER1 2, п. 13) 126 ASRock A75M-HVS Motherboard - ASRock A75M-HVS | Quick Installation Guide - Page 127
(24 ATXPWR1 2, п. 6) 12 24 ATX. 1 13 12 24 ивает 24 ATX 20 ATX 20 ATX 1 13. 20 ATX 1 13 12V-ATX (8 ATX12V1 2, п. 1) 5 1 8 4 ATX 12 127 ASRock A75M-HVS Motherboard - ASRock A75M-HVS | Quick Installation Guide - Page 128
5 1 COM 9 COM1 2, п. 16) ATX С 4-Pin 12V 8 4 COM COM. 2.9 2.10 Windows® 7 / 7 64-bit / VistaTM / VistaTM 64-bit / XP / XP 64-bit RAID Windows® 7 / 7 64-bit / VistaTM / VistaTM 64-bit / XP / XP 64-bit SATA3 RAID RAID Installation Guide 128 ASRock A75M-HVS Motherboard - ASRock A75M-HVS | Quick Installation Guide - Page 129
.2 Windows® 7 / 7 64-bit / VistaTM / VistaTM 64bit RAID Windows® 7 / 7 64-bit / VistaTM / VistaTM 64-bit SATA3 RAID SATA3 NCQ ШАГ 1 UEFI. A UEFI AdvancedЎч Storage Configuration. B SATA Mode IDE]. ШАГ 2 Windows® 7 / 7 64-bit / VistaTM / VistaTM 64-bit. 129 ASRock A75M-HVS Motherboard - ASRock A75M-HVS | Quick Installation Guide - Page 130
BIOS Setup F2> или + + - ASRock A75M-HVS | Quick Installation Guide - Page 131
/ 7 64-bit / VistaTM / VistaTM 64-bit ile daha iyi performans elde etmek için, Depolama Konfigürasyonundaki BIOS seçeneğini AHCI moduna ayarlamanız tavsiye edilir. BIOS ayarı için, ayrıntıları öğrenmek üzere lütfen destek CD'mizdeki "Kullanıcı Kılavuzu"na bakın. 131 ASRock A75M-HVS Motherboard Türk - ASRock A75M-HVS | Quick Installation Guide - Page 132
otomatik titreşim azaltma için yeni video işleme sonrası özelliği - HDMI portlarэyla HDCP iюlevini destekler - HDMI portlarэyla Tam HD 1080p Blu-ray (BD) / HD-DVD oynatэmэnэ destekler - (VIA® VT1705 Ses Codec'i) 5,1 Kanal HD Ses - THX TruStudioTM desteği Türkçe 132 ASRock A75M-HVS Motherboard - ASRock A75M-HVS | Quick Installation Guide - Page 133
2.3.1 Desteği - DRAM, VDDP, SB Voltaj Çoklu ayarı - Sürücüler, Yardımcı Programlar, AntiVirüs Yazılımı (Deneme Sürümü), AMD Live! Explorer, AMD Fusion, CyberLink MediaEspresso 6.5 Deneme Sürümü, ASRock Yazılım Paketi (CyberLink DVD Paketi - OEM ve Deneme) Türkçe 133 ASRock A75M-HVS Motherboard - ASRock A75M-HVS | Quick Installation Guide - Page 134
CPU Sıcaklık Duyarlılığı Monitör - Kasa Sıcaklık Duyarlılığı - CPU/Kasa/Güç Fan Takometresi - İşlemci/Kasa Sessiz Fanı - CPU/Kasa Fan Çoklu-Hız Kontrolü - Voltaj İzleme: +12V, +5V, +3,3V, CPU Vcore İS - Microsoft® Windows® 7 / 7 64-bit / VistaTM / VistaTM 64 134 ASRock A75M-HVS Motherboard - ASRock A75M-HVS | Quick Installation Guide - Page 135
ye kaydedin, sonra BIOS'unuzu yalnızca birkaç tıklatma ile ek bir disket veya diğer karmaşık flash yardımcı programlarını hazırlamadan güncelleyebilirsiniz. Lütfen USB flash sürücünün veya sabit diskin FAT32/16/12 dosya sistemi kullanması gerektiğini unutmayın. 135 ASRock A75M-HVS Motherboard Türkçe - ASRock A75M-HVS | Quick Installation Guide - Page 136
kapatılır. Sistemi devam ettirmeden önce, lütfen anakarttaki CPU fanının düzgün çalıştığını kontrol edin ve güç kablosunu çıkarın, sonra geri takın. Isı geçişini artırmak için, PC sistemini yüklediğinizde CPU ile ısı emici arasına ısı macunu sürmeyi unutmayın. 136 ASRock A75M-HVS Motherboard Türkçe - ASRock A75M-HVS | Quick Installation Guide - Page 137
güç etkinliği %50'den yüksektir standardını karşılaması gerekir. EuP hazır güç kaynağı seçimi için, daha fazla ayrıntı için güç kaynağı üreticisine başvurmanızı öneririz. 137 ASRock A75M-HVS Motherboard Türkçe - ASRock A75M-HVS | Quick Installation Guide - Page 138
şenle birlikte gelen poşete koyun. 5. Ana kartı kasaya sabitlemek için vida deliklerine vida takarken lütfen vidaları aşırı sıkmayın! Aksi halde anakart zarar görebilir. Türkçe 138 ASRock A75M-HVS Motherboard - ASRock A75M-HVS | Quick Installation Guide - Page 139
sağlam bir şekilde sabitlendiğinden ve birbiriyle iyi temas ettiğinden emin olun. Ardından CPU fanını CPU FAN konektörüne bağlayın (CPU_FAN1, bkz. Sayfa 2, No. 4). Düzgün şekilde takmak için lütfen CPU fanının ve ısı emicinin kullanım kılavuzlarına bakın. Türkçe 139 ASRock A75M-HVS Motherboard - ASRock A75M-HVS | Quick Installation Guide - Page 140
2.3 Bellek Modüllerinin (DIMM) Takılması A75M anakartı iki 240 pinli DDR3 (Çift Veri Hızı 3) DIMM yuvası sağlar ve Çift Kanallı Bellek Teknolojisi'ni tutucu klipsler yerine geri oturuncaya ve DIMM düzgün şekilde yerleşinceye kadar DIMM'yi yuvanın içinde bastırın. 140 ASRock A75M-HVS Motherboard - ASRock A75M-HVS | Quick Installation Guide - Page 141
çalıştırmak için aşırı hızlı kare hızları için çoklu GPU performans kapasitelerini getirir. Şu anda, AMD Dual Graphics Teknolojisi yalnızca Windows® 7 İS ile desteklenir ve Windows® VistaTM / XP İS ile kullanılamaz. Lütfen ayrıntılar için sayfa 14'a başvurun. Türkçe 141 ASRock A75M-HVS Motherboard - ASRock A75M-HVS | Quick Installation Guide - Page 142
IRRX ATX+5VSB Adım 3. Çok Açılı CIR Alıcıyı ön USB bağlantı noktasına takın. Çok Açılı CIR Alıcısı MCE Uzaktan ASRock Akıllı Uzaktan Kumanda sadece bazı ASRock anakartları tarafından desteklenir. Lütfen anakart listesi için ASRock web sitesine bakın: http://www.asrock.com 142 ASRock A75M-HVS Motherboard - ASRock A75M-HVS | Quick Installation Guide - Page 143
sistemi başlatmanız ve ardından CMOS temizleme işlemini gerçekleştirmeden önce kapatmanız gereklidir. Parola, tarih, saat, kullanıcı varsayılan profili, 1394 GUID ve MAC adresinin yalnızca CMOS pili çıkarıldığında temizleneceğini lütfen aklınızda bulundurunuz. Türkçe 143 ASRock A75M-HVS Motherboard - ASRock A75M-HVS | Quick Installation Guide - Page 144
pinli USB6_7) (bkz. s.2 No. 21) G/Ç panelindeki varsayılan iki USB 2.0 portundan başka, bu anakartta üç USB 2.0 fişi bulunur. Her USB 2.0 fişi iki USB 2.0 portunu destekler. (9-pinli USB8_9) (bkz. s.2 No. 23) USB_PWR P-9 P+9 GND DUMMY 1 GND P+8 P-8 USB_PWR Türkçe 144 ASRock A75M-HVS Motherboard - ASRock A75M-HVS | Quick Installation Guide - Page 145
'u (GND) Ground'a (GND) bağlayın. D. MIC_RET ve OUT_RET yalnızca HD ses paneli içindir. Bunları AC'97 ses paneli için bağlamanız gerekmez. Türkçe 145 ASRock A75M-HVS Motherboard - ASRock A75M-HVS | Quick Installation Guide - Page 146
panele bağlayın. Güç anahtarını kullanarak sisteminizi kapatma şeklinizi yapılandırabilirsiniz. RESET (Sıfırlama Anahtarı): Kasa üzerindeki sıfırlama anahtarını ön panele bağlayın. Bilgisayar konektöre bağlayın ve siyah kabloyu toprak pinine bağlayın. 146 ASRock A75M-HVS Motherboard Türkçe - ASRock A75M-HVS | Quick Installation Guide - Page 147
anakart 4-Pinli CPU fan (Sessiz Fan) desteği sağlasa da, 3-Pinli CPU fan hızı kontrol işlevi olmadan bile hala başarılı bir şekilde çalışabilir. 3-Pinli CPU fanı bu konektördeki CPU fan konekt (bkz. s.2 No. 16) Bu COM1 fişi bir seri port modülünü destekler. Türkçe 147 ASRock A75M-HVS Motherboard - ASRock A75M-HVS | Quick Installation Guide - Page 148
HDD'ler aygıtlarını kullanma ADIM 1: UEFI'u ayarlayın. A. UEFI AYARLARI YARDIMCI PROGRAMI'na girin Depolama Yapılandırması. B. "SATA Modu" seçeneğini [IDE] olarak ayarlayın. ADIM 2: Windows® XP / XP 64-bit İS'yi sisteminize yükleyin. Gelişmiş ekran Türkçe 148 ASRock A75M-HVS Motherboard - ASRock A75M-HVS | Quick Installation Guide - Page 149
ADIM 1: UEFI'u ayarlayın. A. UEFI AYARLARI YARDIMCI PROGRAMI'na girin Gelişmiş ekran Depolama Yapılandırması. B. "SATA Modu" seçeneğini [AHCI] olarak ayarlayın. ADIM 2: Windows® 7 / 7 64-bit / VistaTM / VistaTM 64-bit İS'yi sisteminize yükleyin. Türkçe 149 ASRock A75M-HVS Motherboard - ASRock A75M-HVS | Quick Installation Guide - Page 150
POST) sırasında BIOS Ayarları yardımcı programına girmek için veya tuşuna basın; aksi halde, POST test rutinlerine devam eder. BIOS Ayarlarına POST ® Windows® işletim sistemleri destekler: 7 / 7 64-bit / VistaTM / VistaTM 64-bit / XP SP3 / XP 64-bit ASRock A75M-HVS Motherboard Türkçe - ASRock A75M-HVS | Quick Installation Guide - Page 151
www.asrock.com/support/index.asp 1.1 ASRock A75M-HVS Micro ATX 8.9" x 8.5", 22.6 x 21.6 cm) ASRock A75M-HVS ASRock A75M-HVS 지원 CD 시리얼 ATA (SATA 2 I/O 차폐 1 개 ASRock Windows® 7 / 7 64-비트 / VistaTM / VistaTM 64 Storage Configuration BIOS 옵션을 AHCI BIOS CD 151 ASRock A75M-HVS Motherboard - ASRock A75M-HVS | Quick Installation Guide - Page 152
xvYCC, HBR HDMI 지원 (HDMI 5 참조 ) - HDMI 1.4a 3D AMD Steady VideoTM HDMI HDCP HDMI 1080p Blu-ray (BD) / HD-DVD 5.1 CH HD Audio (VIA® VT1705 Audio Codec) - THX TruStudioTM 지원 - PCIE x1 Gigabit LAN 10/100/1000 Mb/s - Realtek RTL8111E LAN 802.3az 지원 - PXE 지원 ASRock A75M-HVS Motherboard 한 국 어 - ASRock A75M-HVS | Quick Installation Guide - Page 153
/s 1 1 1 개 - COM 1 개 - CPU 24 핀 ATX 8 핀 ATX 12V USB 2.0 헤더 3 개 (6 USB 2.0 2개 ) - 32Mb GUI AMI UEFI 적합형 BIOS ACPI 1.1 SMBIOS 2.3.1 지원 - DRAM, VDDP, SB AMD Live! Explorer, AMD Fusion, CyberLink MediaEspresso 6.5 ASRock CyberLink DVD 세트 ) (OEM 한 국 어 153 ASRock A75M-HVS Motherboard - ASRock A75M-HVS | Quick Installation Guide - Page 154
CPU - CPU 계 - CPU - CPU 12V,+5V,+3.3V,Vcore OS Windows® 7/7 64 비트 /VistaTM/ VistaTM 64 비트 /XP SP3/XP 64 인증서 - FCC, CE, WHQL - ErP/EuP 지원 (ErP/EuP ( 주의 12 참조 ) http://www.asrock.com BIOS Untied Overclocking Technology 한 국 어 154 ASRock A75M-HVS Motherboard - ASRock A75M-HVS | Quick Installation Guide - Page 155
4 AMD 5. xvYCC Windows® 7 64-bit / 7 EDID 에서 12bpc HBR 은 Windows® 7 64-bit / 7 / VistaTM 64-bit / VistaTM 6. AXTU (ASRock Extreme Tuning Utility IES IES (Intelligent Energy Saver CPU ASRock 의 AXTU (Extreme Tuning Utility ASRock http://www.asrock.com 155 ASRock A75M-HVS Motherboard 한국어 - ASRock A75M-HVS | Quick Installation Guide - Page 156
://www.asrock.com/ Feature/AppCharger/index.asp 9 SmartView IE ASRock SmartView SmartView OS 버전이 Windows® 7 / 7 64 비트 / VistaTM / VistaTM 64 IE8 ASRock http://www.asrock.com/ Feature/SmartView/index.asp 10. ASRock XFast USB 는 USB 11 CPU PC CPU 156 ASRock A75M-HVS Motherboard 한 국 어 - ASRock A75M-HVS | Quick Installation Guide - Page 157
12. EuP 는 Energy Using Product EuP AC 1.00W EuP EuP EuP Intel EuP 5V 100 mA 50 EuP 157 ASRock A75M-HVS Motherboard 한국어 - ASRock A75M-HVS | Quick Installation Guide - Page 158
2 이것은 Micro ATX 22.6x21.6 cm, 8.9x8.5 in 1 2 3 IC 4 5 158 ASRock A75M-HVS Motherboard 한 국 어 - ASRock A75M-HVS | Quick Installation Guide - Page 159
2.1 CPU 설치 단계 1. 단계 2. 단계 3. 90 CPU CPU CPU CPU 주의 ! CPU CPU 단계 4. CPU CPU CPU CPU 레버를 90 CPU 단계 1 단계 2 / 단계 3. CPU 단계 4 2.2 CPU CPU CPU CPU CPU 팬을 CPU FAN 커넥터 (CPU_FAN1, 2 4 CPU 한국어 159 ASRock A75M-HVS Motherboard - ASRock A75M-HVS | Quick Installation Guide - Page 160
2.3 A75M 2 개의 240 핀 DDR3 (Double Data Rate 3) DIMM DDR3 DIMM 2 1. DDR / DDR2 을 DDR3 DIMM 2 2 DIMM 1 2 DIMM notch break notch break DIMM DIMM 3. DIMM 160 ASRock A75M-HVS Motherboard 한 국 어 - ASRock A75M-HVS | Quick Installation Guide - Page 161
PCI PCIE 슬롯 : PCIE1 (PCIE x1 Gigabit LAN 카드 , SATA2 카 x1 인 PCI Express PCIE2 (PCIE x16 PCI Express x16 단계 1. 단계 2. 단계 3. 단계 4. 2.5 AMD AMD AMD AMD A75 FCH (Hudson-D3 GPU AMD Windows® 7 OS Windows® VistaTM / XP OS PCI Express 14 한국어 161 ASRock A75M-HVS Motherboard - ASRock A75M-HVS | Quick Installation Guide - Page 162
헤더 (4 2 단계 . 전면 USB USB 2.0 1-5) CIR USB_PWR PP+ GND DUMMY GND IRTX IRRX ATX+5VSB 3 단계 . CIR USB CIR MCE USB 한 국 어 3 개의 CIR 센서 1 USB 포트만 CIR CIR USB 2 CIR USB USB 3 * ASRock Smart Remote 는 일부 ASRock ASRock http://www.asrock.com 162 ASRock A75M-HVS Motherboard - ASRock A75M-HVS | Quick Installation Guide - Page 163
2.7 3 1-2 점퍼 CMOS 초기화 (CLRCMOS1, 3 2 18 세팅 CMOS 삭제 참고 : CLRCMOS1 CMOS 15 CLRCMOS1 의 핀 2 와 핀 3 을 5 BIOS CMOS BIOS CMOS CMOS CMOS 1394 GUID, MAC 한국어 163 ASRock A75M-HVS Motherboard - ASRock A75M-HVS | Quick Installation Guide - Page 164
SATA SATA3 SATA3 (25 핀 LPT1) (2 15 AFD# ERROR# PINIT# SLIN# GND 1 SPD7 SPD6 ACK# SPD5 BUSY SPD4 PE SPD3 SLCT SPD2 SPD1 SPD0 STB# USB 2.0 헤더 (9 핀 USB6_7) (2 21 I/O 2 USB 2.0 USB 2.0 헤더가 3 USB 2.0 헤더 는 2 개의 USB 2.0 한 국 어 164 ASRock A75M-HVS Motherboard - ASRock A75M-HVS | Quick Installation Guide - Page 165
1 OUT2_L J_SENSE OUT2_R MIC2_R MIC2_L 1. High Definition Audio HAD 2. AC'97 A. Mic_IN (MIC) 을 MIC2_L B. Audio_R (RIN) 을 OUT2_R Audio_L (LIN) 을 OUT2_L C. Ground (GND) 을 Ground (GND D. MIC_RET 및 OUT_RET 는 HD 이들을 AC'97 한국어 165 ASRock A75M-HVS Motherboard - ASRock A75M-HVS | Quick Installation Guide - Page 166
PWRBTN RESET PLED LED LED S1 LED S3/S4 S5 LED HDLED LED LED LED LED LED (4 핀 SPEAKER 1) (2 13 (4 핀 CHA_FAN1) (2 19 (3 핀 PWR_FAN1) (2 30 FAN_SPEED_CONTROL GND +12V CHA_FAN_SPEED PWR_FAN_SPEED +12V GND 한 국 어 166 ASRock A75M-HVS Motherboard - ASRock A75M-HVS | Quick Installation Guide - Page 167
(2 4 FAN_SPEED_CONTROL CPU_FAN_SPEED +12V GND 1 2 3 4 CPU 4 핀 CPU 3 핀 CPU CPU 3 핀 CPU 1-3 1-3 3 ATX (24 핀 ATXPWR1) (2 6 12 12V 8- 핀 ATX 12V 4- 핀 ATX 12V 용하여 4- 핀 ATX 1 과 핀 5 5 1 4- 핀 ATX 12V 8 4 한국어 167 ASRock A75M-HVS Motherboard - ASRock A75M-HVS | Quick Installation Guide - Page 168
(9 핀 COM1) (2 16 한 국 어 168 ASRock A75M-HVS Motherboard - ASRock A75M-HVS | Quick Installation Guide - Page 169
XP 64 2.11.1 RAID Windows® XP / XP 64 비트 설치 SATA3 HDD 에 RAID Windows® XP / XP 64 NCQ SATA3 HDD 단계 1: UEFI A. UEFI SETUP UTILITY (UEFI Advanced screen Storage Configuration (Storage B. "SATA Mode"을 [IDE 단계 2 Windows® XP / XP 64 비트 OS 한국어 169 ASRock A75M-HVS Motherboard - ASRock A75M-HVS | Quick Installation Guide - Page 170
단계 2 Windows® 7 / 7 64 비트 / VistaTM / VistaTM 64 비트 OS NCQ SATA3 HDD 단계 1: UEFI A. UEFI SETUP UTILITY (UEFI Advanced screen Storage Configuration (Storage B. "SATA Mode"을 [AHCI 단계 2 Windows® 7 / 7 64 비트 / VistaTM / VistaTM 64 비트 OS 한 국 어 170 ASRock A75M-HVS Motherboard - ASRock A75M-HVS | Quick Installation Guide - Page 171
3 POST F2> 또는 ++ - ASRock A75M-HVS | Quick Installation Guide - Page 172
asrock.com Web www.asrock.com/support/index.asp 1.1 ASRock A75M-HVS Micro ATX 8.9-in x 8.5-in, 22.6 cm x 21.6 cm) ASRock A75M-HVS ASRock A75M-HVS CD 2 x ATA (SATA 1 x I/O ASRock Windows® 7 / 7 64-bit / VistaTM / VistaTM 64-bit BIOS AHCI B I O S C D 172 ASRock A75M-HVS Motherboard - ASRock A75M-HVS | Quick Installation Guide - Page 173
搭載 Blu-ray Stereoscopic 3D 対応 - AMD Steady VideoTM HDCP 機能、HDMI 1080p Blu-ray (BD) / HD-DVD HDMI 5.1 CH HD VIA® VT1705 Codec) - THX TruStudioTM PCIE x1 Gigabit LAN 10/100/1000 Mb/s - Realtek RTL8111E - Wake-On-LAN LAN Energy Efficient Ethernet 802.3az 173 ASRock A75M-HVS Motherboard 日本語 - ASRock A75M-HVS | Quick Installation Guide - Page 174
Legal BIOS(GUI ACPI 1.1 jumperfree SMBIOS 2.3.1 DRAM、VDDP、SB AMD Live! Explorer、AMD Fusion、CyberLink MediaEspresso 6.5 ASRock CyberLink DVD Suite) (OEM ASRock Extreme AXTU) ( 注意 6 参照 ) - ASRock ASRock Instant Flash ( 注意 7 参照 ) - ASRock APP 8 を参照 ) 日本語 174 ASRock A75M-HVS Motherboard - ASRock A75M-HVS | Quick Installation Guide - Page 175
CPU - CPU - CPU - CPU 12V, +5V, +3.3V, Vcore OS - Microsoft® Windows® 7/7 64-bit/VistaTM/VistaTM 64-bit/XP SP3/XP 64-bit compliant 認証 - FCC, CE, Microsoft® WHQL - ErP/EuP 対応(ErP/EuP ( 注意 12 を参照 ) http://www.asrock.com BIOS 日本語 175 ASRock A75M-HVS Motherboard - ASRock A75M-HVS | Quick Installation Guide - Page 176
(AXTU IES IES CPU ASRock Extreme Tuning Utility (AXTU Web ASRock Web サイト :http://www.asrock.com ASRock Instant Flash は、Flash ROM ROM BIOS BIOS MS-DOS Windows BIOS POST の間に - ASRock A75M-HVS | Quick Installation Guide - Page 177
IE ASRock マザー SmartView SmartView OS Windows® 7 / 7 64 bit / VistaTM / VistaTM 64 bit IE8 ASRock http://www.asrock.com/Feature/ SmartView/index.asp 10. ASRock XFast USB は USB 11. CPU CPU 冷 PC ル時に、CPU です。 日本語 177 ASRock A75M-HVS Motherboard - ASRock A75M-HVS | Quick Installation Guide - Page 178
12. Energy Using Product EuP EuP に従っ AC 1.00W EuP EuP EuP 対応 Intel EuP 5v 100 mA で 50 EuP 日本語 178 ASRock A75M-HVS Motherboard - ASRock A75M-HVS | Quick Installation Guide - Page 179
これは Micro ATX 8.9-in x 8.5-in, 22.6 cm x 21.6 cm 1 2 3. IC 4 5 179 ASRock A75M-HVS Motherboard 日本語 - ASRock A75M-HVS | Quick Installation Guide - Page 180
2.1 CPU 1 90 2.CPU CPU 3 CPU CPU CPU 4 CPU CPU CPU 90°上に 1 CPU 2 3 CPU 4 2.2 CPU CPU CPU CPU CPU CPU CPU_FAN1、2 No. 4 CPU 日本語 180 ASRock A75M-HVS Motherboard - ASRock A75M-HVS | Quick Installation Guide - Page 181
2.3 DIMM A75M-HVS 2 つの 240 ピン DDR3 DIMM DDR3 DIMM 2 1. DDR/DDR2 DDR3 DIMM 2. たった 1 2 DIMM DIMM OFF 1 2. DIMM DIMM DIMM 日本語 notch break notch break DIMM は 1 DIMM DIMM 3. 最後に、DIMM DIMM 181 ASRock A75M-HVS Motherboard - ASRock A75M-HVS | Quick Installation Guide - Page 182
Express x1 PCIE2 (PCIE x16 PCI Express x16 レーン 1 OFF 2 3 4 2.5 AMD Dual Graphics AMD Dual Graphics AMD Dual Graphics は AMD A75 FCH (Hudson-D3 GPU 1 AMD Dual Graphics Technology は Windows® 7 OS Windows® VistaTM / XP OS 14 日本語 182 ASRock A75M-HVS Motherboard - ASRock A75M-HVS | Quick Installation Guide - Page 183
CIR ヘッダ (4 2 3. USB USB 2.0 1-5) と CIR USB_PWR PP+ GND DUMMY GND IRTX IRRX ATX+5VSB USB CIR CIR MCE USB 日本語 3 つの CIR 1. CIR USB 1 CIR USB 2 CIR USB USB CIR 3 * ASRock Smart Remote ASRock ASRock Web http://www.asrock.com 183 ASRock A75M-HVS Motherboard - ASRock A75M-HVS | Quick Installation Guide - Page 184
2.7 1-2 CMOS CLRCMOS1 18 参照) 設定 説明 CMOS の消去 注 : CLRCMOS1 CMOS 15 CLRCMOS1 のピン 2 とピン 3 を 5 BIOS CMOS BIOS CMOS CMOS 1394 GUID と MAC CMOS 日本語 184 ASRock A75M-HVS Motherboard - ASRock A75M-HVS | Quick Installation Guide - Page 185
PINIT# SLIN# GND 1 SPD7 SPD6 ACK# SPD5 BUSY SPD4 PE SPD3 SLCT SPD2 SPD1 SPD0 STB# USB 2.0 ヘッダ (9 ピン USB6_7 21 を参照 (9 ピン USB8_9 23 を参照 USB_PWR P-9 P+9 GND DUMMY 1 GND P+8 P-8 USB_PWR I/O 2 つの USB 2.0 3 つの USB 2.0 USB 2.0 2 つの USB 2.0 日本語 185 ASRock A75M-HVS Motherboard - ASRock A75M-HVS | Quick Installation Guide - Page 186
J_SENSE OUT2_R MIC2_R MIC2_L 1. HAD い。 2. AC'97 A. Mic_IN (MIC) を MIC2_L B. Audio_R (RIN) を OUT2_R に、Audio_L (LIN) を OUT2_L C. Ground (GND) を Ground (GND す。 D. MIC_RET と OUT_RET AC'97 日本語 186 ASRock A75M-HVS Motherboard - ASRock A75M-HVS | Quick Installation Guide - Page 187
を参照 PWRBTN RESET PLED LED LED LED S1 S3 または S4 S5 LED HDLED LED LED LED LED LED 4 ピン SPEAKER1 13 を参照 (4 ピン CHA_FAN1 19 を参照 FAN_SPEED_CONTROL GND +12V CHA_FAN_SPEED (3 ピン PWR_FAN1 30 を参照 PWR_FAN_SPEED +12V GND 日本語 187 ASRock A75M-HVS Motherboard - ASRock A75M-HVS | Quick Installation Guide - Page 188
12 24 ATX 1 13 24 ピン ATX 従来の 20 ピン ATX 12 24 20 ピン ATX 1 13 ATX 12V 8 ピン ATX12V1 1 を参照 20 ピン ATX 1 13 5 1 8 4 CPU に Vcore ATX 12V 8-pin ATX 12V 4-pin ATX 12V 4-pin ATX Pin 1 と Pin 5 5 1 4-Pin ATX 12V 8 4 日本語 188 ASRock A75M-HVS Motherboard - ASRock A75M-HVS | Quick Installation Guide - Page 189
9 ピン COM1 16 を参照 この COM1 日本語 189 ASRock A75M-HVS Motherboard - ASRock A75M-HVS | Quick Installation Guide - Page 190
HDD に Windows® 7 / 7 64-bit / VistaTM / VistaTM 64-bit / XP / XP 64-bit ビット OS 2.11.1 RAID Windows® XP / XP 64-bit RAID SATA3 HDD に Windows® XP / XP 64-bit ビット OS NCQ SATA3 HDD 1 UEFI。 A. UEFI Storage B. 「SATA Mode」を [IDE 2 Windows® XP / XP 64- ビット OS 190 ASRock A75M-HVS Motherboard - ASRock A75M-HVS | Quick Installation Guide - Page 191
/ VistaTM 64-bit ビット OS NCQ SATA3 HDD 1 UEFI。 A. UEFI Storage B. 「SATA Mode」を [IDE 2 Windows® 7 / 7 64 VistaTM / VistaTM 64 ビ ト OS NCQ SATA3 HDD 1 UEFI。 A. UEFI Storage B. 「SATA Mode」を [AHCI 2 Windows® 7 / 7 64 VistaTM / VistaTM 64 ビ ト OS 191 ASRock A75M-HVS Motherboard 日本語 - ASRock A75M-HVS | Quick Installation Guide - Page 192
3.BIOS 情報 BIOS POST F2 Del BIOS POST BIOS POST Ctrl〉+〈Alt〉+〈Delete BIOS BIOS CD PDF CD 情報 Microsoft® Windows® 7 / 7 64-bit / VistaTM / VistaTM 64-bit / XP SP3 / XP 64-bit CD CD CDROM CD AUTORUN AUTORUN CD 内 の BIN ASSETUP.EXE 192 ASRock A75M-HVS Motherboard 日本語 - ASRock A75M-HVS | Quick Installation Guide - Page 193
asrock.com/support/index.asp 1.1 華擎 A75M-HVS 主板 (Micro ATX 規格 : 8.9 英吋 X 8.5 英吋 , 22.6 厘米 X 21.6 厘米 ) 華擎 A75M-HVS A75M-HVS Serial ATA(SATA I/O 擋板 ASRock 為了在 Windows® 7 / 7 64-bit / VistaTM / VistaTM 64-bit BIOS中將Storage Configuration AHCI BIOS User Manual 193 ASRock A75M-HVS Motherboard - ASRock A75M-HVS | Quick Installation Guide - Page 194
12bpc)、 xvYCC 與 HBR HDMI 5 3D 和 HDMI 1.4a - 支持 AMD Steady VideoTM HDMI HDCP HDMI 10800 BD) / HD-DVD 光盤 - 5.1 VIA® VT1705 THX TruStudioTM - PCIE x1 Gigabit LAN 10/100/1000 Mb/s - Realtek RTL8111E Wake-On-LAN Energy Efficient Ethernet 802.3az - 支持 PXE 簡體中文 194 ASRock A75M-HVS Motherboard - ASRock A75M-HVS | Quick Installation Guide - Page 195
- ACPI 1.1 jumperfree DRAM、VDDP、SB AMD Live! Explorer, AMD Fusion, CyberLink MediaEspresso 6.5 CyberLink DVD 套件 )(OEM ASRock Extreme Tuning Utility (AXTU 6 Instant Flash 7 APP Charger 8 SmartView 9 XFast USB 10) - Hybrid Booster ASRock U-COP 11) 簡體中文 195 ASRock A75M-HVS Motherboard - ASRock A75M-HVS | Quick Installation Guide - Page 196
- CPU - CPU - CPU - CPU 12V, +5V, +3.3V 操作系統 - Microsoft® Windows® 7/7 64 位元 /VistaTM/VistaTM 64 位元 / XP SP3/XP 64 認證 - FCC, CE, WHQL - 支持 ErP/EuP ErP/EuP 12) http://www.asrock.com BIOS 簡體中文 196 ASRock A75M-HVS Motherboard - ASRock A75M-HVS | Quick Installation Guide - Page 197
APP Charger S1 S3 S4 S5 APP Charger 9、 S m a r t V i e w 是 I n t e r n e t I E F a c e b o o k Internet SmartView SmartView Windows® 7 / 7 64 位元 / VistaTM / VistaTM 64 IE8 http://www.asrock.com/Feature/SmartView/index.asp 10、華擎 XFast USB USB ASRock A75M-HVS Motherboard 197 簡體中文 - ASRock A75M-HVS | Quick Installation Guide - Page 198
11 CPU C P U PC CPU 12、EuP, 全稱 Energy Using Product E u P 1.00W EuP EuP EuP Intel EuP 100m A 5V s b 50 E u P 198 ASRock A75M-HVS Motherboard 簡體中文 - ASRock A75M-HVS | Quick Installation Guide - Page 199
2 Micro ATX 8.9 英吋 X 8.5 英吋 , 22.6 厘米 X 21.6 安全防范 1、 2、 3、 4、 5、 簡體中文 199 ASRock A75M-HVS Motherboard - ASRock A75M-HVS | Quick Installation Guide - Page 200
2.1 CPU 安裝 步驟 1 90 2: 將 CPU CPU CPU 3 C P U CPU 步驟 4 拉杆 90°角抬起 步驟 1 CPU 2 / 步驟 3: 將 CPU 步驟 4 2.2 安裝 CPU CPU CPU CPU CPU CPU FAN 接口 (CPU_FAN1 2 頁 No. 4 CPU 簡體中文 200 ASRock A75M-HVS Motherboard - ASRock A75M-HVS | Quick Installation Guide - Page 201
2.3 240- 針 DDR3 (Double Data Rate 3 DIMM DDR3 DIMM 1 DDR 或 DDR2 DDR3 DIMM 2 DIMM 1、 DIMM 2 DIMM DIMM notch break notch break DIMM DIMM DIMM 3、 將 DIMM DIMM ASRock A75M-HVS Motherboard 201 簡體中文 - ASRock A75M-HVS | Quick Installation Guide - Page 202
PCI Express 插槽。 PCI 32 PCI 卡。 PCIE 插槽: PCIE1 (PCIE x1 PCIE x1 SATA2 卡等。 PCIE2 (PCIE x16 PCI Express x16 顯卡。 步驟 1 步驟 2 3 4 2.5 AMD AMD AMD GPU AMD A75 FCH (Hudson-D3 A M D W i n d o w s ® 7 W i n d o w s ® VistaTM / XP 14 PCI Express 202 ASRock A75M-HVS Motherboard 簡體中文 - ASRock A75M-HVS | Quick Installation Guide - Page 203
步骤 2. 将前部 USB USB_PWR USB 2.0 1-5) 和 CIR PP+ GND DUMMY GND IRTX IRRX ATX+5VSB 步骤 3. CIR USB CIR MCE USB 端 口。 簡體中文 3 CIR 传感器 1 USB CIR CIR USB 功能。 2. 多角度 CIR USB USB CIR 3. 多角度 CIR ASRock ASRock ASRock 网站: http://www.asrock.com 203 ASRock A75M-HVS Motherboard - ASRock A75M-HVS | Quick Installation Guide - Page 204
2.7 3 1 和針腳 2 CMOS (CLRCMOS1, 3 2 頁第 18 項 ) 設定 默認設置 清除 CMOS 注意: C L R C M O S1 C M O S 15 C L R C M O S1 2 和插針 3 短接 5 B I O S C M O S B I O S C M O S C M O S C M O S 1394 GUID 和 MAC 簡體中文 204 ASRock A75M-HVS Motherboard - ASRock A75M-HVS | Quick Installation Guide - Page 205
STB# USB 2.0 (9 針 USB6_7) ( 見第 2 頁第 21 項 ) (9 針 USB8_9) ( 見第 2 頁第 23 項 ) (9 針 USB10_11) ( 見第 2 頁第 24 項 ) USB_PWR P-9 P+9 GND DUMMY 1 GND P+8 P-8 USB_PWR USB_PWR P-11 P+11 GND DUMMY 1 GND P+10 P-10 USB_PWR I/O USB 2.0 USB 2.0 USB 2.0 USB 2.0 接口。 205 ASRock A75M-HVS Motherboard 簡體中文 - ASRock A75M-HVS | Quick Installation Guide - Page 206
1 High Definition Audio, HDA Jack Sensing HDA 2 AC'97 A. 將 Mic_IN(MIC) 連接到 MIC2_L。 B. 將 Audio_R(RIN) 連接到 OUT2_R, 將 Audio_L(LIN) 連接到 OUT2_L。 C. 將 Ground(GND) 連接到 Ground(GND)。 D. MIC_RET 和 OUT_RET 僅用于 HD AC'97 (9 針 PANEL1) ( 見第 2 頁第 17 項 ) 簡體中文 206 ASRock A75M-HVS Motherboard - ASRock A75M-HVS | Quick Installation Guide - Page 207
項 ) FAN_SPEED_CONTROL GND +12V CHA_FAN_SPEED PWR_FAN_SPEED +12V GND CPU (4 針 CPU_FAN1) ( 見第 2 頁第 4 項 ) FAN_SPEED_CONTROL CPU_FAN_SPEED +12V GND 1 2 3 4 請將 CPU 4-Pin CPU 風扇 (Quiet Fan 3-Pin CPU 3-Pin CPU CPU Pin 1-3。 Pin 1-3 連接 3-Pin 簡體中文 207 ASRock A75M-HVS Motherboard - ASRock A75M-HVS | Quick Installation Guide - Page 208
ATX 1 13 ATX 12V 接頭 (8 針 ATX12V1) ( 見第 2 頁第 1 項 ) 5 1 8 4 ATX 12V 8-pin ATX 12V 4-pin ATX 12V 4-pin ATX 12V Pin 1 和 Pin 5 插上電 源接頭。 5 1 4-Pin ATX 12V 8 4 (9 針 COM1) ( 見第 2 頁第 16 項 ) 這個 COM1 簡體中文 208 ASRock A75M-HVS Motherboard - ASRock A75M-HVS | Quick Installation Guide - Page 209
64 位元 RAID 功能的 SATA3 Windows® XP / XP 64 Using SATA3 HDDs without NCQ function NCQ 功能的 SATA3 硬盤 ) 步驟 1: 設置 UEFI。 A. 進入 UEFI SETUP UTILITY (UEFI Advanced Screen ( 高級 Storage Configuration B. 將"SATA Mode"(SATA IDE]。 步驟 2 Windows® XP / XP 64 簡體中文 209 ASRock A75M-HVS Motherboard - ASRock A75M-HVS | Quick Installation Guide - Page 210
VistaTM / VistaTM 64 Using SATA3 HDDs with NCQ function NCQ 功能的 SATA3 硬盤 ) 步驟 1: 設置 UEFI。 A. 進入 UEFI SETUP UTILITY (UEFI Advanced Screen ( 高級 Storage Configuration B. 將"SATA Mode"(SATA AHCI]。 步驟 2 Windows® 7 / 7 64 位元 / VistaTM / VistaTM 64 簡體中文 210 ASRock A75M-HVS Motherboard - ASRock A75M-HVS | Quick Installation Guide - Page 211
3. BIOS 信息 Flash Memory 存儲了 BIOS POST F2> 或 < D e l B I O S P O S T P O S T B I O S Ctrl>++ - ASRock A75M-HVS | Quick Installation Guide - Page 212
SJ/T 11364-2006 10 年。 圖一 部件名稱 鉛 (Pb) 鎘 (Cd) 汞 (Hg Cr(VI PBB PBDE) X O O O O O X O O O O O O SJ/T 11363-2006 X SJ/T 11363-2006 2002/95/EC 簡體中文 212 ASRock A75M-HVS Motherboard - ASRock A75M-HVS | Quick Installation Guide - Page 213
CPU http://www.asrock.com www.asrock.com/support/index.asp 1.1 華擎 A75M-HVS 主機板 (Micro ATX 規格 : 8.9 英吋 x 8.5 英吋 , 22.6 公分 x 21.6 公分 ) 華擎 A75M-HVS A75M-HVS Serial ATA(SATA I/O 擋板 ASRock提醒您... 若要在Windows® 7 / 7 64位元 / VistaTM / VistaTM 64 BIOS選項設為AHCI BIOS 213 ASRock A75M-HVS Motherboard - ASRock A75M-HVS | Quick Installation Guide - Page 214
(12bpc)、 xvYCC 與 HBR HDMI 5 HDMI 1.4a 3D AMD Steady VideoTM HDMI HDCP 功能 - HDMI 1080p BD) / HD-DVD 光碟 - 5.1 VIA® VT1705 THX TruStudioTM - PCIE x1 Gigabit LAN 10/100/1000 Mb/s - Realtek RTL8111E Wake-On-LAN Energy Efficient Ethernet 802.3az - 支援 PXE 繁體中文 214 ASRock A75M-HVS Motherboard - ASRock A75M-HVS | Quick Installation Guide - Page 215
) - ACPI 1.1 jumperfree DRAM、VDDP、SB AMD Live! Explorer,AMD Fusion,CyberLink MediaEspresso 6.5 CyberLink DVD 套餐 )(OEM ASRock Extreme Tuning Utility (AXTU 6 Instant Flash 7 APP Charger 8 SmartView 9 XFast USB 10) - Hybrid Booster ASRock U-COP 11) 繁體中文 215 ASRock A75M-HVS Motherboard - ASRock A75M-HVS | Quick Installation Guide - Page 216
硬體監控 - CPU - CPU - CPU - CPU 12V, +5V, +3.3V 操作系統 - Microsoft® Windows® 7/7 64 位元 /VistaTM/VistaTM 64 位元 / XP SP3/XP 64 位元 認證 - FCC, CE, WHQL - 支援 ErP/EuP ErP/EuP 12) http://www.asrock.com BIOS 繁體中文 216 ASRock A75M-HVS Motherboard - ASRock A75M-HVS | Quick Installation Guide - Page 217
APP Charger iPhone 40%。華擎 APP Charger S1 S3 S4 S5 APP Charger 9、 S m a r t V i e w I E F a c e b o o k ASRock SmartView SmartView Windows® 7 / 7 64 位元 / VistaTM / VistaTM 64 IE8。ASRock 網站:http://www.asrock.com/Feature/SmartView/ index.asp ASRock A75M-HVS Motherboard 217 繁體中文 - ASRock A75M-HVS | Quick Installation Guide - Page 218
10、華擎 XFast USB 可提升 USB 11 C P U C P U PC CPU 12、EuP, 全稱 Energy Using Product EuP 1.00W EuP EuP EuP Intel EuP 100mA 5Vsb 50 EuP 218 ASRock A75M-HVS Motherboard 繁體中文 - ASRock A75M-HVS | Quick Installation Guide - Page 219
2 Micro ATX 8.9 英吋 x 8.5 英吋 , 22.6 公分 x 21.6 安全防範 1、 2、 3、 4、 5、 繁體中文 219 ASRock A75M-HVS Motherboard - ASRock A75M-HVS | Quick Installation Guide - Page 220
2.1 CPU 安裝 步驟 1 90 2: 將 CPU CPU CPU 3 C P U CPU 步驟 4 拉桿 90°角抬起 步驟 1 CPU 步驟 2 / 步驟 3: 將 CPU 步驟 4 2.2 安裝 CPU CPU CPU CPU CPU CPU FAN 接口 (CPU_FAN1, 參看第 2 頁 No. 4 CPU 繁體中文 220 ASRock A75M-HVS Motherboard - ASRock A75M-HVS | Quick Installation Guide - Page 221
2.3 240- 針 DDR3 (Double Data Rate DIMM DDR3 DIMM 1. 請勿將 DDR 或 DDR2 DDR3 DIMM 2 1 2 繁體中文 notch break notch break 3 ASRock A75M-HVS Motherboard 221 - ASRock A75M-HVS | Quick Installation Guide - Page 222
插槽和 2 條 PCI Express 插槽。 PCI 32 PCI 卡。 PCIE 插槽: PCIE1 (PCIE x1 PCIE x1 卡 , SATA2 卡等。 PCIE2 (PCIE x16 PCI Express x16 步驟 1 步驟 2 3 4 2.5 AMD A M D A M D G P U AMD A75 FCH (Hudson-D3 AMD Windows® 7 Windows® VistaTM / XP 14 PCI Express 222 ASRock A75M-HVS Motherboard 繁體中文 - ASRock A75M-HVS | Quick Installation Guide - Page 223
步驟 1. 在 ASRock USB 2.0 USB 2.0 接頭(9-pin 4-pin,白色) 步驟 2. 將前 USB USB 2.0 pin 1 至 5 pin USB_PWR PP+ GND DUMMY GND IRTX IRRX ATX+5VSB 步驟 3. USB MCE USB 繁體中文 裝於 3 1 USB USB 功能。 2 USB USB 3 ASRock ASRock ASRock http://www.asrock.com 223 ASRock A75M-HVS Motherboard - ASRock A75M-HVS | Quick Installation Guide - Page 224
2.7 3 1 和針腳 2 CMOS (CLRCMOS1, 3 2 頁第 18 項 ) 設定 默認設置 清除 CMOS 註: C L R C M O S1 C M O S 15 CLRCMOS1 的 pin2 及 pin3 短路 5 BIOS CMOS BIOS CMOS CMOS C M O S 1394 GUID 及 MAC 繁體中文 224 ASRock A75M-HVS Motherboard - ASRock A75M-HVS | Quick Installation Guide - Page 225
SPD0 STB# USB 2.0 (9 針 USB6_7) ( 見第 2 頁第 21 項 ) (9 針 USB8_9) ( 見第 2 頁第 23 項 ) (9 針 USB10_11) ( 見第 2 頁第 24 項 ) USB_PWR P-9 P+9 GND DUMMY 1 GND P+8 P-8 USB_PWR USB_PWR P-11 P+11 GND DUMMY 1 GND P+10 P-10 USB_PWR I/O USB 2.0 USB 2.0 USB 2.0 USB 2.0 接口。 ASRock A75M-HVS Motherboard 225 - ASRock A75M-HVS | Quick Installation Guide - Page 226
1 High Definition Audio, HDA Jack Sensing HDA 2 AC'97 A. 將 Mic_IN(MIC) 連接到 MIC2_L。 B. 將 Audio_R(RIN) 連接到 OUT2_R, 將 Audio_L(LIN) 連接到 OUT2_L。 C. 將 Ground(GND) 連接到 Ground(GND)。 D. MIC_RET 和 OUT_RET 僅用於 HD AC'97 (9 針 PANEL1) ( 見第 2 頁第 17 項 ) 繁體中文 226 ASRock A75M-HVS Motherboard - ASRock A75M-HVS | Quick Installation Guide - Page 227
30 項 ) FAN_SPEED_CONTROL GND +12V CHA_FAN_SPEED PWR_FAN_SPEED +12V GND CPU (4 針 CPU_FAN1) ( 見第 2 頁第 4 項 ) FAN_SPEED_CONTROL CPU_FAN_SPEED +12V GND 請將 CPU 1 2 3 4 4-Pin CPU 風扇 (Quiet Fan 3-Pin CPU 3-Pin CPU CPU Pin 1-3。 Pin 1-3 連接 3-Pin 繁體中文 227 ASRock A75M-HVS Motherboard - ASRock A75M-HVS | Quick Installation Guide - Page 228
ATX 1 13 ATX 12V (8 針 ATX12V1) ( 見第 2 頁第 1 項 ) 5 1 8 4 ATX 12V 8-pin ATX 12V 4-pin ATX 12V 4-pin ATX 12V 5 1 順著 Pin 1 和 Pin 5 序列埠 (9 針 COM1) ( 見第 2 頁第 16 項 ) 4-Pin ATX 12V 8 4 COM1 繁體中文 228 ASRock A75M-HVS Motherboard - ASRock A75M-HVS | Quick Installation Guide - Page 229
功能的 SATA3 Windows® XP / XP 64 Using SATA3 HDDs without NCQ and Hot Plug functions NCQ SATA3 硬碟 ) 步驟 1: 設置 UEFI。 A. 進入 UEFI SETUP UTILITY (UEFI Advanced Screen ( 進階 Storage Configuration B. 將"SATA Mode"(SATA IDE]。 步驟 2 Windows® XP / XP 64 繁體中文 229 ASRock A75M-HVS Motherboard - ASRock A75M-HVS | Quick Installation Guide - Page 230
VistaTM 64 Using SATA3 HDDs with NCQ and Hot Plug functions NCQ SATA3 硬碟 ) 步驟 1: 設置 UEFI。 A. 進入 UEFI SETUP UTILITY (UEFI Advanced Screen ( 進階 Storage Configuration B. 將"SATA Mode"(SATA AHCI]。 步驟 2 Windows® 7 / 7 64 位元 / VistaTM / VistaTM 64 繁體中文 230 ASRock A75M-HVS Motherboard - ASRock A75M-HVS | Quick Installation Guide - Page 231
3. BIOS 訊息 Flash Memory BIOS POST F2> 或 + + - ASRock A75M-HVS | Quick Installation Guide - Page 232
> Boot > Boot Option #1. ("xxx" is the device which contains your Windows® installation files. Normally it is an optical drive.) You can also press to launch boot menu at system POST and choose the item "UEFI:xxx" to boot. 4. Start Windows® installation. 232 ASRock A75M-HVS Motherboard English
-
 1
1 -
 2
2 -
 3
3 -
 4
4 -
 5
5 -
 6
6 -
 7
7 -
8
-
9
-
10
-
11
-
12
-
13
-
14
-
15
-
16
-
17
-
18
-
19
-
20
-
21
-
22
-
23
-
24
-
25
-
26
-
27
-
28
-
29
-
30
-
31
-
32
-
33
-
34
-
35
-
36
-
37
-
38
-
39
-
40
-
41
-
42
-
43
-
44
-
45
-
46
-
47
-
48
-
49
-
50
-
51
-
52
-
53
-
54
-
55
-
56
-
57
-
58
-
59
-
60
-
61
-
62
-
63
-
64
-
65
-
66
-
67
-
68
-
69
-
70
-
71
-
72
-
73
-
74
-
75
-
76
-
77
-
78
-
79
-
80
-
81
-
82
-
83
-
84
-
85
-
86
-
87
-
88
-
89
-
90
-
91
-
92
-
93
-
94
-
95
-
96
-
97
-
98
-
99
-
100
-
101
-
102
-
103
-
104
-
105
-
106
-
107
-
108
-
109
-
110
-
111
-
112
-
113
-
114
-
115
-
116
-
117
-
118
-
119
-
120
-
121
-
122
-
123
-
124
-
125
-
126
-
127
-
128
-
129
-
130
-
131
-
132
-
133
-
134
-
135
-
136
-
137
-
138
-
139
-
140
-
141
-
142
-
143
-
144
-
145
-
146
-
147
-
148
-
149
-
150
-
151
-
152
-
153
-
154
-
155
-
156
-
157
-
158
-
159
-
160
-
161
-
162
-
163
-
164
-
165
-
166
-
167
-
168
-
169
-
170
-
171
-
172
-
173
-
174
-
175
-
176
-
177
-
178
-
179
-
180
-
181
-
182
-
183
-
184
-
185
-
186
-
187
-
188
-
189
-
190
-
191
-
192
-
193
-
194
-
195
-
196
-
197
-
198
-
199
-
200
-
201
-
202
-
203
-
204
-
205
-
206
-
207
-
208
-
209
-
210
-
211
-
212
-
213
-
214
-
215
-
216
-
217
-
218
-
219
-
220
-
221
-
222
-
223
-
224
-
225
-
226
-
227
-
228
-
229
-
230
-
231
-
232
 |
 |

1
ASRock
A75M-HVS
Motherboard
English
Copyright Notice:
No part of this installation guide may be reproduced, transcribed, transmitted, or trans-
lated in any language, in any form or by any means, except duplication of documentation
by the purchaser for backup purpose, without written consent of ASRock Inc.
Products and corporate names appearing in this guide may or may not be registered
trademarks or copyrights of their respective companies, and are used only for identi
fi
ca-
tion or explanation and to the owners’ bene
fi
t, without intent to infringe.
Disclaimer:
Speci
fi
cations and information contained in this guide are furnished for informational use
only and subject to change without notice, and should not be constructed as a commit-
ment by ASRock. ASRock assumes no responsibility for any errors or omissions that may
appear in this guide.
With respect to the contents of this guide, ASRock does not provide warranty of any kind,
either expressed or implied, including but not limited to the implied warranties or condi-
tions of merchantability or
fi
tness for a particular purpose. In no event shall ASRock, its
directors, of
fi
cers, employees, or agents be liable for any indirect, special, incidental, or
consequential damages (including damages for loss of pro
fi
ts, loss of business, loss of
data, interruption of business and the like), even if ASRock has been advised of the pos-
sibility of such damages arising from any defect or error in the guide or product.
This device complies with Part 15 of the FCC Rules. Operation is subject to the following
two conditions:
(1) this device may not cause harmful interference, and
(2) this device must accept any interference received, including interference that
may cause undesired operation.
CALIFORNIA, USA ONLY
The Lithium battery adopted on this motherboard contains Perchlorate, a toxic substance
controlled in Perchlorate Best Management Practices (BMP) regulations passed by the
California Legislature. When you discard the Lithium battery in California, USA, please
follow the related regulations in advance.
“Perchlorate Material-special handling may apply, see
www.dtsc.ca.gov/hazardouswaste/perchlorate”
ASRock Website: http://www.asrock.com
Published June 2011
Copyright
©
2011 ASRock INC. All rights reserved.