ASRock A770DE Quick Installation Guide
ASRock A770DE Manual
 |
View all ASRock A770DE manuals
Add to My Manuals
Save this manual to your list of manuals |
ASRock A770DE manual content summary:
- ASRock A770DE | Quick Installation Guide - Page 1
benefit, without intent to infringe. Disclaimer: Specifications and information contained in this guide are furnished for informational use only and subject ASRock Website: http://www.asrock.com Published April 2009 Copyright©2009 ASRock INC. All rights reserved. 1 ASRock A770DE+ Motherboard - ASRock A770DE | Quick Installation Guide - Page 2
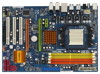
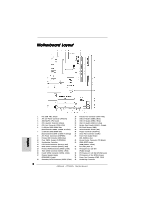
Motherboard Layout English 1 PS2_USB_PW1 Jumper 19 Chassis Fan Connector (CHA_FAN1) 2 ATX 12V Power Connector (ATX12V1) 20 USB 2.0 Header (USB8_9, Blue) 3 AM2 940-Pin CPU Socket 21 USB 2.0 Header (USB6_7, Blue) 4 CPU Heatsink Retention Module 22 USB 2.0 Header (USB10_11, Blue) 5 CPU Fan - ASRock A770DE | Quick Installation Guide - Page 3
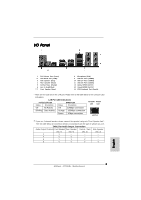
(Pink) 9 USB 2.0 Ports (USB45) 10 USB 2.0 Ports (USB23) 11 USB 2.0 Audio Output Connection Audio Output Channels Front Speaker Rear Speaker Central / Bass Side Speaker (No. 7) (No. 4) (No. 5) (No. 3) 2 V -- -- -- 4 V V -- -- 6 V V V -- 8 V V V V 3 ASRock A770DE+ Motherboard - ASRock A770DE | Quick Installation Guide - Page 4
Streaming function, you need to connect a front panel audio cable to the front panel audio header. After restarting your computer, you will find "VIA HD Audio Deck" tool on your system. Please follow below instructions according to the OS you install. For Windows® XP / XP 64-bit OS: Please click - ASRock A770DE | Quick Installation Guide - Page 5
of this manual occur, the updated version will be available on ASRock website without further notice. You may find the latest VGA cards and CPU support lists on ASRock website as well. ASRock website http://www.asrock.com If you require technical support related to this motherboard, please visit - ASRock A770DE | Quick Installation Guide - Page 6
CPU Chipset Memory Expansion Slot Audio LAN Rear Panel I/O 6 - 12.0-in x 8.2-in, 30.5 cm x 20.8 cm - Support for Socket AM2+ / AM2 processors: AMD PhenomTM FX / Phenom / Athlon 64 FX / Athlon 64 X2 Dual-Core / Athlon X2 Dual-Core / Athlon 64 / Sempron processor - Support for AM3 processors: AMD - ASRock A770DE | Quick Installation Guide - Page 7
Multi-adjustment - Supports Smart BIOS - Drivers, Utilities, AntiVirus Software (Trial Version), AMD OverDriveTM Utility - ASRock OC Tuner (see CAUTION 8) - Intelligent Energy Saver (see CAUTION 9) - Instant Boot - Hybrid Booster: - CPU Frequency Stepless Control (see CAUTION 10) - ASRock U-COP (see - ASRock A770DE | Quick Installation Guide - Page 8
installation. 3. Whether 1066MHz memory speed is supported depends on the AM2+ CPU you adopt. If you want to adopt DDR2 1066 memory module on this motherboard, please refer to the memory support list on our website for the compatible memory modules. ASRock website http://www.asrock.com 4. Due to - ASRock A770DE | Quick Installation Guide - Page 9
system. 12. This motherboard supports ASRock AM2 Boost overclocking technology. If you enable this function in the BIOS setup, the memory performance will improve up to 12.5%, but the effect still depends on the AM2 CPU you adopt. Enabling this function will overclock the chipset/CPU reference clock - ASRock A770DE | Quick Installation Guide - Page 10
, place it on a grounded antistatic pad or in the bag that comes with the component. 5. When placing screws into the screw holes to secure the motherboard to the chassis, please do not over-tighten the screws! Doing so may damage the motherboard. 10 ASRock A770DE+ Motherboard English - ASRock A770DE | Quick Installation Guide - Page 11
the heatsink are securely fastened and in good contact with each other. Then connect the CPU fan to the CPU FAN connector (CPU_FAN1, see Page 2, No. 5). For proper installation, please kindly refer to the instruction manuals of the CPU fan and the heatsink. English 11 ASRock A770DE+ Motherboard - ASRock A770DE | Quick Installation Guide - Page 12
Technology . 4. It is not allowed to install a DDR memory module into DDR2 slot; otherwise, this motherboard and DIMM may be damaged. 5. If you adopt DDR2 1066 memory modules on this motherboard, it is recommended to install them on DDRII_3 and DDRII_4 slots. English 12 ASRock A770DE+ Motherboard - ASRock A770DE | Quick Installation Guide - Page 13
cause permanent damage to the motherboard and the DIMM if you force the DIMM into the slot at incorrect orientation. Step 3. Firmly insert the DIMM into the slot until the retaining clips at both ends fully snap back in place and the DIMM is properly seated. 13 ASRock A770DE+ Motherboard English - ASRock A770DE | Quick Installation Guide - Page 14
as Gigabit LAN card, SATA2 card, etc., or used to install PCI Express graphics cards to support CrossFireTM function. 1. If you plan to install only one PCI Express VGA card on this motherboard, please install it on PCIE2 slot (Green). 2. For the information of the compatible CrossFireTM Mode PCI - ASRock A770DE | Quick Installation Guide - Page 15
is supported with Windows® XP with Service Pack 2 and VistaTM OS. Please check AMD website for ATITM CrossFireTM driver updates. What graphics cards work with CrossFireTM? A complete CrossFireTM system requires a CrossFireTM Ready motherboard, a CrossFireTM Edition graphics card and a compatible - ASRock A770DE | Quick Installation Guide - Page 16
by installing two CrossFireTM Bridge on CrossFireTM Bridge Interconnects on the top of Radeon graphics cards. (CrossFireTM Bridge is provided with the graphics card you purchase, not bundled with this motherboard. Please refer to your graphics card vendor for details.) 16 ASRock A770DE+ Motherboard - ASRock A770DE | Quick Installation Guide - Page 17
CATALYST Control Center. Please check AMD website for details. Restart your computer. Install the VGA card drivers to your system, and restart your computer. Then you will find "ATI Catalyst Control Center" on your Windows® taskbar. ATI Catalyst Control Center 17 ASRock A770DE+ Motherboard English - ASRock A770DE | Quick Installation Guide - Page 18
Display upgrade. With the external add-on PCI Express VGA cards, you can easily enjoy the benefits of Surround Display feature. For the detailed instruction, please refer to the document at the following path in the Support CD: ..\ Surround Display Information English 18 ASRock A770DE+ Motherboard - ASRock A770DE | Quick Installation Guide - Page 19
on CLRCMOS1 for 5 seconds. However, please do not clear the CMOS right after you update the BIOS. If you need to clear the CMOS when you just finish updating the BIOS, you must boot up the system first, and then shut it down before you do the clearCMOS action. English 19 ASRock A770DE+ Motherboard - ASRock A770DE | Quick Installation Guide - Page 20
the black end of Power Cable SATA power cable to the power (Optional) connect to the SATA HDD power connector connect to the power supply connector on each drive. Then connect the white end of SATA power cable to the power connector of the power supply. 20 ASRock A770DE+ Motherboard English - ASRock A770DE | Quick Installation Guide - Page 21
MPEG card. This is an interface for the front panel audio cable that allows convenient connection and control of audio devices. 1. High Definition Audio supports Jack Sensing, but the panel wire on the chassis must support HDA to function correctly. Please follow the instruction in our manual and - ASRock A770DE | Quick Installation Guide - Page 22
4-Pin CPU fan (Quiet Fan) support, the 3-Pin CPU fan still can work successfully even without the fan speed control function. If you plan to connect the 3-Pin CPU fan to the CPU fan connector on this motherboard, please connect it to Pin 1-3. Pin 1-3 Connected 3-Pin Fan Installation ATX Power - ASRock A770DE | Quick Installation Guide - Page 23
Header (3-pin HDMI_SPDIF1) (see p.2 No. 30) HDMI_SPDIF header, providing SPDIF audio output to HDMI VGA card, allows the system to con nect HDMI Digital TV/ projector/LCD devices. Please connect the HDMI_SPDIF connector of HDMI VGA card to this header. on English 23 ASRock A770DE+ Motherboard - ASRock A770DE | Quick Installation Guide - Page 24
drive first. Then, the drivers compatible to your system can be auto-detected and listed on the support CD driver page. Please follow the order from up to bottom side to install those required drivers. Therefore, the drivers you install can work properly. 2.10 Installing Windows® XP / XP 64-bit - ASRock A770DE | Quick Installation Guide - Page 25
install Windows?" page, please insert the ASRock Support CD into your optical drive, and click the "Load Driver" button on the left on the bottom to load the AMD AHCI drivers. AMD AHCI drivers are in the following path in our Support CD: (There are two ASRock Support CD in the motherboard gift - ASRock A770DE | Quick Installation Guide - Page 26
This motherboard supports Untied Overclocking Technology, which means during overclocking, FSB enjoys better margin due to fixed PCI / PCIE buses. Before you enable Untied Overclocking function, please enter "Overclock Mode" option of BIOS setup to set the selection from [Auto] to [CPU, PCIE - ASRock A770DE | Quick Installation Guide - Page 27
Information The Flash Memory on the motherboard stores BIOS Setup Utility. When you start up the computer, please press during the Power-On-Self-Test (POST) to enter BIOS Setup utility; otherwise, POST continues with its test routines. If you wish to enter BIOS Setup after POST, please restart - ASRock A770DE | Quick Installation Guide - Page 28
Modell benötigen, besuchen Sie bitte unsere Webseite: www.asrock.com/support/index.asp 1.1 Kartoninhalt ASRock A770DE+ Motherboard (ATX-Formfaktor: 30.5 cm x 20.8 cm; 12.0 Zoll x 8.2 Zoll) ASRock A770DE+ Schnellinstallationsanleitung ASRock A770DE+ Support-CD Ein 80-adriges Ultra-ATA 66/100/133 IDE - ASRock A770DE | Quick Installation Guide - Page 29
1.2 Spezifikationen Plattform CPU Chipsatz Speicher Erweiterungssteckplätze Audio LAN E/A-Anschlüsse an der Rückseite - ATX-Formfaktor: 30.5 cm x 20.8 cm; 12.0 Zoll x 8.2 Zoll - Unterstützung für Socket AM2+ / AM2-Prozessoren: AMD PhenomTM FX / Phenom / Athlon 64 FX / Athlon 64 X2 Dualkern / - ASRock A770DE | Quick Installation Guide - Page 30
Intelligent Energy Saver (Intelligente Energiesparfunktion) (siehe VORSICHT 9) - Sofortstart - Hybrid Booster: - Schrittloser CPU-Frequenz-Kontrolle (siehe VORSICHT 10) - ASRock U-COP (siehe VORSICHT 11) - Boot Failure Guard (B.F.G. - Systemstartfehlerschutz) Deutsch 30 ASRock A770DE+ Motherboard - ASRock A770DE | Quick Installation Guide - Page 31
wird, hängt von der von Ihnen eingesetzten AM2+-CPU ab. Schauen Sie bitte auf unseren Internetseiten in der Liste mit unterstützten Speichermodulen nach, wenn Sie DDR2 1066-Speichermodule einsetzen möchten. ASRock-Internetseite: http://www.asrock.com 4. Durch Betriebssystem-Einschränkungen kann die - ASRock A770DE | Quick Installation Guide - Page 32
7. Das Power Management für USB 2.0 arbeitet unter Microsoft® Windows® VistaTM BIOS. Weitere Bedienungshinweise zum Intelligent Energy Saver finden Sie auf unseren Internetseiten. ASRock-Internetseite: http://www.asrock.com 10. Obwohl dieses Motherboard stufenlose Steuerung bietet, wird Overclocking - ASRock A770DE | Quick Installation Guide - Page 33
Unterlage, oder zurück in die Tüte, mit der die Komponente geliefert wurde. 5. Wenn Sie das Motherboard mit den Schrauben an dem Computergehäuse befestigen, überziehen Sie bitte die Schrauben nicht! Das Motherboard kann sonst beschädigt werden. Deutsch 33 ASRock A770DE+ Motherboard - ASRock A770DE | Quick Installation Guide - Page 34
gut befestigt sind und einen guten Kontakt zueinander haben. Verbinden Sie dann den CPULüfter mit dem CPU-LÜFTER-Anschluss (CPU_FAN1, siehe Seite 2, Nr. 5). Beziehen Sie sich für eine richtige Installation auf die Handbücher des CPULüfters und des Kühlkörpers. Deutsch 34 ASRock A770DE+ Motherboard - ASRock A770DE | Quick Installation Guide - Page 35
zulässig, DDR in einen DDR2 Steckplatz zu installieren; andernfalls könnten Motherboard und DIMMs beschädigt werden. 5. Wenn Sie DDR2 1066-Speichermodule für dieses Motherboard übernehmen, wird empfohlen, sie in den DDRII_3- und DDRII_4Steckplätzen zu installieren. 35 ASRock A770DE+ Motherboard - ASRock A770DE | Quick Installation Guide - Page 36
in die Steckplätze, so dass die Halteklammern an beiden Enden des Moduls einschnappen und das DIMM-Modul fest an Ort und Stelle sitzt. 36 ASRock A770DE+ Motherboard - ASRock A770DE | Quick Installation Guide - Page 37
- und PCI Express-Slots): Es stehen 3 PCI- und 3 PCI Express-Slot auf dem A770DE+ Motherboard zur Verfügung. PCI-Slots: PCI-Slots werden zur Installation von Erweiterungskarten mit dem 32bit PCI Schritt 4: Befestigen Sie die Karte mit der Schraube aus Schritt 2. 37 ASRock A770DE+ Motherboard Deutsch - ASRock A770DE | Quick Installation Guide - Page 38
Funktion CrossFireTM vom Betriebssystem Windows® XP mit Service Pack 2 und VistaTM unterstützt. Besuchen Sie die AMD-Website, um sich 2A oder mehr leisten können. CMOS löschen (CLRCMOS1, 3-Pin jumper) (siehe S.2, No. 10) 38 DefaultEinstellung CMOS löschen ASRock A770DE+ Motherboard Deutsch - ASRock A770DE | Quick Installation Guide - Page 39
BIOS löschen müssen, müssen Sie zuerst das System starten und dann wieder ausschalten, bevor Sie den CMOS-Inhalt löschen. 2.8 Anschlüsse Anschlussleisten sind KEINE Jumper. Setzen Sie KEINE Jumperkappen auf die Pins übertragungsrate bis SATAII_2 SATAII_4 3,0 Gb/s. 39 ASRock A770DE+ Motherboard - ASRock A770DE | Quick Installation Guide - Page 40
ützt ein optionales, drahtloses Sendeund Empfangs-Infrarotmodul. Interne Audio-Anschlüsse (4-Pin CD1) (CD1: siehe S.2, No. 29) Diese ermöglichen Ihnen Stereo- CD1 Signalquellen, wie z. B. CD-ROM, DVD-ROM, TV-Tuner oder MPEG-Karten mit Ihrem System zu verbinden. 40 ASRock A770DE+ Motherboard - ASRock A770DE | Quick Installation Guide - Page 41
BIOS-Setup pin CHA_FAN1) (siehe S.2, No. 19) (3-pin PWR_FAN1) (siehe S.2, No. 35) Schließen Sie den Gehäuselautsprecher an diesen Header an. Verbinden Sie die Lüfterkabel mit den Lüfteranschlüssen, wobei der schwarze Draht an den Schutzleiterstift angeschlossenwird. 41 ASRock A770DE+ Motherboard - ASRock A770DE | Quick Installation Guide - Page 42
Sie einen traditionellen 4-Pin ATX 12V Energieversorgung adoptieren. Um die 4 8 4-Pin ATX Energieversorgung zu verwenden, stecken Sie bitte Ihre Energieversorgung zusammen mit dem Pin 1 und Pin 5 ein. Installation der 4-Pin ATX 12V Energieversorgung 1 6 Deutsch 42 ASRock A770DE+ Motherboard - ASRock A770DE | Quick Installation Guide - Page 43
ßen ren 12 24 teils 1 13 COM-Anschluss-Header (9-pin COM1) (siehe S.2 - No. 27) Dieser COM-AnschlussHeader wird Bitte verbinden Sie das schwarze Ende (A) des HDMI_SPDIF-Kabels mit dem HDMI_SPDIF-Anschluss am Motherboard. Schließen Sie dann das weiße Ende (B oder C) des HDMI_SPDIF-Kabels an - ASRock A770DE | Quick Installation Guide - Page 44
Sie BIOS. A. Rufen Sie im BIOS-DIENSTPROGRAMM den Bildschirm „Erweitert" und „IDE-Konfiguration" auf. B. Setzen Sie die Option "SATA Operation Mode" (SATA-Betriebsmodus) auf [IDE]. SCHRITT 2: Installieren Sie Windows® XP / XP 64-Bit in Ihrem System. Deutsch 44 ASRock A770DE+ Motherboard - ASRock A770DE | Quick Installation Guide - Page 45
/ VistaTM 64-Bit.) .. \ I386 (Für Windows® VistaTM-Benutzer) .. \ AMD64 (Für Windows® VistaTM 64-Bit Benutzer) Legen Sie danach noch einmal die Windows® VistaTM / VistaTM 64-Bit optische Disc in das optische Laufwerk, um die Installation fortzusetzen. Deutsch 45 ASRock A770DE+ Motherboard - ASRock A770DE | Quick Installation Guide - Page 46
bitte die Option "Overclock Mode" (Übertaktungsmodus) im BIOS von [Auto] auf [CPU, PCIE, Async.] um. Dadurch wird der CPU-FSB beim Übertakten die Warnung vor möglichen Overclocking-Risiken auf Seite 31, bevor Sie die Untied Overclocking-Technologie anwenden. 46 ASRock A770DE+ Motherboard Deutsch - ASRock A770DE | Quick Installation Guide - Page 47
3. BIOS-Information Das Flash Memory dieses Motherboards speichert das Setup-Utility. Drücken Sie während des POST (Power-On-Self-Test) um ins Setup zu gelangen, ansonsten werden die Testroutinen weiter abgearbeitet. Wenn Sie ins Setup gelangen wollen, nachdem der POST durchgeführt wurde, mü - ASRock A770DE | Quick Installation Guide - Page 48
pour de plus amples informations particulières au modèle que vous utilisez. www.asrock.com/support/index.asp 1.1 Contenu du paquet Carte mère ASRock A770DE+ (Facteur de forme ATX: 12.0 pouces x 8.2 pouces, 30.5 cm x 20.8 cm) Guide d'installation rapide ASRock A770DE+ CD de soutien ASRock A770DE+ Un - ASRock A770DE | Quick Installation Guide - Page 49
haute définition de première qualité CH Windows® VistaTM (codec audio VIA® VT1708S) - PCIE x1 Gigabit LAN 10/100/1000 Mb/s - Realtek RTL8111DL - Support du Wake-On-LAN I/O Panel - 1 x port souris PS/2 - 1 x port clavier PS/2 - 1 x Port de sortie coaxial SPDIF 49 ASRock A770DE+ Motherboard Français - ASRock A770DE | Quick Installation Guide - Page 50
"Plug and Play" - Compatible pour événements de réveil ACPI 1.1 - Gestion jumperless - Support SMBIOS 2.3.1 - CPU, NB, SB, VCCM Tension Multi-ajustement - Prise en charge du Smart BIOS - Pilotes, utilitaires, logiciel anti-virus (Version d'essai), Utilitaire AMD OverDriveTM - Tuner ASRock OC (voir - ASRock A770DE | Quick Installation Guide - Page 51
l'entrée microphone, cette carte mère supporte les deux modes stéréo et mono. Pour la sortie audio, cette carte mère supporte les modes 2-canaux, 4-canaux, 6-canaux et 8-canaux. Veuillez vous référer au tableau en page 3 pour effectuer la bonne connexion. Français 51 ASRock A770DE+ Motherboard - ASRock A770DE | Quick Installation Guide - Page 52
les configurations CPU/DRAM. Si votre systèmes devient instable une fois la fonction AM2 Boost activée, il est possible qu'elle ne s'applique pas à votre système. Vous pouvez choisir de désactiver cette fonction pour conserver la stabilité de votre système. 52 ASRock A770DE+ Motherboard Français - ASRock A770DE | Quick Installation Guide - Page 53
mère à facteur de forme ATX (12,0 po x 8,2 po support antistatique ou dans son sachet d'origine. 5. Lorsque vous placez les vis dans les orifices pour vis pour fixer la carte mère sur le châssis, ne serrez pas trop les vis ! Vous risquez sinon d'endommager la carte mère. 53 ASRock A770DE+ Motherboard - ASRock A770DE | Quick Installation Guide - Page 54
l'un avec l'autre. Ensuite, connectez le ventilateur du CPU à la prise du VENTILATEUR DU CPU (CPU_FAN1, reportez-vous en page 2, No. 5). Pour une bonne installation, veuillez vous référer aux manuels d'instruction sur le ventilateur du CPU et le dissipateur. Français 54 ASRock A770DE+ Motherboard - ASRock A770DE | Quick Installation Guide - Page 55
des modules m émoire [DIMM] La carte mère A770DE+ dispose de quatre emplacements DIMM DDR2 (Double Data Rate 2) de 240-broches, et supporte la Technologie de Mémoire à Canal Double. Pour effectuer sur le slot DDR2; la carte mère et les DIMM pourraient être endommagés. 55 ASRock A770DE+ Motherboard - ASRock A770DE | Quick Installation Guide - Page 56
jusqu'à ce que les clips de maintien situés aux deux extrémités se ferment complètement et que le module DIMM soit inséré correctement. 56 ASRock A770DE+ Motherboard - ASRock A770DE | Quick Installation Guide - Page 57
mère, veuillez l'installer sur le slot PCIE2 (vert). 2. Pour l'information du Mode PCI compatible CrossFireTM Procédures de configuration des cartes Express VGA et CrossFireTM, référez-vous Au "mode d'emploi 4. Fixez la carte sur le châssis à l'aide d'une vis. 57 ASRock A770DE+ Motherboard Français - ASRock A770DE | Quick Installation Guide - Page 58
prise en charge par les OS Windows® XP avec le Service Pack 2 et VistaTM. Veuillez vérifier le site Web d'AMD pour les mises à jour des pilotes ATITM CrossFireTM. Pour la procédure de fonctionnement détaillée et la liste des cartes graphiques PCI Express compatibles, veuillez vous référer à la page - ASRock A770DE | Quick Installation Guide - Page 59
après avoir mis le BIOS à jour. Si vous avez besoin d'effacer la CMOS lorsque vous avez fini de mettre le BIOS à jour, vous ATA 66/100/133 80 conducteurs Note: Veuillez vous reporter aux instructions du fabricant de votre IDE périphérique pour les détails. Go/s. 59 ASRock A770DE+ Motherboard - ASRock A770DE | Quick Installation Guide - Page 60
infrarouge optionnel de transfert et de réception sans fil. Connecteurs audio internes (CD1 br. 4) (CD1: voir p.2 fig. 29) Ils vous permettent de gérer des entrées audio à partir de sources CD1 stéréo comme un CD-ROM, DVD-ROM, un tuner TV ou une carte MPEG. 60 ASRock A770DE+ Motherboard - ASRock A770DE | Quick Installation Guide - Page 61
. Veuillez suivre les instructions dans notre manuel et le manuel de châssis afin installer votre système. 2. Si vous utilisez le panneau audio AC'97, installez-le sur l'adaptateur audio du panneau avant conform correspondre le fil noir à la broche de terre. Français 61 ASRock A770DE+ Motherboard - ASRock A770DE | Quick Installation Guide - Page 62
si vous adoptez une approche 4 8 traditionnelle à 4 broches ATX 12V alimentation. Pour utiliser l'alimentation des 4 broches ATX, branchez votre alimentation avec la broche 1 et la broche 5. 1 6 4-Installation d'alimentation à 4 broches ATX 12V 62 ASRock A770DE+ Motherboard Français - ASRock A770DE | Quick Installation Guide - Page 63
charge un module de port COM. Connecteur HDMI_SPDIF (HDMI_SPDIF1 3-pin) (voir p.2 No. 30) Connecteur HDMI_SPDIF, fournissant une sortie audio SPDIF vers la carte VGA HDMI, et permettant au blanche (2 briches) C. extrémité blanche (3 briches) Français 4 8 1 6 63 ASRock A770DE+ Motherboard - ASRock A770DE | Quick Installation Guide - Page 64
le BIOS. A. Entrez dans UTILITAIRE DE CONFIGURATION BIOS écran Avancé Configuration IDE. B. Réglez l'option "SATA Operation Mode"« Mode de fonctionnement SATA » sur [IDE]. ETAPE 2: Installer le système d'exploitation Windows® XP / XP 64-bit sur votre système. 64 ASRock A770DE+ Motherboard Fran - ASRock A770DE | Quick Installation Guide - Page 65
optique pour démarrer votre système, et suivez les instructions pour installer l'OS Windows® VistaTM / VistaTM 64-bits sur votre système. Lorsque vous voyez la page "Où souhaitez-vous installer Windows ?", veuillez insérer le CD Support d' ASRock dans votre lecteur optique, et cliquer sur le bouton - ASRock A770DE | Quick Installation Guide - Page 66
du BIOS pour établir la sélection de [Auto] à [CPU, PCIE, Async.]. Par conséquent, le CPU FSB plus stable. Veuillez vous reporter à l'avertissement en page 51 pour connaître les risques liés à l'overclocking avant d'appliquer la technologie Untied Overclocking. 66 ASRock A770DE+ Motherboard - ASRock A770DE | Quick Installation Guide - Page 67
le BIOS La puce Flash Memory sur la carte mère stocke le Setup du BIOS. Lorsque vous démarrez l'ordinateur, veuillez presser pendant le POST (Power-On-SelfTest) pour entrer dans le BIOS; sinon, le POST continue ses tests de routine. Si vous désirez entrer dans le BIOS après le POST, veuillez - ASRock A770DE | Quick Installation Guide - Page 68
in x 8.2-in, 30.5 cm x 20.8 cm) Guida di installazione rapida ASRock A770DE+ CD di supporto ASRock A770DE+ Un cavo IDE 80-pin Ultra ATA 66/100/133 Due cavo dati Serial ATA (SATA) (Opzionale) Un cavo alimentatore HDD Serial ATA (SATA) (Opzionale) Un I/O Shield 68 ASRock A770DE+ Motherboard Italiano - ASRock A770DE | Quick Installation Guide - Page 69
espansione Audio LAN Pannello posteriore I/O - ATX Form Factor: 12.0-in x 8.2-in, 30.5 cm x 20.8 cm - Supporto per processori Socket AM2+ / AM2: AMD PhenomTM FX / Phenom / Athlon 64 FX / Athlon 64 X2 Dual-Core / Athlon X2 Dual-Core / Athlon 64 / processore Sempron - Supporto di processori AM3: AMD - ASRock A770DE | Quick Installation Guide - Page 70
- Stepless control per frequenza del processore (vedi ATTENZIONE 10) - ASRock U-COP (vedi ATTENZIONE 11) - Boot Failure Guard (B.F.G.) - ASRock AM2 Boost: Tecnologia brevettata ASRock per migliorare le prestazioni della memoria fino al 12,5% (vedi ATTENZIONE 12) 70 ASRock A770DE+ Motherboard - ASRock A770DE | Quick Installation Guide - Page 71
o meno, dipende dagli AM2+ CPU utilizzati. Se si desidera adottare il modulo di memoria DDR2 1066 su questa scheda madre, fare riferimento all'elenco delle memorie supportate nel nostro sito web per scoprire quali sono i moduli compatibili. Sito web ASRock http://www.asrock.com 4. A causa delle - ASRock A770DE | Quick Installation Guide - Page 72
di applicare l'apposita pasta siliconica tra il processore e il dissipatore quando si installa il sistema. 12. Questa scheda madre supporta la tecnologia di overclocking ASRock AM2 Boost. Se si abilita questa funzione nel Setup del BIOS, le prestazioni della memoria miglioreranno fino al 12 - ASRock A770DE | Quick Installation Guide - Page 73
2. Installazione Questa è una scheda madre con Form Factor ATX (12.0 pollici x 8.2 pollici; 30,5 cm x 20,8 cm). Prima di installare la scheda madre, studiare al telaio non serrare eccessivamente le viti! Altrimenti si rischia di danneggiare la scheda madre. 73 ASRock A770DE+ Motherboard Italiano - ASRock A770DE | Quick Installation Guide - Page 74
aderenza tra i due. Quindi collegare la ventolina CPU al connettore CPU FAN (CPU_FAN1, fare riferimento a pagina 2, Numero 5). Per eseguire un'installazione appropriata, fare riferimento al manuale d'istruzioni della ventolina CPU e del dispersore di calore. Italiano 74 ASRock A770DE+ Motherboard - ASRock A770DE | Quick Installation Guide - Page 75
Dual Channel Memory. 4. Non è consentito installare la DDR nello slot DDR2, altrimenti si possono danneggiare questa scheda madre e la DIMM. 5. Se si adottano moduli di memoria DDR2 1066 sulla scheda madre, si consiglia di installarli sugli slot DDRII_3 e DDRII_4. 75 ASRock A770DE+ Motherboard - ASRock A770DE | Quick Installation Guide - Page 76
DIMM nello slot fino a far scattare completamente in posizione i fermagli di ritegno alle due estremità e fino ad installare correttamente la DIMM nella sua sede. 76 ASRock A770DE+ Motherboard - ASRock A770DE | Quick Installation Guide - Page 77
2.4 Slot di espansione (Slot PCI ed Slot PCI Express) Sulla scheda madre A770DE+ c'è 3 slot PCI ed 3 slot PCI Express. Slot PCI: Sono utilizzati per installare schede di completamente inserita nello slot. Step 4. Agganciare la scheda allo chassis con le viti. 77 ASRock A770DE+ Motherboard Italiano - ASRock A770DE | Quick Installation Guide - Page 78
con qualsiasi applicazione 3D. Al momento la funzione CrossFireTM è supportata dai sistemi operativi Windows® XP con Service Pack 2 e VistaTM. COntrollare sul sito web AMD la presenza di driver aggiornati per ATITM CrossFireTM. Per le procedure di installazione dettagliate e per conoscere le - ASRock A770DE | Quick Installation Guide - Page 79
aver aggiornato il BIOS. Se è necessario cancellare la CMOS una volta completato l'aggiornamento del BIOS, è necessario riavviare alla scheda madre! Connettori Connettore del Floppy disk (33-pin FLOPPY1) (vedi p.2 item 26) Descrizione dei connettori Lato a 3.0 Gb/s. 79 ASRock A770DE+ Motherboard - ASRock A770DE | Quick Installation Guide - Page 80
audio interni (4-pin CD1) (CD1: vedi p.2 item 29) Questo collettore supporta moduli ad infrarossi optional per la trasmissione e la ricezione senza fili. Permettono di ricevere input stereo audio da fonti di CD1 suono come CD-ROM, DVD ROM,TV tuner, o schede MPEG. 80 ASRock A770DE+ Motherboard - ASRock A770DE | Quick Installation Guide - Page 81
ed alimentazione ventola (3-pin CHA_FAN1) (vedi p.2 Nr. 19) (3-pin PWR_FAN1) (vedi p.2 Nr. 35) Collegare le casse del telaio a questo collettore. Collegare i cavi della ventola ai corrispondenti connettori facendo combaciare il cavo nero col pin di terra. Italiano 81 ASRock A770DE+ Motherboard - ASRock A770DE | Quick Installation Guide - Page 82
' ancora essere funzionante se viene utilizzata una fornitura elettrica tradizionale a 4-pin ATX 12V. Per usare tale fornitura elettrica 4-pin ATX 12V, prego collegare la 4 8 presa elettrica al Pin 1 e Pin 5. Installazione elettrica 4-Pin ATX 12V 1 6 Italiano 82 ASRock A770DE+ Motherboard - ASRock A770DE | Quick Installation Guide - Page 83
RAID si vuole installare il sistema operativo Windows® XP / XP 64-bit / VistaTM / VistaTM 64-bit, fare riferimento al documento che si trova sul seguente percorso del CD di supporto, per le relative procedure: ..\ RAID Installation Guide (Guida all'installazione RAID) 83 ASRock A770DE+ Motherboard - ASRock A770DE | Quick Installation Guide - Page 84
-bit sul sistema. Utilizzo dei dischi rigidi SATA / SATAII con funzioni NCQ e Hot Plug 1° PASSO: Configurare il BIOS. A. Entrare in UTILIT BIOS SETUP Avanzate Configurazione IDE. B. Impostare l'opzione "SATA Operation Mode" (Modalità operativa SATA) su [AHCI]. 84 ASRock A770DE+ Motherboard Italiano - ASRock A770DE | Quick Installation Guide - Page 85
pagina "Where do you want to install Windows?" (Dove si vuole eseguire l'istallazione di Windows), inserire il CD di supporto ASRock nell'unità ottica e fare clic sul pulsante "Carica driver" , in basso a sinistra, per caricare i driver AMD AHCI. I driver AMD AHCI si trova sul seguente percorso del - ASRock A770DE | Quick Installation Guide - Page 86
3. Informazioni sul BIOS La Flash Memory sulla scheda madre contiene le Setup Utility. Quando si avvia il computer, premi durante il Power-On-Self-Test (POST) della Setup utility del BIOS; altrimenti, POST continua con i suoi test di routine. Per entrare il BIOS Setup dopo il POST, riavvia il - ASRock A770DE | Quick Installation Guide - Page 87
número de modelo específico de su placa. www.asrock.com/support/index.asp 1.1 Contenido de la caja Placa base ASRock A770DE+ (Factor forma ATX: 30,5 cm x 20,8 cm, 12,0" x 8,2") Guía de instalación rápida de ASRock A770DE+ CD de soporte de ASRock A770DE+ Una cinta de datos IDE de conducción 80 Ultra - ASRock A770DE | Quick Installation Guide - Page 88
procesadores con zócalo AM2+ y AM2: AMD PhenomTM FX, Phenom, Athlon 64 FX, Athlon 64 X2 Dual-Core, Athlon X2 Dual-Core, Athlon 64 y procesador Sempron - Compatibilidad con procesadores con AM3: procesador AMD PhenomTM II X4 / X3 y Athlon II X4 / X3 / X2 - Compatible con AMD OverDriveTM con la funci - ASRock A770DE | Quick Installation Guide - Page 89
ajuste de CPU, NB, SB, VCCM Voltage - Compatible con Smart BIOS - Controladores, Utilerías, Software de Anti Virus (Versión de prueba), Utilidad AMD OverDriveTM - Sintonizador de ASRock OC (vea ATENCIÓN 8) - Administrador de energía inteligente (vea ATENCIÓN 9) - Instant Boot - Amplificador Híbrido - ASRock A770DE | Quick Installation Guide - Page 90
de Forzado de Reloj (Overclocking) no relacionado" en admita, depende de la configuración AM2+ Procesador que adopte. Si Windows® XP y Windows® VistaTM. Para equipos con Windows® XP 64-bit y Windows® VistaTM 64-bit con CPU de 64-bit, no existe dicha limitación. Español 90 ASRock A770DE+ Motherboard - ASRock A770DE | Quick Installation Guide - Page 91
SATAII. 7. Power Management para USB 2.0 funciona bien bajo Microsoft® Windows® VistaTM 64 bits / VistaTM / XP 64 bits / XP SP1; SP2. 8. Es una herramienta de overclocking de ASRock de usuario-fácil disipador de calor cuando usted instala el sistema de PC. 91 ASRock A770DE+ Motherboard Español - ASRock A770DE | Quick Installation Guide - Page 92
ASRock AM2 Boost para aumento de la velocidad del reloj. Si habilita esta función en la configuración del BIOS, el rendimiento de la memoria mejorará hasta en un 12,5%, pero seguirá dependiendo del procesador AM2 tiene un factor de forma ATX (12,0 pulgadas x 8,2 ASRock A770DE+ Motherboard Español - ASRock A770DE | Quick Installation Guide - Page 93
seguridad y hacen buen contacto entre sí. Conecte entonces el ventilador de la CPU al conector CPU FAN (CPU_FAN1, consulte Página 2, N. 5). Para realizar la instalación correctamente, consulte el manual de instrucciones del ventilador de la CPU y el radiador. Español 93 ASRock A770DE+ Motherboard - ASRock A770DE | Quick Installation Guide - Page 94
2.3 Instalación de Memoria La placa A770DE+ ofrece cuatro ranuras DIMM DDR2 de 240 pines, y soporta Tecnología de Memoria de Doble Canal. Para la configuración módulos de memoria DDR2 1066 en esta placa base, se recomienda instalarlos en las ranuras DDRII_3 y DDRII_4. 94 ASRock A770DE+ Motherboard - ASRock A770DE | Quick Installation Guide - Page 95
de la ranura hasta que los clips de sujeción de ambos lados queden completamente introducidos en su sitio y la DIMM se haya asentado apropiadamente. 95 ASRock A770DE+ Motherboard Español - ASRock A770DE | Quick Installation Guide - Page 96
con tarjetas PCI Express con ancho de banda x16, o para instalar tarjetas gráficas PCI Express compatibles con la función CrossFireTM. La ranura PCIE3 (ranura PCIE x16, Anaranjado) se utiliza con tarjetas en la ranura. Paso 4. Asegure la tarjeta con tornillos. 96 ASRock A770DE+ Motherboard Español - ASRock A770DE | Quick Installation Guide - Page 97
compatible con los sistemas operativos Windows® XP con Service Pack 2 y VistaTM. Consulte el sitio web de AMD de 3 pins cuyo pin 1 y pin 2 están "Short". Short Open Jumper Setting PS2_USB_PW1 Ponga en cortocircuito pin 2, (vea p.2, No. 1) pin 3 para 97 ASRock A770DE+ Motherboard Español - ASRock A770DE | Quick Installation Guide - Page 98
borrar la CMOS cuando acabe de finalizar la actualización de la BIOS, debe arrancar primero el sistema y, a continuación, apagarlo antes el contacto 1 de la conexión. IDE conector primario (azul) (39-pin IDE1, vea p.2, No. 9) Español Conector azul a placa madre ASRock A770DE+ Motherboard - ASRock A770DE | Quick Installation Guide - Page 99
) Conector de Audio Interno (4-pin CD1) (CD1: vea p.2, No. 29) Este cabezal soporta un módulo infrarrojos de transmisión y recepción wireless opcional. Permite recepción de input CD1 audio de fuente sónica como CD-ROM, DVD-ROM, TV tuner, o tarjeta MPEG. 99 ASRock A770DE+ Motherboard Español - ASRock A770DE | Quick Installation Guide - Page 100
ón (3-pin CHA_FAN1) (vea p.2, N. 19) (3-pin PWR_FAN1) (vea p.2, N. 35) Conecte el altavoz del chasis a su cabezal. Por favor, conecte los cables del ventilador a los conectores de ventilador, haciendo coincidir el cable negro con la patilla de masa. Español 100 ASRock A770DE+ Motherboard - ASRock A770DE | Quick Installation Guide - Page 101
ía trabajar si usted adopta un fuente tradicional de energía de 4-pin ATX 12V. Para usar el fuente de 4 8 energía de 4-pin ATX 12V, por favor conecte su fuente de energía junto con Pin 1 y Pin 5. Instalación de Fuente de Energía de 4-Pin ATX 12V 1 6 ASRock A770DE+ Motherboard 101 Español - ASRock A770DE | Quick Installation Guide - Page 102
puerto COM se utiliza para admitir un módulo de puerto COM. Cabecera HDMI_SPDIF (HDMI_SPDIF1 de 3 pin) (ver p.2, No. 30) Cabecera HDMI_SPDIF. Ofrece una salida SPDIF la tarjeta VGA HDMI, negro B. Extremo blanco (2 patillas) C. Extremo blanco (3 patillas) Español 102 ASRock A770DE+ Motherboard - ASRock A770DE | Quick Installation Guide - Page 103
BIOS. A. Entre a la Utilidad de configuración de BIOS pantalla de Avanzada Configuración IDE. B. Establezca la opción "SATA Operation Mode"(Modo de funcionamiento SATA) en [IDE]. PASO 2: Instale el sistema operativo Windows® XP / XP 64 bits en su sistema. Español ASRock A770DE+ Motherboard - ASRock A770DE | Quick Installation Guide - Page 104
64-bit.) .. \ I386 (para usuarios de Windows® VistaTM) .. \ AMD64 (para usuarios de Windows® VistaTM 64 bits) A continuación, vuelva a insertar el disco óptico de Windows® VistaTM / VistaTM 64 bits en la unidad óptica para continuar con la instalación. Español 104 ASRock A770DE+ Motherboard - ASRock A770DE | Quick Installation Guide - Page 105
Reloj (Overclocking) no relacionado, por favor entre a la opción de "Modo de Forzado de Reloj" de la configuración de BIOS para establecer la selección de [Auto] a [CPU, PCIE, Async.]. Por lo tanto, FSB de CPU no tecnología de aumento de velocidad liberada. Español ASRock A770DE+ Motherboard 105 - ASRock A770DE | Quick Installation Guide - Page 106
ón El Flash Memory de la placa madre deposita SETUP Utility. Durante el Power-Up (POST) apriete para entrar en la BIOS. Sí usted no oprime ninguna tecla, el POST continúa con sus rutinas de prueba. Si usted desea entrar en la BIOS después del POST, por favor reinicie el sistema apretando - ASRock A770DE | Quick Installation Guide - Page 107
ASRock A770DE+ Motherboard 107 - ASRock A770DE | Quick Installation Guide - Page 108
'' ® ® 108 ASRock A770DE+ Motherboard - ASRock A770DE | Quick Installation Guide - Page 109
ASRock A770DE+ Motherboard 109 - ASRock A770DE | Quick Installation Guide - Page 110
® " " ® ® ® ® " " " " 110 ® ASRock A770DE+ Motherboard - ASRock A770DE | Quick Installation Guide - Page 111
ASRock A770DE+ Motherboard 111 - ASRock A770DE | Quick Installation Guide - Page 112
112 ASRock A770DE+ Motherboard - ASRock A770DE | Quick Installation Guide - Page 113
ASRock A770DE+ Motherboard 113 - ASRock A770DE | Quick Installation Guide - Page 114
( ) ( - - ) ( ) ( ) - - " " 114 ASRock A770DE+ Motherboard - ASRock A770DE | Quick Installation Guide - Page 115
ASRock A770DE+ Motherboard 115 - ASRock A770DE | Quick Installation Guide - Page 116
" " 116 ® ASRock A770DE+ Motherboard - ASRock A770DE | Quick Installation Guide - Page 117
"" "" "" "" ASRock A770DE+ Motherboard 117 - ASRock A770DE | Quick Installation Guide - Page 118
SATAII_5 SATAII_6 SATAII_1 SATAII_3 SATAII_2 SATAII_4 118 ASRock A770DE+ Motherboard - ASRock A770DE | Quick Installation Guide - Page 119
CD1 ASRock A770DE+ Motherboard 119 - ASRock A770DE | Quick Installation Guide - Page 120
4 3 2 1 120 ASRock A770DE+ Motherboard - ASRock A770DE | Quick Installation Guide - Page 121
12 24 1 13 4 8 1 6 12 24 1 13 4 8 1 6 ASRock A770DE+ Motherboard 121 - ASRock A770DE | Quick Installation Guide - Page 122
C B A ® ® \ 122 ASRock A770DE+ Motherboard - ASRock A770DE | Quick Installation Guide - Page 123
® ® ® ® ® ® ® ® ® ® ® ASRock A770DE+ Motherboard 123 - ASRock A770DE | Quick Installation Guide - Page 124
® ® ® ® \ \ ® ® ® " " 124 ASRock A770DE+ Motherboard - ASRock A770DE | Quick Installation Guide - Page 125
" " \\ " " ASRock A770DE+ Motherboard 125 - ASRock A770DE | Quick Installation Guide - Page 126
126 ASRock A770DE+ Motherboard - ASRock A770DE | Quick Installation Guide - Page 127
'' ® ® ASRock A770DE+ Motherboard 127 - ASRock A770DE | Quick Installation Guide - Page 128
128 ASRock A770DE+ Motherboard - ASRock A770DE | Quick Installation Guide - Page 129
® ® ® " " ® ® ® ® ASRock A770DE+ Motherboard 129 - ASRock A770DE | Quick Installation Guide - Page 130
® ® TM TM ® 130 ASRock A770DE+ Motherboard - ASRock A770DE | Quick Installation Guide - Page 131
ASRock A770DE+ Motherboard 131 - ASRock A770DE | Quick Installation Guide - Page 132
132 ASRock A770DE+ Motherboard - ASRock A770DE | Quick Installation Guide - Page 133
ASRock A770DE+ Motherboard 133 - ASRock A770DE | Quick Installation Guide - Page 134
134 ASRock A770DE+ Motherboard - ASRock A770DE | Quick Installation Guide - Page 135
ASRock A770DE+ Motherboard 135 - ASRock A770DE | Quick Installation Guide - Page 136
® \ 136 ASRock A770DE+ Motherboard - ASRock A770DE | Quick Installation Guide - Page 137
ASRock A770DE+ Motherboard 137 - ASRock A770DE | Quick Installation Guide - Page 138
SATAII_5 SATAII_6 SATAII_1 SATAII_3 SATAII_2 SATAII_4 138 ASRock A770DE+ Motherboard - ASRock A770DE | Quick Installation Guide - Page 139
CD1 ASRock A770DE+ Motherboard 139 - ASRock A770DE | Quick Installation Guide - Page 140
4 3 2 1 140 12 24 1 13 ASRock A770DE+ Motherboard - ASRock A770DE | Quick Installation Guide - Page 141
4 8 1 6 12 24 1 13 4 8 1 6 C B A ASRock A770DE+ Motherboard 141 - ASRock A770DE | Quick Installation Guide - Page 142
® ® \ ® ® ® ® 142 ® ASRock A770DE+ Motherboard - ASRock A770DE | Quick Installation Guide - Page 143
® ® ® ® ® ® ® \ ® \ ® ® ASRock A770DE+ Motherboard 143 - ASRock A770DE | Quick Installation Guide - Page 144
144 ASRock A770DE+ Motherboard - ASRock A770DE | Quick Installation Guide - Page 145
® ® TM TM ASRock A770DE+ Motherboard 145 - ASRock A770DE | Quick Installation Guide - Page 146
146 ASRock A770DE+ Motherboard - ASRock A770DE | Quick Installation Guide - Page 147
'' ™ ® ® ASRock A770DE+ Motherboard 147 - ASRock A770DE | Quick Installation Guide - Page 148
148 ASRock A770DE+ Motherboard - ASRock A770DE | Quick Installation Guide - Page 149
® ® ® ® ® ® ® ® ASRock A770DE+ Motherboard 149 - ASRock A770DE | Quick Installation Guide - Page 150
150 ASRock A770DE+ Motherboard - ASRock A770DE | Quick Installation Guide - Page 151
ASRock A770DE+ Motherboard 151 - ASRock A770DE | Quick Installation Guide - Page 152
DDRII_1 DDRII_2 DDRII_3 DDRII_4 ( )( )( )( ) (1) - - (2) - - (3) 152 ASRock A770DE+ Motherboard - ASRock A770DE | Quick Installation Guide - Page 153
ASRock A770DE+ Motherboard 153 - ASRock A770DE | Quick Installation Guide - Page 154
® ® 154 ASRock A770DE+ Motherboard - ASRock A770DE | Quick Installation Guide - Page 155
ASRock A770DE+ Motherboard 155 - ASRock A770DE | Quick Installation Guide - Page 156
SATAII_5 SATAII_6 SATAII_1 SATAII_3 SATAII_2 SATAII_4 156 ASRock A770DE+ Motherboard - ASRock A770DE | Quick Installation Guide - Page 157
CD1 ASRock A770DE+ Motherboard 157 - ASRock A770DE | Quick Installation Guide - Page 158
4 3 2 1 12 24 1 13 4 8 1 5 12 24 1 13 4 8 1 5 158 ASRock A770DE+ Motherboard - ASRock A770DE | Quick Installation Guide - Page 159
12 24 1 13 4 8 1 5 C B A ® ® ® ® ® ® ® ® ® ® ASRock A770DE+ Motherboard 159 - ASRock A770DE | Quick Installation Guide - Page 160
® ® ® ® ® ® ® ® 160 ASRock A770DE+ Motherboard - ASRock A770DE | Quick Installation Guide - Page 161
® ® ® ® ® ® ® ® ® ® ASRock A770DE+ Motherboard 161 - ASRock A770DE | Quick Installation Guide - Page 162
® ® 162 ASRock A770DE+ Motherboard - ASRock A770DE | Quick Installation Guide - Page 163
X O O O X O O O O: X: O O O O ASRock A770DE+ Motherboard 163
-
 1
1 -
 2
2 -
 3
3 -
 4
4 -
 5
5 -
 6
6 -
 7
7 -
8
-
9
-
10
-
11
-
12
-
13
-
14
-
15
-
16
-
17
-
18
-
19
-
20
-
21
-
22
-
23
-
24
-
25
-
26
-
27
-
28
-
29
-
30
-
31
-
32
-
33
-
34
-
35
-
36
-
37
-
38
-
39
-
40
-
41
-
42
-
43
-
44
-
45
-
46
-
47
-
48
-
49
-
50
-
51
-
52
-
53
-
54
-
55
-
56
-
57
-
58
-
59
-
60
-
61
-
62
-
63
-
64
-
65
-
66
-
67
-
68
-
69
-
70
-
71
-
72
-
73
-
74
-
75
-
76
-
77
-
78
-
79
-
80
-
81
-
82
-
83
-
84
-
85
-
86
-
87
-
88
-
89
-
90
-
91
-
92
-
93
-
94
-
95
-
96
-
97
-
98
-
99
-
100
-
101
-
102
-
103
-
104
-
105
-
106
-
107
-
108
-
109
-
110
-
111
-
112
-
113
-
114
-
115
-
116
-
117
-
118
-
119
-
120
-
121
-
122
-
123
-
124
-
125
-
126
-
127
-
128
-
129
-
130
-
131
-
132
-
133
-
134
-
135
-
136
-
137
-
138
-
139
-
140
-
141
-
142
-
143
-
144
-
145
-
146
-
147
-
148
-
149
-
150
-
151
-
152
-
153
-
154
-
155
-
156
-
157
-
158
-
159
-
160
-
161
-
162
-
163
 |
 |

1
ASRock
A770DE+
Motherboard
English
English
English
English
English
Copyright Notice:
Copyright Notice:
Copyright Notice:
Copyright Notice:
Copyright Notice:
No part of this installation guide may be reproduced, transcribed, transmitted, or trans-
lated in any language, in any form or by any means, except duplication of documen-
tation by the purchaser for backup purpose, without written consent of ASRock Inc.
Products and corporate names appearing in this guide may or may not be registered
trademarks or copyrights of their respective companies, and are used only for identifica-
tion or explanation and to the owners’ benefit, without intent to infringe.
Disclaimer:
Disclaimer:
Disclaimer:
Disclaimer:
Disclaimer:
Specifications and information contained in this guide are furnished for informational
use only and subject to change without notice, and should not be constructed as a
commitment by ASRock. ASRock assumes no responsibility for any errors or omissions
that may appear in this guide.
With respect to the contents of this guide, ASRock does not provide warranty of any kind,
either expressed or implied, including but not limited to the implied warranties or
conditions of merchantability or fitness for a particular purpose. In no event shall
ASRock, its directors, officers, employees, or agents be liable for any indirect, special,
incidental, or consequential damages (including damages for loss of profits, loss of
business, loss of data, interruption of business and the like), even if ASRock has been
advised of the possibility of such damages arising from any defect or error in the guide
or product.
This device complies with Part 15 of the FCC Rules. Operation is subject to the
following two conditions:
(1)
this device may not cause harmful interference, and
(2)
this device must accept any interference received, including interference that
may cause undesired operation.
Published April 2009
Copyright
©
2009 ASRock INC. All rights reserved.
CALIFORNIA, USA ONLY
The Lithium battery adopted on this motherboard contains Perchlorate, a toxic
substance controlled in Perchlorate Best Management Practices (BMP) regulations
passed by the California Legislature. When you discard the Lithium battery in
California, USA, please follow the related regulations in advance.
“Perchlorate Material-special handling may apply, see
www
.dtsc.ca.gov/hazardouswa
ste/perchlorate”
ASRock Website: http://www.asrock.com