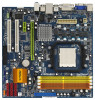
ASRock A780FullHD RAID Installation Guide
ASRock A780FullHD Manual
 |
View all ASRock A780FullHD manuals
Add to My Manuals
Save this manual to your list of manuals |
ASRock A780FullHD manual content summary:
- ASRock A780FullHD | RAID Installation Guide - Page 1
Vista / Vista 64-bit With RAID Funtions 4 1.4 Create Disk Array 5 2. AMD Windows RAID Installation Guide 10 2.1 Components of RAIDXpert Installation Software 10 2.2 Browser Support 10 2.3 Installing RAIDXpert 10 2.4 Logging into RAIDXpert 13 2.5 Regular Connection 13 2.6 Secure Connection - ASRock A780FullHD | RAID Installation Guide - Page 2
by using the onboard FastBuild BIOS utility under BIOS environment. After you make a SATA / SATAII driver diskette, press to enter BIOS setup to set the option to RAID mode by following the detailed instruction of the "User Manual" in our support CD or "Quick Installation Guide", then you can - ASRock A780FullHD | RAID Installation Guide - Page 3
can accommodate up to four physical drives, more than most PC motherboards. As a single physical drive, RAID Ready does not offer the Installing Windows XP / XP 64-bit / Vista / Vista 64-bit With RAID Functions If you want to install Windows XP, Windows XP 64-bit, Windows Vista or Windows Vista 64 - ASRock A780FullHD | RAID Installation Guide - Page 4
Mode" option to [RAID]. STEP 2: Make a SATA / SATAII driver diskette. A. Insert the ASRock Support CD into your optical drive to boot your system. (There are two ASRock Support CD in the motherboard gift box pack, please choose the one for Windows XP / XP 64-bit.) B. During POST at the beginning of - ASRock A780FullHD | RAID Installation Guide - Page 5
bottom to load the AMD RAID drivers. AMD RAID drivers are in the following path in our Support CD: (There are two ASRock Support CD in the motherboard gift box pack, please choose the one for Windows Vista / Vista 64-bit.) .. \ I386 (For Windows Vista OS) .. \ AMD64 (For Windows Vista 64-bit OS - ASRock A780FullHD | RAID Installation Guide - Page 6
Press keys, then the FastBuild Utility Main Menu appears. Press 2 on the Main Menu screen to display the Define LD Menu. Press the arrow keys to highlight a logical drive number you want to define and press to select it. The Define LD Menu for the logical drive number you selected - ASRock A780FullHD | RAID Installation Guide - Page 7
Choose the RAID level you want. In the Define LD Menu section, press the spacebar to cycle through logical drive types, including RAID 0, RAID 1, RAID Ready, JBOD and RAID 10. WARNING!! While you are allowed to use any available RAID level for your bootable logical drive, it is recommended to use - ASRock A780FullHD | RAID Installation Guide - Page 8
following the detailed instruction of the "User Manual" in our support CD or "Quick Installation Guide". Two Logical Drives After selecting the logical drive in Disk Assignments as the above-mentioned procedures, press to allocate a portion of the disk drives - ASRock A780FullHD | RAID Installation Guide - Page 9
. 6. Press to restart the computer. You have successfully created a new RAID logical drive. Please install the operating system to your computer by following the detailed instruction of the "User Manual" in our support CD or "Quick Installation Guide". 9 - ASRock A780FullHD | RAID Installation Guide - Page 10
of RAID controllers are not supported. Please read this guide carefully and follow the instructions below to configure and manage RAIDXpert Follow these steps to install RAIDXpert on your Windows-based PC or Server. 1. Boot the PC or server, launch Windows, and log in as the Administrator. If the - ASRock A780FullHD | RAID Installation Guide - Page 11
you click Next. 9. When the Choose Install Folder screen appears, make your selection of a folder for the RAIDXpert applications you are installing. For example, the Windows default folder is: C:\Program Files\AMD\RAIDXpert 11 - ASRock A780FullHD | RAID Installation Guide - Page 12
If you want a different folder, type its location or click the Choose... button and select a new location. Click the Next button when you are finished. 10. When the Check HTTP SSL screen appears, you can choose External Security. An explanation follows. External SSL Security - Applies security to - ASRock A780FullHD | RAID Installation Guide - Page 13
12. When the Install Complete screen appears, click the Finish button. 2.4 Logging into RAIDXpert Choose RAIDXpert in the Windows Programs menu. Or, log on manually with your browser: 1. Launch the Browser. 2. In the Browser address field, type the entry explained below. If you did not choose the - ASRock A780FullHD | RAID Installation Guide - Page 14
• Enter the Host PC's IP address 127.0.0.1 or localhost • Enter the Port number 8443 • Add to launch RAIDXpert amd Together, your entry looks like this: https://127.0.0.1:8443/amd or https://localhost:8443/amd Note that the IP address shown above applies to a log-in at the Host PC. When you log - ASRock A780FullHD | RAID Installation Guide - Page 15
4. In the Select Drive Type screen, click the following option: • Free Drives - Select all Free (unassigned) physical drives The Select Drives screen appears. 5. Click the Next button. 6. If you want to split the capacity of your physical drives between two logical drives, enter the capacity for the - ASRock A780FullHD | RAID Installation Guide - Page 16
8. Click the Next button. The Assign a Name screen appears. 9. Enter a name for the logical drive in the field provided. 10. Click the Next button. The Final Settings screen appears. 11. RAID 0, 5, and 10. Choose a Stripe Block Size from the dropdown menu. The choices are 64 and 128 KB. The Write - ASRock A780FullHD | RAID Installation Guide - Page 17
system. 2.8 Connecting to RAIDXpert from the Internet The above instructions cover connections between the Host PC and other PCs using RAIDXpert the Host PC. Follow this procedure: 1. Choose RAIDXpert in the Windows Programs menu.Or choose RAIDXpert in the Linux Applications menu.Your browser
-
 1
1 -
 2
2 -
 3
3 -
 4
4 -
 5
5 -
 6
6 -
 7
7 -
8
-
9
-
10
-
11
-
12
-
13
-
14
-
15
-
16
-
17
 |
 |

1
AMD RAID Installation Guide
1.
AMD BIOS RAID Installation Guide …………………………………………………………………….. 2
1.1
Introduction to RAID ……………………………………………………………………………….. 2
1.2
RAID Configurations Precautions ………………………………………………………………… 3
1.3
Installing Windows XP / XP 64-bit / Vista / Vista 64-bit With RAID Funtions ………………… 3
1.3.1
Installing Windows XP / XP 64-bit With RAID Funtions …………………………………. 3
1.3.2
Installing Windows Vista / Vista 64-bit With RAID Funtions …………………………….. 4
1.4
Create Disk Array ………………………………………………………………………………….. 5
2.
AMD Windows RAID Installation Guide ……………………………………………………………… 10
2.1
Components of RAIDXpert Installation Software ……………………………………………. 10
2.2
Browser Support ………………………………………………………………………………… 10
2.3
Installing RAIDXpert ……………………………………………………………………………. 10
2.4
Logging into RAIDXpert ………………………………………………………………………… 13
2.5
Regular Connection……………………………………………………………………………... 13
2.6
Secure Connection………………………………………………………………………………. 13
2.7
Creating a New Logical Drive
………………………………………………………………….. 14
2.8
Connecting to RAIDXpert from the Internet ………………………………………………….. 17
2.9
Running RAIDXpert without Network Connection …………………………………………… 17