ASRock ALiveNF5-VSTA Quick Installation Guide
ASRock ALiveNF5-VSTA Manual
 |
View all ASRock ALiveNF5-VSTA manuals
Add to My Manuals
Save this manual to your list of manuals |
ASRock ALiveNF5-VSTA manual content summary:
- ASRock ALiveNF5-VSTA | Quick Installation Guide - Page 1
purchaser for backup purpose, without written consent of ASRock Inc. Products and corporate names appearing in this guide may or may not be registered trademarks or ASRock Website: http://www.asrock.com Published March 2007 Copyright©2007 ASRock INC. All rights reserved. 1 ASRock ALiveNF5-VSTA - ASRock ALiveNF5-VSTA | Quick Installation Guide - Page 2
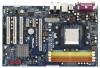
Header (SPEAKER 1) 3 CPU Fan Connector (CPU_FAN1) 18 USB 2.0 Header (USB6_7, Blue) 4 CPU Heatsink Retention Module 19 System Panel Header (PANEL1) 5 AM2 940-Pin CPU Socket 20 Chassis Fan USB 2.0 Header (USB8_9, Blue) 32 ATX Power Connector (ATXPWR1) 2 ASRock ALiveNF5-VSTA Motherboard - ASRock ALiveNF5-VSTA | Quick Installation Guide - Page 3
"Realtek HDA Primary output" to use Rear Speaker, Central/Bass, and Front Speaker, or select "Realtek HDA Audio 2nd output" to use front panel audio. 3 ASRock ALiveNF5-VSTA Motherboard English - ASRock ALiveNF5-VSTA | Quick Installation Guide - Page 4
cards and CPU support lists on ASRock website as well. ASRock website http://www.asrock.com 1.1 Package Contents 1 x ASRock ALiveNF5-VSTA Motherboard (ATX Form Factor: 12.0-in x 7.6-in, 30.5 cm x 19.3 cm) 1 x ASRock ALiveNF5-VSTA Quick Installation Guide 1 x ASRock ALiveNF5-VSTA Support CD 1 x Ultra - ASRock ALiveNF5-VSTA | Quick Installation Guide - Page 5
Mouse Port - 1 x PS/2 Keyboard Port - 1 x Serial Port: COM1 - 1 x Parallel Port (ECP/EPP Support) - 4 x Ready-to-Use USB 2.0 Ports - 1 x RJ-45 Port - HD Audio Jack: Side Speaker/Rear Speaker/Central/Bass/ Line in/Front Speaker/Microphone (see CAUTION 8) English 5 ASRock ALiveNF5-VSTA Motherboard - ASRock ALiveNF5-VSTA | Quick Installation Guide - Page 6
BIOS - AMI Legal BIOS - Supports "Plug and Play" - ACPI 1.1 Compliance Wake Up Events - Supports jumperfree - SMBIOS 2.3.1 Support - Drivers, Utilities, AntiVirus Software (Trial Version) - CPU Internal Temperature Sensing - CPU damage caused by overclocking. 6 ASRock ALiveNF5-VSTA Motherboard - ASRock ALiveNF5-VSTA | Quick Installation Guide - Page 7
64-bit driver keeps on updating now. As long as we have the latest driver, we will update it to our website in the future. Please visit our website for Microsoft® Windows® VistaTM / VistaTM 64-bit driver and related information. ASRock website http://www.asrock.com 7 ASRock ALiveNF5-VSTA Motherboard - ASRock ALiveNF5-VSTA | Quick Installation Guide - Page 8
DX9.0 with WDDM Driver with 128bit VGA memory (Premium) with 64bit VGA memory (Basic) * After June 1, 2007, all Windows® VistaTM systems are required to meet above minimum hardware requirements in order to qualify for Windows® VistaTM Premium 2007 logo. English 8 ASRock ALiveNF5-VSTA Motherboard - ASRock ALiveNF5-VSTA | Quick Installation Guide - Page 9
screws into the screw holes to secure the motherboard to the chassis, please do not over-tighten the screws! Doing so may damage the motherboard. 9 ASRock ALiveNF5-VSTA Motherboard English - ASRock ALiveNF5-VSTA | Quick Installation Guide - Page 10
CPU and the heatsink are securely fastened and in good contact with each other. Then connect the CPU fan to the CPU FAN connector (CPU_FAN1, see Page 2, No. 3). For proper installation, please kindly refer to the instruction manuals of the CPU fan and the heatsink. English 10 ASRock ALiveNF5-VSTA - ASRock ALiveNF5-VSTA | Quick Installation Guide - Page 11
) This motherboard provides four 240-pin DDRII (Double Data Rate II) DIMM slots, and supports Dual Channel Memory Technology. For dual channel configuration, you always need to install identical (the ; otherwise, this motherboard and DIMM may be damaged. English 11 ASRock ALiveNF5-VSTA Motherboard - ASRock ALiveNF5-VSTA | Quick Installation Guide - Page 12
insert the DIMM into the slot until the retaining clips at both ends fully snap back in place and the DIMM is properly seated. 12 ASRock ALiveNF5-VSTA Motherboard English - ASRock ALiveNF5-VSTA | Quick Installation Guide - Page 13
(PCIE x1 slot) is used for PCI Express cards with x1 lane width cards, such as Gigabit LAN card, SATA2 card, etc. Installing an expansion card Step 1. Before installing the expansion card, please make chassis with screws. Step 6. Replace the system cover. 13 ASRock ALiveNF5-VSTA Motherboard English - ASRock ALiveNF5-VSTA | Quick Installation Guide - Page 14
for 5 seconds. However, please do not clear the CMOS right after you update the BIOS. If you need to clear the CMOS when you just finish updating the BIOS, you must boot up the system first, and then shut it down before you do the clear-CMOS action. English 14 ASRock ALiveNF5-VSTA Motherboard - ASRock ALiveNF5-VSTA | Quick Installation Guide - Page 15
conductor ATA 66/100/133 cable Note: Please refer to the instruction of your IDE device vendor for the details. Serial ATAII see p.2, No. 12) These four Serial ATAII (SATAII) connectors support SATAII or SATA hard disk for internal storage devices. The current ASRock ALiveNF5-VSTA Motherboard - ASRock ALiveNF5-VSTA | Quick Installation Guide - Page 16
can support two instruction in our manual and chassis manual to install your system. 2. If you use AC'97 audio panel, please install it to the front panel audio header as below: A. Connect Mic_IN (MIC) to MIC2_L. B. Connect Audio_R (RIN) to OUT2_R and Audio_L (LIN) to OUT2_L. 16 ASRock ALiveNF5-VSTA - ASRock ALiveNF5-VSTA | Quick Installation Guide - Page 17
connect the 3-Pin CPU fan to the CPU fan connector on this motherboard, please connect it to Pin 1-3. Pin 1-3 Connected 3-Pin Fan Installation ATX Power Connector (20-pin ATXPWR1) (see p.2, No. 32) Please connect an ATX power supply to this connector. 17 ASRock ALiveNF5-VSTA Motherboard English - ASRock ALiveNF5-VSTA | Quick Installation Guide - Page 18
. Then connect the white end (B or C) of HDMI_SPDIF cable to the HDMI_SPDIF connector of HDMI VGA card. B. white end (2-pin) C. white end (3-pin) English 18 ASRock ALiveNF5-VSTA Motherboard - ASRock ALiveNF5-VSTA | Quick Installation Guide - Page 19
guide manual for connector usage in advance. Connect the HDMI output connector on HDMI VGA card to HDMI device, such as HDTV. Please refer to the user manual of HDTV and HDMI VGA card vendor for detailed connection procedures. Install HDMI VGA card driver to your system. 19 ASRock ALiveNF5-VSTA - ASRock ALiveNF5-VSTA | Quick Installation Guide - Page 20
.hitachigst.com/hdd/support/download.htm The above examples are just for your reference. For different SATAII hard disk products of different vendors, the jumper pin setting methods may not be the same. Please visit the vendors' website for the updates. 20 ASRock ALiveNF5-VSTA Motherboard English - ASRock ALiveNF5-VSTA | Quick Installation Guide - Page 21
. This section will guide you to install the drivers compatible to your system can be auto-detected and listed on the support CD driver page. Please follow the order from up to bottom side to install those required drivers. Therefore, the drivers you install can work properly. 21 ASRock ALiveNF5-VSTA - ASRock ALiveNF5-VSTA | Quick Installation Guide - Page 22
RAID Driver diskette for WindowsXP64 4. Exit Reboot system now Press any key to continue Please insert a floppy diskette into the floppy drive. Select your required item on the list according to the mode you choose and the OS you install. Then press any key. 22 ASRock ALiveNF5-VSTA Motherboard - ASRock ALiveNF5-VSTA | Quick Installation Guide - Page 23
Driver" button on the left on the bottom to load the NVIDIA® AHCI drivers. NVIDIA® AHCI drivers are in the following path in our Support CD: .. \ I386 \ Vista32_AHCI (For Windows® VistaTM OS) .. \ AMD64 \ Vista64_AHCI (For Windows® VistaTM 64-bit OS) English 23 ASRock ALiveNF5-VSTA Motherboard - ASRock ALiveNF5-VSTA | Quick Installation Guide - Page 24
RAID function, you need to check the RAID installation guide in the Support CD for proper configuration. Please refer to the BIOS RAID installation guide part of the document in the following path in the Support CD: .. \ RAID Installation Guide English 24 ASRock ALiveNF5-VSTA Motherboard - ASRock ALiveNF5-VSTA | Quick Installation Guide - Page 25
Support CD: .. \ I386 \ Vista32_RAID (For Windows® VistaTM OS) .. \ AMD64 \ Vista64_RAID (For Windows® VistaTM 64-bit OS) After that, please insert Windows® VistaTM / Windows® VistaTM 64-bit optical disk into the optical drive again to continue the installation. 25 ASRock ALiveNF5-VSTA Motherboard - ASRock ALiveNF5-VSTA | Quick Installation Guide - Page 26
, CPU FSB is untied during overclocking, but PCI / PCIE buses are in the fixed mode so that FSB can operate under a more stable overclocking environment. Please refer to the warning on page 6 for the possible overclocking risk before you apply Untied Overclocking Technology. 26 ASRock ALiveNF5-VSTA - ASRock ALiveNF5-VSTA | Quick Installation Guide - Page 27
choices. For the detailed information about BIOS Setup, please refer to the User Manual (PDF file) contained in the Support CD. 4. Software Support CD information This motherboard supports various Microsoft® Windows® operating systems: 2000 / XP / XP Media Center / XP 64-bit / VistaTM / VistaTM 64 - ASRock ALiveNF5-VSTA | Quick Installation Guide - Page 28
28 ASRock ALiveNF5-VSTA Motherboard - ASRock ALiveNF5-VSTA | Quick Installation Guide - Page 29
™ '' ™ ® ® 29 ASRock ALiveNF5-VSTA Motherboard - ASRock ALiveNF5-VSTA | Quick Installation Guide - Page 30
® ® 30 ASRock ALiveNF5-VSTA Motherboard - ASRock ALiveNF5-VSTA | Quick Installation Guide - Page 31
™ '' ™ ® ® '' ® ® ® ® ® ® ® 31 ASRock ALiveNF5-VSTA Motherboard - ASRock ALiveNF5-VSTA | Quick Installation Guide - Page 32
® ® ® ® 32 ASRock ALiveNF5-VSTA Motherboard - ASRock ALiveNF5-VSTA | Quick Installation Guide - Page 33
33 ASRock ALiveNF5-VSTA Motherboard - ASRock ALiveNF5-VSTA | Quick Installation Guide - Page 34
34 ASRock ALiveNF5-VSTA Motherboard - ASRock ALiveNF5-VSTA | Quick Installation Guide - Page 35
DDRII_1 DDRII_2 DDRII_3 DDRII_4 ( )( )( )( ) (1) - - (2) - - (3) 35 ASRock ALiveNF5-VSTA Motherboard - ASRock ALiveNF5-VSTA | Quick Installation Guide - Page 36
36 ASRock ALiveNF5-VSTA Motherboard - ASRock ALiveNF5-VSTA | Quick Installation Guide - Page 37
37 ASRock ALiveNF5-VSTA Motherboard - ASRock ALiveNF5-VSTA | Quick Installation Guide - Page 38
38 ASRock ALiveNF5-VSTA Motherboard - ASRock ALiveNF5-VSTA | Quick Installation Guide - Page 39
SATAII_1 SATAII_3 SATAII_2 SATAII_4 39 ASRock ALiveNF5-VSTA Motherboard - ASRock ALiveNF5-VSTA | Quick Installation Guide - Page 40
CD1 40 ASRock ALiveNF5-VSTA Motherboard - ASRock ALiveNF5-VSTA | Quick Installation Guide - Page 41
4 3 2 1 41 ASRock ALiveNF5-VSTA Motherboard - ASRock ALiveNF5-VSTA | Quick Installation Guide - Page 42
C B A 42 ASRock ALiveNF5-VSTA Motherboard - ASRock ALiveNF5-VSTA | Quick Installation Guide - Page 43
43 ASRock ALiveNF5-VSTA Motherboard - ASRock ALiveNF5-VSTA | Quick Installation Guide - Page 44
44 ASRock ALiveNF5-VSTA Motherboard - ASRock ALiveNF5-VSTA | Quick Installation Guide - Page 45
® ® 45 ASRock ALiveNF5-VSTA Motherboard - ASRock ALiveNF5-VSTA | Quick Installation Guide - Page 46
® ® ® ® ® ® ® ® ® ® ® ® 46 ASRock ALiveNF5-VSTA Motherboard - ASRock ALiveNF5-VSTA | Quick Installation Guide - Page 47
® ® ® ® A. NVIDIA nForce Storage Controller (required) Windows XP/2000 B. NVIDIA nForce Storage Controller (required) Windows XP64 ® ® ® ® ® ® 47 ASRock ALiveNF5-VSTA Motherboard - ASRock ALiveNF5-VSTA | Quick Installation Guide - Page 48
® ® ® ® ® ® ® ® ® ® ® ® ® ® ® ® ® ® ® ® ® 48 ® ® ® ASRock ALiveNF5-VSTA Motherboard - ASRock ALiveNF5-VSTA | Quick Installation Guide - Page 49
® ® ® ® A. NVIDIA RAID Driver (required) B. NVIDIA nForce Storage Controller (required) ® ® ® ® ® ® ® 49 ASRock ALiveNF5-VSTA Motherboard - ASRock ALiveNF5-VSTA | Quick Installation Guide - Page 50
® ® ® ® ® ® ® ® ® ® ® ® 50 ASRock ALiveNF5-VSTA Motherboard - ASRock ALiveNF5-VSTA | Quick Installation Guide - Page 51
® ® 51 ASRock ALiveNF5-VSTA Motherboard - ASRock ALiveNF5-VSTA | Quick Installation Guide - Page 52
X O O O X O O O O: X: O O O O 52 ASRock ALiveNF5-VSTA Motherboard - ASRock ALiveNF5-VSTA | Quick Installation Guide - Page 53
CPUs sind auch auf der ASRock-Website aufgelistet. ASRock-Website: http://www.asrock.com 1.1 Kartoninhalt ASRock ALiveNF5-VSTA Motherboard (ATX-Formfaktor: 30.5 cm x 19.3 cm; 12.0 Zoll x 7.6 Zoll) ASRock ALiveNF5-VSTA Schnellinstallationsanleitung ASRock ALiveNF5-VSTA Support-CD Ein 80-adriges Ultra - ASRock ALiveNF5-VSTA | Quick Installation Guide - Page 54
- 7.1 CH Windows® VistaTM Premium Level HD Audio (ALC888 Audio Codec) LAN - Realtek PHY RTL8201CL - Speed: 10/100 Ethernet - Unterstützt Wake-On-LAN E/A-Anschlüsse HD / Mitte/Bass / Audioeingang/ Lautsprecher vorne / Mikrofon (siehe VORSICHT 8) 54 ASRock ALiveNF5-VSTA Motherboard Deutsch - ASRock ALiveNF5-VSTA | Quick Installation Guide - Page 55
CPU-Lüfter - Drehzahlmessung für Gehäuselüfter - CPU-Lüftergeräuschdämpfung - Spannungsüberwachung: +12V, +5V, +3.3V, Vcore Betriebssysteme - Unterstützt Microsoft® Windows® 2000 / XP / XP Media Center / XP , die aufgrund von Overclocking verursacht wurden. 55 ASRock ALiveNF5-VSTA Motherboard - ASRock ALiveNF5-VSTA | Quick Installation Guide - Page 56
ASRock AM2 Boost Übertaktungstechnologie. Wenn Sie diese Funktion im BIOS-Setup aktivieren, wird die Arbeitsspeicherleistung um bis zu 12,5% gesteigert. Die Wirkung hängt aber von der verwendeten AM2 CPU Sie auch direkt mit dem SATA II-Anschluss verbinden. 56 ASRock ALiveNF5-VSTA Motherboard Deutsch - ASRock ALiveNF5-VSTA | Quick Installation Guide - Page 57
(Premium) mit 64 Bit-VGA-Speicher (Basic) * Nach dem ersten Juni, 2007 sind , all Windows® VistaTM Systems dafür erforderlich, mit der Minimalforderung der obengenannte Hardware übereinzustimmen, um Windows® VistaTM Premium 2007 logo.zu befähigen. Deutsch 57 ASRock ALiveNF5-VSTA Motherboard - ASRock ALiveNF5-VSTA | Quick Installation Guide - Page 58
das Motherboard mit den Schrauben an dem Computergehäuse befestigen, überziehen Sie bitte die Schrauben nicht! Das Motherboard kann sonst beschädigt werden. Deutsch 58 ASRock ALiveNF5-VSTA Motherboard - ASRock ALiveNF5-VSTA | Quick Installation Guide - Page 59
sind und einen guten Kontakt zueinander haben. Verbinden Sie dann den CPULüfter mit dem CPU-LÜFTER-Anschluss (CPU_FAN1, siehe Seite 2, Nr. 3). Beziehen Sie sich für eine richtige Installation auf die Handbücher des CPULüfters und des Kühlkörpers. Deutsch 59 ASRock ALiveNF5-VSTA Motherboard - ASRock ALiveNF5-VSTA | Quick Installation Guide - Page 60
2.3 Installation der Speichermodule (DIMM) Die Motherboards ALiveNF5-VSTA bieten vier 240-pol. DDRII (Double Data Rate) DIMM-Steckplätze und unterstützen die DDRII Steckplatz zu installieren; andernfalls könnten Motherboard und DIMMs beschädigt werden. Deutsch 60 ASRock ALiveNF5-VSTA Motherboard - ASRock ALiveNF5-VSTA | Quick Installation Guide - Page 61
ätze zu zwingen, führt dies zu dauerhaften Schäden am Mainboard und am DIMM-Modul. Schritt 3: Drücken Sie die DIMM-Module fest in die Steckplätze, so dass die Halteklammern an beiden Enden des Moduls einschnappen und das DIMM-Modul fest an Ort und Stelle sitzt. 61 ASRock ALiveNF5-VSTA Motherboard - ASRock ALiveNF5-VSTA | Quick Installation Guide - Page 62
ätze) Es gibt einen 3 PCI-Steckplätze und 3 PCI Express-Steckplätze am ALiveNF5-VSTA Motherboard. PCI-Slots: PCI-Slots werden zur Installation von Erweiterungskarten mit dem 32bit PCI-Interface Befestigen Sie die Karte mit der Schraube aus Schritt 2. 62 ASRock ALiveNF5-VSTA Motherboard Deutsch - ASRock ALiveNF5-VSTA | Quick Installation Guide - Page 63
nicht, den Jumper wieder zu entfernen, nachdem das CMOS gelöscht wurde. Wenn Sie den CMOSInhalt gleich nach dem Aktualisieren des BIOS löschen müssen, müssen Sie zuerst das System starten und dann wieder ausschalten, bevor Sie den CMOS-Inhalt löschen. Deutsch 63 ASRock ALiveNF5-VSTA Motherboard - ASRock ALiveNF5-VSTA | Quick Installation Guide - Page 64
übertragungsrate bis 3,0 Gb/s. Serial ATA- (SATA-) Datenkabel (Option) Sie können beide Enden des SATA-Datenkabels entweder mit der SATA / SATAIIFestplatte oder dem SATAII-Anschluss am Mainboard verbinden. 64 ASRock ALiveNF5-VSTA Motherboard Deutsch - ASRock ALiveNF5-VSTA | Quick Installation Guide - Page 65
S.2, Punkt 23) Dieses Interface zu einem Audio-Panel auf der Vorderseite Ihres Gehäuses, ermöglicht Ihnen eine bequeme Kontrolle über Audio-Geräte. 65 ASRock ALiveNF5-VSTA Motherboard Deutsch - ASRock ALiveNF5-VSTA | Quick Installation Guide - Page 66
Sie das BIOS-Setup-Dienstprogramm auf F. Rufen Sie das Windows-System auf. Klicken Sie CPU-Lüfteranschluss (4-pin CPU_FAN1) (siehe S.2, Punkt 3) Verbinden Sie das CPU - 4 3 Lüfterkabel mit diesem 2 1 Anschluss und passen Sie den schwarzen Draht dem Erdungsstift an. 66 ASRock ALiveNF5-VSTA - ASRock ALiveNF5-VSTA | Quick Installation Guide - Page 67
Anschluss angeschlossen werden; auch ohne Geschwindigkeitsregulierung. Wenn Sie einen dreipoligen CPU-Lüfter an den CPU-Lüferanschluss dieses Motherboards anschließen möchten, verbinden Sie ihn bitte mit Fernsehgeräten, Projektoren, LCD-Geräten an das System. 67 ASRock ALiveNF5-VSTA Motherboard - ASRock ALiveNF5-VSTA | Quick Installation Guide - Page 68
(B oder C) des HDMI_SPDIF-Kabels an den HDMI_SPDIF-Anschluss der HDMI-VGA-Karte an. A. Schwarzes Ende B. Weißes Ende (zweipolig) C. Weißes Ende (dreipolig) Deutsch 68 ASRock ALiveNF5-VSTA Motherboard - ASRock ALiveNF5-VSTA | Quick Installation Guide - Page 69
zu verbinden. Schauen Sie in die Dokumentation Ihrer VGA-Karte und informieren Sie sich schon im Vorfeld über die richtige Nutzung der Anschlüsse. 69 ASRock ALiveNF5-VSTA Motherboard - ASRock ALiveNF5-VSTA | Quick Installation Guide - Page 70
/download.htm Die Beispiele oben dienen lediglich Ihrer Referenz. Die Steckbrückeneinstellungen können bei unterschiedlichen SATA II Festplatten verschiedener Hersteller abweichen. Aktualisierungen und ergänzende Informationen finden Sie auf der Internetseite des Herstellers. 70 ASRock ALiveNF5-VSTA - ASRock ALiveNF5-VSTA | Quick Installation Guide - Page 71
/ SATAII-Festplatte an. 2.10 Hot-Plug- und Hot-Swap-Funktion für SATA / SATAIIFestplatten Das ALiveNF5-VSTA-Motherboard unterstützt Hot Plug- und Hot SwapFunktionen für SATA- / SATAII- Geräte im RAID das System in Betrieb ist und einwandfrei läuft. Deutsch 71 ASRock ALiveNF5-VSTA Motherboard - ASRock ALiveNF5-VSTA | Quick Installation Guide - Page 72
Konfigurieren Sie BIOS. A. Rufen Sie im BIOS-DIENSTPROGRAMM den Bildschirm „Erweitert" und „IDE-Konfiguration" auf. B. Setzen Sie die Option "SATA Operation Mode" (SATA-Betriebsmodus) auf [AHCI]. SCHRITT 2: Erstellen Sie eine SATA / SATAII-Treiberdiskette. 72 ASRock ALiveNF5-VSTA Motherboard - ASRock ALiveNF5-VSTA | Quick Installation Guide - Page 73
zur Verfügung: A. NVIDIA nForce Storage Controller (required) Windows XP/2000 B. NVIDIA nForce Storage Controller (required) Windows XP64 Für Windows® 2000 / XP im AHCI-Modus wählen Sie bitte A. Für Windows® XP 64bit im AHCI-Modus wählen Sie bitte B. Deutsch 73 ASRock ALiveNF5-VSTA Motherboard - ASRock ALiveNF5-VSTA | Quick Installation Guide - Page 74
Vista32_AHCI (Für Windows® VistaTM-Benutzer) .. \ AMD64 \ Vista64_AHCI (Für Windows® VistaTM 64-Bit Benutzer) Legen Sie danach noch einmal die Windows® VistaTM / VistaTM 64-Bit optische Disc in das optische Laufwerk, um die Installation fortzusetzen. Deutsch 74 ASRock ALiveNF5-VSTA Motherboard - ASRock ALiveNF5-VSTA | Quick Installation Guide - Page 75
www.microsoft.com/Windows2000/downloads/servicepacks/sp4/ spdeploy.htm#the_integrated_installation_fmay Deutsch 2.13.1 Installation von Windows® 2000 / XP / XP 64-Bit mit Seite 72 in Kapitel 2.12.1 Schritt 2 beschrieben, eine SATA / SATAII-Treiberdiskette. 75 ASRock ALiveNF5-VSTA Motherboard - ASRock ALiveNF5-VSTA | Quick Installation Guide - Page 76
Konfiguration nach. Bitte lesen Sie die BIOS RAID-Installationsanleitung in dem folgenden Pfad auf der Support-CD: .. \ RAID Installation Guide SCHRITT 4: Installieren Sie Windows® 2000 / XP / XP 64-Bit in Ihrem System. Sie mit der Installation von Windows® 2000 / XP / XP 64-Bit beginnen. Zu Beginn - ASRock ALiveNF5-VSTA | Quick Installation Guide - Page 77
Support CD für eine richtige Konfiguration nach. Bitte lesen Sie die BIOS RAID-Installationsanleitung in dem folgenden Pfad auf der Support-CD: .. \ RAID Installation Guide SCHRITT 3: Installieren Sie Windows die Untied Overclocking-Technologie anwenden. 77 ASRock ALiveNF5-VSTA Motherboard Deutsch - ASRock ALiveNF5-VSTA | Quick Installation Guide - Page 78
-Verzeichnis der Support-CD, um die Menüs aufzurufen. Das Setup-Programm soll es Ihnen so leicht wie möglich machen. Es ist menügesteuert, d.h. Sie können in den verschiedenen Untermenüs Ihre Auswahl treffen und die Programme werden dann automatisch installiert. 78 ASRock ALiveNF5-VSTA Motherboard - ASRock ALiveNF5-VSTA | Quick Installation Guide - Page 79
VGA et CPU également sur le site Web ASRock. Site web ASRock, http://www.asrock.com 1.1 Contenu du paquet Carte mère ASRock ALiveNF5-VSTA (Facteur de forme ATX: 12.0 pouces x 7.6 pouces, 30.5 cm x 19.3 cm) Guide d'installation rapide ASRock ALiveNF5-VSTA CD de soutien ASRock ALiveNF5-VSTA Un câble - ASRock ALiveNF5-VSTA | Quick Installation Guide - Page 80
(codec audio ALC888) - Realtek PHY RTL8201CL - Vitesse: 10/100 Ethernet - Support du Wake-On-LAN HD 8CH I/O - 1 port souris PS/2 - 1 port clavier PS/2 - 1 port série: COM 1 - 1 port parallèle: Support ECP/EPP - 4 ports USB 2.0 par défaut - 1 port RJ-45 Français 80 ASRock ALiveNF5-VSTA Motherboard - ASRock ALiveNF5-VSTA | Quick Installation Guide - Page 81
CPU - Tachéomètre ventilateur châssis - Ventilateur silencieux d'unité centrale - Monitoring de la tension: +12V, +5V, +3.3V, Vcore - Microsoft® Windows® 2000 / XP / XP Media Center / XP 64-bit / VistaTM / VistaTM 64-bit (voir ATTENTION 11) - FCC, CE, WHQL Français 81 ASRock ALiveNF5-VSTA - ASRock ALiveNF5-VSTA | Quick Installation Guide - Page 82
les configurations CPU/DRAM. Si votre systèmes devient instable une fois la fonction AM2 Boost activée, il est possible qu'elle ne s'applique pas à votre système. Vous pouvez choisir de désactiver cette fonction pour conserver la stabilité de votre système. 82 ASRock ALiveNF5-VSTA Motherboard Fran - ASRock ALiveNF5-VSTA | Quick Installation Guide - Page 83
supporte «Guide Windows® VistaTM 64-bit/ VistaTM / XP 64-bit / XP SP1; SP2/ 2000 SP4. 11. Le pilote Microsoft® Windows Windows® VistaTM systems sont demandes de mettre au dessus de exigence du hardware minimum pour qualifier pour Windows® VistaTM Premium 2007 logo. Français 83 ASRock ALiveNF5-VSTA - ASRock ALiveNF5-VSTA | Quick Installation Guide - Page 84
composant, placez-le sur un support antistatique ou dans son sachet d'origine. 5. Lorsque vous placez les vis dans les orifices pour vis pour fixer la carte mère sur le châssis, ne serrez pas trop les vis ! Vous risquez sinon d'endommager la carte mère. 84 ASRock ALiveNF5-VSTA Motherboard Français - ASRock ALiveNF5-VSTA | Quick Installation Guide - Page 85
avec l'autre. Ensuite, connectez le ventilateur du CPU à la prise du VENTILATEUR DU CPU (CPU_FAN1, reportez-vous en page 2, No. 3). Pour une bonne installation, veuillez vous référer aux manuels d'instruction sur le ventilateur du CPU et le dissipateur. Français 85 ASRock ALiveNF5-VSTA Motherboard - ASRock ALiveNF5-VSTA | Quick Installation Guide - Page 86
modules m émoire [DIMM] La carte mère ALiveNF5-VSTA dispose de quatre emplacements DIMM DDRII (Double Data Rate) de 240-broches, et supporte la Technologie de Mémoire à Canal Double. Pour effectuer ; la carte mère et les DIMM pourraient être endommagés. Français 86 ASRock ALiveNF5-VSTA Motherboard - ASRock ALiveNF5-VSTA | Quick Installation Guide - Page 87
jusqu'à ce que les clips de maintien situés aux deux extrémités se ferment complètement et que le module DIMM soit inséré correctement. 87 ASRock ALiveNF5-VSTA Motherboard - ASRock ALiveNF5-VSTA | Quick Installation Guide - Page 88
pour les cartes PCI Express avec cartes graphiques de largeur x1 voies, telles que les cartes Gigabit LAN, les cartes SATA2, etc. Installation d'une carte d'extension Etape 1. Avant d'installer les cartes Fixez la carte sur le châssis à l'aide d'une vis. 88 ASRock ALiveNF5-VSTA Motherboard Français - ASRock ALiveNF5-VSTA | Quick Installation Guide - Page 89
après avoir mis le BIOS à jour. Si vous avez besoin d'effacer la CMOS lorsque vous avez fini de mettre le BIOS à jour, vous devez d'abord initialiser le système, puis le mettre hors tension avant de procéder à l'opération d'effacement de la CMOS. Français 89 ASRock ALiveNF5-VSTA Motherboard - ASRock ALiveNF5-VSTA | Quick Installation Guide - Page 90
mère vers le disque dur Câble ATA 66/100/133 80 conducteurs Note: Veuillez vous reporter aux instructions du fabricant de votre IDE périphérique pour les détails. Connecteurs Série ATAII (SATAII_1: voir au connecteur SATAII sur la carte mère. Français 90 ASRock ALiveNF5-VSTA Motherboard - ASRock ALiveNF5-VSTA | Quick Installation Guide - Page 91
. 23) C'est une interface pour un câble audio en façade qui permet le branchement et le contrôle commodes de périphériques audio. 91 ASRock ALiveNF5-VSTA Motherboard Français - ASRock ALiveNF5-VSTA | Quick Installation Guide - Page 92
correctement. Veuillez suivre les instructions dans notre manuel et le dans l'utilitaire de configuration du BIOS. Saisir les Paramètres F. Entrer dans le système Windows. Cliquer sur l'icône sur fig. 20) Connecteur pour ventilateur CPU (CPU_FAN1 br. 4) (voir p.2 ASRock ALiveNF5-VSTA Motherboard - ASRock ALiveNF5-VSTA | Quick Installation Guide - Page 93
ventilateur. Si vous prévoyez de connecter le ventilateur de CPU à 3 broches au connecteur du ventilateur de CPU sur cette carte mère, veuillez le connecter aux broches 1-3. un câble jeux sur ce connecteur si le support pour port jeux est installée. Français 93 ASRock ALiveNF5-VSTA Motherboard - ASRock ALiveNF5-VSTA | Quick Installation Guide - Page 94
C) du câble HDMI_SPDIF au connecteur HDMI_SPDIF de la carte VGA HDMI. A. extrémité noire B. extrémité blanche (2 briches) C. extrémité blanche (3 briches) Français 94 ASRock ALiveNF5-VSTA Motherboard - ASRock ALiveNF5-VSTA | Quick Installation Guide - Page 95
re. Pour une bonne installation de la carte VGA HDMI, veuillez vous reporter à la page 88 du guide d'installation. Etape 2. Connectez l'extrémité noire (A) du câble HDMI_SPDIF au collecteur HDMI_SPDIF (HDMI_SPDIF1, de la carte VGA pour l'utilisation du connecteur. 95 ASRock ALiveNF5-VSTA Motherboard - ASRock ALiveNF5-VSTA | Quick Installation Guide - Page 96
HDMI à votre système. 2.8 Guide d'installation du disque dur SATAII Avant d'installer fonction SATAII, veuillez suivre les instructions ci-dessous avec les différents détails. http://www.hitachigst.com/hdd/support/download.htm Les exemples donnés précédemment ne ASRock ALiveNF5-VSTA Motherboard Français - ASRock ALiveNF5-VSTA | Quick Installation Guide - Page 97
La carte-mère ALiveNF5-VSTA gère les fonctions Hot Plug et Hot Swap pour les périphériques SATA / SATAII en mode RAID / AHCI. Le jeu de puces de pont sud NVIDIA® nForce 520 offre un support de matériel et en fonctionnement s'appelle le "Hot Swap". Français 97 ASRock ALiveNF5-VSTA Motherboard - ASRock ALiveNF5-VSTA | Quick Installation Guide - Page 98
SATA » sur [AHCI]. ETAP 2: Créez une disquette pilotes SATA / SATAII. A. Insérez le CD de soutien ASRock dans votre lecteur de disque optique pour démarrer votre système. (N'insérez AUCUNE disquette dans le lecteur de disquette pour l'instant!) 98 ASRock ALiveNF5-VSTA Motherboard Français - ASRock ALiveNF5-VSTA | Quick Installation Guide - Page 99
/ SATAII sans NCQ et les fonctions de connexion à chaud ETAP 1: Configurez le BIOS. A. Entrez dans UTILITAIRE DE CONFIGURATION BIOS écran Avancé Configuration IDE. B. Réglez l'option "SATA Operation Mode"« Mode de fonctionnement SATA » sur [non-RAID]. 99 ASRock ALiveNF5-VSTA Motherboard Français - ASRock ALiveNF5-VSTA | Quick Installation Guide - Page 100
UTILITAIRE DE CONFIGURATION BIOS écran Avancé Configuration IDE. B. Réglez l'option "SATA Operation Mode"« Mode de fonctionnement SATA » sur [non-RAID]. ETAPE 2: Installer le système d'exploitation Windows® VistaTM / VistaTM 64-bit sur votre système. Français 100 ASRock ALiveNF5-VSTA Motherboard - ASRock ALiveNF5-VSTA | Quick Installation Guide - Page 101
Windows® 2000 / XP / XP 64- bit sur votre système. Vous pouvez installer Windows® 2000 / XP / XP 64-bit. Au début de la configuration Windows®, appuyez sur F6 pour installer un lecteur RAID tiers. Lorsque vous y êtes invité, insérez une disquette contenant le lecteur NVIDIA® ASRock ALiveNF5-VSTA - ASRock ALiveNF5-VSTA | Quick Installation Guide - Page 102
instructions pour installer l'OS Windows® VistaTM / VistaTM 64-bits sur votre système. Lorsque vous voyez la page "Où souhaitez-vous installer Windows ?", veuillez insérer le CD Support d' ASRock dans votre lecteur optique, et cliquer sur le bouton "Charger le pilote" en 102 ASRock ALiveNF5-VSTA - ASRock ALiveNF5-VSTA | Quick Installation Guide - Page 103
de la partie Guide d'installation RAID Windows du document sous le chemin suivant du CD Support: .. \ RAID Installation Guide 2.14 La " de la configuration du BIOS pour établir la sélection de [Auto] à [CPU, PCIE, Async.]. Par conséquent, le CPU FSB n'est pas lié ASRock ALiveNF5-VSTA Motherboard 103 - ASRock ALiveNF5-VSTA | Quick Installation Guide - Page 104
BIOS, veuillez consulter le Guide de l'utilisateur (fichier PDF) dans le CD technique. 4. Informations sur le CD de support Cette carte mère supporte divers systèmes d'exploitation Microsoft® Windows®: 2000 / XP / XP Media Center / XP les menus. Français 104 ASRock ALiveNF5-VSTA Motherboard - ASRock ALiveNF5-VSTA | Quick Installation Guide - Page 105
VGA e gli elenchi di CPU supportate. ASRock website http://www.asrock.com 1.1 Contenuto della confezione Scheda madre ASRock ALiveNF5-VSTA (ATX Form Factor: 12.0-in x 7.6-in, 30.5 cm x 19.3 cm) Guida di installazione rapida ASRock ALiveNF5-VSTA CD di supporto ASRock ALiveNF5-VSTA Un cavo IDE 80-pin - ASRock ALiveNF5-VSTA | Quick Installation Guide - Page 106
AM2 Boost: Tecnologia brevettata ASRock per migliorare le prestazioni della memoria fino al 12,5% (vedi ATTENZIONE 7) Slot di - 3 x slot PCI espansione - 1 x slot PCI Express x16 - 2 x slot PCI Express x1 Audio - 7.1 Audio HD CH Windows® VistaTM Premium Level (ALC888 Audio Codec) LAN - ASRock ALiveNF5-VSTA | Quick Installation Guide - Page 107
ventola di raffreddamento - Ventola CPU silenziosa - Voltaggio: +12V, +5V, +3.3V, Vcore Compatibi- - Microsoft® Windows® 2000 / XP / Centro multimediale XP / XP 64 lità SO bit essere ritenuti responsabili per possibili danni provocati dall'overclocking. ASRock ALiveNF5-VSTA Motherboard 107 - ASRock ALiveNF5-VSTA | Quick Installation Guide - Page 108
ASRock AM2 Boost. Se si abilita questa funzione nel Setup del BIOS, le prestazioni della memoria miglioreranno fino al 12,5%, per gli effetti dipendono sempre dalla CPU AM2 con Microsoft® Windows® VistaTM 64-bit / VistaTM / XP 64 bit / XP SP1; SP2/2000 SP4. ASRock ALiveNF5-VSTA Motherboard - ASRock ALiveNF5-VSTA | Quick Installation Guide - Page 109
.0 con driver WDDM Con memoria VGA 128bit (Premium) Con memoria VGA 64bit (Basic) * Dopo il 1 Giugno 2007, tutti i sistemi Windows® VistaTM vengono richiesti di essere in accordo ai requisiti minimi del sistema per Windows® VistaTM Premium 2007 logo. Italiano ASRock ALiveNF5-VSTA Motherboard 109 - ASRock ALiveNF5-VSTA | Quick Installation Guide - Page 110
. 5. Nell'usare i giraviti per fissare la scheda madre al telaio non serrare eccessivamente le viti! Altrimenti si rischia di danneggiare la scheda madre. Italiano 110 ASRock ALiveNF5-VSTA Motherboard - ASRock ALiveNF5-VSTA | Quick Installation Guide - Page 111
tra i due. Quindi collegare la ventolina CPU al connettore CPU FAN (CPU_FAN1, fare riferimento a pagina 2, Numero 3). Per eseguire un'installazione appropriata, fare riferimento al manuale d'istruzioni della ventolina CPU e del dispersore di calore. Italiano ASRock ALiveNF5-VSTA Motherboard 111 - ASRock ALiveNF5-VSTA | Quick Installation Guide - Page 112
2.3 Installazione dei moduli di memoria (DIMM) La scheda madre ALiveNF5-VSTA fornisce quattro alloggiamenti DIMM DDRII (Double Data Rate) a 240 pin, e supporta la tecnologia DDR nello slot DDRII, altrimenti si possono danneggiare questa scheda madre e la DIMM. 112 ASRock ALiveNF5-VSTA Motherboard - ASRock ALiveNF5-VSTA | Quick Installation Guide - Page 113
la DIMM nello slot fino a far scattare completamente in posizione i fermagli di ritegno alle due estremità e fino ad installare correttamente la DIMM nella sua sede. ASRock ALiveNF5-VSTA Motherboard 113 - ASRock ALiveNF5-VSTA | Quick Installation Guide - Page 114
PCIE x1) usato per schede PCI Express con schede grafiche di larghezza x1, quali scheda Gigabit LAN, SATA2, ecc. Installare una scheda di espansione Step 1. Prima d'installare la scheda di Step 4. Agganciare la scheda allo chassis con le viti. Italiano 114 ASRock ALiveNF5-VSTA Motherboard - ASRock ALiveNF5-VSTA | Quick Installation Guide - Page 115
. Non cancellare la CMOS subito dopo aver aggiornato il BIOS. Se è necessario cancellare la CMOS una volta completato l'aggiornamento del BIOS, è necessario riavviare prima il sistema, e poi spegnerlo prima di procedere alla cancellazione della CMOS. Italiano ASRock ALiveNF5-VSTA Motherboard 115 - ASRock ALiveNF5-VSTA | Quick Installation Guide - Page 116
Serial ATA (SATA) Entrambe le estremità del cavo (Opzionale) dati SATA possono collegarsi all'hard disk SATA / SATAII o al connettore SATAII sulla scheda madre. 116 ASRock ALiveNF5-VSTA Motherboard Italiano - ASRock ALiveNF5-VSTA | Quick Installation Guide - Page 117
come CD-ROM, DVD ROM,TV tuner, o schede MPEG. È un'interfaccia per il cavo del pannello audio. Che consente connessione facile e controllo dei dispositivi audio. ASRock ALiveNF5-VSTA Motherboard 117 - ASRock ALiveNF5-VSTA | Quick Installation Guide - Page 118
alle istruzioni del nostro manuale e del manuale del telaio per installare nel programma di impostazione BIOS. Entrare su Impostazioni avanzate nel sistema di Windows. Fare clic sull CPU a questo connettore e far 3 2 combaciare il filo nero al pin 1 terra. Italiano 118 ASRock ALiveNF5-VSTA - ASRock ALiveNF5-VSTA | Quick Installation Guide - Page 119
della velocità della ventola. Se si intende collegare la ventola CPU a 3 piedini al connettore della ventola CPU su questa scheda madre, collegarla ai piedini 1-3. Piedini 1-3 LCD . Collegare il connettore HDMI_SPDIF della scheda VGA HDMI a questo header. ASRock ALiveNF5-VSTA Motherboard 119 - ASRock ALiveNF5-VSTA | Quick Installation Guide - Page 120
madre. Quindi collegare l'estremità bianca (B o C) del cavo HDMI_SPDIF al connettore HDMI_SPDIF della scheda HDMI VGA. A. estremità nera B. estremità bianca (2 pin) C. estremità bianca (3 pin) Italiano 120 ASRock ALiveNF5-VSTA Motherboard - ASRock ALiveNF5-VSTA | Quick Installation Guide - Page 121
la definizione di pin dei connettori HDMI_SPDIF, consultare il manuale dell'utente della scheda HDMI VGA. Un collegamento non manuale dell'utente di HDTV e della scheda HDMI VGA per il collegamento dettagliato. Punto 5. Installare il driver della scheda HDMI VGA nel sistema. ASRock ALiveNF5-VSTA - ASRock ALiveNF5-VSTA | Quick Installation Guide - Page 122
.com/hdd/support/download.htm Gli esempi di cui sopra sono solo per riferimento. Per dischi rigidi SATAII di diversi produttori, i metodi di impostazione dei pin del jumper possono non essere gli stessi. Visitare i siti web dei produttori per gli aggiornamenti. Italiano 122 ASRock ALiveNF5-VSTA - ASRock ALiveNF5-VSTA | Quick Installation Guide - Page 123
di collegamento e scambio a caldo per i dischi rigidi SATA / SATAII La scheda madre ALiveNF5-VSTA supporta le funzioni Hot Plug ed Hot Swap per periferiche SATA / SATAII in modo RAID il sistema è ancora acceso ed in condizione di funzionamento. Italiano ASRock ALiveNF5-VSTA Motherboard 123 - ASRock ALiveNF5-VSTA | Quick Installation Guide - Page 124
downloads/servicepacks/sp4/ spdeploy.htm#the_integrated_installation_fmay 2.12.1 Installazione di Windows® 2000 / XP / XP 64 bit senza funzioni RAID Se si desidera installare Windows® 2000 / Windows® XP / Windows® XP fase di POST, all'inzio del boot 124 ASRock ALiveNF5-VSTA Motherboard Italiano - ASRock ALiveNF5-VSTA | Quick Installation Guide - Page 125
1° PASSO: Configurare il BIOS. A. Entrare in UTILIT BIOS SETUP Avanzate Configurazione IDE. B. Impostare l'opzione "SATA Operation Mode" (Modalità operativa SATA) su [non-RAID]. 2° PASSO: Installazione di Windows® 2000 / XP / XP 64-bit sul sistema. Italiano ASRock ALiveNF5-VSTA Motherboard 125 - ASRock ALiveNF5-VSTA | Quick Installation Guide - Page 126
Se si desidera installare Windows® 2000, Windows® XP, Windows® XP 64 bit, Windows® VistaTM, Windows® VistaTM 64 bit sui dischi rigidi SATA / SATAII con funzioni RAID, attenersi alle procedure che seguono relative al sistema operativo che si installa. Italiano 126 ASRock ALiveNF5-VSTA Motherboard - ASRock ALiveNF5-VSTA | Quick Installation Guide - Page 127
(required) Selezionare A e B per Windows® 2000 / XP / XP 64 bit in modalità RAID. (Sono necessarie due unità RAID per la modalità RAID, è necessario selezionarle separatamente. Specificare la prima unità RAID e poi specificare la seconda unità.) ASRock ALiveNF5-VSTA Motherboard 127 Italiano - ASRock ALiveNF5-VSTA | Quick Installation Guide - Page 128
di funzionamento SATA" su [RAID]. Quindi, impostare la configurazione RAID usando la sezione Windows RAID della guida all'installazione che si trova sul seguente percorso del CD di supporto: .. \ RAID Installation Guide (Guida all'installazione RAID) 128 ASRock ALiveNF5-VSTA Motherboard Italiano - ASRock ALiveNF5-VSTA | Quick Installation Guide - Page 129
l'opzione "Modalità Overclock" nelle impostazioni del BIOS per impostare la selezione da [Auto] a [CPU, PCIE, Async.]. A questo punto, la CPU FSB è "libera" durante l'overclocking, ma di applicare la tecnologia Untied Overclocking Technology. Italiano ASRock ALiveNF5-VSTA Motherboard 129 - ASRock ALiveNF5-VSTA | Quick Installation Guide - Page 130
BIOS, fare riferimento al Manuale dell'Utente (PDF file) contenuto nel cd di supporto. 4. Software di supporto e informazioni su CD Questa scheda madre supporta vari sistemi operativi Microsoft® Windows®: 2000 / XP / Centro multimediale XP / XP i menù. Italiano 130 ASRock ALiveNF5-VSTA Motherboard - ASRock ALiveNF5-VSTA | Quick Installation Guide - Page 131
manual, la versión actualizada estará disponible en el website de ASRock sin previo aviso. También encontrará las listas de las últimas tarjetas VGA y CPU soportadas en la página web de ASRock. Website de ASRock http://www.asrock.com 1.1 Contenido de la caja Placa base ASRock ALiveNF5-VSTA (Factor - ASRock ALiveNF5-VSTA | Quick Installation Guide - Page 132
x1 - Sonido HD de Nivel Superior 7.1 Canales Windows® VistaTM (Códec de sonido ALC888) - Realtek PHY RTL8201CL - Velocidad: 10/100 Ethernet - Soporta Wake-On-LAN HD 8CH I/O - 1 puerto de ratón / Entrada de línea / Altavoz frontal / Micrófono (ver ATENCIÓN 8) ASRock ALiveNF5-VSTA Motherboard Español - ASRock ALiveNF5-VSTA | Quick Installation Guide - Page 133
y del chasis - Ventilador silencioso para procesador - Monitor de Voltaje: +12V, +5V, +3.3V, Vcore - En conformidad con Microsoft® Windows® 2000 / XP / XP Media Center / XP 64 bits / VistaTM / VistaTM 64 bits (vea ATENCIÓN 11) - FCC, CE, WHQL Español ASRock ALiveNF5-VSTA Motherboard 133 - ASRock ALiveNF5-VSTA | Quick Installation Guide - Page 134
ajuste del BIOS, aplicando Windows. Consulte el APÉNDICE en la página 47 del "User Manual" (Manual Windows® XP y Windows® VistaTM. Para equipos con Windows® XP 64-bit y Windows® VistaTM 64-bit con CPU AM2 Boost, es posible que dicha función no se pueda aplicar a aquél. Si lo ASRock ALiveNF5-VSTA Motherboard - ASRock ALiveNF5-VSTA | Quick Installation Guide - Page 135
® Windows® VistaTM 64 bits / VistaTM / XP 64 bits / XP SP1; SP2/2000 SP4. 11. El controlador para Microsoft® Windows® VistaTM Windows® VistaTM son requieridos para satisfacer los requisitos del hardware mínimos para calificar el logo de Windows® VistaTM Premium 2007. Español ASRock ALiveNF5-VSTA - ASRock ALiveNF5-VSTA | Quick Installation Guide - Page 136
en sus agujeros para fijar la placa madre en el chasis, no los apriete demasiado. Eso podría dañar la placa madre. Español 136 ASRock ALiveNF5-VSTA Motherboard - ASRock ALiveNF5-VSTA | Quick Installation Guide - Page 137
y hacen buen contacto entre sí. Conecte entonces el ventilador de la CPU al conector CPU FAN (CPU_FAN1, consulte Página 2, N. 3). Para realizar la instalación correctamente, consulte el manual de instrucciones del ventilador de la CPU y el radiador. Español ASRock ALiveNF5-VSTA Motherboard 137 - ASRock ALiveNF5-VSTA | Quick Installation Guide - Page 138
2.3 Instalación de Memoria La placa ALiveNF5-VSTA ofrece cuatro ranuras DIMM DDRII de 240 pines, y soporta Tecnología de Memoria de Doble Canal. Para la configuración ranura DDRII; si lo hace, esta placa base y los módulos DIMM pueden resultar dañados. Español 138 ASRock ALiveNF5-VSTA Motherboard - ASRock ALiveNF5-VSTA | Quick Installation Guide - Page 139
dentro de la ranura hasta que los clips de sujeción de ambos lados queden completamente introducidos en su sitio y la DIMM se haya asentado apropiadamente. ASRock ALiveNF5-VSTA Motherboard 139 - ASRock ALiveNF5-VSTA | Quick Installation Guide - Page 140
Express con tarjetas gráficas con una anchura de 1 carriles, como por ejemplo, para tarjetas Gigabit LAN, SATA2, etc. Instalación de Tarjetas de Expansión. Paso 1. Antes de instalar la tarjeta de expansi . Paso 4. Asegure la tarjeta con tornillos. Español 140 ASRock ALiveNF5-VSTA Motherboard - ASRock ALiveNF5-VSTA | Quick Installation Guide - Page 141
acuérdase de quitar el jumper cap después de limpiar el COMS. Si necesita borrar la CMOS cuando acabe de finalizar la actualización de la BIOS, debe arrancar primero el sistema y, a continuación, apagarlo antes de realizar la acción de borrado de CMOS. Español ASRock ALiveNF5-VSTA Motherboard 141 - ASRock ALiveNF5-VSTA | Quick Installation Guide - Page 142
de serie ATA (SATA) (Opcional) Ambos extremos del cable pueden conectarse al disco duro SATA / SATAII o la conexión de la placa base. Español 142 ASRock ALiveNF5-VSTA Motherboard - ASRock ALiveNF5-VSTA | Quick Installation Guide - Page 143
(9-pin HD_AUDIO1) (vea p.2, No. 23) Este es una interface para cable de audio de panel frontal que permite conexión y control conveniente de apparatos de Audio. ASRock ALiveNF5-VSTA Motherboard 143 - ASRock ALiveNF5-VSTA | Quick Installation Guide - Page 144
instrucciones en nuestro manual y en el manual de chasis para de configuración del BIOS Entre en Configuración avanzada Entre en el sistema Windows. Haga clic en CPU a este conector y 3 2 haga coincidir el cable negro 1 con el conector de tierra. Español 144 ASRock ALiveNF5-VSTA Motherboard - ASRock ALiveNF5-VSTA | Quick Installation Guide - Page 145
VGA HDMI, permite al sistema conectarse a dispositivos de TV Digital HDMI / proyectores / Dispositivos LCD. Conecte el conector HDMI_SPDIF de la tarjeta VGA HDMI a esta cabecera. ASRock ALiveNF5-VSTA Motherboard 145 - ASRock ALiveNF5-VSTA | Quick Installation Guide - Page 146
extremo blanco (B o C) del cable HDMI_SPDIF en el conector HDMI_SPDIF de la tarjeta VGA HDMI. A. Extremo negro B. Extremo blanco (2 patillas) C. Extremo blanco (3 patillas) Español 146 ASRock ALiveNF5-VSTA Motherboard - ASRock ALiveNF5-VSTA | Quick Installation Guide - Page 147
4. Conecte el conector de salida HDMI a un dispositivo HDMI, como un HDTV. Consulte el manual del usuario del HDTV y la tarjeta VGA HDMI para conocer el procedimiento detallado de conexión. Paso 5. Instale el controlador de la tarjeta VGA HDMI en su sistema. ASRock ALiveNF5-VSTA Motherboard 147 - ASRock ALiveNF5-VSTA | Quick Installation Guide - Page 148
Por favor visite el sitio Web de Hitachi para detalles. http://www.hitachigst.com/hdd/support/download.htm Los ejemplos anteriores son sólo para referencia. Para diferentes productos de disco duro los proveedores para obtener las actualizaciones. Español 148 ASRock ALiveNF5-VSTA Motherboard - ASRock ALiveNF5-VSTA | Quick Installation Guide - Page 149
2.10 Función de conexión y cambio en caliente para HDDs SATA / SATAII La placa base ALiveNF5-VSTA soporta las funciones Hot Plug y Hot Swap para dispositivos SATA / SATAII en modo RAID / AHCI el sistema está conectado y en condiciones de funcionamiento. Español ASRock ALiveNF5-VSTA Motherboard 149 - ASRock ALiveNF5-VSTA | Quick Installation Guide - Page 150
Modo de funcionamiento SATA) en [AHCI]. PASO 2: Haga un Disquete de Controlador SATA / SATAII. A. Inserte el CD de soporte de ASRock en la unidad óptica de la unidad para iniciar el sistema. (NO inserte ningún disquete en la unidad de disco en este 150 momento) ASRock ALiveNF5-VSTA Motherboard - ASRock ALiveNF5-VSTA | Quick Installation Guide - Page 151
driver BIOS. A. Entre a la Utilidad de configuración de BIOS pantalla de Avanzada Configuración IDE. B. Establezca la opción "SATA Operation Mode"(Modo de funcionamiento SATA) en [non-RAID]. PASO 2: Instale el sistema operativo Windows® 2000 / XP / XP 64 bits en su sistema. ASRock ALiveNF5-VSTA - ASRock ALiveNF5-VSTA | Quick Installation Guide - Page 152
Utilidad de configuración de BIOS pantalla de Avanzada Configuración IDE. B. Establezca la opción "SATA Operation Mode"(Modo de funcionamiento SATA) en [non-RAID]. PASO 2: Instale el sistema operativo Windows® VistaTM / VistaTM 64 bits en su sistema. Español 152 ASRock ALiveNF5-VSTA Motherboard - ASRock ALiveNF5-VSTA | Quick Installation Guide - Page 153
® 2000 / Windows® XP / Windows® XP 64 bits. Cuando comience la instalación de Windows®, presione F6 para instalar un controlador RAID. Cuando el programa se lo pida, inserte un disco flexible con el controlador NVIDIA® RAID. Después de leer el disco flexible, se presentará el ASRock ALiveNF5-VSTA - ASRock ALiveNF5-VSTA | Quick Installation Guide - Page 154
unidad óptica y haga clic en el botón "Load Driver" (Cargar controlador) situado en la parte inferior izquierda para cargar los controladores RAID de NVIDIA®. Los controladores RAID de NVIDIA® se encuentran en la siguiente ruta de nuestro CD de soporte: 154 ASRock ALiveNF5-VSTA Motherboard Español - ASRock ALiveNF5-VSTA | Quick Installation Guide - Page 155
Windows RAID del documento que se encuentra en la siguiente ruta del CD de soporte: .. \ RAID Installation Guide " de la configuración de BIOS para establecer la selección de [Auto] a [CPU, PCIE, Async.]. Por lo tanto, FSB de CPU no está relacionado durante el ASRock ALiveNF5-VSTA Motherboard 155 - ASRock ALiveNF5-VSTA | Quick Installation Guide - Page 156
BIOS, por favor refiérase al Manual del Usuario (archivo PDF) contenido en el CD. 4.Información de Software Support CD Esta placa-base soporta diversos tipos de sistema operativo Windows®: 2000 / XP / XP Media Center / XP para iniciar la instalación. Español 156 ASRock ALiveNF5-VSTA Motherboard - ASRock ALiveNF5-VSTA | Quick Installation Guide - Page 157
ASRock ALiveNF5-VSTA Motherboard 157 - ASRock ALiveNF5-VSTA | Quick Installation Guide - Page 158
'' ® ® 158 ASRock ALiveNF5-VSTA Motherboard - ASRock ALiveNF5-VSTA | Quick Installation Guide - Page 159
® ASRock ALiveNF5-VSTA Motherboard 159 - ASRock ALiveNF5-VSTA | Quick Installation Guide - Page 160
" " '' '' " " ® ® ® ® " ® ® ® ® 160 ASRock ALiveNF5-VSTA Motherboard - ASRock ALiveNF5-VSTA | Quick Installation Guide - Page 161
® ® ® ® ASRock ALiveNF5-VSTA Motherboard 161 - ASRock ALiveNF5-VSTA | Quick Installation Guide - Page 162
162 ASRock ALiveNF5-VSTA Motherboard - ASRock ALiveNF5-VSTA | Quick Installation Guide - Page 163
ASRock ALiveNF5-VSTA Motherboard 163 - ASRock ALiveNF5-VSTA | Quick Installation Guide - Page 164
DDRII_1 DDRII_2 DDRII_3 DDRII_4 ( ) ( ) ( ) ( ) (1) - - (2) - - (3) " " 164 ASRock ALiveNF5-VSTA Motherboard - ASRock ALiveNF5-VSTA | Quick Installation Guide - Page 165
ASRock ALiveNF5-VSTA Motherboard 165 - ASRock ALiveNF5-VSTA | Quick Installation Guide - Page 166
166 ASRock ALiveNF5-VSTA Motherboard - ASRock ALiveNF5-VSTA | Quick Installation Guide - Page 167
"" "" "" "" ASRock ALiveNF5-VSTA Motherboard 167 - ASRock ALiveNF5-VSTA | Quick Installation Guide - Page 168
168 SATAII_1 SATAII_3 SATAII_2 SATAII_4 ASRock ALiveNF5-VSTA Motherboard - ASRock ALiveNF5-VSTA | Quick Installation Guide - Page 169
CD1 ASRock ALiveNF5-VSTA Motherboard 169 - ASRock ALiveNF5-VSTA | Quick Installation Guide - Page 170
4 3 2 1 170 ASRock ALiveNF5-VSTA Motherboard - ASRock ALiveNF5-VSTA | Quick Installation Guide - Page 171
C B A ASRock ALiveNF5-VSTA Motherboard 171 - ASRock ALiveNF5-VSTA | Quick Installation Guide - Page 172
172 ASRock ALiveNF5-VSTA Motherboard - ASRock ALiveNF5-VSTA | Quick Installation Guide - Page 173
ASRock ALiveNF5-VSTA Motherboard 173 - ASRock ALiveNF5-VSTA | Quick Installation Guide - Page 174
® ® " " " " 174 ASRock ALiveNF5-VSTA Motherboard - ASRock ALiveNF5-VSTA | Quick Installation Guide - Page 175
® ® ® ® ® ® ® ® ® ® ® ASRock ALiveNF5-VSTA Motherboard 175 - ASRock ALiveNF5-VSTA | Quick Installation Guide - Page 176
® ® ® ® A. NVIDIA nForce Storage Controller (required) Windows XP/2000 B. NVIDIA nForce Storage Controller (required) Windows XP64 ® ® ® ® ® 176 ® ASRock ALiveNF5-VSTA Motherboard - ASRock ALiveNF5-VSTA | Quick Installation Guide - Page 177
® ® ® ® \ \ \ \ ® ® ® ® ® ® ® ® ® ® ® ® ® ASRock ALiveNF5-VSTA Motherboard 177 - ASRock ALiveNF5-VSTA | Quick Installation Guide - Page 178
® ® " " \ ® ® ® ® ® ® A. NVIDIA RAID Driver (required) B. NVIDIA nForce Storage Controller (required) ® ® " " \ ® ® 178 ASRock ALiveNF5-VSTA Motherboard - ASRock ALiveNF5-VSTA | Quick Installation Guide - Page 179
® ® " " \ ® ® ® \ \ \ \ ® ® ® ® ® ® " \ ® " ASRock ALiveNF5-VSTA Motherboard 179 - ASRock ALiveNF5-VSTA | Quick Installation Guide - Page 180
" " 180 ASRock ALiveNF5-VSTA Motherboard - ASRock ALiveNF5-VSTA | Quick Installation Guide - Page 181
" " \\ " " ASRock ALiveNF5-VSTA Motherboard 181 - ASRock ALiveNF5-VSTA | Quick Installation Guide - Page 182
- ASRock ALiveNF5-VSTA | Quick Installation Guide - Page 183
- ASRock ALiveNF5-VSTA | Quick Installation Guide - Page 184
- ASRock ALiveNF5-VSTA | Quick Installation Guide - Page 185
- ASRock ALiveNF5-VSTA | Quick Installation Guide - Page 186
- ASRock ALiveNF5-VSTA | Quick Installation Guide - Page 187
- ASRock ALiveNF5-VSTA | Quick Installation Guide - Page 188
- ASRock ALiveNF5-VSTA | Quick Installation Guide - Page 189
- ASRock ALiveNF5-VSTA | Quick Installation Guide - Page 190
- ASRock ALiveNF5-VSTA | Quick Installation Guide - Page 191
- ASRock ALiveNF5-VSTA | Quick Installation Guide - Page 192
-
 1
1 -
 2
2 -
 3
3 -
 4
4 -
 5
5 -
 6
6 -
 7
7 -
8
-
9
-
10
-
11
-
12
-
13
-
14
-
15
-
16
-
17
-
18
-
19
-
20
-
21
-
22
-
23
-
24
-
25
-
26
-
27
-
28
-
29
-
30
-
31
-
32
-
33
-
34
-
35
-
36
-
37
-
38
-
39
-
40
-
41
-
42
-
43
-
44
-
45
-
46
-
47
-
48
-
49
-
50
-
51
-
52
-
53
-
54
-
55
-
56
-
57
-
58
-
59
-
60
-
61
-
62
-
63
-
64
-
65
-
66
-
67
-
68
-
69
-
70
-
71
-
72
-
73
-
74
-
75
-
76
-
77
-
78
-
79
-
80
-
81
-
82
-
83
-
84
-
85
-
86
-
87
-
88
-
89
-
90
-
91
-
92
-
93
-
94
-
95
-
96
-
97
-
98
-
99
-
100
-
101
-
102
-
103
-
104
-
105
-
106
-
107
-
108
-
109
-
110
-
111
-
112
-
113
-
114
-
115
-
116
-
117
-
118
-
119
-
120
-
121
-
122
-
123
-
124
-
125
-
126
-
127
-
128
-
129
-
130
-
131
-
132
-
133
-
134
-
135
-
136
-
137
-
138
-
139
-
140
-
141
-
142
-
143
-
144
-
145
-
146
-
147
-
148
-
149
-
150
-
151
-
152
-
153
-
154
-
155
-
156
-
157
-
158
-
159
-
160
-
161
-
162
-
163
-
164
-
165
-
166
-
167
-
168
-
169
-
170
-
171
-
172
-
173
-
174
-
175
-
176
-
177
-
178
-
179
-
180
-
181
-
182
-
183
-
184
-
185
-
186
-
187
-
188
-
189
-
190
-
191
-
192
 |
 |

1
ASRock
ALiveNF5-VSTA
Motherboard
English
English
English
English
English
Copyright Notice:
Copyright Notice:
Copyright Notice:
Copyright Notice:
Copyright Notice:
No part of this installation guide may be reproduced, transcribed, transmitted, or trans-
lated in any language, in any form or by any means, except duplication of documen-
tation by the purchaser for backup purpose, without written consent of ASRock Inc.
Products and corporate names appearing in this guide may or may not be registered
trademarks or copyrights of their respective companies, and are used only for identifica-
tion or explanation and to the owners’ benefit, without intent to infringe.
Disclaimer:
Disclaimer:
Disclaimer:
Disclaimer:
Disclaimer:
Specifications and information contained in this guide are furnished for informational
use only and subject to change without notice, and should not be constructed as a
commitment by ASRock. ASRock assumes no responsibility for any errors or omissions
that may appear in this guide.
With respect to the contents of this guide, ASRock does not provide warranty of any kind,
either expressed or implied, including but not limited to the implied warranties or
conditions of merchantability or fitness for a particular purpose. In no event shall
ASRock, its directors, officers, employees, or agents be liable for any indirect, special,
incidental, or consequential damages (including damages for loss of profits, loss of
business, loss of data, interruption of business and the like), even if ASRock has been
advised of the possibility of such damages arising from any defect or error in the guide
or product.
This device complies with Part 15 of the FCC Rules. Operation is subject to the
following two conditions:
(1)
this device may not cause harmful interference, and
(2)
this device must accept any interference received, including interference that
may cause undesired operation.
Published March 2007
Copyright
©
2007 ASRock INC. All rights reserved.
CALIFORNIA, USA ONLY
The Lithium battery adopted on this motherboard contains Perchlorate, a toxic
substance controlled in Perchlorate Best Management Practices (BMP) regulations
passed by the California Legislature. When you discard the Lithium battery in
California, USA, please follow the related regulations in advance.
“Perchlorate Material-special handling may apply, see
www
.dtsc.ca.gov/hazardouswa
ste/perchlorate”
ASRock Website: http://www.asrock.com