ASRock ALiveNF7G-HD720p R2.0 Quick Installation Guide
ASRock ALiveNF7G-HD720p R2.0 Manual
 |
View all ASRock ALiveNF7G-HD720p R2.0 manuals
Add to My Manuals
Save this manual to your list of manuals |
ASRock ALiveNF7G-HD720p R2.0 manual content summary:
- ASRock ALiveNF7G-HD720p R2.0 | Quick Installation Guide - Page 1
for backup purpose, without written consent of ASRock Inc. Products and corporate names appearing in this guide may or may not be registered trademarks ASRock Website: http://www.asrock.com Published December 2007 Copyright©2007 ASRock INC. All rights reserved. 1 ASRock ALiveNF7G-HD720p Motherboard - ASRock ALiveNF7G-HD720p R2.0 | Quick Installation Guide - Page 2
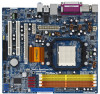
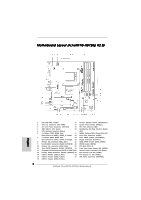
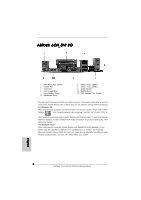
Motherboard Layout (ALiveNF7G-HD720p R2.0) English 1 PS2_USB_PW1 Jumper 17 Chassis Speaker Header (SPEAKER 1) 2 CPU Fan Connector (CPU_FAN1) 18 System 15 USB 2.0 Header (USB6_7, Blue) 32 ATX Power Connector (ATXPWR1) 16 USB 2.0 Header (USB4_5, Blue) 2 ASRock ALiveNF7G-HD720p Motherboard - ASRock ALiveNF7G-HD720p R2.0 | Quick Installation Guide - Page 3
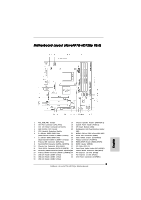
Motherboard Layout (ALiveNF7G-HD720p R5.0) English 1 PS2_USB_PW1 Jumper 17 Chassis Speaker Header (SPEAKER 1) 2 CPU Fan Connector (CPU_FAN1) 18 System Panel 15 USB 2.0 Header (USB6_7, Blue) 32 ATX Power Connector (ATXPWR1) 16 USB 2.0 Header (USB4_5, Blue) 3 ASRock ALiveNF7G-HD720p Motherboard - ASRock ALiveNF7G-HD720p R2.0 | Quick Installation Guide - Page 4
audio header. Please refer to below steps for the software setting of Multi-Streaming. For Windows® XP: After restarting your computer, you will find "Mixer" tool on your system. Please simultaneously", and click "ok". Then reboot your system. 4 ASRock ALiveNF7G-HD720p Motherboard English - ASRock ALiveNF7G-HD720p R2.0 | Quick Installation Guide - Page 5
the model you are using. www.asrock.com/support/index.asp 1.1 Package Contents 1 x ASRock ALiveNF7G-HD720p Motherboard (Micro ATX Form Factor: 9.6-in x 8.6-in, 24.4 cm x 21.8 cm) 1 x ASRock ALiveNF7G-HD720p Quick Installation Guide 2 x ASRock ALiveNF7G-HD720p Support CD 1 x Ultra ATA 66/100/133 - ASRock ALiveNF7G-HD720p R2.0 | Quick Installation Guide - Page 6
) - Chipset embedded HDMI Audio - Realtek PHY RTL8201CL (ALiveNF7G-HD720p R2.0) - Speed: 10/100 Ethernet (ALiveNF7G-HD720p R2.0) - Gigabit LAN 10/100/1000 Mb/s (ALiveNF7G-HD720p R5.0) - Giga PHY RTL8211B (ALiveNF7G-HD720p R5.0) - Supports Wake-On-LAN English 6 ASRock ALiveNF7G-HD720p Motherboard - ASRock ALiveNF7G-HD720p R2.0 | Quick Installation Guide - Page 7
AMI BIOS - AMI Legal BIOS - Supports "Plug and Play" - ACPI 1.1 Compliance Wake Up Events - Supports jumperfree - SMBIOS 2.3.1 Support - Drivers, Windows® 2000/XP/XP Media Center/XP 64-bit/ VistaTM/VistaTM 64-bit compliant - FCC, CE, Microsoft® WHQL Certificated 7 ASRock ALiveNF7G-HD720p Motherboard - ASRock ALiveNF7G-HD720p R2.0 | Quick Installation Guide - Page 8
when you install the PC system. 7. This motherboard supports ASRock AM2 Boost overclocking technology. If you enable this function in the BIOS setup, the memory performance will improve up to 12 Please check Intel® website for the latest information. 8 ASRock ALiveNF7G-HD720p Motherboard English - ASRock ALiveNF7G-HD720p R2.0 | Quick Installation Guide - Page 9
Disk Setup Guide" on support HDCP function to qualify for Windows® VistaTM Premium 2007 logo. * After June 1, 2007, all Windows® VistaTM systems are required to meet above minimum hardware requirements in order to qualify for Windows® VistaTM Premium 2007 logo. 9 ASRock ALiveNF7G-HD720p Motherboard - ASRock ALiveNF7G-HD720p R2.0 | Quick Installation Guide - Page 10
. B. Click "Configuration". C. Select "Video". D. Click "Enable hardware acceleration (nVidia PureVideo)" to remove the "V" mark in this item. E. Click "OK" to save the change. English 10 ASRock ALiveNF7G-HD720p Motherboard - ASRock ALiveNF7G-HD720p R2.0 | Quick Installation Guide - Page 11
Athlon 64X2 5200+ VGA Onboard VGA with DVI-D port Memory Dual Channel DDR2 800, 1GB x 2 OS Windows® VistaTM or Windows® VistaTM 64 Playback Software CyberLink PowerDVD Ultra DVD Player Pioneer BDR-101A / LG GBW-H10N (BD) HP HD100 (HD-DVD) English 11 ASRock ALiveNF7G-HD720p Motherboard - ASRock ALiveNF7G-HD720p R2.0 | Quick Installation Guide - Page 12
, place it on a grounded antistatic pad or in the bag that comes with the component. 5. When placing screws into the screw holes to secure the motherboard to the chassis, please do not over-tighten the screws! Doing so may damage the motherboard. 12 ASRock ALiveNF7G-HD720p Motherboard English - ASRock ALiveNF7G-HD720p R2.0 | Quick Installation Guide - Page 13
2.2 Installation of CPU Fan and Heatsink After you install the CPU into this motherboard, it is necessary to install a larger heatsink and cooling fan to dissipate heat , please kindly refer to the instruction manuals of the CPU fan and the heatsink. English 13 ASRock ALiveNF7G-HD720p Motherboard - ASRock ALiveNF7G-HD720p R2.0 | Quick Installation Guide - Page 14
Installation of Memory Modules (DIMM) This motherboard provides four 240-pin DDR2 (Double Data Rate 2) DIMM slots, and supports Dual Channel Memory Technology. For dual memory module into DDR2 slot; otherwise, this motherboard and DIMM may be damaged. English 14 ASRock ALiveNF7G-HD720p Motherboard - ASRock ALiveNF7G-HD720p R2.0 | Quick Installation Guide - Page 15
permanent damage to the motherboard and the DIMM if you force the DIMM into the slot at incorrect orientation. Step 3. Firmly insert the DIMM into the slot until the retaining clips at both ends fully snap back in place and the DIMM is properly seated. 15 ASRock ALiveNF7G-HD720p Motherboard English - ASRock ALiveNF7G-HD720p R2.0 | Quick Installation Guide - Page 16
(PCI and PCI Express Slots) There are 2 PCI slots and 2 PCI Express slots on this motherboard. PCI slots: PCI slots are used to install expansion cards that have the 32-bit PCI interface. on the slot. Step 4. Fasten the card to the chassis with screws. 16 ASRock ALiveNF7G-HD720p Motherboard English - ASRock ALiveNF7G-HD720p R2.0 | Quick Installation Guide - Page 17
use dual monitor function provided by VGA/DVI-D and VGA/D-Sub ports with this motherboard. When you playback HDCP-protected video from Blu-ray (BD) or HD-DVD disc, the content will be displayed only in one of the two monitors instead of both monitors. 17 ASRock ALiveNF7G-HD720p Motherboard English - ASRock ALiveNF7G-HD720p R2.0 | Quick Installation Guide - Page 18
the number one, two, three and four. For Windows® VistaTM / VistaTM 64-bit OS: Right click the desktop, choose "Personalize", and select the "Display Settings" tab so that you can adjust the parameters of the multi-monitor according to the steps below. 18 ASRock ALiveNF7G-HD720p Motherboard English - ASRock ALiveNF7G-HD720p R2.0 | Quick Installation Guide - Page 19
to the increase in manufacturers employing HDCP in their equipment, it is highly recommended that the HDTV or LCD monitor you purchase is compatible. 19 ASRock ALiveNF7G-HD720p Motherboard English - ASRock ALiveNF7G-HD720p R2.0 | Quick Installation Guide - Page 20
. For Windows® XP / XP 64-bit OS Step 1: Set up BIOS. A. Enter BIOS SETUP UTILITY Advanced screen Chipset Configuration. B. Set the option "OnBoard HDMI HD Audio" to [Auto]. Step 2: Install HDMI audio driver to your system. Install "Onboard HDMI HD Audio Driver" from ASRock Support CD to - ASRock ALiveNF7G-HD720p R2.0 | Quick Installation Guide - Page 21
for 5 seconds. However, please do not clear the CMOS right after you update the BIOS. If you need to clear the CMOS when you just finish updating the BIOS, you must boot up the system first, and then shut it down before you do the clear-CMOS action. English 21 ASRock ALiveNF7G-HD720p Motherboard - ASRock ALiveNF7G-HD720p R2.0 | Quick Installation Guide - Page 22
motherboard connect the black end to the IDE devices 80-conductor ATA 66/100/133 cable Note: Please refer to the instruction (PORT 3) These four Serial ATAII (SATAII) connectors support SATAII or SATA hard disk for internal storage devices. The ASRock ALiveNF7G-HD720p Motherboard English - ASRock ALiveNF7G-HD720p R2.0 | Quick Installation Guide - Page 23
No. 29) Front Panel Audio Header (9-pin HD_AUDIO1) (see p.2/3, No. 28) This header supports WiFi+AP function with ASRock WiFi-802.11g or WiFi-802.11n module, an easy-to-use wireless local area network (WLAN connection and control of audio devices. 23 ASRock ALiveNF7G-HD720p Motherboard English - ASRock ALiveNF7G-HD720p R2.0 | Quick Installation Guide - Page 24
support HDA to function correctly. Please follow the instruction in our manual and chassis manual BIOS Setup Utility. Enter Advanced Settings, and then select Chipset Configuration. Set the Front Panel Control option from [Auto] to [Enabled]. F. Enter Windows ASRock ALiveNF7G-HD720p Motherboard - ASRock ALiveNF7G-HD720p R2.0 | Quick Installation Guide - Page 25
is necessary to connect a power supply with ATX 12V plug to this connector. Failing to do so will cause power up failure. This COM1 header supports a serial port module. English 25 ASRock ALiveNF7G-HD720p Motherboard - ASRock ALiveNF7G-HD720p R2.0 | Quick Installation Guide - Page 26
C B A Please connect the black end (A) of HDMI_SPDIF cable to the HDMI_SPDIF header on the motherboard. Then connect the white end (B or C) of HDMI_SPDIF cable to the HDMI_SPDIF connector of HDMI VGA card. B. white end (2-pin) C. white end (3-pin) English 26 ASRock ALiveNF7G-HD720p Motherboard - ASRock ALiveNF7G-HD720p R2.0 | Quick Installation Guide - Page 27
Graphics slot on this motherboard. For the proper installation of HDMI VGA card, please refer to the installation guide on page 16. Step manual of HDTV and HDMI VGA card vendor for detailed connection procedures. Install HDMI VGA card driver to your system. 27 ASRock ALiveNF7G-HD720p Motherboard - ASRock ALiveNF7G-HD720p R2.0 | Quick Installation Guide - Page 28
hitachigst.com/hdd/support/download.htm The above examples are just for your reference. For different SATAII hard disk products of different vendors, the jumper pin setting methods may not be the same. Please visit the vendors' website for the updates. 28 ASRock ALiveNF7G-HD720p Motherboard English - ASRock ALiveNF7G-HD720p R2.0 | Quick Installation Guide - Page 29
that supports Serial ATA (SATA) / Serial ATAII (SATAII) hard disks and RAID functions. You may install SATA / SATAII hard disks on this motherboard for internal storage devices. This section will guide you is still power-on and in working condition. 29 ASRock ALiveNF7G-HD720p Motherboard English - ASRock ALiveNF7G-HD720p R2.0 | Quick Installation Guide - Page 30
the beginning of system boot-up, press key, and then a window for boot devices selection appears. Please select CD- ROM as the boot device. C. When you see the message on the screen, "Generate Serial ATA driver diskette [YN]?", press . 30 ASRock ALiveNF7G-HD720p Motherboard English - ASRock ALiveNF7G-HD720p R2.0 | Quick Installation Guide - Page 31
HDDs without NCQ and Hot Plug functions STEP 1: Set Up BIOS. A. Enter BIOS SETUP UTILITY Advanced screen IDE Configuration. B. Set the "SATA Operation Mode" option to [non-RAID]. STEP 2: Install Windows® 2000 / XP / XP 64-bit OS on your system. English 31 ASRock ALiveNF7G-HD720p Motherboard - ASRock ALiveNF7G-HD720p R2.0 | Quick Installation Guide - Page 32
VistaTM 64-bit With RAID Functions If you want to install Windows® 2000, Windows® XP, Windows® XP 64-bit, Windows® VistaTM or Windows® VistaTM 64-bit on your SATA / SATAII HDDs with RAID functions, please follow below procedures according to the OS you install. 32 ASRock ALiveNF7G-HD720p Motherboard - ASRock ALiveNF7G-HD720p R2.0 | Quick Installation Guide - Page 33
driver for Windows® 2000 / Windows® XP / Windows® XP 64-bit OS is not ready yet. As long as we get the Windows® 2000 / Windows® XP / Windows® XP 64-bit RAID driver, we will update it to our website in the future. ASRock website http://www.asrock.com 33 ASRock ALiveNF7G-HD720p Motherboard English - ASRock ALiveNF7G-HD720p R2.0 | Quick Installation Guide - Page 34
drivers. NVIDIA® RAID drivers are in the following path in our Support CD: (There are two ASRock Support CD in the motherboard gift box pack, please choose the one for Windows® VistaTM / VistaTM 64-bit.) .. \ I386 \ RAID_Vista (For Windows Technology. 34 ASRock ALiveNF7G-HD720p Motherboard - ASRock ALiveNF7G-HD720p R2.0 | Quick Installation Guide - Page 35
about BIOS Setup, please refer to the User Manual (PDF file) contained in the Support CD. 4. Software Support CD information This motherboard supports various Microsoft® Windows® operating " from the "BIN" folder in the Support CD to display the menus. 35 ASRock ALiveNF7G-HD720p Motherboard English - ASRock ALiveNF7G-HD720p R2.0 | Quick Installation Guide - Page 36
36 ASRock ALiveNF7G-HD720p Motherboard - ASRock ALiveNF7G-HD720p R2.0 | Quick Installation Guide - Page 37
™ '' ™ ® ® ® ® 37 ASRock ALiveNF7G-HD720p Motherboard - ASRock ALiveNF7G-HD720p R2.0 | Quick Installation Guide - Page 38
® ® 38 ASRock ALiveNF7G-HD720p Motherboard - ASRock ALiveNF7G-HD720p R2.0 | Quick Installation Guide - Page 39
® ® ® ® ® ® 39 ASRock ALiveNF7G-HD720p Motherboard - ASRock ALiveNF7G-HD720p R2.0 | Quick Installation Guide - Page 40
® ® ® ® ® ® ® 40 ASRock ALiveNF7G-HD720p Motherboard - ASRock ALiveNF7G-HD720p R2.0 | Quick Installation Guide - Page 41
41 ASRock ALiveNF7G-HD720p Motherboard - ASRock ALiveNF7G-HD720p R2.0 | Quick Installation Guide - Page 42
42 ASRock ALiveNF7G-HD720p Motherboard - ASRock ALiveNF7G-HD720p R2.0 | Quick Installation Guide - Page 43
DDRII_1 DDRII_2 DDRII_3 DDRII_4 ( )( )( )( ) (1) - - (2) - - (3) 43 ASRock ALiveNF7G-HD720p Motherboard - ASRock ALiveNF7G-HD720p R2.0 | Quick Installation Guide - Page 44
44 ASRock ALiveNF7G-HD720p Motherboard - ASRock ALiveNF7G-HD720p R2.0 | Quick Installation Guide - Page 45
45 ASRock ALiveNF7G-HD720p Motherboard - ASRock ALiveNF7G-HD720p R2.0 | Quick Installation Guide - Page 46
46 ASRock ALiveNF7G-HD720p Motherboard - ASRock ALiveNF7G-HD720p R2.0 | Quick Installation Guide - Page 47
® ® ® 47 ASRock ALiveNF7G-HD720p Motherboard - ASRock ALiveNF7G-HD720p R2.0 | Quick Installation Guide - Page 48
® 48 ASRock ALiveNF7G-HD720p Motherboard - ASRock ALiveNF7G-HD720p R2.0 | Quick Installation Guide - Page 49
® ® ® 49 ASRock ALiveNF7G-HD720p Motherboard - ASRock ALiveNF7G-HD720p R2.0 | Quick Installation Guide - Page 50
50 ASRock ALiveNF7G-HD720p Motherboard - ASRock ALiveNF7G-HD720p R2.0 | Quick Installation Guide - Page 51
51 ASRock ALiveNF7G-HD720p Motherboard SATAII_1 (PORT 0) SATAII_2 (PORT 1) SATAII_3 (PORT 2) SATAII_4 (PORT 3) - ASRock ALiveNF7G-HD720p R2.0 | Quick Installation Guide - Page 52
CD1 ® ® 52 ASRock ALiveNF7G-HD720p Motherboard - ASRock ALiveNF7G-HD720p R2.0 | Quick Installation Guide - Page 53
4 3 2 1 13 1 24 12 13 1 24 12 53 ASRock ALiveNF7G-HD720p Motherboard - ASRock ALiveNF7G-HD720p R2.0 | Quick Installation Guide - Page 54
C B A 54 ASRock ALiveNF7G-HD720p Motherboard - ASRock ALiveNF7G-HD720p R2.0 | Quick Installation Guide - Page 55
55 ASRock ALiveNF7G-HD720p Motherboard - ASRock ALiveNF7G-HD720p R2.0 | Quick Installation Guide - Page 56
56 ASRock ALiveNF7G-HD720p Motherboard - ASRock ALiveNF7G-HD720p R2.0 | Quick Installation Guide - Page 57
® ® 57 ASRock ALiveNF7G-HD720p Motherboard - ASRock ALiveNF7G-HD720p R2.0 | Quick Installation Guide - Page 58
® ® ® ® ® ® ® ® ® ® ® ® 58 ASRock ALiveNF7G-HD720p Motherboard - ASRock ALiveNF7G-HD720p R2.0 | Quick Installation Guide - Page 59
® ® ® ® A. NVIDIA nForce Storage Controller (required) Windows XP/2000 B. NVIDIA nForce Storage Controller (required) Windows XP64 ® ® ® ® ® ® 59 ASRock ALiveNF7G-HD720p Motherboard - ASRock ALiveNF7G-HD720p R2.0 | Quick Installation Guide - Page 60
® ® ® ® ® ® ® ® ® ® ® ® ® ® ® ® ® ® ® 60 ASRock ALiveNF7G-HD720p Motherboard - ASRock ALiveNF7G-HD720p R2.0 | Quick Installation Guide - Page 61
® ® 61 ASRock ALiveNF7G-HD720p Motherboard - ASRock ALiveNF7G-HD720p R2.0 | Quick Installation Guide - Page 62
X O O O X O O O O: X: O O O O 62 ASRock ALiveNF7G-HD720p Motherboard - ASRock ALiveNF7G-HD720p R2.0 | Quick Installation Guide - Page 63
Unterstützung zu Ihrem Motherboard oder spezifische Informationen zu Ihrem Modell benötigen, besuchen Sie bitte unsere Webseite: www.asrock.com/support/index.asp 1.1 Kartoninhalt ASRock ALiveNF7G-HD720pMotherboard (Micro ATX-Formfaktor: 24.4 cm x 21.8 cm; 9.6 Zoll x 8.6 Zoll) ASRock ALiveNF7G-HD720p - ASRock ALiveNF7G-HD720p R2.0 | Quick Installation Guide - Page 64
) - Chipsatz eingebettetes HDMI Audio LAN - Realtek PHY RTL8201CL (ALiveNF7G-HD720p R2.0) - Speed: 10/100 Ethernet (ALiveNF7G-HD720p R2.0) - Gigabit LAN 10/100/1000 Mb/s (ALiveNF7G-HD720p R5.0) - Giga PHY Realtek RTL8211B (ALiveNF7G-HD720p R5.0) 64 ASRock ALiveNF7G-HD720p Motherboard Deutsch - ASRock ALiveNF7G-HD720p R2.0 | Quick Installation Guide - Page 65
BIOS - 4Mb AMI BIOS - AMI legal BIOS mit Unterstützung für "Plug and Play" - ACPI 1.1-Weckfunktionen - JumperFree-Modus - SMBIOS 2.3.1 Support ® Windows® 2000 / XP / XP Media Center / XP 64-Bit / VistaTM / VistaTM 64-Bit Zertifizierungen - FCC, CE, WHQL 65 ASRock ALiveNF7G-HD720p Motherboard - ASRock ALiveNF7G-HD720p R2.0 | Quick Installation Guide - Page 66
Windows® XP 64-bit und Windows® Vista™ 64-bit mit 64-Bit-CPU besteht diese Einschränkung nicht. 5. Obwohl dieses Motherboard 7. Dieses Motherboard unterstützt die ASRock AM2 Boost Übertaktungstechnologie. Wenn Sie diese Funktion im BIOS-Setup aktivieren, ASRock ALiveNF7G-HD720p Motherboard Deutsch - ASRock ALiveNF7G-HD720p R2.0 | Quick Installation Guide - Page 67
direkt mit dem SATA II-Anschluss verbinden. 12. Das Power Management für USB 2.0 arbeitet unter Microsoft® Windows® VistaTM 64-Bit / VistaTM / XP 64-Bit / XP SP1 oder SP2/2000 SP4 einwandfrei. 13 MB x 2 Dual Channel (Basic) DX9.0 mit WDDM-Treiber DVI mit HDCP 67 ASRock ALiveNF7G-HD720p Motherboard - ASRock ALiveNF7G-HD720p R2.0 | Quick Installation Guide - Page 68
Gesamtsystemspeichergröße von 512MB verwenden und das Windows® VistaTM Premium oder Basic Logo vorlegen Motherboard mit den Schrauben an dem Computergehäuse befestigen, überziehen Sie bitte die Schrauben nicht! Das Motherboard kann 68 sonst beschädigt werden. ASRock ALiveNF7G-HD720p Motherboard - ASRock ALiveNF7G-HD720p R2.0 | Quick Installation Guide - Page 69
ihn ein 2.2 Installation des CPU-Lüfters und des Kühlkörpers Nachdem Sie die CPU auf diesem Motherboard installiert haben, müssen Sie einen größeren Kühlkörper und Lüfter installieren, um Wärme die Handbücher des CPULüfters und des Kühlkörpers. Deutsch 69 ASRock ALiveNF7G-HD720p Motherboard - ASRock ALiveNF7G-HD720p R2.0 | Quick Installation Guide - Page 70
2.3 Installation der Speichermodule (DIMM) Die Motherboards ALiveNF7G-HD720p bieten vier 240-pol. DDR2 (Double Data Rate 2) DIMM-Steckplä ässig, DDR in einen DDR2 Steckplatz zu installieren; andernfalls könnten Motherboard und DIMMs beschädigt werden. Deutsch 70 ASRock ALiveNF7G-HD720p Motherboard - ASRock ALiveNF7G-HD720p R2.0 | Quick Installation Guide - Page 71
in die Steckplätze, so dass die Halteklammern an beiden Enden des Moduls einschnappen und das DIMM-Modul fest an Ort und Stelle sitzt. 71 ASRock ALiveNF7G-HD720p Motherboard - ASRock ALiveNF7G-HD720p R2.0 | Quick Installation Guide - Page 72
tze) Es gibt einen 2 PCI-Steckplätze und 2 PCI Express-Steckplätze am ALiveNF7G-720p Motherboard. PCI-Slots: PCI-Slots werden zur Installation von Erweiterungskarten mit dem 32bit PCI-Interface Befestigen Sie die Karte mit der Schraube aus Schritt 2. 72 ASRock ALiveNF7G-HD720p Motherboard Deutsch - ASRock ALiveNF7G-HD720p R2.0 | Quick Installation Guide - Page 73
-Funktion der beiden Ports VGA/DVI-D und VGA/D-Sub auf dem Motherboard benutzen. Als Sie HDCP-schützten Video von Blu-ray (BD) oder HD-DVD Platte abspielen, wird der Inhalt nur in einem der zwei Monitoren anstelle in beiden Monitoren angezeigt. 73 ASRock ALiveNF7G-HD720p Motherboard Deutsch - ASRock ALiveNF7G-HD720p R2.0 | Quick Installation Guide - Page 74
Systemspeichers sein. Falls Sie im BIOS-Setup nichts ändern, wird Windows desktop onto this monitor (WindowsDesktop auf diesen Monitor erweitern)". E. Klicken Sie mit der rechten Maustaste auf das Anzeige-Symbol und wählen Sie ggf. „Attached (Angeschlossen)". 74 ASRock ALiveNF7G-HD720p Motherboard - ASRock ALiveNF7G-HD720p R2.0 | Quick Installation Guide - Page 75
die mit den Ziffern Eins, Zwei, Drei und Vier gekennzeichneten Anzeigegeräte. Für Windows® VistaTM / VistaTM 64-Bit Betriebssystem: Rechtsklicken Sie den Arbeitsbereich, wählen Sie „Personalize und Unversehrtheit zu schützen,wenn es transmmittert wird. 75 ASRock ALiveNF7G-HD720p Motherboard Deutsch - ASRock ALiveNF7G-HD720p R2.0 | Quick Installation Guide - Page 76
. Für Windows® XP / XP 64-Bit Betriebssystem Schritt 1: BIOS einstellen. A. BIOS-SETUP-DIENSTPROGRAMM Windows® eintreten, um Ihr System manuell einzustellen. A. „Starten" Knopf anklicken, „Einstellungen" auswählen und dann „ 7 6 Bedienungsfeld" anklicken. ASRock ALiveNF7G-HD720p Motherboard - ASRock ALiveNF7G-HD720p R2.0 | Quick Installation Guide - Page 77
beinhalten das System-Passwort, Datum, Zeit und die verschiedenen BIOS-Parameter. Um die Systemparameter zu löschen und auf die BIOS löschen müssen, müssen Sie zuerst das System starten und dann wieder ausschalten, bevor Sie den CMOS-Inhalt löschen. 77 ASRock ALiveNF7G-HD720p Motherboard - ASRock ALiveNF7G-HD720p R2.0 | Quick Installation Guide - Page 78
blau) (39-pin IDE1, siehe S.2/3, No. 8) Blauer Anschluss Schwarzer Anschluss zum Motherboard zur Festplatte 80-adriges ATA 66/100/133 Kabel Hinweis: Details entnehmen Sie bitte / SATAIIFestplatte oder dem SATAII-Anschluss am Mainboard verbinden. 78 ASRock ALiveNF7G-HD720p Motherboard Deutsch - ASRock ALiveNF7G-HD720p R2.0 | Quick Installation Guide - Page 79
üblichen USB 2.0-Ports an den I/O-Anschlüssen befinden sich drei USB 2.0-Anschlussleisten am Motherboard. Pro USB 2.0Anschlussleiste werden zwei USB 2.0-Ports unterstützt. (9-pol. USB4_5) (siehe Stecker Untersuchungsfunktion für ASRock DeskExpress. 79 ASRock ALiveNF7G-HD720p Motherboard Deutsch - ASRock ALiveNF7G-HD720p R2.0 | Quick Installation Guide - Page 80
'97-Audioleiste angeschlossen werden. E. Rufen Sie das BIOS-Setup-Dienstprogramm auf. Wechseln Sie zu Erweiterte Einstellungen von [Automatisch] auf [Aktiviert]. F. Rufen Sie das Windows-System auf. Klicken Sie auf das Symbol in der der Gehäusefront. Deutsch 80 ASRock ALiveNF7G-HD720p Motherboard - ASRock ALiveNF7G-HD720p R2.0 | Quick Installation Guide - Page 81
No. 32) 13 1 Verbinden Sie die ATXStromversorgung mit diesem Header. 24 12 Obwohl dieses Motherboard einen 24-pol. ATX-Stromanschluss 13 1 bietet, kann es auch mit einem modifizierten traditionellen 20 reicht der Strom nicht aus, das System zu starten. 81 ASRock ALiveNF7G-HD720p Motherboard - ASRock ALiveNF7G-HD720p R2.0 | Quick Installation Guide - Page 82
-Kabels mit dem HDMI_SPDIF-Anschluss am Motherboard. Schließen Sie dann das weiße Ende (B oder C) des HDMI_SPDIF-Kabels an den HDMI_SPDIF-Anschluss der HDMI-VGA-Karte an. A. Schwarzes Ende B. Weißes Ende (zweipolig) C. Weißes Ende (dreipolig) Deutsch 82 ASRock ALiveNF7G-HD720p Motherboard - ASRock ALiveNF7G-HD720p R2.0 | Quick Installation Guide - Page 83
falschen Anschluss der HDMI-VGA-Karte oder gar an eine andere VGA-Karte an. Dadurch können Motherboard und VGA-Karte schwer beschädigt werden. In der Abbildung sehen Sie ein Beispiel für einen falschen schon im Vorfeld über die richtige Nutzung der Anschlüsse. 83 ASRock ALiveNF7G-HD720p Motherboard - ASRock ALiveNF7G-HD720p R2.0 | Quick Installation Guide - Page 84
von HITACHI finden Sie entsprechende Details: http://www.hitachigst.com/hdd/support/download.htm Die Beispiele oben dienen lediglich Ihrer Referenz. Die Steckbrü und ergänzende Informationen finden Sie auf der Internetseite des Herstellers. 84 ASRock ALiveNF7G-HD720p Motherboard Deutsch - ASRock ALiveNF7G-HD720p R2.0 | Quick Installation Guide - Page 85
SATAII-Festplatte an. 2.12 Hot-Plug- und Hot-Swap-Funktion für SATA / SATAIIFestplatten Das ALiveNF7G-HD720p-Motherboard unterstützt Hot Plug- und Hot SwapFunktionen für SATA- / SATAII- Geräte im RAID- das System in Betrieb ist und einwandfrei läuft. Deutsch 85 ASRock ALiveNF7G-HD720p Motherboard - ASRock ALiveNF7G-HD720p R2.0 | Quick Installation Guide - Page 86
System hochzufahren. (Legen Sie zu diesem Zeitpunkt KEINE Diskette in das Diskettenlaufwerk ein!) (Es gibt die zwei ASRock Unterstützungs-CDs in dem Hauptplatinegeschenkkastensatz, bitte wählen Sie dasjenige für Windows® 2000 / XP / XP 64-Bit.) 86 ASRock ALiveNF7G-HD720p Motherboard Deutsch - ASRock ALiveNF7G-HD720p R2.0 | Quick Installation Guide - Page 87
ATA driver diskette BIOS-DIENSTPROGRAMM den Bildschirm „Erweitert" und „IDE-Konfiguration" auf. B. Setzen Sie die Option "SATA Operation Mode" (SATA-Betriebsmodus) auf [non-RAID]. SCHRITT 2: Installieren Sie Windows® 2000 / XP / XP 64-Bit in Ihrem System. 87 ASRock ALiveNF7G-HD720p Motherboard - ASRock ALiveNF7G-HD720p R2.0 | Quick Installation Guide - Page 88
ohne NCQ und Hot-PlugFunktionen SCHRITT 1: Konfigurieren Sie BIOS. A. Rufen Sie im BIOS-DIENSTPROGRAMM den Bildschirm „Erweitert" und „IDE-Konfiguration" auf. B. Setzen Sie die Option "SATA Operation Mode" (SATA-Betriebsmodus) auf [non-RAID]. Deutsch 88 ASRock ALiveNF7G-HD720p Motherboard - ASRock ALiveNF7G-HD720p R2.0 | Quick Installation Guide - Page 89
den Anweisungen, um das Windows® VistaTM / VistaTM 64-Bit Betriebssystem auf Ihrem System zu installieren. 2.15 Installation von Windows® 2000 / XP / Guide 2.16 Entkoppelte Übertaktungstechnologie (Untied Overclocking Technology) Dieses Motherboard unterst ASRock ALiveNF7G-HD720p Motherboard Deutsch - ASRock ALiveNF7G-HD720p R2.0 | Quick Installation Guide - Page 90
der Support-CD, um die Menüs aufzurufen. Das Setup-Programm soll es Ihnen so leicht wie möglich machen. Es ist menügesteuert, d.h. Sie können in den verschiedenen Untermenüs Ihre Auswahl treffen und die Programme werden dann automatisch installiert. 90 ASRock ALiveNF7G-HD720p Motherboard Deutsch - ASRock ALiveNF7G-HD720p R2.0 | Quick Installation Guide - Page 91
èle que vous utilisez. www.asrock.com/support/index.asp 1.1 Contenu du paquet Carte mère ASRock ALiveNF7G-HD720p (Facteur de forme Micro ATX: 9.6 pouces x 8.6 pouces, 24.4 cm x 21.8 cm) Guide d'installation rapide ASRock ALiveNF7G-HD720p CD de soutien ASRock ALiveNF7G-HD720p Un câble ruban IDE Ultra - ASRock ALiveNF7G-HD720p R2.0 | Quick Installation Guide - Page 92
- Supporte la Windows® VistaTM (codec audio ALC662) - HDMI Audio avec Chipset enclave LAN - Realtek PHY RTL8201CL (ALiveNF7G-HD720p R2.0) - Vitesse: 10/100 Ethernet (ALiveNF7G-HD720p R2.0) - Gigabit LAN 10/100/1000 Mb/s (ALiveNF7G-HD720p R5.0) 92 ASRock ALiveNF7G-HD720p Motherboard - ASRock ALiveNF7G-HD720p R2.0 | Quick Installation Guide - Page 93
ALiveNF7G-HD720p R5.0) - Support du Wake-On-LAN Panneau arrière ASRock 6CH_DVI I/O E/S - 1 x port souris PS/2 - 1 x port clavier PS/2 - 1 x port VGA/D-Sub - 1 x port VGA/DVI-D (voir ATTENTION 10) - 1 x port parallèle: Support éomètre ventilateur châssis 93 ASRock ALiveNF7G-HD720p Motherboard - ASRock ALiveNF7G-HD720p R2.0 | Quick Installation Guide - Page 94
+5V, +3.3V, Vcore - Microsoft® Windows® 2000 / XP / XP Media Center les réglages du BIOS, appliquer la technologie . 2. Cette carte mère supporte la Technologie de Mémoire à assurezvous de bien lire le guide d'installation des modules mémoire en ASRock ALiveNF7G-HD720p Motherboard Français - ASRock ALiveNF7G-HD720p R2.0 | Quick Installation Guide - Page 95
SVP. 9. Le support du lecteur HD-DVD «Guide d' Windows® VistaTM Basic, veuillez régler la taille de la mémoire partagée de VGA intégré sur 64Mo. Si vous utilisez un VGA intégré à la carte mère avec une mémoire système totale supérieure à 512MB et que vous 95 ASRock ALiveNF7G-HD720p Motherboard - ASRock ALiveNF7G-HD720p R2.0 | Quick Installation Guide - Page 96
, placez-le sur un support antistatique ou dans son sachet d'origine. 5. Lorsque vous placez les vis dans les orifices pour vis pour fixer la carte mère sur le châssis, ne serrez pas trop les vis ! Vous risquez sinon d'endommager la carte mère. 96 ASRock ALiveNF7G-HD720p Motherboard Français - ASRock ALiveNF7G-HD720p R2.0 | Quick Installation Guide - Page 97
coin de la prise. Etape 3. Insérez avec précaution le CPU dans le support jusqu'à ce qu'il soit bien en place. Le CPU ne peut être ins bonne installation, veuillez vous référer aux manuels d'instruction sur le ventilateur du CPU et le dissipateur. Français 97 ASRock ALiveNF7G-HD720p Motherboard - ASRock ALiveNF7G-HD720p R2.0 | Quick Installation Guide - Page 98
modules m émoire [DIMM] La carte mère ALiveNF7G-HD720p dispose de quatre emplacements DIMM DDR2 (Double Data Rate 2) de 240-broches, et supporte la Technologie de Mémoire à Canal Double. Pour ; la carte mère et les DIMM pourraient être endommagés. Français 98 ASRock ALiveNF7G-HD720p Motherboard - ASRock ALiveNF7G-HD720p R2.0 | Quick Installation Guide - Page 99
jusqu'à ce que les clips de maintien situés aux deux extrémités se ferment complètement et que le module DIMM soit inséré correctement. 99 ASRock ALiveNF7G-HD720p Motherboard - ASRock ALiveNF7G-HD720p R2.0 | Quick Installation Guide - Page 100
et Slots PCI Express) Il y a 2 ports PCI et 2 ports PCI Express sur la carte mère ALiveNF7G-HD720p. Slots PCI: Les slots PCI sont utilisés pour installer des cartes d'extension dotées d'une interface PCI la carte sur le châssis à l'aide d'une vis. Français 100 ASRock ALiveNF7G-HD720p Motherboard - ASRock ALiveNF7G-HD720p R2.0 | Quick Installation Guide - Page 101
installé le pilote VGA intégré, installez le pilote VGA intégré de notre CD de support sur votre ordinateur et redémarrez votre ordinateur. Vous pourrez alors utiliser la fonction de doublemoniteur grâ de deux moniteurs au lieu de deux moniteurs. ASRock ALiveNF7G-HD720p Motherboard 101 Français - ASRock ALiveNF7G-HD720p R2.0 | Quick Installation Guide - Page 102
supporte ne configurez pas le BIOS, l'option "Share Memory Windows desktop onto this monitor (Ajouter mon bureau Windows sur ce moniteur)". E. Cliquez avec le bouton droit sur l'icône d'affichage et sélectionnez "Attached (Attaché)" si nécessaire. Français 102 ASRock ALiveNF7G-HD720p Motherboard - ASRock ALiveNF7G-HD720p R2.0 | Quick Installation Guide - Page 103
un, deux, trois et quatre. Pour Windows® VistaTM / VistaTM 64-bit OS: Cliquez supporte aussi HDCP foncion. Certe, vous pouvez admirer l'ecran superieur de bonne qualite avec le contenu de la hign-definition HDCP encryption. Veuillez se referer a l'instruction ASRock ALiveNF7G-HD720p Motherboard 103 - ASRock ALiveNF7G-HD720p R2.0 | Quick Installation Guide - Page 104
Pour Windows® XP / XP 64-bit OS Procede 1: Regler BIOS A. Entrer BIOS SETUP UTILITY Ecran advance Configuration de chipset B. Regler l'option" Onboard HDMI HD Audio"sur [Auto]. Procede 2: Installer le lecteur audio HDMI sur votre systeme. Installer "Onboard HDMI HD Audio Driver" du ASRock Support CD - ASRock ALiveNF7G-HD720p R2.0 | Quick Installation Guide - Page 105
ès avoir mis le BIOS à jour. Si vous avez besoin d'effacer la CMOS lorsque vous avez fini de mettre le BIOS à jour, vous devez d'abord initialiser le système, puis le mettre hors tension avant de procéder à l'opération d'effacement de la CMOS. Français ASRock ALiveNF7G-HD720p Motherboard 105 - ASRock ALiveNF7G-HD720p R2.0 | Quick Installation Guide - Page 106
mère vers le disque dur Câble ATA 66/100/133 80 conducteurs Note: Veuillez vous reporter aux instructions du fabricant de votre IDE périphérique pour les détails. Connecteurs Série ATAII (SATAII_1 (PORT au connecteur SATAII sur la carte mère. Français 106 ASRock ALiveNF7G-HD720p Motherboard - ASRock ALiveNF7G-HD720p R2.0 | Quick Installation Guide - Page 107
de HotPlug pour ASRock DeskExpress. Connecteurs audio internes Ils vous permettent de gérer des (CD1 br. 4) (CD1: voir p.2/3 fig. 29) entrées audio à partir de sources CD1 stéréo comme un CD-ROM, DVD-ROM, un tuner TV ou une carte MPEG. ASRock ALiveNF7G-HD720p Motherboard 107 Français - ASRock ALiveNF7G-HD720p R2.0 | Quick Installation Guide - Page 108
fonctionner correctement. Veuillez suivre les instructions dans notre manuel et le manuel Entrer dans l'utilitaire de configuration du BIOS. Saisir les Paramètres avancés puis pour entrer dans le Gestionnaire audio Realtek HD. Pour Windows® 2000 / XP / XP 64-bit OS: ASRock ALiveNF7G-HD720p Motherboard - ASRock ALiveNF7G-HD720p R2.0 | Quick Installation Guide - Page 109
connecteur et brancher le fil noir 1 sur la broche de terre. ien que cette carte mère offre un support de (Ventilateur silencieux) ventilateur de CPU à 4 broches , le ventilateur de CPU à 3 broches peut sera pas possible de mettre sous tension. Français ASRock ALiveNF7G-HD720p Motherboard 109 - ASRock ALiveNF7G-HD720p R2.0 | Quick Installation Guide - Page 110
C) du câble HDMI_SPDIF au connecteur HDMI_SPDIF de la carte VGA HDMI. A. extrémité noire B. extrémité blanche (2 briches) C. extrémité blanche (3 briches) Français 110 ASRock ALiveNF7G-HD720p Motherboard - ASRock ALiveNF7G-HD720p R2.0 | Quick Installation Guide - Page 111
Pour une bonne installation de la carte VGA HDMI, veuillez vous reporter à la page 100 du guide d'installation. Etape 2. Connectez l'extrémité noire (A) du câble HDMI_SPDIF au collecteur HDMI_SPDIF (HDMI_SPDIF1 la carte VGA pour l'utilisation du connecteur. ASRock ALiveNF7G-HD720p Motherboard 111 - ASRock ALiveNF7G-HD720p R2.0 | Quick Installation Guide - Page 112
à votre système. 2.10 Guide d'installation du disque dur SATAII Avant d'installer la fonction SATAII, veuillez suivre les instructions ci-dessous avec les différents de détails. http://www.hitachigst.com/hdd/support/download.htm 112 Les exemples donnés précédemment ASRock ALiveNF7G-HD720p Motherboard - ASRock ALiveNF7G-HD720p R2.0 | Quick Installation Guide - Page 113
HD720p gère les fonctions Hot Plug et Hot Swap pour les périphériques SATA / SATAII en mode RAID / AHCI. Le jeu de puces de pont sud NVIDIA® GeForce 7050 / nForce 630A MCP offre un support sous tension et en fonctionnement s'appelle le "Hot Swap". Français ASRock ALiveNF7G-HD720p Motherboard 113 - ASRock ALiveNF7G-HD720p R2.0 | Quick Installation Guide - Page 114
Guide à chaud ETAP 1: Configurez le BIOS. A. Entrez dans UTILITAIRE DE CONFIGURATION BIOS écran Avancé Configuration IDE. B. ASRock Support CD dans le paquet de boite de cadeau de la carte mere, veuilliez selectionner un pour Windows® 2000 / XP / XP 64-bit.) 114 ASRock ALiveNF7G-HD720p Motherboard - ASRock ALiveNF7G-HD720p R2.0 | Quick Installation Guide - Page 115
Generate Serial ATA driver diskette [Y/N]?" BIOS écran Avancé Configuration IDE. B. Réglez l'option "SATA Operation Mode"« Mode de fonctionnement SATA » sur [non-RAID]. ETAPE 2: Installer le système d'exploitation Windows® 2000 / XP / XP 64- bit sur votre système. ASRock ALiveNF7G-HD720p Motherboard - ASRock ALiveNF7G-HD720p R2.0 | Quick Installation Guide - Page 116
le BIOS. A. Entrez dans UTILITAIRE DE CONFIGURATION BIOS écran Windows® VistaTM / VistaTM 64-bits dans le lecteur optique pour démarrer votre système, et suivez les instructions pour installer l'OS Windows® VistaTM / VistaTM 64-bits sur votre système. 116 ASRock ALiveNF7G-HD720p Motherboard - ASRock ALiveNF7G-HD720p R2.0 | Quick Installation Guide - Page 117
çage plus stable. Veuillez vous reporter à l'avertissement en page 94 pour connaître les risques liés à l'overclocking avant d'appliquer la technologie Untied Overclocking. Français ASRock ALiveNF7G-HD720p Motherboard 117 - ASRock ALiveNF7G-HD720p R2.0 | Quick Installation Guide - Page 118
sur le BIOS, veuillez consulter le Guide de l'utilisateur (fichier PDF) dans le CD technique. 4. Informations sur le CD de support Cette carte mère supporte divers systèmes d'exploitation Microsoft® Windows®: 2000 dessus pour afficher les menus. Français 118 ASRock ALiveNF7G-HD720p Motherboard - ASRock ALiveNF7G-HD720p R2.0 | Quick Installation Guide - Page 119
che si sta usando. www.asrock.com/support/index.asp 1.1 Contenuto della confezione Scheda madre ASRock ALiveNF7G-HD720p (Micro ATX Form Factor: 9.6-in x 8.6-in, 24.4 cm x 21.8 cm) Guida di installazione rapida ASRock ALiveNF7G-HD720p CD di supporto ASRock ALiveNF7G-HD720p Un cavo IDE 80-pin Ultra - ASRock ALiveNF7G-HD720p R2.0 | Quick Installation Guide - Page 120
HD CH Windows® VistaTM Premium Level (ALC662 Audio Codec) - Chipset HDMI Audio incorporato LAN - Realtek PHY RTL8201CL (ALiveNF7G-HD720p R2.0) - Velocità: 10/100 Ethernet (ALiveNF7G-HD720p R2.0) 120 - Gigabit LAN 10/100/1000 Mb/s (ALiveNF7G-HD720p R5.0) ASRock ALiveNF7G-HD720p Motherboard - ASRock ALiveNF7G-HD720p R2.0 | Quick Installation Guide - Page 121
à per la ventola di raffreddamento - Ventola CPU silenziosa - Voltaggio: +12V, +5V, +3.3V, Vcore Compatibi- - Microsoft® Windows® 2000 / XP / Centro multimediale XP / XP 64 lità SO bit / VistaTM / VistaTM 64 bit Certificazioni - FCC, CE, WHQL ASRock ALiveNF7G-HD720p Motherboard 121 Italiano - ASRock ALiveNF7G-HD720p R2.0 | Quick Installation Guide - Page 122
, come anche la regolazione delle impostazioni del BIOS, l'applicazione della tecnologia Untied Overclocking Technology, memorie supportate nel nostro sito web per scoprire quali sono i moduli compatibili. Sito web ASRock http://www.asrock.com . ASRock ALiveNF7G-HD720p Motherboard Italiano - ASRock ALiveNF7G-HD720p R2.0 | Quick Installation Guide - Page 123
inoltre la funzione HDCP per qualificare il logo Windows® VistaTM Premium 2007. * Dopo il 1 Giugno 2007, tutti i sistemi Windows® VistaTM vengono richiesti di essere in accordo ai requisiti minimi del sistema per Windows® VistaTM Premium 2007 logo. ASRock ALiveNF7G-HD720p Motherboard 123 - ASRock ALiveNF7G-HD720p R2.0 | Quick Installation Guide - Page 124
. 5. Nell'usare i giraviti per fissare la scheda madre al telaio non serrare eccessivamente le viti! Altrimenti si rischia di danneggiare la scheda madre. Italiano 124 ASRock ALiveNF7G-HD720p Motherboard - ASRock ALiveNF7G-HD720p R2.0 | Quick Installation Guide - Page 125
i due. Quindi collegare la ventolina CPU al connettore CPU FAN (CPU_FAN1, fare riferimento a pagina 2/3, Numero 2). Per eseguire un'installazione appropriata, fare riferimento al manuale d'istruzioni della ventolina CPU e del dispersore di calore. Italiano ASRock ALiveNF7G-HD720p Motherboard 125 - ASRock ALiveNF7G-HD720p R2.0 | Quick Installation Guide - Page 126
2.3 Installazione dei moduli di memoria (DIMM) La scheda madre ALiveNF7G-HD720p fornisce quattro alloggiamenti DIMM DDR2 (Double Data Rate 2) a 240 pin, e supporta la tecnologia DDR2, altrimenti si possono danneggiare questa scheda madre e la DIMM. Italiano 126 ASRock ALiveNF7G-HD720p Motherboard - ASRock ALiveNF7G-HD720p R2.0 | Quick Installation Guide - Page 127
la DIMM nello slot fino a far scattare completamente in posizione i fermagli di ritegno alle due estremità e fino ad installare correttamente la DIMM nella sua sede. ASRock ALiveNF7G-HD720p Motherboard 127 - ASRock ALiveNF7G-HD720p R2.0 | Quick Installation Guide - Page 128
2.4 Slot di espansione (Slot PCI ed Slot PCI Express) Sulla scheda madre ALiveNF7G-HD720p c'è 2 slot PCI ed 2 slot PCI Express. Slot PCI: Sono utilizzati per installare schede nello slot. Step 4. Agganciare la scheda allo chassis con le viti. Italiano 128 ASRock ALiveNF7G-HD720p Motherboard - ASRock ALiveNF7G-HD720p R2.0 | Quick Installation Guide - Page 129
scheda madre. porta VGA/DVI-D porta VGA/D-Sub 2. Se si è già installato nel sistema il driver VGA integrato dal CD di supporto, con questa scheda madre si può utilizzare la funzione Dual Monitor fornita uno dei due monitor invece che su entrambi. ASRock ALiveNF7G-HD720p Motherboard 129 Italiano - ASRock ALiveNF7G-HD720p R2.0 | Quick Installation Guide - Page 130
my Windows desktop onto this monitor (Estendi desktop su questo schermo)". E. Fare clic con il tasto destro sull'icona del display e selezionare "Attached (Allegato)", se necessario. F. Impostare "Screen Resolution (Risoluzione schermo)" e "Color Quality 130 ASRock ALiveNF7G-HD720p Motherboard - ASRock ALiveNF7G-HD720p R2.0 | Quick Installation Guide - Page 131
C ad E per l'icona del display indicata con il numero uno, due, tre e quattro. Per Windows® VistaTM / VistaTM 64-bit OS: Fare clic con il tasto destro sul desktop, scegliere "Personalize" ( set-top-boxes via cavo, come anche alcuni PC, richiedono una ASRock ALiveNF7G-HD720p Motherboard 131 - ASRock ALiveNF7G-HD720p R2.0 | Quick Installation Guide - Page 132
Device (HDMI)". D. Scattare "OK" per rifinire la regolazione. Punto 3: Reboot il vostro sistema. Dopo che reboot il sistema, la funzione dell'audio HDMI è disponibile. 132 ASRock ALiveNF7G-HD720p Motherboard Italiano - ASRock ALiveNF7G-HD720p R2.0 | Quick Installation Guide - Page 133
Non cancellare la CMOS subito dopo aver aggiornato il BIOS. Se è necessario cancellare la CMOS una volta completato l'aggiornamento del BIOS, è necessario riavviare prima il sistema, e poi spegnerlo prima di procedere alla cancellazione della CMOS. Italiano ASRock ALiveNF7G-HD720p Motherboard 133 - ASRock ALiveNF7G-HD720p R2.0 | Quick Installation Guide - Page 134
Serial ATA (SATA) Entrambe le estremità del cavo (Opzionale) dati SATA possono collegarsi all'hard disk SATA / SATAII o al connettore SATAII sulla scheda madre. 134 ASRock ALiveNF7G-HD720p Motherboard Italiano - ASRock ALiveNF7G-HD720p R2.0 | Quick Installation Guide - Page 135
la funzione di rilevazione di Hot Plug per ASRock DeskExpress. Connettori audio interni (4-pin CD1) (CD1: vedi p.2/3 item 29) Permettono di ricevere input CD1 stereo audio da fonti di suono come CD-ROM, DVD - ROM,TV tuner, o schede MPEG. ASRock ALiveNF7G-HD720p Motherboard 135 Italiano - ASRock ALiveNF7G-HD720p R2.0 | Quick Installation Guide - Page 136
. Attenersi alle istruzioni del nostro manuale e del manuale del telaio per installare il sistema E. Entrare nel programma di impostazione BIOS. Entrare su Impostazioni avanzate, quindi F. Entrare nel sistema di Windows. Fare clic sull'icona situata ASRock ALiveNF7G-HD720p Motherboard Italiano - ASRock ALiveNF7G-HD720p R2.0 | Quick Installation Guide - Page 137
modo che possa fornire energia sufficiente. In caso contrario l'unità non si avvia. Questo collettore porta COM è utilizzato per supportare il modulo porta COM. Italiano ASRock ALiveNF7G-HD720p Motherboard 137 - ASRock ALiveNF7G-HD720p R2.0 | Quick Installation Guide - Page 138
madre. Quindi collegare l'estremità bianca (B o C) del cavo HDMI_SPDIF al connettore HDMI_SPDIF della scheda HDMI VGA. A. estremità nera B. estremità bianca (2 pin) C. estremità bianca (3 pin) Italiano 138 ASRock ALiveNF7G-HD720p Motherboard - ASRock ALiveNF7G-HD720p R2.0 | Quick Installation Guide - Page 139
. Punto 4. Collegare il connettore di uscita HDMI al dispositivo HDMI, ad esempio HDTV. Consultare il manuale dell'utente di HDTV e della scheda HDMI VGA per il collegamento dettagliato. Punto 5. Installare il driver della scheda HDMI VGA nel sistema. ASRock ALiveNF7G-HD720p Motherboard 139 - ASRock ALiveNF7G-HD720p R2.0 | Quick Installation Guide - Page 140
di diversi produttori, i metodi di impostazione dei pin del jumper possono non essere gli stessi. Visitare i siti web dei produttori per gli aggiornamenti. Italiano 140 ASRock ALiveNF7G-HD720p Motherboard - ASRock ALiveNF7G-HD720p R2.0 | Quick Installation Guide - Page 141
RAID 1 / RAID 5 allora è detta "scambio a caldo" l'azione d'inserimento e rimozione dei dischi rigidi SATA / SATAII mentre il sistema è ancora acceso ed in condizione di funzionamento. Italiano ASRock ALiveNF7G-HD720p Motherboard 141 - ASRock ALiveNF7G-HD720p R2.0 | Quick Installation Guide - Page 142
driver installati funzioneranno correttamente. 2.14 Installazione di Windows® 2000 / XP / XP 64 bit / VistaTM / VistaTM 64 bit senza funzioni RAID Se si desidera installare Windows® 2000, Windows® XP, Windows® XP 64 bit, Windows® VistaTM, Windows boot. ASRock ALiveNF7G-HD720p Motherboard Italiano - ASRock ALiveNF7G-HD720p R2.0 | Quick Installation Guide - Page 143
1° PASSO: Configurare il BIOS. A. Entrare in UTILIT BIOS SETUP Avanzate Configurazione IDE. B. Impostare l'opzione "SATA Operation Mode" (Modalità operativa SATA) su [non-RAID]. 2° PASSO: Installazione di Windows® 2000 / XP / XP 64-bit sul sistema. Italiano ASRock ALiveNF7G-HD720p Motherboard 143 - ASRock ALiveNF7G-HD720p R2.0 | Quick Installation Guide - Page 144
® VistaTM / VistaTM 64-bit sul sistema. Inserire il disco Windows® VistaTM / VistaTM 64-bit nell'unità ottica per avviare il sistema, poi seguire le istruzioni per installare il sistema operativo Windows® VistaTM / VistaTM 64-bit sul sistema. Italiano 144 ASRock ALiveNF7G-HD720p Motherboard - ASRock ALiveNF7G-HD720p R2.0 | Quick Installation Guide - Page 145
/ SATAII con funzione RAID si vuole installare il sistema operativo Windows® 2000 / XP / XP 64-bit / VistaTM / ...\ RAID Installation Guide (Guida all'installazione opzione "Modalità Overclock" nelle impostazioni del BIOS per impostare la selezione da [Auto] ASRock ALiveNF7G-HD720p Motherboard 145 - ASRock ALiveNF7G-HD720p R2.0 | Quick Installation Guide - Page 146
più dettagliate circa il Setup del BIOS, fare riferimento al Manuale dell'Utente (PDF file) contenuto nel Windows®: 2000 / XP / Centro multimediale XP / XP 64 bit / VistaTM / VistaTM 64-bit. Il CD di supporto a corredo della scheda madre contiene i driver ASRock ALiveNF7G-HD720p Motherboard - ASRock ALiveNF7G-HD720p R2.0 | Quick Installation Guide - Page 147
específico de su placa. www.asrock.com/support/index.asp 1.1 Contenido de la caja Placa base ASRock ALiveNF7G-HDready (Factor forma Micro ATX: 24,4 cm x 21,8 cm, 9,6" x 8,6") Guía de instalación rápida de ASRock ALiveNF7G-HD720p CD de soporte de ASRock ALiveNF7G-HD720p Una cinta de datos IDE de - ASRock ALiveNF7G-HD720p R2.0 | Quick Installation Guide - Page 148
encajado en HDMI Audio - Realtek PHY RTL8201CL (ALiveNF7G-HD720p R2.0) - Velocidad: 10/100 Ethernet (ALiveNF7G-HD720p R2.0) - Gigabit LAN 10/100/1000 Mb/s (ALiveNF7G-HD720p R5.0) - Giga PHY Realtek RTL8211B (ALiveNF7G-HD720p R5.0) - Soporta Wake-On-LAN ASRock ALiveNF7G-HD720p Motherboard Español - ASRock ALiveNF7G-HD720p R2.0 | Quick Installation Guide - Page 149
adicionales) (vea ATENCIÓN 12) - 1 x Cabezal WiFi/E (vea ATENCIÓN 13) BIOS - 4Mb AMI BIOS - AMI legal BIOS - Soporta "Plug and Play" - ACPI 1.1 compliance wake up events - Soporta "jumper para procesador - Monitor de Voltaje: +12V, +5V, +3.3V, Vcore ASRock ALiveNF7G-HD720p Motherboard 149 - ASRock ALiveNF7G-HD720p R2.0 | Quick Installation Guide - Page 150
la tecnología ASRock AM2 Boost para aumento de la velocidad del reloj. Si habilita esta función en la configuración del BIOS, el rendimiento de la memoria mejorará hasta en un 12,5%, pero seguirá dependiendo del procesador AM2 que adopte. Al activar esta ASRock ALiveNF7G-HD720p Motherboard Español - ASRock ALiveNF7G-HD720p R2.0 | Quick Installation Guide - Page 151
el disco duro SATA al conector SATAII directamente. 12. Power Management para USB 2.0 funciona bien bajo Microsoft® Windows® VistaTM 64 bits / VistaTM / XP 64 bits / XP SP1; SP2/2000 SP4. 13. El x 2 Doble canal (Basic) DX9.0 con controlador WDDM DVI con HDCP ASRock ALiveNF7G-HD720p Motherboard 151 - ASRock ALiveNF7G-HD720p R2.0 | Quick Installation Guide - Page 152
una memoria total en su sistema de 512 MB, y desea pasar la prueba de certificación del logotipo de Windows® VistaTM Basic, ajuste el tamaño de memoria compartida de su VGA en placa a 64MB. Si utiliza una no los apriete demasiado. Eso podría dañar la placa madre. ASRock ALiveNF7G-HD720p Motherboard - ASRock ALiveNF7G-HD720p R2.0 | Quick Installation Guide - Page 153
hacen buen contacto entre sí. Conecte entonces el ventilador de la CPU al conector CPU FAN (CPU_FAN1, consulte Página 2/3, N. 2). Para realizar la instalación correctamente, consulte el manual de instrucciones del ventilador de la CPU y el radiador. Español ASRock ALiveNF7G-HD720p Motherboard 153 - ASRock ALiveNF7G-HD720p R2.0 | Quick Installation Guide - Page 154
2.3 Instalación de Memoria La placa ALiveNF7G-HD720p ofrece cuatro ranuras DIMM DDR2 de 240 pines, y soporta Tecnología de Memoria de Doble Canal. Para la configuración DDR2; si lo hace, esta placa base y los módulos DIMM pueden resultar dañados. Español 154 ASRock ALiveNF7G-HD720p Motherboard - ASRock ALiveNF7G-HD720p R2.0 | Quick Installation Guide - Page 155
dentro de la ranura hasta que los clips de sujeción de ambos lados queden completamente introducidos en su sitio y la DIMM se haya asentado apropiadamente. ASRock ALiveNF7G-HD720p Motherboard 155 - ASRock ALiveNF7G-HD720p R2.0 | Quick Installation Guide - Page 156
2.4 Ranuras de Expansión (ranuras PCI y ranuras PCI Express) La placa madre ALiveNF7G-HD720p cuenta con 2 ranuras PCI y 2 ranuras PCI Express. Ranura PCI: Para instalar tarjetas de la tarjeta en la ranura. Paso 4. Asegure la tarjeta con tornillos. Español 156 ASRock ALiveNF7G-HD720p Motherboard - ASRock ALiveNF7G-HD720p R2.0 | Quick Installation Guide - Page 157
disco de Blu-rayo (BD) o de HD-DVD, el contenido será exhibido solamente en uno de los dos monitores en vez de los ambos monitores. ASRock ALiveNF7G-HD720p Motherboard 157 Español - ASRock ALiveNF7G-HD720p R2.0 | Quick Installation Guide - Page 158
estos valores en la utilidad BIOS, el valor predeterminado de " Windows desktop onto this monitor (Extender mi escritorio de Windows a este monitor)". E. Haga clic derecho en el icono de pantalla y seleccione "Attached (Adjunto)" si es necesario. Español 158 ASRock ALiveNF7G-HD720p Motherboard - ASRock ALiveNF7G-HD720p R2.0 | Quick Installation Guide - Page 159
a E para el icono de pantalla identificado con el número uno, dos, tres y cuatro. Para Windows® VistaTM / VistaTM 64-bit OS: Haga clic con el botón derecho en el escritorio, seleccione la integridad del contenido mientras que se está transmitiendo. ASRock ALiveNF7G-HD720p Motherboard 159 Español - ASRock ALiveNF7G-HD720p R2.0 | Quick Installation Guide - Page 160
no funcionará. Para Windows® VistaTM / VistaTM 64-bit OS Paso 1: Instale el BIOS. A. Incorpore la UTILIDAD de DISPOSICIÓN del BIOS Pantalla avanzada Configuración del Chipset. B. Ajuste la opción de "Audio de HDMI HD Sobre la placa base" a [Auto]. 160 ASRock ALiveNF7G-HD720p Motherboard Español - ASRock ALiveNF7G-HD720p R2.0 | Quick Installation Guide - Page 161
Paso 2: Entre Windows® para instalar su sistema manualmente. A. Haga el clic el botón del "Comienzo", seleccione actualización de la BIOS, debe arrancar primero el sistema y, a continuación, apagarlo antes de realizar la acción de borrado de CMOS. ASRock ALiveNF7G-HD720p Motherboard 161 Español - ASRock ALiveNF7G-HD720p R2.0 | Quick Installation Guide - Page 162
de serie ATA (SATA) (Opcional) Ambos extremos del cable pueden conectarse al disco duro SATA / SATAII o la conexión de la placa base. Español 162 ASRock ALiveNF7G-HD720p Motherboard - ASRock ALiveNF7G-HD720p R2.0 | Quick Installation Guide - Page 163
apoya la función de la detección del Enchufe Caliente para ASRock DeskExpress. Conector de Audio Interno (4-pin CD1) (CD1: vea p.2/3, No. 29) Permite recepción de input CD1 audio de fuente sónica como CD-ROM, DVD-ROM, TV tuner, o tarjeta MPEG. ASRock ALiveNF7G-HD720p Motherboard 163 Español - ASRock ALiveNF7G-HD720p R2.0 | Quick Installation Guide - Page 164
, siga las instrucciones en nuestro manual y en el manual de chasis para instalar su sistema en la Utilidad de configuración del BIOS Entre en Configuración avanzada y, a continuaci el Administrador de audio HD Realtek. Para Windows® 2000 / XP / XP 64-bit ASRock ALiveNF7G-HD720p Motherboard Español - ASRock ALiveNF7G-HD720p R2.0 | Quick Installation Guide - Page 165
conector a una toma de corriente con el enchufe ATX 12V, de modo que proporcione suficiente electricidad. De lo contrario no se podrá encender. Español ASRock ALiveNF7G-HD720p Motherboard 165 - ASRock ALiveNF7G-HD720p R2.0 | Quick Installation Guide - Page 166
extremo blanco (B o C) del cable HDMI_SPDIF en el conector HDMI_SPDIF de la tarjeta VGA HDMI. A. Extremo negro B. Extremo blanco (2 patillas) C. Extremo blanco (3 patillas) Español 166 ASRock ALiveNF7G-HD720p Motherboard - ASRock ALiveNF7G-HD720p R2.0 | Quick Installation Guide - Page 167
4. Conecte el conector de salida HDMI a un dispositivo HDMI, como un HDTV. Consulte el manual del usuario del HDTV y la tarjeta VGA HDMI para conocer el procedimiento detallado de conexión. Paso 5. Instale el controlador de la tarjeta VGA HDMI en su sistema. ASRock ALiveNF7G-HD720p Motherboard 167 - ASRock ALiveNF7G-HD720p R2.0 | Quick Installation Guide - Page 168
Por favor visite el sitio Web de Hitachi para detalles. http://www.hitachigst.com/hdd/support/download.htm Los ejemplos anteriores son sólo para referencia. Para diferentes productos de disco duro los proveedores para obtener las actualizaciones. Español 168 ASRock ALiveNF7G-HD720p Motherboard - ASRock ALiveNF7G-HD720p R2.0 | Quick Installation Guide - Page 169
2.12 Función de conexión y cambio en caliente para HDDs SATA / SATAII La placa base ALiveNF7G-HD720p soporta las funciones Hot Plug y Hot Swap para dispositivos SATA / SATAII en modo RAID / sistema está conectado y en condiciones de funcionamiento. Español ASRock ALiveNF7G-HD720p Motherboard 169 - ASRock ALiveNF7G-HD720p R2.0 | Quick Installation Guide - Page 170
Conexión en Caliente PASO 1: Configure BIOS. A. Entre a la Utilidad de configuración de BIOS pantalla de Avanzada Configuración IDE. ASRock en el paquete de la caja del regalo de la placa base, por favor elige uno para Windows® 2000 / XP / XP 64-bit.) 170 ASRock ALiveNF7G-HD720p Motherboard - ASRock ALiveNF7G-HD720p R2.0 | Quick Installation Guide - Page 171
"Generate Serial ATA driver diskette [Y/ N]? BIOS pantalla de Avanzada Configuración IDE. B. Establezca la opción "SATA Operation Mode"(Modo de funcionamiento SATA) en [non-RAID]. PASO 2: Instale el sistema operativo Windows® 2000 / XP / XP 64 bits en su sistema. ASRock ALiveNF7G-HD720p Motherboard - ASRock ALiveNF7G-HD720p R2.0 | Quick Installation Guide - Page 172
Configure BIOS. A. Entre a la Utilidad de configuración de BIOS Windows® VistaTM / VistaTM 64 bits en la unidad óptica para iniciar el sistema y siga las instrucciones para instalar el sistema operativo Windows® VistaTM / VistaTM 64 bits en el equipo. 172 ASRock ALiveNF7G-HD720p Motherboard - ASRock ALiveNF7G-HD720p R2.0 | Quick Installation Guide - Page 173
bits con Funciones RAID Si desea instalar Windows® 2000 / XP / XP 64-bit detallado: ..\ RAID Installation Guide 2.16 Tecnología de Forzado ón de "Modo de Forzado de Reloj" de la configuración de BIOS para establecer la selección de [Auto] a [CPU, PCIE, ASRock ALiveNF7G-HD720p Motherboard 173 - ASRock ALiveNF7G-HD720p R2.0 | Quick Installation Guide - Page 174
la BIOS, por favor refiérase al Manual del Usuario (archivo PDF) contenido en el CD. 4.Información de Software Support CD Esta placa-base soporta diversos tipos de sistema operativo Windows®: 2000 archivo ASSETUP.EXE para iniciar la instalación. Español 174 ASRock ALiveNF7G-HD720p Motherboard - ASRock ALiveNF7G-HD720p R2.0 | Quick Installation Guide - Page 175
modelo que está a utilizar. www.asrock.com/support/index.asp 1.1 Este pacote contém Placa-mãe ASRock ALiveNF7G-HD720p (Formato Micro ATX: 9,6 pol. x 8,6 pol., 24,4 cm x 21,8 cm) Guia de instalação rápida da ASRock ALiveNF7G-HD720p CD de suporte da placa ASRock ALiveNF7G-HD720p Um cabo-fita IDE Ultra - ASRock ALiveNF7G-HD720p R2.0 | Quick Installation Guide - Page 176
ção PCI LAN - Realtek PHY RTL8201CL (ALiveNF7G-HD720p R2.0) - Velocidade: 10/100 Ethernet (ALiveNF7G-HD720p R2.0) - Gigabit LAN 10/100/1000 Mb/s (ALiveNF7G-HD720p R5.0) - Giga PHY Realtek RTL8211B (ALiveNF7G-HD720p R5.0) 176 - Suporta Wake-On-LAN ASRock ALiveNF7G-HD720p Motherboard Português - ASRock ALiveNF7G-HD720p R2.0 | Quick Installation Guide - Page 177
adicionais) (veja o AVISO 12) - 1 x cabezal WiFi/E (veja o AVISO 13) - 4Mb BIOS AMI - BIOS AMI - Suporta dispositivos "Plug and Play" - ACPI 1.1 atendendo a eventos de "wake up" - para a CPU - Monitoramento de voltagem : +12 V, +5 V, +3.3 V, Vcore ASRock ALiveNF7G-HD720p Motherboard 177 Português - ASRock ALiveNF7G-HD720p R2.0 | Quick Installation Guide - Page 178
7. Esta placa principal suporta a tecnologia de overclocking ASRock AM2 Boost. Se activar esta função na configuração do BIOS, o desempenho da memória sofrerá um melhoramento até 12,5%, no entanto tal dependerá da CPU AM2 que adoptar. A activação desta ASRock ALiveNF7G-HD720p Motherboard Português - ASRock ALiveNF7G-HD720p R2.0 | Quick Installation Guide - Page 179
o disco duro SATA ao conector SATAII. 12. Power Management para USB 2.0 funciona bem embaixo de Microsoft® Windows® VistaTM de 64 bits / VistaTM / XP de 64 bits / XP SP1; SP2/2000 SP4. 13. Canal duplo de 256 MB x 2 (Basic) DX9.0 com WDDM Driver DVI com HDCP ASRock ALiveNF7G-HD720p Motherboard 179 - ASRock ALiveNF7G-HD720p R2.0 | Quick Installation Guide - Page 180
uma memória de sistema com uma capacidade total acima dos 512 MB e pretender utilizar o Windows® VistaTM Premium ou Basic, ajuste o tamanho da memória partilhada da especificação VGA onboard para chassi, não os aperte excessivamente para não danificar a placa-mãe. ASRock ALiveNF7G-HD720p Motherboard - ASRock ALiveNF7G-HD720p R2.0 | Quick Installation Guide - Page 181
e heatsink são apertados firmemente e no bom contacto com cada um. E depois ligue o ventilador de CPU e o ligador de CPU_FAN (CPU_FAN1, veja p.2/3 No.2). Para a instalação apropriada, Refera ao manual da instrução de CPU ventilador e heatsink. Português ASRock ALiveNF7G-HD720p Motherboard 181 - ASRock ALiveNF7G-HD720p R2.0 | Quick Installation Guide - Page 182
2.3 Instalação dos Módulos de Memória (DIMM) A ALiveNF7G-HD720p possui quatro slots DIMM DDR2 (taxa de dados dupla 2) de 240 pinos e suporta a tecnologia na ranhura DDR2; pois caso contrário, esta placa-principal e os DIMMs podem ficar danificados. Português 182 ASRock ALiveNF7G-HD720p Motherboard - ASRock ALiveNF7G-HD720p R2.0 | Quick Installation Guide - Page 183
firmemente no slot até que os clipes de retenção em ambos os lados se encaixem totalmente em seus locais e a DIMM esteja encaixada de modo apropriado. ASRock ALiveNF7G-HD720p Motherboard 183 - ASRock ALiveNF7G-HD720p R2.0 | Quick Installation Guide - Page 184
PCI e PCI Express) Há 2 slots de PCI e 2 slots de PCI Express na placa-mãe do ALiveNF7G-HD720p. Slots PCI: Os slots PCI se usam para instalar placas de expansão com uma interface de PCI slot. 4º passo: Aparafuse a placa no chassis com os parafusos. Português 184 ASRock ALiveNF7G-HD720p Motherboard - ASRock ALiveNF7G-HD720p R2.0 | Quick Installation Guide - Page 185
-protegido vídeo de Blu-raio (BD) ou HD-DVD disco, o conteúdo será editado apenas em um de dois monitores em vez de ambos monitores. ASRock ALiveNF7G-HD720p Motherboard 185 Português - ASRock ALiveNF7G-HD720p R2.0 | Quick Installation Guide - Page 186
para aceder à BIOS Setup. Aceda à op Windows desktop onto this monitor (Prolongar o ambiente Windows para este monitor)". E. Clique com o botão direito do rato sobre o ícone de apresentação e seleccione "Attached (Anexo)", se for necessário. Português 186 ASRock ALiveNF7G-HD720p Motherboard - ASRock ALiveNF7G-HD720p R2.0 | Quick Installation Guide - Page 187
E para o ícone de apresentação identificado pelo número um, dois, três e quatro. Para Windows® VistaTM / VistaTM 64-bit OS: Clique no botão direito do rato no ambiente de trabalho, a integridade de conteúdo como a qual está sendo transmitida. Português ASRock ALiveNF7G-HD720p Motherboard 187 - ASRock ALiveNF7G-HD720p R2.0 | Quick Installation Guide - Page 188
Windows® VistaTM / VistaTM de 64 bits Etapa 1: Configuração do BIOS. A. Vá até BIOS SETUP UTILITY Ecrã Advanced (Avançadas) IDE Configuration (Configuração IDE). B. Defina a opção "OnBoard HDMI HD Audio" (Áudio de alta definição HDMI na placa) para [Auto]. 188 ASRock ALiveNF7G-HD720p Motherboard - ASRock ALiveNF7G-HD720p R2.0 | Quick Installation Guide - Page 189
Etapa 2: Aceda ao Windows® para configurar o sistema manualmente. A.Clique no botão "Start" (Iniciar) e CMOS ao concluir a atualização do BIOS, deverá reiniciar o sistema primeiro e, em seguida, desligá-lo antes de executar a ação de limpeza o CMOS. ASRock ALiveNF7G-HD720p Motherboard 189 - ASRock ALiveNF7G-HD720p R2.0 | Quick Installation Guide - Page 190
(SATA) (opcional) Tanto a saída do cabo de Serial dados SATA pode ser conectado ao disco rígido SATA / SATAII quanto o conector SATAII na placa mãe. 190 ASRock ALiveNF7G-HD720p Motherboard Português - ASRock ALiveNF7G-HD720p R2.0 | Quick Installation Guide - Page 191
ambiente sem fios e desfrutar da conveniência da conectividade de rede sem fios. Este suporte suporta a função de detecção automática de Periféricos para ASRock DeskExpress. ASRock ALiveNF7G-HD720p Motherboard 191 - ASRock ALiveNF7G-HD720p R2.0 | Quick Installation Guide - Page 192
s instruções que aparecem no manual e no manual do chassis para instalar o sistema AC'97. E. Entre no utilitário de configuração do BIOS. Vá até à opção Definições avançadas e a alteração clicando em "OK". Para Windows® VistaTM / VistaTM 64-bit OS: ASRock ALiveNF7G-HD720p Motherboard Português - ASRock ALiveNF7G-HD720p R2.0 | Quick Installation Guide - Page 193
que é necessário ligar uma fonte de alimentação com conector ATX 12V neste conector para fornecer alimentação suficiente. Do contrário, haverá falhas de funcionamento. ASRock ALiveNF7G-HD720p Motherboard 193 - ASRock ALiveNF7G-HD720p R2.0 | Quick Installation Guide - Page 194
seguida, ligue a extremidade branca (B ou C) do cabo HDMI_SPDIF ao conector HDMI_SPDIF da placa VGA HDMI. A. Extremidade negra B. Extremidade branca C. Extremidade branca (2 pinos) (3 pinos) Português 194 ASRock ALiveNF7G-HD720p Motherboard - ASRock ALiveNF7G-HD720p R2.0 | Quick Installation Guide - Page 195
ficar danificadas. Por exemplo, esta imagem mostra uma ligação incorrecta do cabo HDMI_SPDIF ao conector da ventoinha da placa VGA PCI Express. Consulte o manual de utilizador da placa VGA para se informar acerca do método de ligação correcto do conector. ASRock ALiveNF7G-HD720p Motherboard 195 - ASRock ALiveNF7G-HD720p R2.0 | Quick Installation Guide - Page 196
HDMI ao dispositivo HDMI que pode ser, por exemplo, um televisor de alta definição. Consulte o manual do utilizador fornecido pelo fabricante do televisor de alta definição e da placa VGA HDMI para . Por favor visite o sítio Web do vendedor para actualizações. ASRock ALiveNF7G-HD720p Motherboard - ASRock ALiveNF7G-HD720p R2.0 | Quick Installation Guide - Page 197
como RAID 1 ou RAID 5 e depois é chamado "Hot Swap" para a ação para inserir e remover os SATA / SATAII HDDs quando o sistema ainda é ligado e na condição de trabalho. Português ASRock ALiveNF7G-HD720p Motherboard 197 - ASRock ALiveNF7G-HD720p R2.0 | Quick Installation Guide - Page 198
Support no acionador ótico para reiniciar seu sistema. (NÃO insira nenhum disquete no acionador de disquete neste momento!) (Há dois ASRock Suportado CD no pacote de caixa de presente de tábua maderna, escolha um para Windows® 2000 / XP / XP 64-bit.) 198 ASRock ALiveNF7G-HD720p Motherboard - ASRock ALiveNF7G-HD720p R2.0 | Quick Installation Guide - Page 199
drivers SATA / SATAII HDD. ETAPA 3: Instalar o Windows BIOS - Ecrã avançado - Configuração IDE). B. Defina a opção "SATA Operation Mode" (Modo de funcionamento SATA) para [non-RAID]. ETAPA 2: Instalar o Windows® 2000 / XP / XP de 64 bits OS no seu sistema. ASRock ALiveNF7G-HD720p Motherboard - ASRock ALiveNF7G-HD720p R2.0 | Quick Installation Guide - Page 200
ções ETAPA 1: Aceda à BIOS. A. Vá até BIOS SETUP UTILITY Advanced screen IDE Configuration (Utilitário de configuração da BIOS - Ecrã avançado - Configuração IDE). B. Defina a opção "SATA Operation Mode" (Modo de funcionamento SATA) para [non-RAID]. 200 ASRock ALiveNF7G-HD720p Motherboard - ASRock ALiveNF7G-HD720p R2.0 | Quick Installation Guide - Page 201
ções para instalar o Windows® VistaTM / VistaTM de 64 bits no computador. 2.15 Instalação do Windows® 2000 / XP : ..\ RAID Installation Guide 2.16 A tecnologia Overclock Mode" (Modo de overclock) da configuração da BIOS para definir a função de [Auto] para [CPU ASRock ALiveNF7G-HD720p Motherboard 201 - ASRock ALiveNF7G-HD720p R2.0 | Quick Installation Guide - Page 202
es mais detalhadas sobre a configuração da BIOS, consulte o manual do usuário (em pdf) contido Windows®: 2000 / XP / Centro de multimedia XP / XP de 64 bits / VistaTM / VistaTM de 64 bits. O CD de instalação que acompanha a placa Mãe contem: drivers Português 202 ASRock ALiveNF7G-HD720p Motherboard - ASRock ALiveNF7G-HD720p R2.0 | Quick Installation Guide - Page 203
ASRock ALiveNF7G-HD720p Motherboard 203 - ASRock ALiveNF7G-HD720p R2.0 | Quick Installation Guide - Page 204
'' ® ® ® ® 204 ASRock ALiveNF7G-HD720p Motherboard - ASRock ALiveNF7G-HD720p R2.0 | Quick Installation Guide - Page 205
® ASRock ALiveNF7G-HD720p Motherboard 205 - ASRock ALiveNF7G-HD720p R2.0 | Quick Installation Guide - Page 206
" " ® ® ® ® ® 206 ASRock ALiveNF7G-HD720p Motherboard - ASRock ALiveNF7G-HD720p R2.0 | Quick Installation Guide - Page 207
" ® ® ® ® ® ® ® ASRock ALiveNF7G-HD720p Motherboard 207 - ASRock ALiveNF7G-HD720p R2.0 | Quick Installation Guide - Page 208
208 ASRock ALiveNF7G-HD720p Motherboard - ASRock ALiveNF7G-HD720p R2.0 | Quick Installation Guide - Page 209
ASRock ALiveNF7G-HD720p Motherboard 209 - ASRock ALiveNF7G-HD720p R2.0 | Quick Installation Guide - Page 210
DDRII_1 DDRII_2 DDRII_3 DDRII_4 ( ) ( ) ( ) ( ) (1) - - (2) - - (3) " " 210 ASRock ALiveNF7G-HD720p Motherboard - ASRock ALiveNF7G-HD720p R2.0 | Quick Installation Guide - Page 211
ASRock ALiveNF7G-HD720p Motherboard 211 - ASRock ALiveNF7G-HD720p R2.0 | Quick Installation Guide - Page 212
212 ASRock ALiveNF7G-HD720p Motherboard - ASRock ALiveNF7G-HD720p R2.0 | Quick Installation Guide - Page 213
ASRock ALiveNF7G-HD720p Motherboard 213 - ASRock ALiveNF7G-HD720p R2.0 | Quick Installation Guide - Page 214
® " " " " ® " " " " " " " " " " " " " " " " " " " " 214 ASRock ALiveNF7G-HD720p Motherboard - ASRock ALiveNF7G-HD720p R2.0 | Quick Installation Guide - Page 215
® " " " "" " " " " " " ® ASRock ALiveNF7G-HD720p Motherboard 215 - ASRock ALiveNF7G-HD720p R2.0 | Quick Installation Guide - Page 216
® ® ® 216 ASRock ALiveNF7G-HD720p Motherboard - ASRock ALiveNF7G-HD720p R2.0 | Quick Installation Guide - Page 217
"" "" "" "" ASRock ALiveNF7G-HD720p Motherboard 217 - ASRock ALiveNF7G-HD720p R2.0 | Quick Installation Guide - Page 218
218 ASRock ALiveNF7G-HD720p Motherboard SATAII_1 (PORT 0) SATAII_2 (PORT 1) SATAII_3 (PORT 2) SATAII_4 (PORT 3) - ASRock ALiveNF7G-HD720p R2.0 | Quick Installation Guide - Page 219
CD1 ASRock ALiveNF7G-HD720p Motherboard 219 - ASRock ALiveNF7G-HD720p R2.0 | Quick Installation Guide - Page 220
® ® ® 4 3 2 1 220 13 1 24 12 ASRock ALiveNF7G-HD720p Motherboard - ASRock ALiveNF7G-HD720p R2.0 | Quick Installation Guide - Page 221
13 1 24 12 C B A ASRock ALiveNF7G-HD720p Motherboard 221 - ASRock ALiveNF7G-HD720p R2.0 | Quick Installation Guide - Page 222
222 ASRock ALiveNF7G-HD720p Motherboard - ASRock ALiveNF7G-HD720p R2.0 | Quick Installation Guide - Page 223
ASRock ALiveNF7G-HD720p Motherboard 223 - ASRock ALiveNF7G-HD720p R2.0 | Quick Installation Guide - Page 224
® ® " " " " 224 ASRock ALiveNF7G-HD720p Motherboard - ASRock ALiveNF7G-HD720p R2.0 | Quick Installation Guide - Page 225
® ® ® ® ® ® ® ® ® ® ASRock ALiveNF7G-HD720p Motherboard 225 - ASRock ALiveNF7G-HD720p R2.0 | Quick Installation Guide - Page 226
® ® ® ® A. NVIDIA nForce Storage Controller (required) Windows XP/2000 B. NVIDIA nForce Storage Controller (required) Windows XP64 ® ® ® ® ® 226 ASRock ALiveNF7G-HD720p Motherboard - ASRock ALiveNF7G-HD720p R2.0 | Quick Installation Guide - Page 227
® ® ® ® ® ® \ \ \ \ ® ® ® ® ® ® \ ® ® ASRock ALiveNF7G-HD720p Motherboard 227 - ASRock ALiveNF7G-HD720p R2.0 | Quick Installation Guide - Page 228
" " 228 ASRock ALiveNF7G-HD720p Motherboard - ASRock ALiveNF7G-HD720p R2.0 | Quick Installation Guide - Page 229
" " \\ " " ASRock ALiveNF7G-HD720p Motherboard 229 - ASRock ALiveNF7G-HD720p R2.0 | Quick Installation Guide - Page 230
NOTE. The current RAID driver does not support Hot Plug function. Please do not insert or remove your SATA / SATAII HDDs while the system is power on and in working condition. As soon as the RAID driver with Hot Plug function is ready, we will upload it to our website. Please visit our website - ASRock ALiveNF7G-HD720p R2.0 | Quick Installation Guide - Page 231
- ASRock ALiveNF7G-HD720p R2.0 | Quick Installation Guide - Page 232
-
 1
1 -
 2
2 -
 3
3 -
 4
4 -
 5
5 -
 6
6 -
 7
7 -
8
-
9
-
10
-
11
-
12
-
13
-
14
-
15
-
16
-
17
-
18
-
19
-
20
-
21
-
22
-
23
-
24
-
25
-
26
-
27
-
28
-
29
-
30
-
31
-
32
-
33
-
34
-
35
-
36
-
37
-
38
-
39
-
40
-
41
-
42
-
43
-
44
-
45
-
46
-
47
-
48
-
49
-
50
-
51
-
52
-
53
-
54
-
55
-
56
-
57
-
58
-
59
-
60
-
61
-
62
-
63
-
64
-
65
-
66
-
67
-
68
-
69
-
70
-
71
-
72
-
73
-
74
-
75
-
76
-
77
-
78
-
79
-
80
-
81
-
82
-
83
-
84
-
85
-
86
-
87
-
88
-
89
-
90
-
91
-
92
-
93
-
94
-
95
-
96
-
97
-
98
-
99
-
100
-
101
-
102
-
103
-
104
-
105
-
106
-
107
-
108
-
109
-
110
-
111
-
112
-
113
-
114
-
115
-
116
-
117
-
118
-
119
-
120
-
121
-
122
-
123
-
124
-
125
-
126
-
127
-
128
-
129
-
130
-
131
-
132
-
133
-
134
-
135
-
136
-
137
-
138
-
139
-
140
-
141
-
142
-
143
-
144
-
145
-
146
-
147
-
148
-
149
-
150
-
151
-
152
-
153
-
154
-
155
-
156
-
157
-
158
-
159
-
160
-
161
-
162
-
163
-
164
-
165
-
166
-
167
-
168
-
169
-
170
-
171
-
172
-
173
-
174
-
175
-
176
-
177
-
178
-
179
-
180
-
181
-
182
-
183
-
184
-
185
-
186
-
187
-
188
-
189
-
190
-
191
-
192
-
193
-
194
-
195
-
196
-
197
-
198
-
199
-
200
-
201
-
202
-
203
-
204
-
205
-
206
-
207
-
208
-
209
-
210
-
211
-
212
-
213
-
214
-
215
-
216
-
217
-
218
-
219
-
220
-
221
-
222
-
223
-
224
-
225
-
226
-
227
-
228
-
229
-
230
-
231
-
232
 |
 |
1
ASRock
ALiveNF7G-HD720p
Motherboard
English
English
English
English
English
Copyright Notice:
Copyright Notice:
Copyright Notice:
Copyright Notice:
Copyright Notice:
No part of this installation guide may be reproduced, transcribed, transmitted, or trans-
lated in any language, in any form or by any means, except duplication of documen-
tation by the purchaser for backup purpose, without written consent of ASRock Inc.
Products and corporate names appearing in this guide may or may not be registered
trademarks or copyrights of their respective companies, and are used only for identifica-
tion or explanation and to the owners’ benefit, without intent to infringe.
Disclaimer:
Disclaimer:
Disclaimer:
Disclaimer:
Disclaimer:
Specifications and information contained in this guide are furnished for informational
use only and subject to change without notice, and should not be constructed as a
commitment by ASRock. ASRock assumes no responsibility for any errors or omissions
that may appear in this guide.
With respect to the contents of this guide, ASRock does not provide warranty of any kind,
either expressed or implied, including but not limited to the implied warranties or
conditions of merchantability or fitness for a particular purpose. In no event shall
ASRock, its directors, officers, employees, or agents be liable for any indirect, special,
incidental, or consequential damages (including damages for loss of profits, loss of
business, loss of data, interruption of business and the like), even if ASRock has been
advised of the possibility of such damages arising from any defect or error in the guide
or product.
This device complies with Part 15 of the FCC Rules. Operation is subject to the
following two conditions:
(1)
this device may not cause harmful interference, and
(2)
this device must accept any interference received, including interference that
may cause undesired operation.
Published December 2007
Copyright
©
2007 ASRock INC. All rights reserved.
CALIFORNIA, USA ONLY
The Lithium battery adopted on this motherboard contains Perchlorate, a toxic
substance controlled in Perchlorate Best Management Practices (BMP) regulations
passed by the California Legislature. When you discard the Lithium battery in
California, USA, please follow the related regulations in advance.
“Perchlorate Material-special handling may apply, see
www
.dtsc.ca.gov/hazardouswa
ste/perchlorate”
ASRock Website: http://www.asrock.com