ASRock AM2NF3-VSTA Quick Installation Guide
ASRock AM2NF3-VSTA Manual
 |
View all ASRock AM2NF3-VSTA manuals
Add to My Manuals
Save this manual to your list of manuals |
ASRock AM2NF3-VSTA manual content summary:
- ASRock AM2NF3-VSTA | Quick Installation Guide - Page 1
' benefit, without intent to infringe. Disclaimer: Specifications and information contained in this guide are furnished for informational use only and subject ASRock Website: http://www.asrock.com Published January 2007 Copyright©2007 ASRock INC. All rights reserved. 1 ASRock AM2NF3-VSTA Motherboard - ASRock AM2NF3-VSTA | Quick Installation Guide - Page 2
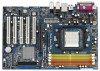
(IDE1, Blue) 25 AGP Slot (1.5V_AGP1) 11 Secondary IDE Connector (IDE2, Black) 26 CPU Fan Connector (CPU_FAN1) 12 USB 2.0 Header (USB45, Blue) 27 ATX Power Connector (ATXPWR1) 13 Chassis Speaker Header (SPEAKER 1) 28 Shared USB 2.0 Header (USB2_3, Blue) 2 ASRock AM2NF3-VSTA Motherboard - ASRock AM2NF3-VSTA | Quick Installation Guide - Page 3
in accordance with the type of speaker you use. TABLE for Audio Output Connection Audio Output Channels Front Speaker Rear Speaker Central / Bass (No. 7) (No. 4) (No. 5) 2 V -- -- 4 V -- -- 6 V -- V 8 V V V Side Speaker (No. 3) -V V V 3 ASRock AM2NF3-VSTA Motherboard English - ASRock AM2NF3-VSTA | Quick Installation Guide - Page 4
of this manual occur, the updated version will be available on ASRock website without further notice. You may find the latest VGA cards and CPU support lists on ASRock website as well. ASRock website http://www.asrock.com 1.1 Package Contents 1 x ASRock AM2NF3-VSTA Motherboard (ATX Form Factor - ASRock AM2NF3-VSTA | Quick Installation Guide - Page 5
1.2 Specifications Platform CPU Chipset Memory Hybrid Booster Expansion Slot Audio LAN Rear Panel I/O - ATX Form Factor: 12.0-in x 8.0-in, 30.5 cm x 20.3 cm - Socket AM2 for AMD AthlonTM 64FX / 64X2 / 64 and Sempron Processors - Supports AMD's Cool 'n' QuietTM Technology (see CAUTION 1) - Supports - ASRock AM2NF3-VSTA | Quick Installation Guide - Page 6
Fan Tachometer - CPU Quiet Fan - Voltage Monitoring: +12V, +5V, +3.3V, Vcore - Microsoft® Windows® 2000/XP/XP 64-bit/VistaTM / VistaTM 64-bit compliant (see CAUTION 11) - FCC, CE, Microsoft® WHQL Certificated WARNING Please realize that there is a certain risk involved with overclocking, including - ASRock AM2NF3-VSTA | Quick Installation Guide - Page 7
64-bit driver keeps on updating now. As long as we have the latest driver, we will update it to our website in the future. Please visit our website for Microsoft® Windows® VistaTM / VistaTM 64-bit driver and related information. ASRock website http://www.asrock.com 7 ASRock AM2NF3-VSTA Motherboard - ASRock AM2NF3-VSTA | Quick Installation Guide - Page 8
plan to submit Windows® VistaTM Premium and Basic logo, please follow the below table for minimum hardware requirement. CPU Memory VGA Sempron 2800+ 512MB Single Channel DX9.0 with WDDM Driver with 128bit VGA memory (Premium) with 64bit VGA memory (Basic) English 8 ASRock AM2NF3-VSTA Motherboard - ASRock AM2NF3-VSTA | Quick Installation Guide - Page 9
you push down the socket lever to secure the CPU. The lever clicks on the side tab to indicate that it is locked. Install CPU fan and heatsink. For proper installation, please kindly refer to the instruction manuals of your CPU fan and heatsink vendors. English 9 ASRock AM2NF3-VSTA Motherboard - ASRock AM2NF3-VSTA | Quick Installation Guide - Page 10
for example, installing a pair of memory modules in DDRII_1 and DDRII_3, it is unable to activate the Dual Channel Memory Technology . 4. It is not allowed to install a DDR memory module into DDRII slot; otherwise, this motherboard and DIMM may be damaged. English 10 ASRock AM2NF3-VSTA Motherboard - ASRock AM2NF3-VSTA | Quick Installation Guide - Page 11
permanent damage to the motherboard and the DIMM if you force the DIMM into the slot at incorrect orientation. Step 3. Firmly insert the DIMM into the slot until the retaining clips at both ends fully snap back in place and the DIMM is properly seated. 11 ASRock AM2NF3-VSTA Motherboard English - ASRock AM2NF3-VSTA | Quick Installation Guide - Page 12
Expansion Slots (PCI Slots and AGP Slot) There are 5 PCI slots and 1 AGP slot on AM2NF3-VSTA motherboard. PCI Slots: PCI slots are used to install expansion cards that have the 32-bit PCI interface. AGP slot: The AGP slot is used to install a graphics card. The ASRock AGP slot has a special design - ASRock AM2NF3-VSTA | Quick Installation Guide - Page 13
current provided by power supply. JR1 JL1 panel audio connectors can update the BIOS. If you need to clear the CMOS when you just finish updating the BIOS, you must boot up the system first, and then shut it down before you do the clear-CMOS action. English 13 ASRock AM2NF3-VSTA Motherboard - ASRock AM2NF3-VSTA | Quick Installation Guide - Page 14
for internal storage devices. The current SATA interface allows up to 1.5 Gb/s data transfer rate. Serial ATA (SATA) Data Cable (Optional) Either end of the SATA data cable can be connected to the SATA hard disk or the SATA connector on the motherboard. English 14 ASRock AM2NF3-VSTA Motherboard - ASRock AM2NF3-VSTA | Quick Installation Guide - Page 15
) This connector allows you to receive stereo audio input CD1 from sound sources such as a CD-ROM, DVD-ROM, TV tuner card, or MPEG card. This is an interface for front panel audio cable that allows convenient connection and control of audio devices. English 15 ASRock AM2NF3-VSTA Motherboard - ASRock AM2NF3-VSTA | Quick Installation Guide - Page 16
) Please connect an ATX power supply to this connector. ATX 12V Power Connector (4-pin ATX12V1) (see p.2 No. 2) Please note that it is necessary to connect a power supply with ATX 12V plug to this connector. Failing to do so will cause power up failure. English 16 ASRock AM2NF3-VSTA Motherboard - ASRock AM2NF3-VSTA | Quick Installation Guide - Page 17
Game Port Header (15-pin GAME1) (see p.2 No. 19) Connect a Game cable to this header if the Game port bracket is installed. a 17 ASRock AM2NF3-VSTA Motherboard English - ASRock AM2NF3-VSTA | Quick Installation Guide - Page 18
. Then, the drivers compatible to your system can be auto-detected and listed on the support CD driver page. Please follow the order from up to bottom side to install those required drivers. Therefore, the drivers you install can work properly. For users who install Windows® XP 64-bit OS and plan - ASRock AM2NF3-VSTA | Quick Installation Guide - Page 19
http://www.asrock.com 2.9 Installing Windows® 2000 / XP / XP 64-bit / VistaTM / VistaTM 64-bit Without RAID Functions The installation procedures for Windows® VistaTM / VistaTM 64-bit are subject to change. Please visit our website for the updates of Windows® VistaTM / VistaTM 64-bit driver and - ASRock AM2NF3-VSTA | Quick Installation Guide - Page 20
RAID Utility for Windows Guide" in Windows® environment. Please refer to the document in the Support CD, "Guide to nVidia RAID Utility for Windows", which is located in the folder at the following path: .. \Information\Manual\RAID Utility for Windows Guide English 20 ASRock AM2NF3-VSTA Motherboard - ASRock AM2NF3-VSTA | Quick Installation Guide - Page 21
to the User Manual (PDF file) contained in the Support CD. 4. Software Support CD information This motherboard supports various Microsoft® Windows® operating systems: 2000 / XP / XP 64-bit / VistaTM / VistaTM 64-bit. The Support CD that came with the motherboard contains necessary drivers and useful - ASRock AM2NF3-VSTA | Quick Installation Guide - Page 22
22 ASRock AM2NF3-VSTA Motherboard - ASRock AM2NF3-VSTA | Quick Installation Guide - Page 23
™ '' ™ ® 23 ASRock AM2NF3-VSTA Motherboard - ASRock AM2NF3-VSTA | Quick Installation Guide - Page 24
® ® 24 ASRock AM2NF3-VSTA Motherboard - ASRock AM2NF3-VSTA | Quick Installation Guide - Page 25
™ '' ™ ® ® '' ® ® ® ® ® ® ® 25 ASRock AM2NF3-VSTA Motherboard - ASRock AM2NF3-VSTA | Quick Installation Guide - Page 26
® ® 26 ASRock AM2NF3-VSTA Motherboard - ASRock AM2NF3-VSTA | Quick Installation Guide - Page 27
27 ASRock AM2NF3-VSTA Motherboard - ASRock AM2NF3-VSTA | Quick Installation Guide - Page 28
DDRII_1 DDRII_2 DDRII_3 DDRII_4 ( )( )( )( ) (1) - - (2) - - (3) 28 ASRock AM2NF3-VSTA Motherboard - ASRock AM2NF3-VSTA | Quick Installation Guide - Page 29
29 ASRock AM2NF3-VSTA Motherboard - ASRock AM2NF3-VSTA | Quick Installation Guide - Page 30
30 ASRock AM2NF3-VSTA Motherboard - ASRock AM2NF3-VSTA | Quick Installation Guide - Page 31
31 ASRock AM2NF3-VSTA Motherboard - ASRock AM2NF3-VSTA | Quick Installation Guide - Page 32
" " SATA2 SATA1 32 ASRock AM2NF3-VSTA Motherboard - ASRock AM2NF3-VSTA | Quick Installation Guide - Page 33
CD1 33 ASRock AM2NF3-VSTA Motherboard - ASRock AM2NF3-VSTA | Quick Installation Guide - Page 34
1 2 3 4 ® 34 ASRock AM2NF3-VSTA Motherboard - ASRock AM2NF3-VSTA | Quick Installation Guide - Page 35
® ® ® ® ® ® ® 35 ASRock AM2NF3-VSTA Motherboard - ASRock AM2NF3-VSTA | Quick Installation Guide - Page 36
® ® ® ® ® ® ® ® ® ® ® ® ® ® ® ® ® ® ® ® 36 ASRock AM2NF3-VSTA Motherboard - ASRock AM2NF3-VSTA | Quick Installation Guide - Page 37
® ® ® ® ® ® ® ® ® ® ® ® 37 ASRock AM2NF3-VSTA Motherboard - ASRock AM2NF3-VSTA | Quick Installation Guide - Page 38
® ® 38 ASRock AM2NF3-VSTA Motherboard - ASRock AM2NF3-VSTA | Quick Installation Guide - Page 39
X O O O X O O O O: X: O O O O 39 ASRock AM2NF3-VSTA Motherboard - ASRock AM2NF3-VSTA | Quick Installation Guide - Page 40
ASRock AM2NF3-VSTA Motherboard (ATX-Formfaktor: 30.5 cm x 20.3 cm; 12.0 Zoll x 8.0 Zoll) ASRock AM2NF3-VSTA Schnellinstallationsanleitung ASRock AM2NF3-VSTA Support-CD Ein 80-adriges Ultra-ATA 66/100/133 IDE-Flachbandkabel Ein Flachbandkabel für ein 3,5-Zoll-Diskettenlaufwerk Ein Seriell-ATA- (SATA - ASRock AM2NF3-VSTA | Quick Installation Guide - Page 41
CPU Chipsatz Speicher Hybrid Booster Erweiterungssteckplätze Audio LAN E/A-Anschlüsse an der Rückseite - ATX-Formfaktor: 30.5 cm x 20.3 cm; 12.0 Zoll x 8.0 Zoll - Sockel AM2, unterstützt AMD AthlonTM 64FX / 64X2 / 64 vorne / Mikrofon (siehe VORSICHT 9) Deutsch 41 ASRock AM2NF3-VSTA Motherboard - ASRock AM2NF3-VSTA | Quick Installation Guide - Page 42
- CPU-Lüftergeräuschdämpfung - Spannungsüberwachung: +12V, +5V, +3.3V, Vcore Betriebssysteme - Unterstützt Microsoft® Windows® 2000 / XP / XP 64-Bit / VistaTM / VistaTM 64-Bit (siehe VORSICHT 11) Zertifizierungen - FCC, CE, WHQL Deutsch WARNUNG Beachten Sie bitte, dass Overclocking, einschlie - ASRock AM2NF3-VSTA | Quick Installation Guide - Page 43
, da unter Windows® XP und Windows® Vista™ etwas Speicher zur Nutzung durch das System reserviert wird. Unter Windows® XP 64-bit und Windows® Vista™ 64-bit mit 64-Bit-CPU besteht diese Einschränkung nicht. 5. Obwohl dieses Motherboard stufenlose Steuerung bietet, wird Overclocking nicht empfohlen - ASRock AM2NF3-VSTA | Quick Installation Guide - Page 44
und BasicLogos vorbereiten möchten, finden die minimalen Hardwarevoraussetzungen in der folgenden Tabelle. CPU Speicher VGA Sempron 2800+ 512 MB, Single Channel DX9.0 mit WDDM-Treiber mit 128 Bit-VGA-Speicher (Premium) mit 64 Bit-VGA-Speicher (Basic) Deutsch 44 ASRock AM2NF3-VSTA Motherboard - ASRock AM2NF3-VSTA | Quick Installation Guide - Page 45
. Schritt 5: Installieren Sie einen aktiven CPU-Kühler, der die gesamte Fläche der CPU abdeckt und eine ausreichende Wärmeableitung für den von Ihnen verwendeten CPU-Typ bietet. Weitere Hinweise finden Sie der Installationsanleitung für Ihren CPU-Kühler. 45 ASRock AM2NF3-VSTA Motherboard Deutsch - ASRock AM2NF3-VSTA | Quick Installation Guide - Page 46
der Speichermodule (DIMM) Die Motherboards AM2NF3-VSTA bieten vier 240-pol. DDRII (Double Data Rate) DIMM-Steckplätze und unterst nicht zulässig, DDR in einen DDRII Steckplatz zu installieren; andernfalls könnten Motherboard und DIMMs beschädigt werden. Deutsch 46 ASRock AM2NF3-VSTA Motherboard - ASRock AM2NF3-VSTA | Quick Installation Guide - Page 47
ätze zu zwingen, führt dies zu dauerhaften Schäden am Mainboard und am DIMM-Modul. Schritt 3: Drücken Sie die DIMM-Module fest in die Steckplätze, so dass die Halteklammern an beiden Enden des Moduls einschnappen und das DIMM-Modul fest an Ort und Stelle sitzt. 47 ASRock AM2NF3-VSTA Motherboard - ASRock AM2NF3-VSTA | Quick Installation Guide - Page 48
einen 5 PCI-Steckplätze und 1 AGP-Steckplätze am AM2NF3-VSTA Motherboard. PCI-Slots: PCI-Slots werden zur Installation von Erweiterungskarten mit dem 32bit PCI-Interface genutzt. AGP-Slot: Der AGP-Steckplatz dient zur Installation einer Grafikkarte. Der ASRock AGP-Steckplatz hat speziell entwickelte - ASRock AM2NF3-VSTA | Quick Installation Guide - Page 49
Sie nicht, den Jumper wieder zu entfernen, nachdem das CMOS gelöscht wurde. Wenn Sie den CMOS-Inhalt gleich nach dem Aktualisieren des BIOS löschen müssen, müssen Sie zuerst das System starten und dann wieder ausschalten, bevor Sie den CMOS-Inhalt löschen. 49 ASRock AM2NF3-VSTA Motherboard Deutsch - ASRock AM2NF3-VSTA | Quick Installation Guide - Page 50
Die aktuelle SATA-Schnittstelle ermöglicht eine Datenübertragungsrate bis 1,5 Gb/s. Serial ATA- (SATA-) Sie können beide Enden des Datenkabel SATA-Datenkabels entweder (Option) mit der SATA-Festplatte oder dem SATA-Anschluss am Mainboard verbinden. 50 ASRock AM2NF3-VSTA Motherboard Deutsch - ASRock AM2NF3-VSTA | Quick Installation Guide - Page 51
das schwarze Ende des SATA-Netzkabels mit dem Netzanschluss Audio-Anschlüsse (4-Pin CD1) (CD1: siehe S.2, Punkt 22) Diese ermöglichen Ihnen Stereo- Signalquellen, wie z. B. CD-ROM, CD1 DVD-ROM, TV-Tuner oder MPEG-Karten mit Ihrem System zu verbinden. Deutsch 51 ASRock AM2NF3-VSTA Motherboard - ASRock AM2NF3-VSTA | Quick Installation Guide - Page 52
dieses Motherboards anschließen möchten, verbinden Sie ihn bitte mit den Pins 1 - 3. Pins 1-3 anschließen Lüfter mit dreipoligem Anschluss installieren ATX-Netz-Header (20-pin ATXPWR1) (siehe S.2, Punkt 27) Verbinden Sie die ATXStromversorgung mit diesem Header. Deutsch 52 ASRock AM2NF3-VSTA - ASRock AM2NF3-VSTA | Quick Installation Guide - Page 53
Sie eine Stromversorgung mit ATX 12Volt-Stecker mit SATA-Netzkabel mit der SATA-Festplatte. Schließen Sie ein Ende des SATA-Datenkabels am SATA-Anschluss des Motherboards an. Schließen Sie das andere Ende des SATA-Datenkabels an die SATAFestplatte an. Deutsch 53 ASRock AM2NF3-VSTA Motherboard - ASRock AM2NF3-VSTA | Quick Installation Guide - Page 54
Treiber verfügbar ist, finden Sie diesen demnächst auf unserer Internetseite. Auf unserer Internetseite finden Sie Angaben zum Microsoft® Windows® VistaTM-/ VistaTM 64-bit-Treiber sowie weitere Informationen. ASRock-Internetseite: http:// www.asrock.com 54 ASRock AM2NF3-VSTA Motherboard Deutsch - ASRock AM2NF3-VSTA | Quick Installation Guide - Page 55
einer SATA-Treiberdiskette nicht erforderlich. Außerdem brauchen Sie die BIOS-Einstellungen nicht zu ändern. Sie können Windows® 2000, Windows® XP, Windows® XP 64-Bit, Windows® VistaTM, Windows® VistaTM 64-Bit direkt auf Ihr System installieren. 2.10 Installation von Windows® 2000 / XP / XP 64-Bit - ASRock AM2NF3-VSTA | Quick Installation Guide - Page 56
informieren. Sie finden das Dokument, "Guide to SATA Hard Disks Installation and RAID Configuration" unter folgendem Pfad auf der Support- CD: .. \ Information\Manual\RAID Installation Guide SCHRITT 4: Installieren Sie Windows® 2000 / Windows® XP / Windows® XP 64-Bit in Ihrem System. Nach den - ASRock AM2NF3-VSTA | Quick Installation Guide - Page 57
zum BIOS-Setup, siehe bitte das Benutzerhandbuch (PDF Datei) auf der Support CD. 4. Software Support CD information Dieses Motherboard unterstützt eine Reiche von Microsoft® Windows® Betriebssystemen: 2000 / XP / XP 64-Bit / VistaTM / VistaTM 64-Bit. Die Ihrem Motherboard beigefügte Support-CD - ASRock AM2NF3-VSTA | Quick Installation Guide - Page 58
cartes VGA et CPU également sur le site Web ASRock. Site web ASRock, http://www.asrock.com 1.1 Contenu du paquet Carte mère ASRock AM2NF3-VSTA (Facteur de forme ATX: 12.0 pouces x 8.0 pouces, 30.5 cm x 20.3 cm) Guide d'installation rapide ASRock AM2NF3-VSTA CD de soutien ASRock AM2NF3-VSTA Un câble - ASRock AM2NF3-VSTA | Quick Installation Guide - Page 59
1 x port série: COM 1 - 1 x port parallèle: Support ECP/EPP - 4 x ports USB 2.0 par défaut - 1 x port RJ-45 - Prise Audio: Haut-parleur latéral / Haut-parleur arrière / Central /Basses / Entrée Ligne / Haut-parleur frontal / Microphone (voir ATTENTION 9) Français 59 ASRock AM2NF3-VSTA Motherboard - ASRock AM2NF3-VSTA | Quick Installation Guide - Page 60
Windows® 2000 / XP / XP 64-bit / VistaTM / VistaTM 64-bit (voir ATTENTION 11) - FCC, CE, WHQL Français ATTENTION Il est important que vous réalisiez qu'il y a un certain risque à effectuer l'overclocking, y compris ajuster les réglages du BIOS par l'overclocking. 60 ASRock AM2NF3-VSTA Motherboard - ASRock AM2NF3-VSTA | Quick Installation Guide - Page 61
l'entrée microphone, cette carte mère supporte les deux modes stéréo et mono. Pour la sortie audio, cette carte mère supporte les modes 2-canaux, 4-canaux, 6-canaux et 8-canaux. Veuillez vous référer au tableau en page 3 pour effectuer la bonne connexion. 61 ASRock AM2NF3-VSTA Motherboard Français - ASRock AM2NF3-VSTA | Quick Installation Guide - Page 62
de Windows® sont invités à respecter le tableau suivant relatif au matériel minimal requis. Unité centrale Mémoire Adaptateur VGA Sempron 2800+ 512 Mo Canal simple DX9.0 avec pilote WDDM avec mémoire VGA 128bits (Premium) avec mémoire VGA 64bits (Basic) Français 62 ASRock AM2NF3-VSTA Motherboard - ASRock AM2NF3-VSTA | Quick Installation Guide - Page 63
bloquer le CPU. Le verrouillage du levier dans son encoche latérale est annoncé par un clic. Etape 5. Installez le ventilateur et le radiateur du CPU. Pour une installation correcte, reportez-vous aux manuels du fabricant du ventilateur et du radiateur de CPU. 63 ASRock AM2NF3-VSTA Motherboard Fran - ASRock AM2NF3-VSTA | Quick Installation Guide - Page 64
une paire de modules mémoire dans le DDRII_1 et le DDRII_3, il sera impossible d'activer la Technologie de Mémoire à Canal Double. 4. Il n'est pas permis d'installer de la DDR sur le slot DDRII; la carte mère et les DIMM pourraient être endommagés. Français 64 ASRock AM2NF3-VSTA Motherboard - ASRock AM2NF3-VSTA | Quick Installation Guide - Page 65
Installation d'un module DIMM Ayez bien le soin de débrancher l'alimentation avant d'ajouter ou de retirer des modules DIMM ou les composants du clips de maintien situés aux deux extrémités se ferment complètement et que le module DIMM soit inséré correctement. 65 ASRock AM2NF3-VSTA Motherboard - ASRock AM2NF3-VSTA | Quick Installation Guide - Page 66
PCI et Slot AGP) Il y a 5 slots PCI et 1 slot AGP sur la carte mère AM2NF3-VSTA. Slots PCI: Les slots PCI sont utilisés pour installer des cartes d'extension dotées d'une interface PCI 32 bits. Slot AGP: Le slot AGP est utilisé pour installer une carte graphique. Le slot AGP ASRock utilise un design - ASRock AM2NF3-VSTA | Quick Installation Guide - Page 67
les connecteurs audio des panneaux BIOS à jour. Si vous avez besoin d'effacer la CMOS lorsque vous avez fini de mettre le BIOS à jour, vous devez d'abord initialiser le système, puis le mettre hors tension avant de procéder à l'opération d'effacement de la CMOS. 67 ASRock AM2NF3-VSTA Motherboard - ASRock AM2NF3-VSTA | Quick Installation Guide - Page 68
ître". Veuillez vous reporter aux instructions du fabricant de votre IDE SATA) prennent en charge les câbles SATA pour les périphériques de stockage internes. L'interface SATA actuelle permet des taux transferts de données pouvant aller jusqu'à 1,5 Go/s. Français 68 ASRock AM2NF3-VSTA Motherboard - ASRock AM2NF3-VSTA | Quick Installation Guide - Page 69
module en option d'émission/réception sans fil infrarouge. Connecteurs audio internes Ils vous permettent de gérer des (CD1 br. 4) (CD1: voir p.2 fig. 22) entrées audio à partir de sources CD1 stéréo comme un CD-ROM, DVD-ROM, un tuner TV ou une carte MPEG. 69 ASRock AM2NF3-VSTA Motherboard - ASRock AM2NF3-VSTA | Quick Installation Guide - Page 70
terre. Connecteur pour ventilateur CPU (CPU_FAN1 br. 4) Installation de ventilateur à 3 broches Broches 1-3 connectées Connecteur d'alimentation ATX (ATXPWR1 br. 20) (voir p.2 fig. 27) Veuillez connecter une unité d'alimentation ATX sur ce connecteur. Français 70 ASRock AM2NF3-VSTA Motherboard - ASRock AM2NF3-VSTA | Quick Installation Guide - Page 71
disques de votre châssis. Connectez le câble d'alimentation SATA au disque dur SATA. Connectez l'une des extrémités du câble de données SATA sur le connecteur SATA de la carte mère. Connectez l'autre extrémité du câble de données SATA au disque dur SATA. Français 71 ASRock AM2NF3-VSTA Motherboard - ASRock AM2NF3-VSTA | Quick Installation Guide - Page 72
les pilotes requis. En conséquence, les pilotes que vous installez peuvent fonctionner correctement. Si vous utilisez le système d'exploitation Windows® XP 64-bit et que vous désirez installer les pilotes du CD de support sur votre ordinateur, puisque le pilote SATA fourni par votre vendeur de - ASRock AM2NF3-VSTA | Quick Installation Guide - Page 73
pilote SATA. En outre, vous n'avez pas besoin de modifier les paramètres BIOS. Vous pouvez lancer directement l'installation de Windows® 2000, Windows® XP, Windows® XP 64-bit, Windows® VistaTM, Windows® VistaTM 64-bit directement sur votre système. 2.10 Installation de Windows® 2000 / XP / XP 64-bit - ASRock AM2NF3-VSTA | Quick Installation Guide - Page 74
consulter le document, "Guide to SATA Hard disks Installation and RAID Configuration" sur le CD de Support, à l'emplacement suivant: .. \ Information\Manual\RAID Installation Guide ETAPE 4: Installer le système d'exploitation Windows® 2000 / Windows® XP / Windows® XP 64-bit sur votre système - ASRock AM2NF3-VSTA | Quick Installation Guide - Page 75
BIOS, veuillez consulter le Guide de l'utilisateur (fichier PDF) dans le CD technique. 4. Informations sur le CD de support Cette carte mère supporte divers systèmes d'exploitation Microsoft® Windows®: 2000 / XP / XP 64-bit / VistaTM / VistaTM 64 bits . 75 ASRock AM2NF3-VSTA Motherboard Français - ASRock AM2NF3-VSTA | Quick Installation Guide - Page 76
rapida ASRock AM2NF3-VSTA CD di supporto ASRock AM2NF3-VSTA Un cavo IDE 80-pin Ultra ATA 66/100/133 Un cavo per floppy drive a 1,44 Mb Un cavo dati Serial ATA (SATA) (Opzionale) Un cavo alimentatore HDD Serial ATA (SATA) (Opzionale) Un ASRock 8CH I/O Shield 76 ASRock AM2NF3-VSTA Motherboard - ASRock AM2NF3-VSTA | Quick Installation Guide - Page 77
: COM 1 - 1 x porta parallela: supporto ECP/EPP - 4 x porte USB 2.0 già integrate - 1 x porta RJ-45 - Connettore Audio: cassa laterale / cassa posteriore / cassa centrale / bassi / ingresso linea / cassa frontale / microfono (vedi ATTENZIONE 9) Italiano 77 ASRock AM2NF3-VSTA Motherboard - ASRock AM2NF3-VSTA | Quick Installation Guide - Page 78
- Ventola CPU silenziosa - Voltaggio: +12V, +5V, +3.3V, Vcore Compatibi- - Microsoft® Windows® 2000 / XP / XP 64 bit / VistaTM / VistaTM lità SO 64 bit (vedi ATTENZIONE 11) Certificazioni- FCC, CE, WHQL AVVISO Si prega di prendere atto che la procedura di overclocking implica dei - ASRock AM2NF3-VSTA | Quick Installation Guide - Page 79
canali e 8 canali per l'uscita audio. Controllare la tavola a pagina 3 per eseguire il collegamento appropriato. 10. La Gestione Risorse per USB 2.0 funziona perfettamente con Microsoft® Windows® VistaTM 64-bit / VistaTM / XP 64 bit / XP SP1; SP2/2000 SP4. 79 ASRock AM2NF3-VSTA Motherboard Italiano - ASRock AM2NF3-VSTA | Quick Installation Guide - Page 80
inviare il logo Windows® VistaTM Premium e Basic devono osservare la tabella di seguito sui requisiti hardware minimi. CPU Memoria VGA Sempron 2800+ 512MB ad un canale DX9.0 con driver WDDM Con memoria VGA 128bit (Premium) Con memoria VGA 64bit (Basic) Italiano 80 ASRock AM2NF3-VSTA Motherboard - ASRock AM2NF3-VSTA | Quick Installation Guide - Page 81
sulla linguetta laterale significa che è bloccata. Step 5. Installare la ventola del processore e l'heatsink. Per una corretta installazione, per favore fare riferimento ai manuali di istruzione dei produttori della ventola e dell'heatsink del processore. 81 ASRock AM2NF3-VSTA Motherboard Italiano - ASRock AM2NF3-VSTA | Quick Installation Guide - Page 82
", ad esempio se si installa una coppia di moduli di memoria su DDRII_1 e DDII_3, è impossibile attivare la tecnologia Dual Channel Memory. 4. Non è consentito installare la DDR nello slot DDRII, altrimenti si possono danneggiare questa scheda madre e la DIMM. 82 ASRock AM2NF3-VSTA Motherboard - ASRock AM2NF3-VSTA | Quick Installation Guide - Page 83
Italiano La DIMM può essere montata correttamente soltanto con un orientamento. Se si dovesse installare a forza la DIMM nello slot con un orientamento errato, si causerebbero danni permanenti alla scheda e fino ad installare correttamente la DIMM nella sua sede. 83 ASRock AM2NF3-VSTA Motherboard - ASRock AM2NF3-VSTA | Quick Installation Guide - Page 84
espansione (Slot PCI ed Slot AGP) Sulla scheda madre AM2NF3-VSTA c'è 5 slot PCI ed 1 slot AGP. Slot PCI: Sono utilizzati per installare schede di espansione con Interfaccia PCI a 32-bit. Slot AGP: Lo slot AGP serve all'installazione di schede grafiche. Lo slot AGP ASRock usa uno speciale gancio che - ASRock AM2NF3-VSTA | Quick Installation Guide - Page 85
possono funzionare i connettori audio del pannello frontale e BIOS. Se è necessario cancellare la CMOS una volta completato l'aggiornamento del BIOS, è necessario riavviare prima il sistema, e poi spegnerlo prima di procedere alla cancellazione della CMOS. Italiano 85 ASRock AM2NF3-VSTA Motherboard - ASRock AM2NF3-VSTA | Quick Installation Guide - Page 86
. L'interfaccia SATA attuale permette velocità di trasferimento dati fino a 1.5 Gb/s. Cavi dati Serial ATA (SATA) Entrambe le estremità del cavo (Opzionale) dati SATA possono collegarsi all'hard disk SATA o al connettore SATA sulla scheda madre. 86 ASRock AM2NF3-VSTA Motherboard Italiano - ASRock AM2NF3-VSTA | Quick Installation Guide - Page 87
supporta una wireless opzionale che trasmette e riceve moduli infrarossi. Connettori audio interni (4-pin CD1) (CD1: vedi p.2 item 22) Permettono di ricevere input stereo audio da fonti di CD1 suono come CD-ROM, DVD - ROM,TV tuner, o schede MPEG. Italiano 87 ASRock AM2NF3-VSTA Motherboard - ASRock AM2NF3-VSTA | Quick Installation Guide - Page 88
ventola CPU su questa scheda madre, collegarla ai piedini 1-3. Piedini 1-3 collegati Installazione della ventola a 3 piedini Collettore alimentazione ATX (20-pin ATXPWR1) (vedi p.2 item 27) Collegare la sorgente d'alimentazione ATX a questo collettore. Italiano 88 ASRock AM2NF3-VSTA Motherboard - ASRock AM2NF3-VSTA | Quick Installation Guide - Page 89
una alimentazione con spinotto da 12V ATX a questo SATA NON sono impostati per una configurazione RAID, è detta "collegamento a caldo" l'azione d'inserimento e rimozione dei dischi rigidi SATA mentre il sistema è ancora acceso ed in condizione di funzionamento. 89 ASRock AM2NF3-VSTA Motherboard - ASRock AM2NF3-VSTA | Quick Installation Guide - Page 90
. Fintanto che saremo in possesso del driver più recente, terremo aggiornata la versione sul nostro sito. Visitare il nostro sito per il driver Microsoft® Windows® VistaTM / VistaTM 64-bit e relative informazioni. Sito ASRock http://www.asrock.com 90 ASRock AM2NF3-VSTA Motherboard Italiano - ASRock AM2NF3-VSTA | Quick Installation Guide - Page 91
dischetto driver SATA. Inoltre, non è necessario modificare le impostazioni del BIOS. È possibile iniziare l'installazione di Windows® 2000, Windows® XP, Windows® XP 64 bit, Windows® VistaTM, Windows® VistaTM 64 bit direttamente sul sistema. 2.10 Installazione di Windows® 2000 / XP / XP 64 bit con - ASRock AM2NF3-VSTA | Quick Installation Guide - Page 92
. Il documento "Guide to SATA Hard disks Installation and RAID Configuration" si trova sul CD di supporto, selezionando il percorso seguente: .. \ Information\Manual\RAID Installation Guide 4° PASSO: Installazione di Windows® 2000 / Windows® XP / Windows® XP 64-bit sul sistema. Dopo - ASRock AM2NF3-VSTA | Quick Installation Guide - Page 93
al Manuale dell'Utente (PDF file) contenuto nel cd di supporto. 4. Software di supporto e informazioni su CD Questa scheda madre supporta vari sistemi operativi Microsoft® Windows®: 2000 / XP / XP 64 bit / VistaTM / VistaTM 64-bit. Il CD di supporto a corredo della scheda madre contiene i driver - ASRock AM2NF3-VSTA | Quick Installation Guide - Page 94
tarjetas VGA y CPU soportadas en la página web de ASRock. Website de ASRock http://www.asrock.com 1.1 Contenido de la caja Placa base ASRock AM2NF3-VSTA (Factor forma ATX: 30,5 cm x 20,3 cm, 12,0" x 8,0") Guía de instalación rápida de ASRock AM2NF3-VSTA CD de soporte de ASRock AM2NF3-VSTA Una cinta - ASRock AM2NF3-VSTA | Quick Installation Guide - Page 95
Procesador Chipset Memoria Amplificador Híbrido Ranuras de Expansión Audio LAN Entrada/Salida de Panel Trasero - Factor forma ATX: 30,5 cm x 20,3 cm, 12,0" x 8,0" - Socket de AM2 con soporte para procesador AMD AthlonTM 64FX / 64X2 / 64 y Sempron - Con soporte para tecnología Cool 'n' Quiet™ de AMD - ASRock AM2NF3-VSTA | Quick Installation Guide - Page 96
los ventiladores del procesador y del chasis - Ventilador silencioso para procesador - Monitor de Voltaje: +12V, +5V, +3.3V, Vcore - En conformidad con Microsoft® Windows® 2000 / XP / XP 64 bits / VistaTM / VistaTM 64 bits (vea ATENCIÓN 11) - FCC, CE, WHQL Español 96 ASRock AM2NF3-VSTA Motherboard - ASRock AM2NF3-VSTA | Quick Installation Guide - Page 97
Windows® XP y Windows® VistaTM. Para equipos con Windows® XP 64-bit y Windows® VistaTM 64-bit con CPU de 64-bit, AM2 Boost, es posible que dicha función no se pueda aplicar a aquél. Si lo desea, puede deshabilitar la función para mantener la estabilidad del sistema. 97 ASRock AM2NF3-VSTA Motherboard - ASRock AM2NF3-VSTA | Quick Installation Guide - Page 98
consulte la tabla siguiente para obtener información sobre los requisitos mínimos de hardware. Procesador Memoria VGA Sempron 2800+ 512 MB de un solo canal DX9.0 con controlador WDDM con memoria VGA de 128 bit (Premium) con memoria VGA de 64 bit (Basic) Español 98 ASRock AM2NF3-VSTA Motherboard - ASRock AM2NF3-VSTA | Quick Installation Guide - Page 99
del CPU. Si no puede encajar el CPU, examine su orientación o examine si los pins están ya encorvados. Paso 4. Encierre el zócalo bajando la palanca. Paso 5. Instale el disipador de calor con ventilador del CPU ( consulte la documentación del disipador de calor). 99 ASRock AM2NF3-VSTA Motherboard - ASRock AM2NF3-VSTA | Quick Installation Guide - Page 100
2.2 Instalación de Memoria La placa AM2NF3-VSTA ofrece cuatro ranuras DIMM DDRII de 240 pines, y soporta Tecnología de Memoria de Doble Canal. Para la configuración de ranura DDRII; si lo hace, esta placa base y los módulos DIMM pueden resultar dañados. Español 100 ASRock AM2NF3-VSTA Motherboard - ASRock AM2NF3-VSTA | Quick Installation Guide - Page 101
incorrecta, provocará daños permanentes en la placa base y en la DIMM. Paso 3. Inserte la DIMM con firmeza dentro de la ranura hasta que los clips de sujeción de ambos lados queden completamente introducidos en su sitio y la DIMM se haya asentado apropiadamente. ASRock AM2NF3-VSTA Motherboard 101 - ASRock AM2NF3-VSTA | Quick Installation Guide - Page 102
AGP) La placa madre AM2NF3-VSTA cuenta con 5 ranuras PCI y 1 ranuras AGP. Ranura PCI: Para instalar tarjetas de expansión que tienen 32-bit Interface PCI. Ranura AGP: Para instalar trajeta gráfica. La ranura AGP ASRock 4. Asegure la tarjeta con tornillos. Español 102 ASRock AM2NF3-VSTA Motherboard - ASRock AM2NF3-VSTA | Quick Installation Guide - Page 103
ón: Si los jumpers JR1 y JL1 son cortos, los conectores de audio del panel frontal y los del panel posterior podrán funcionar. Limpiar CMOS BIOS, debe arrancar primero el sistema y, a continuación, apagarlo antes de realizar la acción de borrado de CMOS. Español ASRock AM2NF3-VSTA Motherboard - ASRock AM2NF3-VSTA | Quick Installation Guide - Page 104
de almacenamiento internos. La interfaz SATA actual permite una velocidad de transferencia de 1.5 Gb/s. Cable de datos de serie ATA (SATA) (Opcional) Ambos extremos del cable pueden conectarse al disco duro SATA o la conexión de la placa base. 104 ASRock AM2NF3-VSTA Motherboard Español - ASRock AM2NF3-VSTA | Quick Installation Guide - Page 105
del cable de alimentación SATA a la conexión de audio de fuente sónica como CD-ROM, DVD-ROM, TV tuner, o tarjeta MPEG. Este es una interface para cable de audio de panel frontal que permite conexión y control conveniente de apparatos de Audio. Español ASRock AM2NF3-VSTA Motherboard - ASRock AM2NF3-VSTA | Quick Installation Guide - Page 106
. Español Conector de ATX 12V power (4-pin ATX12V1) (vea p.2, No. 2) Tenga en cuenta que es necesario conectar este conector a una toma de corriente con el enchufe ATX 12V, de modo que proporcione suficiente electricidad. De lo contrario no se podrá encender. 106 ASRock AM2NF3-VSTA Motherboard - ASRock AM2NF3-VSTA | Quick Installation Guide - Page 107
funcionamiento. ¿Qué es la función de cambio en caliente? Si los HDDs SATA están configurados como RAID1 se llama "Cambio en caliente" a la acción de insertar y quitar los HDDs SATA mientras el sistema está conectado y en condiciones de funcionamiento. ASRock AM2NF3-VSTA Motherboard 107 Español - ASRock AM2NF3-VSTA | Quick Installation Guide - Page 108
RAID, no tiene que hacer un disquete de controlador SATA. Además, no necesita cambiar la configuración BIOS. Puede comenzar a instalar Windows® 2000, Windows® XP, Windows® XP 64 bits, Windows® VistaTM, Windows® VistaTM 64 bits en su sistema directamente. 108 ASRock AM2NF3-VSTA Motherboard Español - ASRock AM2NF3-VSTA | Quick Installation Guide - Page 109
en esta placa base bajo el sistema operativo Windows® VistaTM / VistaTM 64-bit. La función RAID sólo podrá ser utilizada en Windows® 2000, XP o XP 64-bit OS. Si desea instalarWindows® 2000, Windows® XP, Windows® XP 64 bits en sus HDDs SATA con funciones RAID, por favor siga los pasos siguientes - ASRock AM2NF3-VSTA | Quick Installation Guide - Page 110
, busque el documento, "Guide to SATA Hard Disks Installation and RAID Configuration" siguiendo la ruta de acceso siguiente en el CD de soporte: .. \ Information\Manual\RAID Installation Guide PASO 4: Instale el sistema operativo Windows® 2000 / Windows® XP / Windows® XP 64 bits en su sistema. Despu - ASRock AM2NF3-VSTA | Quick Installation Guide - Page 111
BIOS, por favor refiérase al Manual del Usuario (archivo PDF) contenido en el CD. 4.Información de Software Support CD Esta placa-base soporta diversos tipos de sistema operativo Windows®: 2000 / XP / XP 64 bits / VistaTM / VistaTM 64 bits la instalación. Español ASRock AM2NF3-VSTA Motherboard 111 - ASRock AM2NF3-VSTA | Quick Installation Guide - Page 112
-
 1
1 -
 2
2 -
 3
3 -
 4
4 -
 5
5 -
 6
6 -
 7
7 -
8
-
9
-
10
-
11
-
12
-
13
-
14
-
15
-
16
-
17
-
18
-
19
-
20
-
21
-
22
-
23
-
24
-
25
-
26
-
27
-
28
-
29
-
30
-
31
-
32
-
33
-
34
-
35
-
36
-
37
-
38
-
39
-
40
-
41
-
42
-
43
-
44
-
45
-
46
-
47
-
48
-
49
-
50
-
51
-
52
-
53
-
54
-
55
-
56
-
57
-
58
-
59
-
60
-
61
-
62
-
63
-
64
-
65
-
66
-
67
-
68
-
69
-
70
-
71
-
72
-
73
-
74
-
75
-
76
-
77
-
78
-
79
-
80
-
81
-
82
-
83
-
84
-
85
-
86
-
87
-
88
-
89
-
90
-
91
-
92
-
93
-
94
-
95
-
96
-
97
-
98
-
99
-
100
-
101
-
102
-
103
-
104
-
105
-
106
-
107
-
108
-
109
-
110
-
111
-
112
 |
 |

1
ASRock
AM2NF3-VSTA
Motherboard
English
English
English
English
English
Copyright Notice:
Copyright Notice:
Copyright Notice:
Copyright Notice:
Copyright Notice:
No part of this installation guide may be reproduced, transcribed, transmitted, or trans-
lated in any language, in any form or by any means, except duplication of documen-
tation by the purchaser for backup purpose, without written consent of ASRock Inc.
Products and corporate names appearing in this guide may or may not be registered
trademarks or copyrights of their respective companies, and are used only for identifica-
tion or explanation and to the owners’ benefit, without intent to infringe.
Disclaimer:
Disclaimer:
Disclaimer:
Disclaimer:
Disclaimer:
Specifications and information contained in this guide are furnished for informational
use only and subject to change without notice, and should not be constructed as a
commitment by ASRock. ASRock assumes no responsibility for any errors or omissions
that may appear in this guide.
With respect to the contents of this guide, ASRock does not provide warranty of any kind,
either expressed or implied, including but not limited to the implied warranties or
conditions of merchantability or fitness for a particular purpose. In no event shall
ASRock, its directors, officers, employees, or agents be liable for any indirect, special,
incidental, or consequential damages (including damages for loss of profits, loss of
business, loss of data, interruption of business and the like), even if ASRock has been
advised of the possibility of such damages arising from any defect or error in the guide
or product.
This device complies with Part 15 of the FCC Rules. Operation is subject to the
following two conditions:
(1)
this device may not cause harmful interference, and
(2)
this device must accept any interference received, including interference that
may cause undesired operation.
Published January 2007
Copyright
©
2007 ASRock INC. All rights reserved.
CALIFORNIA, USA ONLY
The Lithium battery adopted on this motherboard contains Perchlorate, a toxic
substance controlled in Perchlorate Best Management Practices (BMP) regulations
passed by the California Legislature. When you discard the Lithium battery in
California, USA, please follow the related regulations in advance.
“Perchlorate Material-special handling may apply, see
www
.dtsc.ca.gov/hazardouswa
ste/perchlorate”
ASRock Website: http://www.asrock.com