ASRock ConRoe865GV Quick Installation Guide
ASRock ConRoe865GV Manual
 |
View all ASRock ConRoe865GV manuals
Add to My Manuals
Save this manual to your list of manuals |
ASRock ConRoe865GV manual content summary:
- ASRock ConRoe865GV | Quick Installation Guide - Page 1
not cause harmful interference, and (2) this device must accept any interference received, including interference that may cause undesired operation. ASRock Website: http://www.asrock.com Published August 2006 Copyright©2006 ASRock INC. All rights reserved. 1 ASRock ConRoe865GV Motherboard English - ASRock ConRoe865GV | Quick Installation Guide - Page 2
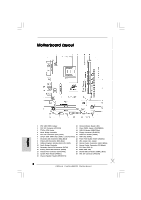
FLOPPY1) 5 CPU Fan Connector (CPU_FAN1) 20 COM Port Header (COM1) 6 184-pin DDR DIMM Slots (DDR1- 2, Dual Channel) 21 AMR Slot (AMR1) 7 Secondary IDE Connector (IDE2, Black) 22 Front Panel Audio Header (AUDIO1) 8 Primary IDE Connector (IDE1, Blue) 23 JR1 Jumper / JL1 Jumper 9 ASRock Graphics - ASRock ConRoe865GV | Quick Installation Guide - Page 3
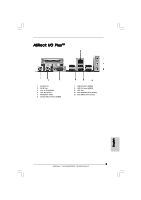
ASRock I/O PlusTM 1 Parallel Port 2 RJ-45 Port 3 Line In (Light Blue) 4 Line Out (Lime) 5 Microphone (Pink) 6 Shared USB 2.0 Ports (USB45) 7 USB 2.0 Ports (USB01) 8 USB 2.0 Ports (USB23) 9 VGA Port 10 PS/2 Keyboard Port (Purple) 11 PS/2 Mouse Port (Green) English 3 ASRock ConRoe865GV Motherboard - ASRock ConRoe865GV | Quick Installation Guide - Page 4
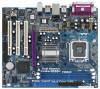
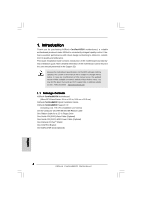
latest VGA cards and CPU support lists on ASRock website as well. ASRock website http://www.asrock.com 1.1 Package Contents ASRock ConRoe865GV Motherboard (Micro ATX Form Factor: 9.6-in x 8.0-in, 24.4 cm x 20.3 cm) ASRock ConRoe865GV Quick Installation Guide ASRock ConRoe865GV Support CD (including - ASRock ConRoe865GV | Quick Installation Guide - Page 5
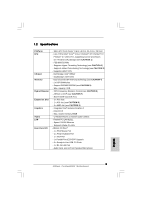
® D, supporting Conroe processors (in 775-land LGA package) (see CAUTION 1) - FSB 800/533 MHz - Supports Hyper-Threading Technology (see CAUTION 2) - Supports Untied Overclocking Technology (see CAUTION 3) - Supports EM64T CPU - Northbridge: Intel® 865GV - Southbridge: Intel® ICH5 - Dual Channel DDR - ASRock ConRoe865GV | Quick Installation Guide - Page 6
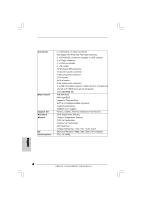
(Trial Version) - CPU Temperature Sensing - Chassis Temperature Sensing - CPU Fan Tachometer - Chassis Fan Tachometer - CPU Quiet Fan - Voltage Monitoring: +12V, +5V, +3.3V, Vcore - Microsoft® Windows® 98SE / ME / 2000 / XP compliant - FCC, CE, WHQL English 6 ASRock ConRoe865GV Motherboard - ASRock ConRoe865GV | Quick Installation Guide - Page 7
to install any PCI card in "PCI3" slot if an AMR card has already been installed in the AMR slot. 10. Power Management for USB 2.0 works fine under Microsoft® Windows® XP SP1 or SP2 / 2000 SP4. It may not work properly under Microsoft® Windows® 98 / ME. English 7 ASRock ConRoe865GV Motherboard - ASRock ConRoe865GV | Quick Installation Guide - Page 8
1.3 Supported AGP VGA Cards List (for Windows® 2000/Windows® XP) I. AGP 4X Graphics Chip Vendor NVIDIA Model Name ASUS V8170 Ennyah G2 MX400 Chipset Name GeForce MX440SE GeForce FX 5700 NVIDIA GeForce 5700 FX5900 FX 5700 LE 128MB NVIDIA GeForce 7800GS English 8 ASRock ConRoe865GV Motherboard - ASRock ConRoe865GV | Quick Installation Guide - Page 9
Radeon 9250 * ATI 9600/9550 series and all Matrox series VGA cards are NOT supported with AGI. For the latest updates of the supported AGP VGA cards list, please visit ASRock website for details. ASRock website: http://www.asrock.com/support/index.htm English 9 ASRock ConRoe865GV Motherboard - ASRock ConRoe865GV | Quick Installation Guide - Page 10
you insert the 775-Pin CPU into the socket, please check if the CPU surface is unclean or if there is any bent pin on the socket. Do not force to insert the CPU into the socket if above situation is found. Otherwise, the CPU will be seriously damaged. 10 ASRock ConRoe865GV Motherboard English - ASRock ConRoe865GV | Quick Installation Guide - Page 11
keys. Step 3. Remove PnP Cap (Pick and Place Cap): Use your left hand index finger and thumb to support the load plate edge, engage PnP cap with right hand thumb and peel the cap from the socket while pressing on center of PnP cap to assist in removal. 11 ASRock ConRoe865GV Motherboard English - ASRock ConRoe865GV | Quick Installation Guide - Page 12
load plate, engage the load lever. Step 4-3. Secure load lever with load plate tab under retention tab of load lever. 2.2 Installation of CPU Fan and Heatsink For proper installation, please kindly refer to the instruction manuals of your CPU fan and heatsink. Below is an example to illustrate the - ASRock ConRoe865GV | Quick Installation Guide - Page 13
ConRoe865GV motherboard provides two 184-pin DDR (Double Data Rate) DIMM slots, and supports Dual Channel Memory Technology. For dual channel configuration, you always need to install Dual Channel Memory Technology. Otherwise, it will operate at single channel mode. If you install the motherboard and - ASRock ConRoe865GV | Quick Installation Guide - Page 14
AGP VGA card and its driver. For the detailed instruction, please refer to the documents in the Support CD, "AGI Slot Installation Guide (for Windows 2000)" and "AGI Slot Installation Guide (for Windows XP)", which are located in the folder at the following path: ..\ Easy Dual Monitor Installing an - ASRock ConRoe865GV | Quick Installation Guide - Page 15
ASRock patented AGI8X Technology, this motherboard supports Easy Dual Monitor upgrade. With the internal onboard VGA and the external add-on AGP VGA card, you can easily enjoy the benefits of Dual Monitor feature. For the detailed instruction panel audio connectors can ASRock ConRoe865GV Motherboard - ASRock ConRoe865GV | Quick Installation Guide - Page 16
on this motherboard, please set the IDE device as "Master". Please refer to the instruction of your IDE 11) SATA2 SATA1 These two Serial ATA (SATA) connectors support SATA data cables for internal storage devices. The current SATA interface motherboard. 16 ASRock ConRoe865GV Motherboard English - ASRock ConRoe865GV | Quick Installation Guide - Page 17
input from sound sources such as a CD-ROM, DVD-ROM, TV tuner card, or MPEG card. Front Panel Audio Header (8-pin AUDIO1) (see p.2 No. 22) This is an interface for front panel audio cable that allows convenient connection and control of audio devices. English 17 ASRock ConRoe865GV Motherboard - ASRock ConRoe865GV | Quick Installation Guide - Page 18
. 13) CPU Fan Connector Installation ATX Power Connector (20-pin ATXPWR1) (see p.2 No. 29) Please connect an ATX power supply to this connector. COM Port Header (9-pin COM1) (see p.2 No. 20) This COM port header is used to support a COM port module. English 18 ASRock ConRoe865GV Motherboard - ASRock ConRoe865GV | Quick Installation Guide - Page 19
OnBoard IDE Operate Mode option in BIOS setup is correct according to the condition of your system. For the configuration details, please refer to the instruction on page 31 of "User Manual" in the support CD. 2.9 Driver Installation Guide To install the drivers to your system, please insert the - ASRock ConRoe865GV | Quick Installation Guide - Page 20
the BIOS Setup Utility, please refer to the User Manual (PDF file) contained in the Support CD. 4. Software Support CD information This motherboard supports various Microsoft® Windows® operating systems: 98 SE/ ME / 2000 / XP. The Support CD that came with the motherboard contains necessary drivers - ASRock ConRoe865GV | Quick Installation Guide - Page 21
21 ASRock ConRoe865GV Motherboard - ASRock ConRoe865GV | Quick Installation Guide - Page 22
® ® ® ® ® ® ® ® 22 ASRock ConRoe865GV Motherboard - ASRock ConRoe865GV | Quick Installation Guide - Page 23
® ® 23 ASRock ConRoe865GV Motherboard - ASRock ConRoe865GV | Quick Installation Guide - Page 24
, " " ® ® "" 24 ASRock ConRoe865GV Motherboard - ASRock ConRoe865GV | Quick Installation Guide - Page 25
® ® 25 ASRock ConRoe865GV Motherboard - ASRock ConRoe865GV | Quick Installation Guide - Page 26
26 ASRock ConRoe865GV Motherboard - ASRock ConRoe865GV | Quick Installation Guide - Page 27
27 ASRock ConRoe865GV Motherboard - ASRock ConRoe865GV | Quick Installation Guide - Page 28
28 ASRock ConRoe865GV Motherboard - ASRock ConRoe865GV | Quick Installation Guide - Page 29
29 ASRock ConRoe865GV Motherboard - ASRock ConRoe865GV | Quick Installation Guide - Page 30
"" "" " " 30 ASRock ConRoe865GV Motherboard - ASRock ConRoe865GV | Quick Installation Guide - Page 31
31 ASRock ConRoe865GV Motherboard - ASRock ConRoe865GV | Quick Installation Guide - Page 32
" " SATA2 SATA1 32 ASRock ConRoe865GV Motherboard - ASRock ConRoe865GV | Quick Installation Guide - Page 33
AUX1 CD1 33 ASRock ConRoe865GV Motherboard - ASRock ConRoe865GV | Quick Installation Guide - Page 34
1 2 3 4 34 ASRock ConRoe865GV Motherboard - ASRock ConRoe865GV | Quick Installation Guide - Page 35
35 ASRock ConRoe865GV Motherboard - ASRock ConRoe865GV | Quick Installation Guide - Page 36
® ® "LGA 775 CPU Installation Live Demo" ..\ Live Demo \ LGA 775 CPU Installation \ LGA775INST_SChinese.DAT 36 ASRock ConRoe865GV Motherboard - ASRock ConRoe865GV | Quick Installation Guide - Page 37
der ASRock-Website aufgelistet. ASRock-Website: http://www.asrock.com 1.1 Kartoninhalt ASRock ConRoe865GV Motherboard (Micro ATX-Formfaktor: 24.4 cm x 20.3 cm; 9.6 Zoll x 8.0 Zoll) ASRock ConRoe865GV Schnellinstallationsanleitung ASRock ConRoe865GV Support-CD (einschl. LGA 775 CPU Installation Live - ASRock ConRoe865GV | Quick Installation Guide - Page 38
/100 Ethernet - Unterstützt Wake-On-LAN ASRock I/O PlusTM - 1 x PS/2 Mouse Port - 1 x PS/2 Keyboard Port - 1 x VGA Port - 1 x Parallel Port (ECP/EPP Support) - 6 x Ready-to-Use USB 2.0 Ports - 1 x RJ-45 Port - Audioanschlüsse: Line In / Line Out / Mikrofon 38 ASRock ConRoe865GV Motherboard Deutsch - ASRock ConRoe865GV | Quick Installation Guide - Page 39
- Drehzahlmessung für CPU-Lüfter - Drehzahlmessung für Gehäuselüfter - CPU-Lüftergeräuschdämpfung - Spannungsüberwachung: +12V, +5V, +3.3V, Vcore Betriebssysteme - Unterstützt Microsoft® Windows® 98SE / ME / 2000 / XP Zertifizierungen - FCC, CE, WHQL Deutsch 39 ASRock ConRoe865GV Motherboard - ASRock ConRoe865GV | Quick Installation Guide - Page 40
, wenn bereits eine AMR- Karte im AMR-Steckplatz installiert ist. 10. Das Power Management für USB 2.0 arbeitet unter Microsoft® Windows® XP SP1 oder SP2/2000 SP4 einwandfrei. Unter Microsoft® Windows® 98/ ME könnte es dagegen zu Störungen kommen. Deutsch 40 ASRock ConRoe865GV Motherboard - ASRock ConRoe865GV | Quick Installation Guide - Page 41
) 775-Pin Sockel Übersicht Bevor Sie die 775-Pin CPU in den Sockel sitzen, prüfen Sie bitte, ob die CPU-Oberfläche sauber ist und keine der Kontakte verbogen sind. Setzen Sie die CPU nicht mit Gewalt in den Sockel, dies kann die CPU schwer beschädigen. Deutsch 41 ASRock ConRoe865GV Motherboard - ASRock ConRoe865GV | Quick Installation Guide - Page 42
775-Pin Sockel 775-Pin CPU Um die CPU ordnungsgemäß einsetzen zu können, richten Sie die zwei Orientierungskerben der CPU mit den beiden Markierungen des Sockels aus. Schritt 2-3. Drücken Sie die CPU vorsichtig in vertikaler Richtung in den Sockel. 42 ASRock ConRoe865GV Motherboard - ASRock ConRoe865GV | Quick Installation Guide - Page 43
Schritt 2-4. Prüfen Sie, dass die CPU ordnungsgemäß im Sockel sitzt und die Orientierungskerben einwandfrei in den entsprechenden Auskerbungen sitzen. en Sie den Ladehebel. Schritt 4-3. Sichern Sie Ladehebel und Ladeplatte mithilfe des Hebelverschlusses. 43 ASRock ConRoe865GV Motherboard Deutsch - ASRock ConRoe865GV | Quick Installation Guide - Page 44
ordnungsgemäß am Motherboard befestigt. Schritt 5. Schließen Sie den Lüfter an den CPULüfteranschluss des Motherboards. Schritt 6. Befestigen Sie überschüssiges Kabel mit Band, um eine Störung des Lüfters oder Kontakt mit anderen Teilen zu vermeiden. Deutsch 44 ASRock ConRoe865GV Motherboard - ASRock ConRoe865GV | Quick Installation Guide - Page 45
2.3 Installation der Speichermodule (DIMM) Das ConRoe865GV Motherboard bietet zwei 184polige DDR (Double Data Rate) DIMM-Steckplätze und unterstützt Zweikanal-Speichertechnologie. Es mü Enden des Moduls einschnappen und das DIMM-Modul fest an Ort und Stelle sitzt. 45 ASRock ConRoe865GV Motherboard - ASRock ConRoe865GV | Quick Installation Guide - Page 46
[ASRock Graphics Interface] Steckplatz ist so ausgelegt, dass nur kompatible AGP-Grafikkarten unterstützt werden. Informationen über kompatible AGP VGA-Karten finden Sie in der "Supported AGP VGA Cards List" (Liste unterstützter AGP VGAKarten) auf den Seiten 8 und 9. (Nur Englisch) Zur Installation - ASRock ConRoe865GV | Quick Installation Guide - Page 47
Befestigen Sie die Karte mit der Schraube aus Schritt 2. 2.5 "Easy Dual Monitor" Aufgrund der ASRock-patentierten AGI8X-Technologie unterstützt dieses Motherboard einen mühelosen Dual-Monitor-Upgrade. Mit dem intern integrierten VGA und der externen AGP-Grafikzusatzkarte können Sie die Vorteile der - ASRock ConRoe865GV | Quick Installation Guide - Page 48
Default-Werte wiederherzustellen, schalten Sie den Computer aus, ziehen Sie den Netzstecker und überbrücken Sie 2-pin von CLRCMOS0 mithilfe des Jumpers für 5 Sekunden. Deutsch 48 ASRock ConRoe865GV Motherboard - ASRock ConRoe865GV | Quick Installation Guide - Page 49
Header und Anschlüsse. Wenn Sie Jumperkappen auf Header und Anschlüsse setzen, wird das Motherboard unreparierbar beschädigt! Anschluss für das Floppy-Laufwerk (33-Pin FLOPPY1) (siehe S.2 - SATA-Festplatte oder dem SATA-Anschluss am Mainboard verbinden. 49 ASRock ConRoe865GV Motherboard Deutsch - ASRock ConRoe865GV | Quick Installation Guide - Page 50
. Interne Audio-Anschlüsse (4-Pin CD1, 4-Pin AUX1) (CD1: siehe S.2 - No. 25) (AUX1: siehe S.2 - No. 24) AUX1 CD1 Diese ermöglichen Ihnen Stereo-Signalquellen, wie z. B. CD-ROM, DVD-ROM, TV-Tuner oder MPEG-Karten mit Ihrem System zu verbinden. Deutsch 50 ASRock ConRoe865GV Motherboard - ASRock ConRoe865GV | Quick Installation Guide - Page 51
Audio Motherboards anschließen möchten, verbinden Sie ihn bitte mit den Pins 1 - 3. Pins 1-3 anschließen Lüfter mit dreipoligem Anschluss installieren ATX-Netz-Header (20-pin ATXPWR1) (siehe S.2 - No. 29) Verbinden Sie die ATXStromversorgung mit diesem Header. 51 ASRock ConRoe865GV Motherboard - ASRock ConRoe865GV | Quick Installation Guide - Page 52
-Anschlussmodul zu unterstützen. ATX 12V Anschluss Bitte beachten Sie, dass Sie ein Netzteil mit ATX 12V Stecker mit diesem Anschluss verbinden müssen, um die CPU mit Strom versorgen zu können. Ansonsten kann das System nicht eingeschaltet werden. Deutsch 52 ASRock ConRoe865GV Motherboard - ASRock ConRoe865GV | Quick Installation Guide - Page 53
die tatsächliche CPU Host-Frequenz beim folgenden Eintrag angezeigt. Der CPU-FSB wird dadurch beim Übertakten freigegeben, allerdings befindet sich der PCI-Bus in einem fixierten Modus, so dass der FSB in einer stabileren Übertaktungsumgebung arbeiten kann. 53 ASRock ConRoe865GV Motherboard Deutsch - ASRock ConRoe865GV | Quick Installation Guide - Page 54
äße Handhabung zu verringern. Öffnen Sie die Datei mit Microsoft Media Player, um das Live-Demo anzusehen. Sie finden das Live-Demo auf der Motherboard Support-CD in folgendem Verzeichnis: ..\ Live Demo \ LGA 775 CPU Installation \ LGA775INST_English.DAT 54 ASRock ConRoe865GV Motherboard Deutsch - ASRock ConRoe865GV | Quick Installation Guide - Page 55
des cartes VGA et CPU également sur le site Web ASRock. Site web ASRock, http://www.asrock.com 1.1 Contenu du paquet Carte mère ASRock ConRoe865GV (Facteur de forme Micro ATX : 9.6 pouces x 8.0 pouces, 24.4 cm x 20.3 cm) Guide d'installation rapide ASRock ConRoe865GV CD de soutien ASRock ConRoe865GV - ASRock ConRoe865GV | Quick Installation Guide - Page 56
C-Media 9761A 5.1 canaux audio - Realtek PCI LAN 8101L - Vitesse: 10/100 Ethernet - Support du Wake-On-LAN ASRock I/O PlusTM - 1 x port souris PS/2 - 1 x port clavier PS/2 - 1 x port VGA - 1 x port parallèle: Support ECP/EPP - 6 x ports USB 2.0 par défaut Français 56 ASRock ConRoe865GV Motherboard - ASRock ConRoe865GV | Quick Installation Guide - Page 57
de température de la carte mère - Tachéomètre ventilateur CPU - Tachéomètre ventilateur châssis - Ventilateur silencieux d'unité centrale - Monitoring de la tension: +12V, +5V, +3.3V, Vcore - Microsoft® Windows® 98SE / ME / 2000 / XP - FCC, CE, WHQL Français 57 ASRock ConRoe865GV Motherboard - ASRock ConRoe865GV | Quick Installation Guide - Page 58
installée occupera la même position de connexion externe que la carte PCI installée dans l'emplacement "PCI3", vous ne serez en mesure d'installer aucune carte PCI dans l'emplacement "PCI3" si une carte AMR a déjà été installée dans l'emplacement AMR. Français 58 ASRock ConRoe865GV Motherboard - ASRock ConRoe865GV | Quick Installation Guide - Page 59
de composant, placez-le sur un support antistatique ou dans son sachet d'origine. 5. Lorsque vous placez les vis dans les orifices pour vis pour fixer la carte mère sur le châssis, ne serrez pas trop les vis ! Vous risquez sinon d'endommager la carte mère. 59 ASRock ConRoe865GV Motherboard Français - ASRock ConRoe865GV | Quick Installation Guide - Page 60
2.1 Installation du CPU Pour l'installation du processeur Intel 775 (Plaque de chargement) broches, veuillez suivre la procédure ci-dessous. (Barrette de 2-1. Tenez le processeur par ses bords là où se trouvent des lignes noires Ligne noire Ligne noire Français 60 ASRock ConRoe865GV Motherboard - ASRock ConRoe865GV | Quick Installation Guide - Page 61
le processeur est bien installé dans le socle service après vente. Français Etape 4. Refermez le socle : Etape 4-1. Faites pivoter la plaque de chargement sur l'IHS. Etape 4-2. Tout en appuyant doucement sur la plaque de chargement, engagez le levier de chargement. 61 ASRock ConRoe865GV Motherboard - ASRock ConRoe865GV | Quick Installation Guide - Page 62
de chargement. 2.2 Installation du ventilateur du processeur et dissipateur thermique Pour une installation correcte, veuillez vous reporter aux manuels d'instructions de votre ventilateur le connecteur pour ventilateur de processeur sur la carte mère. 62 ASRock ConRoe865GV Motherboard Français - ASRock ConRoe865GV | Quick Installation Guide - Page 63
. 2.3 Installation des modules mémoire (DIMM) La carte mère ConRoe865GV possède deux emplacements DIMM DDR (Double Débit de données) 184 broches, et prend en charge la technologie Dual Channel Memory. encoches du module DIMM aux trous du connecteur. Français 63 ASRock ConRoe865GV Motherboard - ASRock ConRoe865GV | Quick Installation Guide - Page 64
détaillées, veuillez vous référer aux documents contenus sur le CD de support, "Guide d'Installation du Slot AGI (pour Windows 2000) " et "Guide d'Installation du Slot AGI (pour Windows XP) ", qui se trouvent dans le dossier suivant : ..\ Easy Dual Monitor 64 ASRock ConRoe865GV Motherboard Français - ASRock ConRoe865GV | Quick Installation Guide - Page 65
installation ASRock, cette carte mère prend en charge la mise à niveau Easy Dual Monitor. Avec la carte VGA interne sur carte et la carte VGA AGP complémentaire externe, vous pouvez facilement profiter de la fonction Dual Monitor (Double moniteur). Pour les instructions ASRock ConRoe865GV Motherboard - ASRock ConRoe865GV | Quick Installation Guide - Page 66
(voir p.2 No. 23) Note: Si les cavaliers JR1 et JL1 sont en court-circuit, les connecteurs audio des panneaux avant et arrière peuvent fonctionner. Effacer la CMOS (CLRCMOS0) (voir p.2 No. 17) le retirer le cavalier avant après avoir restauré le CMOS. Français 66 ASRock ConRoe865GV Motherboard - ASRock ConRoe865GV | Quick Installation Guide - Page 67
carte mère, veuillez configurer le périphérique IDE comme "Maître". Veuillez vous reporter aux instructions du fabricant de votre IDE périphérique pour les détails. En outre, pour optimiser la taux transferts de données pouvant aller jusqu'à 1,5 Gb/s. Français 67 ASRock ConRoe865GV Motherboard - ASRock ConRoe865GV | Quick Installation Guide - Page 68
), les ports USB 4 et 5 sur panneau arrière E/S ne pourront pas fonctionner. En-tête du module infrarouge (IR1 br.5) (voir p.2 No. 16) Cet en-tête supporte un module infrarouge optionnel de transfert et de réception sans fil. Français 68 ASRock ConRoe865GV Motherboard - ASRock ConRoe865GV | Quick Installation Guide - Page 69
de vitesse du ventilateur. Si vous prévoyez de connecter le ventilateur de CPU à 3 broches au connecteur du ventilateur de CPU sur cette carte mère, veuillez le connecter aux broches 1-3. Installation de ventilateur à 3 broches Broches 1-3 connectées 69 ASRock ConRoe865GV Motherboard Français - ASRock ConRoe865GV | Quick Installation Guide - Page 70
connecteur afin qu'elle puisse alimenter le Vcore du processeur. Faute de quoi, il ne sera pas possible de mettre sous tension. Français 70 ASRock ConRoe865GV Motherboard - ASRock ConRoe865GV | Quick Installation Guide - Page 71
BIOS en fonction de l'état de votre système. Pour les détails de la configuration, veuillez vous reporter aux instructions à la page 31 du "Manuel de l'utilisateur" sur le CD d'assistance. 2.9 Guide d'installation des pilotes Pour installer plus stable. Français 71 ASRock ConRoe865GV Motherboard - ASRock ConRoe865GV | Quick Installation Guide - Page 72
lire le fichier. Vous trouverez cette Démo vidéo dans le CD d'assistance de la carte mère sur le chemin d'accès suivant : ..\ Live Demo \ LGA 775 CPU Installation \ LGA775INST_English.DAT 72 ASRock ConRoe865GV Motherboard Français - ASRock ConRoe865GV | Quick Installation Guide - Page 73
aggiornata sarà disponibile sul sito di ASRock senza altro avviso. Sul sito ASRock si possono anche trovare le più recenti schede VGA e gli elenchi di CPU supportate. ASRock website http://www.asrock.com 1.1 Contenuto della confezione Scheda madre ASRock ConRoe865GV (Micro ATX Form Factor: 9.6-in - ASRock ConRoe865GV | Quick Installation Guide - Page 74
ASRock I/O PlusTM posteriore I/O - 1 x porta PS/2 per mouse - 1 x porta PS/2 per tastiera - 1 x Porta VGA - 1 x Porta parallela: supporto ECP/EPP - 6 x porte USB 2.0 già integrate - 1 x Porta RJ-45 - Audio Jack: Line In / Line Out / Microfono Italiano 74 ASRock ConRoe865GV Motherboard - ASRock ConRoe865GV | Quick Installation Guide - Page 75
à per la ventola del processore - Indicatore di velocità per la ventola di raffreddamento - Ventola CPU silenziosa - Voltaggio: +12V, +5V, +3.3V, Vcore Compatibi- - Microsoft® Windows® 98SE / ME / 2000 / XP lità SO Certificazioni- FCC, CE, WHQL Italiano 75 ASRock ConRoe865GV Motherboard - ASRock ConRoe865GV | Quick Installation Guide - Page 76
"PCI3" se è già stata installata una scheda AMR nell'alloggiamento AMR. 10. La Gestione Risorse per USB 2.0 funziona perfettamente con Microsoft® Windows® XP SP1; SP2/2000 SP4. Potrebbe dare qualche problema con Microsoft® Windows® 98/ME. Italiano 76 ASRock ConRoe865GV Motherboard - ASRock ConRoe865GV | Quick Installation Guide - Page 77
componente. 5. Nell'usare i giraviti per fissare la scheda madre al telaio non serrare eccessivamente le viti! Altrimenti si rischia di danneggiare la scheda madre. 77 ASRock ConRoe865GV Motherboard Italiano - ASRock ConRoe865GV | Quick Installation Guide - Page 78
135 gradi la leva di carico per aprirla completamente. Fase 1-3. Ruotare di circa 100 gradi la piastra di carico per aprirla completamente. Fase 2. Inserire la CPU 775-Pin: Fase 2-1. Tenere la CPU dai bordi segnati con linee nere. Linea nera Linea nera Italiano 78 ASRock ConRoe865GV Motherboard - ASRock ConRoe865GV | Quick Installation Guide - Page 79
. Pin1 Dente di orientamento Pin1 Dente di Tacca di allineamento orientamento Tacca di allineamento CPU da 775-Pin Socket da 775-Pin Per il corretto inserimento, verificare di far combaciare di carico mentre si preme leggermente sulla piastra di carico. 79 ASRock ConRoe865GV Motherboard - ASRock ConRoe865GV | Quick Installation Guide - Page 80
i cavi della ventola sono orientati sul lato più vicino al connettore della ventola della CPU presente sulla scheda madre (CPU_FAN1, si veda pagina 2, No. 5). Allineare i fastener della ventola al connettore ventola della CPU sulla scheda madre. 80 ASRock ConRoe865GV Motherboard Italiano - ASRock ConRoe865GV | Quick Installation Guide - Page 81
DIMM) La motherboard ConRoe865GV dispone di due slot DIMM DDR (Double Data Rate) a 184 pin e supporta la tecnologia Dual Channel Memory. Per attivare la configurazione Dual Channel Memory bisogna si causerebbero danni permanenti alla scheda madre e alla DIMM stessa. 81 ASRock ConRoe865GV Motherboard - ASRock ConRoe865GV | Quick Installation Guide - Page 82
Slot Installation Guide (for Windows 2000)" (Installazione alloggiamento AGI per Windows 2000) e "AGI Slot Installation Guide (for Windows XP)" (Installazione alloggiamento AGI per Windows XP), che si trovano sul seguente percorso: ..\ Easy Dual Monitor Italiano 82 ASRock ConRoe865GV Motherboard - ASRock ConRoe865GV | Quick Installation Guide - Page 83
Dual Monitor" Grazie alla tecnologia brevettata AGI8X ASRock, questa scheda madre supporta l'aggiornamento Easy Dual Monitor (doppio monitor); e grazie alla scheda integrata VGA ed alla scheda aggiuntiva esterna AGP VGA corrente in standby sarà maggiore. Italiano 83 ASRock ConRoe865GV Motherboard - ASRock ConRoe865GV | Quick Installation Guide - Page 84
vedi p.2 Nr. 23) Nota: Se i jumper JR1 e JL1 sono in corto, possono funzionare i connettori audio del pannello frontale e del pannello posteriore. Resettare la CMOS (CLRCMOS0) (vedi p.2 Nr. 17) jumper poi collegare il jumper sul CLRCMOS0 per 5 secondi. Italiano 84 ASRock ConRoe865GV Motherboard - ASRock ConRoe865GV | Quick Installation Guide - Page 85
di immagazzinamento interni. ATA (SATA) supportano cavi SATA per dispositivi di memoria interni. L'interfaccia SATA attuale permette velocità di trasferimento dati fino a 1.5 Gb/s. Italiano 85 ASRock ConRoe865GV Motherboard - ASRock ConRoe865GV | Quick Installation Guide - Page 86
funzionare. Collettore modulo infrarossi (5-pin IR1) (vedi p.2 Nr. 16) Questo collettore supporta moduli ad infrarossi optional per la trasmissione e la ricezione senza fili. Italiano 86 ASRock ConRoe865GV Motherboard - ASRock ConRoe865GV | Quick Installation Guide - Page 87
pannello audio. Che consente connessione facile e controllo dei dispositivi audio. Collettore CPU a 3 piedini al connettore della ventola CPU su questa scheda madre, collegarla ai piedini 1-3. Piedini 1-3 collegati Installazione della ventola a 3 piedini Italiano 87 ASRock ConRoe865GV Motherboard - ASRock ConRoe865GV | Quick Installation Guide - Page 88
COM è utilizzato per supportare il modulo porta COM. È necessario collegare a questo un'alimentazione con spinotto ATX 12V in modo che possa alimentare il Vcore della CPU. In caso contrario potrebbe venire a mancare l'alimentazione. Italiano 88 ASRock ConRoe865GV Motherboard - ASRock ConRoe865GV | Quick Installation Guide - Page 89
BIOS su [Auto] per far apparire la frequenza CPU attuale nella seguente voce. Quindi, FSB della CPU è svincolato durante l'overclocking, ma il bus PCI si trova in modo fisso affinché FSB possa funzionare in un ambiente di overclocking più stabile. 89 ASRock ConRoe865GV Motherboard Italiano - ASRock ConRoe865GV | Quick Installation Guide - Page 90
BIOS. 4. Software di supporto e informazioni su CD Questa scheda madre supporta vari sistemi operativi Microsoft® Windows®: 98 SE / ME / 2000 / XP. Il CD di supporto a corredo della scheda madre contiene i driver CPU Installation \ LGA775INST_English.DAT 90 ASRock ConRoe865GV Motherboard Italiano - ASRock ConRoe865GV | Quick Installation Guide - Page 91
manual, la versión actualizada estará disponible en el website de ASRock sin previo aviso. También encontrará las listas de las últimas tarjetas VGA y CPU soportadas en la página web de ASRock. Website de ASRock http://www.asrock.com 1.1 Contenido de la caja Placa base ASRock ConRoe865GV (Factor - ASRock ConRoe865GV | Quick Installation Guide - Page 92
- Soporta Wake-On-LAN ASRock I/O PlusTM - 1 x puerto de ratón PS/2 - 1 x puerto de teclado PS/2 - 1 x Puerto VGA - 1 x Puerto paralelo: soporta ECP/EPP - 6 x puertos USB 2.0 predeterminados - 1 x Puerto RJ-45 - Audio Jack: Line In / Line Out / Micrófono Español 92 ASRock ConRoe865GV Motherboard - ASRock ConRoe865GV | Quick Installation Guide - Page 93
procesador - Taquímetros de los ventiladores del procesador y del chasis - Ventilador silencioso para procesador - Monitor de Voltaje: +12V, +5V, +3.3V, Vcore - En conformidad con Microsoft® Windows® 98SE / ME / 2000 / XP - FCC, CE, WHQL Español 93 ASRock ConRoe865GV Motherboard - ASRock ConRoe865GV | Quick Installation Guide - Page 94
en la ranura "PCI3" si ya se ha instalado una tarjeta AMR en la ranura AMR. 10. Power Management para USB 2.0 funciona bien bajo Microsoft® Windows® XP SP1; SP2/2000 SP4. Es posible que no funcione propiamente bajo Microsoft® Windows® 98/ME. Español 94 ASRock ConRoe865GV Motherboard - ASRock ConRoe865GV | Quick Installation Guide - Page 95
de 775 agujas en el socket, compruebe que la superficie de la CPU se encuentra limpia y no hay ninguna aguja torcida en el socket. No introduzca la CPU en el socket por la fuerza si se produce la situación anterior. Si lo hace, puede producir daños graves en la CPU. 95 ASRock ConRoe865GV Motherboard - ASRock ConRoe865GV | Quick Installation Guide - Page 96
de la CPU coinciden con las teclas de alineación del socket. Step 2-3. Coloque con cuidado la CPU en el socket con un movimiento totalmente vertical. Step 2-4. Compruebe que la CPU se encuentra en el socket y la orientación coincide con la indicada por las muescas. 96 ASRock ConRoe865GV Motherboard - ASRock ConRoe865GV | Quick Installation Guide - Page 97
la CPU. A continuación se ofrece un ejemplo para ilustrar la instalación del disipador para la CPU de 775 agujas. Paso 1. Aplique el material termal de interfaz en el centro del IHS de la superficie del socket. (Aplique el material termal de interfaz) Español 97 ASRock ConRoe865GV Motherboard - ASRock ConRoe865GV | Quick Installation Guide - Page 98
conector del ventilador de la CPU en la placa madre ( CPU en la placa madre. Paso 6. Fije el cable que sobre con un lazo para asegurarse de que el cable no interfiere en el funcionamiento del ventilador y tampoco entra en contacto con otros componentes. Español 98 ASRock ConRoe865GV Motherboard - ASRock ConRoe865GV | Quick Installation Guide - Page 99
módulos de memoria que no sean idénticos, será imposible activar la Tecnología de memoria de canal dual. Instalación de una DIMM Asegúrese de desconectar la fuente de alimentación antes de añadir o retirar sitio y la DIMM se haya asentado apropiadamente. 99 ASRock ConRoe865GV Motherboard Español - ASRock ConRoe865GV | Quick Installation Guide - Page 100
mardres ConRoe865GV. Ranuras PCI: Para instalar tarjetas de expansión que tienen 32-bit Interface PCI VGA en placa. Si el controlador VGA en Windows 2000)" y "Guía de Instalación de Ranura AGI (para Windows XP)", que se encuentra en la carpeta siguiente: ..\ Easy Dual ASRock ConRoe865GV Motherboard - ASRock ConRoe865GV | Quick Installation Guide - Page 101
VGA en placa interna y la tarjeta VGA AGP externa, puede disfrutar fácilmente de los beneficios de la función Dual Monitor. Para más instrucciones, consulte el documento en la siguiente ruta del CD de Soporte: ..\ Easy Dual los conectores de audio del panel frontal ASRock ConRoe865GV Motherboard 101 - ASRock ConRoe865GV | Quick Installation Guide - Page 102
/s. Cable de datos de serie ATA (SATA) (Opcional) Ambos extremos del cable pueden conectarse al disco duro SATA o la conexión de la placa base. 102 ASRock ConRoe865GV Motherboard Español - ASRock ConRoe865GV | Quick Installation Guide - Page 103
(8-pin AUDIO1) (vea p.2, N. 22) CD1 Permite recepción de input audio de fuente sónica como CDROM, DVD-ROM, TV tuner, o tarjeta MPEG. Este es una interface para cable de audio de panel frontal que permite conexión y control conveniente de apparatos de Audio. ASRock ConRoe865GV Motherboard 103 - ASRock ConRoe865GV | Quick Installation Guide - Page 104
con el conector de tierra. Conector del ventilador de la CPU 1 2 (4-pin CPU_FAN1) 3 4 (vea p.2, N. 5) Conecte el cable del ventilador de la CPU a este conector y haga coincidir el cable negro con se utiliza para admitir un módulo de puerto COM. Español 104 ASRock ConRoe865GV Motherboard - ASRock ConRoe865GV | Quick Installation Guide - Page 105
Manual instale pueden funcionar correctamente. 2.10 Tecnología de Forzado de Reloj (Overclocking) no relacionado Esta placa base soporta Untied Overclocking Technology, lo cual significa que durante el overclocking, FSB disfrutará de un mejor margen debido a que el bus ASRock ConRoe865GV Motherboard - ASRock ConRoe865GV | Quick Installation Guide - Page 106
ón de la BIOS, consulte el Manual del usuario (archivo PDF), que se encuentra en el CD de soporte. 4.Información de Software Support CD Esta placa-base soporta diversos tipos de sistema operativo Windows®: 98SE / ME / 2000 / XP El CD de instalación que acompaña la placa-base trae todos los drivers
-
 1
1 -
 2
2 -
 3
3 -
 4
4 -
 5
5 -
 6
6 -
 7
7 -
8
-
9
-
10
-
11
-
12
-
13
-
14
-
15
-
16
-
17
-
18
-
19
-
20
-
21
-
22
-
23
-
24
-
25
-
26
-
27
-
28
-
29
-
30
-
31
-
32
-
33
-
34
-
35
-
36
-
37
-
38
-
39
-
40
-
41
-
42
-
43
-
44
-
45
-
46
-
47
-
48
-
49
-
50
-
51
-
52
-
53
-
54
-
55
-
56
-
57
-
58
-
59
-
60
-
61
-
62
-
63
-
64
-
65
-
66
-
67
-
68
-
69
-
70
-
71
-
72
-
73
-
74
-
75
-
76
-
77
-
78
-
79
-
80
-
81
-
82
-
83
-
84
-
85
-
86
-
87
-
88
-
89
-
90
-
91
-
92
-
93
-
94
-
95
-
96
-
97
-
98
-
99
-
100
-
101
-
102
-
103
-
104
-
105
-
106
 |
 |
1
ASRock
ConRoe865GV
Motherboard
English
English
English
English
English
Copyright Notice:
Copyright Notice:
Copyright Notice:
Copyright Notice:
Copyright Notice:
No part of this installation guide may be reproduced, transcribed, transmitted, or
translated in any language, in any form or by any means, except duplication of
documentation by the purchaser for backup purpose, without written consent of
ASRock Inc.
Products and corporate names appearing in this guide may or may not be registered
trademarks or copyrights of their respective companies, and are used only for
identification or explanation and to the owners’ benefit, without intent to infringe.
Disclaimer:
Disclaimer:
Disclaimer:
Disclaimer:
Disclaimer:
Specifications and information contained in this guide are furnished for informational
use only and subject to change without notice, and should not be constructed as a
commitment by ASRock. ASRock assumes no responsibility for any errors or
omissions that may appear in this guide.
With respect to the contents of this guide, ASRock does not provide warranty of any
kind, either expressed or implied, including but not limited to the implied warranties or
conditions of merchantability or fitness for a particular purpose.
In no event shall ASRock, its directors, officers, employees, or agents be liable for
any indirect, special, incidental, or consequential damages (including damages for
loss of profits, loss of business, loss of data, interruption of business and the like),
even if ASRock has been advised of the possibility of such damages arising from any
defect or error in the guide or product.
This device complies with Part 15 of the FCC Rules. Operation is subject to the
following two conditions:
(1)
this device may not cause harmful interference, and
(2)
this device must accept any interference received, including interference that
may cause undesired operation.
ASRock Website: http://www.asrock.com
Published August 2006
Copyright
©
2006 ASRock INC. All rights reserved.