ASRock E35LM1 R2.0 Quick Installation Guide
ASRock E35LM1 R2.0 Manual
 |
View all ASRock E35LM1 R2.0 manuals
Add to My Manuals
Save this manual to your list of manuals |
ASRock E35LM1 R2.0 manual content summary:
- ASRock E35LM1 R2.0 | Quick Installation Guide - Page 1
for backup purpose, without written consent of ASRock Inc. Products and corporate names appearing in this guide may or may not be registered trademarks or perchlorate" ASRock Website: http://www.asrock.com Published October 2012 Copyright©2012 ASRock INC. All rights reserved. 1 ASRock E35LM1 R2.0 - ASRock E35LM1 R2.0 | Quick Installation Guide - Page 2
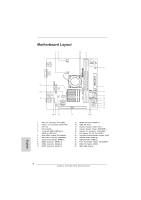
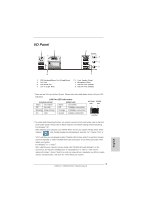
USB1 CHA_FAN1 CMOS Battery CLRCMOS1 1 6 XFast RAM DDR3_A1 (64 bit, 240-FpinSBmo8d0ul0e) DDR3_A2 (64 bit, 240-FpinSBmo8d0ul0e) CPU_FAN1 VGA1 SATA3 6Gb/s Dx11 RoHS 23 22 21 Top: Audio Header (HD_AUDIO1) 22 COM Port Header (COM1) 23 AMD A50M Chipset English 2 ASRock E35LM1 R2.0 Motherboard - ASRock E35LM1 R2.0 | Quick Installation Guide - Page 3
". Click "Device advanced settings", choose "Make front and rear output devices playbacks two different audio streams simultaneously", and click "ok". Then reboot your system. English 3 ASRock E35LM1 R2.0 Motherboard - ASRock E35LM1 R2.0 | Quick Installation Guide - Page 4
specific information about the model you are using. www.asrock.com/support/index.asp 1.1 Package Contents ASRock E35LM1 R2.0 Motherboard (Mini-ITX Form Factor) ASRock E35LM1 R2.0 Quick Installation Guide ASRock E35LM1 R2.0 Support CD 2 x Serial ATA (SATA) Data Cables (Optional) 1 x I/O Panel Shield - ASRock E35LM1 R2.0 | Quick Installation Guide - Page 5
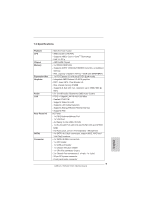
Mini-ITX Form Factor - AMD Zacate E-240 APU - Supports AMD's Cool 'n' QuietTM Technology - UMI 2.5 GT/s - AMD A50M Chipset - 2 x DDR3 DIMM slots - Supports DDR3 Fan connectors (1 x 4-pin, 1 x 3-pin) - 24 pin ATX power connector - Front panel audio connector 5 ASRock E35LM1 R2.0 Motherboard English - ASRock E35LM1 R2.0 | Quick Installation Guide - Page 6
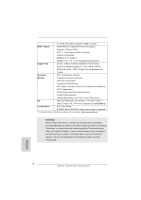
Supports jumperfree - SMBIOS 2.3.1 Support - DRAM, FCH, +1V, +1.8V Voltage Multi-adjustment Support CD - Drivers, Utilities, AntiVirus Software (Trial Version), CyberLink MediaEspresso 6.5 Trial, ASRock for possible damage caused by overclocking. English 6 ASRock E35LM1 R2.0 Motherboard - ASRock E35LM1 R2.0 | Quick Installation Guide - Page 7
less than 4GB for the reservation for system usage under Windows® 8 / 7 / VistaTM / XP. For Windows® OS with 64-bit CPU, there is no such limitation. 2. ASRock XFast RAM is not supported by Microsoft® Windows® XP 64-bit. 7 ASRock E35LM1 R2.0 Motherboard English - ASRock E35LM1 R2.0 | Quick Installation Guide - Page 8
devices simultaneously and even supports continuous charging when your PC enters into Standby mode (S1), Suspend to RAM (S3), hibernation mode (S4) or power off (S5). With APP Charger driver installed, you can easily enjoy the marvelous charging experience. 8 ASRock E35LM1 R2.0 Motherboard English - ASRock E35LM1 R2.0 | Quick Installation Guide - Page 9
to be placed in the root directory of your USB disk. Only USB2.0 ports support this feature. ASRock OMG (Online Management Guard) Administrators are able to establish an internet curfew or restrict internet permission to modify the system time are required. 9 ASRock E35LM1 R2.0 Motherboard English - ASRock E35LM1 R2.0 | Quick Installation Guide - Page 10
; the PC will be assured to access the UEFI directly in the very beginning. ASRock Good Night LED ASRock Good Night LED technology can offer you a better environment by extinguishing the unessential LED. enters into Standby / Hibernation mode as well. 10 ASRock E35LM1 R2.0 Motherboard English - ASRock E35LM1 R2.0 | Quick Installation Guide - Page 11
2. Installation This is a Mini-ITX form factor motherboard. Before you install the motherboard, study the configuration of your chassis to ensure that power supply. Failure to do so may cause severe damage to the motherboard, peripherals, and/or components. 11 ASRock E35LM1 R2.0 Motherboard English - ASRock E35LM1 R2.0 | Quick Installation Guide - Page 12
2.3 Installation of Memory Modules (DIMM) E35LM1 R2.0 motherboard provides two 240-pin DDR3 (Double Data Rate 3) DIMM slots. It is not allowed to install a DDR or DDR2 memory retaining clips at both ends fully snap back in place and the DIMM is properly seated. 12 ASRock E35LM1 R2.0 Motherboard - ASRock E35LM1 R2.0 | Quick Installation Guide - Page 13
firmly until the card is completely seated on the slot. Step 5. Fasten the card to the chassis with screws. Step 6. Replace the system cover. 13 ASRock E35LM1 R2.0 Motherboard English - ASRock E35LM1 R2.0 | Quick Installation Guide - Page 14
default profile, 1394 GUID and MAC address will be cleared only if the CMOS battery is removed. If you clear the CMOS, the case open may be detected. Please adjust the BIOS option "Clear Status" to clear the record of previous chassis intrusion status. English 14 ASRock E35LM1 R2.0 Motherboard - ASRock E35LM1 R2.0 | Quick Installation Guide - Page 15
connector on this motherboard. Besides four default USB 2.0 ports on the I/O panel, there are two USB 2.0 headers on this motherboard. Each USB 2.0 header can support two USB 2.0 ports. This header can be used to connect the remote controller receiver. English 15 ASRock E35LM1 R2.0 Motherboard - ASRock E35LM1 R2.0 | Quick Installation Guide - Page 16
1. High Definition Audio supports Jack Sensing, but the panel wire on the chassis must support HDA to function correctly. Please follow the instruction in our manual and chassis manual to install your system. computer freezes and fails to perform a normal restart. 16 ASRock E35LM1 R2.0 Motherboard - ASRock E35LM1 R2.0 | Quick Installation Guide - Page 17
ground pin. CHA_FAN2 supports fan speed control by fan power voltage. Please connect the CPU fan cable to the connector and match the black wire to the ground pin. CPU_FAN1 supports fan speed control. Please connect an ATX power supply to this connector. English 17 ASRock E35LM1 R2.0 Motherboard - ASRock E35LM1 R2.0 | Quick Installation Guide - Page 18
a chassis with chassis intrusion detection design. 2.7 Driver Installation Guide To install the drivers to your system, please insert the support CD to your optical drive first. Then, the drivers follow below procedures according to the OS you install. English 18 ASRock E35LM1 R2.0 Motherboard - ASRock E35LM1 R2.0 | Quick Installation Guide - Page 19
-bit OS on your SATA3 HDDs without RAID functions, please follow below steps. AHCI mode is not supported under Windows® XP / XP 64-bit OS. Using SATA3 HDDs without NCQ function STEP 1: Set 64-bit / 7 / 7 64-bit / VistaTM / VistaTM 64-bit OS on your system. 19 ASRock E35LM1 R2.0 Motherboard English - ASRock E35LM1 R2.0 | Quick Installation Guide - Page 20
the Power-On-Self-Test (POST) to enter BIOS Setup utility; otherwise, POST continues with its test routines. If you Manual (PDF file) contained in the Support CD. 4. Software Support CD information This motherboard supports Support CD to display the menus. 20 ASRock E35LM1 R2.0 Motherboard English - ASRock E35LM1 R2.0 | Quick Installation Guide - Page 21
Modell benötigen, besuchen Sie bitte unsere Webseite: www.asrock.com/support/index.asp 1.1 Kartoninhalt ASRock E35LM1 R2.0 Motherboard (Mini-ITX-Formfaktor) ASRock E35LM1 R2.0 Schnellinstallationsanleitung ASRock E35LM1 R2.0 Support-CD Zwei Serial ATA (SATA) -Datenkabel (optional) Ein I/O Shield - ASRock E35LM1 R2.0 | Quick Installation Guide - Page 22
üsse 22 - Mini-ITX-Formfaktor - AMD Zacate E-240 APU - Unterstützt Cool 'n' QuietTM-Technologie von AMD - UMI 2.5 GT/s - AMD A50M Chipsatz - 2 x Steckpl äuseeindringversuche - 1 x CPUlüfter-Anschluss (3-pin) - 2 x Gehäuselüfter-Anschluss (1 x 4-pin, 1 x 3-pin) ASRock E35LM1 R2.0 Motherboard Deutsch - ASRock E35LM1 R2.0 | Quick Installation Guide - Page 23
Dienstprogramme, Antivirussoftware (Probeversion), CyberLink MediaEspresso 6.5-Testversion, ASRock MAGIX-Multimedia-Suite - OEM, Google Chrome Browser und Für die ausführliche Produktinformation, besuchen Sie bitte unsere Website: http://www.asrock.com Deutsch 23 ASRock E35LM1 R2.0 Motherboard - ASRock E35LM1 R2.0 | Quick Installation Guide - Page 24
CMOS-Löschung herunter. Bitte beachten Sie, dass Kennwort, Datum, Uhrzeit, benutzerdefiniertes Profil, 1394 GUID und MAC-Adresse nur gelöscht werden, wenn die CMOS-Batterie entfernt wird. Durch Löschen des die BIOS-Option "Status leeren" ein. Deutsch 24 ASRock E35LM1 R2.0 Motherboard - ASRock E35LM1 R2.0 | Quick Installation Guide - Page 25
sich zwei USB 2.0Anschlussleisten am Motherboard. Pro USB 2.0Anschlussleiste werden zwei USB 2.0-Ports unterstützt. Dieser Header kann zum Anschließen RemoteEmpfänger. Deutsch 25 ASRock E35LM1 R2.0 Motherboard - ASRock E35LM1 R2.0 | Quick Installation Guide - Page 26
Ein-/Ausschalters an der Frontblende des Gehäu ses. Sie können konfigurieren, wie das System mit Hilfe des Ein-/Ausschalters ausgeschaltet werden können soll. 26 ASRock E35LM1 R2.0 Motherboard - ASRock E35LM1 R2.0 | Quick Installation Guide - Page 27
Sie das CPU Lüfterkabel mit diesem Anschluss und passen Sie den schwarzen Draht dem Erdungsstift an. Verbinden Sie die ATXStromversorgung mit diesem Header. 1 13 27 ASRock E35LM1 R2.0 Motherboard - ASRock E35LM1 R2.0 | Quick Installation Guide - Page 28
ÄUSE OFFENErkennungsfunktion,die feststellt, ob dieGehäuseabdeckung entferntwurde. Für diese Funktion istein Gehäuse erforderlich, dasmit einem Design zur Erkennung von Gehäuseeindringversuchenausgestattet ist. Deutsch 28 ASRock E35LM1 R2.0 Motherboard - ASRock E35LM1 R2.0 | Quick Installation Guide - Page 29
(Power-On-Self-Test) um ins Setup Support-CD, um die Menüs aufzurufen. Das Setup-Programm soll es Ihnen so leicht wie möglich machen. Es ist menügesteuert, d.h. Sie können in den verschiedenen Untermenüs Ihre Auswahl treffen und die Programme werden dann automatisch installiert. 29 ASRock E35LM1 R2 - ASRock E35LM1 R2.0 | Quick Installation Guide - Page 30
informations particulières au modèle que vous utilisez. www.asrock.com/support/index.asp 1.1 Contenu du paquet Carte mère ASRock E35LM1 R2.0 (Facteur de forme Mini-ITX) Guide d'installation rapide ASRock E35LM1 R2.0 CD de soutien ASRock E35LM1 R2.0 Deux câbles de données de série ATA (SATA) (en - ASRock E35LM1 R2.0 | Quick Installation Guide - Page 31
Facteur de forme Mini-ITX - AMD Zacate E-240 APU - Supporte la technologie Cool 'n' QuietTM d'AMD - UMI 2.5 GT/s - AMD A50M Chipsets - 2 x slots DIMM DDR3 - Supporter DDR3 1333(OC)/1066/800 public - 1 x En-tête de port COM - 1 x Embase d'intrusion châssis 31 ASRock E35LM1 R2.0 Motherboard Français - ASRock E35LM1 R2.0 | Quick Installation Guide - Page 32
- 32Mb AMI UEFI Legal BIOS avec support GUI - Support du "Plug and Play" - Compatible pour événements de réveil ACPI 1.1 - Gestion jumperless - Support SMBIOS 2.3.1 - DRAM, FCH, +1V , s'il vous plaît visitez notre site web: http://www.asrock.com Français 32 ASRock E35LM1 R2.0 Motherboard - ASRock E35LM1 R2.0 | Quick Installation Guide - Page 33
noter que le mot de passe, la date, l'heure, le profil par défaut de l'utilisateur, 1394 GUID et l'adresse MAC seront effacés seulement si la batterie du CMOS est enlevée. Si vous effacez la CMOS, il effacer la mention d'état d'intrusion dans le châssis. Français 33 ASRock E35LM1 R2.0 Motherboard - ASRock E35LM1 R2.0 | Quick Installation Guide - Page 34
2.0 sur cette carte mère. Chaque embase USB 2.0 peut prendre en charge 2 ports USB 2.0. Cette barrette peut être utilisée pour connecter des récepteur. Français 34 ASRock E35LM1 R2.0 Motherboard - ASRock E35LM1 R2.0 | Quick Installation Guide - Page 35
de panneau sur le châssis doit prendre en charge le HDA pour fonctionner correctement. Veuillez suivre les instructions dans notre manuel et le manuel de châssis afin installer votre système. 2. Si vous utilisez se bloque ou s'il n'arrive pas à redémarrer normalement. 35 ASRock E35LM1 R2.0 Motherboard - ASRock E35LM1 R2.0 | Quick Installation Guide - Page 36
d'UC sur ce connecteur et brancher le fil noir sur la broche de terre. Veuillez connecter l'unité d'alimentation ATX sur cet entête. Français 36 ASRock E35LM1 R2.0 Motherboard - ASRock E35LM1 R2.0 | Quick Installation Guide - Page 37
tout retrait du capot duchâssis. Cette fonctionnécessite un châssis qui a étéconçu pour la détectiond'intrusion dans le châssis. Français 37 ASRock E35LM1 R2.0 Motherboard - ASRock E35LM1 R2.0 | Quick Installation Guide - Page 38
Del> pendant le POST (Power-OnSelf-Test) pour entrer dans le BIOS; sinon, le POST continue ses tests de routine. Si vous désirez le Guide de l'utilisateur (fichier PDF) dans le CD technique. 3. Informations sur le CD de support Cette carte mère supporte divers ASRock E35LM1 R2.0 Motherboard Français - ASRock E35LM1 R2.0 | Quick Installation Guide - Page 39
asrock.com/support/index.asp 1.1 Contenuto della confezione Scheda madre ASRock E35LM1 R2.0 (Mini-ITX Form Factor) Guida di installazione rapida ASRock E35LM1 R2.0 CD di supporto ASRock E35LM1 R2 Manual" (Manuale dell'utente) nel CD di supporto per dettagli. 39 ASRock E35LM1 R2.0 Motherboard - ASRock E35LM1 R2.0 | Quick Installation Guide - Page 40
SATA3 Connettori - Mini-ITX Form Factor - AMD Zacate E-240 APU - Supporto tecnologia AMD Cool 'n' QuietTM - UMI 2.5 GT/s - AMD A50M Chipset - 2 x dello chassis - 1 x Connettore CPU ventola (3-pin) - 2 x Connettore Chassis ventola (1 x 4-pin, 1 x 3-pin) 40 ASRock E35LM1 R2.0 Motherboard Italiano - ASRock E35LM1 R2.0 | Quick Installation Guide - Page 41
(versione di prova), supporto CyberLink MediaEspresso 6.5 Trial, Suite multimediale ASRock MAGIX - OEM, Google Chrome Browser e Toolbar Monitoraggio - Sensore per ulteriori informazioni, prego visitare il nostro sito internet: http://www.asrock.com Italiano 41 ASRock E35LM1 R2.0 Motherboard - ASRock E35LM1 R2.0 | Quick Installation Guide - Page 42
azzeramento della CMOS. Notare che password, data, ore, profilo utente predefinito, 1394 GUID e indirizzo MAC saranno cancellati solo se è rimossa la batteria della CMOS. Se si cancella cancellarela registrazione del precedente stato d'intrusione chassis. Italiano 42 ASRock E35LM1 R2.0 Motherboard - ASRock E35LM1 R2.0 | Quick Installation Guide - Page 43
scheda madre dispone di due intestazioni USB 2.0. Ciascuna intestazione USB 2.0 supporta due porte USB 2.0. Questo connettore può essere utilizzato per collegare ricevitore remoto. Italiano 43 ASRock E35LM1 R2.0 Motherboard - ASRock E35LM1 R2.0 | Quick Installation Guide - Page 44
nition Audio) per far sì che questa operi in modo corretto. Attenersi alle istruzioni del nostro manuale e del manuale del telaio per installare il sistema. 2. Se si utilizza un pannello audio AC'97, installarlo si può configurare il modo in cui si spegne il sistema. 44 ASRock E35LM1 R2.0 Motherboard - ASRock E35LM1 R2.0 | Quick Installation Guide - Page 45
. Collegare il cavo della ventolina CPU a questo connettore e far combaciare il filo nero al pin terra. Collegare la sorgente d'alimentazione ATX a questo connettore. Italiano 45 ASRock E35LM1 R2.0 Motherboard - ASRock E35LM1 R2.0 | Quick Installation Guide - Page 46
funzione di rilevamento del CASE APERTOche rileva che il coperchio dellochassis è stato rimosso.Questa funzione richiede unochassis con struttura dirilevamento di intrusione dellochassis. Italiano 46 ASRock E35LM1 R2.0 Motherboard - ASRock E35LM1 R2.0 | Quick Installation Guide - Page 47
test di routine. Per entrare il BIOS Setup dopo il POST, riavvia il sistema premendo + + , o premi il tasto di reset sullo chassis del sistema. Per informazioni più dettagliate circa il Setup del BIOS, fare riferimento al Manuale i menù. 47 ASRock E35LM1 R2.0 Motherboard Italiano - ASRock E35LM1 R2.0 | Quick Installation Guide - Page 48
asrock.com/support/index.asp 1.1 Contenido de la caja Placa base ASRock E35LM1 R2.0 (Factor forma Mini-ITX) Guía de instalación rápida de ASRock E35LM1 R2.0 CD de soporte de ASRock E35LM1 R2 el "Manual del usuario" que se encuentra en nuestro CD de soporte. 48 ASRock E35LM1 R2.0 Motherboard Español - ASRock E35LM1 R2.0 | Quick Installation Guide - Page 49
de Panel Trasero SATA3 Conectores - Factor forma Mini-ITX - AMD Zacate E-240 APU - Con soporte para tecnología Cool 'n' QuietTM de AMD - UMI 2.5 GT/s - AMD A50M Chipset - 2 x DDR3 DIMM slots - Apoya infrarrojos para el consumidor - 1x En-tête de port COM 49 ASRock E35LM1 R2.0 Motherboard Español - ASRock E35LM1 R2.0 | Quick Installation Guide - Page 50
antivirus (versión de prueba), Prueba de CyberLink MediaEspresso 6.5, Conjunto multimedia ASRock MAGIX - OEM, Google Chrome Browser y Toolbar Monitor - Sensibilidad a la sobre los productos, por favor visite nuestro sitio web: http://www.asrock.com Español 50 ASRock E35LM1 R2.0 Motherboard - ASRock E35LM1 R2.0 | Quick Installation Guide - Page 51
GUID 1394 y la dirección MAC solamente se borrará si la batería CMOS se quita. Si borra la memoria CMOS, se puede detectar un caso de abertura.Ajuste la opción del BIOS "Clear Status" (Borrar estado) para borrar elregistro del estado de intrusión anterior del chasis. Español 51 ASRock E35LM1 R2 - ASRock E35LM1 R2.0 | Quick Installation Guide - Page 52
interface para cable de audio de panel frontal que permite conexión y control (vea p.2, N. 21) 52 1 OUT2_L J_SENSE OUT2_R MIC2_R MIC2_L conveniente de apparatos de Audio. ASRock E35LM1 R2.0 Motherboard Español - ASRock E35LM1 R2.0 | Quick Installation Guide - Page 53
panel en el chasis debe soportar HDA para operar correctamente. Por favor, siga las instrucciones en nuestro manual y en el manual de chasis para instalar su sistema. 2. Si utiliza el panel de sonido AC'97, instálelo en estado de suspensión S3/S4 o se apaga (S5). 53 ASRock E35LM1 R2.0 Motherboard - ASRock E35LM1 R2.0 | Quick Installation Guide - Page 54
20 pins, por favor, conecte su fuente de alimentación usando los Pins 1 y 13. Instalación de una Fuente de Alimentación ATX de 20 Pins 1 13 54 ASRock E35LM1 R2.0 Motherboard Español - ASRock E35LM1 R2.0 | Quick Installation Guide - Page 55
si se haretirado la cubierta del chasis.Dicha función requiere unchasis con diseño específicopara la detección de intrusiónen el chasis. Español 55 ASRock E35LM1 R2.0 Motherboard - ASRock E35LM1 R2.0 | Quick Installation Guide - Page 56
como configurar la BIOS, por favor refiérase al Manual del Usuario (archivo PDF) contenido en el CD. 3. Información de Software Support CD Esta placa-base soporta diversos tipos de sistema operativo Windows archivo "ASSETUP.EXE" para iniciar la instalación. 56 ASRock E35LM1 R2.0 Motherboard Español - ASRock E35LM1 R2.0 | Quick Installation Guide - Page 57
1 ASRock E35LM1 R2.0 ASRock ASRock BIOS ASRock ASRock. ASRock http://www.asrock.com www.asrock.com/support/index.asp 1.1 ASRock E35LM1 R2.0 Mini-ITX ASRock E35LM1 R2.0 ASRock E35LM1 R2.0 2 x Serial ATA (SATA 1 x I/O ASRock Windows® 8 / - ASRock E35LM1 R2.0 | Quick Installation Guide - Page 58
ITX - AMD Zacate E-240 APU AMD Cool 'n' QuietTM - UMI 2.5 GT/s AMD A50M Память - 2 x DDR3 DIMM DDR3 1333(OC)/1066/800 не- ECC память 16 ГБ Гнезда - 1 x PCI Express 2.0 x16 (PCIE1 x4) AMD - 2 x USB 2.0 4 USB 2.0 58 ASRock E35LM1 R2.0 Motherboard - ASRock E35LM1 R2.0 | Quick Installation Guide - Page 59
DRAM, FCH, +1V, +1.8V CyberLink MediaEspresso 6.5, ASRock MAGIX Multimedia Suite - Google Chrome Browser и Toolbar / XP / XP 64-bit - FCC, CE, WHQL ErP/EuP Ready ErP/EuP) http://www.asrock.com 59 ASRock E35LM1 R2.0 Motherboard - ASRock E35LM1 R2.0 | Quick Installation Guide - Page 60
1.3 short open 3 1 и 2 CMOS (CLRCMOS1, 3 2, п. 6) CMOS CLRCMOS1 CMOS 15 5 2 и 3 CLRCMOS1 CMOS BIOS CMOS BIOS CMOS 1394 GUID и MAC CMOS. CMOS Clear Status» в BIOS 60 ASRock E35LM1 R2.0 Motherboard - ASRock E35LM1 R2.0 | Quick Installation Guide - Page 61
SATA3 SATA 6,0 SATA / SATAII / SATA3 SATAII / SATA3 USB 2.0 USB 2.0 USB 2.0 USB 2.0. 9 HD_AUDIO1) GND PRESENCE# MIC_RET OUT_RET (см. cтр. 2, п.21) 1 OUT2_L J_SENSE OUT2_R MIC2_R MIC2_L 61 ASRock E35LM1 R2.0 Motherboard - ASRock E35LM1 R2.0 | Quick Installation Guide - Page 62
AC'97 E Windows® XP / XP 64 Mixer Recorder FrontMic Windows® 8 / 8 64-бита / 7 / 7 64-бита / VistaTM / VistaTM 64 FrontMic Realtek Recording Volume 9 PANEL1 2, п. 8) PWRBTN RESET 62 ASRock E35LM1 R2.0 Motherboard - ASRock E35LM1 R2.0 | Quick Installation Guide - Page 63
PLED S1 S3 или S4 S5). HDLED 4 SPEAKER1 2, п. 15) Chassis Fan 4 CHA_FAN1 2, п. 2) (3 CHA_FAN2 2, п. 16) 3 CPU_FAN1 2, п. 1) ATX (24 ATXPWR1 2, п. 7) 12 24 ATX. 1 13 63 ASRock E35LM1 R2.0 Motherboard - ASRock E35LM1 R2.0 | Quick Installation Guide - Page 64
12 24 ивает 24 ATX 20 ATX 20 ATX 1 13. 20 ATX 1 13 COM 9 COM1 2, п. 22) COM COM. 2 CI1 2, п. 14) 1 GND Signal 64 ASRock E35LM1 R2.0 Motherboard - ASRock E35LM1 R2.0 | Quick Installation Guide - Page 65
F2> или + + - ASRock E35LM1 R2.0 | Quick Installation Guide - Page 66
asrock.com/support/index.asp 1.1 Este pacote contém Placa-mãe ASRock E35LM1 R2.0 (Formato Mini-ITX) Guia de instalação rápida da ASRock E35LM1 R2.0 CD de suporte da placa ASRock E35LM1 R2 da BIOS consulte o "Manual de utilizador" no nosso CD de suporte. 66 ASRock E35LM1 R2.0 Motherboard Português - ASRock E35LM1 R2.0 | Quick Installation Guide - Page 67
da pelo painel traseiro SATA3 Conectores - Formato Mini-ITX - AMD Zacate E-240 APU - Suporta a tecnologia AMD Cool 'n' QuietTM - UMI 2.5 GT/s - AMD A50M Chipsets - 2 x slots de DDR3 DIMM - - 1 x Conector da porta COM - 1 x Conector de intrusão no chassis 67 ASRock E35LM1 R2.0 Motherboard Português - ASRock E35LM1 R2.0 | Quick Installation Guide - Page 68
antivírus (Experimentacao Versao), CyberLink MediaEspresso 6.5 versão de demonstração, ASRock MAGIX Multimedia Suite - OEM, Navegador Google Chrome e Barra de Ferramentas ções mais detalhadas por favor visite o nosso sítio Web: http://www.asrock.com Português 68 ASRock E35LM1 R2.0 Motherboard - ASRock E35LM1 R2.0 | Quick Installation Guide - Page 69
, 1394 GUID e endereço MAC apenas serão limpos se a bateria do CMOS for retirada. Se limpar o CMOS, poderá ser detectada a abertura da caixa. Ajuste aopção do BIOS "Clear Status" (Limpar estado) para limpar o registo anterior de estado de intrusão no chassis. Português 69 ASRock E35LM1 R2 - ASRock E35LM1 R2.0 | Quick Installation Guide - Page 70
2.0. Conector do módulo de infravermelhos (CIR1 de 4 pinos) (veja a folha 2, No. 18) Este conector pode ser utilizado para ligar o receptor do controlo remoto. Português 70 ASRock E35LM1 R2.0 Motherboard - ASRock E35LM1 R2.0 | Quick Installation Guide - Page 71
no chassis tem de suportar HDA para funcionar correctamente. Siga s instruções que aparecem no manual e no manual do chassis para instalar o sistema. 2. Se utilizar o painel de áudio AC'97, computador caso este bloqueie e não seja possível reiniciar normalmente. 71 ASRock E35LM1 R2.0 Motherboard - ASRock E35LM1 R2.0 | Quick Installation Guide - Page 72
2, No. 7) 12 24 Ligue o cabo do ventilador da CPU, coincidindo o fio preto com o pino de aterramento. Ligue a fonte de alimentação ATX neste conector. 1 13 Português 72 ASRock E35LM1 R2.0 Motherboard - ASRock E35LM1 R2.0 | Quick Installation Guide - Page 73
a função de detecção de ABERTURA da CAIXA quedetecta se a tampa do chassisfoi removida. Esta funçãorequer um chassis com designde detecção de intrusão. Português 73 ASRock E35LM1 R2.0 Motherboard - ASRock E35LM1 R2.0 | Quick Installation Guide - Page 74
ções da BIOS; caso contrário o POST continua com suas rotinas de teste. Caso você queira entrar nas configurações da BIOS após o mais detalhadas sobre a configuração da BIOS, consulte o manual do usuário (em pdf) contido no CD de instalação. na pasta "BIN". 74 ASRock E35LM1 R2.0 Motherboard Português - ASRock E35LM1 R2.0 | Quick Installation Guide - Page 75
, kullandığınız modele özel bilgiler için lütfen web sitemizi ziyaret edin. www.asrock.com/support/index.asp 1.1 Paket İçindekiler ASRock E35LM1 R2.0 Anakart (Mini-ITX Form Faktörü) ASRock E35LM1 R2.0 Hızlı Takma Kılavuzu ASRock E35LM1 R2.0 Destek CD'si 2 x Seri ATA (SATA) Veri Kablosu (İsteğe Ba - ASRock E35LM1 R2.0 | Quick Installation Guide - Page 76
Konektör 76 - Mini-ITX Form Faktörü - AMD Zacate E-240 APU - AMD'nin Cool 'n' QuietTM Teknolojisini Destekler - UMI 2.5 GT/s - AMD A50M Yonga seti - 2 x pinos) - 24 pin ATX güç konektörü - Ön panel ses konektörü - 2 x USB 2.0 fiş (4 USB 2.0 portu destekler) ASRock E35LM1 R2.0 Motherboard Türkçe - ASRock E35LM1 R2.0 | Quick Installation Guide - Page 77
BIOS Özelliği - 32 Mb GUI destekli AMI UEFI Geçerli BIOS - "Tak Çalıştır"ı destekler - ACPI 1.1 Uyumlu Uyandırma Olayları - Jumpersız hazır güç kaynağı gerekli) * Ayrıntılı ürün bilgileri için lütfen web sitemizi ziyaret edin: http://www.asrock.com Türkçe 77 ASRock E35LM1 R2.0 Motherboard - ASRock E35LM1 R2.0 | Quick Installation Guide - Page 78
GUID ve MAC adresinin yalnızca CMOS pili çıkarıldığında temizleneceğini lütfen aklınızda bulundurunuz. CMOS'u temizlerseniz, kasa açma algılanabilir. Lütfen "Temizleme Durumu" BIOS seçeneğini önceki kasaya yetkisiz erişim durumunun kaydı için ayarlayın. Türkçe 78 ASRock E35LM1 R2.0 Motherboard - ASRock E35LM1 R2.0 | Quick Installation Guide - Page 79
kumanda alıcısı destekler. Bu, panel ses kablosu için uygun bağlantı sağlayan ve ses cihazlarını kontrol etmeyi sağlayan bir arayüzdür. Türkçe 79 ASRock E35LM1 R2.0 Motherboard - ASRock E35LM1 R2.0 | Quick Installation Guide - Page 80
Disk Çalışma LED'i): Kasa üzerindeki sabit disk çalışma LED'ini ön panele bağlayın. Sabit disk veri okurken veya yazarken LED yanar. Türkçe 80 ASRock E35LM1 R2.0 Motherboard - ASRock E35LM1 R2.0 | Quick Installation Guide - Page 81
birlikte takın. Seri port Fişi (9-pinli COM1) (bkz. s.2 No. 22) 20-Pinli ATX Güç Kaynağını Takma 1 13 Bu COM1 fişi bir seri port modülünü destekler. Türkçe 81 ASRock E35LM1 R2.0 Motherboard - ASRock E35LM1 R2.0 | Quick Installation Guide - Page 82
BIOS Ayarları yardımcı programına girmek için veya tuşuna basın; aksi halde, POST test rutinlerine devam eder. BIOS Ayarlarına POST'tan sonra girmek istiyorsanız, lütfen + + "ASSETUP.EXE" dosyasını bulun ve çift tıklatın. Türkçe 82 ASRock E35LM1 R2.0 Motherboard - ASRock E35LM1 R2.0 | Quick Installation Guide - Page 83
www.asrock.com www.asrock.com/support/index.asp 1.1 華擎 E35LM1 R2.0 主板 (Mini-ITX E35LM1 R2.0 E35LM1 R2.0 Serial ATA(SATA I/O 擋板 ASRock 為了在 Windows® 8 / 8 64-bit / 7 / 7 64-bit / VistaTM / VistaTM 64bit BIOS中將Storage Configuration AHCI BIOS User Manual 83 ASRock E35LM1 R2.0 Motherboard - ASRock E35LM1 R2.0 | Quick Installation Guide - Page 84
ITX 規格 - AMD Zacate E-240 APU - 支持 AMD Cool 'n' Quiet UMI 2.5 GT/s - AMD A50M 2 個 DDR3 DIMM DDR3 1333( 超頻 )/1066/800 non-ECC、un-buffered 內 GB 1 x PCI Express 2.0 x16 插槽 (PCIE1 @ x4 AMD ) - 2 x 1 x 4 針、1 x 3 針 ) - 24 針 ATX 2 x USB 2.0 4 USB 2.0 接口 ) 簡體中文 84 ASRock E35LM1 R2.0 Motherboard - ASRock E35LM1 R2.0 | Quick Installation Guide - Page 85
- CPU CPU - CPU 12V, +5V, +3.3V 操作系統 - Microsoft® Windows® 8/8 64 位元 /7/7 64 位元 /VistaTM/ VistaTM 64 位元 /XP/XP 64 認證 - FCC, CE, WHQL - 支持 ErP/EuP ErP/EuP http://www.asrock.com 簡體中文 85 ASRock E35LM1 R2.0 Motherboard - ASRock E35LM1 R2.0 | Quick Installation Guide - Page 86
1.3 3 1 和針腳 2 CMOS (CLRCMOS1, 3 2 頁第 6 項 ) 設定 默認設置 清除 CMOS 注意: C L R C M O S1 C M O S 15 C L R C M O S1 2 和插針 3 短接 5 B I O S C M O S B I O S C M O S C M O S C M O S 1394 GUID 和 MAC C M O S B I O S 選 項"Clear Status 簡體中文 86 ASRock E35LM1 R2.0 Motherboard - ASRock E35LM1 R2.0 | Quick Installation Guide - Page 87
(SATA3 Serial (SATA SATA3 6.0Gb/s SATA SATA/SATAII/SATA3 SATAII/ SATA3 接口。 I/O USB 2.0 USB 2.0 USB 2.0 USB 2.0 接口。 GND PRESENCE# MIC_RET OUT_RET 1 OUT2_L J_SENSE OUT2_R MIC2_R MIC2_L 簡體中文 87 ASRock E35LM1 R2.0 Motherboard - ASRock E35LM1 R2.0 | Quick Installation Guide - Page 88
64 Mixer"。選擇"Recorder FrontMic"。 在 Windows® 8 / 8 64 位元 / 7 / 7 64 位元 / VistaTM / VistaTM 64 Realtek FrontMic"。調節"Recording Volume"。 (9 針 PANEL1) ( 見第 2 頁第 8 項 ) PWRBTN RESET PLED S1 S3/S4 S5 HD LED 簡體中文 88 ASRock E35LM1 R2.0 Motherboard - ASRock E35LM1 R2.0 | Quick Installation Guide - Page 89
-pin ATX 12 24 傳統的 20-pin ATX 20-pin ATX Pin 1 和 Pin 13 (9 針 COM1) ( 見第 2 頁第 22 項 ) 20-Pin ATX 1 13 這個 COM1 (2 針 CI1) ( 見第 2 頁第 14 項 ) 1 GND Signal 簡體中文 89 ASRock E35LM1 R2.0 Motherboard - ASRock E35LM1 R2.0 | Quick Installation Guide - Page 90
2. BIOS 信息 Flash Memory 存儲了 BIOS POST F2> 或 < D e l B I O S P O S T P O S T B I O S Ctrl>++ - ASRock E35LM1 R2.0 | Quick Installation Guide - Page 91
SJ/T 11364-2006 10 年。 圖一 部件名稱 鉛 (Pb) 鎘 (Cd) 汞 (Hg Cr(VI PBB PBDE) X O O O O O X O O O O O O SJ/T 11363-2006 X SJ/T 11363-2006 2002/95/EC 簡體中文 91 ASRock E35LM1 R2.0 Motherboard - ASRock E35LM1 R2.0 | Quick Installation Guide - Page 92
yang paling baru dan daftar bantuan CPU pada website ASRock. Website ASRock http://www.asrock.com 1.1 Isi Paket Papan Induk E35LM1 R2.0 ASRock (Faktor Form Mini-ITX) Pemimpin Instalasi Cepat E35LM1 R2.0 ASRock Support CD E35LM1 R2.0 ASRock 2 x Kabel satu serial Data ATA (SATA) (bebas-pilih) 1 x Satu - ASRock E35LM1 R2.0 | Quick Installation Guide - Page 93
Penghubung - Faktor Form Mini-ITX - AMD Zacate E-240 APU - Dapat digunakan AM's Cool 'n' QuietTM Technology - UMI 2.5 GT/s - AMD A50M - 2 x Alur DDR3 power 24 pin ATX - Penghubung audio panel dapan - 2 x USB 2.0 header (menggunakan 4 port USB 2.0) 93 ASRock E35LM1 R2.0 Motherboard Bahasa Indonesia - ASRock E35LM1 R2.0 | Quick Installation Guide - Page 94
, Perangkat Lunak Antivirus (Versi Percobaan), CyberLink MediaEspresso 6.5 Versi Percobaan, ASRock MAGIX Multimedia Suite - OEM, Google Chrome Browser dan Toolbar Penjaga - informasi rinci, silakan kunjungi website kami: http://www.asrock.com Bahasa Indonesia 94 ASRock E35LM1 R2.0 Motherboard - ASRock E35LM1 R2.0 | Quick Installation Guide - Page 95
POST and choose the item "UEFI:xxx" to boot. 4. Start Windows® installation. 5. If you install Windows® 7 64-bit OS, OS will be formatted by GPT (GUID Partition Table). Please install the hotfix file from Microsoft®: http://support.microsoft.com/kb/979903 95 ASRock E35LM1 R2.0 Motherboard English
-
 1
1 -
 2
2 -
 3
3 -
 4
4 -
 5
5 -
 6
6 -
 7
7 -
8
-
9
-
10
-
11
-
12
-
13
-
14
-
15
-
16
-
17
-
18
-
19
-
20
-
21
-
22
-
23
-
24
-
25
-
26
-
27
-
28
-
29
-
30
-
31
-
32
-
33
-
34
-
35
-
36
-
37
-
38
-
39
-
40
-
41
-
42
-
43
-
44
-
45
-
46
-
47
-
48
-
49
-
50
-
51
-
52
-
53
-
54
-
55
-
56
-
57
-
58
-
59
-
60
-
61
-
62
-
63
-
64
-
65
-
66
-
67
-
68
-
69
-
70
-
71
-
72
-
73
-
74
-
75
-
76
-
77
-
78
-
79
-
80
-
81
-
82
-
83
-
84
-
85
-
86
-
87
-
88
-
89
-
90
-
91
-
92
-
93
-
94
-
95
 |
 |
1
ASRock
E35LM1 R2.0
Motherboard
English
Copyright Notice:
No part of this installation guide may be reproduced, transcribed, transmitted, or trans-
lated in any language, in any form or by any means, except duplication of documentation
by the purchaser for backup purpose, without written consent of ASRock Inc.
Products and corporate names appearing in this guide may or may not be registered
trademarks or copyrights of their respective companies, and are used only for identi
fi
ca-
tion or explanation and to the owners’ bene
fi
t, without intent to infringe.
Disclaimer:
Speci
fi
cations and information contained in this guide are furnished for informational use
only and subject to change without notice, and should not be constructed as a commit-
ment by ASRock. ASRock assumes no responsibility for any errors or omissions that may
appear in this guide.
With respect to the contents of this guide, ASRock does not provide warranty of any kind,
either expressed or implied, including but not limited to the implied warranties or condi-
tions of merchantability or
fi
tness for a particular purpose. In no event shall ASRock, its
directors, of
fi
cers, employees, or agents be liable for any indirect, special, incidental, or
consequential damages (including damages for loss of pro
fi
ts, loss of business, loss of
data, interruption of business and the like), even if ASRock has been advised of the pos-
sibility of such damages arising from any defect or error in the guide or product.
This device complies with Part 15 of the FCC Rules. Operation is subject to the following
two conditions:
(1) this device may not cause harmful interference, and
(2) this device must accept any interference received, including interference that
may cause undesired operation.
CALIFORNIA, USA ONLY
The Lithium battery adopted on this motherboard contains Perchlorate, a toxic substance
controlled in Perchlorate Best Management Practices (BMP) regulations passed by the
California Legislature. When you discard the Lithium battery in California, USA, please
follow the related regulations in advance.
“Perchlorate Material-special handling may apply, see
www.dtsc.ca.gov/hazardouswaste/perchlorate”
ASRock Website: http://www.asrock.com
Published October 2012
Copyright
©
2012 ASRock INC. All rights reserved.