ASRock E35LM1 Quick Installation Guide
ASRock E35LM1 Manual
 |
View all ASRock E35LM1 manuals
Add to My Manuals
Save this manual to your list of manuals |
ASRock E35LM1 manual content summary:
- ASRock E35LM1 | Quick Installation Guide - Page 1
for backup purpose, without written consent of ASRock Inc. Products and corporate names appearing in this guide may or may not be registered trademarks or " ASRock Website: http://www.asrock.com Published March 2012 Copyright©2012 ASRock INC. All rights reserved. 1 ASRock E35LM1 Motherboard English - ASRock E35LM1 | Quick Installation Guide - Page 2
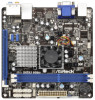
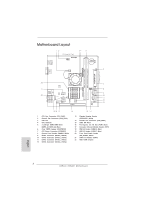
CHA_FAN1) 3 CPU Fan 4 CPU Heatsink 5 2 x 240-pin DDR3 DIMM Slots (DDR3_A1, DDR3_A2, Blue) 6 Clear CMOS Jumper (CLRCMOS1) 7 ATX Power Connector (ATXPWR1) 8 System Panel Header (PANEL1, White Header (HD_AUDIO1, White) 21 COM Port Header (COM1) 22 AMD A50M Chipset English 2 ASRock E35LM1 Motherboard - ASRock E35LM1 | Quick Installation Guide - Page 3
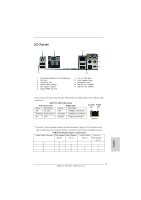
use. TABLE for Audio Output Connection Audio Output Channels Front Speaker Rear Speaker Central / Bass Line In or (No. 8) (No. 5) (No. 4) Side Speaker (No. 7) 2 V -- -- -- 4 V V -- -- 6 V V V -- 8 V V V V English 3 ASRock E35LM1 Motherboard - ASRock E35LM1 | Quick Installation Guide - Page 4
HDA Primary output" to use Rear Speaker, Central/Bass, and Front Speaker, or select "Realtek HDA Audio 2nd output" to use front panel audio. English 4 ASRock E35LM1 Motherboard - ASRock E35LM1 | Quick Installation Guide - Page 5
Package Contents ASRock E35LM1 Motherboard (Mini-ITX Form Factor: 6.7-in x 6.7-in, 17.0 cm x 17.0 cm) ASRock E35LM1 Quick Installation Guide ASRock E35LM1 Support CD 2 x Serial ATA (SATA) Data Cables (Optional) 1 x I/O Panel Shield ASRock Reminds You... To get better performance in Windows® 7 / 7 64 - ASRock E35LM1 | Quick Installation Guide - Page 6
Panel I/O SATA3 Connector 6 - Mini-ITX Form Factor: 6.7-in x 6.7-in, 17.0 cm x 17.0 cm - AMD Zacate E-240 APU - Supports AMD's Cool 'n' QuietTM Technology - UMI 2.5 GT/s - AMD A50M Chipset - 2 x DDR3 DIMM slots - Supports DDR3 1333(OC)/1066/800 non-ECC, un-buffered memory - Max. capacity of system - ASRock E35LM1 | Quick Installation Guide - Page 7
BIOS with GUI support - Supports "Plug and Play" - ACPI 1.1 Compliance Wake Up Events - Supports jumperfree - SMBIOS 2.3.1 Support - DRAM, FCH, +1V, +1.8V Voltage Multi-adjustment Support CD - Drivers, Utilities, AntiVirus Software (Trial Version), CyberLink MediaEspresso 6.5 Trial, ASRock - ASRock E35LM1 | Quick Installation Guide - Page 8
output, this motherboard supports 2-channel, 4-channel, 6-channel, and 8-channel modes. Please check the table on page 3 for proper connection. 4. ASRock Instant Flash is a BIOS flash utility embedded in Flash ROM. This convenient BIOS update tool allows you to update system BIOS without entering - ASRock E35LM1 | Quick Installation Guide - Page 9
fear of failing. If power loss occurs during the BIOS update process, ASRock Crashless BIOS will automatically finish the BIOS update procedure after regaining power. Please note that BIOS files need to be placed in the root directory of your USB disk. Only USB2.0 ports support this feature. 11 - ASRock E35LM1 | Quick Installation Guide - Page 10
and the heatsink when you install the PC system. 14. ASRock XFast RAM is not supported by Microsoft® Windows® XP / XP 64-bit. 15. EuP stands for Energy Using Product, was a provision regulated by the European Union to define the power consumption for the completed system. According to EuP, the total - ASRock E35LM1 | Quick Installation Guide - Page 11
This is a Mini-ITX form factor (6.7" x 6.7", 17.0 x 17.0 cm) motherboard. Before you install the motherboard, study the configuration of your chassis to ensure that the motherboard fits into it. Make sure to unplug the power cord before installing or removing the motherboard. Failure to do - ASRock E35LM1 | Quick Installation Guide - Page 12
Memory Modules (DIMM) E35LM1 motherboard provides two 240-pin DDR3 (Double Data Rate 3) DIMM slots. It is not allowed to install a DDR or DDR2 memory module into DDR3 slot; otherwise, this motherboard and DIMM may be damaged. Installing a DIMM Please make sure to disconnect power the motherboard - ASRock E35LM1 | Quick Installation Guide - Page 13
motherboard. PCIE slot: PCIE1 (PCIE x16 slot; Blue) is used for PCI Express x4 lane width graphics cards. Installing an expansion card Step 1. Before installing the expansion card, please make sure that the power supply is switched off or the power system cover. 13 ASRock E35LM1 Motherboard English - ASRock E35LM1 | Quick Installation Guide - Page 14
port. Step4. Boot up your system. Press or to enter BIOS Setup Utility. Make sure the option "CIR Controller" is setting at [Enabled]. (Advanced Windows. Execute ASRock support CD and install CIR Driver. (It is listed at the bottom of driver list.) English 14 ASRock E35LM1 Motherboard - ASRock E35LM1 | Quick Installation Guide - Page 15
-Angle CIR Receiver does not support Hot-Plug function. Please install it before you boot the system. * ASRock Smart Remote is only supported by some of ASRock motherboards. Please refer to ASRock website for the motherboard support list: http://www.asrock.com 15 ASRock E35LM1 Motherboard English - ASRock E35LM1 | Quick Installation Guide - Page 16
updating the BIOS, you must boot up the system first, and then shut it down before you do the clear-CMOS action. Please be noted that the password, date, time, user default profile, 1394 GUID and MAC address will be cleared only if the CMOS battery is removed. English 16 ASRock E35LM1 Motherboard - ASRock E35LM1 | Quick Installation Guide - Page 17
SATA3_3: see p.2, No. 11) (SATA3_4: see p.2, No. 9) These four Serial ATA3 (SATA3) connectors support SATA data cables for internal storage devices. The current SATA3 interface allows up to 6.0 Gb/s data transfer rate audio devices. OUT2_L J_SENSE OUT2_R MIC2_R MIC2_L 17 ASRock E35LM1 Motherboard - ASRock E35LM1 | Quick Installation Guide - Page 18
sleep state. The LED is off when the system is in S3/S4 sleep state or powered off (S5). HDLED (Hard Drive Activity LED): Connect to the hard drive activity LED on the chassis front panel. The LED is on when the hard drive is reading or writing data. English 18 ASRock E35LM1 Motherboard - ASRock E35LM1 | Quick Installation Guide - Page 19
pin ATX power supply. To use the 20-pin ATX power supply, please plug your power supply along with Pin 1 and Pin 13. Serial port Header (9-pin COM1) (see p.2 No. 21) 20-Pin ATX Power Supply Installation 1 13 This COM1 header supports a serial port module. English 19 ASRock E35LM1 Motherboard - ASRock E35LM1 | Quick Installation Guide - Page 20
and listed on the support CD driver page. Please follow the order from up to bottom side to install those required drivers. Therefore, the drivers you install can work properly. 2.9 Installing Windows® 7 / 7 64-bit / VistaTM / VistaTM 64-bit / XP / XP 64-bit Without RAID Functions If you want - ASRock E35LM1 | Quick Installation Guide - Page 21
without NCQ function STEP 1: Set up UEFI. A. Enter UEFI SETUP UTILITY Advanced screen Storage Configuration. B. Set the option "SATA Mode" to [IDE]. STEP 2: Install Windows® 7 / 7 64-bit / VistaTM / VistaTM 64-bit OS on your system. 21 ASRock E35LM1 Motherboard English - ASRock E35LM1 | Quick Installation Guide - Page 22
to the User Manual (PDF file) contained in the Support CD. 4. Software Support CD information This motherboard supports various Microsoft® Windows® operating systems: 7 / 7 64-bit / VistaTM / VistaTM 64-bit / XP / XP 64-bit. The Support CD that came with the motherboard contains necessary drivers and - ASRock E35LM1 | Quick Installation Guide - Page 23
1.1 Kartoninhalt ASRock E35LM1 Motherboard (Mini-ITX-Formfaktor: 17.0 cm x 17.0 cm; 6.7 Zoll x 6.7 Zoll) ASRock E35LM1 Schnellinstallationsanleitung ASRock E35LM1 Support-CD Zwei Serial ATA (SATA) -Datenkabel (optional) Ein I/O Shield ASRock erinnert... Zur besseren Leistung unter Windows® 7 / 7, 64 - ASRock E35LM1 | Quick Installation Guide - Page 24
sse 24 - Mini-ITX-Formfaktor: 17.0 cm x 17.0 cm; 6.7 Zoll x 6.7 Zoll - AMD Zacate E-240 APU - Unterstützt Cool 'n' QuietTM-Technologie von AMD - UMI 2.5 GT/s - AMD A50M Chipsatz - NCQ-, AHCIund „Hot Plug" (Hot-Plugging)-Funktionen - 4 x SATA3 6,0 GB/s-Anschlüsse ASRock E35LM1 Motherboard Deutsch - ASRock E35LM1 | Quick Installation Guide - Page 25
x USB 2.0-Anschlüsse (Unterstützung 4 zusätzlicher USB 2.0-Anschlüsse) - 32Mb AMI BIOS - AMIs Legal BIOS UEFI mit GUI-Unterstützung - Unterstützung für "Plug and Play" - ACPI 1.1-Weckfunktionen - /Gehäuse lüfter - Spannungsüberwachung: +12V, +5V, +3.3V, Vcore Deutsch 25 ASRock E35LM1 Motherboard - ASRock E35LM1 | Quick Installation Guide - Page 26
Ihr BIOS mit nur wenigen Klickvorgängen ohne Bereitstellung einer zusätzlichen Diskette oder eines anderen komplizierten Flash-Programms aktualisieren. Achten Sie darauf, dass das USB-Flash-Laufwerk oder die Festplatte das Dateisystem FAT32/16/12 benutzen muss. 26 ASRock E35LM1 Motherboard Deutsch - ASRock E35LM1 | Quick Installation Guide - Page 27
Nutzung des Speicherplatzes, der unter Windows®-Betriebssystemen mit 32-Bit-CPU nicht verwendet werden kann. ASRock XFast RAM verkürzt die Ladezeit ASRock XFast RAM liegt in der Reduzierung der Häufigkeit des Zugriffs auf SSDs bzw. HDDs zur Verlän gerung deren Lebenszeit. 27 ASRock E35LM1 Motherboard - ASRock E35LM1 | Quick Installation Guide - Page 28
ASRock Crashless BIOS die BIOS-Aktualisierung automatisch fort, sobald die Stromversorgung wiederhergestellt ist. Bitte beachten Sie, dass alle BIOS und aktualisiert die Geräte-Firmware ohne Zutun von Windows. Bitte beachten Sie, dass diese Funktion nur mit DHCP ASRock E35LM1 Motherboard Deutsch - ASRock E35LM1 | Quick Installation Guide - Page 29
das CMOS allerdings nicht direkt nach der BIOS-Aktualisierung löschen. Wenn Sie das CMOS nach Abschluss der BIOS-Aktualisierung löschen müssen, fahren Sie zuerst niertes Profil, 1394 GUID und MAC-Adresse nur gelöscht werden, wenn die CMOS-Batterie entfernt wird. Deutsch 29 ASRock E35LM1 Motherboard - ASRock E35LM1 | Quick Installation Guide - Page 30
. Wenn Sie Jumperkappen auf Header und Anschlüsse setzen, wird das Motherboard unreparierbar beschädigt! SATA3_1 SATA3_2 SATA3_3 SATA3_4 Seriell-ATA3-Anschlüsse ( I/O-Anschlüssen befinden sich zwei USB 2.0Anschlussleisten am Motherboard. Pro USB 2.0Anschlussleiste werden zwei USB 2.0-Ports unterst - ASRock E35LM1 | Quick Installation Guide - Page 31
AC'97-Audioleiste angeschlossen werden. E. So aktivieren Sie das Mikrofon an der Vorderseite. Bei den Betriebssystemen Windows® XP / XP 64 Bit: Wählen Sie „Mixer". Wählen Sie „Recorder" (Rekorder). Klicken mit Hilfe des Ein-/Ausschalters ausgeschaltet werden können soll. 31 ASRock E35LM1 Motherboard - ASRock E35LM1 | Quick Installation Guide - Page 32
Sie das CPU Lüfterkabel mit diesem Anschluss und passen Sie den schwarzen Draht dem Erdungsstift an. Verbinden Sie die ATXStromversorgung mit diesem Header. 1 13 32 ASRock E35LM1 Motherboard - ASRock E35LM1 | Quick Installation Guide - Page 33
Obwohl dieses Motherboard einen 24-pol. ATX- 12 24 Stromanschluss bietet, kann es auch mit einem modifizierten traditionellen 20-pol. (9-pin COM1) (siehe S.2 - No. 21) Dieser COM-AnschlussHeader wird verwendet, um ein COM-Anschlussmodul zu unterstützen. Deutsch 33 ASRock E35LM1 Motherboard - ASRock E35LM1 | Quick Installation Guide - Page 34
2. BIOS-Information Das Flash Memory dieses Motherboards speichert das Setup-Utility. Drücken Sie oder während des POST (Power-On-Self-Test) um ins Setup zu gelangen, ansonsten werden die Testroutinen weiter abgearbeitet. Wenn Sie ins Setup gelangen wollen, nachdem der POST durchgeführt - ASRock E35LM1 | Quick Installation Guide - Page 35
particulières au modèle que vous utilisez. www.asrock.com/support/index.asp 1.1 Contenu du paquet Carte mère ASRock E35LM1 (Facteur de forme Mini-ITX: 6.7 pouces x 6.7 pouces, 17.0 cm x 17.0 cm) Guide d'installation rapide ASRock E35LM1 CD de soutien ASRock E35LM1 Deux câbles de données de série ATA - ASRock E35LM1 | Quick Installation Guide - Page 36
Mini-ITX: 6.7 pouces x 6.7 pouces, 17.0 cm x 17.0 cm - AMD Zacate E-240 APU - Supporte la technologie Cool 'n' QuietTM d'AMD - UMI 2.5 GT/s - AMD A50M Chipsets - 2 x slots DIMM DDR3 - Supporter DDR3 fonctions NCQ, AHCI et « Hot Plug » (Branche ment à chaud) Français 36 ASRock E35LM1 Motherboard - ASRock E35LM1 | Quick Installation Guide - Page 37
te USB 2.0 (prendre en charge 4 ports USB 2.0 supplémentaires) - 32Mb BIOS AMI - AMI UEFI Legal BIOS avec support GUI - Support du "Plug and Play" - Compatible pour événements de réveil ACPI 1.1 - - Commande de ventilateur processeur/châssis à plusieurs vitesses 37 ASRock E35LM1 Motherboard Français - ASRock E35LM1 | Quick Installation Guide - Page 38
de entrar nos sistemas operativos, como o MS-DOS ou o Windows®. Com este utilitário, poderá premir a tecla durante o teste de arranque POST ou premir a tecla para exibir o menu de configuração do BIOS para aceder ao ASRock Instant Flash. Execute esta ferramenta para guardar o novo ficheiro - ASRock E35LM1 | Quick Installation Guide - Page 39
mémoire que les processeurs du système d'exploitation Windows OS 32-bit ne peuvent pas utiliser. ASRock XFast RAM diminue le temps de chargement des sites ASRock XFast RAM est qu'il réduit la fréquence d'accès à vos SSD ou HDD afin d'accroitre leur durée de vie utile. 39 ASRock E35LM1 Motherboard - ASRock E35LM1 | Quick Installation Guide - Page 40
BIOS, ASRock Crashless BIOS terminera automatiquement la mise à jour du BIOS une fois le courant rétabli. Veuillez noter que les fichiers BIOS avoir à accéder au système d'exploitation Windows. Veuillez noter que le service DHCP doit être activé sur votre ordinateur ASRock E35LM1 Motherboard Français - ASRock E35LM1 | Quick Installation Guide - Page 41
diatement après avoir mis à jour le BIOS. Si vous avez besoin d'effacer le CMOS après avoir mis à jour le BIOS, vous devez allumer en premier le systè faut de l'utilisateur, 1394 GUID et l'adresse MAC seront effacés seulement si la batterie du CMOS est enlevée. Français 41 ASRock E35LM1 Motherboard - ASRock E35LM1 | Quick Installation Guide - Page 42
2.0 sur cette carte mère. Chaque embase USB 2.0 peut prendre en charge 2 ports USB 2.0. Cette barrette peut être utilisée pour connecter des récepteur. Français 42 ASRock E35LM1 Motherboard - ASRock E35LM1 | Quick Installation Guide - Page 43
prendre en charge le HDA pour fonctionner correctement. Veuillez suivre les instructions dans notre manuel et le manuel de châssis afin installer votre E. Pour activer le micro avant. Pour les systèmes d'exploitation Windows® XP / XP 64 bits : Sélectionnez "Mixer". Sélectionnez ASRock E35LM1 Motherboard - ASRock E35LM1 | Quick Installation Guide - Page 44
sur ce connecteur et brancher le fil noir sur la broche de terre. Veuillez connecter l'unité d'alimentation ATX sur cet entête. 1 13 Français 44 ASRock E35LM1 Motherboard - ASRock E35LM1 | Quick Installation Guide - Page 45
(COM1 br.9) (voir p.2 No. 21) Cette en-tête de port COM est utilisée pour prendre en charge un module de port COM. Français 45 ASRock E35LM1 Motherboard - ASRock E35LM1 | Quick Installation Guide - Page 46
édéterminés. Pour des informations détaillées sur le BIOS, veuillez consulter le Guide de l'utilisateur (fichier PDF) dans le CD technique. 3. Informations sur le CD de support Cette carte mère supporte divers systèmes d'exploitation Microsoft® Windows®: 7 / 7 64 bits / VistaTM / VistaTM 64 bits / XP - ASRock E35LM1 | Quick Installation Guide - Page 47
che sul modello che si sta usando. www.asrock.com/support/index.asp 1.1 Contenuto della confezione Scheda madre ASRock E35LM1 (Mini-ITX Form Factor: 6.7-in x 6.7-in, 17.0 cm x 17.0 cm) Guida di installazione rapida ASRock E35LM1 CD di supporto ASRock E35LM1 Due cavi dati Serial ATA (SATA) (opzionali - ASRock E35LM1 | Quick Installation Guide - Page 48
Mini-ITX Form Factor: 6.7-in x 6.7-in, 17.0 cm x 17.0 cm Processore - AMD Zacate E-240 APU - Supporto tecnologia AMD Cool 'n' QuietTM - UMI 2.5 GT/s Chipset - AMD A50M SATA3 6.0Go/s - 1 x Connettore modulo infrarosso consumer - 1 x collettore porta COM 48 ASRock E35LM1 Motherboard Italiano - ASRock E35LM1 | Quick Installation Guide - Page 49
9) - ASRock Crashless BIOS (vedi ATTENZIONE 10) - ASRock OMG (Online Management Guard) (vedi ATTENZIONE 11) - ASRock Internet Flash (vedi ATTENZIONE 12) - Booster ibrido: - ASRock U-COP (vedi ATTENZIONE 13) - Boot Failure Guard (B.F.G.) Monitoraggio - Sensore per la temperatura del processore - ASRock E35LM1 | Quick Installation Guide - Page 50
per eseguire il collegamento appropriato. 4. ASRock Instant Flash è una utilità Flash BIOS integrata nella Flash ROM. Questo comodo strumento d'aggiornamento del BIOS permette di aggiornare il sistema BIOS senza accedere a sistemi operativi come MS-DOS or Windows®. Con questa utilità, si può premere - ASRock E35LM1 | Quick Installation Guide - Page 51
BIOS, ASRock Crashless BIOS terminerà automaticamente la procedura di aggiornamento del BIOS quando è ripristinata la corrente. Notare che i file del BIOS Windows. È necessario eseguire un computer configurato DHCP per attivare questa funzione. 13. Se il processore ASRock E35LM1 Motherboard Italiano - ASRock E35LM1 | Quick Installation Guide - Page 52
del BIOS, è necessario per prima cosa avviare il sistema e poi spegnerlo prima di eseguire l'azzeramento della CMOS. Notare che password, data, ore, profilo utente predefinito, 1394 GUID e indirizzo MAC saranno cancellati solo se è rimossa la batteria della CMOS. 52 ASRock E35LM1 Motherboard - ASRock E35LM1 | Quick Installation Guide - Page 53
scheda madre dispone di due intestazioni USB 2.0. Ciascuna intestazione USB 2.0 supporta due porte USB 2.0. Questo connettore può essere utilizzato per collegare ricevitore remoto. Italiano 53 ASRock E35LM1 Motherboard - ASRock E35LM1 | Quick Installation Guide - Page 54
operi in modo corretto. Attenersi alle istruzioni del nostro manuale e del manuale del telaio per installare il sistema. 2. Se si audio AC'97. E. Per attivare il microfono frontale. Sistema operativo Windows® XP / XP 64-bit: Selezionare "Mixer". Selezionare "Recorder ASRock E35LM1 Motherboard - ASRock E35LM1 | Quick Installation Guide - Page 55
il cavo della ventolina CPU a questo connettore e far combaciare il filo nero al pin terra. Collegare la sorgente d'alimentazione ATX a questo connettore. 1 13 Italiano 55 ASRock E35LM1 Motherboard - ASRock E35LM1 | Quick Installation Guide - Page 56
ATX a 20 pin 1 13 Collettore porta COM (9-pin COM1) (vedi p.2 Nr. 21) Questo collettore porta COM è utilizzato per supportare il modulo porta COM. Italiano 56 ASRock E35LM1 Motherboard - ASRock E35LM1 | Quick Installation Guide - Page 57
BIOS La Flash Memory sulla scheda madre contiene le Setup Utility. Quando si avvia il computer, premi o durante il Power-On-Self-Test (POST) della Setup utility del BIOS; altrimenti, POST continua con i suoi test di routine. Per entrare il BIOS menù. 57 ASRock E35LM1 Motherboard Italiano - ASRock E35LM1 | Quick Installation Guide - Page 58
mero de modelo específico de su placa. www.asrock.com/support/index.asp 1.1 Contenido de la caja Placa base ASRock E35LM1 (Factor forma Mini-ITX: 17,0 cm x 17,0 cm, 6,7" x 6,7") Guía de instalación rápida de ASRock E35LM1 CD de soporte de ASRock E35LM1 Dos cables de datos Serial ATA (SATA) (Opcional - ASRock E35LM1 | Quick Installation Guide - Page 59
Conectores - Factor forma Mini-ITX: 17,0 cm x 17,0 cm, 6,7" x 6,7" - AMD Zacate E-240 APU - Con soporte para tecnología Cool 'n' QuietTM de AMD - UMI 2.5 GT/s - AMD A50M Chipset - 2 x SATA3, admiten una velocidad de transferencia de datos de hasta 6,0Gb/s 59 ASRock E35LM1 Motherboard Español - ASRock E35LM1 | Quick Installation Guide - Page 60
audio de panel frontal - 2 x Cabezal USB 2.0 (admite 4 puertos USB 2.0 adicionales) - 32Mb AMI BIOS - BIOS legal UEFI AMI compatible con GUI - Soporta "Plug and Play" - ACPI 1.1 compliance wake up events - la CPU y el chasis - Monitor de Voltaje: +12V, +5V, +3.3V, Vcore ASRock E35LM1 Motherboard - ASRock E35LM1 | Quick Installation Guide - Page 61
actualizar el BIOS con sólo pulsar un par de botones, sin necesidad de preparar un disco flexible adicional ni utilizar complicadas utilidades de programación. Recuerde que la unidad flash USB o disco duro utilizado debe disponer del sistema de archivos FAT32/16/12. 61 ASRock E35LM1 Motherboard Espa - ASRock E35LM1 | Quick Installation Guide - Page 62
bits en sistemas operativos Windows®. ASRock XFast RAM acorta ASRock Crashless BIOS le permite a los usuarios actualizar su BIOS sin miedo de que ocurra un fallo. Si ocurre una interrupción en el suministro de energía durante el proceso de actualización del BIOS, ASRock 62 ASRock E35LM1 Motherboard - ASRock E35LM1 | Quick Installation Guide - Page 63
en suministro de energía. Tome en cuenta que los archivos del BIOS deben colocarse en el directorio raíz de su disco USB. Só calor cuando usted instala el sistema de PC. 14. ASRock XFast RAM no se admite en Microsoft® Windows® XP / XP 64 bits. 15. EuP, siglas de 63 ASRock E35LM1 Motherboard Español - ASRock E35LM1 | Quick Installation Guide - Page 64
CMOS justamente después de actualizar el BIOS. Si necesita borrar la memoria CMOS justamente después de actualizar el BIOS, debe iniciar primero el sistema y, del usuario, el GUID 1394 y la dirección MAC solamente se borrará si la batería CMOS se quita. Español 64 ASRock E35LM1 Motherboard - ASRock E35LM1 | Quick Installation Guide - Page 65
es una interface para cable de audio de panel frontal que permite conexión y control 1 conveniente de apparatos de OUT2_L J_SENSE Audio. OUT2_R MIC2_R MIC2_L 65 ASRock E35LM1 Motherboard Español - ASRock E35LM1 | Quick Installation Guide - Page 66
operar correctamente. Por favor, siga las instrucciones en nuestro manual y en el manual de chasis para instalar su sistema. 2. Si utiliza el 97. E. Activación del micrófono frontal. En sistemas operativos Windows® XP / XP 64-bit: Seleccione "Mixer" (Mezclador). ASRock E35LM1 Motherboard Español - ASRock E35LM1 | Quick Installation Guide - Page 67
20 pins, por favor, conecte su fuente de alimentación usando los Pins 1 y 13. Instalación de una Fuente de Alimentación ATX de 20 Pins 1 13 67 ASRock E35LM1 Motherboard Español - ASRock E35LM1 | Quick Installation Guide - Page 68
Cabezal del puerto COM (9-pin COM1) (vea p.2, N. 21) Este cabezal del puerto COM se utiliza para admitir un módulo de puerto COM. Español 68 ASRock E35LM1 Motherboard - ASRock E35LM1 | Quick Installation Guide - Page 69
configurar la BIOS, por favor refiérase al Manual del Usuario (archivo PDF) contenido en el CD. 3. Información de Software Support CD Esta placa-base soporta diversos tipos de sistema operativo Windows®: 7 / 7 el archivo "ASSETUP.EXE" para iniciar la instalación. 69 ASRock E35LM1 Motherboard Español - ASRock E35LM1 | Quick Installation Guide - Page 70
www.asrock.com/support/index.asp 1.1 ASRock E35LM1 Mini-ITX: 6,7 x 6,7 17,0 x 17,0 см) ASRock E35LM1 ASRock E35LM1 2 x Serial ATA (SATA 1 x I/O ASRock Windows® 7 / 7 64-bit / VistaTM / VistaTM 64-bit BIOS Storage Configuration AHCI BIOS 70 ASRock E35LM1 Motherboard - ASRock E35LM1 | Quick Installation Guide - Page 71
Mini-ITX: 6,7 x 6,7 17,0 x 17,0 см - AMD Zacate E-240 APU AMD Cool 'n' QuietTM - UMI 2.5 GT/s AMD A50M Память - 2 x DDR3 DIMM DDR3 1333(OC)/1066/800 не- ECC память 8 ГБ 1) Гнезда - 1 x PCI Express 2.0 x16 x4) AMD ATX 71 ASRock E35LM1 Motherboard - ASRock E35LM1 | Quick Installation Guide - Page 72
вания CPU FAN Chassis FAN 12V, +5V, +3.3V, Vcore Microsoft® Windows® 7 / 7 64-bit / VistaTM / 64 VistaTM / XP / XP 64-bit 14) - FCC, CE, WHQL ErP/EuP Ready ErP/EuP 15) http://www.asrock.com 72 ASRock E35LM1 Motherboard - ASRock E35LM1 | Quick Installation Guide - Page 73
ASRock Instant Flash BIOS на USB BIOS USB FAT32/16/12. 5 Apple iPhone, iPod и iPad Touch ASRock ASRock APP Charger APP Charger iPhone 40%. ASRock APP Charger Apple S1 S3 S4 S5 APP Charger ASRock: http://www.asrock.com/Feature/AppCharger/index.asp 73 ASRock E35LM1 Motherboard - ASRock E35LM1 | Quick Installation Guide - Page 74
USB 8. ASRock XFast LAN Youtube 9 32 Windows®. ASRock XFast RAM Adobe Photoshop 5 ASRock XFast RAM SSD 10. ASRock Crashless BIOS BIOS BIOS ASRock Crashless BIOS BIOS BIOS USB USB2.0. 11 OMG OMG 12. Internet Flash UEFI UEFI Windows DHCP 74 ASRock E35LM1 Motherboard - ASRock E35LM1 | Quick Installation Guide - Page 75
. 15. EuP Energy Using Product EuP 1 EuP Intel EuP 50 5V 100 EuP. 1.3 short open 3 1 и 2 CMOS (CLRCMOS1, 3 2, п. 6) CMOS CLRCMOS1 CMOS 15 5 2 и 3 CLRCMOS1 CMOS BIOS CMOS BIOS CMOS 1394 GUID и MAC CMOS. 75 ASRock E35LM1 Motherboard - ASRock E35LM1 | Quick Installation Guide - Page 76
2.0 USB 2.0 USB 2.0. 1 GND P+8 P-8 USB_PWR (4 CIR1 2, п. 17) 1 GND IRTX IRRX ATX+5VSB 9 HD_AUDIO1) (см. cтр. 2, п.20) 76 GND PRESENCE# MIC_RET OUT_RET 1 OUT2_L J_SENSE OUT2_R MIC2_R MIC2_L ASRock E35LM1 Motherboard - ASRock E35LM1 | Quick Installation Guide - Page 77
Audio_L (LIN OUT2_L. C Ground (GND Ground (GND). D MIC_RET и OUT_RET HD AC'97 E Windows® XP / XP 64 Mixer Recorder FrontMic Windows® 7 / 7 64-бита, VistaTM / VistaTM 64 FrontMic Realtek Recording Volume 9 PANEL1 2, п. 8) PWRBTN RESET 77 ASRock E35LM1 Motherboard - ASRock E35LM1 | Quick Installation Guide - Page 78
PLED S1 S3 или S4 S5). HDLED 4 SPEAKER1 2, п. 13) Chassis Fan 4 CHA_FAN1 2, п. 2) (3 CHA_FAN2 2, п. 14) CHA_FAN_SPEED +12V GND FAN_SPEED_CONTROL 3 CPU_FAN1 2, п. 1) ATX (24 ATXPWR1 2, п. 7) 12 24 ATX. 1 13 78 ASRock E35LM1 Motherboard - ASRock E35LM1 | Quick Installation Guide - Page 79
12 24 ивает 24 ATX 20 ATX 20 ATX 1 13. 20 ATX 1 13 COM 9 COM1 2, п. 21) COM COM. 79 ASRock E35LM1 Motherboard - ASRock E35LM1 | Quick Installation Guide - Page 80
(BIOS Setup BIOS Setup F2> или + + - ASRock E35LM1 | Quick Installation Guide - Page 81
desempenho em Windows® 7 / 7 64-bit / VistaTM / VistaTM 64-bit, recomendamos que defina a opção Configuração de Armazenamento na BIOS para o modo AHCI. Para mais detalhes acerca da configuração da BIOS consulte o "Manual de utilizador" no nosso CD de suporte. 81 ASRock E35LM1 Motherboard Português - ASRock E35LM1 | Quick Installation Guide - Page 82
painel traseiro SATA3 - Formato Mini-ITX: 6,7 pol. x 6,7 pol., 17,0 cm x 17,0 cm - AMD Zacate E-240 APU - Suporta a tecnologia AMD Cool 'n' QuietTM - UMI 2.5 GT/s - AMD A50M Chipsets - 2 x de dados de até 6,0 Gb/s, suporte NCQ, AHCI e "conexão a quente" Português 82 ASRock E35LM1 Motherboard - ASRock E35LM1 | Quick Installation Guide - Page 83
- 2 x cabezal USB 2.0 (suportar 4 portas USB 2.0 adicionais) - 32Mb BIOS AMI - BIOS UEFI oficial da AMI com suporte para GUI - Suporta dispositivos "Plug and Play ® Windows® 7 / 7 64-bit / VistaTM / VistaTM 64-bit / XP / XP 64-bit Operacional (veja o AVISO 14) Português 83 ASRock E35LM1 Motherboard - ASRock E35LM1 | Quick Installation Guide - Page 84
abord dans un système d'exploitation tel que MS-DOS ou Windows®. Avec cet utilitaire, vous pouvez appuyer sur la touche pendant le POST ou sur la touche durant le menu de configuration du BIOS pour accéder à ASRock Instant Flash. Lancez simplement cet outil et enregistrez le nouveau fichier - ASRock E35LM1 | Quick Installation Guide - Page 85
Crashless BIOS retoma automaticamente o processo de actualização da BIOS após o restabelecimento da energia. Tenha em atenção que será necessário colocar os ficheiros da BIOS no directório de raiz do seu disco USB. Esta funcionalidade apenas é suportada em portas USB 2.0. 85 ASRock E35LM1 Motherboard - ASRock E35LM1 | Quick Installation Guide - Page 86
de interface térmica entre o processador e o dissipador de calor. 14. ASRock XFast RAM não é suportada nos sistemas operativos Microsoft® Windows® XP / XP de 64 bits. 15. EuP, que significa Energy com o fabricante da fonte de alimentação para mais detalhes. 86 ASRock E35LM1 Motherboard Português - ASRock E35LM1 | Quick Installation Guide - Page 87
após ter efectuado a actualização da BIOS. Se precisar de limpar o CMOS logo após ter terminado uma actualização da BIOS, deverá primeiro iniciar o sistema e finido de utilizador, 1394 GUID e endereço MAC apenas serão limpos se a bateria do CMOS for retirada. Português 87 ASRock E35LM1 Motherboard - ASRock E35LM1 | Quick Installation Guide - Page 88
(CIR1 de 4 pinos) (veja a folha 2, No. 17) 1 GND IRTX IRRX ATX+5VSB Este conector pode ser utilizado para ligar o receptor do controlo remoto. Português 88 ASRock E35LM1 Motherboard - ASRock E35LM1 | Quick Installation Guide - Page 89
para funcionar correctamente. Siga s instruções que aparecem no manual e no manual do chassis para instalar o sistema. 2. Se utilizar o E. Para activar o microfone frontal. Para os Sistemas Operativos Windows® XP / XP 64 bits: Seleccione "Misturador". Seleccione "Gravador ASRock E35LM1 Motherboard - ASRock E35LM1 | Quick Installation Guide - Page 90
2, No. 7) 12 24 Ligue o cabo do ventilador da CPU, coincidindo o fio preto com o pino de aterramento. Ligue a fonte de alimentação ATX neste conector. 1 13 Português 90 ASRock E35LM1 Motherboard - ASRock E35LM1 | Quick Installation Guide - Page 91
Pinos 1 13 Conector da porta COM (COM1 de 9 pinos) (veja a folha 2, No. 21) Este conector é usado para suportar um módulo de porta COM. Português 91 ASRock E35LM1 Motherboard - ASRock E35LM1 | Quick Installation Guide - Page 92
do computador. Automaticamente iniciará o menu principal, casa o "AUTORUN" esteja ativado. Se o menu principal não aparecer automaticamente, explore o CD e execute o "ASSETUP.EXE" localizado na pasta "BIN". 92 ASRock E35LM1 Motherboard Português - ASRock E35LM1 | Quick Installation Guide - Page 93
.com/support/index.asp 1.1 Paket İçindekiler ASRock E35LM1 Anakart (Mini-ITX Form Faktörü: 6,7-inç x 6,7-inç, 17,0 cm x 17,0 cm) ASRock E35LM1 Hızlı Takma Kılavuzu ASRock E35LM1 Destek CD'si 2 x Seri ATA (SATA) Veri Kablosu (İsteğe Bağlı) 1 x G/Ç Panel Kalkanı ASRock Size Şunu Hatırlatır... Windows - ASRock E35LM1 | Quick Installation Guide - Page 94
94 - Mini-ITX Form Faktörü: 6,7-inç x 6,7-inç, 17,0 cm x 17,0 cm - AMD Zacate E-240 APU - AMD'nin Cool 'n' QuietTM Teknolojisini Destekler - UMI 2.5 GT/s - AMD A50M Yonga seti portu fişi - CPU/Kasa FAN konektörü - 24 pin ATX güç konektörü - Ön panel ses konektörü ASRock E35LM1 Motherboard Türkçe - ASRock E35LM1 | Quick Installation Guide - Page 95
ASRock APP Charger (bkz. DİKKAT 5) - ASRock SmartView (bkz. DİKKAT 6) - ASRock XFast USB (bkz. DİKKAT 7) - ASRock XFast LAN (bkz. DİKKAT 8) - ASRock XFast RAM (bkz. DİKKAT 9) - ASRock Crashless BIOS (bkz. DİKKAT 10) - ASRock Microsoft® Windows® 7 asrock.com Türkçe 95 ASRock E35LM1 Motherboard - ASRock E35LM1 | Quick Installation Guide - Page 96
destekler. Düzgün bağlantı için sayfa 3'teki tabloyu kontrol edin. 4. ASRock Anında Flash, Flash ROM'a katıştırılmış bir BIOS flash yardımcı programıdır. Bu kullanışlı BIOS güncelleme aracı, sistem BIOS'unu MSDOS veya Windows® gibi ilk önce işletim sistemine girmeden güncellemenizi sağlar. Bu yardımc - ASRock E35LM1 | Quick Installation Guide - Page 97
ASRock Crashless BIOS kullanıcıların arıza çıkma korkusu olmadan BIOS'larını güncellemesine imkan verir. BIOS güncelleme işlemi sırasında güç kaybı yaşanırsa, ASRock Crashless BIOS güç geri geldiğinde BIOS otomatik olarak algılar ve Windows İşletim Sistemi'ne girmeden ASRock E35LM1 Motherboard Türkçe - ASRock E35LM1 | Quick Installation Guide - Page 98
14. ASRock XFast RAM, Microsoft® Windows® XP / XP 64-bit ile uyumlu değildir. 15. Enerji Kullanan Ürün anlamına gelen EuP, tamamlanmış sistemler iç ı gerekir. EuP hazır güç kaynağı seçimi için, daha fazla ayrıntı için güç kaynağı üreticisine başvurmanızı öneririz. 98 ASRock E35LM1 Motherboard Türkçe - ASRock E35LM1 | Quick Installation Guide - Page 99
atlatıcı şapkası kullanın. Ancak, BIOS'u güncelledikten hemen sonra lütfen CMOS'u temizlemeyin. BIOS'u güncellemeyi tamamladığınızda CMOS'u fili, 1394 GUID ve MAC adresinin yalnızca CMOS pili çıkarıldığında temizleneceğini lütfen aklınızda bulundurunuz. Türkçe 99 ASRock E35LM1 Motherboard - ASRock E35LM1 | Quick Installation Guide - Page 100
OUT2_R MIC2_R MIC2_L Bu, panel ses kablosu için uygun bağlantı sağlayan ve ses cihazlarını kontrol etmeyi sağlayan bir arayüzdür. Türkçe 100 ASRock E35LM1 Motherboard - ASRock E35LM1 | Quick Installation Guide - Page 101
/ XP 64-bit İS için: "Karıştırıcı"yı seçin. "Kaydedici"yi seçin. Sonra "Ön Mikrofon"u tıklatın. Windows® 7 / 7 64-bit / VistaTM / VistaTM 64-bit İS için: Realtek Kontrol panelinde "Ön Mikrofon" Sekmesine gidin. Sabit disk veri okurken veya yazarken LED yanar. Türkçe 101 ASRock E35LM1 Motherboard - ASRock E35LM1 | Quick Installation Guide - Page 102
birlikte takın. Seri port Fişi (9-pinli COM1) (bkz. s.2 No. 21) 20-Pinli ATX Güç Kaynağını Takma 1 13 Bu COM1 fişi bir seri port modülünü destekler. Türkçe 102 ASRock E35LM1 Motherboard - ASRock E35LM1 | Quick Installation Guide - Page 103
nda BIOS Ayarları yardımcı programına girmek için veya tuşuna basın; aksi halde, POST test rutinlerine devam eder. BIOS Ayarları 3. Yazılım Destek CD'si bilgileri Bu anakart çeşitli Microsoft® Windows® işletim sistemleri destekler: 7 / 7 64-bit / VistaTM / ASRock E35LM1 Motherboard Türkçe - ASRock E35LM1 | Quick Installation Guide - Page 104
Induk E35LM1 ASRock (Faktor Form Mini-ITX: 6.7-in x 6.7-in, 17.0 cm x 17.0 cm) Pemimpin Instalasi Cepat E35LM1 ASRock Support CD E35LM1 ASRock 2 x Kabel satu serial Data ATA (SATA) (bebas-pilih) 1 x Satu Pelindung I/O ASRock Mengingatkan... Untuk mendapatkan performa lebih baik di Windows® 7/ 7 64 - ASRock E35LM1 | Quick Installation Guide - Page 105
Mini-ITX: 6.7-in x 6.7-in, 17.0 cm x 17.0 cm - AMD Zacate E-240 APU - Dapat digunakan AM's Cool 'n' QuietTM Technology - UMI 2.5 GT/s - AMD A50M - 2 x Alur DDR3 DIMM - Mendukung memori /casis - Penghubung power 24 pin ATX - Penghubung audio panel dapan 105 ASRock E35LM1 Motherboard Bahasa Indonesia - ASRock E35LM1 | Quick Installation Guide - Page 106
digunakan Microsoft® Windows® 7 / 7 64-bit / VistaTM / VistaTM 64-bit / XP / XP 64-bit Sertifikasi - FCC, CE, WHQL - ErP/EuP Ready (memerlukan catu daya ErP/EuP ready) * Untuk informasi rinci, silakan kunjungi website kami: http://www.asrock.com Bahasa Indonesia 106 ASRock E35LM1 Motherboard - ASRock E35LM1 | Quick Installation Guide - Page 107
pengaturan susunan BIOS, penggunaan Untied Overclocking Technology, atau pemakaian perlengkapan overclocking lain. Overclocking barangkali mengganggu stabilitas sistem Anda, atau menimbulkan kerusakan terhadap komponen dan alat sistem Anda. Anda seharusnya. 107 ASRock E35LM1 Motherboard Bahasa - ASRock E35LM1 | Quick Installation Guide - Page 108
system POST and choose the item "UEFI:xxx" to boot. 4. Start Windows® installation. 5. If you install Windows® 7 64-bit OS, OS will be formatted by GPT (GUID Partition Table). Please install the hotfix file from Microsoft®: http://support.microsoft.com/kb/979903 108 ASRock E35LM1 Motherboard English
-
 1
1 -
 2
2 -
 3
3 -
 4
4 -
 5
5 -
 6
6 -
 7
7 -
8
-
9
-
10
-
11
-
12
-
13
-
14
-
15
-
16
-
17
-
18
-
19
-
20
-
21
-
22
-
23
-
24
-
25
-
26
-
27
-
28
-
29
-
30
-
31
-
32
-
33
-
34
-
35
-
36
-
37
-
38
-
39
-
40
-
41
-
42
-
43
-
44
-
45
-
46
-
47
-
48
-
49
-
50
-
51
-
52
-
53
-
54
-
55
-
56
-
57
-
58
-
59
-
60
-
61
-
62
-
63
-
64
-
65
-
66
-
67
-
68
-
69
-
70
-
71
-
72
-
73
-
74
-
75
-
76
-
77
-
78
-
79
-
80
-
81
-
82
-
83
-
84
-
85
-
86
-
87
-
88
-
89
-
90
-
91
-
92
-
93
-
94
-
95
-
96
-
97
-
98
-
99
-
100
-
101
-
102
-
103
-
104
-
105
-
106
-
107
-
108
 |
 |
1
ASRock
E35LM1
Motherboard
English
Copyright Notice:
No part of this installation guide may be reproduced, transcribed, transmitted, or trans-
lated in any language, in any form or by any means, except duplication of documentation
by the purchaser for backup purpose, without written consent of ASRock Inc.
Products and corporate names appearing in this guide may or may not be registered
trademarks or copyrights of their respective companies, and are used only for identi
fi
ca-
tion or explanation and to the owners’ bene
fi
t, without intent to infringe.
Disclaimer:
Speci
fi
cations and information contained in this guide are furnished for informational use
only and subject to change without notice, and should not be constructed as a commit-
ment by ASRock. ASRock assumes no responsibility for any errors or omissions that may
appear in this guide.
With respect to the contents of this guide, ASRock does not provide warranty of any kind,
either expressed or implied, including but not limited to the implied warranties or condi-
tions of merchantability or
fi
tness for a particular purpose. In no event shall ASRock, its
directors, of
fi
cers, employees, or agents be liable for any indirect, special, incidental, or
consequential damages (including damages for loss of pro
fi
ts, loss of business, loss of
data, interruption of business and the like), even if ASRock has been advised of the pos-
sibility of such damages arising from any defect or error in the guide or product.
This device complies with Part 15 of the FCC Rules. Operation is subject to the following
two conditions:
(1) this device may not cause harmful interference, and
(2) this device must accept any interference received, including interference that
may cause undesired operation.
CALIFORNIA, USA ONLY
The Lithium battery adopted on this motherboard contains Perchlorate, a toxic substance
controlled in Perchlorate Best Management Practices (BMP) regulations passed by the
California Legislature. When you discard the Lithium battery in California, USA, please
follow the related regulations in advance.
“Perchlorate Material-special handling may apply, see
www.dtsc.ca.gov/hazardouswaste/perchlorate”
ASRock Website: http://www.asrock.com
Published March 2012
Copyright
©
2012 ASRock INC. All rights reserved.