ASRock FM2A88X-ITX User Manual
ASRock FM2A88X-ITX Manual
 |
View all ASRock FM2A88X-ITX manuals
Add to My Manuals
Save this manual to your list of manuals |
ASRock FM2A88X-ITX manual content summary:
- ASRock FM2A88X-ITX | User Manual - Page 1
User Manual - ASRock FM2A88X-ITX | User Manual - Page 2
and subject to change without notice, and should not be constructed as a commitment by ASRock. ASRock assumes no responsibility for any errors or omissions that may CALIFORNIA, USA ONLY The Lithium battery adopted on this motherboard contains Perchlorate, a toxic substance controlled in Perchlorate - ASRock FM2A88X-ITX | User Manual - Page 3
The terms HDMI™ and HDMI High-Definition Multimedia Interface, and the HDMI logo are trademarks or registered trademarks of HDMI Licensing LLC in the United States and other countries. Manufactured under license under U.S. Patent Nos: 5,956,674; 5,974,380; 6,487,535; 7,003,467 & other U.S. and - ASRock FM2A88X-ITX | User Manual - Page 4
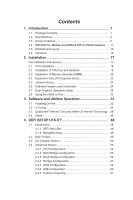
6 1.4 WiFi-802.11n Module and ASRock WiFi 2.4/5GHz Antenna...... 11 1.5 Motherboard Layout 13 1.6 I/O Panel 15 2. Installation 17 Pre-installation Precautions 17 2.1 CPU Installation 18 2.2 Installation of CPU Fan and Heatsink 19 2.3 Installation of Memory Modules (DIMM 20 2.4 Expansion Slots - ASRock FM2A88X-ITX | User Manual - Page 5
4.5 Tool 62 4.6 Hardware Health Event Monitoring Screen 65 4.7 Boot Screen 66 4.8 Security Screen 68 4.9 Exit Screen 69 - ASRock FM2A88X-ITX | User Manual - Page 6
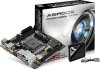
the model you are using. www.asrock.com/support/index.asp 1.1 Package Contents ASRock FM2A88X-ITX+ Motherboard (Mini-ITX Form Factor) ASRock FM2A88X-ITX+ Quick Installation Guide ASRock FM2A88X-ITX+ Support CD 2 x Serial ATA (SATA) Data Cables (Optional) 1 x ASRock WiFi 2.4/5GHz Antenna 2 x SMA Wi - ASRock FM2A88X-ITX | User Manual - Page 7
Memory Expansion Slot Graphics - Mini-ITX Form Factor - Premium Gold Capacitor design (100% Japan-made high- quality conductive polymer capacitors) - Home Cloud - HDMI-In - Supports Socket FM2+ 95W / FM2 100W processors - 4 + 2 Power Phase design - AMD A88X (Bolton-D4) - Dual Channel DDR3 Memory - ASRock FM2A88X-ITX | User Manual - Page 8
1 x eSATA Connector - 2 x USB 3.0 Ports (AMD A88X (Bolton-D4)) - 1 x RJ-45 LAN Port with LED (ACT/LINK LED and SPEED LED) - HD Audio Jacks: Rear Speaker/Central/Bass/Line in/Front Speaker/Microphone - 6 x SATA3 6.0 Gb/s Connectors, support RAID (RAID 0, RAID 1, RAID 5 and RAID 10), NCQ, AHCI and Hot - ASRock FM2A88X-ITX | User Manual - Page 9
- 1 x CPU Fan Connector (4-pin) - 1 x Chassis Fan Connector (4-pin) - 1 x 24 pin ATX Power Connector - 1 x 4 pin 12V Power Connector - 1 x Front Panel Audio Connector - 2 x USB 2.0 Headers (Support 4 USB 2.0 ports) - 1 x USB 3.0 Header by AMD A88X (Bolton-D4) (Supports 2 USB 3.0 ports) BIOS - ASRock FM2A88X-ITX | User Manual - Page 10
overclocking. CAUTION! 1. Whether 2400/2133/1866/1600MHz memory speed is supported depends on the CPU you adopt. If you want to adopt DDR3 2400/2133/1866/1600 memory module on this motherboard, please refer to the memory support list on our website for the compatible memory modules. ASRock website - ASRock FM2A88X-ITX | User Manual - Page 11
solution for you - ASRock APP Charger. Simply install the APP Charger driver, it makes your iPhone charge much quickly from your computer and up to 40% faster than before. ASRock APP Charger allows you to quickly charge many Apple devices simultaneously and even supports continuous charging when - ASRock FM2A88X-ITX | User Manual - Page 12
fear of failing. If power loss occurs during the BIOS update process, ASRock Crashless BIOS will automatically finish the BIOS update procedure after regaining power. Please note that BIOS files need to be placed in the root directory of your USB disk. Only USB2.0 ports support this feature. 7 - ASRock FM2A88X-ITX | User Manual - Page 13
ASRock Tech Service by sending a support request from the UEFI setup utility if you are having trouble with your PC. ASRock Dehumidifier Function Users may prevent motherboard damages due to dampness by enabling "Dehumidifier Function". When enabling Dehumidifier Function, the computer will power - ASRock FM2A88X-ITX | User Manual - Page 14
drive to install the drivers from our support CD, Easy Driver Installer is a handy tool in the UEFI that installs the LAN driver to your system via an USB storage device, then downloads and installs the other required drivers automatically. ASRock Interactive UEFI ASRock Interactive UEFI is a blend - ASRock FM2A88X-ITX | User Manual - Page 15
Windows? Why should we even bother memorizing those foot long passwords? Just plug in the USB Key and let your computer log in to windows automatically! ASRock FAN-Tastic Tuning ASRock FAN-Tastic Tuning is included in A-Tuning. Configure up to five different fan speeds using the graph. The fans will - ASRock FM2A88X-ITX | User Manual - Page 16
also includes Low Energy Technology and ensures extraordinary low power consumption for PCs. The 2T2R WiFi solution sets a WiFi high speed standard and offers max link rate up to 300Mbps. Compared to other 1T1R WiFi motherboards with 150Mbps, ASRock's 2T2R WiFi solution drives up to 2X faster. * The - ASRock FM2A88X-ITX | User Manual - Page 17
Installing the SMA Wi-Fi Antenna Cables and ASRock WiFi 2.4/5GHz Antenna Step 1 Prepare the SMA Wi-Fi Antenna Cables that come with the package. Step 2 Locate the WiFi Module that is installed on the motherboard's half/full (mSATA) miniPCI Express slot. Then attach the SMA WiFi Antenna Cables to the - ASRock FM2A88X-ITX | User Manual - Page 18
-45 1 USB_45 MINI_PCIE1(mSATA) Top: CTR BASS LINE IN Center: REAR SPK FRONT Center: Bottom: MIC IN Top: HD_AUDIO1 1 WiFi-802.11n+BT Module NUT2 ATX12V1 NUT1 PCIE1 SATA3_6 SATA3_5 SATA3_4 SATA3_3 AMD A88X (Bolton-D4) Chipset SATA3_2 SATA3_1 64Mb BIOS Bottom: Optical SPDIF USB3_0_1 - ASRock FM2A88X-ITX | User Manual - Page 19
No. Description 1 TPM Header (TPMS1) 2 CPU Fan Connector (CPU_FAN1) 3 Chassis Intrusion Header (CI1) 4 Clear CMOS Jumper (CLRCMOS1) 5 ATX Power Connector (ATXPWR1) 6 Chassis Speaker Header (SPEAKER1) 7 2 x 240-pin DDR3 DIMM Slots (DDR3_A1, DDR3_B1) 8 Chassis Fan Connector (CHA_FAN1) 9 System Panel - ASRock FM2A88X-ITX | User Manual - Page 20
4 LAN RJ-45 Port** 5 Central / Bass (Orange) 6 Rear Speaker (Black) 7 Line In (Light Blue) 8 Front Speaker (Lime)*** 14 13 12 11 10 9 No. Description 9 Microphone (Pink) 10 Optical SPDIF Out Port USB 3.0 Ports (USB3_23) 11 (AMD A88X (Bolton-D4)) 12 eSATA Connector 13 HDMI-In Port 14 HDMI-Out - ASRock FM2A88X-ITX | User Manual - Page 21
are two LEDs on the LAN port. Please refer to the table below for the LAN port LED indications. ACT/LINK LED SPEED LED LAN Port Activity / Link front panel audio cable to the front panel audio header. After restarting your computer, you will find the "Mixer" tool on your system. Please select " - ASRock FM2A88X-ITX | User Manual - Page 22
you install or remove any component, ensure that the power is switched off or the power cord is detached from the power supply. Failure to do so may cause severe damage to the motherboard, peripherals, and/or components. 1. Unplug the power cord from the wall socket before touching any component - ASRock FM2A88X-ITX | User Manual - Page 23
the socket corner with a small triangle. Carefully insert the CPU into the socket until it fits in place. The CPU fits only in one correct orientation. DO NOT force the CPU into the socket to avoid bending of the pins. Step 4. When the CPU is in place, press it firmly on the socket while - ASRock FM2A88X-ITX | User Manual - Page 24
. Make sure that the CPU and the heatsink are securely fastened and in good contact with each other. Then connect the CPU fan to the CPU FAN connector (CPU_FAN1, see Page 13, No. 2). For proper installation, please kindly refer to the instruction manuals of the CPU fan and the heatsink. 19 - ASRock FM2A88X-ITX | User Manual - Page 25
2.3 Installation of Memory Modules (DIMM) This motherboard provides two 240-pin DDR3 (Double Data Rate 3) DIMM slots, and supports Dual Channel Memory Technology. 1. For dual channel configuration, you always need to install identical (the same brand, speed, size and chip-type) DDR3 DIMM pairs. 2. - ASRock FM2A88X-ITX | User Manual - Page 26
1 2 3 21 - ASRock FM2A88X-ITX | User Manual - Page 27
Slots (PCI Express Slots) There is 1 PCI Express slot and 1 half/full (mSATA) mini-PCI Express slot on this motherboard. Before installing an expansion card, please make sure that the power supply is switched off or the power cord is unplugged. Please read the documentation of the expansion card and - ASRock FM2A88X-ITX | User Manual - Page 28
to default setup, please turn off the computer and unplug the power cord from the power supply. After waiting for 15 seconds, use a jumper cap to short pin2 and pin3 on CLRCMOS1 for 5 seconds. However, please do not clear the CMOS right after you update the BIOS. If you need to clear the CMOS - ASRock FM2A88X-ITX | User Manual - Page 29
1 GND P+6 P-6 USB_PWR 1 Besides four default USB 2.0 ports on the I/O panel, there are two USB 2.0 headers on this motherboard. Each USB 2.0 header can support two USB 2.0 ports. USB 3.0 Header (19-pin USB3_0_1) (see p.13, No. 10) Vbus IntA_P0_SSRXIntA_P0_SSRX+ GND IntA_P0_SSTXIntA_P0_SSTX+ GND - ASRock FM2A88X-ITX | User Manual - Page 30
supports Jack Sensing, but the panel wire on the chassis must support HDA to function correctly. Please follow the instruction in our manual and chassis manual restart the computer if the computer freezes and fails to perform a normal restart. PLED (System Power LED): Connect to the power status - ASRock FM2A88X-ITX | User Manual - Page 31
. If you plan to connect the 3-Pin CPU fan to the CPU fan connector on this motherboard, please connect it to Pin 1-3. Pin 1-3 Connected 3-Pin Fan Installation ATX Power Connector 24 13 (24-pin ATXPWR1) (see p.13 No. 5) 12 1 Please connect an ATX power supply to this connector. 26 - ASRock FM2A88X-ITX | User Manual - Page 32
p.13 No. 17) Chassis Intrusion Header (2-pin CI1) (see p.13, No. 3) 1 GND Signal Please connect an ATX 12V power supply to this connector. This motherboard supports CASE OPEN detection feature that detects if the chassis cover has been removed. This feature requires a chassis with - ASRock FM2A88X-ITX | User Manual - Page 33
Graphics Operation Guide This motherboard supports AMD Dual Graphics feature. AMD Dual Graphics brings multi-GPU performance capabilities by enabling an AMD A88X (Bolton-D4) integrated graphics processor and a discrete graphics processor to operate simultaneously with combined output to a single - ASRock FM2A88X-ITX | User Manual - Page 34
your system. Then you can freely enjoy the benefit of Dual Graphics feature. * Dual Graphics appearing here is a registered trademark of AMD Technologies Inc., and is used only for identification or explanation and to the owners' benefit, without intent to infringe. * For further information - ASRock FM2A88X-ITX | User Manual - Page 35
the HDMI-In Port The HDMI-In port on this motherboard lets you easily switch between PC screen (on-board VGA) and external video source on feature of this function is that external video source can be viewed even when your PC is in standby mode or powered off. For example, you can play smartphone - ASRock FM2A88X-ITX | User Manual - Page 36
USB 3.0 USB 3.0 Connection Diagram HDMI Adapter Power Source 31 - ASRock FM2A88X-ITX | User Manual - Page 37
:" and enter the action for the key. 1. If there is no video displayed on your monitor, make sure that the cables are properly connected and make sure that "Deep S5" option in BIOS SETUP is set to [Disable]. 2. If required, connect a power source to the adapter that lets the smartphone/tablet output - ASRock FM2A88X-ITX | User Manual - Page 38
comes with the motherboard contains necessary drivers and useful utilities that enhance the motherboard's features. Running The Support CD To begin using the support CD, insert the CD into your CD-ROM drive. The CD automatically displays the Main Menu if "AUTORUN" is enabled in your computer. If the - ASRock FM2A88X-ITX | User Manual - Page 39
lot more. 3.2.1 Installing A-Tuning When you install the all-in-one driver to your system from ASRock's support CD, A-Tuning will be auto-installed as well. After the installation, Tools, OC Tweaker, System Info and Tech Service. Operation Mode Choose an operation mode for your computer. 34 - ASRock FM2A88X-ITX | User Manual - Page 40
8 and the VBIOS must support UEFI GOP if you are using an external graphics card. OMG Schedule the starting and ending hours of Internet access granted to other users. Place X marks on the time table to disable the Internet. Good Night LED Switch off the Power/HDD/LAN LEDs when the system is - ASRock FM2A88X-ITX | User Manual - Page 41
level when the assigned temperature is met. Dehumidifier Prevent motherboard damages due to dampness. Enable this function and configure the period of time until the computer powers on, and the duration of the dehumidifying process. HDMI-IN Connect two different devices to one monitor and toggle - ASRock FM2A88X-ITX | User Manual - Page 42
Tech Service Contact Tech Service. 37 - ASRock FM2A88X-ITX | User Manual - Page 43
Wake On Internet Technology allows you to wake up and remote control your home computer from energy efficient sleep mode. Before configuring this feature, make sure that the "PCI Device Power On" is enabled in UEFI SETUP UTILITY > Advanced > ACPI Configuration. 3.3.1 Configuring and Using Sunlogin - ASRock FM2A88X-ITX | User Manual - Page 44
Step 3 Click on Remote Client and follow the onscreen instructions to complete the installation. Step 4 Double-click the Sunlogin Remote Control icon tray. in the Windows system Step 5 Make sure that "Remote wakeup module" and "Remote control module" is set to On. 39 - ASRock FM2A88X-ITX | User Manual - Page 45
Installing Sunlogin control client Step 1 For Windows users: Download "Control Client" from the Download section of sunlogin.oray.com and execute it. Log-in with your Sunlogin Account and Password. For iPad/iPhone users: Download "Sunlogin" from the App Store and install the app. Then fill in your - ASRock FM2A88X-ITX | User Manual - Page 46
. Then fill in your Sunlogin Account and Password. Using Remote Wakeup For Windows users: Select one Host (Offline with Gray power button) on the control client panel to wake up your home computer. For iPad/iPhone users: Tap one Host (Offline with Gray power button ) on the Host List. Then tap the - ASRock FM2A88X-ITX | User Manual - Page 47
For Andriod mobile device users: Tap one Host (Offline with Blue power button ) on the Host List. Then tap the Power button to wakeup your home computer. 42 - ASRock FM2A88X-ITX | User Manual - Page 48
Using Remote Control For Windows users: Right-click on a Host (Online with Blue Windows logo) on the control client panel. Then key in your remote access password. For iPad/iPhone users: Tap one online machine on the Host List and fill in the Access password to start using remote control. 43 - ASRock FM2A88X-ITX | User Manual - Page 49
For Andriod mobile device users: Tap one online machine and fill in the Access password to start using remote control. Tutorial Video 44 - ASRock FM2A88X-ITX | User Manual - Page 50
greater efficiency. 3.4.1 Installing Start8 Install Start8�, �w��h�ic��h��is��l�o�c�a��te��d�i�n��t�h�e��f�o�l�d�e�r��a�t�t�h�e��f�o�l�lo��w��in�g��p��a�t�h��o�f�t�h�e��S��u�p��port CD: \ ASRock Utility > Start8. 3.4.2 Configuring Start8 Style Select between the Windows 7 style and Windows 8 style - ASRock FM2A88X-ITX | User Manual - Page 51
Configure Configure provides configuration options, including icon sizes, which shortcuts you want Start Menu to display, quick access to recently used apps, the functionality of the power button, and more. Control 46 - ASRock FM2A88X-ITX | User Manual - Page 52
Control lets you configure what a click on the start button or a press on the Windows key does. Desktop Desktop allows you to disable the hot corners when you are working on the desktop. It also lets you choose whether or not the system boots directly into desktop mode and bypass the Metro user - ASRock FM2A88X-ITX | User Manual - Page 53
SETUP UTILITY to configure your system. The UEFI chip on the motherboard stores the UEFI SETUP UTILITY. You may run the UEFI SETUP UTILITY when you start up the computer. Please press or during the Power-On-Self-Test (POST) to enter the UEFI SETUP UTILITY, otherwise, POST will continue - ASRock FM2A88X-ITX | User Manual - Page 54
4.1.2 Navigation Keys Please check the following table for the function description of each navigation key. Navigation Key(s) Function Description / Moves cursor left or right to select Screens / Moves cursor up or down to select items + / - To change option for the selected items - ASRock FM2A88X-ITX | User Manual - Page 55
Please note that overclocing may cause damage to your components and motherboard. It should be done at your own risk and expense. CPU Configuration Overclock Mode Use this to select Overclock Mode. Configuration options: [Auto] and [Manual]. The default value is [Auto]. APU/PCIE Frequency (MHz) This - ASRock FM2A88X-ITX | User Manual - Page 56
[Auto] by default. If it is set to [Manual], you may adjust the value of Processor Frequency and recommended to adjust the value of this item. CPU Frequency Multiplier For safety and system stability, it motherboard will detect the memory module(s) inserted and assigns appropriate frequency - ASRock FM2A88X-ITX | User Manual - Page 57
Use this item to view SPD data. DRAM Timing Control Use this item to control DRAM timing. Power Down Enable Use this item to enable or disable DDR power down mode. Bank Interleaving Interleaving allows memory accesses to be spread out over banks on the same node, or accross nodes, decreasing access - ASRock FM2A88X-ITX | User Manual - Page 58
Screen In this section, you may set the configurations for the following items: CPU Configuration, Nouth Bridge Configuration, South Bridge Configuration, Storage Configuration, ACPI Configuration, USB Configuration and Trusted Computing. Setting wrong values in this section may cause the system to - ASRock FM2A88X-ITX | User Manual - Page 59
is [Disabled]. Cool 'n' Quiet Use this item to enable or disable AMD's Cool 'n' QuietTM technology. The default value is [Enabled]. Configuration options: reduce CPU voltage and memory frequency, and lead to system stability or compatibility issue with some memory modules or power supplies. Please - ASRock FM2A88X-ITX | User Manual - Page 60
HD Audio This allows you to enable or disable the "Onboard HDMI HD Audio" feature. Dual Graphics This item appears only when you install AMD RADEON graphics card on this motherboard. Use this to enable or disable Dual Graphics feature. If you enable this option, the primary monitor will be onboard - ASRock FM2A88X-ITX | User Manual - Page 61
Panel Select [Auto] or [Disabled] for the onboard HD Audio Front Panel. Onboard LAN This allows you to enable or disable the onboard LAN feature. Good Night LED Enable this option to turn off Power LED when the system is power on. The keyboard LED will also be turned off in S3 and S4 - ASRock FM2A88X-ITX | User Manual - Page 62
is [AHCI Mode]. Configuration options: [AHCI Mode], [RAID Mode] and [IDE Mode]. If you set this item to RAID mode, it is suggested to install SATA ODD driver on SATA3_5, SATA3_6 and eSATA ports. AMD AHCI BIOS ROM Use this item to enable or disable AMD AHCI BIOS ROM. The default value of this option - ASRock FM2A88X-ITX | User Manual - Page 63
Suspend-toRAM feature. Select [Auto] will enable this feature if the OS supports it. Check Ready Bit Enable to enter the operating system after S3 only when stability. Deep Sleep Configure deep sleep mode for power saving when the computer is shut down. We recommend disabling Deep Sleep for better - ASRock FM2A88X-ITX | User Manual - Page 64
USB Mouse Power On Use this item to enable or disable USB Mouse to power on the system. ACPI HPET table Use this item to enable or disable ACPI HPET Table. The default value is [Enabled]. Please set this option to [Enabled] if you plan to use this motherboard to submit Windows® certification. 59 - ASRock FM2A88X-ITX | User Manual - Page 65
A88X USB 3.0 Controller Use this item to enable or disable the use of USB 3.0 controller. Legacy USB Support Use this option to select legacy support under UEFI setup and Windows / Linux OS. Legacy USB 3.0 Support Use this option to enable or disable legacy support for USB 3.0 devices. The default - ASRock FM2A88X-ITX | User Manual - Page 66
4.4.7 Trusted Computing Security Device Support Enable to activate Trusted Platform Module (TPM) security for your hard disk drives. 61 - ASRock FM2A88X-ITX | User Manual - Page 67
system time are required. UEFI Tech Service Contact ASRock Tech Service if you are having trouble with your PC. Please setup network configuration before using UEFI Tech Service. Easy RAID Installer Easy RAID Installer helps you to copy the RAID driver from the support CD to your USB storage device - ASRock FM2A88X-ITX | User Manual - Page 68
floppy disk or hard drive and launch this tool, then you can update your UEFI only in a few clicks without preparing an additional floppy may prevent motherboard damages due to dampness by enabling "Dehumidifier Function". When enabling Dehumidifier Function, the computer will power on automatically - ASRock FM2A88X-ITX | User Manual - Page 69
Duration This allows users to configure the duration of the dehumidifying process before it returns to S4/S5 state. Dehumidifier CPU Fan Setting Use this setting to configure CPU fan speed while "Dehumidifier" is enabled. Would you like to save current setting user defaults? In this option, you are - ASRock FM2A88X-ITX | User Manual - Page 70
CPU temperature, motherboard temperature, CPU fan speed, chassis fan speed, and the critical voltage. CPU Fan 1 Setting Select a fan mode for CPU Fans 1, or choose Customize to set 5 CPU value is [Enabled]. Case Open Feature This allows you to enable or disable case open detection feature. The - ASRock FM2A88X-ITX | User Manual - Page 71
priority. Fast Boot Fast Boot minimizes your computer's boot time. There are three configuration options BIOS Setup). 3. If you are using an external graphics card, the VBIOS must support UEFI GOP in order to boot. Boot From Onboard LAN Use this item to enable or disable the Boot From Onboard LAN - ASRock FM2A88X-ITX | User Manual - Page 72
Guard. Boot Failure Guard Count Enable or disable the feature of Boot Failure Guard Count. CSM (Compatibility Support Module) CSM Enable to launch the Compatibility Support Module. Please do not disable unless you're running a WHCK test. If you are using Windows® 8 64-bit and all of your devices - ASRock FM2A88X-ITX | User Manual - Page 73
4.8 Security Screen In this section, you may set or change the supervisor/user password for the system. For the user password, you may also clear it. Secure Boot Enable to support Windows® 8 Secure Boot. 68 - ASRock FM2A88X-ITX | User Manual - Page 74
4.9 Exit Screen Save Changes and Exit When you select this option, it will pop-out the following message, "Save configuration changes and exit setup?" Select [OK] to save the changes and exit the UEFI SETUP UTILITY. Discard Changes and Exit When you select this option, it will pop-out the following - ASRock FM2A88X-ITX | User Manual - Page 75
or want to know more about ASRock, you're welcome to visit ASRock's website at http://www.asrock.com; or you may contact your dealer for further information. For technical questions, please submit a support request form at http://www.asrock.com/support/tsd.asp ASRock Incorporation 2F., No.37, Sec
-
 1
1 -
 2
2 -
 3
3 -
 4
4 -
 5
5 -
 6
6 -
 7
7 -
8
-
9
-
10
-
11
-
12
-
13
-
14
-
15
-
16
-
17
-
18
-
19
-
20
-
21
-
22
-
23
-
24
-
25
-
26
-
27
-
28
-
29
-
30
-
31
-
32
-
33
-
34
-
35
-
36
-
37
-
38
-
39
-
40
-
41
-
42
-
43
-
44
-
45
-
46
-
47
-
48
-
49
-
50
-
51
-
52
-
53
-
54
-
55
-
56
-
57
-
58
-
59
-
60
-
61
-
62
-
63
-
64
-
65
-
66
-
67
-
68
-
69
-
70
-
71
-
72
-
73
-
74
-
75
 |
 |

User Manual