ASRock G41MH/USB3 Quick Installation Guide
ASRock G41MH/USB3 Manual
 |
View all ASRock G41MH/USB3 manuals
Add to My Manuals
Save this manual to your list of manuals |
ASRock G41MH/USB3 manual content summary:
- ASRock G41MH/USB3 | Quick Installation Guide - Page 1
for backup purpose, without written consent of ASRock Inc. Products and corporate names appearing in this guide may or may not be registered trademarks or ASRock Website: http://www.asrock.com Published May 2010 Copyright©2010 ASRock INC. All rights reserved. 1 ASRock G41MH/USB3 Motherboard - ASRock G41MH/USB3 | Quick Installation Guide - Page 2
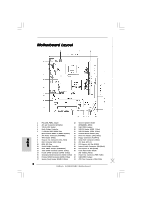
Serial Port Connector (COM1) 9 IDE1 Connector (IDE1, Blue) 26 PCI Slots (PCI1- 2) 10 BIOS SPI Chip 27 PCI Express x16 Slot (PCIE2) 11 South Bridge Controller 28 Internal Audio Jumper 17 System Panel Header (PANEL1, White) 33 CPU Fan Connector (CPU_FAN1) 2 ASRock G41MH/USB3 Motherboard - ASRock G41MH/USB3 | Quick Installation Guide - Page 3
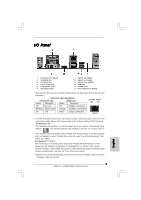
10 11 12 USB 2.0 Port (USB2) USB 3.0 Port (USB3) USB 2.0 Ports (USB01) HDMI Port VGA/DVI-D Port PS/2 Keyboard Port (Purple) * There are two LED next to the LAN Windows® USB Keyboard and Mouse on USB 3.0 port. Besides, USB 3.0 port does not support Wake Up function. 3 ASRock G41MH/USB3 Motherboard - ASRock G41MH/USB3 | Quick Installation Guide - Page 4
information about the model you are using. www.asrock.com/support/index.asp 1.1 Package Contents ASRock G41MH/USB3 Motherboard (Micro ATX Form Factor: 9.6-in x 8.4-in, 24.4 cm x 21.3 cm) ASRock G41MH/USB3 Quick Installation Guide ASRock G41MH/USB3 Support CD Two Serial ATA (SATA) Data Cables - ASRock G41MH/USB3 | Quick Installation Guide - Page 5
DVI and HDMI ports - Supports Full HD 1080p Blu-ray (BD) / HD-DVD playback with DVI and HDMI ports - 5.1 CH HD Audio (Realtek ALC662 Audio Codec) - PCIE x1 Gigabit LAN 10/100/1000 Mb/s - Realtek RTL8111E - Supports Wake-On-LAN - Supports LAN Cable Detection English 5 ASRock G41MH/USB3 Motherboard - ASRock G41MH/USB3 | Quick Installation Guide - Page 6
(support 4 USB 2.0 ports) - 8Mb AMI BIOS - AMI Legal BIOS - Supports "Plug and Play" - ACPI 1.1 Compliance Wake Up Events - Supports jumperfree - AMBIOS 2.3.1 Support - Supports I. O. T. (Intelligent Overclocking Technology) - Drivers, Utilities, AntiVirus Software (Trial Version), ASRock Software - ASRock G41MH/USB3 | Quick Installation Guide - Page 7
800 memory module. 5. Due to the operating system limitation, the actual memory size may be less than 4GB for the reservation for system usage under Windows® 7 / VistaTM / XP. For Windows® OS with 64-bit CPU, there is no such limitation. 7 ASRock G41MH/USB3 Motherboard English - ASRock G41MH/USB3 | Quick Installation Guide - Page 8
of Intelligent Energy Saver. ASRock website: http://www.asrock.com 10. ASRock Instant Flash is a BIOS flash utility embedded in Flash ROM. This convenient BIOS update tool allows you to update system BIOS without entering operating systems first like MS-DOS or Windows®. With this utility, you - ASRock G41MH/USB3 | Quick Installation Guide - Page 9
system shall be under 1.00W in off mode condition. To meet EuP standard, an EuP ready motherboard and an EuP ready power supply are required. According to Intel's suggestion, the EuP ready power checking with the power supply manufacturer for more details. 9 ASRock G41MH/USB3 Motherboard English - ASRock G41MH/USB3 | Quick Installation Guide - Page 10
you insert the 775-LAND CPU into the socket, please check if the CPU surface is unclean or if there is any bent pin on the socket. Do not force to insert the CPU into the socket if above situation is found. Otherwise, the CPU will be seriously damaged. 10 ASRock G41MH/USB3 Motherboard English - ASRock G41MH/USB3 | Quick Installation Guide - Page 11
100 degrees. Step 2. Insert the 775-LAND CPU: Step 2-1. Hold the CPU by the edges where are marked with black support the load plate edge, engage PnP cap with right hand thumb and peel the cap from the socket while pressing on center of PnP cap to assist in removal. 11 ASRock G41MH/USB3 Motherboard - ASRock G41MH/USB3 | Quick Installation Guide - Page 12
them clockwise, the heatsink cannot be secured on the motherboard. Step 5. Connect fan header with the CPU fan connector on the motherboard. Step 6. Secure excess cable with tie-wrap to ensure cable does not interfere with fan operation or contact other components. 12 ASRock G41MH/USB3 Motherboard - ASRock G41MH/USB3 | Quick Installation Guide - Page 13
2.3 Installation of Memory Modules (DIMM) G41MH/USB3 motherboard provides two 240-pin DDR3 (Double Data Rate 3) DIMM slots, and supports Dual Channel Memory Technology. For dual channel configuration, you always need to install two identical (the same brand, speed, size and chiptype) memory modules - ASRock G41MH/USB3 | Quick Installation Guide - Page 14
LAN card, SATA2 card, etc. PCIE2 (PCIE x16 slot) is used for PCI Express cards with x16 lane width graphics cards. If you install the add-on PCI Express VGA card or other PCIE device to PCIE2 (PCIE x16 slot), only D-Sub port will be enabled. DVI-D and HDMI . 14 ASRock G41MH/USB3 Motherboard English - ASRock G41MH/USB3 | Quick Installation Guide - Page 15
your computer. 1. D-Sub, DVI-D and HDMI ports cannot be connected simultaneously. You can choose to use two of them only. 2. When you playback HDCP-protected video from Blu-ray (BD) or HD-DVD disc, the content will be displayed only in one of the monitors. 15 ASRock G41MH/USB3 Motherboard English - ASRock G41MH/USB3 | Quick Installation Guide - Page 16
these new values. G. Repeat steps C through E for the diaplay icon identified by the number one and two. For Windows® 7 / 7 64-bit / VistaTM / VistaTM 64-bit OS: Right click the desktop, choose "Personalize", and select move items from one monitor to another. 16 ASRock G41MH/USB3 Motherboard English - ASRock G41MH/USB3 | Quick Installation Guide - Page 17
to the increase in manufacturers employing HDCP in their equipment, it is highly recommended that the HDTV or LCD monitor you purchase is compatible. 17 ASRock G41MH/USB3 Motherboard English - ASRock G41MH/USB3 | Quick Installation Guide - Page 18
+5V_DUAL, it requires 2 Amp and higher standby current provided by power supply. When you select +5V_DUAL, USB devices can wake up the system under S3 (Suspend to RAM) state. USB_PWR3 Short pin2, pin3 to enable to short 2 pins on CLRCMOS1 for 5 seconds. English 18 ASRock G41MH/USB3 Motherboard - ASRock G41MH/USB3 | Quick Installation Guide - Page 19
) Data Cable (Optional) Either end of the SATA data cable can be connected to the SATA / SATAII hard disk or the SATAII connector on the motherboard. SATAII_1 SATAII_3 SATAII_2 SATAII_4 English 19 ASRock G41MH/USB3 Motherboard - ASRock G41MH/USB3 | Quick Installation Guide - Page 20
USB4_5) (see p.2 No. 21) Besides three default USB 2.0 ports on the I/O panel, there are two USB 2.0 headers on this motherboard. Each USB 2.0 header can support two USB 2.0 ports. Infrared Module Header (5-pin IR1) (see -ROM, TV tuner card, or MPEG card. 20 ASRock G41MH/USB3 Motherboard English - ASRock G41MH/USB3 | Quick Installation Guide - Page 21
supports Jack Sensing, but the panel wire on the chassis must support HDA to function correctly. Please follow the instruction in our manual and chassis manual to . Please connect a CPU fan cable to this connector and match the black wire to the ground pin. English 21 ASRock G41MH/USB3 Motherboard - ASRock G41MH/USB3 | Quick Installation Guide - Page 22
(9-pin COM1) (see p.2 No.25) 20-Pin ATX Power Supply Installation 1 13 Please connect an ATX 12V power supply to this connector. This COM1 header supports a serial port module. English 22 ASRock G41MH/USB3 Motherboard - ASRock G41MH/USB3 | Quick Installation Guide - Page 23
during overclocking, but PCI / PCIE buses are in the fixed mode so that FSB can operate under a more stable overclocking environment. Please refer to the warning on page 7 for the possible overclocking risk before you apply Untied Overclocking Technology. 23 ASRock G41MH/USB3 Motherboard English - ASRock G41MH/USB3 | Quick Installation Guide - Page 24
about BIOS Setup, please refer to the User Manual (PDF file) contained in the Support CD. 4. Software Support CD information This motherboard supports various Microsoft® Windows® operating " from the BIN folder in the Support CD to display the menus. 24 ASRock G41MH/USB3 Motherboard English - ASRock G41MH/USB3 | Quick Installation Guide - Page 25
/support/index.asp 1.1 Kartoninhalt ASRock G41MH/USB3 Motherboard (Micro ATX-Formfaktor: 24.4 cm x 21.3 cm; 9.6 Zoll x 8.4 Zoll) ASRock G41MH/USB3 Schnellinstallationsanleitung ASRock G41MH/USB3 Support-CD Zwei Serial ATA (SATA) -Datenkabel (optional) Ein I/O Shield 25 ASRock G41MH/USB3 Motherboard - ASRock G41MH/USB3 | Quick Installation Guide - Page 26
x 1200 bei 75 Hz - Unterstützt D-Sub mit einer maximalen Auflösung von 2048 x 1536 bei 60 Hz - unterstützt HDCP Funktion mit DVI- und HDMI-Ports - Unterstutzt 1080p Blu-ray (BD) / HD-DVD-Wiedergabe mit DVI- und HDMI-Ports ASRock G41MH/USB3 Motherboard Deutsch - ASRock G41MH/USB3 | Quick Installation Guide - Page 27
üsse an der Rückseite USB 3.0 Anschlüsse BIOS Support-CD - 5.1 CH HD Audio (Realtek ALC662 Audio Codec) - PCIE x1 Gigabit LAN 10/100/1000 Mb/s - Realtek RTL8111E - Unterstützt Wake-On-LAN - Unterstützt LAN-Kabelerkennung I/O Panel - 1 x PS/2-Mausanschluss - 1 x PS/2-Tastaturanschluss - 1 x VGA - ASRock G41MH/USB3 | Quick Installation Guide - Page 28
CPU-Temperatur - Motherboardtemperaturerkennung - Drehzahlmessung für CPU/Gehäuse/Stromlüfter - CPU-Lüftergeräuschdämpfung - Spannungsüberwachung: +12V, +5V, +3.3V, Vcore Betriebssysteme - Unterstützt Microsoft® Windows Overclocking verursacht wurden. Deutsch 28 ASRock G41MH/USB3 Motherboard - ASRock G41MH/USB3 | Quick Installation Guide - Page 29
einer FSB533-CPU auf diesem Motherboard lauft esmit "Bedienungsanleitung" auf der Support-CD, um Ihre Windows® Umgebung zu erreichen. Besuchen Sie bitte unsere Website für die Operationsverfahren von ASRock OC Tuner. ASRock-Website: http://www.asrock.com Deutsch 29 ASRock G41MH/USB3 Motherboard - ASRock G41MH/USB3 | Quick Installation Guide - Page 30
ähig gemacht werden kann. 12. Obwohl dieses Motherboard stufenlose Steuerung bietet, wird Overclocking nicht empfohlen. Frequenzen, die von den empfohlenen CPU-Busfrequenzen abweichen, können Instabilität des Systems verursachen oder die CPU beschädigen. 30 ASRock G41MH/USB3 Motherboard Deutsch - ASRock G41MH/USB3 | Quick Installation Guide - Page 31
. Bevor Sie das System neu starten, prüfen Sie bitte, ob der CPU-Lüfter am Motherboard richtig funktioniert, und stecken Sie bitte den Stromkabelstecker aus und dann wieder ein wir Ihnen, weitere Details beim Hersteller der Stromversorgung abzufragen. 31 ASRock G41MH/USB3 Motherboard Deutsch - ASRock G41MH/USB3 | Quick Installation Guide - Page 32
, muss das Netzteil auf dieser Leitung 2A oder mehr leisten können. Wenn Sie +5V_DUAL auswahlen, konnen USB-Gerate das System aus dem S3-Zustand (Suspend to RAM) aufwecken. USB_PWR3 Überbrücken Sie Pin2, -Werte wiederherzustellen, schalten Sie den Computer aus, 32 ASRock G41MH/USB3 Motherboard - ASRock G41MH/USB3 | Quick Installation Guide - Page 33
Header und Anschlüsse. Wenn Sie Jumperkappen auf Header und Anschlüsse setzen, wird das Motherboard unreparierbar beschädigt! Anschluss für das Floppy-Laufwerk (33-Pin FLOPPY1) (siehe S.2 - SATA / SATAIIFestplatte oder dem SATAII-Anschluss am Mainboard verbinden. 33 ASRock G41MH/USB3 Motherboard - ASRock G41MH/USB3 | Quick Installation Guide - Page 34
tzlich zu den drei üblichen USB 2.0-Ports an den I/O-Anschlüssen befinden sich zwei USB 2.0-Anschlussleisten am Motherboard. Pro USB 2.0Anschlussleiste werden zwei USB 2.0-Ports unterstützt. Infrarot-Modul oder MPEG-Karten mit Ihrem System zu verbinden. 34 ASRock G41MH/USB3 Motherboard Deutsch - ASRock G41MH/USB3 | Quick Installation Guide - Page 35
den Gehäuselautsprecher an diesen Header an. Verbinden Sie die Lüfterkabel mit den Lüfteranschlüssen, wobei der schwarze Draht an den Schutzleiterstift angeschlossenwird. Deutsch 35 ASRock G41MH/USB3 Motherboard - ASRock G41MH/USB3 | Quick Installation Guide - Page 36
angeschlossen werden; auch ohne Geschwindigkeitsregulierung. Wenn Sie einen dreipoligen CPU-Lüfter an den CPU-Lüferanschluss dieses Motherboards anschließen möchten, verbinden Sie ihn bitte mit den verwendet, um ein COM-Anschlussmodul zu unterstützen. Deutsch 36 ASRock G41MH/USB3 Motherboard - ASRock G41MH/USB3 | Quick Installation Guide - Page 37
der Support-CD, um die Menüs aufzurufen. Das Setup-Programm soll es Ihnen so leicht wie möglich machen. Es ist menügesteuert, d.h. Sie können in den verschiedenen Untermenüs Ihre Auswahl treffen und die Programme werden dann automatisch installiert. 37 ASRock G41MH/USB3 Motherboard Deutsch - ASRock G41MH/USB3 | Quick Installation Guide - Page 38
Carte mère ASRock G41MH/USB3 (Facteur de forme Micro ATX: 9.6 pouces x 8.4 pouces, 24.4 cm x 21.3 cm) Guide d'installation rapide ASRock G41MH/USB3 CD de soutien ASRock G41MH/USB3 Deux câbles de données de série ATA (SATA) (en option) Un I/O Panel Shield 38 ASRock G41MH/USB3 Motherboard Français - ASRock G41MH/USB3 | Quick Installation Guide - Page 39
une résolution maximale jusqu'à 1920x1200 @ 75Hz - Prend en charge le D-Sub avec une résolution maximale jusqu'à 2048x1536 @ 60Hz - Supporter la fonction de HDCP avec ports DVI et HDMI - Supporter 1080p Blu-ray(BD)/ lecteur de HD-DVD avec ports DVI et HDMI 39 ASRock G41MH/USB3 Motherboard Français - ASRock G41MH/USB3 | Quick Installation Guide - Page 40
panneau avant - 2 x en-tête USB 2.0 (accepte 4 ports USB 2.0) - 8Mb BIOS AMI - BIOS AMI - Support du "Plug and Play" - Compatible pour événements de réveil ACPI 1.1 - Gestion jumperless - Support SMBIOS 2.3.1 - Supporter I. O. T. (Technologie d'Overclocking Intelligent) ASRock G41MH/USB3 Motherboard - ASRock G41MH/USB3 | Quick Installation Guide - Page 41
CPU/Châssis/Ventilateur - Ventilateur silencieux d'unité centrale - Monitoring de la tension: +12V, +5V, +3.3V, Vcore OS - Microsoft® Windows® Overclocking. Veuillez lire "La technologie de surcadençage à la volée" à la page 23 pour plus d'informations. 41 ASRock G41MH/USB3 Motherboard - ASRock G41MH/USB3 | Quick Installation Guide - Page 42
Flash é um utilitário de flash do BIOS incorporado na memória Flash ROM. Esta prática ferramenta de actualização do BIOS permite-lhe actualizar o BIOS do sistema sem necessitar de entrar nos sistemas operativos, como o MS-DOS ou o Windows®. Com este Français 42 ASRock G41MH/USB3 Motherboard - ASRock G41MH/USB3 | Quick Installation Guide - Page 43
teste de arranque POST ou premir a tecla para exibir o menu de configuração do BIOS para aceder ao ASRock Instant Flash. Execute esta ferramenta para guardar o novo ficheiro de BIOS numa unidade flash USB pâte thermique entre le CPU le dissipateur lors de ASRock G41MH/USB3 Motherboard Français - ASRock G41MH/USB3 | Quick Installation Guide - Page 44
un courant standby supérieur fourni par l'alimentation. Lorsque vous selectionnez +5V_DUAL, les peripheriques USB reveillent le systeme en etat S3 (Suspension a la RAM). Français USB_PWR3 Court- faut, éteignez l'ordinateur et débranchez le câble d'alimentation. 44 ASRock G41MH/USB3 Motherboard - ASRock G41MH/USB3 | Quick Installation Guide - Page 45
connecteur noir vers le disque dur Câble ATA 66/100 80 conducteurs Note: Veuillez vous reporter aux instructions du fabricant de votre IDE périphérique pour les détails. Connecteurs Série ATAII (SATAII_1: voir 3,0 Go/s. SATAII_1 SATAII_3 SATAII_2 SATAII_4 Français 45 ASRock G41MH/USB3 Motherboard - ASRock G41MH/USB3 | Quick Installation Guide - Page 46
USB 2.0 peut prendre en charge 2 ports USB 2.0. En-tête du module infrarouge (IR1 br.5) (voir p.2 No. 22) Embase de port d'impression (LPT1 25 broches) (voir p.2 No. 23) Cet en-tête supporte un identités numériques, et assure l'intégrité de la plate-forme. ASRock G41MH/USB3 Motherboard Français - ASRock G41MH/USB3 | Quick Installation Guide - Page 47
de panneau sur le châssis doit prendre en charge le HDA pour fonctionner correctement. Veuillez suivre les instructions dans notre manuel et le manuel de châssis afin installer votre système. 2. Si vous utilisez faites correspondre le fil noir à la broche de terre. 47 ASRock G41MH/USB3 Motherboard - ASRock G41MH/USB3 | Quick Installation Guide - Page 48
et brancher le fil 1 ien que cette carte mère offre un support de (Ventilateur silencieux) ventilateur de CPU à 4 broches , le ventilateur de CPU à 3 broches peut bien fonctionner même sans la fonction de commande prendre en charge un module de port COM. Français 48 ASRock G41MH/USB3 Motherboard - ASRock G41MH/USB3 | Quick Installation Guide - Page 49
le BIOS, veuillez consulter le Guide de l'utilisateur (fichier PDF) dans le CD technique. 3. Informations sur le CD de support Cette carte mère supporte divers systèmes d'exploitation Microsoft® Windows®: 7 et double-cliquez dessus pour afficher les menus. 49 ASRock G41MH/USB3 Motherboard Français - ASRock G41MH/USB3 | Quick Installation Guide - Page 50
di CPU supportate. ASRock website http://www.asrock.com Se si necessita dell'assistenza tecnica per questa scheda madre, visitare il nostro sito per informazioni specifiche sul modello che si sta usando. www.asrock.com/support/index.asp 1.1 Contenuto della confezione Scheda madre ASRock G41MH/USB3 - ASRock G41MH/USB3 | Quick Installation Guide - Page 51
Quad Core Yorkfield e Dual Core Wolfdale - FSB1333/1066/800/533 MHz - Supporto tecnologia Hyper Threading (vedi ATTENZIONE 1) - Supporta la tecnologia overclocking "slegata" (vedi ATTENZIONE 2) - Supporto CPU EM64T - Northbridge: Intel® G41 Codec) Italiano 51 ASRock G41MH/USB3 Motherboard - ASRock G41MH/USB3 | Quick Installation Guide - Page 52
jumperfree - Supporta SMBIOS 2.3.1 - Supporto I. O. T. (Intelligent Overclocking Technology) - Driver, utilità, software antivirus (Versione dimostrativa), Suite software ASRock (Suite CyberLink DVD e Creative Sound Blaster X-Fi MB) (OEM e Versione demo) Italiano 52 ASRock G41MH/USB3 Motherboard - ASRock G41MH/USB3 | Quick Installation Guide - Page 53
CPU/Chassis/ Alimentazione - Ventola CPU silenziosa - Voltaggio: +12V, +5V, +3.3V, Vcore Compatibi- - Microsoft® Windows® BIOS, l'applicazione della tecnologia Untied Overclocking Technology, oppure l'uso di strumenti di overclocking forniti da terzi. L'overclocking ASRock G41MH/USB3 Motherboard - ASRock G41MH/USB3 | Quick Installation Guide - Page 54
floppy) o disco rigido; poi si può aggiornare il BIOS con pochi clic, senza preparare altri dischetti (dischi floppy) o altre complicate utilità Flash. Si prega di notare che l'unità Flash USB o il disco rigido devono usare il File System FAT32/16/ 12. Italiano 54 ASRock G41MH/USB3 Motherboard - ASRock G41MH/USB3 | Quick Installation Guide - Page 55
% con un consumo di corrente di 100 mA. Per la scelta di un'alimentatore predisposto EuP consigliamo di verificare ulteriori dettagli con il produttore. 55 ASRock G41MH/USB3 Motherboard Italiano - ASRock G41MH/USB3 | Quick Installation Guide - Page 56
il consumo di corrente in standby sarà maggiore. Quando si seleziona +5V_DUAL, i dispositivi USB possono riattivare il sistema dallo stato S3 (Suspend to RAM). USB_PWR3 Cortocircuitare pin2, pin3 alimentatore, poi collegare il jumper sul CLRCMOS1 per 5 secondi. 56 ASRock G41MH/USB3 Motherboard - ASRock G41MH/USB3 | Quick Installation Guide - Page 57
Serial ATA (SATA) (Opzionale) Entrambe le estremità del cavo dati SATA possono collegarsi all'hard disk SATA / SATAII o al connettore SATAII sulla scheda madre. 57 ASRock G41MH/USB3 Motherboard - ASRock G41MH/USB3 | Quick Installation Guide - Page 58
21) Oltre alle tre porte USB 2.0 predefinite nel pannello I/O, la scheda madre dispone di due intestazioni USB 2.0. Ciascuna intestazione USB 2.0 supporta due porte USB 2.0. Collettore modulo infrarossi (5-pin CD-ROM, DVD ROM,TV tuner, o schede MPEG. 58 ASRock G41MH/USB3 Motherboard Italiano - ASRock G41MH/USB3 | Quick Installation Guide - Page 59
modo corretto. Attenersi alle istruzioni del nostro manuale e del manuale del telaio per installare il sistema. CPU (4-pin CPU_FAN1) (vedi p.2 Nr. 33) Collegare il cavo della ventolina 4 3 CPU a questo connettore e far 2 1 combaciare il filo nero al pin terra. 59 ASRock G41MH/USB3 Motherboard - ASRock G41MH/USB3 | Quick Installation Guide - Page 60
della velocità della ventola. Se si intende collegare la ventola CPU a 3 piedini al connettore della ventola CPU su questa scheda madre, collegarla ai piedini 1-3. Piedini 1-3 collegati collettore porta COM è utilizzato per supportare il modulo porta COM. Italiano 60 ASRock G41MH/USB3 Motherboard - ASRock G41MH/USB3 | Quick Installation Guide - Page 61
BIOS, fare riferimento al Manuale dell'Utente (PDF file) contenuto nel cd di supporto. 3. Software di supporto e informazioni su CD Questa scheda madre supporta vari sistemi operativi Microsoft® Windows®: e cliccare due volte per visualizzare i menù. 61 ASRock G41MH/USB3 Motherboard Italiano - ASRock G41MH/USB3 | Quick Installation Guide - Page 62
Contenido de la caja Placa base ASRock G41MH/USB3 (Factor forma Micro ATX: 24,4 cm x 21,3 cm, 9,6" x 8,4") Guía de instalación rápida de ASRock G41MH/USB3 CD de soporte de ASRock G41MH/USB3 Dos cables de datos Serial ATA (SATA) (Opcional) Una protección I/O 62 ASRock G41MH/USB3 Motherboard Español - ASRock G41MH/USB3 | Quick Installation Guide - Page 63
ATENCIÓN 2) - Admite CPU EM64T - North Bridge: Intel® G41 - South Bridge: Intel HDMI - Sonido HD de 5.1 Canales (Códec de sonido Realtek ALC662) - PCIE x1 Gigabit LAN 10/100/1000 Mb/s - Realtek RTL8111E - Soporta Wake-On-LAN - Admite detección de conexión de cable LAN 63 ASRock G41MH/USB3 Motherboard - ASRock G41MH/USB3 | Quick Installation Guide - Page 64
setup" - Soporta SMBIOS 2.3.1 - Apoya I.O.T. (Tecnología Inteligente de Overclocking) - Controladores, Utilerías, Software de Anti Virus (Versión de prueba), conjunto de aplicaciones ASRock (CyberLink DVD Suite y Creative Sound Blaster X-Fi MB) (OEM y versión de prueba) ASRock G41MH/USB3 Motherboard - ASRock G41MH/USB3 | Quick Installation Guide - Page 65
CPU / chasis / alimentacion - Ventilador silencioso para procesador - Monitor de Voltaje: +12V, +5V, +3.3V, Vcore OS - En conformidad con Microsoft® Windows del BIOS, 37 del Manual del Overclocking) no relacionado" en la página 23 para obtener detalles. Español 65 ASRock G41MH/USB3 Motherboard - ASRock G41MH/USB3 | Quick Installation Guide - Page 66
sistema operativo, como MS-DOS o Windows®. Gracias a esta utilidad, sólo necesitará pulsar durante la fase POST o pulsar para acceder al menú de configuración del BIOS y a la utilidad ASRock Instant Flash. Ejecute esta herramienta y guarde el Español 66 ASRock G41MH/USB3 Motherboard - ASRock G41MH/USB3 | Quick Installation Guide - Page 67
BIOS con sólo pulsar un par de botones, sin necesidad de preparar un disco flexible adicional ni utilizar complicadas utilidades de programación. Recuerde que la unidad flash USB , compruebe si el ventilador de la CPU de la placa base funciona apropiadamente y ASRock G41MH/USB3 Motherboard Español - ASRock G41MH/USB3 | Quick Installation Guide - Page 68
corriente mas que 2 Amp proveida por la fuente de electricidad. Si selecciona +5V_DUAL, los dispositivos USB podran reactivar el sistema siempre que se encuentre en el estado S3 (Suspension a RAM). Espa pins de CLRCMOS1 por más que 5 segundos usando un jumper cap. 68 ASRock G41MH/USB3 Motherboard - ASRock G41MH/USB3 | Quick Installation Guide - Page 69
) (Opcional) Ambos extremos del cable pueden conectarse al disco duro SATA / SATAII o la conexión de la placa base. SATAII_1 SATAII_3 SATAII_2 SATAII_4 Español 69 ASRock G41MH/USB3 Motherboard - ASRock G41MH/USB3 | Quick Installation Guide - Page 70
Además de tres puertos USB 2.0 predeterminados en el panel de E/S, hay dos bases de conexiones USB 2.0 en esta placa base. Cada una de estas bases de conexiones admite dos puertos USB 2.0. Cabezal de Módulo CDROM, DVD-ROM, TV tuner, o tarjeta MPEG. 70 ASRock G41MH/USB3 Motherboard Español - ASRock G41MH/USB3 | Quick Installation Guide - Page 71
favor, siga las instrucciones en nuestro manual y en el manual de chasis para instalar su sistema. CPU (4-pin CPU_FAN1) (vea p.2, N. 33) Conecte el cable del ventilador 4 3 de la CPU a este conector y 2 1 haga coincidir el cable negro con el conector de tierra. 71 ASRock G41MH/USB3 Motherboard - ASRock G41MH/USB3 | Quick Installation Guide - Page 72
electricidad. De lo contrario no se podrá encender. Este cabezal del puerto COM se utiliza para admitir un módulo de puerto COM. Español 72 ASRock G41MH/USB3 Motherboard - ASRock G41MH/USB3 | Quick Installation Guide - Page 73
de la BIOS, consulte el Manual del usuario (archivo PDF), que se encuentra en el CD de soporte. 3.Información de Software Support CD Esta placa-base soporta diversos tipos de sistema operativo Windows®: 7 el archivo "ASSETUP.EXE" para iniciar la instalación. 73 ASRock G41MH/USB3 Motherboard Español - ASRock G41MH/USB3 | Quick Installation Guide - Page 74
. . ASRock. ASRock ( - Micro ATX: 9,6 x 8,4 / 24,4 x 21,3 ) ASRock ASRock Serial ATA (SATA) ( ) - I/O 74 ASRock G41MH/USB3 Motherboard - ASRock G41MH/USB3 | Quick Installation Guide - Page 75
75 ASRock G41MH/USB3 Motherboard - ASRock G41MH/USB3 | Quick Installation Guide - Page 76
76 ASRock G41MH/USB3 Motherboard - ASRock G41MH/USB3 | Quick Installation Guide - Page 77
77 ASRock G41MH/USB3 Motherboard - ASRock G41MH/USB3 | Quick Installation Guide - Page 78
78 ASRock G41MH/USB3 Motherboard - ASRock G41MH/USB3 | Quick Installation Guide - Page 79
79 ASRock G41MH/USB3 Motherboard - ASRock G41MH/USB3 | Quick Installation Guide - Page 80
Short Open CMOS 80 ASRock G41MH/USB3 Motherboard - ASRock G41MH/USB3 | Quick Installation Guide - Page 81
SATAII_1 SATAII_3 SATAII_2 SATAII_4 la banda roja debe quedar en el mismo lado que el contacto 1 IDE 81 ASRock G41MH/USB3 Motherboard - ASRock G41MH/USB3 | Quick Installation Guide - Page 82
(5- IR1) CD1 82 ASRock G41MH/USB3 Motherboard - ASRock G41MH/USB3 | Quick Installation Guide - Page 83
(9- PANEL1) 4 3 2 1 83 ASRock G41MH/USB3 Motherboard - ASRock G41MH/USB3 | Quick Installation Guide - Page 84
ATX 12 24 1 13 ATX. 12 24 12V-ATX COM- 1 13 , ATX 12 , . . 84 ASRock G41MH/USB3 Motherboard - ASRock G41MH/USB3 | Quick Installation Guide - Page 85
BIOS Setup F Power-On-Self-Test - POST POST BIOS Setup POST Ctrl> + + - ASRock G41MH/USB3 | Quick Installation Guide - Page 86
pacote contém Placa-mãe ASRock G41MH/USB3 (Formato Micro ATX: 9,6 pol. x 8,4 pol., 24,4 cm x 21,3 cm) Guia de instalação rápida da ASRock G41MH/USB3 CD de suporte da placa ASRock G41MH/USB3 Dois cabo de dados ATA Serial (SATA) (Opcional) Uma proteção I/O 86 ASRock G41MH/USB3 Motherboard Português - ASRock G41MH/USB3 | Quick Installation Guide - Page 87
Core / Celeron® de 775 pinos com suporte para o processador Penryn Quad Core Yorkfield e Dual Core Wolfdale - FSB1333/1066/800/533 MHz - Suporta a tecnologia Hyper-Threading (veja o AVISO 1) - Suporta a tecnologia Untied Overclocking (veja o AVISO 2) - Suporta a CPU EM64T - North Bridge: Intel® G41 - ASRock G41MH/USB3 | Quick Installation Guide - Page 88
USB 2.0 (suporta 4 portas USB 2.0) - 8Mb BIOS AMI - BIOS AMI - Suporta dispositivos "Plug and Play" - ACPI 1.1 atendendo a eventos de "wake up" - Suporta dispositivos sem jumper - Suporte para SMBIOS 2.3.1 - Suporta I. O. T. (Tecnologia Inteligente de Overclocking) ASRock G41MH/USB3 Motherboard - ASRock G41MH/USB3 | Quick Installation Guide - Page 89
Hyper Threading", consulte a página 37 do Manual do Usuário no CD de suporte. (Somente inglês) 2. Esta placa principal suporta a tecnologia Untied Overclocking. Consulte a secção "Tecnologia Untied Overclocking" na página 23 para mais informações. Português 89 ASRock G41MH/USB3 Motherboard - ASRock G41MH/USB3 | Quick Installation Guide - Page 90
Flash est un utilitaire de flash du BIOS flash intégré dans la ROM Flash. Cet outil pratique de mise à jour du BIOS vous permet de mettre à jour le BIOS du système sans entrer d'abord dans un système d'exploitation tel que MS-DOS ou Windows®. Avec cet Português 90 ASRock G41MH/USB3 Motherboard - ASRock G41MH/USB3 | Quick Installation Guide - Page 91
BIOS pour accéder à ASRock Instant Flash. Lancez simplement cet outil et enregistrez le nouveau fichier BIOS sur votre lecteur flash USB "overclocking CPU podem provocar instabilidade do sistema ou danos à CPU. 13. Assim que se detecta um superaquecimento na CPU ASRock G41MH/USB3 Motherboard Português - ASRock G41MH/USB3 | Quick Installation Guide - Page 92
corrente de repouso mais elevada fornecida pela fonte de alimentação. Quando seleccionar +5V_DUPLO, os dispositivos USB podem activar o sistema quando este se encontra no estado S3 (Suspender para RAM). USB_PWR3 de 5 segundos para limpar o CMOS usando um jumper. 92 ASRock G41MH/USB3 Motherboard - ASRock G41MH/USB3 | Quick Installation Guide - Page 93
do cabo de Serial dados SATA pode ser conectado ao disco rígido SATA / SATAII quanto o conector SATAII na placa mãe. SATAII_1 SATAII_3 SATAII_2 SATAII_4 Português 93 ASRock G41MH/USB3 Motherboard - ASRock G41MH/USB3 | Quick Installation Guide - Page 94
No. 21) Além das trés portas USB 2.0 por defeito no painel de entrada/saída, há dois ligações USB 2.0 nesta placamãe. Cada ligação USB 2.0 pode suportar dois portas USB 2.0. Conector do módulo de infravermelho (IR1 sintonizadora de TV ou placa MPEG. 94 ASRock G41MH/USB3 Motherboard Português - ASRock G41MH/USB3 | Quick Installation Guide - Page 95
correctamente. Siga s instruções que aparecem no manual e no manual do chassis para instalar o sistema. 2. Se CPU (CPU_FAN1 de 4 pinos) (veja a folha 2, No. 33) Ligue o cabo do ventilador da 4 CPU, coincidindo o fio preto com 3 2 o pino de aterramento. 1 95 ASRock G41MH/USB3 Motherboard - ASRock G41MH/USB3 | Quick Installation Guide - Page 96
de controlo de velocidade da ventoinha. Se pretender ligar uma ventoinha de 3 pinos para CPU ao conector de ventoinha do CPU nesta placa-mãe, por favor, ligue-a aos pinos 1-3. Pinos 1-3 ligados Instalação de é usado para suportar um módulo de porta COM. Português 96 ASRock G41MH/USB3 Motherboard - ASRock G41MH/USB3 | Quick Installation Guide - Page 97
de Configuração do BIOS, consulte o Manual do Usuário (arquivo PDF) no CD de suporte. 3. Informações do CD de Suporte Esta placa Mãe suporta vários sistemas operacionais: Microsoft® Windows®: 7 / 7 o CD e execute o "ASSETUP.EXE" localizado na pasta BIN. 97 ASRock G41MH/USB3 Motherboard Português - ASRock G41MH/USB3 | Quick Installation Guide - Page 98
98 ASRock G41MH/USB3 Motherboard - ASRock G41MH/USB3 | Quick Installation Guide - Page 99
® ® / ® ® ® ® ® 99 ASRock G41MH/USB3 Motherboard - ASRock G41MH/USB3 | Quick Installation Guide - Page 100
100 ASRock G41MH/USB3 Motherboard - ASRock G41MH/USB3 | Quick Installation Guide - Page 101
® " " ® ® ® ASRock G41MH/USB3 Motherboard 101 - ASRock G41MH/USB3 | Quick Installation Guide - Page 102
" " " " ® ® 102 ASRock G41MH/USB3 Motherboard - ASRock G41MH/USB3 | Quick Installation Guide - Page 103
ASRock G41MH/USB3 Motherboard 103 - ASRock G41MH/USB3 | Quick Installation Guide - Page 104
"" "" "" "" "" 104 ASRock G41MH/USB3 Motherboard - ASRock G41MH/USB3 | Quick Installation Guide - Page 105
SATAII_1 SATAII_3 SATAII_2 SATAII_4 ASRock G41MH/USB3 Motherboard 105 - ASRock G41MH/USB3 | Quick Installation Guide - Page 106
106 CD1 ASRock G41MH/USB3 Motherboard - ASRock G41MH/USB3 | Quick Installation Guide - Page 107
4 3 2 1 ASRock G41MH/USB3 Motherboard 107 - ASRock G41MH/USB3 | Quick Installation Guide - Page 108
12 24 1 13 12 24 1 13 108 ASRock G41MH/USB3 Motherboard - ASRock G41MH/USB3 | Quick Installation Guide - Page 109
" " \\ " " ASRock G41MH/USB3 Motherboard 109 - ASRock G41MH/USB3 | Quick Installation Guide - Page 110
110 ASRock G41MH/USB3 Motherboard - ASRock G41MH/USB3 | Quick Installation Guide - Page 111
® ® ® ® ® ® ® ASRock G41MH/USB3 Motherboard 111 - ASRock G41MH/USB3 | Quick Installation Guide - Page 112
112 ASRock G41MH/USB3 Motherboard - ASRock G41MH/USB3 | Quick Installation Guide - Page 113
® ® ® " " ASRock G41MH/USB3 Motherboard 113 - ASRock G41MH/USB3 | Quick Installation Guide - Page 114
® ® ® ® ® 114 ASRock G41MH/USB3 Motherboard - ASRock G41MH/USB3 | Quick Installation Guide - Page 115
- ASRock G41MH/USB3 Motherboard 115 - ASRock G41MH/USB3 | Quick Installation Guide - Page 116
116 ASRock G41MH/USB3 Motherboard - ASRock G41MH/USB3 | Quick Installation Guide - Page 117
SATAII_1 SATAII_3 SATAII_2 SATAII_4 ASRock G41MH/USB3 Motherboard 117 - ASRock G41MH/USB3 | Quick Installation Guide - Page 118
CD1 118 ASRock G41MH/USB3 Motherboard - ASRock G41MH/USB3 | Quick Installation Guide - Page 119
4 3 2 1 ASRock G41MH/USB3 Motherboard 119 - ASRock G41MH/USB3 | Quick Installation Guide - Page 120
12 24 1 13 12 24 1 13 120 ASRock G41MH/USB3 Motherboard - ASRock G41MH/USB3 | Quick Installation Guide - Page 121
® ® TM TM ASRock G41MH/USB3 Motherboard 121 - ASRock G41MH/USB3 | Quick Installation Guide - Page 122
122 ASRock G41MH/USB3 Motherboard - ASRock G41MH/USB3 | Quick Installation Guide - Page 123
® ® ® ® ® ® ® ASRock G41MH/USB3 Motherboard 123 - ASRock G41MH/USB3 | Quick Installation Guide - Page 124
124 ASRock G41MH/USB3 Motherboard - ASRock G41MH/USB3 | Quick Installation Guide - Page 125
® ® ® ® ® ASRock G41MH/USB3 Motherboard 125 - ASRock G41MH/USB3 | Quick Installation Guide - Page 126
® ® ® 126 ASRock G41MH/USB3 Motherboard - ASRock G41MH/USB3 | Quick Installation Guide - Page 127
ASRock G41MH/USB3 Motherboard 127 - ASRock G41MH/USB3 | Quick Installation Guide - Page 128
128 SATAII_1 SATAII_3 SATAII_2 SATAII_4 ASRock G41MH/USB3 Motherboard - ASRock G41MH/USB3 | Quick Installation Guide - Page 129
CD1 ASRock G41MH/USB3 Motherboard 129 - ASRock G41MH/USB3 | Quick Installation Guide - Page 130
4 3 2 1 130 12 24 1 13 12 24 ASRock G41MH/USB3 Motherboard 1 13 - ASRock G41MH/USB3 | Quick Installation Guide - Page 131
ASRock G41MH/USB3 Motherboard 131 - ASRock G41MH/USB3 | Quick Installation Guide - Page 132
® ® 132 ASRock G41MH/USB3 Motherboard - ASRock G41MH/USB3 | Quick Installation Guide - Page 133
X O O O X O O O O: X: O O O O ASRock G41MH/USB3 Motherboard 133 - ASRock G41MH/USB3 | Quick Installation Guide - Page 134
134 ASRock G41MH/USB3 Motherboard - ASRock G41MH/USB3 | Quick Installation Guide - Page 135
® ® ® ® ® ® ® ASRock G41MH/USB3 Motherboard 135 - ASRock G41MH/USB3 | Quick Installation Guide - Page 136
136 ASRock G41MH/USB3 Motherboard - ASRock G41MH/USB3 | Quick Installation Guide - Page 137
® ® ® ® ® ASRock G41MH/USB3 Motherboard 137 - ASRock G41MH/USB3 | Quick Installation Guide - Page 138
® ® ® 138 ASRock G41MH/USB3 Motherboard - ASRock G41MH/USB3 | Quick Installation Guide - Page 139
ASRock G41MH/USB3 Motherboard 139 - ASRock G41MH/USB3 | Quick Installation Guide - Page 140
140 SATAII_1 SATAII_3 SATAII_2 SATAII_4 ASRock G41MH/USB3 Motherboard - ASRock G41MH/USB3 | Quick Installation Guide - Page 141
CD1 ASRock G41MH/USB3 Motherboard 141 - ASRock G41MH/USB3 | Quick Installation Guide - Page 142
4 3 2 1 12 24 1 13 142 ASRock G41MH/USB3 Motherboard - ASRock G41MH/USB3 | Quick Installation Guide - Page 143
12 24 1 13 ASRock G41MH/USB3 Motherboard 143 - ASRock G41MH/USB3 | Quick Installation Guide - Page 144
® ® ® 144 ASRock G41MH/USB3 Motherboard - ASRock G41MH/USB3 | Quick Installation Guide - Page 145
ASRock G41MH/USB3 Motherboard 145 Türkçe - ASRock G41MH/USB3 | Quick Installation Guide - Page 146
Türkçe 146 ASRock G41MH/USB3 Motherboard - ASRock G41MH/USB3 | Quick Installation Guide - Page 147
ASRock G41MH/USB3 Motherboard 147 Türkçe - ASRock G41MH/USB3 | Quick Installation Guide - Page 148
Türkçe 148 ASRock G41MH/USB3 Motherboard - ASRock G41MH/USB3 | Quick Installation Guide - Page 149
ASRock G41MH/USB3 Motherboard 149 Türkçe - ASRock G41MH/USB3 | Quick Installation Guide - Page 150
Türkçe 150 ASRock G41MH/USB3 Motherboard - ASRock G41MH/USB3 | Quick Installation Guide - Page 151
Short Open USB23 uyandýrma olaylarý için +5V_DUAL'ý etkinleþtirmek için pin2, pin3'ü kapatýn. Türkçe ASRock G41MH/USB3 Motherboard 151 - ASRock G41MH/USB3 | Quick Installation Guide - Page 152
. SATA veri kablosunu her iki ucu da SATA / SATAII sabit diskine veya anakarttaki SATAII konektörüne baðlanabilir. G/Ç panelindeki varsayýlan üç USB 2.0 portundan baþka, bu anakartta iki USB 2.0 fiþi bulunur. Her USB 2.0 fiþi iki USB 2.0 portunu destekler. Türkçe 152 ASRock G41MH/USB3 Motherboard - ASRock G41MH/USB3 | Quick Installation Guide - Page 153
giriþi almanýzý saðlar. Bu, panel ses kablosu için uygun baðlantý saðlayan ve ses cihazlarýný kontrol etmeyi saðlayan bir arayüzdür. Türkçe ASRock G41MH/USB3 Motherboard 153 - ASRock G41MH/USB3 | Quick Installation Guide - Page 154
siyah kabloyu toprak pinine baðlayýn. Lütfen fan kablolarýný CPU 4 3 fanýna bu konektöre baðlayýn 2 1 ve siyah kabloyu toprak pinine baðlayýn. Türkçe ATX Güç Konektörü (24-pinli ATXPWR1) 12 24 1 13 Lütfen bir ATX güç kaynaðýný bu konektöre baðlayýn. 154 ASRock G41MH/USB3 Motherboard - ASRock G41MH/USB3 | Quick Installation Guide - Page 155
fiþi olan bir güç kaynaðýný bu konektöre baðlamak gerekir. Aksi halde açarken sorun oluþabilir. Bu COM1 fiþi bir seri port modülünü destekler. Türkçe ASRock G41MH/USB3 Motherboard 155
-
 1
1 -
 2
2 -
 3
3 -
 4
4 -
 5
5 -
 6
6 -
 7
7 -
8
-
9
-
10
-
11
-
12
-
13
-
14
-
15
-
16
-
17
-
18
-
19
-
20
-
21
-
22
-
23
-
24
-
25
-
26
-
27
-
28
-
29
-
30
-
31
-
32
-
33
-
34
-
35
-
36
-
37
-
38
-
39
-
40
-
41
-
42
-
43
-
44
-
45
-
46
-
47
-
48
-
49
-
50
-
51
-
52
-
53
-
54
-
55
-
56
-
57
-
58
-
59
-
60
-
61
-
62
-
63
-
64
-
65
-
66
-
67
-
68
-
69
-
70
-
71
-
72
-
73
-
74
-
75
-
76
-
77
-
78
-
79
-
80
-
81
-
82
-
83
-
84
-
85
-
86
-
87
-
88
-
89
-
90
-
91
-
92
-
93
-
94
-
95
-
96
-
97
-
98
-
99
-
100
-
101
-
102
-
103
-
104
-
105
-
106
-
107
-
108
-
109
-
110
-
111
-
112
-
113
-
114
-
115
-
116
-
117
-
118
-
119
-
120
-
121
-
122
-
123
-
124
-
125
-
126
-
127
-
128
-
129
-
130
-
131
-
132
-
133
-
134
-
135
-
136
-
137
-
138
-
139
-
140
-
141
-
142
-
143
-
144
-
145
-
146
-
147
-
148
-
149
-
150
-
151
-
152
-
153
-
154
-
155
 |
 |
1
ASRock
G41MH/USB3
Motherboard
English
English
English
English
English
Copyright Notice:
Copyright Notice:
Copyright Notice:
Copyright Notice:
Copyright Notice:
No part of this installation guide may be reproduced, transcribed, transmitted, or trans-
lated in any language, in any form or by any means, except duplication of documen-
tation by the purchaser for backup purpose, without written consent of ASRock Inc.
Products and corporate names appearing in this guide may or may not be registered
trademarks or copyrights of their respective companies, and are used only for identifica-
tion or explanation and to the owners’ benefit, without intent to infringe.
Disclaimer:
Disclaimer:
Disclaimer:
Disclaimer:
Disclaimer:
Specifications and information contained in this guide are furnished for informational
use only and subject to change without notice, and should not be constructed as a
commitment by ASRock. ASRock assumes no responsibility for any errors or omissions
that may appear in this guide.
With respect to the contents of this guide, ASRock does not provide warranty of any kind,
either expressed or implied, including but not limited to the implied warranties or
conditions of merchantability or fitness for a particular purpose. In no event shall
ASRock, its directors, officers, employees, or agents be liable for any indirect, special,
incidental, or consequential damages (including damages for loss of profits, loss of
business, loss of data, interruption of business and the like), even if ASRock has been
advised of the possibility of such damages arising from any defect or error in the guide
or product.
This device complies with Part 15 of the FCC Rules. Operation is subject to the
following two conditions:
(1)
this device may not cause harmful interference, and
(2)
this device must accept any interference received, including interference that
may cause undesired operation.
Published May 2010
Copyright
©
2010 ASRock INC. All rights reserved.
CALIFORNIA, USA ONLY
The Lithium battery adopted on this motherboard contains Perchlorate, a toxic
substance controlled in Perchlorate Best Management Practices (BMP) regulations
passed by the California Legislature. When you discard the Lithium battery in
California, USA, please follow the related regulations in advance.
“Perchlorate Material-special handling may apply, see
www
.dtsc.ca.gov/hazardouswa
ste/perchlorate”
ASRock Website: http://www.asrock.com