ASRock G41MH-GE Quick Installation Guide
ASRock G41MH-GE Manual
 |
View all ASRock G41MH-GE manuals
Add to My Manuals
Save this manual to your list of manuals |
ASRock G41MH-GE manual content summary:
- ASRock G41MH-GE | Quick Installation Guide - Page 1
for backup purpose, without written consent of ASRock Inc. Products and corporate names appearing in this guide may or may not be registered trademarks or ASRock Website: http://www.asrock.com Published September 2009 Copyright©2009 ASRock INC. All rights reserved. 1 ASRock G41MH-GE Motherboard - ASRock G41MH-GE | Quick Installation Guide - Page 2
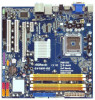
Motherboard Layout English 1 PS2_USB_PWR1 Jumper 17 USB 2.0 Header (USB4_5, Blue) 2 ATX 12V Connector (ATX12V1) 18 Chassis Fan Connector (CHA_FAN1) 3 CPU Fan Connector (CPU_FAN1) 19 System Panel Header (PANEL1, Orange) 4 775-Pin CPU Header 9 BIOS SPI Chip ASRock G41MH-GE Motherboard - ASRock G41MH-GE | Quick Installation Guide - Page 3
type of speaker you use. TABLE for Audio Output Connection Audio Output Channels Front Speaker Rear Speaker Central / Bass Side Speaker (No. 8) (No. 5) (No. 6) (No. 4) 2 V -- -- -- 4 V V -- -- 6 V V V -- 8 V V V V 3 ASRock G41MH-GE Motherboard English - ASRock G41MH-GE | Quick Installation Guide - Page 4
After restarting your computer, you will find "VIA HD Audio Deck" tool on your system. Please follow below instructions according to the OS you install. For Windows® XP / XP 64-bit OS: Please click "VIA HD Multi-Streaming function or Side Speaker function. English 4 ASRock G41MH-GE Motherboard - ASRock G41MH-GE | Quick Installation Guide - Page 5
specific information about the model you are using. www.asrock.com/support/index.asp 1.1 Package Contents ASRock G41MH-GE Motherboard (Micro ATX Form Factor: 9.6-in x 9.6-in, 24.4 cm x 24.4 cm) ASRock G41MH-GE Quick Installation Guide ASRock G41MH-GE Support CD One 80-conductor Ultra ATA 66/100 IDE - ASRock G41MH-GE | Quick Installation Guide - Page 6
-ray (BD) / HD-DVD playback (see CAUTION 7) - 7.1 CH Windows® VistaTM Premium Level HD Audio (VIA® VT1708S Audio Codec) - PCIE x1 Gigabit LAN 10/100/1000 Mb/s - Realtek RTL8111DL - Supports Wake-On-LAN I/O Panel - 1 x PS/2 Mouse Port - 1 x PS/2 Keyboard Port ASRock G41MH-GE Motherboard English - ASRock G41MH-GE | Quick Installation Guide - Page 7
- ASRock Instant Flash (see CAUTION 13) - ASRock OC DNA (see CAUTION 14) - Hybrid Booster: - CPU Frequency Stepless Control (see CAUTION 15) - ASRock U-COP (see CAUTION 16) - Boot Failure Guard (B.F.G.) - CPU Temperature Sensing - Chassis Temperature Sensing 7 ASRock G41MH-GE Motherboard English - ASRock G41MH-GE | Quick Installation Guide - Page 8
latest information. 7. Full HD 1080p Blu-ray (BD) / HD-DVD playback support requires the proper hardware configuration. Please refer to page 10 for the minimum hardware requirement and the passed Full HD 1080p Blu-ray (BD) / HD-DVD films in our lab test. 8 ASRock G41MH-GE Motherboard English - ASRock G41MH-GE | Quick Installation Guide - Page 9
and worked on the same motherboard. 15. Although this motherboard offers stepless control, it is not recommended to perform over-clocking. Frequencies other than the recommended CPU bus frequencies may cause the instability of the system or damage the CPU. 9 ASRock G41MH-GE Motherboard English - ASRock G41MH-GE | Quick Installation Guide - Page 10
with patch 1830U (Windows® VistaTM / VistaTM 64-bit) CyberLink PowerDVD9 with patch 2029 (Windows® 7 / 7 64-bit) * Currently, 1080p Blu-ray (BD) / HD-DVD playback is supported under Windows® 7 / 7 64-bit / VistaTM / VistaTM 64-bit OS only. English 10 ASRock G41MH-GE Motherboard - ASRock G41MH-GE | Quick Installation Guide - Page 11
Before you insert the 775-LAND CPU into the socket, please check if the CPU surface is unclean or if there is any bent pin on the socket. Do not force to insert the CPU into the socket if above situation is found. Otherwise, the CPU will be seriously damaged. 11 ASRock G41MH-GE Motherboard English - ASRock G41MH-GE | Quick Installation Guide - Page 12
100 degrees. Step 2. Insert the 775-LAND CPU: Step 2-1. Hold the CPU by the edges where are marked with support the load plate edge, engage PnP cap with right hand thumb and peel the cap from the socket while pressing on center of PnP cap to assist in removal. 12 ASRock G41MH-GE Motherboard - ASRock G41MH-GE | Quick Installation Guide - Page 13
, the heatsink cannot be secured on the motherboard. Step 5. Step 6. Connect fan header with the CPU fan connector on the motherboard. Secure excess cable with tie-wrap to ensure cable does not interfere with fan operation or contact other components. 13 ASRock G41MH-GE Motherboard English - ASRock G41MH-GE | Quick Installation Guide - Page 14
allowed to install a DDR memory module into DDR2 slot; otherwise, this motherboard and DIMM may be damaged. 5. This motherboard supports two double-sided or four single-sided DIMMs. Therefore, if you install four DDR2 DIMMs, you can only adopt four single-sided DIMMs. 14 ASRock G41MH-GE Motherboard - ASRock G41MH-GE | Quick Installation Guide - Page 15
cause permanent damage to the motherboard and the DIMM if you force the DIMM into the slot at incorrect orientation. Step 3. Firmly insert the DIMM into the slot until the retaining clips at both ends fully snap back in place and the DIMM is properly seated. 15 ASRock G41MH-GE Motherboard English - ASRock G41MH-GE | Quick Installation Guide - Page 16
Slots (PCI and PCI Express Slots) There are 2 PCI slots and 2 PCI Express slots on this motherboard. PCI slots: PCI slots are used to install expansion cards that have the 32-bit PCI interface. on the slot. Step 4. Fasten the card to the chassis with screws. 16 ASRock G41MH-GE Motherboard English - ASRock G41MH-GE | Quick Installation Guide - Page 17
panel. VGA/D-Sub port VGA/DVI-D port HDMI port 2. If you have installed onboard VGA driver from our support CD to your system already, you can freely enjoy the benefits of multi monitor function after all additional monitors will be designated as Secondary. 17 ASRock G41MH-GE Motherboard English - ASRock G41MH-GE | Quick Installation Guide - Page 18
of your monitors that you would like to use. The placement of display icons determines how you move items from one monitor to another. 18 ASRock G41MH-GE Motherboard English - ASRock G41MH-GE | Quick Installation Guide - Page 19
to the increase in manufacturers employing HDCP in their equipment, it is highly recommended that the HDTV or LCD monitor you purchase is compatible. 19 ASRock G41MH-GE Motherboard English - ASRock G41MH-GE | Quick Installation Guide - Page 20
unplug the power cord from the power supply. After waiting for 15 seconds, use a jumper cap to short 2 pins on CLRCMOS1 for 5 seconds. English 20 ASRock G41MH-GE Motherboard - ASRock G41MH-GE | Quick Installation Guide - Page 21
) Data Cable (Optional) Either end of the SATA data cable can be connected to the SATA / SATAII hard disk or the SATAII connector on the motherboard. English 21 ASRock G41MH-GE Motherboard - ASRock G41MH-GE | Quick Installation Guide - Page 22
connection and control of audio devices. 1. High Definition Audio supports Jack Sensing, but the panel wire on the chassis must support HDA to function correctly. Please follow the instruction in our manual and chassis manual to install your system. 22 ASRock G41MH-GE Motherboard English - ASRock G41MH-GE | Quick Installation Guide - Page 23
) support, the 3-Pin CPU fan still can work successfully even without the fan speed control function. If you plan to connect the 3-Pin CPU fan to the CPU fan connector on this motherboard, please connect it to Pin 1-3. Pin 1-3 Connected 3-Pin Fan Installation English 23 ASRock G41MH-GE Motherboard - ASRock G41MH-GE | Quick Installation Guide - Page 24
7) 12 24 Please connect an ATX power supply to this connector. 1 13 Though this motherboard provides 24-pin ATX power connector, 12 24 it can still work if you adopt a power supply to this connector. This COM1 header supports a serial port module. English 24 ASRock G41MH-GE Motherboard - ASRock G41MH-GE | Quick Installation Guide - Page 25
under a more stable overclocking environment. Please refer to the warning on page 8 for the possible overclocking risk before you apply Untied Overclocking Technology. English 25 ASRock G41MH-GE Motherboard - ASRock G41MH-GE | Quick Installation Guide - Page 26
detailed information about BIOS Setup, please refer to the User Manual (PDF file) contained in the Support CD. 4. Software Support CD information This motherboard supports various Microsoft® EXE" from the BIN folder in the Support CD to display the menus. 26 ASRock G41MH-GE Motherboard English - ASRock G41MH-GE | Quick Installation Guide - Page 27
benötigen, besuchen Sie bitte unsere Webseite: www.asrock.com/support/index.asp 1.1 Kartoninhalt ASRock G41MH-GE Motherboard (Micro ATX-Formfaktor: 24.4 cm x 24.4 cm; 9.6 Zoll x 9.6 Zoll) ASRock G41MH-GE Schnellinstallationsanleitung ASRock G41MH-GE Support-CD Ein 80-adriges Ultra-ATA 66/100 IDE - ASRock G41MH-GE | Quick Installation Guide - Page 28
- Unterstützt Untied-Übertaktungstechnologie (siehe VORSICHT 2) - Unterstützt EM64T-CPU - Northbridge: Intel® G41 - Southbridge: Intel® ICH7 - Unterstützung von Dual-Kanal-DDR2- 7) - 7.1 CH Windows® VistaTM Premium Level HD Audio (VIA® VT1708S Audio Codec) ASRock G41MH-GE Motherboard Deutsch - ASRock G41MH-GE | Quick Installation Guide - Page 29
BIOS Support-CD Einzigartige Eigenschaft - PCIE x1 Gigabit LAN 10/100/1000 Mb CPU/ BIOS - Treiber, Dienstprogramme, Antivirussoftware (Probeversion) - ASRock OC Tuner (siehe VORSICHT 11) - Intelligent Energy Saver (Intelligente Energiesparfunktion) (siehe VORSICHT 12) 29 ASRock G41MH-GE Motherboard - ASRock G41MH-GE | Quick Installation Guide - Page 30
www.asrock.com WARNUNG Beachten Sie bitte, dass Overclocking, einschließlich der Einstellung im BIOS, auf der Support-CD enthaltenen Benutzerhandbuches beschrieben. 2. Dieses Motherboard unterstützt die CPU FSB-Frequenz entnehmen Sie bitte der nachstehenden Tabelle. 30 ASRock G41MH-GE Motherboard - ASRock G41MH-GE | Quick Installation Guide - Page 31
-Bit-CPU besteht diese Support ASRock OC Tuner. ASRock-Website: http://www.asrock ASRock-Website: http://www.asrock.com 13. ASRock Instant Flash ist ein im Flash-ROM eingebettetes BIOS-Flash- Programm. Mithilfe dieses praktischen BIOS-Aktualisierungswerkzeugs Deutsch 31 ASRock G41MH-GE Motherboard - ASRock G41MH-GE | Quick Installation Guide - Page 32
BIOS-Setup-Menü Zugang zu ASRock Instant Flash. Sie brauchen dieses Werkzeug einfach nur zu starten und die neue BIOS OC DNA können Sie Ihre Übertaktungseinstellungen als Profil üfen Sie bitte, ob der CPU-Lüfter am Motherboard richtig funktioniert, und stecken Sie ASRock G41MH-GE Motherboard Deutsch - ASRock G41MH-GE | Quick Installation Guide - Page 33
sie ausgeschaltet sind. Um dem EuP-Standard zu entsprechen, sind ein EuP-fähiges Motherboard und eine EuP-fähige Stromversorgung erforderlich. Gemäß einer Empfehlung von Intel muss eine überbrücken Sie 2-pin von CLRCMOS1 mithilfe des Jumpers für 5 Sekunden. Deutsch 33 ASRock G41MH-GE Motherboard - ASRock G41MH-GE | Quick Installation Guide - Page 34
Header und Anschlüsse. Wenn Sie Jumperkappen auf Header und Anschlüsse setzen, wird das Motherboard unreparierbar beschädigt! Anschluss für das Floppy-Laufwerk (33-Pin FLOPPY1) (siehe S.2 - SATAIIFestplatte oder dem SATAII-Anschluss am Mainboard verbinden. Deutsch 34 ASRock G41MH-GE Motherboard - ASRock G41MH-GE | Quick Installation Guide - Page 35
den vier üblichen USB 2.0-Ports an den I/O-Anschlüssen befinden sich zwei USB 2.0-Anschlussleisten am Motherboard. Pro USB 2.0Anschlussleiste werden zwei USB 2.0-Ports unterstützt. Infrarot-Modul-Header (5-pin IR1) glichkeit und Kontrolle über Audio-Geräte. Deutsch 35 ASRock G41MH-GE Motherboard - ASRock G41MH-GE | Quick Installation Guide - Page 36
müssen nicht an die AC'97-Audioleiste angeschlossen werden. E. Rufen Sie das BIOS-Setup-Dienstprogramm auf. Wechseln Sie zu Erweiterte Einstellungen und wählen Sie Chipset-Konfiguration. , wobei der schwarze Draht an den Schutzleiterstift angeschlossenwird. Deutsch 36 ASRock G41MH-GE Motherboard - ASRock G41MH-GE | Quick Installation Guide - Page 37
angeschlossen werden; auch ohne Geschwindigkeitsregulierung. Wenn Sie einen dreipoligen CPU-Lüfter an den CPU-Lüferanschluss dieses Motherboards anschließen möchten, verbinden Sie ihn bitte mit den wird verwendet, um ein COM-Anschlussmodul zu unterstützen. Deutsch 37 ASRock G41MH-GE Motherboard - ASRock G41MH-GE | Quick Installation Guide - Page 38
der Support-CD, um die Menüs aufzurufen. Das Setup-Programm soll es Ihnen so leicht wie möglich machen. Es ist menügesteuert, d.h. Sie können in den verschiedenen Untermenüs Ihre Auswahl treffen und die Programme werden dann automatisch installiert. 38 ASRock G41MH-GE Motherboard Deutsch - ASRock G41MH-GE | Quick Installation Guide - Page 39
forme Micro ATX: 9.6 pouces x 9.6 pouces, 24.4 cm x 24.4 cm) Guide d'installation rapide ASRock G41MH-GE CD de soutien ASRock G41MH-GE Un câble ruban IDE Ultra ATA 66/100 80 conducteurs Un câbles de données de série ATA (SATA) (en option) Un I/O Panel Shield 39 ASRock G41MH-GE Motherboard Français - ASRock G41MH-GE | Quick Installation Guide - Page 40
le D-Sub avec une résolution maximale jusqu'à 2048x1536 @ 60Hz - Supporter la fonction de HDCP - Supporter 1080p Blu-ray(BD)/ lecteur de HD-DVD (voir ATTENTION 7) - 7.1 Son haute définition de première qualité CH Windows® VistaTM (codec audio VIA® VT1708S) 40 ASRock G41MH-GE Motherboard Français - ASRock G41MH-GE | Quick Installation Guide - Page 41
LAN 10/100/1000 Mb/s - Realtek RTL8111DL - Support du Wake-On-LAN Support SMBIOS 2.3.1 - Supporter I. O. T. (Technologie d'Overclocking Intelligent) - Prise en charge du Smart BIOS CD d'assistance - Pilotes, utilitaires, logiciel anti-virus (Version d'essai) 41 ASRock G41MH-GE Motherboard - ASRock G41MH-GE | Quick Installation Guide - Page 42
Double, assurezvous de bien lire le guide d'installation des modules mémoire en page 14 pour réaliser une installation correcte. 4. Veuillez vérifier dans le tableau ci-dessous pour les fréquences de prise en charge mémoire et les fréquences FSB UC correspondantes. 42 ASRock G41MH-GE Motherboard - ASRock G41MH-GE | Quick Installation Guide - Page 43
ASRock Instant Flash é um utilitário de flash do BIOS incorporado na memória Flash ROM. Esta prática ferramenta de actualização do BIOS permite-lhe actualizar o BIOS do sistema sem necessitar de entrar nos sistemas operativos, como o MS-DOS ou o Windows®. Com este 43 ASRock G41MH-GE Motherboard - ASRock G41MH-GE | Quick Installation Guide - Page 44
d'overclockage. Avec OC DNA , vous pouvez enregistrer vos réglages d'overclockage en tant que profil et les partager avec vos amis ! Vos amis peuvent alors charger le profil d'overclockage sur de consulter votre fournisseur de courant pour plus de détails. 44 ASRock G41MH-GE Motherboard Français - ASRock G41MH-GE | Quick Installation Guide - Page 45
. Puis placez un cavalier sur les pins CLRCMOS1 pendant 5 secondes. N'oubliez pas de retirer le cavalier avant après avoir restauré le CMOS. Français 45 ASRock G41MH-GE Motherboard - ASRock G41MH-GE | Quick Installation Guide - Page 46
connecteur noir vers le disque dur Câble ATA 66/100 80 conducteurs Note: Veuillez vous reporter aux instructions du fabricant de votre IDE périphérique pour les détails. Connecteurs Série ATAII (SATAII_1: voir / SATAIIou au connecteur SATAII sur la carte mère. ASRock G41MH-GE Motherboard Français - ASRock G41MH-GE | Quick Installation Guide - Page 47
voir p.2 No. 30) Embase de port d'impression (LPT1 25 broches) (voir p.2 No. 20) Cet en-tête supporte un module infrarouge optionnel de transfert et de réception sans fil. AIl s'agit d'une interface pour le câble du contrôle commodes de périphériques audio. Français 47 ASRock G41MH-GE Motherboard - ASRock G41MH-GE | Quick Installation Guide - Page 48
en charge le HDA pour fonctionner correctement. Veuillez suivre les instructions dans notre manuel et le manuel de châssis afin panneau audio AC'97. E. Entrer dans l'utilitaire de configuration du BIOS. Saisir les Paramètres avancés puis sélectionner Configuration du jeu ASRock G41MH-GE Motherboard - ASRock G41MH-GE | Quick Installation Guide - Page 49
correspondre oche de terre. ien que cette carte mère offre un support de (Ventilateur silencieux) ventilateur de CPU à 4 broches , le ventilateur de CPU à 3 broches peut bien fonctionner même sans la fonction de prendre en charge un module de port COM. Français 49 ASRock G41MH-GE Motherboard - ASRock G41MH-GE | Quick Installation Guide - Page 50
Test) pour entrer dans le BIOS; sinon, le POST continue ses tests de routine. Si vous désirez entrer dans le BIOS BIOS, veuillez consulter le Guide de l'utilisateur (fichier PDF) dans le CD technique. 3. Informations sur le CD de support Cette carte mère supporte ASRock G41MH-GE Motherboard Français - ASRock G41MH-GE | Quick Installation Guide - Page 51
di CPU supportate. ASRock website http://www.asrock.com Se si necessita dell'assistenza tecnica per questa scheda madre, visitare il nostro sito per informazioni specifiche sul modello che si sta usando. www.asrock.com/support/index.asp 1.1 Contenuto della confezione Scheda madre ASRock G41MH-GE - ASRock G41MH-GE | Quick Installation Guide - Page 52
Factor: 9.6-in x 9.6-in, 24.4 cm x 24.4 cm - LGA 775 per Intel® CoreTM 2 Extreme / CoreTM 2 Quad / CoreTM 2 Duo " (vedi ATTENZIONE 2) - Supporto CPU EM64T - Northbridge: Intel® G41 - Southbridge: Intel® ICH7 - 1000 Mb/s - Realtek RTL8111DL - Supporta Wake-On-LAN ASRock G41MH-GE Motherboard Italiano - ASRock G41MH-GE | Quick Installation Guide - Page 53
antivirus (Versione dimostrativa) supporto Caratteris- - Sintonizzatore ASRock OC (vedi ATTENZIONE 11) tica speciale - Intelligent Energy Saver (Risparmio intelligente dell'energia) (vedi ATTENZIONE 12) - Instant Boot - ASRock Instant Flash (vedi ATTENZIONE 13) 53 ASRock G41MH-GE Motherboard - ASRock G41MH-GE | Quick Installation Guide - Page 54
Manuale CPU FSB. Fréquence FSB UC Fréquence de prise en charge mémoire 1333 DDR2 667, DDR2 800, DDR2 1066 1066 DDR2 667, DDR2 800, DDR2 1066 800 DDR2 667, DDR2 800 533 DDR2 533 * I moduli di memoria DDR2 1066 funzioneranno in modalita' di sincronizzazione. 54 ASRock G41MH-GE Motherboard - ASRock G41MH-GE | Quick Installation Guide - Page 55
per il test 1080p Blu- 29 del "Manuale utente" nel BIOS nell'unità Flash USB, dischetto (disco floppy) o disco rigido; poi si può aggiornare il BIOS con pochi clic, senza preparare altri dischetti (dischi floppy) o altre complicate utilità Flash. Si prega di notare che 55 ASRock G41MH-GE Motherboard - ASRock G41MH-GE | Quick Installation Guide - Page 56
OC DNA - dice di cosa è capace. OC DNA, una utilità esclusiva sviluppata da ASRock, fornisce un modo comodo per registrare le impostazioni OC riavviare il sistema, assicurarsi che la ventolina CPU della scheda madre funzioni correttamente; scollegare e ASRock G41MH-GE Motherboard Italiano - ASRock G41MH-GE | Quick Installation Guide - Page 57
. Per pulire I parametri di sistema e resettare ai parametri di default, spegnere il computer e scollegare l'alimentatore, poi collegare il jumper sul CLRCMOS1 per 5 secondi. Italiano 57 ASRock G41MH-GE Motherboard - ASRock G41MH-GE | Quick Installation Guide - Page 58
Serial ATA (SATA) (Opzionale) Entrambe le estremità del cavo dati SATA possono collegarsi all'hard disk SATA / SATAII o al connettore SATAII sulla scheda madre. 58 ASRock G41MH-GE Motherboard Italiano - ASRock G41MH-GE | Quick Installation Guide - Page 59
-ROM, DVD - ROM,TV tuner, o schede MPEG. È un'interfaccia per il cavo del pannello audio. Che consente connessione facile e controllo dei dispositivi audio. Italiano 59 ASRock G41MH-GE Motherboard - ASRock G41MH-GE | Quick Installation Guide - Page 60
corretto. Attenersi alle istruzioni del nostro manuale e del manuale del telaio per installare il sistema. Entrare nel programma di impostazione BIOS. Entrare su Impostazioni avanzate, quindi CPU a questo connettore e far combaciare il filo nero al pin terra. Italiano 60 ASRock G41MH-GE Motherboard - ASRock G41MH-GE | Quick Installation Guide - Page 61
della velocità della ventola. Se si intende collegare la ventola CPU a 3 piedini al connettore della ventola CPU su questa scheda madre, collegarla ai piedini 1-3. Piedini 1-3 collegati collettore porta COM è utilizzato per supportare il modulo porta COM. Italiano 61 ASRock G41MH-GE Motherboard - ASRock G41MH-GE | Quick Installation Guide - Page 62
test di routine. Per entrare il BIOS Setup dopo il POST, riavvia il sistema premendo + + , o premi il tasto di reset sullo chassis del sistema. Per informazioni più dettagliate circa il Setup del BIOS, fare riferimento al Manuale i driver e ASRock G41MH-GE Motherboard Italiano - ASRock G41MH-GE | Quick Installation Guide - Page 63
G41MH-GE (Factor forma Micro ATX: 24,4 cm x 21,8 cm, 9,6" x 8,6") Guía de instalación rápida de ASRock G41MH-GE CD de soporte de ASRock G41MH-GE Una cinta de datos IDE de conducción 80 Ultra ATA 66/100 Una cables de datos Serial ATA (SATA) (Opcional) Una protección I/O 63 ASRock G41MH-GE Motherboard - ASRock G41MH-GE | Quick Installation Guide - Page 64
,4 cm x 24,4 cm, 9,6" x 9,6" - LGA 775 para Intel® CoreTM 2 Extreme / CoreTM 2 Quad / velocidad liberada (vea ATENCIÓN 2) - Admite CPU EM64T - North Bridge: Intel® G41 - South Bridge: Intel® ICH7 - Soporte de Mb/s - Realtek RTL8111DL - Soporta Wake-On-LAN Español 64 ASRock G41MH-GE Motherboard - ASRock G41MH-GE | Quick Installation Guide - Page 65
te de port COM - Conector de ventilador de CPU / chasis / alimentacion - 24-pin cabezal de BIOS - Controladores, Utilerías, Software de Anti Virus (Versión de prueba) - Sintonizador de ASRock OC (vea ATENCIÓN 11) - Administrador de energía inteligente (vea ATENCIÓN 12) 65 ASRock G41MH-GE Motherboard - ASRock G41MH-GE | Quick Installation Guide - Page 66
ASRock Instant Flash (vea ATENCIÓN 13) - ASRock OC DNA (vea ATENCIÓN 14) - Amplificador Híbrido: - Stepless control de frecuencia de CPU (vea ATENCIÓN 15) - ASRock el ajuste del BIOS, aplicando la consulte página 36 del Manual del Usuario en el CPU correspondiente. 66 ASRock G41MH-GE Motherboard - ASRock G41MH-GE | Quick Installation Guide - Page 67
® XP 64-bit y Windows® VistaTM 64-bit con CPU de 64-bit, no existe dicha limitación. 6. El duros SATAII" en la página 29 del "Manual de usuario" que se incluye en el CD de ASRock OC. Sitio web de ASRock: http://www.asrock.com ASRock: http://www.asrock.com Español 67 ASRock G41MH-GE Motherboard - ASRock G41MH-GE | Quick Installation Guide - Page 68
, es decir, la eficiencia de energía de 5v en modo de espera debería ser mayor del 50% con un consumo de corriente de 100mA. 68 ASRock G41MH-GE Motherboard Español - ASRock G41MH-GE | Quick Installation Guide - Page 69
y desconecte el cable de la fuente de electricidad, ponga en cortocircuito los pins de CLRCMOS1 por más que 5 segundos usando un jumper cap. Español 69 ASRock G41MH-GE Motherboard - ASRock G41MH-GE | Quick Installation Guide - Page 70
de serie ATA (SATA) (Opcional) Ambos extremos del cable pueden conectarse al disco duro SATA / SATAII o la conexión de la placa base. Español 70 ASRock G41MH-GE Motherboard - ASRock G41MH-GE | Quick Installation Guide - Page 71
, o tarjeta MPEG. Este es una interface para cable de audio de panel frontal que permite conexión y control conveniente de apparatos de Audio. Español 71 ASRock G41MH-GE Motherboard - ASRock G41MH-GE | Quick Installation Guide - Page 72
en nuestro manual y en el manual de chasis de configuración del BIOS Entre en Configuración CPU 1 2 (4-pin CPU_FAN1) 3 4 (vea p.2, N. 3) Conecte el cable del ventilador de la CPU a este conector y haga coincidir el cable negro con el conector de tierra. Español 72 ASRock G41MH-GE Motherboard - ASRock G41MH-GE | Quick Installation Guide - Page 73
electricidad. De lo contrario no se podrá encender. Este cabezal del puerto COM se utiliza para admitir un módulo de puerto COM. Español 73 ASRock G41MH-GE Motherboard - ASRock G41MH-GE | Quick Installation Guide - Page 74
la Utilidad de configuración de la BIOS, consulte el Manual del usuario (archivo PDF), que se encuentra en el CD de soporte. 3.Información de Software Support CD Esta placa-base soporta diversos pulse en el archivo "ASSETUP.EXE" para iniciar la instalación. 74 ASRock G41MH-GE Motherboard Español - ASRock G41MH-GE | Quick Installation Guide - Page 75
G41MH-GE (Formato Micro ATX: 9,6 pol. x 9,6 pol., 24,4 cm x 24,4 cm) Guia de instalação rápida da ASRock G41MH-GE CD de suporte da placa ASRock G41MH-GE Um cabo-fita IDE Ultra ATA 66/100 de 80 condutores Um cabo de dados ATA Serial (SATA) (Opcional) Uma proteção I/O 87 ASRock G41MH-GE Motherboard - ASRock G41MH-GE | Quick Installation Guide - Page 76
playback (veja o AVISO 7) - Áudio de alta definição de canal 7.1 através do Windows® VistaTM (Codec de áudio VIA® VT1708S) - PCIE x1 Gigabit LAN 10/100/1000 Mb/s - Realtek RTL8111DL - Suporta Wake-On-LAN 88 ASRock G41MH-GE Motherboard Português - ASRock G41MH-GE | Quick Installation Guide - Page 77
da porta COM - Conector do ventilador da CPU/chassis/energia - Conector de força do ATX BIOS - Controladores, utilitários, software antivírus (Experimentacao Versao) - Sintonizador ASRock OC (veja o AVISO 11) - Intelligent Energy Saver (veja o AVISO 12) - Instant Boot 89 ASRock G41MH-GE Motherboard - ASRock G41MH-GE | Quick Installation Guide - Page 78
ASRock OC DNA (veja o AVISO 14) - Booster híbrido: - Frequência da CPU com controle contínuo (veja o AVISO 15) - ASRock ao ajuste das definições do BIOS, à aplicação da tecnologia Untied Threading", consulte a página 36 do Manual do Usuário no CD de suporte. ASRock G41MH-GE Motherboard - ASRock G41MH-GE | Quick Installation Guide - Page 79
® VistaTM. No caso da CPU de 64 bits do Windows® HDDVD filmes no nosso teste de laboratório. 8. na página 29 do Manual do Usuário no ASRock OC. Sítio Web da ASRock: http://www.asrock BIOS pour accéder à ASRock Instant Flash. Lancez simplement cet outil et 91 ASRock G41MH-GE Motherboard Português - ASRock G41MH-GE | Quick Installation Guide - Page 80
jour votre BIOS en quelques OC só pode ser partilhado e trabalhado na mesma placa-mãe. 15. Apesar de esta placa-mãe oferecer controle continuamente variável, não se recomenda efetuar over-clock. Freqüências de barramento diferentes das recomendadas para a CPU ASRock G41MH-GE Motherboard Português - ASRock G41MH-GE | Quick Installation Guide - Page 81
favor desligue o cabo de força, ponha em curto-circuito os pins de CLRCMOS1 por mais de 5 segundos para limpar o CMOS usando um jumper. Português 93 ASRock G41MH-GE Motherboard - ASRock G41MH-GE | Quick Installation Guide - Page 82
) (opcional) Tanto a saída do cabo de Serial dados SATA pode ser conectado ao disco rígido SATA / SATAII quanto o conector SATAII na placa mãe. Português 94 ASRock G41MH-GE Motherboard - ASRock G41MH-GE | Quick Installation Guide - Page 83
ou placa MPEG. Esta é uma interface para o cabo de áudio no painel frontal, que permite uma conexão e controle convenientes dos dispositivos de áudio. Português 95 ASRock G41MH-GE Motherboard - ASRock G41MH-GE | Quick Installation Guide - Page 84
. Siga s instruções que aparecem no manual e no manual do chassis para instalar o sistema. 2. udio AC'97. E. Entre no utilitário de configuração do BIOS. Vá até à opção Definições avançadas e escolha CPU, coincidindo o fio preto com o pino de aterramento. Português 96 ASRock G41MH-GE Motherboard - ASRock G41MH-GE | Quick Installation Guide - Page 85
de controlo de velocidade da ventoinha. Se pretender ligar uma ventoinha de 3 pinos para CPU ao conector de ventoinha do CPU nesta placa-mãe, por favor, ligue-a aos pinos 1-3. Pinos 1-3 ligados Instalação de é usado para suportar um módulo de porta COM. Português 97 ASRock G41MH-GE Motherboard - ASRock G41MH-GE | Quick Installation Guide - Page 86
do computador. Automaticamente iniciará o menu principal, casa o AUTORUN esteja ativado. Se o menu principal não aparecer automaticamente, explore o CD e execute o "ASSETUP.EXE" localizado na pasta BIN. 98 ASRock G41MH-GE Motherboard Português - ASRock G41MH-GE | Quick Installation Guide - Page 87
99 ASRock G41MH-GE Motherboard - ASRock G41MH-GE | Quick Installation Guide - Page 88
® ® / ® ® ® ® ® ® ® 100 ASRock G41MH-GE Motherboard - ASRock G41MH-GE | Quick Installation Guide - Page 89
ASRock G41MH-GE Motherboard 101 - ASRock G41MH-GE | Quick Installation Guide - Page 90
® " " ® ® ® ® ® 102 ASRock G41MH-GE Motherboard - ASRock G41MH-GE | Quick Installation Guide - Page 91
" " " " ® ® ASRock G41MH-GE Motherboard 103 - ASRock G41MH-GE | Quick Installation Guide - Page 92
104 ASRock G41MH-GE Motherboard - ASRock G41MH-GE | Quick Installation Guide - Page 93
"" "" "" "" ASRock G41MH-GE Motherboard 105 - ASRock G41MH-GE | Quick Installation Guide - Page 94
SATAII_1 SATAII_3 SATAII_2 SATAII_4 106 ASRock G41MH-GE Motherboard - ASRock G41MH-GE | Quick Installation Guide - Page 95
CD1 ASRock G41MH-GE Motherboard 107 - ASRock G41MH-GE | Quick Installation Guide - Page 96
1 2 3 4 108 ASRock G41MH-GE Motherboard - ASRock G41MH-GE | Quick Installation Guide - Page 97
12 24 1 13 12 24 1 13 ASRock G41MH-GE Motherboard 109 - ASRock G41MH-GE | Quick Installation Guide - Page 98
" " \\ " " 110 ASRock G41MH-GE Motherboard - ASRock G41MH-GE | Quick Installation Guide - Page 99
ASRock G41MH-GE Motherboard 111 - ASRock G41MH-GE | Quick Installation Guide - Page 100
® ® ® ® ® ® ® 112 ® ® ASRock G41MH-GE Motherboard - ASRock G41MH-GE | Quick Installation Guide - Page 101
ASRock G41MH-GE Motherboard 113 - ASRock G41MH-GE | Quick Installation Guide - Page 102
® ® ® " " 114 ASRock G41MH-GE Motherboard - ASRock G41MH-GE | Quick Installation Guide - Page 103
® ® ® ® ® ® ® TM TM ® ® ASRock G41MH-GE Motherboard 115 - ASRock G41MH-GE | Quick Installation Guide - Page 104
- 116 ASRock G41MH-GE Motherboard - ASRock G41MH-GE | Quick Installation Guide - Page 105
ASRock G41MH-GE Motherboard 117 - ASRock G41MH-GE | Quick Installation Guide - Page 106
SATAII_1 SATAII_3 SATAII_2 SATAII_4 118 ASRock G41MH-GE Motherboard - ASRock G41MH-GE | Quick Installation Guide - Page 107
CD1 ASRock G41MH-GE Motherboard 119 - ASRock G41MH-GE | Quick Installation Guide - Page 108
1 2 3 4 120 ASRock G41MH-GE Motherboard - ASRock G41MH-GE | Quick Installation Guide - Page 109
12 24 1 13 12 24 1 13 ASRock G41MH-GE Motherboard 121 - ASRock G41MH-GE | Quick Installation Guide - Page 110
® ® TM TM 122 ASRock G41MH-GE Motherboard - ASRock G41MH-GE | Quick Installation Guide - Page 111
ASRock G41MH-GE Motherboard 123 - ASRock G41MH-GE | Quick Installation Guide - Page 112
® ® ® ® ® ® ® ® ® 124 ASRock G41MH-GE Motherboard - ASRock G41MH-GE | Quick Installation Guide - Page 113
ASRock G41MH-GE Motherboard 125 - ASRock G41MH-GE | Quick Installation Guide - Page 114
® ® ® ® ® ® ® 126 ASRock G41MH-GE Motherboard - ASRock G41MH-GE | Quick Installation Guide - Page 115
® ® ® ® ASRock G41MH-GE Motherboard 127 - ASRock G41MH-GE | Quick Installation Guide - Page 116
128 ASRock G41MH-GE Motherboard - ASRock G41MH-GE | Quick Installation Guide - Page 117
SATAII_1 SATAII_3 SATAII_2 SATAII_4 ASRock G41MH-GE Motherboard 129 - ASRock G41MH-GE | Quick Installation Guide - Page 118
CD1 130 ASRock G41MH-GE Motherboard - ASRock G41MH-GE | Quick Installation Guide - Page 119
1 2 3 4 12 24 1 13 ASRock G41MH-GE Motherboard 131 - ASRock G41MH-GE | Quick Installation Guide - Page 120
12 24 1 13 ® ® 132 ASRock G41MH-GE Motherboard - ASRock G41MH-GE | Quick Installation Guide - Page 121
12 24 1 13 X O O O X O O O O: X: O O O O ASRock G41MH-GE Motherboard 133 - ASRock G41MH-GE | Quick Installation Guide - Page 122
134 ASRock G41MH-GE Motherboard - ASRock G41MH-GE | Quick Installation Guide - Page 123
® ® ® ® ® ® ® ® ® ASRock G41MH-GE Motherboard 135 - ASRock G41MH-GE | Quick Installation Guide - Page 124
136 ASRock G41MH-GE Motherboard - ASRock G41MH-GE | Quick Installation Guide - Page 125
® ® ® ® ® ® ® ASRock G41MH-GE Motherboard 137 - ASRock G41MH-GE | Quick Installation Guide - Page 126
® ® ® ® 138 ASRock G41MH-GE Motherboard - ASRock G41MH-GE | Quick Installation Guide - Page 127
ASRock G41MH-GE Motherboard 139 - ASRock G41MH-GE | Quick Installation Guide - Page 128
SATAII_1 SATAII_3 SATAII_2 SATAII_4 140 ASRock G41MH-GE Motherboard - ASRock G41MH-GE | Quick Installation Guide - Page 129
CD1 ASRock G41MH-GE Motherboard 141 - ASRock G41MH-GE | Quick Installation Guide - Page 130
1 2 3 4 142 12 24 1 13 ASRock G41MH-GE Motherboard - ASRock G41MH-GE | Quick Installation Guide - Page 131
12 24 1 13 ® ® ® ASRock G41MH-GE Motherboard 143
-
 1
1 -
 2
2 -
 3
3 -
 4
4 -
 5
5 -
 6
6 -
 7
7 -
8
-
9
-
10
-
11
-
12
-
13
-
14
-
15
-
16
-
17
-
18
-
19
-
20
-
21
-
22
-
23
-
24
-
25
-
26
-
27
-
28
-
29
-
30
-
31
-
32
-
33
-
34
-
35
-
36
-
37
-
38
-
39
-
40
-
41
-
42
-
43
-
44
-
45
-
46
-
47
-
48
-
49
-
50
-
51
-
52
-
53
-
54
-
55
-
56
-
57
-
58
-
59
-
60
-
61
-
62
-
63
-
64
-
65
-
66
-
67
-
68
-
69
-
70
-
71
-
72
-
73
-
74
-
75
-
76
-
77
-
78
-
79
-
80
-
81
-
82
-
83
-
84
-
85
-
86
-
87
-
88
-
89
-
90
-
91
-
92
-
93
-
94
-
95
-
96
-
97
-
98
-
99
-
100
-
101
-
102
-
103
-
104
-
105
-
106
-
107
-
108
-
109
-
110
-
111
-
112
-
113
-
114
-
115
-
116
-
117
-
118
-
119
-
120
-
121
-
122
-
123
-
124
-
125
-
126
-
127
-
128
-
129
-
130
-
131
 |
 |

1
ASRock
G41MH-GE
Motherboard
English
English
English
English
English
Copyright Notice:
Copyright Notice:
Copyright Notice:
Copyright Notice:
Copyright Notice:
No part of this installation guide may be reproduced, transcribed, transmitted, or trans-
lated in any language, in any form or by any means, except duplication of documen-
tation by the purchaser for backup purpose, without written consent of ASRock Inc.
Products and corporate names appearing in this guide may or may not be registered
trademarks or copyrights of their respective companies, and are used only for identifica-
tion or explanation and to the owners’ benefit, without intent to infringe.
Disclaimer:
Disclaimer:
Disclaimer:
Disclaimer:
Disclaimer:
Specifications and information contained in this guide are furnished for informational
use only and subject to change without notice, and should not be constructed as a
commitment by ASRock. ASRock assumes no responsibility for any errors or omissions
that may appear in this guide.
With respect to the contents of this guide, ASRock does not provide warranty of any kind,
either expressed or implied, including but not limited to the implied warranties or
conditions of merchantability or fitness for a particular purpose. In no event shall
ASRock, its directors, officers, employees, or agents be liable for any indirect, special,
incidental, or consequential damages (including damages for loss of profits, loss of
business, loss of data, interruption of business and the like), even if ASRock has been
advised of the possibility of such damages arising from any defect or error in the guide
or product.
This device complies with Part 15 of the FCC Rules. Operation is subject to the
following two conditions:
(1)
this device may not cause harmful interference, and
(2)
this device must accept any interference received, including interference that
may cause undesired operation.
Published September 2009
Copyright
©
2009 ASRock INC. All rights reserved.
CALIFORNIA, USA ONLY
The Lithium battery adopted on this motherboard contains Perchlorate, a toxic
substance controlled in Perchlorate Best Management Practices (BMP) regulations
passed by the California Legislature. When you discard the Lithium battery in
California, USA, please follow the related regulations in advance.
“Perchlorate Material-special handling may apply, see
www
.dtsc.ca.gov/hazardouswa
ste/perchlorate”
ASRock Website: http://www.asrock.com