ASRock G965M-S Quick Installation Guide
ASRock G965M-S Manual
 |
View all ASRock G965M-S manuals
Add to My Manuals
Save this manual to your list of manuals |
ASRock G965M-S manual content summary:
- ASRock G965M-S | Quick Installation Guide - Page 1
for backup purpose, without written consent of ASRock Inc. Products and corporate names appearing in this guide may or may not be registered trademarks or ASRock Website: http://www.asrock.com Published February 2009 Copyright©2009 ASRock INC. All rights reserved. 1 ASRock G965M-S Motherboard - ASRock G965M-S | Quick Installation Guide - Page 2
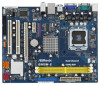
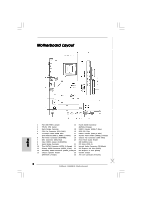
20 Front Panel Audio Header 8 Clear CMOS Jumper (CLRCMOS1) (HD_AUDIO1, Lime) 9 South Bridge Controller 21 PCI Slots (PCI1- 2) 10 Third SATAII Connector (SATAII_3; Orange) 22 Internal Audio 25 OC 800 Jumper (SPEAKER 1, Purple) 26 ATX 12V Connector (ATX12V1) 2 ASRock G965M-S Motherboard - ASRock G965M-S | Quick Installation Guide - Page 3
HD Audio Manager" on the system tray. Set "Speaker Configuration" to "Quadraphonic" or "Stereo". Click "Device advanced settings", choose "Make front and rear output devices playbacks two different audio streams simultaneously", and click "ok". Then reboot your system. 3 ASRock G965M-S Motherboard - ASRock G965M-S | Quick Installation Guide - Page 4
of this manual occur, the updated version will be available on ASRock website without further notice. You may find the latest VGA cards and CPU support lists on ASRock website as well. ASRock website http://www.asrock.com If you require technical support related to this motherboard, please visit - ASRock G965M-S | Quick Installation Guide - Page 5
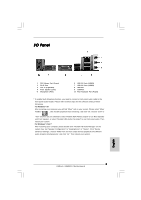
(ACT/LINK LED and SPEED LED) - HD Audio Jack: Line in / Front Speaker / Microphone - 4 x SATAII 3.0 Gb/s connectors (No Support for RAID and "Hot Plug" functions) (see CAUTION 8) - 1 x ATA133 IDE connector (supports 2 x IDE devices) - CPU/Chassis FAN connector 5 ASRock G965M-S Motherboard English - ASRock G965M-S | Quick Installation Guide - Page 6
Compliance Wake Up Events - Supports jumperfree - AMBIOS 2.3.1 Support - CPU, NB, +1.5V,VTT, DRAM Voltage Multi-adjustment - Supports Smart BIOS Support CD - Drivers, Utilities, AntiVirus Software (Trial Version) Unique Feature - ASRock OC Tuner (see CAUTION 10) - Intelligent Energy Saver - ASRock G965M-S | Quick Installation Guide - Page 7
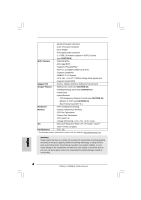
support frequency. CPU FSB Frequency Memory Support Frequency 1066 DDR2 533, DDR2 667, DDR2 800 800 DDR2 533, DDR2 667, DDR2 800 533 DDR2 533 6. Due to the chipset limitation, the actual memory size may be less than 4GB for the reservation for system usage under Windows® XP, Win- dows® XP - ASRock G965M-S | Quick Installation Guide - Page 8
the system, please check if the CPU fan on the motherboard functions properly and unplug the power cord, then plug it back again. To improve heat dissipation, remember to spray thermal grease between the CPU and the heatsink when you install the PC system. 8 ASRock G965M-S Motherboard English - ASRock G965M-S | Quick Installation Guide - Page 9
Before you insert the 775-LAND CPU into the socket, please check if the CPU surface is unclean or if there is any bent pin on the socket. Do not force to insert the CPU into the socket if above situation is found. Otherwise, the CPU will be seriously damaged. 9 ASRock G965M-S Motherboard English - ASRock G965M-S | Quick Installation Guide - Page 10
degrees. Step 2. Insert the 775-LAND CPU: Step 2-1. Hold the CPU by the edges where are marked with black lines support the load plate edge, engage PnP cap with right hand thumb and peel the cap from the socket while pressing on center of PnP cap to assist in removal. 10 ASRock G965M-S Motherboard - ASRock G965M-S | Quick Installation Guide - Page 11
, the heatsink cannot be secured on the motherboard. Step 5. Step 6. Connect fan header with the CPU fan connector on the motherboard. Secure excess cable with tie-wrap to ensure cable does not interfere with fan operation or contact other components. 11 ASRock G965M-S Motherboard English - ASRock G965M-S | Quick Installation Guide - Page 12
Memory Modules (DIMM) G965M-S motherboard provides two 240-pin DDR2 (Double Data Rate 2) DIMM slots, and supports Dual Channel Memory Technology. For dual channel configuration, you always need to install two identical (the same brand, speed, size and chip-type) memory to the motherboard and the - ASRock G965M-S | Quick Installation Guide - Page 13
If you install the add-on PCI Express VGA card to PCIE2 (PCIE x16 slot) and adjust the "Share Memory" BIOS option to [Enabled, 1MB] or [Enabled, 8MB], the onboard VGA will be enabled, and the primary screen . Step 4. Fasten the card to the chassis with screws. 13 ASRock G965M-S Motherboard English - ASRock G965M-S | Quick Installation Guide - Page 14
overclock the FSB800-CPU (e.g. Cel400, E1000, E2000, E4000, E5000, E6000 series CPU) to FSB1066 on this motherboard, you need to adjust the jumpers. Please short pin2, pin3. Otherwise, the CPU may not work properly on this motherboard. Please refer to below jumper settings. English 14 ASRock G965M - ASRock G965M-S | Quick Installation Guide - Page 15
refer to the instruction of your IDE device vendor for the details. Serial ATAII Connectors (SATAII_1: see p.2, No. 11) (SATAII_2: see p.2, No. 12) (SATAII_3: see p.2, No. 10) (SATAII_4: see p.2, No. 14) SATAII_3 SATAII_1 SATAII_4 SATAII_2 These Serial ATAII (SATAII) connectors support SATAII or - ASRock G965M-S | Quick Installation Guide - Page 16
. Click the icon on the lower right hand taskbar to enter Realtek HD Audio Manager. For Windows® 2000 / XP / XP 64-bit OS: Click "Audio I/O", select "Connector Settings" , choose "Disable front panel jack detection", and save the change by clicking "OK". 16 ASRock G965M-S Motherboard English - ASRock G965M-S | Quick Installation Guide - Page 17
) support, the 3-Pin CPU fan still can work successfully even without the fan speed control function. If you plan to connect the 3-Pin CPU fan to the CPU fan connector on this motherboard, please connect it to Pin 1-3. Pin 1-3 Connected 3-Pin Fan Installation English 17 ASRock G965M-S Motherboard - ASRock G965M-S | Quick Installation Guide - Page 18
it can still work if you adopt a traditional 20-pin ATX power supply. To use the 20-pin ATX power supply, please plug your power supply along with Pin 1 and Pin 13. 20-Pin ATX Power Supply Installation 1 13 ATX 12V so will cause the failure to power up. English 18 ASRock G965M-S Motherboard - ASRock G965M-S | Quick Installation Guide - Page 19
This motherboard supports Untied Overclocking Technology, which means during overclocking, FSB enjoys better margin due to fixed PCI / PCIE buses. Before you enable Untied Overclocking function, please enter "Overclock Mode" option of BIOS setup to set the selection from [Auto] to [CPU, PCIE - ASRock G965M-S | Quick Installation Guide - Page 20
to the User Manual (PDF file) contained in the Support CD. 4. Software Support CD information This motherboard supports various Microsoft® Windows® operating systems: 2000 / XP / XP 64-bit / VistaTM / VistaTM 64-bit. The Support CD that came with the motherboard contains necessary drivers and useful - ASRock G965M-S | Quick Installation Guide - Page 21
número de modelo específico de su placa. www.asrock.com/support/index.asp 1.1 Contenido de la caja Placa base ASRock G965M-S (Factor forma Micro ATX: 24,4 cm x 19,6 cm, 9,6" x 7,7") Guía de instalación rápida de ASRock G965M-S CD de soporte de ASRock G965M-S Una cinta de datos IDE de conducción 80 - ASRock G965M-S | Quick Installation Guide - Page 22
Chipset Memoria Ranuras de Expansión VGA OnBoard Audio ÓN 3) - Admite CPU EM64T - North Bridge: Intel® G965 - South Bridge: Windows® VistaTM (Códec de sonido ALC662) - Realtek PCIE x1 LAN 8102EL - Velocidad: 10/100 ) - Audio Jack: Line In / Line Out / Micrófono ASRock G965M-S Motherboard Español - ASRock G965M-S | Quick Installation Guide - Page 23
procesador - Taquímetros de los ventiladores del procesador y del chasis - Ventilador silencioso para procesador - Monitor de Voltaje: +12V, +5V, +3.3V, Vcore - En conformidad con Microsoft® Windows® 2000 / XP / XP 64 bits / VistaTM / VistaTM 64 bits - FCC, CE Español 23 ASRock G965M-S Motherboard - ASRock G965M-S | Quick Installation Guide - Page 24
disco duro SATAII en modo SATAII. También puede conectar un disco duro SATA directamente al conector SATAII. 9. Power Management para USB 2.0 funciona bien bajo Microsoft® Windows® VistaTM 64 bits / VistaTM / XP 64 bits / XP SP1; SP2 / 2000 SP4. 24 ASRock G965M-S Motherboard Español - ASRock G965M-S | Quick Installation Guide - Page 25
10. Es una herramienta de overclocking de ASRock de usuario-fácil que le permite a supervisar su sistema por la función de monitor de hardware y overclock sus dispositivos de hardware para obtener el mejor funcionamiento del sistema bajo el entorno de Windows CPU ASRock G965M-S Motherboard Español - ASRock G965M-S | Quick Installation Guide - Page 26
terminales, consulte la p. 2, Nº 25) Predeterminado Atención: Si desea forzar la CPU FSB800 (p. ej. CPUs Cel400, E1000, E2000, E4000, E5000 y E6000) la CPU no funcione correctamente en esta placa base. Consulte a continuación la configuración de los puentes. Español 26 ASRock G965M-S Motherboard - ASRock G965M-S | Quick Installation Guide - Page 27
ATAII (SATAII_1: vea p.2, N. 11) (SATAII_2: vea p.2, N. 12) (SATAII_3: vea p.2, N. 10) (SATAII_4: vea p.2, N. 14) SATAII_3 SATAII_4 SATAII_1 SATAII_2 Estos cuatro conectores de la Serie ATA (SATAII a la conexión de alimentación de la fuente de alimentación. Español 27 ASRock G965M-S Motherboard - ASRock G965M-S | Quick Installation Guide - Page 28
97. E. Entre en la Utilidad de configuración del BIOS Entre en Configuración avanzada y, a continuación, seleccione Configuraci Windows. Haga clic en el icono de la barra de tareas situada en la parte inferior derecha para entrar en el Administrador de audio HD Realtek. 28 ASRock G965M-S Motherboard - ASRock G965M-S | Quick Installation Guide - Page 29
el cable del ventilador del chasis a este conector y haga coincidir el cable negro con el conector de tierra. Conecte el cable del ventilador de la CPU a este conector y haga coincidir el cable negro con el conector de tierra. 29 ASRock G965M-S Motherboard - ASRock G965M-S | Quick Installation Guide - Page 30
ésta puede funcionar incluso si utiliza una fuente de alimentación ATX de 20 pins tradicional. Para usar una fuente de alimentación ATX de 20 pins, por favor, conecte su fuente de alimentación usando los Pins 1 . De lo contrario no se podrá encender. Español 30 ASRock G965M-S Motherboard - ASRock G965M-S | Quick Installation Guide - Page 31
BIOS, consulte el Manual del usuario (archivo PDF), que se encuentra en el CD de soporte. 3.Información de Software Support CD Esta placa-base soporta diversos tipos de sistema operativo Windows®: 2000 / XP / XP "ASSETUP.EXE" para iniciar la instalación. Español 31 ASRock G965M-S Motherboard - ASRock G965M-S | Quick Installation Guide - Page 32
ífica acerca do modelo que está a utilizar. www.asrock.com/support/index.asp 1.1 Este pacote contém Placa-mãe ASRock G965M-S (Formato Micro ATX: 9,6 pol. x 7,7 pol., 24,4 cm x 19,6 cm) Guia de instalação rápida da ASRock G965M-S CD de suporte da placa ASRock G965M-S Um cabo-fita IDE Ultra ATA 66/100 - ASRock G965M-S | Quick Installation Guide - Page 33
CPU Chipsets Suporta a tecnologia Untied Overclocking (veja o AVISO 3) - Suporta a CPU EM64T - North Bridge: Intel® G965 - South Bridge: canal 5.1 através do Windows® VistaTM (Codec de áudio ALC662) - Realtek PCIE x1 LAN 8102EL - Velocidade: 10 / 100 Ethernet - ASRock G965M-S Motherboard Português - ASRock G965M-S | Quick Installation Guide - Page 34
: +12 V, +5 V, +3.3 V, Vcore Sistema - Microsoft® Windows® 2000 / XP / XP de 64 bits / VistaTM / Operacional VistaTM de 64 bits Certificações - FCC, CE * Para informações mais detalhadas por favor visite o nosso sítio Web: http://www.asrock.com Português 34 ASRock G965M-S Motherboard - ASRock G965M-S | Quick Installation Guide - Page 35
disco duro SATAII com o modo SATAII. Também pode ligar directamente o disco duro SATA ao conector SATAII. 9. Power Management para USB 2.0 funciona bem embaixo de Microsoft® Windows® VistaTM 64-bit / VistaTM / XP 64-bit / XP SP1; SP2/ 2000 SP4. Português 35 ASRock G965M-S Motherboard - ASRock G965M-S | Quick Installation Guide - Page 36
10. É uma ferramenta de overclocking da ASRock fácil de utilizar que lhe permite vigiar i seu sistema via a função de monitorização de hardware e proceder ao overclock dos dispositivos de hardware para obter o melhor desempenho em ambiente Windows®. Por favor visite o nosso sítio Web para conhecer - ASRock G965M-S | Quick Installation Guide - Page 37
2, No. 25) Configuração-padrão Nota: Se quiser fazer um Overclock a um CPU com FSB800 (ex. CPU da Série Cel400, E1000, E2000, E4000, E5000, E6000) o CPU pode não funcionar devidamente nesta placa-mãe. Consulte por favor as configurações dos jumpers abaixo. Português 37 ASRock G965M-S Motherboard - ASRock G965M-S | Quick Installation Guide - Page 38
2, No. 11) (SATAII_2: veja a folha 2, No. 12) (SATAII_3: veja a folha 2, No. 10) (SATAII_4: veja a folha 2, No. 14) SATAII_3 SATAII_4 SATAII_1 SATAII_2 Estes quatro conectores Serial ATA (SATAII cabo de alimentação SATA ao conector de alimentação da fonte. 38 ASRock G965M-S Motherboard Português - ASRock G965M-S | Quick Installation Guide - Page 39
No. 20) Estes conectores manual e no manual chipset. Defina a opção Controlo do painel frontal de [Automático] para [Activado]. F. Entre no sistema Windows. Clique no ícone existente na barra de tarefas no canto inferior direito para aceder ao Realtek HD Audio Manager. 39 ASRock G965M-S Motherboard - ASRock G965M-S | Quick Installation Guide - Page 40
mudança por clicar "OK". G. Para activar o microfone frontal Para Windows® 2000 / XP / XP 64-bit OS: Queira seleccionar "Front Mic" (Microfone Frontal) como com o pino de aterramento. Ligue o cabo do ventilador da CPU, coincidindo o fio preto com o pino de aterramento. 40 ASRock G965M-S Motherboard - ASRock G965M-S | Quick Installation Guide - Page 41
de 20 Pinos 1 13 Conector ATX 12 V (ATX12V1 de 4 pinos ) (veja a folha 2, No. 26) Note que é necessário ligar uma fonte de alimentação com conector ATX 12V neste conector para fornecer alimentação suficiente. Do contrário, haverá falhas de funcionamento. Português 41 ASRock G965M-S Motherboard - ASRock G965M-S | Quick Installation Guide - Page 42
do BIOS, consulte o Manual do Usuário (arquivo PDF) no CD de suporte. 3. Informações do CD de Suporte Esta placa Mãe suporta vários sistemas operacionais: Microsoft® Windows®: 2000 / XP / XP de explore o CD e execute o "ASSETUP.EXE" localizado na pasta BIN. 42 ASRock G965M-S Motherboard Português
-
 1
1 -
 2
2 -
 3
3 -
 4
4 -
 5
5 -
 6
6 -
 7
7 -
8
-
9
-
10
-
11
-
12
-
13
-
14
-
15
-
16
-
17
-
18
-
19
-
20
-
21
-
22
-
23
-
24
-
25
-
26
-
27
-
28
-
29
-
30
-
31
-
32
-
33
-
34
-
35
-
36
-
37
-
38
-
39
-
40
-
41
-
42
 |
 |

1
ASRock
G965M-S
Motherboard
English
English
English
English
English
Copyright Notice:
Copyright Notice:
Copyright Notice:
Copyright Notice:
Copyright Notice:
No part of this installation guide may be reproduced, transcribed, transmitted, or trans-
lated in any language, in any form or by any means, except duplication of documen-
tation by the purchaser for backup purpose, without written consent of ASRock Inc.
Products and corporate names appearing in this guide may or may not be registered
trademarks or copyrights of their respective companies, and are used only for identifica-
tion or explanation and to the owners’ benefit, without intent to infringe.
Disclaimer:
Disclaimer:
Disclaimer:
Disclaimer:
Disclaimer:
Specifications and information contained in this guide are furnished for informational
use only and subject to change without notice, and should not be constructed as a
commitment by ASRock. ASRock assumes no responsibility for any errors or omissions
that may appear in this guide.
With respect to the contents of this guide, ASRock does not provide warranty of any kind,
either expressed or implied, including but not limited to the implied warranties or
conditions of merchantability or fitness for a particular purpose. In no event shall
ASRock, its directors, officers, employees, or agents be liable for any indirect, special,
incidental, or consequential damages (including damages for loss of profits, loss of
business, loss of data, interruption of business and the like), even if ASRock has been
advised of the possibility of such damages arising from any defect or error in the guide
or product.
This device complies with Part 15 of the FCC Rules. Operation is subject to the
following two conditions:
(1)
this device may not cause harmful interference, and
(2)
this device must accept any interference received, including interference that
may cause undesired operation.
Published February 2009
Copyright
©
2009 ASRock INC. All rights reserved.
CALIFORNIA, USA ONLY
The Lithium battery adopted on this motherboard contains Perchlorate, a toxic
substance controlled in Perchlorate Best Management Practices (BMP) regulations
passed by the California Legislature. When you discard the Lithium battery in
California, USA, please follow the related regulations in advance.
“Perchlorate Material-special handling may apply, see
www
.dtsc.ca.gov/hazardouswa
ste/perchlorate”
ASRock Website: http://www.asrock.com