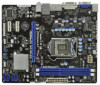
ASRock H61M-GS Quick Installation Guide
ASRock H61M-GS Manual
 |
View all ASRock H61M-GS manuals
Add to My Manuals
Save this manual to your list of manuals |
ASRock H61M-GS manual content summary:
- ASRock H61M-GS | Quick Installation Guide - Page 1
for backup purpose, without written consent of ASRock Inc. Products and corporate names appearing in this guide may or may not be registered trademarks ASRock Website: http://www.asrock.com Published February 2011 Copyright©2011 ASRock INC. All rights reserved. 1 ASRock H61M-GS / H61M-S Motherboard - ASRock H61M-GS | Quick Installation Guide - Page 2
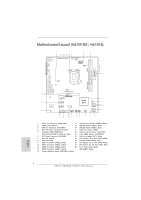
COM1 1 Intel H61 32Mb BIOS SATA2_0 USB8_9 USB6_7 1 1 PANEL1 PLED PWRBTN 1 HDLED RESET SATA2_1 SATA2_2 SPEAKER1 1 SATA2_3 Dual Channel 6 7 8 9 10 11 21 20 1918 17 16 15 14 13 12 1 Power Fan Connector (PWR_FAN1) 14 System Panel Header (PANEL1, White) 2 1155-Pin CPU Socket 15 USB - ASRock H61M-GS | Quick Installation Guide - Page 3
are two LED next to the LAN port. Please refer to the table below for the LAN port LED indications. LAN Port LED Indications Activity/Link LED devices playbacks two different audio streams simultaneously", and click "ok". Then reboot your system. English 3 ASRock H61M-GS / H61M-S Motherboard - ASRock H61M-GS | Quick Installation Guide - Page 4
are two LED next to the LAN port. Please refer to the table below for the LAN port LED indications. LAN Port LED Indications Activity/Link LED devices playbacks two different audio streams simultaneously", and click "ok". Then reboot your system. English 4 ASRock H61M-GS / H61M-S Motherboard - ASRock H61M-GS | Quick Installation Guide - Page 5
CPU support lists on ASRock website as well. ASRock website http://www.asrock.com If you require technical support related to this motherboard, please visit our website for specific information about the model you are using. www.asrock.com/support/index.asp 1.1 Package Contents ASRock H61M-GS / H61M - ASRock H61M-GS | Quick Installation Guide - Page 6
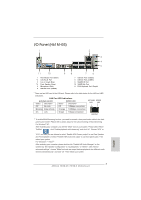
) - H61M-GS Atheros® PCIE x1 Gigabit LAN AR8151, speed 10/100/1000 Mb/s - H61M-S Atheros® PCIEx1 LAN AR8152, speed 10/100 Mb/s - Supports Wake-On-LAN I/O Panel - 1 x PS/2 Mouse Port - 1 x PS/2 Keyboard Port - 1 x VGA/D-Sub Port - 1 x VGA/DVI-D Port English 6 ASRock H61M-GS / H61M-S Motherboard - ASRock H61M-GS | Quick Installation Guide - Page 7
Guard (B.F.G.) - Combo Cooler Option (C.C.O.) (see CAUTION 12) - Good Night LED - CPU Temperature Sensing - Chassis Temperature Sensing - CPU/Chassis/Power Fan Tachometer - CPU/Chassis Quiet Fan (Allow Chassis Fan Speed Auto-Adjust by CPU Temperature) 7 ASRock H61M-GS / H61M-S Motherboard English - ASRock H61M-GS | Quick Installation Guide - Page 8
the number of output phases to improve efficiency when the CPU cores are idle without sacrificing computing performance. Please visit our website for the operation procedures of ASRock Extreme Tuning Utility (AXTU). ASRock website: http://www.asrock.com 8 ASRock H61M-GS / H61M-S Motherboard English - ASRock H61M-GS | Quick Installation Guide - Page 9
bit / VistaTM / VistaTM 64 bit, and your browser version is IE8. ASRock website: http://www.asrock.com/Feature/ SmartView/index.asp 10. ASRock XFast USB can boost USB storage device performance. The performance may depend on the property of the device. 9 ASRock H61M-GS / H61M-S Motherboard English - ASRock H61M-GS | Quick Installation Guide - Page 10
different CPU cooler types, Socket LGA 775, LGA 1155 and LGA 1156. Please be noticed that not all the 775 and 1156 CPU Fan can EuP standard, an EuP ready motherboard and an EuP ready power supply are required. According to Intel's suggestion, the EuP ready ASRock H61M-GS / H61M-S Motherboard English - ASRock H61M-GS | Quick Installation Guide - Page 11
insert the 1155-Pin CPU into the socket, please check if the CPU surface is unclean or if there is any bent pin on the socket. Do not force to insert the CPU into the socket if above situation is found. Otherwise, the CPU will be seriously damaged. English 11 ASRock H61M-GS / H61M-S Motherboard - ASRock H61M-GS | Quick Installation Guide - Page 12
notches. orientation key notch alignment key Pin1 Pin1 orientation key notch 1155-Pin CPU alignment key 1155-Pin Socket For proper inserting, please ensure to match the two orientation key notches of the CPU with the two alignment keys of the socket. 12 ASRock H61M-GS / H61M-S Motherboard - ASRock H61M-GS | Quick Installation Guide - Page 13
be noticed that this motherboard supports Combo Cooler Option (C.C.O.), which provides the flexible option to adopt three different CPU cooler types, Socket LGA 775, LGA 1155 and LGA 1156. The white throughholes are for Socket LGA 1155/1156 CPU fan. 13 ASRock H61M-GS / H61M-S Motherboard English - ASRock H61M-GS | Quick Installation Guide - Page 14
cause permanent damage to the motherboard and the DIMM if you force the DIMM into the slot at incorrect orientation. Step 3. Firmly insert the DIMM into the slot until the retaining clips at both ends fully snap back in place and the DIMM is properly seated. 14 ASRock H61M-GS / H61M-S Motherboard - ASRock H61M-GS | Quick Installation Guide - Page 15
motherboard. PCIE slots: PCIE1 (PCIE x16 slot; Blue) is used for PCI Express x16 lane width graphics cards. PCIE2 / PCIE3 (PCIE x1 slot; White) is used for PCI Express cards with x1 lane width cards, such as Gigabit LAN Step 6. Replace the system cover. 15 ASRock H61M-GS / H61M-S Motherboard English - ASRock H61M-GS | Quick Installation Guide - Page 16
to your system already, you can freely enjoy the benefits of dual monitor function after your system boots. If you haven't installed onboard VGA driver yet, please install onboard VGA driver from our support CD to your system and restart your computer. 16 ASRock H61M-GS / H61M-S Motherboard English - ASRock H61M-GS | Quick Installation Guide - Page 17
This motherboard supports surround display upgrade. With the internal VGA output support (DVI this motherboard. 4. Install the onboard VGA driver and the add-on PCI Express VGA card driver to your system. If you have installed the drivers already, four. 17 ASRock H61M-GS / H61M-S Motherboard English - ASRock H61M-GS | Quick Installation Guide - Page 18
refer to below instruction for more details about HDCP function. What is HDCP? HDCP stands for High-Bandwidth Digital Content Protection, a specification developed by Intel® for protecting digital that the HDTV or LCD monitor you purchase is compatible. 18 ASRock H61M-GS / H61M-S Motherboard English - ASRock H61M-GS | Quick Installation Guide - Page 19
the BIOS, you must boot up the system first, and then shut it down before you do the clear-CMOS action. Please be noted that the password, date, time, user default profile, 1394 GUID and MAC address will be cleared only if the CMOS battery is removed. English 19 ASRock H61M-GS / H61M-S Motherboard - ASRock H61M-GS | Quick Installation Guide - Page 20
SATA2_3: see p.2, No. 12) SATA2_0 SATA2_1 SATA2_2 SATA2_3 These four Serial ATAII (SATAII) connectors support SATA data cables for internal storage devices. The current SATAII interface allows up to 3.0 Gb/s convenient connection of printer devices. ASRock H61M-GS / H61M-S Motherboard English - ASRock H61M-GS | Quick Installation Guide - Page 21
status indicator on the chassis front panel. The LED is on when the system is operating. The LED keeps blinking when the system is in S1 sleep state. The LED is off when the system is in S3/S4 sleep state or powered off (S5). 21 ASRock H61M-GS / H61M-S Motherboard - ASRock H61M-GS | Quick Installation Guide - Page 22
CPU fan to the CPU fan connector on this motherboard, please connect it to Pin 1-3. Pin 1-3 Connected 3-Pin Fan Installation ATX Power Connector (24-pin ATXPWR1) (see p.2 No. 6) 12 24 Please connect an ATX power supply to this connector. 1 13 English 22 ASRock H61M-GS / H61M-S Motherboard - ASRock H61M-GS | Quick Installation Guide - Page 23
5 4 1 Please connect an ATX 12V power supply to this connector. Though this motherboard provides 8-pin ATX 12V power connector, it can still work if you adopt a 12V Power Supply Installation 4 1 This COM1 header supports a serial port module. English 23 ASRock H61M-GS / H61M-S Motherboard - ASRock H61M-GS | Quick Installation Guide - Page 24
Driver Installation Guide To install the drivers to your system, please insert the support CD to your optical drive first. Then, the drivers compatible to your system can be auto-detected and listed on the support CD driver HDDs without RAID functions, ASRock H61M-GS / H61M-S Motherboard English - ASRock H61M-GS | Quick Installation Guide - Page 25
detailed information about BIOS Setup, please refer to the User Manual (PDF file) contained in the Support CD. 4. Software Support CD information This motherboard supports various Microsoft® " from the BIN folder in the Support CD to display the menus. 25 ASRock H61M-GS / H61M-S Motherboard English - ASRock H61M-GS | Quick Installation Guide - Page 26
, besuchen Sie bitte unsere Webseite: www.asrock.com/support/index.asp 1.1 Kartoninhalt ASRock H61M-GS / H61M-S Motherboard (Micro ATX-Formfaktor: 24.4 cm x 19.8 cm; 9.6 Zoll x 7.8 Zoll) ASRock H61M-GS / H61M-S Schnellinstallationsanleitung ASRock H61M-GS / H61M-S Support-CD Zwei Serial ATA (SATA - ASRock H61M-GS | Quick Installation Guide - Page 27
1080p Blu-ray (BD) / HD-DVD-Wiedergabe mit DVI-Port - 5.1 CH HD Audio (Realtek ALC662 Audio Codec) - H61M-GS Atheros® PCIE x1 Gigabit LAN AR8151, speed 10/100/1000 Mb/s - H61M-S Atheros® PCIE x1 LAN AR8152, speed 10/100 Mb/s - Unterstützt Wake-On-LAN Deutsch 27 ASRock H61M-GS / H61M-S Motherboard - ASRock H61M-GS | Quick Installation Guide - Page 28
Extreme Tuning Utility (AXTU) (siehe VORSICHT 5) - Sofortstart - ASRock Instant Flash (siehe VORSICHT 6) - ASRock AIWI (siehe VORSICHT 7) - ASRock APP Charger (siehe VORSICHT 8) - SmartView (siehe VORSICHT 9) - ASRock XFast USB (siehe VORSICHT 10) Deutsch 28 ASRock H61M-GS / H61M-S Motherboard - ASRock H61M-GS | Quick Installation Guide - Page 29
durch CPU- Temperatur) - Mehrstufige Geschwindigkeitsteuerung für CPU-/ Geh asrock.com WARNUNG Beachten Sie bitte, dass Overclocking, einschließlich der Einstellung im BIOS, Anwenden der Untied Overclocking Overclocking verursacht wurden. 29 ASRock H61M-GS / H61M-S Motherboard Deutsch - ASRock H61M-GS | Quick Installation Guide - Page 30
Ihr BIOS mit nur wenigen Klickvorgängen ohne Bereitstellung einer zusätzlichen Diskette oder eines anderen komplizierten Flash-Programms aktualisieren. Achten Sie darauf, dass das USB-Flash-Laufwerk oder die Festplatte das Dateisystem FAT32/16/12 benutzen muss. 30 ASRock H61M-GS / H61M-S Motherboard - ASRock H61M-GS | Quick Installation Guide - Page 31
PC den Ruhezustand (S1), Suspend to RAM- ASRock-Website: http:// www.asrock.com/Feature/SmartView/index.asp 10. ASRocks XFast USB dient der Steigerung der Leistungsfähigkeit Ihrer USB-Speichergeräte. Die Leistung kann je nach Eigenschaften des Gerätes variieren. 31 ASRock H61M-GS / H61M-S Motherboard - ASRock H61M-GS | Quick Installation Guide - Page 32
verschiedenen CPU-Kühlertypen, Socket LGA 775, LGA 1155 und LGA 1156. Beachten Sie bitte, dass nicht alle 775 und 1156 CPU-Lüfter EuP-fähiges Motherboard und eine EuP-fähige Stromversorgung erforderlich. Gemäß einer Empfehlung von Intel muss eine ASRock H61M-GS / H61M-S Motherboard Deutsch - ASRock H61M-GS | Quick Installation Guide - Page 33
das CMOS allerdings nicht direkt nach der BIOS-Aktualisierung löschen. Wenn Sie das CMOS nach Abschluss der BIOS-Aktualisierung löschen müssen, fahren Sie Profil, 1394 GUID und MAC-Adresse nur gelöscht werden, wenn die CMOS-Batterie entfernt wird. Deutsch 33 ASRock H61M-GS / H61M-S Motherboard - ASRock H61M-GS | Quick Installation Guide - Page 34
USB 2.0-Ports an den I/O-Anschlüssen befinden sich zwei USB 2.0Anschlussleisten am Motherboard. Pro USB 2.0Anschlussleiste werden zwei USB 2.0-Ports unterstützt. Dieser Header unterstützt ein optionales, drahtloses Sendeund Empfangs-Infrarotmodul. Deutsch 34 ASRock H61M-GS / H61M-S Motherboard - ASRock H61M-GS | Quick Installation Guide - Page 35
äuses, ermöglicht Ihnen eine bequeme Anschlussmöglichkeit und Kontrolle über Audio-Geräte. 1. High Definition Audio unterstützt Jack Sensing (automatische Erkennung falsch angeschlossener Geräte), wobei und negativen Pins, bevor Sie die Kabel anschließen. 35 ASRock H61M-GS / H61M-S Motherboard - ASRock H61M-GS | Quick Installation Guide - Page 36
System im Ruhezustand S1 befindet. CPU-Lüfteranschluss (4-pin CPU_FAN1) (siehe S.2 - No. 3) FAN_SPEED_CONTROL CPU_FAN_SPEED +12V GND 1 2 3 4 Verbinden Sie das CPU Lüfterkabel mit diesem Anschluss und passen Sie den schwarzen Draht dem Erdungsstift an. Deutsch 36 ASRock H61M-GS / H61M-S Motherboard - ASRock H61M-GS | Quick Installation Guide - Page 37
; auch ohne Geschwindigkeitsregulierung. Wenn Sie einen dreipoligen CPU-Lüfter an den CPU-Lüferanschluss dieses Motherboards anschließen möchten, verbinden Sie ihn bitte COM-AnschlussHeader wird verwendet, um ein COM-Anschlussmodul zu unterstützen. Deutsch 37 ASRock H61M-GS / H61M-S Motherboard - ASRock H61M-GS | Quick Installation Guide - Page 38
der Support-CD, um die Menüs aufzurufen. Das Setup-Programm soll es Ihnen so leicht wie möglich machen. Es ist menügesteuert, d.h. Sie können in den verschiedenen Untermenüs Ihre Auswahl treffen und die Programme werden dann automatisch installiert. 38 ASRock H61M-GS / H61M-S Motherboard Deutsch - ASRock H61M-GS | Quick Installation Guide - Page 39
sous Windows® 7 / 7 64 bits / VistaTM / VistaTM 64 bits, il est recommandé de paramétrer l'option BIOS dans Configuration de stockage en mode AHCI. Pour plus de détails sur l'installation BIOS, référez-vous au "Mode d'emploi" sur votre CD de support. 39 ASRock H61M-GS / H61M-S Motherboard Français - ASRock H61M-GS | Quick Installation Guide - Page 40
- Prise en charge de la fonction HDCP avec ports DVI - Supporter 1080p Blu-ray(BD)/ lecteur de HD-DVD avec ports DVI - 5.1 Son haute définition de CH (codec audio Realtek ALC662) - H61M-GS Atheros® PCIE x1 Gigabit LAN AR8151, Vitesse 10/100/1000 Mb/s Français 40 ASRock H61M-GS / H61M-S Motherboard - ASRock H61M-GS | Quick Installation Guide - Page 41
logicielle ASRock (CyberLink DVD Suite et Creative Sound Blaster X-Fi MB) (Version OEM et d'essai) - Utilitaire ASRock Extreme Tuning (AXTU) (voir ATTENTION 5) - l'Instant Boot - ASRock Instant Flash (voir ATTENTION 6) - ASRock AIWI (voir ATTENTION 7) 41 ASRock H61M-GS / H61M-S Motherboard Fran - ASRock H61M-GS | Quick Installation Guide - Page 42
centrale) - Commande de ventilateur CPU/châssis à plusieurs vitesses overclocking, y compris ajuster les réglages du BIOS, appliquer la technologie Untied Overclocking, ou utiliser des outils de tiers pour l'overclocking. L'overclocking overclocking. Français 42 ASRock H61M-GS / H61M-S Motherboard - ASRock H61M-GS | Quick Installation Guide - Page 43
gido, em seguida, poderá actualizar o BIOS com apenas alguns cliques sem ter de utilizar outra disquete ou outro complicado utilitário de flash. Note que a unidade flash USB ou a unidade de disco rígido devem utilizar o sistema de ficheiros FAT32/16/12. 43 ASRock H61M-GS / H61M-S Motherboard Français - ASRock H61M-GS | Quick Installation Guide - Page 44
et le chargement continu est même pris en charge lorsque le PC passe en mode Veille (S1), Suspension à la RAM (S3), hibernation (S4) ou hors tension (S5). Lorsque le pilote de la pâte thermique entre le CPU le dissipateur lors de l'installation du PC. 44 ASRock H61M-GS / H61M-S Motherboard Français - ASRock H61M-GS | Quick Installation Guide - Page 45
sde CPU, les sockets LGA 775, LGA 1155 et LGA 1156. Veuillez noter que tous les ventilateurs de CPU 775 mère EuP et une alimentation EuP sont requises. Selon les suggestions d'Intel', l'alimentation électrique EuP doit correspondre à la norme, qui est que ASRock H61M-GS / H61M-S Motherboard Français - ASRock H61M-GS | Quick Installation Guide - Page 46
après avoir mis à jour le BIOS. Si vous avez besoin d'effacer le CMOS après avoir mis à jour le BIOS, vous devez allumer en premier le syst de l'utilisateur, 1394 GUID et l'adresse MAC seront effacés seulement si la batterie du CMOS est enlevée. Français 46 ASRock H61M-GS / H61M-S Motherboard - ASRock H61M-GS | Quick Installation Guide - Page 47
2.0 par défaut sur le panneau E/S, il y a deux embases USB 2.0 sur cette carte mère. Chaque embase USB 2.0 peut prendre en charge 2 ports USB 2.0. Cet en-tête supporte un module infrarouge optionnel de transfert et de réception sans fil. Français 47 ASRock H61M-GS / H61M-S Motherboard - ASRock H61M-GS | Quick Installation Guide - Page 48
Veuillez suivre les instructions dans notre manuel et le manuel de châssis afin installer votre système. 2. Si vous utilisez le panneau audio AC'97, installez-le sur l'adaptateur audio du panneau avant broches positives et négatives avant de connecter les câbles. 48 ASRock H61M-GS / H61M-S Motherboard - ASRock H61M-GS | Quick Installation Guide - Page 49
lorsque le système est en marche. Le voyant DEL clignote lorsque le système est en mode veille S1. Le voyant DEL est éteint lorsque le système est en mode veille S3/ S4 ou lorsqu'il sur ce connecteur et brancher le fil noir sur la broche de terre. Français 49 ASRock H61M-GS / H61M-S Motherboard - ASRock H61M-GS | Quick Installation Guide - Page 50
support de (Ventilateur silencieux ventilateur de CPU à 4 broches , le ventilateur de CPU à 3 broches peut bien fonctionner même sans la fonction de commande de vitesse du ventilateur. Si vous prévoyez de connecter le ventilateur de CPU de port COM. Français 50 ASRock H61M-GS / H61M-S Motherboard - ASRock H61M-GS | Quick Installation Guide - Page 51
détaillées sur le BIOS, veuillez consulter le Guide de l'utilisateur (fichier PDF) dans le CD technique. 3. Informations sur le CD de support Cette carte mère supporte divers systèmes d'exploitation BIN et doublecliquez dessus pour afficher les menus. 51 ASRock H61M-GS / H61M-S Motherboard Français - ASRock H61M-GS | Quick Installation Guide - Page 52
/ VistaTM 64-bit, si consiglia di impostare l'opzione BIOS in Storage Configuration (Configurazione di archiviazione) sulla modalità AHCI. Per l'impostazione BIOS, fare riferimento a "User Manual" (Manuale dell'utente) nel CD di supporto per dettagli. 52 ASRock H61M-GS / H61M-S Motherboard Italiano - ASRock H61M-GS | Quick Installation Guide - Page 53
(Realtek ALC662 Audio Codec) - H61M-GS Atheros® PCIE x1 Gigabit LAN AR8151, Velocità 10/100/1000 Mb/s - H61M-S Atheros® PCIE x1 LAN AR8152, Velocità 10/100 Mb/s - Supporta Wake-On-LAN I/O Panel - 1 x porta PS/2 per mouse - 1 x porta PS/2 per tastiera Italiano 53 ASRock H61M-GS / H61M-S Motherboard - ASRock H61M-GS | Quick Installation Guide - Page 54
(vedi ATTENZIONE 8) - SmartView (vedi ATTENZIONE 9) - ASRock XFast USB (vedi ATTENZIONE 10) - Booster ibrido: - ASRock U-COP (vedi ATTENZIONE 11) - Boot Failure Guard (B.F.G.) - Opzione C.C.O. (Combo Cooler Option) (vedi ATTENZIONE 12) - LED notturno Italiano 54 ASRock H61M-GS / H61M-S Motherboard - ASRock H61M-GS | Quick Installation Guide - Page 55
in base alla temperatura della CPU madre) - Ventola CPU/Chassis con controllo di varie BIOS, l'applicazione della tecnologia Untied Overclocking Technology, oppure l'uso di strumenti di overclocking forniti da terzi. L'overclocking overclocking. Italiano 55 ASRock H61M-GS / H61M-S Motherboard - ASRock H61M-GS | Quick Installation Guide - Page 56
floppy) o disco rigido; poi si può aggiornare il BIOS con pochi clic, senza preparare altri dischetti (dischi floppy) o altre complicate utilità Flash. Si prega di notare che l'unità Flash USB o il disco rigido devono usare il File System FAT32/16/12. 56 ASRock H61M-GS / H61M-S Motherboard Italiano - ASRock H61M-GS | Quick Installation Guide - Page 57
il sistema. 12. L'opzione C.C.O. (Combo Cooler Option) fornisce la flessibilità di impiegare tre tipi diversi di dispersori di calore CPU, Socket LGA 775, LGA 1155 e LGA 1156. Notare che non possono essere usate tutte le ventole CPU 775 e 1156. 57 ASRock H61M-GS / H61M-S Motherboard Italiano - ASRock H61M-GS | Quick Installation Guide - Page 58
norma EuP sono necessari un alimentatore e una scheda elettrica predisposti EuP. In base ai suggerimenti Intel l'alimentatore predisposto EuP deve soddisfare lo standard secondo cui l'efficienza energetica in standby di dettagli con il produttore. 58 ASRock H61M-GS / H61M-S Motherboard Italiano - ASRock H61M-GS | Quick Installation Guide - Page 59
CMOS subito dopo avere aggiornato il BIOS. Se si deve azzerare la CMOS quando si è completato l'aggiornamento del BIOS, è necessario per prima cosa predefinito, 1394 GUID e indirizzo MAC saranno cancellati solo se è rimossa la batteria della CMOS. Italiano 59 ASRock H61M-GS / H61M-S Motherboard - ASRock H61M-GS | Quick Installation Guide - Page 60
intestazioni USB 2.0. Ciascuna intestazione USB 2.0 supporta due porte USB 2.0. Questo collettore supporta moduli ad infrarossi optional per la trasmissione e la ricezione senza fili. Italiano 60 ASRock H61M-GS / H61M-S Motherboard - ASRock H61M-GS | Quick Installation Guide - Page 61
Attenersi alle istruzioni del nostro manuale e del manuale del telaio per installare il sistema. 2. Se si utilizza un pannello audio AC'97, installarlo nell'intestazione audio del pannello anteriore, come i pin positivi e negativi prima di collegare i cavi. 61 ASRock H61M-GS / H61M-S Motherboard - ASRock H61M-GS | Quick Installation Guide - Page 62
operativo. Il LED continua a lampeggiare quando il sistema è in stato di standby S1. Il LED è spento quando il sistema è in stato di sospensione /ibernazione S3/ cavo della ventolina CPU a questo connettore e far combaciare il filo nero al pin terra. Italiano 62 ASRock H61M-GS / H61M-S Motherboard - ASRock H61M-GS | Quick Installation Guide - Page 63
velocità della ventola. Se si intende collegare la ventola CPU a 3 piedini al connettore della ventola CPU su questa scheda madre, collegarla ai piedini 1-3. Piedini ) Questo collettore porta COM è utilizzato per supportare il modulo porta COM. Italiano 63 ASRock H61M-GS / H61M-S Motherboard - ASRock H61M-GS | Quick Installation Guide - Page 64
di reset sullo chassis del sistema. Per informazioni più dettagliate circa il Setup del BIOS, fare riferimento al Manuale dell'Utente (PDF file) contenuto nel cd di supporto. 3. Software di supporto e cliccare due volte per visualizzare i menù. 64 ASRock H61M-GS / H61M-S Motherboard Italiano - ASRock H61M-GS | Quick Installation Guide - Page 65
/ VistaTM 64 bits, es recomendable establecer la opción del BIOS de la configuración de almacenamiento en el modo AHCI. Para obtener detalles sobre la configuración del BIOS, consulte el "Manual del usuario" que se encuentra en nuestro CD de soporte. 65 ASRock H61M-GS / H61M-S Motherboard Español - ASRock H61M-GS | Quick Installation Guide - Page 66
dec de sonido Realtek ALC662) - H61M-GS Atheros® PCIE x1 Gigabit LAN AR8151, Velocidad 10/100/1000 Mb/s - H61M-S Atheros® PCIE x1 LAN AR8152, Velocidad 10/100 Mb/s - Soporta Wake-On-LAN I/O Panel - 1 x puerto de ratón PS/2 - 1 x puerto de teclado PS/2 66 ASRock H61M-GS / H61M-S Motherboard Español - ASRock H61M-GS | Quick Installation Guide - Page 67
- SmartView (vea ATENCIÓN 9) - ASRock XFast USB (vea ATENCIÓN 10) - Amplificador Híbrido: - ASRock U-COP (vea ATENCIÓN 11) - Protección de Falla de Inicio (B.F.G..) - Opción de refrigeración combinada (C.C.O.) (vea ATENCIÓN 12) - Indicador LED nocturno 67 ASRock H61M-GS / H61M-S Motherboard Español - ASRock H61M-GS | Quick Installation Guide - Page 68
temperatura del procesador) - Control de ajuste de la velocidad del ventilador de la CPU / chasis - Monitor de Voltaje: +12V, +5V, +3.3V, Vcore OS de la velocidad del reloj, incluido el ajuste del BIOS, aplicando la tecnología de aumento de velocidad liberada ASRock H61M-GS / H61M-S Motherboard - ASRock H61M-GS | Quick Installation Guide - Page 69
con CPU de BIOS con sólo pulsar un par de botones, sin necesidad de preparar un disco flexible adicional ni utilizar complicadas utilidades de programación. Recuerde que la unidad flash USB o disco duro utilizado debe disponer del sistema de archivos FAT32/16/12. 69 ASRock H61M-GS / H61M-S Motherboard - ASRock H61M-GS | Quick Installation Guide - Page 70
entre en modo de espera (S1), suspendido en RAM (S3 ASRock: http://www.asrock.com/Feature/SmartView/index.asp 10. ASRock XFast USB puede aumentar el rendimiento de los dispositivos de almacenamiento USB. El rendimiento depende de las propiedades del dispositivo. 70 ASRock H61M-GS / H61M-S Motherboard - ASRock H61M-GS | Quick Installation Guide - Page 71
CPU diferentes, correspondientes a los zócalos LGA 775, LGA 1155 y LGA 1156. Recuerde que no es posible el uso de todos los ventiladores para CPU cumplan con la directiva EuP. Según las directrices de Intel, una fuente de alimentación que cumpla con la ASRock H61M-GS / H61M-S Motherboard Español - ASRock H61M-GS | Quick Installation Guide - Page 72
BIOS, debe iniciar primero el sistema y, a continuación, cerrarlo antes de llevar a cabo el borrado de dicha memoria. Tenga en cuenta que la contraseña, la fecha, la hora, el perfil predeterminado del usuario, el GUID de transferencia de 3.0 Gb/s. Español 72 ASRock H61M-GS / H61M-S Motherboard - ASRock H61M-GS | Quick Installation Guide - Page 73
dispositivos de impresión. Conector de audio de panel frontal (9-pin HD_AUDIO1) manual y en el manual de chasis para instalar su sistema. 2. Si utiliza el panel de sonido AC'97, instálelo en la cabecera de sonido del panel frontal de la siguiente manera: 73 ASRock H61M-GS / H61M-S Motherboard - ASRock H61M-GS | Quick Installation Guide - Page 74
el sistema esté en funcionamiento. El LED parpadea cuando el sistema se encuentre en estado de suspensión S1. El LED se apaga cuando el sistema se encuentre en estado de suspensión S3/S4 o se del panel frontal consiste principalmente de interruptor de 74 ASRock H61M-GS / H61M-S Motherboard Español - ASRock H61M-GS | Quick Installation Guide - Page 75
Conector del ventilador de la CPU (4-pin CPU_FAN1) (vea p.2, N. 3) FAN_SPEED_CONTROL CPU_FAN_SPEED +12V GND 1 2 3 4 Conecte el cable del ventilador de la CPU a este conector y haga coincidir Instalación de una Fuente de Alimentación ATX de 20 Pins 1 ASRock H61M-GS / H61M-S Motherboard 24 13 75 - ASRock H61M-GS | Quick Installation Guide - Page 76
ón detallada sobre como configurar la BIOS, por favor refiérase al Manual del Usuario (archivo PDF) contenido en el CD. 3. Información de Software Support CD Esta placa-base soporta diversos tipos archivo "ASSETUP.EXE" para iniciar la instalación. 76 ASRock H61M-GS / H61M-S Motherboard Español - ASRock H61M-GS | Quick Installation Guide - Page 77
1 ASRock H61M-GS / H61M-S ASRock ASRock BIOS ASRock ASRock. ASRock http://www.asrock.com www.asrock.com/support/index.asp 1.1 ASRock H61M-GS / H61M-S Micro ATX: 9,6 x 7,8 24,4 x 19,8 см) ASRock H61M-GS / H61M-S ASRock H61M-GS / H61M-S 2 x - ASRock H61M-GS | Quick Installation Guide - Page 78
Gigabit LAN AR8151 10/100/1000 Mb/s - H61M-S Atheros® PCIE x 1 LAN AR8152 10/100 Mb/s Wake-On-LAN I/O Panel 1 x PS/2 панели - 1 x PS/2 - 1 x VGA/D-Sub порт - 1 x VGA/DVI-D порт - 6 x порта USB 2.0 1 x RJ-45 LAN ACT/LINK SPEED) 78 ASRock H61M-GS / H61M-S Motherboard - ASRock H61M-GS | Quick Installation Guide - Page 79
- ASRock Instant Flash 6) - ASRock AIWI 7) - ASRock APP Charger 8) - SmartView 9) - ASRock XFast USB 10) - Hybrid Booster: - ASRock U-COP 11 Boot Failure Guard (B.F.G) - Combo Cooler Option (C.C.O 12 LED CPU/Chassis/Power FAN 12V, +5V, +3.3V, Vcore 79 ASRock H61M-GS / H61M-S Motherboard - ASRock H61M-GS | Quick Installation Guide - Page 80
Microsoft® Windows® 7 / 7 64-bit / VistaTM / 64 VistaTM / XP / XP 64-bit ные - FCC, CE, WHQL ErP/EuP Ready ErP/EuP 13) ты http://www.asrock.com BIOS Untied Overclocking 80 ASRock H61M-GS / H61M-S Motherboard - ASRock H61M-GS | Quick Installation Guide - Page 81
® OS с 64-bit 4 Intel 5 ASRock Extreme Tuning Utility (AXTU Hardware Monitor Fan Control Overclocking OC DNA and IES Hardware Monitor Fan Control Overclocking OC DNA IES ASRock Extreme Tuning Utility (AXTU ASRock: http://www.asrock.com 81 ASRock H61M-GS / H61M-S Motherboard - ASRock H61M-GS | Quick Installation Guide - Page 82
S1 S3 S4 S5 APP Charger ASRock: http://www.asrock.com/Feature/AppCharger/index.asp 9. SmartView IE Facebook ASRock SmartView SmartView Windows® 7 / 7 64 bit / VistaTM / VistaTM 64 bit IE8 ASRock: http://www.asrock. com/Feature/SmartView/index.asp 82 ASRock H61M-GS / H61M-S Motherboard - ASRock H61M-GS | Quick Installation Guide - Page 83
10 ASRock XFast USB USB 11 12. Combo Cooler Option (C.C.O Socket LGA775, LGA1155 или LGA1156 LGA775 или LGA1156 13. EuP Energy Using Product EuP 1 EuP Intel EuP 50 5V 100 EuP. 83 ASRock H61M-GS / H61M-S Motherboard - ASRock H61M-GS | Quick Installation Guide - Page 84
1.3 short open 3 1 и 2 CMOS (CLRCMOS1, 3 2, п. 19) CMOS CLRCMOS1 CMOS 15 5 2 и 3 CLRCMOS1 CMOS BIOS CMOS BIOS CMOS 1394 GUID и MAC CMOS. 84 ASRock H61M-GS / H61M-S Motherboard - ASRock H61M-GS | Quick Installation Guide - Page 85
2, п. 16) USB_PWR P-9 P+9 GND DUMMY 1 GND P+8 P-8 USB_PWR 5 IR1 2, п. 22) IRTX +5VSB DUMMY 1 GND IRRX Serial ATAII SATAII SATA 3,0 SATA / SATAII SATAII USB 2.0 USB 2.0 USB 2.0 USB 2.0. 85 ASRock H61M-GS / H61M-S Motherboard - ASRock H61M-GS | Quick Installation Guide - Page 86
) GND PRESENCE# MIC_RET OUT_RET 1 OUT2_L J_SENSE OUT2_R MIC2_R MIC2_L 1 High Definition Audio Jack Sensing p HDA 2 AC'97 A Mic_IN (MIC MIC2_L. B Audio_R (RIN / VistaTM 64 FrontMic Realtek Recording Volume 9 PANEL1 2, п. 14) 86 ASRock H61M-GS / H61M-S Motherboard - ASRock H61M-GS | Quick Installation Guide - Page 87
PWRBTN RESET PLED S1 S3 или S4 S5). HDLED 4 SPEAKER1 2, п. 13) Chassis и Power Fan (4 CHA_FAN1) 2, п. 18) FAN_SPEED_CONTROL GND +12V CHA_FAN_SPEED (3 PWR_FAN1 2, п. 1) PWR_FAN_SPEED +12V GND 87 ASRock H61M-GS / H61M-S Motherboard - ASRock H61M-GS | Quick Installation Guide - Page 88
ATX 20 ATX 20 ATX 1 13. 20 ATX 1 13 12V-ATX (8 ATX12V1 2, п. 4) 8 5 4 1 ATX 12 ATX с 8 12V ATX с 4-Pin 12V ATX с 4-Pin 1 5. 8 5 ATX С 4-Pin 12V 4 1 88 ASRock H61M-GS / H61M-S Motherboard - ASRock H61M-GS | Quick Installation Guide - Page 89
POST Ctrl> + + - ASRock H61M-GS | Quick Installation Guide - Page 90
/ VistaTM / VistaTM 64-bit ile daha iyi performans elde etmek için, Depolama Konfigürasyonundaki BIOS seçeneğini AHCI moduna ayarlamanız tavsiye edilir. BIOS ayarı için, ayrıntıları öğrenmek üzere lütfen destek CD'mizdeki "Kullanıcı Kılavuzu"na bakın. 90 ASRock H61M-GS / H61M-S Motherboard Türkçe - ASRock H61M-GS | Quick Installation Guide - Page 91
destekler G/З Paneli - 1 x PS/2 Fare Portu - 1 x PS/2 Klavye Portu - 1 x VGA/D-Sub Portu - 1 x VGA/DVI-D Portu - 6 x Kullanэma Hazэr USB 2.0 Portu - 1 x RJ-45 LAN Portu, LED'li (AKT/LЭNK LED'i ve HIZ LED'i) - HD Ses Jakı: Hat Girişi/Ön Hoparlör/Mikrofon 91 ASRock H61M-GS / H61M-S Motherboard Türkçe - ASRock H61M-GS | Quick Installation Guide - Page 92
- İşlemci/Kasa Sessiz Fanı (Kasa Fan Hızı'nın İşlemci sıcaklığı ile Otomatik Ayar'ına izin verir) - CPU/Kasa Fan Çoklu-Hız Kontrolü - Voltaj İzleme: +12V, +5V, +3,3V, CPU Vcore - Microsoft® Windows® 7 / 7 64-bit / VistaTM / VistaTM 64-bit / XP / XP 64-bit uyumlu ASRock H61M-GS / H61M-S Motherboard - ASRock H61M-GS | Quick Installation Guide - Page 93
asrock.com UYARI Lütfen, ayarı BIOS'da ayarlama, Untied Overclocking 64-bit CPU'lu Windows Intel® web sitesini kontrol edin. 5. ASRock BIOS ayarları menüsünün ASRock Anında Flash'a erişmesi için tuşuna basabilirsiniz. Bu aracı başlatın ve yeni BIOS dosyasını 93 ASRock H61M-GS / H61M-S Motherboard - ASRock H61M-GS | Quick Installation Guide - Page 94
Sistemi devam ettirmeden önce, lütfen anakarttaki CPU fanının düzgün çalıştığını kontrol edin ve güç kablosunu çıkarın, sonra geri takın. Isı geçişini artırmak için, PC sistemini yüklediğinizde CPU ile ısı emici arasına ısı macunu sürmeyi unutmayın. 94 ASRock H61M-GS / H61M-S Motherboard Türkçe - ASRock H61M-GS | Quick Installation Guide - Page 95
. Intel'in önerisine göre, EuP hazır güç kaynağının 100 mA akım tüketiminde 5v beklemede güç etkinliği %50'den yüksektir standardını karşılaması gerekir. EuP hazır güç kaynağı seçimi için, daha fazla ayrıntı için güç kaynağı üreticisine başvurmanızı öneririz. 95 ASRock H61M-GS / H61M-S Motherboard - ASRock H61M-GS | Quick Installation Guide - Page 96
şapkası kullanın. Ancak, BIOS'u güncelledikten hemen sonra lütfen CMOS'u temizlemeyin. BIOS'u güncellemeyi tamamladığınızda CMOS'u lan profili, 1394 GUID ve MAC adresinin yalnızca CMOS pili çıkarıldığında temizleneceğini lütfen aklınızda bulundurunuz. Türkçe 96 ASRock H61M-GS / H61M-S Motherboard - ASRock H61M-GS | Quick Installation Guide - Page 97
konektör, dahili depolama cihazları için SATA veri kablolarını destekler. Geçerli SATAII arayüzü 3,0 Gb/sn veri aktarım hızına izin leri (9-pinli USB6_7) (bkz. s.2 No. 15) G/Ç panelindeki varsayılan altı USB 2.0 portundan başka, bu anakartta iki USB 2.0 ASRock H61M-GS / H61M-S Motherboard Türkçe - ASRock H61M-GS | Quick Installation Guide - Page 98
sıfırlama anahtarına basın. PLED (Sistem Gücü LED'i): Kasa üzerindeki güç durumu göstergesini ön panele bağlayın. Sistem çalışırken LED yanar. Sistem S1 uyku modunda iken LED yanıp sön meye devam eder. Sistem S3/S4 uyku modunda veya kapalı (S5) iken LED söner. 98 ASRock H61M-GS / H61M-S Motherboard - ASRock H61M-GS | Quick Installation Guide - Page 99
kabloyu toprak pinine bağlayın. CPU Fan Konektörü (4-pinli CPU_FAN1) (bkz. s.2 No. 3) FAN_SPEED_CONTROL CPU_FAN_SPEED +12V GND 1 2 3 4 Lütfen fan kablolarını CPU fanına bu konektöre ba 13'le birlikte takın. Türkçe 20-Pinli ATX Güç Kaynağını Takma 1 ASRock H61M-GS / H61M-S Motherboard 13 99 - ASRock H61M-GS | Quick Installation Guide - Page 100
ve önceden belirlenen seçenekler arasından seçim yapmanıza izin veren menü tabanlı bir programdır. BIOS Ayarları hakkında ayrıntılı bilgi için, lütfen Destek CD'sinde bulunan Kullanıcı Kılavuzu'na ( ndeki "ASSETUP.EXE" dosyasını bulun ve çift tıklatın. 100 ASRock H61M-GS / H61M-S Motherboard Türkçe - ASRock H61M-GS | Quick Installation Guide - Page 101
1.1 ASRock H61M-GS / H61M-S Micro ATX 9.6" x 7.8", 24.4 x 19.8 cm) ASRock H61M-GS / H61M-S ASRock H61M-GS / H61M-S 지원 CD 시리얼 ATA (SATA 2 I/O 차폐 1 개 ASRock Windows® 7 / 7 64-비트 / VistaTM / VistaTM 64 Storage Configuration BIOS 옵션을 AHCI BIOS CD 101 ASRock H61M-GS / H61M-S Motherboard - ASRock H61M-GS | Quick Installation Guide - Page 102
) - H61M-GS Atheros® PCIE x1 Gigabit LAN AR8151, 속도 10/100/1000 Mb/s - H61M-S Atheros® PCIE x1 LAN AR8152, 속도 10/100 Mb/s I/O Panel - 1 개 PS/2 1 개 PS/2 1 개의 VGA/D-Sub 포트 - 1 개의 VGA/DVI-D 포트 - 6 USB 2.0 포트 - 1 개 LED(ACT/LINK LED 및 SPEED LED RJ-45 LAN ASRock H61M-GS / H61M-S Motherboard 한 국 어 - ASRock H61M-GS | Quick Installation Guide - Page 103
( 주의 6 참조 ) - ASRock AIWI ( 주의 7 참조 ) - ASRock APP Charger ( 주의 8 참조 ) - SmartView ( 주의 9 참조 ) - ASRock XFast USB ( 주의 10 - ASRock U-COP ( 주의 11 참조 ) - B.F.G..(Boot Failure Guard C.C.O.) ( 주의 12 LED - CPU CPU CPU CPU CPU 12V,+5V,+3.3V,Vcore 103 ASRock H61M-GS / H61M-S Motherboard 한 국 어 - ASRock H61M-GS | Quick Installation Guide - Page 104
(ASRock Extreme Tuning Utility OC DNA, IES CPU OC DNA 에서는 OC OS OS IES (Intelligent Energy Saver CPU ASRock 의 AXTU (Extreme Tuning Utility ASRock http://www.asrock.com 6. ASRock Instant Flash ROM BIOS BIOS MS-DOS 나 Windows BIOS POST 중에 BIOS F6> 키를 ASRock H61M-GS / H61M-S Motherboard - ASRock H61M-GS | Quick Installation Guide - Page 105
IE ASRock SmartView SmartView OS 버전이 Windows® 7 / 7 64 비트 / VistaTM / VistaTM 64 IE8 ASRock http://www.asrock.com/ Feature/SmartView/index.asp 10. ASRock XFast USB 는 USB 11 CPU PC CPU 12 C.C.O.) 은 3 CPU LGA 775, LGA 1155 와 LGA 1156 775 와 1156 CPU ASRock H61M-GS / H61M-S Motherboard - ASRock H61M-GS | Quick Installation Guide - Page 106
Product EuP AC 1.00W EuP EuP EuP Intel EuP 5V 100 mA 50 EuP 1.3 3 1-2 점퍼 CMOS 초기화 (CLRCMOS1, 3 2 19 세팅 CMOS 삭제 참고 : CLRCMOS1 CMOS 15 CLRCMOS1 의 핀 2 와 핀 3 을 5 BIOS CMOS BIOS CMOS CMOS CMOS 1394 GUID, MAC 한 국 어 106 ASRock H61M-GS / H61M-S Motherboard - ASRock H61M-GS | Quick Installation Guide - Page 107
+5VSB DUMMY 1 GND IRRX (25 핀 LPT1) (2 20 AFD# ERROR# PINIT# SLIN# GND 1 SPD7 SPD6 ACK# SPD5 BUSY SPD4 PE SPD3 SLCT SPD2 SPD1 SPD0 STB# ASRock H61M-GS / H61M-S Motherboard 107 한국어 - ASRock H61M-GS | Quick Installation Guide - Page 108
MIC_RET OUT_RET 1 OUT2_L J_SENSE OUT2_R MIC2_R MIC2_L 1. High Definition Audio HAD 2. AC'97 A. Mic_IN (MIC) 을 MIC2_L B. Audio_R Recording Volume (9 핀 PANEL1) (2 14 한 국 어 108 PWRBTN RESET PLED LED LED S1 ASRock H61M-GS / H61M-S Motherboard - ASRock H61M-GS | Quick Installation Guide - Page 109
CPU_FAN_SPEED +12V GND CPU 1 2 3 4 4 핀 CPU 3 핀 CPU CPU 3 핀 CPU 1-3 1-3 3 ATX (24 핀 ATXPWR1) (2 6 12 24 ATX 1 13 24 핀 ATX 12 24 종래의 20 핀 ATX 20 핀 ATX Pin 1 과 Pin 13 한국어 20 핀 ATX 1 ASRock H61M-GS / H61M-S Motherboard 13 109 - ASRock H61M-GS | Quick Installation Guide - Page 110
PDF 3 CD 정보 7/7 64 비트 /VistaTM/VistaTM 64 비트 /XP/XP 64 CD CD CD-ROM CD AUTORUN CD BIN 폴더 ASSETUP.EXE D: \ BIN \ ASSETUP.EXE, D: 는 CD-ROM 110 ASRock H61M-GS / H61M-S Motherboard 한 국 어 - ASRock H61M-GS | Quick Installation Guide - Page 111
ASRock H61M-GS / H61M-S CD BIOS VGA CPU サ ASRock http://www.asrock.com Web サイト い。 www.asrock.com/support/index.asp 1.1 ASRock H61M-GS / H61M-S Micro ATX 9.6-in x 7.8-in, 24.4 cm x 19.8 cm) ASRock H61M-GS / H61M-S ASRock H61M-GS / H61M-S CD 2 x ATA (SATA - ASRock H61M-GS | Quick Installation Guide - Page 112
Blu-ray (BD) / HD-DVD DVI 5.1 CH HD Realtek ALC662 Codec) - H61M-GS Atheros® PCIE x1 Gigabit LAN AR8151, 速度 10/100/1000 Mb/s - H61M-S Atheros® PCIE x1 LAN AR8152, 速度 10/100 Mb/s - Wake-On-LAN I/O Panel - PS/2 x 1 - PS/2 x 1 - VGA/D-Sub ポート x 1 日本語 112 ASRock H61M-GS / H61M-S Motherboard - ASRock H61M-GS | Quick Installation Guide - Page 113
Sound Blaster X-Fi MB) (OEM ASRock Extreme AXTU) ( 注意 5 ASRock Instant Flash ( 注意 6 参照 ) - ASRock AIWI ( 注意 7 ASRock APP 8 SmartView ( 注意 9 ASRock XFast USB ( 注意 10 - ASRock U-COP ( 注意 11 Boot Failure Guard:B.F.G C.C.O.) ( 注意 12 LED - CPU 113 ASRock H61M-GS / H61M-S Motherboard 日本語 - ASRock H61M-GS | Quick Installation Guide - Page 114
://www.asrock.com BIOS 注意 1. 2. 3. 4. 5. CD 40 Dual Channel Memory Technology 14 Windows® 7 / VistaTM / XP 4GB 64 ビット CPU の Windows® OS Intel® 社の WEB ASRock Extreme Tuning Utility (AXTU OC DNA、ES CPU OC DNA OC OC OC IES CPU 日本語 114 ASRock H61M-GS / H61M-S Motherboard - ASRock H61M-GS | Quick Installation Guide - Page 115
APP APP iPhone 40 ASRock APP Apple 製品は PC S1 S3 (S4 S5 APP チャー ASRock の Web http://www. asrock.com/Feature/AppCharger/index.asp 9. SmartView Facebook IE ASRock マザー SmartView SmartView 日本語 115 ASRock H61M-GS / H61M-S Motherboard - ASRock H61M-GS | Quick Installation Guide - Page 116
CPU 冷 PC ル時に、CPU です。 12. C.C.O.) では、Socket LGA 775、LGA 1155 と LGA 1156 の 3 CPU 775 と 1156 CPU 13. Energy Using Product EuP EuP に従っ AC 1.00W EuP EuP EuP 対応 Intel EuP 5v 100 mA で 50 EuP 日本語 116 ASRock H61M-GS / H61M-S Motherboard - ASRock H61M-GS | Quick Installation Guide - Page 117
1.3 1-2 CMOS CLRCMOS1 19 参照) 設定 説明 CMOS の消去 注 : CLRCMOS1 CMOS 15 CLRCMOS1 のピン 2 とピン 3 を 5 BIOS CMOS BIOS CMOS CMOS 1394 GUID と MAC CMOS 日本語 117 ASRock H61M-GS / H61M-S Motherboard - ASRock H61M-GS | Quick Installation Guide - Page 118
2.0 2 つの USB 2.0 USB 2.0 2 つの USB 2.0 (25 ピン LPT1 20 を参照 AFD# ERROR# PINIT# SLIN# GND 1 SPD7 SPD6 ACK# SPD5 BUSY SPD4 PE SPD3 SLCT SPD2 SPD1 SPD0 STB# 118 ASRock H61M-GS / H61M-S Motherboard 日本語 - ASRock H61M-GS | Quick Installation Guide - Page 119
E. Windows® XP / XP 64-bit OS の場合 : "Mixer Recorder FrontMic Windows® 7 / 7 64-bit / VistaTM / VistaTM 64-bit OS の場合 : Realtek FrontMic Recording Volume 9 ピン PANEL1 14 を参照 日本語 PWRBTN 119 ASRock H61M-GS / H61M-S Motherboard - ASRock H61M-GS | Quick Installation Guide - Page 120
ピン CHA_FAN1 18 を参照 FAN_SPEED_CONTROL GND +12V CHA_FAN_SPEED (3 ピン PWR_FAN1 1 を参照 PWR_FAN_SPEED +12V GND CPU 4 ピン CPU_FAN1 3 を参照 FAN_SPEED_CONTROL CPU_FAN_SPEED +12V GND CPU 1 2 3 4 4 ピン CPU 3 ピン CPU 3 ピン CPU CPU 1-3 1-3 3 日本語 120 ASRock H61M-GS / H61M-S Motherboard - ASRock H61M-GS | Quick Installation Guide - Page 121
従来の 20 ピン ATX 12 24 20 ピン ATX 1 13 20 ピン ATX 1 13 ATX 12V 8 ピン ATX12V1 4 を参照 8 5 4 1 CPU に Vcore ATX 12V 8-pin ATX 12V 4-pin ATX 12V 4-pin ATX Pin 1 と Pin 5 8 5 4-Pin ATX 12V 4 1 9 ピン COM1 17 を参照 この COM1 日本語 121 ASRock H61M-GS / H61M-S Motherboard - ASRock H61M-GS | Quick Installation Guide - Page 122
2.BIOS 情報 BIOS POST F2 Del BIOS POST BIOS POST Ctrl〉+〈Alt〉+〈Delete BIOS BIOS CD PDF 3 CD 情報 Microsoft® Windows® 7 / 7 64-bit / VistaTM / VistaTM 64bit / XP / XP 64-bit CD CD CDROM CD AUTORUN AUTORUN CD 内の BIN ASSETUP.EXE 122 ASRock H61M-GS / H61M-S Motherboard 日本語 - ASRock H61M-GS | Quick Installation Guide - Page 123
華擎 H61M-GS / H61M-S 主板 (Micro ATX 規格 : 9.6 英吋 X 7.8 英吋 , 24.4 厘米 X 19.8 厘米 ) 華擎 H61M-GS / H61M-S H61M-GS / H61M-S Serial ATA(SATA I/O 擋板 ASRock 為了在 Windows® 7 / 7 64-bit / VistaTM / VistaTM 64-bit BIOS中將Storage Configuration AHCI BIOS User Manual 123 ASRock H61M-GS / H61M-S Motherboard - ASRock H61M-GS | Quick Installation Guide - Page 124
® PCIE x1 Gigabit LAN AR8151, 速度 :10/100/1000 Mb/s - H61M-S Atheros® PCIE x1 LAN AR8152, 速度 :10/100 Mb/s Wake-On-LAN) I/O 界面 - 1 個 PS/2 1 個 PS/2 1 個 VGA/D-Sub 接口 - 1 個 VGA/DVI-D 接口 - 6 USB 2.0 接口 - 1 個 RJ-45 LED 指示燈 (ACT/LINK LED 和 SPEED LED 簡體中文 124 ASRock H61M-GS / H61M-S Motherboard - ASRock H61M-GS | Quick Installation Guide - Page 125
Flash 6 AIWI 7 APP Charger 8) - SmartView 9 XFast USB 10) - Hybrid Booster ASRock U-COP 11) - Boot Failure Guard (B.F.G C.C.O 12 CPU CPU CPU CPU CPU 12V, +5V, +3.3V Microsoft® Windows® 7/7 64 位元 /VistaTM/VistaTM 64 位元 / XP/XP 64 125 ASRock H61M-GS / H61M-S Motherboard 簡體中文 - ASRock H61M-GS | Quick Installation Guide - Page 126
Overclocking CPU OC DNA OC O C OC IES CPU ASRock Extreme Tuning Utility (AXTU http://www.asrock.com 6、 華擎 Instant Flash Flash ROM 的 BIOS BIOS MS-DOS 或 Windows B I O S F6> 鍵或在 B I O S F2 Instant Flash B I O S U B I O S U FAT32/64 簡體中文 126 ASRock H61M-GS / H61M-S Motherboard - ASRock H61M-GS | Quick Installation Guide - Page 127
com/Feature/SmartView/index.asp 10、華擎 XFast USB USB 11 CPU C P U PC CPU 12 C . C . O C P U L G A775, L G A1155 與 L G A1156 775 和 1156 CPU 13、EuP, 全稱 Energy Using Product E u P 1.00W EuP EuP EuP Intel EuP 100m A 5V s b 50 E u P 127 ASRock H61M-GS / H61M-S Motherboard 簡體中文 - ASRock H61M-GS | Quick Installation Guide - Page 128
1.3 3 1 和針腳 2 CMOS (CLRCMOS1, 3 2 頁第 19 項 ) 設定 默認設置 清除 CMOS 注意: C L R C M O S1 C M O S 15 C L R C M O S1 2 和插針 3 短接 5 B I O S C M O S B I O S C M O S C M O S C M O S 1394 GUID 和 MAC 簡體中文 128 ASRock H61M-GS / H61M-S Motherboard - ASRock H61M-GS | Quick Installation Guide - Page 129
1 GND IRRX AFD# ERROR# PINIT# SLIN# GND 1 SPD7 SPD6 ACK# SPD5 BUSY SPD4 PE SPD3 SLCT SPD2 SPD1 SPD0 STB# I/O USB 2.0 USB 2.0 USB 2.0 USB 2.0 接口。 簡體中文 129 ASRock H61M-GS / H61M-S Motherboard - ASRock H61M-GS | Quick Installation Guide - Page 130
GND PRESENCE# MIC_RET OUT_RET 1 OUT2_L J_SENSE OUT2_R MIC2_R MIC2_L 1 High Definition Audio, HDA (Jack Sensing HDA 2 AC'97 A. 將 Mic_IN(MIC) 連接到 (9 針 PANEL1) ( 見第 2 頁第 14 項 ) 簡體中文 130 PWRBTN RESET PLED S1 S3/S4 S5 HD LED ASRock H61M-GS / H61M-S Motherboard - ASRock H61M-GS | Quick Installation Guide - Page 131
CPU Pin 1-3。 Pin 1-3 連接 3-Pin ATX (24 針 ATXPWR1) ( 見第 2 頁第 6 項 ) 12 24 請將 ATX 1 13 24-pin ATX 12 24 傳統的 20-pin ATX 20-pin ATX Pin 1 和 Pin 13 簡體中文 ATX 12V 接頭 (8 針 ATX12V1) ( 見第 2 頁第 4 項 ) 20-Pin ATX 1 13 8 5 4 1 ATX 12V 131 ASRock H61M-GS / H61M-S Motherboard - ASRock H61M-GS | Quick Installation Guide - Page 132
) ( 見第 2 頁第 17 項 ) 這個 COM1 2. BIOS 信息 Flash Memory 存儲了 BIOS POST F2> 或 < D e l B I O S P O S T P O S T B I O S Ctrl>++ - ASRock H61M-GS | Quick Installation Guide - Page 133
SJ/T 11364-2006 10 年。 圖一 部件名稱 鉛 (Pb) 鎘 (Cd) 汞 (Hg Cr(VI PBB PBDE) X O O O O O X O O O O O O SJ/T 11363-2006 X SJ/T 11363-2006 2002/95/EC 簡體中文 133 ASRock H61M-GS / H61M-S Motherboard - ASRock H61M-GS | Quick Installation Guide - Page 134
www.asrock.com/support/index.asp 1.1 華擎 H61M-GS / H61M-S 主機板 (Micro ATX 規格 : 9.6 英吋 x 7.8 英吋 , 24.4 公分 x 19.8 公分 ) 華擎 H61M-GS / H61M-S H61M-GS / H61M-S Serial ATA(SATA I/O 擋板 ASRock提醒您... 若要在Windows® 7 / 7 64位元 / VistaTM / VistaTM 64 BIOS選項設為AHCI BIOS 134 ASRock H61M-GS / H61M-S Motherboard - ASRock H61M-GS | Quick Installation Guide - Page 135
® PCIE x1 Gigabit LAN AR8151, 速度 :10/100/1000 Mb/s - H61M-S Atheros® PCIE x1 LAN AR8152, 速度 :10/100 Mb/s Wake-On-LAN) I/O 界面 - 1 個 PS/2 1 個 PS/2 1 個 VGA/D-Sub 接口 - 1 個 VGA/DVI-D 接口 - 6 USB 2.0 接口 - 1 個 RJ-45 LED 指示燈 (ACT/LINK LED 和 SPEED LED 繁體中文 135 ASRock H61M-GS / H61M-S Motherboard - ASRock H61M-GS | Quick Installation Guide - Page 136
Instant Flash 6 AIWI 7 APP Charger 8) - SmartView 9 XFast USB 10) - Hybrid Booster ASRock U-COP 11) - Boot Failure Guard (B.F.G C.C.O 12 LED CPU CPU CPU CPU CPU 12V, +5V, +3.3V Microsoft® Windows® 7/7 64 位元 /VistaTM/VistaTM 64 位元 / XP/XP 64 位元 ASRock H61M-GS / H61M-S Motherboard - ASRock H61M-GS | Quick Installation Guide - Page 137
com BIOS 警告! 1、 關於"Hyper-Threading Technology CD User Manual 40 頁。 2 14 3 Windows® 7 / VistaTM / XP 4GB。對於 Windows 64 位元 C P U 4 Intel 5、 ASRock Extreme Tuning Utility (AXTU Hardware Monitor、 Fan Control、Overclocking、OC DNA 及 IES)。Hardware Monitor Fan Control Overclocking CPU - ASRock H61M-GS | Quick Installation Guide - Page 138
://www.asrock.com/Feature/SmartView/ index.asp 10、華擎 XFast USB 可提升 USB 11 C P U C P U PC CPU 12 C.C.O CPU LGA775,LGA1155 與 LGA1156 775 和 1156 CPU 13、EuP, 全稱 Energy Using Product EuP 1.00W EuP EuP EuP Intel EuP 100mA 5Vsb 50 EuP 138 ASRock H61M-GS / H61M-S Motherboard 繁體中文 - ASRock H61M-GS | Quick Installation Guide - Page 139
1.3 3 1 和針腳 2 CMOS (CLRCMOS1, 3 2 頁第 19 項 ) 設定 默認設置 清除 CMOS 註: C L R C M O S1 C M O S 15 CLRCMOS1 的 pin2 及 pin3 短路 5 BIOS CMOS BIOS CMOS CMOS C M O S 1394 GUID 及 MAC 繁體中文 139 ASRock H61M-GS / H61M-S Motherboard - ASRock H61M-GS | Quick Installation Guide - Page 140
1 GND IRRX AFD# ERROR# PINIT# SLIN# GND 1 SPD7 SPD6 ACK# SPD5 BUSY SPD4 PE SPD3 SLCT SPD2 SPD1 SPD0 STB# I/O USB 2.0 USB 2.0 USB 2.0 USB 2.0 接口。 140 ASRock H61M-GS / H61M-S Motherboard 繁體中文 - ASRock H61M-GS | Quick Installation Guide - Page 141
GND PRESENCE# MIC_RET OUT_RET 1 OUT2_L J_SENSE OUT2_R MIC2_R MIC2_L 1 High Definition Audio, HDA (Jack Sensing HDA 2 AC'97 A. 將 Mic_IN(MIC) 連接到 "。 (9 針 PANEL1) ( 見第 2 頁第 14 項 ) 繁體中文 PWRBTN RESET PLED S1 S3/S4 S5 HD LED 141 ASRock H61M-GS / H61M-S Motherboard - ASRock H61M-GS | Quick Installation Guide - Page 142
CPU Pin 1-3。 Pin 1-3 連接 3-Pin ATX (24 針 ATXPWR1) ( 見第 2 頁第 6 項 ) 12 24 請將 ATX 1 13 24-pin ATX 12 24 20-pin ATX 20-pin ATX 著 Pin 1 和 Pin 13 繁體中文 20-Pin ATX 1 13 ATX 12V (8 針 ATX12V1) ( 見第 2 頁第 4 項 ) 142 8 5 4 1 ATX 12V ASRock H61M-GS / H61M-S Motherboard - ASRock H61M-GS | Quick Installation Guide - Page 143
4 1 序列埠 (9 針 COM1) ( 見第 2 頁第 17 項 ) COM1 2. BIOS 訊息 Flash Memory BIOS POST F2> 或 + + - ASRock H61M-GS | Quick Installation Guide - Page 144
Installing OS on a HDD Larger Than 2TB This motherboard is adopting UEFI BIOS that allows Windows® OS to be installed on a large install Windows® 7 64-bit OS, OS will be formatted by GPT (GUID Partition Table). Please install the hotfix file from Microsoft®: http://support.microsoft.com/kb/979903 144
-
 1
1 -
 2
2 -
 3
3 -
 4
4 -
 5
5 -
 6
6 -
 7
7 -
8
-
9
-
10
-
11
-
12
-
13
-
14
-
15
-
16
-
17
-
18
-
19
-
20
-
21
-
22
-
23
-
24
-
25
-
26
-
27
-
28
-
29
-
30
-
31
-
32
-
33
-
34
-
35
-
36
-
37
-
38
-
39
-
40
-
41
-
42
-
43
-
44
-
45
-
46
-
47
-
48
-
49
-
50
-
51
-
52
-
53
-
54
-
55
-
56
-
57
-
58
-
59
-
60
-
61
-
62
-
63
-
64
-
65
-
66
-
67
-
68
-
69
-
70
-
71
-
72
-
73
-
74
-
75
-
76
-
77
-
78
-
79
-
80
-
81
-
82
-
83
-
84
-
85
-
86
-
87
-
88
-
89
-
90
-
91
-
92
-
93
-
94
-
95
-
96
-
97
-
98
-
99
-
100
-
101
-
102
-
103
-
104
-
105
-
106
-
107
-
108
-
109
-
110
-
111
-
112
-
113
-
114
-
115
-
116
-
117
-
118
-
119
-
120
-
121
-
122
-
123
-
124
-
125
-
126
-
127
-
128
-
129
-
130
-
131
-
132
-
133
-
134
-
135
-
136
-
137
-
138
-
139
-
140
-
141
-
142
-
143
-
144
 |
 |

1
ASRock
H61M-GS / H61M-S
Motherboard
English
Copyright Notice:
No part of this installation guide may be reproduced, transcribed, transmitted, or trans-
lated in any language, in any form or by any means, except duplication of documentation
by the purchaser for backup purpose, without written consent of ASRock Inc.
Products and corporate names appearing in this guide may or may not be registered
trademarks or copyrights of their respective companies, and are used only for identi
fi
ca-
tion or explanation and to the owners’ bene
fi
t, without intent to infringe.
Disclaimer:
Speci
fi
cations and information contained in this guide are furnished for informational use
only and subject to change without notice, and should not be constructed as a commit-
ment by ASRock. ASRock assumes no responsibility for any errors or omissions that may
appear in this guide.
With respect to the contents of this guide, ASRock does not provide warranty of any kind,
either expressed or implied, including but not limited to the implied warranties or condi-
tions of merchantability or
fi
tness for a particular purpose. In no event shall ASRock, its
directors, of
fi
cers, employees, or agents be liable for any indirect, special, incidental, or
consequential damages (including damages for loss of pro
fi
ts, loss of business, loss of
data, interruption of business and the like), even if ASRock has been advised of the pos-
sibility of such damages arising from any defect or error in the guide or product.
This device complies with Part 15 of the FCC Rules. Operation is subject to the following
two conditions:
(1) this device may not cause harmful interference, and
(2) this device must accept any interference received, including interference that
may cause undesired operation.
CALIFORNIA, USA ONLY
The Lithium battery adopted on this motherboard contains Perchlorate, a toxic substance
controlled in Perchlorate Best Management Practices (BMP) regulations passed by the
California Legislature. When you discard the Lithium battery in California, USA, please
follow the related regulations in advance.
“Perchlorate Material-special handling may apply, see
www.dtsc.ca.gov/hazardouswaste/perchlorate”
ASRock Website: http://www.asrock.com
Published February 2011
Copyright
©
2011 ASRock INC. All rights reserved.