ASRock H61M-HGS Quick Installation Guide
ASRock H61M-HGS Manual
 |
View all ASRock H61M-HGS manuals
Add to My Manuals
Save this manual to your list of manuals |
ASRock H61M-HGS manual content summary:
- ASRock H61M-HGS | Quick Installation Guide - Page 1
for backup purpose, without written consent of ASRock Inc. Products and corporate names appearing in this guide may or may not be registered trademarks or ASRock Website: http://www.asrock.com Published September 2011 Copyright©2011 ASRock INC. All rights reserved. 1 ASRock H61M-HGS Motherboard - ASRock H61M-HGS | Quick Installation Guide - Page 2
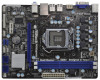
17.3cm (6.8 in) DX10.1 HDMI 1.4a CPU_FAN1 ErP/EuP Ready 1155-Pin CPU Socket ATX 12V Power Connector (ATX12V1) CPU Fan Connector (CPU_FAN1) ATX Power Connector (ATXPWR1) 2 x 240-pin DDR3 DIMM Slots (Dual Channel: DDR3_A1, DDR3_B1, Blue) Intel H61 (PWR_FAN1) English 2 ASRock H61M-HGS Motherboard - ASRock H61M-HGS | Quick Installation Guide - Page 3
USB 2.0 Ports (USB45) USB 2.0 Ports (USB23) USB 2.0 Ports (USB01) HDMI Port D-Sub Port PS/2 Keyboard Port (Purple) * There are two LED VIA HD Audio Deck" tool on your system. Please follow below instructions according to the OS you install. For Windows® XP / XP ASRock H61M-HGS Motherboard English - ASRock H61M-HGS | Quick Installation Guide - Page 4
fic information about the model you are using. www.asrock.com/support/index.asp 1.1 Package Contents ASRock H61M-HGS Motherboard (Micro ATX Form Factor: 8.9-in x 6.8-in, 22.6 cm x 17.3 cm) ASRock H61M-HGS Quick Installation Guide ASRock H61M-HGS Support CD 2 x Serial ATA (SATA) Data Cables (Optional - ASRock H61M-HGS | Quick Installation Guide - Page 5
with HDMI port - Supports Full HD 1080p Blu-ray (BD) / HD-DVD playback with HDMI port - 5.1 CH HD Audio (VIA® VT1705 Audio Codec) - PCIE x1 Gigabit LAN 10/100/1000 Mb/s - Realtek RTL8111E - Supports Wake-On-LAN - Supports PXE Chipset Memory Expansion Slot Graphics Audio LAN 5 ASRock H61M-HGS - ASRock H61M-HGS | Quick Installation Guide - Page 6
Boot - ASRock Instant Flash (see CAUTION 7) - ASRock APP Charger (see CAUTION 8) - ASRock SmartView (see CAUTION 9) - ASRock XFast USB (see CAUTION 10) - ASRock XFast LAN (see CAUTION 11) - Hybrid Booster: - ASRock U-COP (see CAUTION 12) - Boot Failure Guard (B.F.G.) English 6 ASRock H61M-HGS - ASRock H61M-HGS | Quick Installation Guide - Page 7
(see CAUTION 14) * For detailed product information, please visit our website: http://www.asrock.com WARNING Please realize that there is a certain risk involved with overclocking, including adjusting responsible for possible damage caused by overclocking. 7 ASRock H61M-HGS Motherboard English - ASRock H61M-HGS | Quick Installation Guide - Page 8
way of charging your Apple devices, such as iPhone/iPod/iPad Touch, ASRock has prepared a wonderful solution for you - ASRock APP Charger. Simply installing the APP Charger driver, it makes your iPhone charged much quickly from your com- 3. 4. 5. 6. 7. English 8. 8 ASRock H61M-HGS Motherboard - ASRock H61M-HGS | Quick Installation Guide - Page 9
Combo Cooler Option (C.C.O.) provides the flexible option to adopt three different CPU cooler types, Socket LGA 775, LGA 1155 and LGA 1156. Please be noticed that not all the 775 and 1156 CPU Fan can be used. for more details. 10. 11. 12. 13. 14. 9 ASRock H61M-HGS Motherboard English - ASRock H61M-HGS | Quick Installation Guide - Page 10
insert the 1155-Pin CPU into the socket, please check if the CPU surface is unclean or if there is any bent pin on the socket. Do not force to insert the CPU into the socket if above situation is found. Otherwise, the CPU will be seriously damaged. English 10 ASRock H61M-HGS Motherboard - ASRock H61M-HGS | Quick Installation Guide - Page 11
be placed if returning the motherboard for after service. Step 3. Insert the 1155-Pin CPU: Step 3-1. Hold the CPU by 1155-Pin CPU 1155-Pin Socket For proper inserting, please ensure to match the two orientation key notches of the CPU with the two alignment keys of the socket. 11 ASRock H61M-HGS - ASRock H61M-HGS | Quick Installation Guide - Page 12
. Please be noticed that this motherboard supports Combo Cooler Option (C.C.O.), which provides the flexible option to adopt three different CPU cooler types, Socket LGA 775, LGA 1155 and LGA 1156. The white throughholes are for Socket LGA 1155/1156 CPU fan. English 12 ASRock H61M-HGS Motherboard - ASRock H61M-HGS | Quick Installation Guide - Page 13
(DIMM) This motherboard provides two 240-pin DDR3 (Double Data Rate 3) DIMM slots, and supports Dual Channel Memory Technology. For dual channel configuration, you always need to install two identical (the back in place and the DIMM is properly seated. 13 ASRock H61M-HGS Motherboard English - ASRock H61M-HGS | Quick Installation Guide - Page 14
(PCIE x1 slot; White) is used for PCI Express cards with x1 lane width cards, such as Gigabit LAN card, SATA2 card, etc. Installing an expansion card Step 1. Before installing the expansion card, please system cover. Step 2. Step 3. Step 4. Step 5. Step 6. English 14 ASRock H61M-HGS Motherboard - ASRock H61M-HGS | Quick Installation Guide - Page 15
driver from our support CD to your system already, you can freely enjoy the benefits of dual monitor function after your system boots. If you haven't installed onboard VGA driver yet, please install onboard VGA driver from our support CD to your system and restart your computer. 15 ASRock H61M-HGS - ASRock H61M-HGS | Quick Installation Guide - Page 16
With the internal VGA output support (HDMI and D-Sub) and external this motherboard. 4. Install the onboard VGA driver and the add-on PCI Express VGA card driver to your system. If you have installed the drivers already, there is no need to three and four. English 16 ASRock H61M-HGS Motherboard - ASRock H61M-HGS | Quick Installation Guide - Page 17
the monitor that supports HDCP function as well. Therefore, you can enjoy the superior display quality with high-definition HDCP encryption contents. Please refer to below instruction for more details about the HDTV or LCD monitor you purchase is compatible. 17 ASRock H61M-HGS Motherboard English - ASRock H61M-HGS | Quick Installation Guide - Page 18
, and then shut it down before you do the clear-CMOS action. Please be noted that the password, date, time, user default profile, 1394 GUID and MAC address will be cleared only if the CMOS battery is removed. English 18 ASRock H61M-HGS Motherboard - ASRock H61M-HGS | Quick Installation Guide - Page 19
) SATA2_2 SATA2_0 SATA2_3 SATA2_1 These four Serial ATAII (SATAII) connectors support SATA data cables for internal storage devices. The current SATAII interface SLCT SPD2 SPD1 SPD0 STB# 19 ASRock H61M-HGS Motherboard English This is an interface for print port cable that allows - ASRock H61M-HGS | Quick Installation Guide - Page 20
1. High Definition Audio supports Jack Sensing, but the panel wire on the chassis must support HDA to function correctly. Please follow the instruction in our manual and chassis manual to install your system. 2. the hard drive is reading or writing data. English 20 ASRock H61M-HGS Motherboard - ASRock H61M-HGS | Quick Installation Guide - Page 21
match the black wire to the ground pin. Though this motherboard provides 4-Pin CPU fan (Quiet Fan) support, the 3-Pin CPU fan still can work successfully even without the fan speed control function. If you 12 24 20-Pin ATX Power Supply Installation 1 13 21 ASRock H61M-HGS Motherboard English - ASRock H61M-HGS | Quick Installation Guide - Page 22
This COM1 header supports a serial port module. 2.8 Driver Installation Guide To install the drivers to your system, please insert the support CD to your optical drive first. Then, the drivers compatible to your Windows® XP / XP 64-bit OS on your system. English 22 ASRock H61M-HGS Motherboard - ASRock H61M-HGS | Quick Installation Guide - Page 23
screen SATA Configuration. B. Set the option "SATA Mode" to [IDE]. STEP 2: Install Windows® 7 / 7 64-bit / VistaTM / VistaTM 64-bit OS on your system. 23 ASRock H61M-HGS Motherboard English - ASRock H61M-HGS | Quick Installation Guide - Page 24
BIOS Setup, please refer to the User Manual (PDF file) contained in the Support CD. 4. Software Support CD information This motherboard supports various Microsoft® Windows® operating systems: 7 EXE" from the BIN folder in the Support CD to display the menus. English 24 ASRock H61M-HGS Motherboard - ASRock H61M-HGS | Quick Installation Guide - Page 25
1. 主板簡介 謝謝 - ASRock H61M-HGS | Quick Installation Guide - Page 26
1.2 主板規 - ASRock H61M-HGS | Quick Installation Guide - Page 27
連接 - ASRock H61M-HGS | Quick Installation Guide - Page 28
操作系統 認證 - Microsoft Windows 7/7 64 位元 /VistaTM/VistaTM 64 位元 / ® ® XP/XP 64 位元适用于此主板 - FCC, CE, WHQL - 支持 ErP/EuP( 需要同時使用支持 ErP/EuP 的電源供應 器 )(見警告 14) * 請參閱華擎網站了解詳細的產品信息 : http://www.asrock.com 警告 請了解超 - ASRock H61M-HGS | Quick Installation Guide - Page 29
8、 若您想要更快速、更自由地為您的蘋果設備 , 如 i P h o n e / i P a d / i P o d touch 充電 , 華擎為您提供了一個絕妙的解決方案 - 華擎 APP Charger。 只需安裝 APP Charger 驅動程序 , 用電腦為 iPhone 充電最多可比以往快 40%。華擎 APP Charger 允許您同時為多部蘋果設備快速充電 , 甚至可以 在電腦進入待機 ( S1)、掛起至內存 ( S3)、休 - ASRock H61M-HGS | Quick Installation Guide - Page 30
1.3 3 1 和針腳 2 CMOS (CLRCMOS1, 3 2 - ASRock H61M-HGS | Quick Installation Guide - Page 31
1.4 Serial ATAII 接口 (SATA2_0: 見第 2 - ASRock H61M-HGS | Quick Installation Guide - Page 32
1 High Definition Audio, HDA Jack Sensing HDA 2 AC'97 A. 將 Mic_IN(MIC) 連接到 MIC2_L。 B. 將 Audio_R(RIN) 連接到 OUT2_R, 將 Audio_L(LIN) 連接到 OUT2_L。 C. 將 Ground(GND) 連接到 Ground(GND)。 D. MIC_RET 和 OUT_RET 僅用于 HD AC'97 (9 針 PANEL1) ( 見第 2 - ASRock H61M-HGS | Quick Installation Guide - Page 33
(4 針 CHA_FAN1) ( 見第 2 - ASRock H61M-HGS | Quick Installation Guide - Page 34
2. BIOS 信息 Flash Memory 存儲了 BIOS POST F2> 或 < D e l B I O S P O S T P O S T B I O S Ctrl>++ - ASRock H61M-HGS | Quick Installation Guide - Page 35
電子信息產品污染控制標示 依據中國發布的「電子信息產品污染控制管理辦法」及 SJ/T 11364-2006「電子信息 產品污染控制標示要求」,電子信息產品應進行標示,藉以向消費者揭露產品中含有 的有毒有害物質或元 - ASRock H61M-HGS | Quick Installation Guide - Page 36
1. 主機板簡介 謝謝 - ASRock H61M-HGS | Quick Installation Guide - Page 37
1.2 主機板規 - ASRock H61M-HGS | Quick Installation Guide - Page 38
接 - ASRock H61M-HGS | Quick Installation Guide - Page 39
操作系統 認證 - Microsoft® Windows® 7/7 64 位元 /VistaTM/VistaTM 64 位元 / XP/XP 64 位元 - FCC, CE, WHQL - 支援 ErP/EuP( 需要同時使用支援 ErP/EuP 的電源供應器 ) (見警告 14) * 請參閱華擎網站了解詳細的產品訊息 : http://www.asrock.com 警告 請了解超 - ASRock H61M-HGS | Quick Installation Guide - Page 40
.asrock.com/Feature/SmartView/ index.asp 10、 華擎 XFast USB 可提升 USB 11、 華擎 XFast LAN Youtube 12 C P U C P U PC CPU 13 C.C.O CPU LGA775,LGA1155 與 LGA1156 775 和 1156 CPU 14、 EuP, 全稱 Energy Using Product EuP 1.00W EuP EuP EuP Intel EuP 100mA 5Vsb 50 EuP 繁體中文 40 ASRock H61M-HGS - ASRock H61M-HGS | Quick Installation Guide - Page 41
1.3 跳線設置 插圖所示的就是設置跳線的方法。當跳線 帽 放 置 在 針 腳 上 時 , 這 個 跳 線 就 是" 短 接"。如果針腳上沒有放置跳線帽 , 這個 跳線就是"開路"。插圖顯示了一個 3 針 腳的跳線 , 當跳線帽放置在針腳 1 和針腳 2 之間時就是"短接"。 接腳 清除 CMOS (CLRCMOS1, 3 針腳跳線 ) ( 見第 2 - ASRock H61M-HGS | Quick Installation Guide - Page 42
1.4 接 - ASRock H61M-HGS | Quick Installation Guide - Page 43
(9 針 HD_AUDIO1) ( 見第 2 - ASRock H61M-HGS | Quick Installation Guide - Page 44
(4 針 SPEAKER1) ( 見第 2 - ASRock H61M-HGS | Quick Installation Guide - Page 45
序列 - ASRock H61M-HGS | Quick Installation Guide - Page 46
POST and choose the item "UEFI:xxx" to boot. 4. Start Windows® installation. 5. If you install Windows® 7 64-bit OS, OS will be formatted by GPT (GUID Partition Table). Please install the hotfix file from Microsoft®: http://support.microsoft.com/kb/979903 English 46 ASRock H61M-HGS Motherboard
-
 1
1 -
 2
2 -
 3
3 -
 4
4 -
 5
5 -
 6
6 -
 7
7 -
8
-
9
-
10
-
11
-
12
-
13
-
14
-
15
-
16
-
17
-
18
-
19
-
20
-
21
-
22
-
23
-
24
-
25
-
26
-
27
-
28
-
29
-
30
-
31
-
32
-
33
-
34
-
35
-
36
-
37
-
38
-
39
-
40
-
41
-
42
-
43
-
44
-
45
-
46
 |
 |

1
ASRock
H61M-HGS
Motherboard
English
Copyright Notice:
No part of this installation guide may be reproduced, transcribed, transmitted, or trans-
lated in any language, in any form or by any means, except duplication of documentation
by the purchaser for backup purpose, without written consent of ASRock Inc.
Products and corporate names appearing in this guide may or may not be registered
trademarks or copyrights of their respective companies, and are used only for identifica-
tion or explanation and to the owners’ benefit, without intent to infringe.
Disclaimer:
Specifications and information contained in this guide are furnished for informational use
only and subject to change without notice, and should not be constructed as a commit-
ment by ASRock. ASRock assumes no responsibility for any errors or omissions that may
appear in this guide.
With respect to the contents of this guide, ASRock does not provide warranty of any kind,
either expressed or implied, including but not limited to the implied warranties or condi-
tions of merchantability or fitness for a particular purpose. In no event shall ASRock, its
directors, officers, employees, or agents be liable for any indirect, special, incidental, or
consequential damages (including damages for loss of profits, loss of business, loss of
data, interruption of business and the like), even if ASRock has been advised of the pos-
sibility of such damages arising from any defect or error in the guide or product.
This device complies with Part 15 of the FCC Rules. Operation is subject to the following
two conditions:
(1) this device may not cause harmful interference, and
(2) this device must accept any interference received, including interference that
may cause undesired operation.
CALIFORNIA, USA ONLY
The Lithium battery adopted on this motherboard contains Perchlorate, a toxic substance
controlled in Perchlorate Best Management Practices (BMP) regulations passed by the
California Legislature. When you discard the Lithium battery in California, USA, please
follow the related regulations in advance.
“Perchlorate Material-special handling may apply, see
www.dtsc.ca.gov/hazardouswaste/perchlorate”
ASRock Website: http://www.asrock.com
Published September 2011
Copyright
©
2011 ASRock INC. All rights reserved.