ASRock H61M-VS Quick Installation Guide
ASRock H61M-VS Manual
 |
View all ASRock H61M-VS manuals
Add to My Manuals
Save this manual to your list of manuals |
ASRock H61M-VS manual content summary:
- ASRock H61M-VS | Quick Installation Guide - Page 1
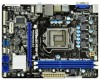
appear in this guide. With respect to the contents of this guide, ASRock does not provide warranty of any kind, either expressed or implied, including ASRock Website: http://www.asrock.com Published February 2011 Copyright©2011 ASRock INC. All rights reserved. 1 ASRock H61M-VGS / H61M-VS Motherboard - ASRock H61M-VS | Quick Installation Guide - Page 2
18 17 16 15 14 13 12 11 10 9 1 1155-Pin CPU Socket 2 ATX 12V Power Connector (ATX12V1) 3 CPU Fan Connector (CPU_FAN1) 4 ATX Power Connector (ATXPWR1) 5 2 x 240-pin DDR3 DIMM Slots (Dual Channel: DDR3_A1, DDR3_B1, Blue) 6 Intel H61 Chipset 7 32Mb SPI Flash 8 SATA2 Connector (SATA2_1, Blue - ASRock H61M-VS | Quick Installation Guide - Page 3
® 7 / 7 64-bit / VistaTM / VistaTM 64-bit OS: Please click "VIA HD Audio Deck" icon , and click "Advanced Options" on the left side on the bottom. In "Advanced Options" screen, select "Independent Headphone", and click "OK" to save your change. English 3 ASRock H61M-VGS / H61M-VS Motherboard - ASRock H61M-VS | Quick Installation Guide - Page 4
® 7 / 7 64-bit / VistaTM / VistaTM 64-bit OS: Please click "VIA HD Audio Deck" icon , and click "Advanced Options" on the left side on the bottom. In "Advanced Options" screen, select "Independent Headphone", and click "OK" to save your change. English 4 ASRock H61M-VGS / H61M-VS Motherboard - ASRock H61M-VS | Quick Installation Guide - Page 5
-VGS / H61M-VS Motherboard (Micro ATX Form Factor: 8.9-in x 6.8-in, 22.6 cm x 17.3 cm) ASRock H61M-VGS / H61M-VS Quick Installation Guide ASRock H61M-VGS / H61M-VS Support CD 2 x Serial ATA (SATA) Data Cables (Optional) 1 x I/O Panel Shield ASRock Reminds You... To get better performance in Windows - ASRock H61M-VS | Quick Installation Guide - Page 6
1 x PCI Express 2.0 x16 slot (blue @ x16 mode) - 1 x PCI Express 2.0 x1 slot - Intel® HD Graphics 2000/3000 - Pixel Shader 4.1, DirectX 10.1 - Max. shared memory 1759MB (see CAUTION 4) - Supports D-Sub with max. resolution up to 2048x1536 @ 75Hz - 5.1 CH HD Audio (VIA® VT1705 Audio Codec) - H61M-VGS - ASRock H61M-VS | Quick Installation Guide - Page 7
1 x COM port header - CPU/Chassis/Power FAN connector - 24 pin ATX power connector - 4 pin 12V power connector - Front panel audio connector - 2 x USB 2.0 headers (support 4 USB 2.0 ports) BIOS Feature - 32Mb AMI BIOS - AMI UEFI Legal BIOS with GUI support - Supports "Plug and Play" - ACPI - ASRock H61M-VS | Quick Installation Guide - Page 8
overclocking. CAUTION! 1. About the setting of "Hyper Threading Technology", please check page 39 of "User Manual" in the support CD. 2. This motherboard supports Dual Channel Memory Technology. Before you implement Dual Channel Memory Technology, make sure to read the installation guide of memory - ASRock H61M-VS | Quick Installation Guide - Page 9
when you install the PC system. 12. Combo Cooler Option (C.C.O.) provides the flexible option to adopt three different CPU cooler types, Socket LGA 775, LGA 1155 and LGA 1156. Please be noticed that not all the 775 and 1156 CPU Fan can be used. 9 ASRock H61M-VGS / H61M-VS Motherboard English - ASRock H61M-VS | Quick Installation Guide - Page 10
off mode condition. To meet EuP standard, an EuP ready motherboard and an EuP ready power supply are required. According to Intel's suggestion, the EuP ready power supply must meet the standard of with the power supply manufacturer for more details. 10 ASRock H61M-VGS / H61M-VS Motherboard English - ASRock H61M-VS | Quick Installation Guide - Page 11
insert the 1155-Pin CPU into the socket, please check if the CPU surface is unclean or if there is any bent pin on the socket. Do not force to insert the CPU into the socket if above situation is found. Otherwise, the CPU will be seriously damaged. English 11 ASRock H61M-VGS / H61M-VS Motherboard - ASRock H61M-VS | Quick Installation Guide - Page 12
notches. orientation key notch alignment key Pin1 Pin1 orientation key notch 1155-Pin CPU alignment key 1155-Pin Socket For proper inserting, please ensure to match the two orientation key notches of the CPU with the two alignment keys of the socket. 12 ASRock H61M-VGS / H61M-VS Motherboard - ASRock H61M-VS | Quick Installation Guide - Page 13
be noticed that this motherboard supports Combo Cooler Option (C.C.O.), which provides the flexible option to adopt three different CPU cooler types, Socket LGA 775, LGA 1155 and LGA 1156. The white throughholes are for Socket LGA 1155/1156 CPU fan. 13 ASRock H61M-VGS / H61M-VS Motherboard English - ASRock H61M-VS | Quick Installation Guide - Page 14
cause permanent damage to the motherboard and the DIMM if you force the DIMM into the slot at incorrect orientation. Step 3. Firmly insert the DIMM into the slot until the retaining clips at both ends fully snap back in place and the DIMM is properly seated. 14 ASRock H61M-VGS / H61M-VS Motherboard - ASRock H61M-VS | Quick Installation Guide - Page 15
Slots (PCI Express Slots) There are 2 PCI Express slots on this motherboard. PCIE slots: PCIE1 (PCIE x16 slot; Blue) is used for PCI Express x16 lane width graphics cards. PCIE2 (PCIE x1 slot; White) is used for PCI Express cards with x1 lane width cards, such as Gigabit LAN card, SATA2 card, etc - ASRock H61M-VS | Quick Installation Guide - Page 16
when the add-on VGA card is inserted to this motherboard. 4. Install the onboard VGA driver and the add-on PCI Express VGA card driver to your system. If you have installed the drivers already, there is no need to install them again. 5. Set up a multi-monitor display. For Windows® XP / XP 64-bit OS - ASRock H61M-VS | Quick Installation Guide - Page 17
values. G. Repeat steps C through E for the diaplay icon identified by the number one, two and three. For Windows® 7 / 7 64-bit / VistaTM / VistaTM 64-bit OS: Right click the desktop, choose "Personalize", and select items from one monitor to another. 17 ASRock H61M-VGS / H61M-VS Motherboard English - ASRock H61M-VS | Quick Installation Guide - Page 18
the BIOS, you must boot up the system first, and then shut it down before you do the clear-CMOS action. Please be noted that the password, date, time, user default profile, 1394 GUID and MAC address will be cleared only if the CMOS battery is removed. English 18 ASRock H61M-VGS / H61M-VS Motherboard - ASRock H61M-VS | Quick Installation Guide - Page 19
p.2, No. 10) (SATA2_1: see p.2, No. 8) (SATA2_2: see p.2, No. 12) (SATA2_3: see p.2, No. 11) SATA2_3 SATA2_1 SATA2_2 SATA2_0 These four Serial ATAII (SATAII) connectors support SATA data cable that allows convenient connection of printer devices. English 19 ASRock H61M-VGS / H61M-VS Motherboard - ASRock H61M-VS | Quick Installation Guide - Page 20
of audio devices. 1. High Definition Audio supports Jack Sensing, but the panel wire on the chassis must support HDA to function correctly. Please follow the instruction in our manual and chassis manual to the hard drive is reading or writing data. 20 ASRock H61M-VGS / H61M-VS Motherboard English - ASRock H61M-VS | Quick Installation Guide - Page 21
24-pin ATX power connector, 12 24 it can still work if you adopt a traditional 20-pin ATX power supply. To use the 20-pin ATX power supply, please plug your power supply along with Pin 1 and Pin 13. English 20-Pin ATX Power Supply Installation 1 13 21 ASRock H61M-VGS / H61M-VS Motherboard - ASRock H61M-VS | Quick Installation Guide - Page 22
ATX 12V Power Connector (4-pin ATX12V1) (see p.2 No. 2) Serial port Header (9-pin COM1) (see p.2 No. 17) Please connect an ATX 12V power supply to this connector. This COM1 header supports a serial port module. English 22 ASRock H61M-VGS / H61M-VS Motherboard - ASRock H61M-VS | Quick Installation Guide - Page 23
SATA / SATAII HDDs without NCQ function STEP 1: Set up UEFI. A. Enter UEFI SETUP UTILITY Advanced screen SATA Configuration. B. Set the option "SATA Mode" to [IDE]. STEP 2: Install Windows® XP / XP 64-bit OS on your system. 23 ASRock H61M-VGS / H61M-VS Motherboard English - ASRock H61M-VS | Quick Installation Guide - Page 24
SATA / SATAII HDDs without NCQ function STEP 1: Set up UEFI. A. Enter UEFI SETUP UTILITY Advanced screen SATA Configuration. B. Set the option "SATA Mode" to [IDE]. STEP 2: Install Windows® 7 / 7 64-bit / VistaTM / VistaTM 64-bit OS on your system. 24 ASRock H61M-VGS / H61M-VS Motherboard English - ASRock H61M-VS | Quick Installation Guide - Page 25
BIOS Setup, please refer to the User Manual (PDF file) contained in the Support CD. 4. Software Support CD information This motherboard supports various Microsoft® Windows® file "ASSETUP.EXE" from the BIN folder in the Support CD to display the menus. 25 ASRock H61M-VGS / H61M-VS Motherboard English - ASRock H61M-VS | Quick Installation Guide - Page 26
-VGS / H61M-VS Motherboard (Micro ATX-Formfaktor: 22.6 cm x 17.3 cm; 8.9 Zoll x 6.8 Zoll) ASRock H61M-VGS / H61M-VS Schnellinstallationsanleitung ASRock H61M-VGS / H61M-VS Support-CD Zwei Serial ATA (SATA) -Datenkabel (optional) Ein I/O Shield ASRock erinnert... Zur besseren Leistung unter Windows - ASRock H61M-VS | Quick Installation Guide - Page 27
-Modus) - 1 x PCI Express 2.0 x1-Steckplätze - Intel® HD Grafik 2000/3000 - Pixel Shader 4.1, DirectX 10.1 - Maximal gemeinsam genutzter Speicher 1759MB (siehe VORSICHT 4) - Unterstützt D-Sub mit einer maximalen Auflösung von 2048 x 1536 bei 75 Hz - 5.1 CH HD Audio (VIA® VT1705 Audio Codec) - H61M-VGS - ASRock H61M-VS | Quick Installation Guide - Page 28
Monitor - Überwachung der CPU-Temperatur - Motherboardtemperaturerkennung - Drehzahlmessung für CPU/Gehäuse/Stromlüfter - Geräuscharmer CPU-/Gehäuselüfter (ermöglicht die au tomatische Anpassung der Gehäuselüftergeschwindigkeit durch CPU- Temperatur) 28 ASRock H61M-VGS / H61M-VS Motherboard - ASRock H61M-VS | Quick Installation Guide - Page 29
- Mehrstufige Geschwindigkeitsteuerung für CPU-/ Gehäuselüfter - Spannungsüberwachung: +12V, +5V, +3.3V, Vcore Betriebssysteme - Unterstützt Microsoft® Windows® 7 / 7 64-Bit / VistaTM / VistaTM Schäden, die aufgrund von Overclocking verursacht wurden. 29 ASRock H61M-VGS / H61M-VS Motherboard Deutsch - ASRock H61M-VS | Quick Installation Guide - Page 30
BIOS mit nur wenigen Klickvorgängen ohne Bereitstellung einer zusätzlichen Diskette oder eines anderen komplizierten Flash-Programms aktualisieren. Achten Sie darauf, dass das USB-Flash-Laufwerk oder die Festplatte das Dateisystem FAT32/16/12 benutzen muss. 30 ASRock H61M-VGS / H61M-VS Motherboard - ASRock H61M-VS | Quick Installation Guide - Page 31
ab Version 8 nutzen. ASRock-Website: http:// www.asrock.com/Feature/SmartView/index.asp 10. ASRocks XFast USB dient der Steigerung der Leistungsfähigkeit Ihrer USB-Speichergeräte. Die Leistung kann je nach Eigenschaften des Gerätes variieren. 31 ASRock H61M-VGS / H61M-VS Motherboard Deutsch - ASRock H61M-VS | Quick Installation Guide - Page 32
verschiedenen CPU-Kühlertypen, Socket LGA 775, LGA 1155 und LGA 1156. Beachten Sie bitte, dass nicht alle 775 und 1156 CPU-Lüfter EuP-fähiges Motherboard und eine EuP-fähige Stromversorgung erforderlich. Gemäß einer Empfehlung von Intel muss eine ASRock H61M-VGS / H61M-VS Motherboard Deutsch - ASRock H61M-VS | Quick Installation Guide - Page 33
das CMOS allerdings nicht direkt nach der BIOS-Aktualisierung löschen. Wenn Sie das CMOS nach Abschluss der BIOS-Aktualisierung löschen müssen, fahren Sie Profil, 1394 GUID und MAC-Adresse nur gelöscht werden, wenn die CMOS-Batterie entfernt wird. Deutsch 33 ASRock H61M-VGS / H61M-VS Motherboard - ASRock H61M-VS | Quick Installation Guide - Page 34
Wenn Sie Jumperkappen auf Header und Anschlüsse setzen, wird das Motherboard unreparierbar beschädigt! Seriell-ATAII-Anschlüsse (SATA2_0: siehe S.2 - No. 10) (SATA2_1: siehe S.2 - No. 8) (SATA2_2: siehe auf einfache Weise anschließen können. 34 ASRock H61M-VGS / H61M-VS Motherboard Deutsch - ASRock H61M-VS | Quick Installation Guide - Page 35
äuses, ermöglicht Ihnen eine bequeme Anschlussmöglichkeit und Kontrolle über Audio-Geräte. 1. High Definition Audio unterstützt Jack Sensing (automatische Erkennung falsch angeschlossener Geräte), wobei Modi S3/S4 befindet oder ausgeschaltet ist (S5). 35 ASRock H61M-VGS / H61M-VS Motherboard Deutsch - ASRock H61M-VS | Quick Installation Guide - Page 36
. Wenn Sie einen dreipoligen CPU-Lüfter an den CPU-Lüferanschluss dieses Motherboards anschließen möchten, verbinden ATX-Netz-Header (24-pin ATXPWR1) (siehe S.2 - No. 4) 12 24 Verbinden Sie die ATXStromversorgung mit diesem Header. 1 13 36 ASRock H61M-VGS / H61M-VS Motherboard - ASRock H61M-VS | Quick Installation Guide - Page 37
pin ATX12V1) (siehe S.2 - No. 2) Bitte schließen Sie an diesen Anschluss die ATX 12V Stromversorgung an. COM-Anschluss-Header (9-pin COM1) (siehe S.2 - No. 17) Dieser COM-AnschlussHeader wird verwendet, um ein COM-Anschlussmodul zu unterstützen. Deutsch 37 ASRock H61M-VGS / H61M-VS Motherboard - ASRock H61M-VS | Quick Installation Guide - Page 38
der Support-CD, um die Menüs aufzurufen. Das Setup-Programm soll es Ihnen so leicht wie möglich machen. Es ist menügesteuert, d.h. Sie können in den verschiedenen Untermenüs Ihre Auswahl treffen und die Programme werden dann automatisch installiert. 38 ASRock H61M-VGS / H61M-VS Motherboard Deutsch - ASRock H61M-VS | Quick Installation Guide - Page 39
le que vous utilisez. www.asrock.com/support/index.asp 1.1 Contenu du paquet Carte mère ASRock H61M-VGS / H61M-VS (Facteur de forme Micro ATX: 8.9 pouces x 6.8 pouces, 22.6 cm x 17.3 cm) Guide d'installation rapide ASRock H61M-VGS / H61M-VS CD de soutien ASRock H61M-VGS / H61M-VS Deux câbles de donn - ASRock H61M-VS | Quick Installation Guide - Page 40
slot PCI Express 2.0 x1 - Intel® HD Graphics 2000/3000 - nuanceur de pixels 4.1, DirectX 10.1 - mémoire partagée max 1759MB (voir ATTENTION 4) - Prend en charge le D-Sub avec une résolution maximale jusqu'à 2048x1536 @ 75Hz - 5.1 Son haute définition de CH (codec audio VIA® VT1705) - H61M-VGS Atheros - ASRock H61M-VS | Quick Installation Guide - Page 41
ATTENTION 8) - SmartView (voir ATTENTION 9) - ASRock XFast USB (voir ATTENTION 10) - L'accélérateur hybride: - ASRock U-COP (voir ATTENTION 11) - Garde d'échec au démarrage (B.F.G.) - Combo Cooler Option (C.C.O.) (voir ATTENTION 12) - DEL veilleuse Français 41 ASRock H61M-VGS / H61M-VS Motherboard - ASRock H61M-VS | Quick Installation Guide - Page 42
de l'unité centrale) - Commande de ventilateur CPU/châssis à plusieurs vitesses - Monitoring de la tension: +12V, +5V, +3.3V, Vcore OS - Microsoft® Windows® 7 / 7 64-bit / VistaTM / VistaTM des dommages possibles causés par l'overclocking. Français 42 ASRock H61M-VGS / H61M-VS Motherboard - ASRock H61M-VS | Quick Installation Guide - Page 43
, em seguida, poderá actualizar o BIOS com apenas alguns cliques sem ter de utilizar outra disquete ou outro complicado utilitário de flash. Note que a unidade flash USB ou a unidade de disco rígido devem utilizar o sistema de ficheiros FAT32/16/12. 43 ASRock H61M-VGS / H61M-VS Motherboard Français - ASRock H61M-VS | Quick Installation Guide - Page 44
Windows® 7 / 7 64 bits / VistaTM / VistaTM 64 bits, et que vous utilisez le navigateur IE8. Site Internet ASRock : http://www.asrock.com/Feature/SmartView/ index.asp 10. ASRock pâte thermique entre le CPU le dissipateur lors de l'installation du PC. 44 ASRock H61M-VGS / H61M-VS Motherboard Français - ASRock H61M-VS | Quick Installation Guide - Page 45
sde CPU, les sockets LGA 775, LGA 1155 et LGA 1156. Veuillez noter que tous les ventilateurs de CPU 775 mère EuP et une alimentation EuP sont requises. Selon les suggestions d'Intel', l'alimentation électrique EuP doit correspondre à la norme, qui est ASRock H61M-VGS / H61M-VS Motherboard Français - ASRock H61M-VS | Quick Installation Guide - Page 46
après avoir mis à jour le BIOS. Si vous avez besoin d'effacer le CMOS après avoir mis à jour le BIOS, vous devez allumer en premier le syst de l'utilisateur, 1394 GUID et l'adresse MAC seront effacés seulement si la batterie du CMOS est enlevée. Français 46 ASRock H61M-VGS / H61M-VS Motherboard - ASRock H61M-VS | Quick Installation Guide - Page 47
No. 16) USB_PWR P-9 P+9 GND DUMMY 1 GND P+8 P-8 USB_PWR USB_PWR P-11 P+11 GND DUMMY 1 GND P+10 P-10 USB_PWR A côté des six ports USB 2.0 par défaut sur le panneau E/S, il y a deux embases USB 2.0 sur pratique de périphériques d'impression. 47 ASRock H61M-VGS / H61M-VS Motherboard Français - ASRock H61M-VS | Quick Installation Guide - Page 48
Veuillez suivre les instructions dans notre manuel et le manuel de châssis afin installer votre système. 2. Si vous utilisez le panneau audio AC'97, installez-le sur l'adaptateur audio du panneau avant veille S3/ S4 ou lorsqu'il est éteint (S5). 48 ASRock H61M-VGS / H61M-VS Motherboard Français - ASRock H61M-VS | Quick Installation Guide - Page 49
vitesse du ventilateur. Si vous prévoyez de connecter le ventilateur de CPU à 3 broches au connecteur du ventilateur de CPU sur cette carte mère, veuillez le connecter aux broches 1-3. Installation de ventilateur à 3 broches Broches 1-3 connectées Français 49 ASRock H61M-VGS / H61M-VS Motherboard - ASRock H61M-VS | Quick Installation Guide - Page 50
br.4) (voir p.2 No. 2) Veuillez connecter une unité d'alimentation électrique ATX 12V sur ce connecteur. En-tête de port COM (COM1 br.9) (voir p.2 No. 17) Cette en-tête de port COM est utilisée pour prendre en charge un module de port COM. Français 50 ASRock H61M-VGS / H61M-VS Motherboard - ASRock H61M-VS | Quick Installation Guide - Page 51
BIOS, veuillez consulter le Guide de l'utilisateur (fichier PDF) dans le CD technique. 3. Informations sur le CD de support Cette carte mère supporte divers systèmes d'exploitation Microsoft® Windows BIN et doublecliquez dessus pour afficher les menus. 51 ASRock H61M-VGS / H61M-VS Motherboard Français - ASRock H61M-VS | Quick Installation Guide - Page 52
si sta usando. www.asrock.com/support/index.asp 1.1 Contenuto della confezione Scheda madre ASRock H61M-VGS / H61M-VS (Micro ATX Form Factor: 8.9-in x 6.8-in, 22.6 cm x 17.3 cm) Guida di installazione rapida ASRock H61M-VGS / H61M-VS CD di supporto ASRock H61M-VGS / H61M-VS Due cavi dati Serial ATA - ASRock H61M-VS | Quick Installation Guide - Page 53
a modalità x16) - 1 x Alloggi PCI Express 2.0 x1 - Intel® HD Graphics 2000/3000 - Pixel Shader 4.1, DirectX 10.1 - Memoria massima condivisa 1759MB (vedi ATTENZIONE 4) - Supporta D-Sub con risoluzione massima fino a 2048x1536 @ 75Hz - 5.1 Audio HD CH (VIA® VT1705 Audio Codec) - H61M-VGS Atheros® PCIE - ASRock H61M-VS | Quick Installation Guide - Page 54
del CPU/Chassis/ Alimentazione - Ventola CPU/Chassis silenziosa (permette la regolazione automatica della ventola dello chassis in base alla temperatura della CPU madre) - Ventola CPU/Chassis con controllo di varie velocità - Voltaggio: +12V, +5V, +3.3V, Vcore ASRock H61M-VGS / H61M-VS Motherboard - ASRock H61M-VS | Quick Installation Guide - Page 55
Compatibi- - Microsoft® Windows® 7 / 7 64 bit / VistaTM / VistaTM 64 BIOS, l'applicazione della tecnologia Untied Overclocking Technology, oppure l'uso di strumenti di overclocking forniti da terzi. L'overclocking danni provocati dall'overclocking. Italiano 55 ASRock H61M-VGS / H61M-VS Motherboard - ASRock H61M-VS | Quick Installation Guide - Page 56
floppy) o disco rigido; poi si può aggiornare il BIOS con pochi clic, senza preparare altri dischetti (dischi floppy) o altre complicate utilità Flash. Si prega di notare che l'unità Flash USB o il disco rigido devono usare il File System FAT32/16/12. 56 ASRock H61M-VGS / H61M-VS Motherboard Italiano - ASRock H61M-VS | Quick Installation Guide - Page 57
il sistema. 12. L'opzione C.C.O. (Combo Cooler Option) fornisce la flessibilità di impiegare tre tipi diversi di dispersori di calore CPU, Socket LGA 775, LGA 1155 e LGA 1156. Notare che non possono essere usate tutte le ventole CPU 775 e 1156. 57 ASRock H61M-VGS / H61M-VS Motherboard Italiano - ASRock H61M-VS | Quick Installation Guide - Page 58
norma EuP sono necessari un alimentatore e una scheda elettrica predisposti EuP. In base ai suggerimenti Intel l'alimentatore predisposto EuP deve soddisfare lo standard secondo cui l'efficienza energetica in standby di dettagli con il produttore. 58 ASRock H61M-VGS / H61M-VS Motherboard Italiano - ASRock H61M-VS | Quick Installation Guide - Page 59
per prima cosa avviare il sistema e poi spegnerlo prima di eseguire l'azzeramento della CMOS. Notare che password, data, ore, profilo utente predefinito, 1394 GUID e indirizzo MAC saranno cancellati solo se è rimossa la batteria della CMOS. Italiano 59 ASRock H61M-VGS / H61M-VS Motherboard - ASRock H61M-VS | Quick Installation Guide - Page 60
collettori e connettori provocherà danni permanenti alla scheda madre! Connettori Serial ATAII (SATA2_0: vedi p.2 Nr. 10) (SATA2_1: vedi p.2 Nr. 8) (SATA2_2: vedi p.2 Nr. 12) (SATA2_3: vedi p.2 BUSY SPD4 PE SPD3 SLCT SPD2 SPD1 SPD0 STB# 60 ASRock H61M-VGS / H61M-VS Motherboard Italiano - ASRock H61M-VS | Quick Installation Guide - Page 61
alle istruzioni del nostro manuale e del manuale del telaio per installare il sistema. 2. Se si utilizza un pannello audio AC'97, installarlo nell'intestazione audio del pannello anteriore, come di sospensione /ibernazione S3/S4 oppure spento (S5). 61 ASRock H61M-VGS / H61M-VS Motherboard Italiano - ASRock H61M-VS | Quick Installation Guide - Page 62
scheda madre disponga di un supporto per ventola CPU a 4 piedini (ventola silenziosa), la ventola CPU a 3 piedini è in grado di ATX (24-pin ATXPWR1) (vedi p.2 Nr. 4) 12 24 Collegare la sorgente d'alimentazione ATX a questo connettore. 1 13 Italiano 62 ASRock H61M-VGS / H61M-VS Motherboard - ASRock H61M-VS | Quick Installation Guide - Page 63
1 13 Connettore ATX 12 V (4-pin ATX12V1) (vedi p.2 Nr. 2) Collettore porta COM (9-pin COM1) (vedi p.2 Nr. 17) Collegare un alimentatore ATX 12 V a questo connettore. Questo collettore porta COM è utilizzato per supportare il modulo porta COM. Italiano 63 ASRock H61M-VGS / H61M-VS Motherboard - ASRock H61M-VS | Quick Installation Guide - Page 64
. Se il Menù principale non appare automaticamente, posizionarsi sul file "ASSETUP.EXE" nel CESTINO del CD di supporto e cliccare due volte per visualizzare i menù. 64 ASRock H61M-VGS / H61M-VS Motherboard Italiano - ASRock H61M-VS | Quick Installation Guide - Page 65
ífico de su placa. www.asrock.com/support/index.asp 1.1 Contenido de la caja Placa base ASRock H61M-VGS / H61M-VS (Factor forma Micro ATX: 22,6 cm x 17,3 cm, 8,9" x 6,8") Guía de instalación rápida de ASRock H61M-VGS / H61M-VS CD de soporte de ASRock H61M-VGS / H61M-VS Dos cables de datos Serial ATA - ASRock H61M-VS | Quick Installation Guide - Page 66
1.2 Especificación Plataforma Procesador Chipset Memoria Ranuras de Expansión VGA OnBoard Audio LAN Entrada/Salida de Panel Trasero - Factor forma Micro ATX: 22,6 cm x 17,3 cm, 8,9" x 6,8" - Condensador sólido para alimentación de CPU - Admite los procesadores Intel® CoreTM i7 / i5 / i3 de segunda - ASRock H61M-VS | Quick Installation Guide - Page 67
madre - Taquímetros de los ventiladores del procesador y del CPU / chasis / alimentación - Ventilador silencioso del procesador y el chasis (ajuste automático de la velocidad del ventilador del chasis en función de la temperatura del procesador) Español 67 ASRock H61M-VGS / H61M-VS Motherboard - ASRock H61M-VS | Quick Installation Guide - Page 68
la velocidad del ventilador de la CPU / chasis - Monitor de Voltaje: +12V, +5V, +3.3V, Vcore OS - En conformidad con Microsoft® Windows® 7 / 7 64 bits la velocidad del reloj, incluido el ajuste del BIOS, aplicando la tecnología de aumento de velocidad liberada ASRock H61M-VGS / H61M-VS Motherboard - ASRock H61M-VS | Quick Installation Guide - Page 69
el BIOS con sólo pulsar un par de botones, sin necesidad de preparar un disco flexible adicional ni utilizar complicadas utilidades de programación. Recuerde que la unidad flash USB o disco duro utilizado debe disponer del sistema de archivos FAT32/16/12. 69 ASRock H61M-VGS / H61M-VS Motherboard Espa - ASRock H61M-VS | Quick Installation Guide - Page 70
de su explorador es IE8. Sitio Web de ASRock: http://www.asrock.com/Feature/SmartView/index.asp 10. ASRock XFast USB puede aumentar el rendimiento de los dispositivos de almacenamiento USB. El rendimiento depende de las propiedades del dispositivo. 70 ASRock H61M-VGS / H61M-VS Motherboard Español - ASRock H61M-VS | Quick Installation Guide - Page 71
CPU diferentes, correspondientes a los zócalos LGA 775, LGA 1155 y LGA 1156. Recuerde que no es posible el uso de todos los ventiladores para CPU cumplan con la directiva EuP. Según las directrices de Intel, una fuente de alimentación que cumpla con la ASRock H61M-VGS / H61M-VS Motherboard Español - ASRock H61M-VS | Quick Installation Guide - Page 72
CMOS justamente después de actualizar el BIOS. Si necesita borrar la memoria CMOS justamente después de actualizar el BIOS, debe iniciar primero el sistema y, usuario, el GUID 1394 y la dirección MAC solamente se borrará si la batería CMOS se quita. Español 72 ASRock H61M-VGS / H61M-VS Motherboard - ASRock H61M-VS | Quick Installation Guide - Page 73
cabezales provocará un daño permanente en la placa base. Conexiones de serie ATAII (SATA2_0: vea p.2, N. 10) (SATA2_1: vea p.2, N. 8) SATA2_3 (SATA2_2: vea p.2, N. 12) (SATA2_3: vea p.2, N. permite conectar cómodamente dispositivos de impresión. Español 73 ASRock H61M-VGS / H61M-VS Motherboard - ASRock H61M-VS | Quick Installation Guide - Page 74
Audio. 1. El Audio de Alta Definición soporta la detección de conector, pero el cable de panel en el chasis debe soportar HDA para operar correctamente. Por favor, siga las instrucciones en nuestro manual y en el manual ón S3/S4 o se apaga (S5). 74 ASRock H61M-VGS / H61M-VS Motherboard Español - ASRock H61M-VS | Quick Installation Guide - Page 75
ventilador de la CPU (4-pin CPU_FAN1) (vea p.2, N. 3) 4 3 2 1 GND +12V CPU_FAN_SPEED FAN_SPEED_CONTROL Conecte el cable del ventilador de la CPU a este ATX (24-pin ATXPWR1) (vea p.2, N. 4) 12 24 Conecte la fuente de alimentación ATX a su cabezal. 1 13 75 ASRock H61M-VGS / H61M-VS Motherboard - ASRock H61M-VS | Quick Installation Guide - Page 76
toma de corriente con el enchufe ATX 12V, de modo que proporcione su BIOS, por favor refiérase al Manual del Usuario (archivo PDF) contenido en el CD. 3. Información de Software Support CD Esta placa-base soporta diversos tipos de sistema operativo Windows ASRock H61M-VGS / H61M-VS Motherboard Español - ASRock H61M-VS | Quick Installation Guide - Page 77
ASRock H61M-VGS / H61M-VS Micro ATX: 8,9 x 6,8 22,6 x 17,3 см) ASRock H61M-VGS / H61M-VS ASRock H61M-VGS / H61M-VS 2 x Serial ATA (SATA 1 x I/O ASRock Windows® 7 / 7 64-bit / VistaTM / VistaTM 64-bit BIOS Storage Configuration AHCI BIOS 77 ASRock H61M-VGS / H61M-VS Motherboard - ASRock H61M-VS | Quick Installation Guide - Page 78
Hyper-Threading 1) Intel® H61 Память Dual Channel DDR3 Memory Technology 2) - 2 x DDR3 DIMM DDR3 1333/1066 не- ECC 16 ГБ 3) Гнезда - 1 x PCI Express 2.0 x16 x16) - 1 x PCI Express 2.0 x1 Intel® HD Graphics 2000/3000 - Pixel Shader 4.1 DirectX 10.1 1759Мб - ASRock H61M-VS | Quick Installation Guide - Page 79
9) - ASRock XFast USB 10) - Hybrid Booster: - ASRock U-COP 11 Boot Failure Guard (B.F.G) - Combo Cooler Option (C.C.O 12 LED CPU/Chassis/Power FAN 12V, +5V, +3.3V, Vcore Microsoft® Windows® 7 / 7 64-bit / VistaTM 64 VistaTM / XP / XP 64-bit 79 ASRock H61M-VGS / H61M-VS Motherboard - ASRock H61M-VS | Quick Installation Guide - Page 80
ные - FCC, CE, WHQL ErP/EuP Ready ErP/EuP 13) ты http://www.asrock.com BIOS Untied Overclocking 80 ASRock H61M-VGS / H61M-VS Motherboard - ASRock H61M-VS | Quick Installation Guide - Page 81
Windows® OS с 64-bit 4 Intel 5 ASRock Extreme Tuning Utility (AXTU Hardware Monitor Fan Control Overclocking OC DNA and IES Hardware Monitor Fan Control Overclocking OC DNA IES ASRock Extreme Tuning Utility (AXTU ASRock: http://www.asrock.com 81 ASRock H61M-VGS / H61M-VS Motherboard - ASRock H61M-VS | Quick Installation Guide - Page 82
S3 S4 S5 APP Charger ASRock: http://www.asrock.com/Feature/AppCharger/index.asp 9. SmartView IE Facebook ASRock SmartView SmartView Windows® 7 / 7 64 bit / VistaTM / VistaTM 64 bit IE8 ASRock: http://www.asrock. com/Feature/SmartView/index.asp 82 ASRock H61M-VGS / H61M-VS Motherboard - ASRock H61M-VS | Quick Installation Guide - Page 83
10 ASRock XFast USB USB 11 12. Combo Cooler Option (C.C.O Socket LGA775, LGA1155 или LGA1156 LGA775 или LGA1156 13. EuP Energy Using Product EuP 1 EuP Intel EuP 50 5V 100 EuP. 83 ASRock H61M-VGS / H61M-VS Motherboard - ASRock H61M-VS | Quick Installation Guide - Page 84
1.3 short open 3 1 и 2 CMOS (CLRCMOS1, 3 2, п. 20) CMOS CLRCMOS1 CMOS 15 5 2 и 3 CLRCMOS1 CMOS BIOS CMOS BIOS CMOS 1394 GUID и MAC CMOS. 84 ASRock H61M-VGS / H61M-VS Motherboard - ASRock H61M-VS | Quick Installation Guide - Page 85
1.4 Serial ATAII (SATA2_0 2, п. 10) (SATA2_1 2, п. 8) (SATA2_2 2, п. 12) (SATA2_3 2, п. 11) SATA2_3 SATA2_1 SATA2_2 SATA2_0 Serial ATAII SATAII SATA 3,0 Serial ATA ( # SPD5 BUSY SPD4 PE SPD3 SLCT SPD2 SPD1 SPD0 STB# 85 ASRock H61M-VGS / H61M-VS Motherboard - ASRock H61M-VS | Quick Installation Guide - Page 86
MIC2_L 1 High Definition Audio Jack Sensing p HDA 2 AC'97 A Mic_IN (MIC MIC2_L. B Audio_R (RIN OUT2_R Audio_L (LIN OUT2_L. C Ground (GND Ground (GND). D MIC_RET и OUT_RET HD AC'97 9 PANEL1 2, п. 14) PWRBTN RESET 86 ASRock H61M-VGS / H61M-VS Motherboard - ASRock H61M-VS | Quick Installation Guide - Page 87
Chassis и Power Fan (4 CHA_FAN1 2, п. 9) CHA_FAN_SPEED +12V GND FAN_SPEED_CONTROL (3 PWR_FAN1 2, п. 23) PWR_FAN_SPEED +12V GND 4 CPU_FAN1 2, п. 3) 4 3 2 1 GND +12V CPU_FAN_SPEED FAN_SPEED_CONTROL 4 3 3 1-3. 1-3 3 87 ASRock H61M-VGS / H61M-VS Motherboard - ASRock H61M-VS | Quick Installation Guide - Page 88
ATX (24 ATXPWR1 2, п. 4) 12 24 ATX. 1 13 12 24 ивает 24 ATX 20 ATX 20 ATX 1 13. 20 ATX 1 13 12V-ATX (4 ATX12V1 2, п. 2) COM 9 COM1 2, п. 17) ATX 12 COM COM. 88 ASRock H61M-VGS / H61M-VS Motherboard - ASRock H61M-VS | Quick Installation Guide - Page 89
Ctrl> + + - ASRock H61M-VS | Quick Installation Guide - Page 90
in lütfen web sitemizi ziyaret edin. www.asrock.com/support/index.asp 1.1 Paket İçindekiler ASRock H61M-VGS / H61M-VS Anakart (Micro ATX Form Faktörü: 8,9-inç x 6,8-inç, 22,6 cm x 17,3 cm) ASRock H61M-VGS / H61M-VS Hızlı Takma Kılavuzu ASRock H61M-VGS / H61M-VS Destek CD'si 2 x Seri ATA (SATA) Veri - ASRock H61M-VS | Quick Installation Guide - Page 91
(bkz. DİKKAT 2) - 2 x DDR3 DIMM yuva - DDR3 1333/1066 ECC olmayan, ara belleksiz bellek - Sistem belleğinin maks. kapasitesi: 16 GB (bkz. DİKKAT 3) - 1 x PCI Express 2.0 x16 yuva (mavi @ x16 modu) - 1 x PCI Express 2.0 x1 yuva - Intel® HD Graphics 2000/3000 - Pixel Shader 4.1, DirectX 10.1 - Maks - ASRock H61M-VS | Quick Installation Guide - Page 92
ığı ile Otomatik Ayar'ına izin verir) - CPU/Kasa Fan Çoklu-Hız Kontrolü - Voltaj İzleme: +12V, +5V, +3,3V, CPU Vcore İS - Microsoft® Windows® 7 / 7 64-bit / VistaTM / ürün bilgileri için lütfen web sitemizi ziyaret edin: http://www.asrock.com Türkçe 92 ASRock H61M-VGS / H61M-VS Motherboard - ASRock H61M-VS | Quick Installation Guide - Page 93
, sonra BIOS'unuzu yalnızca birkaç tıklatma ile ek bir disket veya diğer karmaşık flash yardımcı programlarını hazırlamadan güncelleyebilirsiniz. Lütfen USB flash sürücünün veya sabit diskin FAT32/16/12 dosya sistemi kullanması gerektiğini unutmayın. 93 ASRock H61M-VGS / H61M-VS Motherboard Türk - ASRock H61M-VS | Quick Installation Guide - Page 94
ına ısı macunu sürmeyi unutmayın. 12. Kombo Soğutucu Seçeneği (C.C.O.) üç farklı CPU soğutucu tipi olan Soket LGA 775, LGA 1155 ve LGA 1156'yı çalıştıracak esnek seçeneğe sahiptir. Lütfen tüm 775 ve 1156 CPU Fanlarının kullanılamayacağını unutmayın. 94 ASRock H61M-VGS / H61M-VS Motherboard Türkçe - ASRock H61M-VS | Quick Installation Guide - Page 95
. Intel'in önerisine göre, EuP hazır güç kaynağının 100 mA akım tüketiminde 5v beklemede güç etkinliği %50'den yüksektir standardını karşılaması gerekir. EuP hazır güç kaynağı seçimi için, daha fazla ayrıntı için güç kaynağı üreticisine başvurmanızı öneririz. 95 ASRock H61M-VGS / H61M-VS Motherboard - ASRock H61M-VS | Quick Installation Guide - Page 96
atlatıcı şapkası kullanın. Ancak, BIOS'u güncelledikten hemen sonra lütfen CMOS'u temizlemeyin. BIOS'u güncellemeyi tamamladığınızda CMOS'u 1394 GUID ve MAC adresinin yalnızca CMOS pili çıkarıldığında temizleneceğini lütfen aklınızda bulundurunuz. Türkçe 96 ASRock H61M-VGS / H61M-VS Motherboard - ASRock H61M-VS | Quick Installation Guide - Page 97
yerleştirmek anakartın kalıcı olarak zarar görmesine neden olabilir! Seri ATAII Konektörler (SATA2_0: bkz. s.2, No. 10) (SATA2_1: bkz. s.2, No. 8) (SATA2_2: bkz. s.2, No. 12) (SATA2_3: bkz. s.2, No. ının uygun bağlanmasını sağlayan bir arayüzdür. Türkçe 97 ASRock H61M-VGS / H61M-VS Motherboard - ASRock H61M-VS | Quick Installation Guide - Page 98
(Sabit Disk Çalışma LED'i): Kasa üzerindeki sabit disk çalışma LED'ini ön panele bağlayın. Sabit disk veri okurken veya yazarken LED yanar. 98 ASRock H61M-VGS / H61M-VS Motherboard Türkçe - ASRock H61M-VS | Quick Installation Guide - Page 99
ATX güç konektörü sağlasa da 12 24 geleneksel bir 20-pinli ATX güç kaynağı bağlarsanız da çalışabilir. 20-pinli ATX güç kaynağını kullanmak için, lütfen güç kaynağınızı Pin 1 ve Pin 13'le birlikte takın. 20-Pinli ATX Güç Kaynağını Takma 1 13 Türkçe 99 ASRock H61M-VGS / H61M-VS Motherboard - ASRock H61M-VS | Quick Installation Guide - Page 100
ATX 12V güç kaynağını bu konektöre bağlayın. Bu COM1 fişi bir seri port modülünü destekler. 2. BIOS Bilgileri Anakarttaki Flash Bellek BIOS itli Microsoft® Windows® işletim sistemleri BIN" klasöründeki "ASSETUP.EXE" dosyasını bulun ve çift tıklatın. Türkçe 100 ASRock H61M-VGS / H61M-VS Motherboard - ASRock H61M-VS | Quick Installation Guide - Page 101
ASRock H61M-VGS / H61M-VS Micro ATX 8.9" x 6.8", 22.6 x 17.3 cm) ASRock H61M-VGS / H61M-VS ASRock H61M-VGS / H61M-VS 지원 CD 시리얼 ATA (SATA 2 I/O 차폐 1 개 ASRock Windows® 7 / 7 64-비트 / VistaTM / VistaTM 64 Storage Configuration BIOS 옵션을 AHCI BIOS CD 101 ASRock H61M-VGS / H61M-VS Motherboard - ASRock H61M-VS | Quick Installation Guide - Page 102
H61 2 참조 ) - DDR3 DIMM 슬롯 2 개 - DDR3 1333/1066 비 -ECC 16GB ( 주의 3 참조 ) - PCI Express 2.0 x16 슬롯 (x16 1 개 - PCI Express 2.0 x1 슬롯 1 개 - Intel® HD Graphics 2000/3000 - Pixel Shader 4.1, DirectX 10.1 VGA 1759MB ( 주의 4 2048x1536 @ 75Hz 까지 D-Sub 지원 - 5.1 CH HD Audio (VIA® VT1705 Audio Codec) - H61M - ASRock H61M-VS | Quick Installation Guide - Page 103
주의 12 참조 ) - 굿나잇 LED CPU - CPU 도계 - CPU CPU 가능 ) - CPU 12V,+5V,+3.3V,Vcore OS Windows® 7/7 64 비트 /VistaTM/ VistaTM 64 비트 / XP/XP 64 인증서 - FCC, CE, WHQL - ErP/EuP 지원 (ErP/EuP ( 주의 13 참조 ) http://www.asrock.com 한 국 어 103 ASRock H61M-VGS / H61M-VS Motherboard - ASRock H61M-VS | Quick Installation Guide - Page 104
OC OS OS IES (Intelligent Energy Saver CPU ASRock 의 AXTU (Extreme Tuning Utility ASRock http://www.asrock.com 6. ASRock Instant Flash ROM BIOS BIOS MS-DOS 나 Windows BIOS POST 중에 BIOS F6 F2 ASRock Instant Flash USB BIOS BIOS USB FAT32/16/12 ASRock H61M-VGS / H61M-VS Motherboard - ASRock H61M-VS | Quick Installation Guide - Page 105
IE8 ASRock http://www.asrock.com/ Feature/SmartView/index.asp 10. ASRock XFast USB 는 USB 11 CPU PC CPU 12 C.C.O.) 은 3 CPU LGA 775, LGA 1155 와 LGA 1156 775 와 1156 CPU 13. EuP 는 Energy Using Product EuP AC 1.00W EuP EuP EuP Intel EuP 5V ASRock H61M-VGS / H61M-VS Motherboard - ASRock H61M-VS | Quick Installation Guide - Page 106
효율이 100 mA 50 EuP 1.3 3 1-2 점퍼 CMOS 초기화 (CLRCMOS1, 3 2 20 세팅 CMOS 삭제 참고 : CLRCMOS1 CMOS 15 CLRCMOS1 의 핀 2 와 핀 3 을 5 BIOS CMOS BIOS CMOS CMOS CMOS 1394 GUID, MAC 한 국 어 106 ASRock H61M-VGS / H61M-VS Motherboard - ASRock H61M-VS | Quick Installation Guide - Page 107
1.4 콘넥터 그림 시리얼 ATAII 커넥터 (SATA2_0: 2 10 SATA2_3 (SATA2_1: 2 8 (SATA2_2: 2 12 (SATA2_3: 2 11 SATA2_2 SATA2_1 SATA2_0 설명 4 ATAII (SATA SATA SATA 1 SPD7 SPD6 ACK# SPD5 BUSY SPD4 PE SPD3 SLCT SPD2 SPD1 SPD0 STB# 한국어 107 ASRock H61M-VGS / H61M-VS Motherboard - ASRock H61M-VS | Quick Installation Guide - Page 108
22 GND PRESENCE# MIC_RET OUT_RET 1 OUT2_L J_SENSE OUT2_R MIC2_R MIC2_L 1. High Definition Audio HAD 2. AC'97 A. Mic_IN (MIC) 을 MIC2_L B. Audio_R (RIN) 을 PLED LED LED S1 LED S3/S4 S5 LED HDLED LED LED LED ASRock H61M-VGS / H61M-VS Motherboard 한 국 어 - ASRock H61M-VS | Quick Installation Guide - Page 109
1 GND +12V CPU_FAN_SPEED FAN_SPEED_CONTROL CPU 4 핀 CPU 3 핀 CPU CPU 3 핀 CPU 1-3 1-3 3 ATX (24 핀 ATXPWR1) (2 4 12 24 ATX 1 13 24 핀 ATX 12 24 종래의 20 핀 ATX 20 핀 ATX Pin 1 과 Pin 13 20 핀 ATX 1 13 한국어 109 ASRock H61M-VGS / H61M-VS Motherboard - ASRock H61M-VS | Quick Installation Guide - Page 110
(9 핀 COM1) (2 17 ATX 12V 2 POST F2> 또는 ++ - ASRock H61M-VS | Quick Installation Guide - Page 111
BIOS VGA CPU サ ASRock http://www.asrock.com Web サイト い。 www.asrock.com/support/index.asp 1.1 ASRock H61M-VGS / H61M-VS Micro ATX 8.9-in x 6.8-in, 22.6 cm x 17.3 cm) ASRock H61M-VGS / H61M-VS ASRock H61M-VGS / H61M-VS CD 2 x ATA (SATA 1 x I/O ASRock Windows - ASRock H61M-VS | Quick Installation Guide - Page 112
K CPU 1 Intel® H61 DDR3 ( 注意 2 DDR3 DIMM x 2 - DDR3 1333/1066 non-ECC, un-buffered 16GB ( 注意 3 1 x PCI Express 2.0 x16 x16 1 x PCI Express 2.0 x1 Intel® HD Graphics 2000/3000 - Pixel Shader 4.1、DirectX 10.1 1759MB ( 注意 4 2048x1536 @ 75Hz D-Sub 5.1 CH HD (VIA® VT1705 Codec) - H61M - ASRock H61M-VS | Quick Installation Guide - Page 113
AXTU) ( 注意 5 ASRock Instant Flash ( 注意 6 参照 ) - ASRock AIWI ( 注意 7 ASRock APP 8 SmartView ( 注意 9 ASRock XFast USB ( 注意 10 - ASRock U-COP ( 注意 11 Boot Failure Guard:B.F.G C.C.O.) ( 注意 12 LED - CPU CPU CPU CPU CPU 12V, +5V, +3.3V, Vcore 日本語 113 ASRock H61M-VGS / H61M-VS Motherboard - ASRock H61M-VS | Quick Installation Guide - Page 114
Technology 14 Windows® 7 / VistaTM / XP 4GB 64 ビット CPU の Windows® OS Intel® 社の WEB ASRock Extreme Tuning Utility (AXTU OC DNA、ES CPU OC DNA OC OC OC IES CPU ASRock Extreme Tuning Utility (AXTU Web ASRock Web サイト :http://www.asrock.com 日本語 114 ASRock H61M-VGS / H61M-VS Motherboard - ASRock H61M-VS | Quick Installation Guide - Page 115
asrock.com/Feature/AppCharger/index.asp 9. SmartView Facebook IE ASRock マザー SmartView SmartView OS Windows® 7 / 7 64 bit / VistaTM / VistaTM 64 bit IE8 ASRock http://www.asrock.com/Feature/ SmartView/index.asp 日本語 115 ASRock H61M-VGS / H61M-VS Motherboard - ASRock H61M-VS | Quick Installation Guide - Page 116
CPU 冷 PC ル時に、CPU です。 12. C.C.O.) では、Socket LGA 775、LGA 1155 と LGA 1156 の 3 CPU 775 と 1156 CPU 13. Energy Using Product EuP EuP に従っ AC 1.00W EuP EuP EuP 対応 Intel EuP 5v 100 mA で 50 EuP 日本語 116 ASRock H61M-VGS / H61M-VS Motherboard - ASRock H61M-VS | Quick Installation Guide - Page 117
1.3 1-2 CMOS CLRCMOS1 20 参照) 設定 説明 CMOS の消去 注 : CLRCMOS1 CMOS 15 CLRCMOS1 のピン 2 とピン 3 を 5 BIOS CMOS BIOS CMOS CMOS 1394 GUID と MAC CMOS 日本語 117 ASRock H61M-VGS / H61M-VS Motherboard - ASRock H61M-VS | Quick Installation Guide - Page 118
1.4 ATAII SATA2_0: ページ 2 10 を参照 SATA2_1: ページ 2 8 を参照 SATA2_2: ページ 2 12 を参照 SATA2_3: ページ 2 11 を参照 SATA2_3 SATA2_2 SATA2_1 SATA2_0 これら 4 ATAII (SATAII SATA SPD7 SPD6 ACK# SPD5 BUSY SPD4 PE SPD3 SLCT SPD2 SPD1 SPD0 STB# 日本語 118 ASRock H61M-VGS / H61M-VS Motherboard - ASRock H61M-VS | Quick Installation Guide - Page 119
に、Audio_L (LIN) を OUT2_L C. Ground (GND) を Ground (GND す。 D. MIC_RET と OUT_RET AC'97 9 ピン PANEL1 14 を参照 日本語 PWRBTN RESET PLED LED LED LED S1 S3 または S4 S5 LED 119 ASRock H61M-VGS / H61M-VS Motherboard - ASRock H61M-VS | Quick Installation Guide - Page 120
(3 ピン PWR_FAN1 23 を参照 PWR_FAN_SPEED +12V GND CPU 4 ピン CPU_FAN1 3 を参照 4 3 2 1 GND +12V CPU_FAN_SPEED FAN_SPEED_CONTROL CPU 4 ピン CPU 3 ピン CPU 3 ピン CPU CPU 1-3 1-3 3 ATX 24 ピン ATXPWR1 4 を参照 12 24 ATX 1 13 日本語 120 ASRock H61M-VGS / H61M-VS Motherboard - ASRock H61M-VS | Quick Installation Guide - Page 121
24 ピン ATX 従来の 20 ピン ATX 12 24 20 ピン ATX 1 13 ATX 12V 4 ピン ATX12V1 2 を参照 9 ピン COM1 17 を参照 20 ピン ATX 1 13 CPU に Vcore ATX 12V この COM1 日本語 121 ASRock H61M-VGS / H61M-VS Motherboard - ASRock H61M-VS | Quick Installation Guide - Page 122
2.BIOS 情報 BIOS POST F2 Del BIOS POST BIOS POST Ctrl〉+〈Alt〉+〈Delete BIOS BIOS CD PDF 3 CD 情報 Microsoft® Windows® 7 / 7 64-bit / VistaTM / VistaTM 64bit / XP / XP 64-bit CD CD CDROM CD AUTORUN AUTORUN CD 内の BIN ASSETUP.EXE 122 ASRock H61M-VGS / H61M-VS Motherboard 日本語 - ASRock H61M-VS | Quick Installation Guide - Page 123
/ H61M-VS 主板 (Micro ATX 規格 : 8.9 英吋 X 6.8 英吋 , 22.6 厘米 X 17.3 厘米 ) 華擎 H61M-VGS / H61M-VS H61M-VGS / H61M-VS Serial ATA(SATA I/O 擋板 ASRock 為了在 Windows® 7 / 7 64-bit / VistaTM / VistaTM 64-bit BIOS中將Storage Configuration AHCI BIOS User Manual 123 ASRock H61M-VGS / H61M-VS Motherboard 簡體中文 - ASRock H61M-VS | Quick Installation Guide - Page 124
CPU - 支持 Hyper-Threading 1) - Intel® H61 DDR3 2 2 個 DDR3 DIMM DDR3 1333/1066 non-ECC、un-buffered 16GB 3) - 1 x PCI Express 2.0 x16 x16 模式 ) - 1 x PCI Express x1 插槽 - Intel® HD Graphics 2000/3000 - Pixel Shader 4.1 技術,DirectX 10.1 1759MB 4 D-Sub 2048x1536 @ 75Hz - 5.1 VIA® VT1705 H61M - ASRock H61M-VS | Quick Installation Guide - Page 125
C.C.O 12) - CPU - CPU - CPU CPU 度) - CPU 12V, +5V, +3.3V 操作系統 - Microsoft® Windows® 7/7 64 位元 /VistaTM/VistaTM 64 位元 / XP/XP 64 認證 - FCC, CE, WHQL - 支持 ErP/EuP ErP/EuP 13) http://www.asrock.com 簡體中文 125 ASRock H61M-VGS / H61M-VS Motherboard - ASRock H61M-VS | Quick Installation Guide - Page 126
BIOS 警告! 1、 關于"Hyper-Threading Technology CD User Manual 39 UEFI 8 2 14 3 Windows® 7 / VistaTM / XP 4GB。對於 Windows 64 位元 CPU 4 Intel 5、 ASRock Extreme Tuning Utility (AXTU O C DNA 和 IES。在 Hardware Monitor Fan Control Overclocking CPU OC DNA OC O C OC IES CPU ASRock - ASRock H61M-VS | Quick Installation Guide - Page 127
/Feature/SmartView/index.asp 10、華擎 XFast USB USB 11 CPU C P U PC CPU 12 C . C . O C P U L G A775, L G A1155 與 L G A1156 775 和 1156 CPU 13、EuP, 全稱 Energy Using Product E u P 1.00W EuP EuP EuP Intel EuP 100m A 5V s b 50 E u P 127 ASRock H61M-VGS / H61M-VS Motherboard 簡體中文 - ASRock H61M-VS | Quick Installation Guide - Page 128
1.3 3 1 和針腳 2 CMOS (CLRCMOS1, 3 2 頁第 20 項 ) 設定 默認設置 清除 CMOS 注意: C L R C M O S1 C M O S 15 C L R C M O S1 2 和插針 3 短接 5 B I O S C M O S B I O S C M O S C M O S C M O S 1394 GUID 和 MAC 簡體中文 128 ASRock H61M-VGS / H61M-VS Motherboard - ASRock H61M-VS | Quick Installation Guide - Page 129
1.4 Serial ATAII 接口 (SATA2_0: 見第 2 頁第 10 項 ) (SATA2_1: 見第 2 頁第 8 項 ) (SATA2_2: 見第 2 頁第 12 項 ) (SATA2_3: 見第 2 頁第 11 項 ) Serial ATA (SATA) 數據線 ( 選配 ) SATA2_3 SATA2_1 SATA2_2 MIC2_R MIC2_L I/O USB 2.0 USB 2.0 USB 2.0 USB 2.0 接口。 ASRock H61M-VGS / H61M-VS Motherboard 129 簡體中文 - ASRock H61M-VS | Quick Installation Guide - Page 130
1 High Definition Audio, HDA Jack Sensing HDA 2 AC'97 A. 將 Mic_IN(MIC) 連接到 MIC2_L。 B. 將 Audio_R(RIN) 連接到 OUT2_R, 將 Audio_L(LIN) 連接到 見第 2 頁第 14 項 ) (4 針 SPEAKER1) ( 見第 2 頁第 13 項 ) PWRBTN RESET PLED S1 S3/S4 S5 HD LED 簡體中文 130 ASRock H61M-VGS / H61M-VS Motherboard - ASRock H61M-VS | Quick Installation Guide - Page 131
ATX (24 針 ATXPWR1) ( 見第 2 頁第 4 項 ) 12 24 請將 ATX 1 13 24-pin ATX 12 24 傳統的 20-pin ATX 20-pin ATX Pin 1 和 Pin 13 ATX 12V 接頭 (4 針 ATX12V1) ( 見第 2 頁第 2 項 ) (9 針 COM1) ( 見第 2 頁第 17 項 ) 20-Pin ATX 1 13 ATX 12V 這個 COM1 簡體中文 131 ASRock H61M-VGS / H61M-VS Motherboard - ASRock H61M-VS | Quick Installation Guide - Page 132
2. BIOS 信息 Flash Memory 存儲了 BIOS POST F2> 或 < D e l B I O S P O S T P O S T B I O S Ctrl>++ - ASRock H61M-VS | Quick Installation Guide - Page 133
SJ/T 11364-2006 10 年。 圖一 部件名稱 鉛 (Pb) 鎘 (Cd) 汞 (Hg Cr(VI PBB PBDE) X O O O O O X O O O O O O SJ/T 11363-2006 X SJ/T 11363-2006 2002/95/EC 簡體中文 133 ASRock H61M-VGS / H61M-VS Motherboard - ASRock H61M-VS | Quick Installation Guide - Page 134
.com/support/index.asp 1.1 華擎 H61M-VGS / H61M-VS 主機板 (Micro ATX 規格 : 8.9 英吋 x 6.8 英吋 , 22.6 公分 x 17.3 公分 ) 華擎 H61M-VGS / H61M-VS H61M-VGS / H61M-VS Serial ATA(SATA I/O 擋板 ASRock提醒您... 若要在Windows® 7 / 7 64位元 / VistaTM / VistaTM 64 BIOS選項設為AHCI BIOS 134 ASRock H61M-VGS / H61M-VS Motherboard - ASRock H61M-VS | Quick Installation Guide - Page 135
CPU - 支援 Hyper-Threading 1) - Intel® H61 DDR3 2) - 2 個 DDR3 DIMM DDR3 1333/1066 non-ECC、un-buffered 16GB 3) - 1 x PCI Express 2.0 x16 x16 模式 ) - 1 x PCI Express x1 插槽 - Intel® HD Graphics 2000/3000 - Pixel Shader 4.1 技術,DirectX 10.1 1759MB 4 D-Sub 2048x1536 @ 75Hz - 5.1 VIA® VT1705 H61M - ASRock H61M-VS | Quick Installation Guide - Page 136
12) - 晚安 LED 指示燈 硬體監控 - CPU - CPU - CPU CPU 度) - CPU 12V, +5V, +3.3V 操作系統 - Microsoft® Windows® 7/7 64 位元 /VistaTM/VistaTM 64 位元 / XP/XP 64 位元 認證 - FCC, CE, WHQL - 支援 ErP/EuP ErP/EuP 13) http://www.asrock.com 繁體中文 136 ASRock H61M-VGS / H61M-VS Motherboard - ASRock H61M-VS | Quick Installation Guide - Page 137
BIOS 警告! 1、 關於"Hyper-Threading Technology CD User Manual 39 頁。 2 14 3 Windows® 7 / VistaTM / XP 4GB。對於 Windows 64 位元 C P U 4 Intel 5、 ASRock Extreme Tuning Utility (AXTU Hardware Monitor、 Fan Control、Overclocking、OC DNA 及 IES)。Hardware Monitor Fan Control Overclocking CPU OC - ASRock H61M-VS | Quick Installation Guide - Page 138
www.asrock.com/Feature/SmartView/ index.asp 10、華擎 XFast USB 可提升 USB 11 C P U C P U PC CPU 12 C.C.O CPU LGA775,LGA1155 與 LGA1156 775 和 1156 CPU 13、EuP, 全稱 Energy Using Product EuP 1.00W EuP EuP EuP Intel EuP 100mA 5Vsb 50 EuP 138 ASRock H61M-VGS / H61M-VS Motherboard 繁體中文 - ASRock H61M-VS | Quick Installation Guide - Page 139
1.3 3 1 和針腳 2 CMOS (CLRCMOS1, 3 2 頁第 20 項 ) 設定 默認設置 清除 CMOS 註: C L R C M O S1 C M O S 15 CLRCMOS1 的 pin2 及 pin3 短路 5 BIOS CMOS BIOS CMOS CMOS C M O S 1394 GUID 及 MAC 繁體中文 139 ASRock H61M-VGS / H61M-VS Motherboard - ASRock H61M-VS | Quick Installation Guide - Page 140
1.4 接頭 接頭 Serial ATAII 接口 (SATA2_0: 見第 2 頁第 10 項 ) (SATA2_1: 見第 2 頁第 8 項 ) (SATA2_2: 見第 2 頁第 12 項 ) (SATA2_3: 見第 2 頁第 11 項 ) 圖示 SATA2_3 SATA2_1 SATA2_2 SATA2_0 說明 Serial SPD2 SPD1 SPD0 STB# I/O USB 2.0 USB 2.0 USB 2.0 USB 2.0 接口。 繁體中文 140 ASRock H61M-VGS / H61M-VS Motherboard - ASRock H61M-VS | Quick Installation Guide - Page 141
22 項 ) GND PRESENCE# MIC_RET OUT_RET 1 OUT2_L J_SENSE OUT2_R MIC2_R MIC2_L 1 High Definition Audio, HDA Jack Sensing HDA 2 AC'97 A. 將 Mic_IN(MIC) 連接到 MIC2_L。 B. 將 ) ( 見第 2 頁第 14 項 ) PWRBTN RESET PLED S1 S3/S4 S5 HD LED 141 ASRock H61M-VGS / H61M-VS Motherboard 繁體中文 - ASRock H61M-VS | Quick Installation Guide - Page 142
3-Pin CPU CPU Pin 1-3。 Pin 1-3 連接 3-Pin ATX (24 針 ATXPWR1) ( 見第 2 頁第 4 項 ) 12 24 請將 ATX 1 13 24-pin ATX 12 24 20-pin ATX 20-pin ATX 著 Pin 1 和 Pin 13 ATX 12V (4 針 ATX12V1) ( 見第 2 頁第 2 項 ) 20-Pin ATX 1 13 ATX 12V 繁體中文 142 ASRock H61M-VGS / H61M-VS Motherboard - ASRock H61M-VS | Quick Installation Guide - Page 143
序列埠 (9 針 COM1) ( 見第 2 頁第 17 項 ) COM1 2. BIOS 訊息 Flash Memory BIOS POST F2> 或 + + - ASRock H61M-VS | Quick Installation Guide - Page 144
HDD Larger Than 2TB This motherboard is adopting UEFI BIOS that allows Windows® OS to be installed on a large size HDD (>2TB). Please follow below procedure to install the operating system. 1. Please make sure to use Windows® VistaTM 64-bit (with SP1 or above) or Windows® 7 64-bit. 2. Press or
-
 1
1 -
 2
2 -
 3
3 -
 4
4 -
 5
5 -
 6
6 -
 7
7 -
8
-
9
-
10
-
11
-
12
-
13
-
14
-
15
-
16
-
17
-
18
-
19
-
20
-
21
-
22
-
23
-
24
-
25
-
26
-
27
-
28
-
29
-
30
-
31
-
32
-
33
-
34
-
35
-
36
-
37
-
38
-
39
-
40
-
41
-
42
-
43
-
44
-
45
-
46
-
47
-
48
-
49
-
50
-
51
-
52
-
53
-
54
-
55
-
56
-
57
-
58
-
59
-
60
-
61
-
62
-
63
-
64
-
65
-
66
-
67
-
68
-
69
-
70
-
71
-
72
-
73
-
74
-
75
-
76
-
77
-
78
-
79
-
80
-
81
-
82
-
83
-
84
-
85
-
86
-
87
-
88
-
89
-
90
-
91
-
92
-
93
-
94
-
95
-
96
-
97
-
98
-
99
-
100
-
101
-
102
-
103
-
104
-
105
-
106
-
107
-
108
-
109
-
110
-
111
-
112
-
113
-
114
-
115
-
116
-
117
-
118
-
119
-
120
-
121
-
122
-
123
-
124
-
125
-
126
-
127
-
128
-
129
-
130
-
131
-
132
-
133
-
134
-
135
-
136
-
137
-
138
-
139
-
140
-
141
-
142
-
143
-
144
 |
 |

1
ASRock
H61M-VGS / H61M-VS
Motherboard
English
Copyright Notice:
No part of this installation guide may be reproduced, transcribed, transmitted, or trans-
lated in any language, in any form or by any means, except duplication of documentation
by the purchaser for backup purpose, without written consent of ASRock Inc.
Products and corporate names appearing in this guide may or may not be registered
trademarks or copyrights of their respective companies, and are used only for identi
fi
ca-
tion or explanation and to the owners’ bene
fi
t, without intent to infringe.
Disclaimer:
Speci
fi
cations and information contained in this guide are furnished for informational use
only and subject to change without notice, and should not be constructed as a commit-
ment by ASRock. ASRock assumes no responsibility for any errors or omissions that may
appear in this guide.
With respect to the contents of this guide, ASRock does not provide warranty of any kind,
either expressed or implied, including but not limited to the implied warranties or condi-
tions of merchantability or
fi
tness for a particular purpose. In no event shall ASRock, its
directors, of
fi
cers, employees, or agents be liable for any indirect, special, incidental, or
consequential damages (including damages for loss of pro
fi
ts, loss of business, loss of
data, interruption of business and the like), even if ASRock has been advised of the pos-
sibility of such damages arising from any defect or error in the guide or product.
This device complies with Part 15 of the FCC Rules. Operation is subject to the following
two conditions:
(1) this device may not cause harmful interference, and
(2) this device must accept any interference received, including interference that
may cause undesired operation.
CALIFORNIA, USA ONLY
The Lithium battery adopted on this motherboard contains Perchlorate, a toxic substance
controlled in Perchlorate Best Management Practices (BMP) regulations passed by the
California Legislature. When you discard the Lithium battery in California, USA, please
follow the related regulations in advance.
“Perchlorate Material-special handling may apply, see
www.dtsc.ca.gov/hazardouswaste/perchlorate”
ASRock Website: http://www.asrock.com
Published February 2011
Copyright
©
2011 ASRock INC. All rights reserved.