ASRock K10N78 Quick Installation Guide
ASRock K10N78 Manual
 |
View all ASRock K10N78 manuals
Add to My Manuals
Save this manual to your list of manuals |
ASRock K10N78 manual content summary:
- ASRock K10N78 | Quick Installation Guide - Page 1
for backup purpose, without written consent of ASRock Inc. Products and corporate names appearing in this guide may or may not be registered trademarks ASRock Website: http://www.asrock.com Published August 2008 Copyright©2008 ASRock INC. All rights reserved. 1 ASRock K10N78-1394 / K10N78 Motherboard - ASRock K10N78 | Quick Installation Guide - Page 2
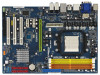
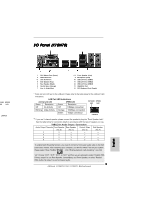
Orange) 30 Front Panel IEEE 1394 Header 12 SATAII Connector ( Port Connector (COM1) 17 SPI BIOS Chip 35 ATX Power Connector (ATXPWR1) 18 SATAII Connector (SATAII_3 (PORT2), Red) 36 eSATAII Connector (eSATAII_TOP, Orange) 19 NVIDIA GeForce 8200 Chipset 2 ASRock K10N78-1394 / K10N78 Motherboard - ASRock K10N78 | Quick Installation Guide - Page 3
Motherboard Layout (K10N78) English 1 PS2_USB_PW1 Jumper 2 ATX 12V Power Connector (ATX12V1) 3 CPU Fan Connector (CPU_FAN1) 4 CPU Heatsink Retention Module 5 AM2 ) 17 SPI BIOS Chip 18 SATAII Port Connector (COM1) 34 ATX Power Connector (ATXPWR1) 3 ASRock K10N78-1394 / K10N78 Motherboard - ASRock K10N78 | Quick Installation Guide - Page 4
No Activity Off 10Mbps connection Blinking Data Activity Orange 100Mbps connection Green 1Gbps connection LAN Port ** If you use 2-channel speaker, please connect the speaker's plug into "Realtek HDA Audio 2nd output" to use front panel audio. 4 ASRock K10N78-1394 / K10N78 Motherboard English - ASRock K10N78 | Quick Installation Guide - Page 5
connection Blinking Data Activity Orange 100Mbps connection Green 1Gbps connection LAN Port ** If you use 2-channel speaker, please connect Multi-Streaming function, you need to connect a front panel audio cable to the front panel audio header. ASRock K10N78-1394 / K10N78 Motherboard English - ASRock K10N78 | Quick Installation Guide - Page 6
www.asrock.com/support/index.asp 1.1 Package Contents ASRock K10N78-1394 / K10N78 Motherboard (ATX Form Factor: 12.0-in x 8.4-in, 30.5 cm x 21.3 cm) ASRock K10N78-1394 / K10N78 Quick Installation Guide ASRock K10N78-1394 / K10N78 Support CD One 80-conductor Ultra ATA 66/100/133 IDE Ribbon Cable One - ASRock K10N78 | Quick Installation Guide - Page 7
with DVI-D port (see CAUTION 8) - NVIDIA® PureVideoTM HD Ready - 7.1 CH Windows® VistaTM Premium Level HD Audio (ALC888 Audio Codec) - Chipset embeded HDMI Audio - Gigabit LAN 10/100/1000 Mb/s - Giga PHY Realtek RTL8211BCL-GR - Supports Wake-On-LAN English 7 ASRock K10N78-1394 / K10N78 Motherboard - ASRock K10N78 | Quick Installation Guide - Page 8
BIOS - Supports "Plug and Play" - ACPI 1.1 Compliance Wake Up Events - Supports jumperfree - AMBIOS 2.3.1 Support - CPU, DRAM, Chipset Core, HTT Voltage Multi-adjustment - Supports Smart BIOS - Drivers, Utilities, AntiVirus Software (Trial Version) English 8 ASRock K10N78-1394 / K10N78 Motherboard - ASRock K10N78 | Quick Installation Guide - Page 9
® Windows® XP BIOS supported depends on the AM2+ CPU you adopt. If you want to adopt DDR2 1066 memory module on this motherboard, please refer to the memory support list on our website for the compatible memory modules. ASRock website http://www.asrock.com 9 ASRock K10N78-1394 / K10N78 Motherboard - ASRock K10N78 | Quick Installation Guide - Page 10
Guide" on page 41 of "User Manual" in the support CD to adjust your SATAII hard disk drive to SATAII mode. You can also connect SATA hard disk to SATAII connector directly. 11. This motherboard supports without sacrificing computing performance. 10 ASRock K10N78-1394 / K10N78 Motherboard English - ASRock K10N78 | Quick Installation Guide - Page 11
the system stability for all CPU/DRAM configurations. If your system is unstable after AM2 Boost function is enabled, it may not be applicative to your system. You may choose to disable this function for keeping the stability of your system. 11 ASRock K10N78-1394 / K10N78 Motherboard English - ASRock K10N78 | Quick Installation Guide - Page 12
® VistaTM / VistaTM 64-bit OS. If you install Windows® XP / XP 64-bit OS, the function of 1080p Blu-ray (BD) / HD-DVD playback is not available, please visit our website for NVIDIA® driver update in the future. ASRock website http://www.asrock.com English 12 ASRock K10N78-1394 / K10N78 Motherboard - ASRock K10N78 | Quick Installation Guide - Page 13
8400 VGA Onboard VGA with DVI-D port Memory Dual Channel DDR2 533, 1GB x 2 OS Windows® VistaTM or Windows® VistaTM 64 Playback Software CyberLink PowerDVD Ultra DVD Player Blu-ray-DVDRW-LG-GBW-H10N (BD) HD DVD-HP-TOSD-H802A-01 (HD-DVD) English 13 ASRock K10N78-1394 / K10N78 Motherboard - ASRock K10N78 | Quick Installation Guide - Page 14
, place it on a grounded antistatic pad or in the bag that comes with the component. 5. When placing screws into the screw holes to secure the motherboard to the chassis, please do not over-tighten the screws! Doing so may damage the motherboard. 14 ASRock K10N78-1394 / K10N78 Motherboard English - ASRock K10N78 | Quick Installation Guide - Page 15
are securely fastened and in good contact with each other. Then connect the CPU fan to the CPU FAN connector (CPU_FAN1, see Page 2/3, No. 3). For proper installation, please kindly refer to the instruction manuals of the CPU fan and the heatsink. English 15 ASRock K10N78-1394 / K10N78 Motherboard - ASRock K10N78 | Quick Installation Guide - Page 16
Installation of Memory Modules (DIMM) This motherboard provides four 240-pin DDR2 (Double Data Rate 2) DIMM slots, and supports Dual Channel Memory Technology. For dual module into DDR2 slot; otherwise, this motherboard and DIMM may be damaged. English 16 ASRock K10N78-1394 / K10N78 Motherboard - ASRock K10N78 | Quick Installation Guide - Page 17
permanent damage to the motherboard and the DIMM if you force the DIMM into the slot at incorrect orientation. Step 3. Firmly insert the DIMM into the slot until the retaining clips at both ends fully snap back in place and the DIMM is properly seated. 17 ASRock K10N78-1394 / K10N78 Motherboard - ASRock K10N78 | Quick Installation Guide - Page 18
the card before you start the installation. Step 2. Remove the system unit cover (if your motherboard is already installed in a chassis). Step 3. Remove the bracket facing the slot that you intend with screws. Step 6. Replace the system cover. 18 ASRock K10N78-1394 / K10N78 Motherboard English - ASRock K10N78 | Quick Installation Guide - Page 19
motherboard GPU Suggested OS Windows® VistaTM or Windows® VistaTM 64 HybridPowerTM CPU Memory Suggested OS AMD Athlon X2 3800+ CPU Dual Channel DDR2 667, 1024MB x 2 256MB or 512MB shared memory for motherboard GPU Windows® VistaTM or Windows® VistaTM 64 English 19 ASRock K10N78-1394 / K10N78 - ASRock K10N78 | Quick Installation Guide - Page 20
off your system. C. Switch your monitor cable to the connector on the I/O shield. After reboot your system, you are allowed to switch between GeForce® Boost mode (Boost Performance) and HybridPowerTM mode (Save Power) according to your request. 20 ASRock K10N78-1394 / K10N78 Motherboard English - ASRock K10N78 | Quick Installation Guide - Page 21
, Hybrid SLITM driver only has VistaTM 32 version, please visit our website for future update. Step 7. Restart your computer. Then you will find the Hybrid icon on your Win- dows® taskbar. Please click the icon and select the item "Save Power". English 21 ASRock K10N78-1394 / K10N78 Motherboard - ASRock K10N78 | Quick Installation Guide - Page 22
of ASRock support CD: (There are two ASRock support CD in the motherboard gift box pack, please choose the one for Windows® VistaTM / VistaTM 64-bit.) ..\Drivers\Hybrid SLI driver\Vista * Currently, Hybrid SLITM driver only has VistaTM 32 version, please visit our website for future update. Step - ASRock K10N78 | Quick Installation Guide - Page 23
displayed only in one of the two monitors instead of both monitors. 2. This motherboard does not support dual monitor feature under DOS because in this situation, the VGA/DVI-D output is not available. There is no such limitation under Windows® OS. 23 ASRock K10N78-1394 / K10N78 Motherboard English - ASRock K10N78 | Quick Installation Guide - Page 24
number one, two, three and four. For Windows® VistaTM / VistaTM 64-bit OS: Right click the desktop, choose "Personalize", and select the "Display Settings" tab so that you can adjust the parameters of the multi-monitor according to the steps below. 24 ASRock K10N78-1394 / K10N78 Motherboard English - ASRock K10N78 | Quick Installation Guide - Page 25
-boxes, as well as few entertainment PCs requires a secure connection to a compliant display. Due to the increase in manufacturers employing HDCP in their equipment, it is highly recommended that the HDTV or LCD monitor you purchase is compatible. 25 ASRock K10N78-1394 / K10N78 Motherboard English - ASRock K10N78 | Quick Installation Guide - Page 26
sometimes. For Windows® XP / XP 64-bit OS Step 1:Set up BIOS. A. Enter BIOS SETUP UTILITY Advanced screen Chipset Configuration. B. Set the option "OnBoard HDMI HD Audio" to [Auto]. Step 2: Install HDMI audio driver to your system. Install "Onboard HDMI HD Audio Driver" from ASRock Support CD to - ASRock K10N78 | Quick Installation Guide - Page 27
5 seconds. However, please do not clear the CMOS right after you update the BIOS. If you need to clear the CMOS when you just finish updating the BIOS, you must boot up the system first, and then shut it down before you do the clearCMOS action. English 27 ASRock K10N78-1394 / K10N78 Motherboard - ASRock K10N78 | Quick Installation Guide - Page 28
(PORT5) connector can be used for internal storage device or be connected to eSATAII connector to support eSATAII device. Please read "eSATAII Interface Introduction" on page 33 for details about eSATAII and eSATAII installation procedures. English 28 ASRock K10N78-1394 / K10N78 Motherboard - ASRock K10N78 | Quick Installation Guide - Page 29
eSATAII connector supports SATA data cable for external SATAII function. The current eSATAII interface allows up to 3.0 Gb/s data transfer rate. Either end of the SATA data cable can be connected to the SATA / SATAII hard disk or the SATAII connector on this motherboard. For K10N78-1394, you can - ASRock K10N78 | Quick Installation Guide - Page 30
"Disable front panel jack detection", and save the change by clicking "OK". For Windows® VistaTM / VistaTM 64-bit OS: Click the right-top "Folder" icon , choose "Disable front panel jack detection", and save the change by clicking "OK". 30 ASRock K10N78-1394 / K10N78 Motherboard English - ASRock K10N78 | Quick Installation Guide - Page 31
fan connector on this motherboard, please connect it to Pin 1-3. Pin 1-3 Connected 3-Pin Fan Installation ATX Power Connector (24-pin ATXPWR1) (see p.2, No. 35 or p.3, No. 34) 12 24 Please connect an ATX power supply to this connector. 1 13 31 ASRock K10N78-1394 / K10N78 Motherboard English - ASRock K10N78 | Quick Installation Guide - Page 32
on this motherboard. This IEEE 1394 header can support one IEEE 1394 port. HDMI_SPDIF Header (3-pin HDMI_SPDIF1) (see p.2/3, No. 29) HDMI_SPDIF header, providing SPDIF audio output to HDMI VGA card, allows the system to con nect HDMI Digital TV/ projector/LCD devices. Please connect the HDMI_SPDIF - ASRock K10N78 | Quick Installation Guide - Page 33
header on the motherboard. Then connect the white end (B or C) of HDMI_SPDIF cable to the HDMI_SPDIF connector of HDMI VGA card. B. white end (2-pin) C. white end (3-pin) 2.10 eSATAII Interface Introduction (Only for K10N78-1394) NOTE: 1. If you set "SATA Operation Mode" option in BIOS setup to - ASRock K10N78 | Quick Installation Guide - Page 34
connector that you connect the SATA data cable. Connect one end of the eSATAII device cable to eSATAII device Connect the other end of the eSATAII device cable to eSATAII port of the I/O shield 2.11Driver Installation Guide To install the drivers to your system, please insert the support CD to - ASRock K10N78 | Quick Installation Guide - Page 35
\ I386 \ AHCI_Vista (For Windows® VistaTM OS) .. \ AMD64\ AHCI_Vista64 (For Windows® VistaTM 64-bit OS) After that, please insert Windows® VistaTM / Windows® VistaTM 64-bit optical disk into the optical drive again to continue the installation. 35 ASRock K10N78-1394 / K10N78 Motherboard English - ASRock K10N78 | Quick Installation Guide - Page 36
about BIOS Setup, please refer to the User Manual (PDF file) contained in the Support CD. 4. Software Support CD information This motherboard supports various Microsoft® Windows® EXE" from the "BIN" folder in the Support CD to display the menus. 36 ASRock K10N78-1394 / K10N78 Motherboard English - ASRock K10N78 | Quick Installation Guide - Page 37
Sie bitte unsere Webseite: www.asrock.com/support/index.asp 1.1 Kartoninhalt ASRock K10N78-1394 / K10N78 Motherboard (ATX-Formfaktor: 30.5 cm x 21.3 cm; 12.0 Zoll x 8.4 Zoll) ASRock K10N78-1394 / K10N78 Schnellinstallationsanleitung ASRock K10N78-1394 / K10N78 Support-CD Ein 80-adriges Ultra-ATA - ASRock K10N78 | Quick Installation Guide - Page 38
HDCP Funktion mit DVI-D Port - unterstützt 1080p Blu-ray (BD) / HD-DVD Playback (siehe VORSICHT 8) - NVIDIA® PureVideoTM HD betriebsbereit - 7.1 CH Windows® VistaTM Premium Level HD Audio (ALC888 Audio Codec) - Chipsatz eingebettetes HDMI Audio Deutsch 38 ASRock K10N78-1394 / K10N78 Motherboard - ASRock K10N78 | Quick Installation Guide - Page 39
- 1 x USB/WiFi-Anschlüsse (siehe VORSICHT 13) BIOS - 8Mb AMI BIOS - AMI legal BIOS mit Unterstützung für "Plug and Play" - ACPI 1.1-Weckfunktionen - JumperFree-Modus - SMBIOS 2.3.1 - CPU, DRAM, Chipsatzkern, HTT- Spannungsmultiplikatoreinstellung 39 ASRock K10N78-1394 / K10N78 Motherboard - ASRock K10N78 | Quick Installation Guide - Page 40
BIOS Support-CD - Treiber, Dienstprogramme, Antivirussoftware (Probeversion) Einzigartige - ASRock ® Windows® AM2+ CPU ab. Weitere Informationen finden Sie in der Liste unterstützter CPUs auf unserer Website. ASRock-Website http://www.asrock.com 40 ASRock K10N78-1394 / K10N78 Motherboard - ASRock K10N78 | Quick Installation Guide - Page 41
der von Ihnen eingesetzten AM2+-CPU ab. Schauen Sie nftige Hybrid SLITMTreiber-Updates. Aktuelle Betriebsvorg der "Bedienungsanleitung" auf der Support-CD, um Ihre SATAII-Festplatte Windows® VistaTM 64-Bit / VistaTM / XP 64-Bit / XP SP1 oder SP2 einwandfrei. 41 ASRock K10N78-1394 / K10N78 Motherboard - ASRock K10N78 | Quick Installation Guide - Page 42
CPU/DRAMKonfigurationen. Wird Ihr System nach dem Aktivieren der AM2 BoostFunktion unstabil, dann ist diese Funktion wahrscheinlich nicht für Ihr System geeignet. Sie können diese Funktion deaktivieren, um die Stabilität Ihres System zu bewahren. 42 ASRock K10N78-1394 / K10N78 Motherboard Deutsch - ASRock K10N78 | Quick Installation Guide - Page 43
, oder zurück in die Tüte, mit der die Komponente geliefert wurde. 5. Wenn Sie das Motherboard mit den Schrauben an dem Computergehäuse befestigen, überziehen Sie bitte die Schrauben nicht! Das Motherboard kann sonst beschädigt werden. Deutsch 43 ASRock K10N78-1394 / K10N78 Motherboard - ASRock K10N78 | Quick Installation Guide - Page 44
ihn ein 2.2 Installation des CPU-Lüfters und des Kühlkörpers Nachdem Sie die CPU auf diesem Motherboard installiert haben, müssen Sie einen größeren Kühlkörper und Lüfter installieren, um Wärme die Handbücher des CPULüfters und des Kühlkörpers. Deutsch 44 ASRock K10N78-1394 / K10N78 Motherboard - ASRock K10N78 | Quick Installation Guide - Page 45
und DDRII_3 installiert, kann es die Dual-Kanal-Speichertechnologie nicht aktivieren. 4. Es ist nicht zulässig, DDR in einen DDR2 Steckplatz zu installieren; andernfalls könnten Motherboard und DIMMs beschädigt werden. Deutsch 45 ASRock K10N78-1394 / K10N78 Motherboard - ASRock K10N78 | Quick Installation Guide - Page 46
zwingen, führt dies zu dauerhaften Schäden am Mainboard und am DIMM-Modul. Schritt 3: Drücken Sie die DIMM-Module fest in die Steckplätze, so dass die Halteklammern an beiden Enden des Moduls einschnappen und das DIMM-Modul fest an Ort und Stelle sitzt. 46 ASRock K10N78-1394 / K10N78 Motherboard - ASRock K10N78 | Quick Installation Guide - Page 47
vom Betriebssystem Windows® VistaTM unterstützt und für andere Betriebssysteme nicht verfügbar. Besuchen Sie unsere Website für künftige Treiber-Updates. GeForce® Boost teilen sich der Motherboard-Grafikprozessor und der eigenständige Grafikprozessor die 47 ASRock K10N78-1394 / K10N78 Motherboard - ASRock K10N78 | Quick Installation Guide - Page 48
Motherboard-Grafikprozessor Windows® VistaTM oder Windows® VistaTM 64 AMD Athlon X2 3800+ CPU Dual-Kanal-DDR2 667, 1024 MB x 2 256 MB oder 512 MB gemeinsam genutzter Speicher für Motherboard-Grafikprozessor Windows® VistaTM oder Windows 174.83 48 ASRock K10N78-1394 / K10N78 Motherboard Deutsch - ASRock K10N78 | Quick Installation Guide - Page 49
Motherboards; wählen Sie diejenige für Windows® VistaTM / VistaTM 64Bit.) ..\Drivers\Hybrid SLI driver\Vista * Derzeit gibt es den Hybrid SLITM-Treiber nur für die VistaTM 32 Version. Besuchen Sie künftig unsere Website, um nach Treiber-Updates zu suchen. 49 ASRock K10N78-1394 / K10N78 Motherboard - ASRock K10N78 | Quick Installation Guide - Page 50
Website, um nach Treiber-Updates zu Schritt 7. suchen. Starten Sie erneut Ihren Computer. Sie finden jetzt das Hybrid-Symbol in Ihrer Windows®-Taskleiste. Klicken Sie dieses Symbol an und wählen Sie den Menüpunkt "Save Power" (Energie sparen). Deutsch 50 ASRock K10N78-1394 / K10N78 Motherboard - ASRock K10N78 | Quick Installation Guide - Page 51
Treiber-Updates zu suchen. Schritt 5. Starten Sie erneut Ihren Computer. Sie finden jetzt das Hybrid-Symbol in Ihrer Windows®-Taskleiste. Klicken Sie dieses Symbol an und wählen Sie den Menüpunkt "Additional Displays" (Zusätzliche Anzeigen). Deutsch 51 ASRock K10N78-1394 / K10N78 Motherboard - ASRock K10N78 | Quick Installation Guide - Page 52
, den Jumper wieder zu entfernen, nachdem das CMOS gelöscht wurde. Wenn Sie den CMOSInhalt gleich nach dem Aktualisieren des BIOS löschen müssen, müssen Sie zuerst das System starten und dann wieder ausschalten, bevor Sie den CMOS-Inhalt löschen. 52 ASRock K10N78-1394 / K10N78 Motherboard Deutsch - ASRock K10N78 | Quick Installation Guide - Page 53
PORT5): siehe S.2/3 - No. 11) SATAII_1 (PORT 0) SATAII_3 (PORT 2) SATAII_5 (PORT 4) SATAII_2 (PORT 1) SATAII_4 (PORT 3) SATAII_6 (PORT 5) Diese sechs Serial ATAII(SATAII-)Verbínder unterst über eSATAII-und eSATAII-Installationsverfahren. 53 ASRock K10N78-1394 / K10N78 Motherboard Deutsch - ASRock K10N78 | Quick Installation Guide - Page 54
am Motherboard. Pro USB 2.0Anschlussleiste werden zwei USB 2.0-Ports unterstützt. Deutsch USB/WiFi-Stiftleiste Diese Stiftleiste kann zur (11-pol. USB?WIFI) Unterstützung von 2 USB 2.0- (siehe S.2/3 - No. 27) Anschlüssen verwendet 54 werden. Auch zur ASRock K10N78-1394 / K10N78 Motherboard - ASRock K10N78 | Quick Installation Guide - Page 55
äusevorderseite (9-Pin HD_AUDIO1) (siehe S.2/3, Punkt 26) Unterstützung der WiFi+APFunktion mit ASRock WiFi-802. 11g- oder WiFi-802.11n-Modul verwendbar, ein einfach zu benutzender Adapter müssen nicht an die AC'97-Audioleiste angeschlossen werden. 55 ASRock K10N78-1394 / K10N78 Motherboard Deutsch - ASRock K10N78 | Quick Installation Guide - Page 56
BIOS-Setup-Dienstprogramm auf. Wechseln Sie zu Erweiterte Einstellungen und wählen Sie Chipset-Konfiguration. Setzen Sie die Option Frontleistenkontrolle von [Automatisch] auf [Aktiviert]. F. Rufen Sie das Windows den schwarzen Draht dem Erdungsstift an. 56 ASRock K10N78-1394 / K10N78 Motherboard - ASRock K10N78 | Quick Installation Guide - Page 57
Punkt 34) Verbinden Sie die ATXStromversorgung mit diesem Header. 1 13 Obwohl dieses Motherboard einen 24-pol. ATX-Stromanschluss 12 24 bietet, kann es auch mit einem ein. 4 8 Deutsch Installation der 4-Pin ATX 12V Energieversorgung 1 ASRock K10N78-1394 / K10N78 Motherboard 5 57 - ASRock K10N78 | Quick Installation Guide - Page 58
einem vorgegebenem IEEE-1394 Port auf dem Ein-/ Ausgabe Paneel, gibt es einen IEEE-1394 Header (FRONT_1394) auf dieser Hauptplatine. Dieser IEEE-1394 Header kann einen IEEE-1394 Port unterstützen. können die von Ihnen installierten Treiber richtig arbeiten. 58 ASRock K10N78-1394 / K10N78 Motherboard - ASRock K10N78 | Quick Installation Guide - Page 59
Sie im BIOS-DIENSTPROGRAMM den Bildschirm „Erweitert" und „IDE-Konfiguration" auf. B. Setzen Sie die Option "SATA Operation Mode" (SATA-Betriebsmodus) auf [IDE]. SCHRITT 2: Installieren Sie Windows® VistaTM / VistaTM 64-Bit in Ihrem System. Deutsch 59 ASRock K10N78-1394 / K10N78 Motherboard - ASRock K10N78 | Quick Installation Guide - Page 60
-Plug-Funktionen SCHRITT 1: Konfigurieren Sie BIOS. A. Rufen Sie im BIOS-DIENSTPROGRAMM den Bildschirm „Erweitert" und "Wo möchten Sie Windows installieren?" erscheint, legen Sie bitte die ASRock Support CD in Ihr optisches Laufwerk Guide Deutsch 60 ASRock K10N78-1394 / K10N78 Motherboard - ASRock K10N78 | Quick Installation Guide - Page 61
der Support-CD, um die Menüs aufzurufen. Das SetupProgramm soll es Ihnen so leicht wie möglich machen. Es ist menügesteuert, d.h. Sie können in den verschiedenen Untermenüs Ihre Auswahl treffen und die Programme werden dann automatisch installiert. 61 ASRock K10N78-1394 / K10N78 Motherboard Deutsch - ASRock K10N78 | Quick Installation Guide - Page 62
le que vous utilisez. www.asrock.com/support/index.asp 1.1 Contenu du paquet Carte mère ASRock K10N78-1394 / K10N78 (Facteur de forme ATX: 12.0 pouces x 8.4 pouces, 30.5 cm x 21.3 cm) Guide d'installation rapide ASRock K10N78-1394 / K10N78 CD de soutien ASRock K10N78-1394 / K10N78 Un câble ruban IDE - ASRock K10N78 | Quick Installation Guide - Page 63
avec le port de DVI-D - Supporter 1080p Blu-ray(BD)/ lecteur de HD-DVD (voir ATTENTION 8) - NVIDIA PureVideoTM HD Prepration - 7.1 Son haute définition de première qualité CH Windows® VistaTM (codec audio ALC888) - HDMI Audio avec Chipset enclave Français 63 ASRock K10N78-1394 / K10N78 Motherboard - ASRock K10N78 | Quick Installation Guide - Page 64
- 2 x En-tête USB 2.0 (prendre en charge 4 ports USB 2.0 supplémentaires) (voir ATTENTION 12) - 1 x En-tête USB/WiFi (voir ATTENTION 13) BIOS - 8Mb BIOS AMI - BIOS AMI - Support du "Plug and Play" - Compatible pour événements de réveil ACPI 1.1 64 ASRock K10N78-1394 / K10N78 Motherboard - ASRock K10N78 | Quick Installation Guide - Page 65
ème est de HT3.0 (jusqu'à 5200 MT/s), et la fréquence HT Link dépend de la capacité du CPU AM2+ que vous choisissez. Veuillez vous référer à la liste des CPU pris en charge sur notre site Web pour plus d'informations. Site Web ASRock http://www.asrock.com 65 ASRock K10N78-1394 / K10N78 Motherboard - ASRock K10N78 | Quick Installation Guide - Page 66
pour les détails au sujet de l'eSATAII et de la procédure d'installation eSATAII. 12. La gestion de l'alimentation pour l'USB 2.0 fonctionne bien sous Microsoft® Windows® VistaTM 64-bit/ VistaTM / XP 64-bit / XP SP1; SP2. 66 ASRock K10N78-1394 / K10N78 Motherboard Français - ASRock K10N78 | Quick Installation Guide - Page 67
CPU/DRAM. Si votre systèmes devient instable une fois la fonction AM2 Boost activée, il est possible qu'elle ne s'applique pas à votre système. Vous pouvez choisir de désactiver cette fonction pour conserver la stabilité de votre système. 67 ASRock K10N78-1394 / K10N78 Motherboard Français - ASRock K10N78 | Quick Installation Guide - Page 68
, placez-le sur un support antistatique ou dans son sachet d'origine. 5. Lorsque vous placez les vis dans les orifices pour vis pour fixer la carte mère sur le châssis, ne serrez pas trop les vis ! Vous risquez sinon d'endommager la carte mère. 68 ASRock K10N78-1394 / K10N78 Motherboard Français - ASRock K10N78 | Quick Installation Guide - Page 69
coin de la prise. Etape 3. Insérez avec précaution le CPU dans le support jusqu'à ce qu'il soit bien en place. Le CPU ne peut être ins installation, veuillez vous référer aux manuels d'instruction sur le ventilateur du CPU et le dissipateur. Français 69 ASRock K10N78-1394 / K10N78 Motherboard - ASRock K10N78 | Quick Installation Guide - Page 70
m émoire [DIMM] La carte mère K10N78-1394 / K10N78 dispose de quatre emplacements DIMM DDR2 (Double Data Rate 2) de 240-broches, et supporte la Technologie de Mémoire à Canal Double. sur le slot DDR2; la carte mère et les DIMM pourraient être endommagés. 70 ASRock K10N78-1394 / K10N78 Motherboard - ASRock K10N78 | Quick Installation Guide - Page 71
jusqu'à ce que les clips de maintien situés aux deux extrémités se ferment complètement et que le module DIMM soit inséré correctement. 71 ASRock K10N78-1394 / K10N78 Motherboard - ASRock K10N78 | Quick Installation Guide - Page 72
y a 3 ports PCI et 3 ports PCI Express sur la carte mère K10N78-1394 / K10N78. Slots PCI: châssis à l'aide d'une vis. 2.5 Guide d'utilisation Hybrid SLITM Cette carte mère prend en prise en charge que par l'OS Windows® VistaTM, et n'est pas disponible ASRock K10N78-1394 / K10N78 Motherboard Français - ASRock K10N78 | Quick Installation Guide - Page 73
256MB ou 512MB de mémoire partagée pour le GPU de la carte mère Windows® VistaTM ou Windows® VistaTM 64 HybridPowerTM CPU Mémoire OS recommandés CPU AMD Athlon X2 3800+ DDR2 667 Double canal, 1024MB x 2 256MB ou 512MB -ASUS-9800GX2/512M 174.83 Français 73 ASRock K10N78-1394 / K10N78 Motherboard - ASRock K10N78 | Quick Installation Guide - Page 74
site Web pour de futures mises à jour. Redémarrez votre ordinateur. Vous trouverez ensuite l'icône Hybrid sur votre barre de tâches Windows®. Le réglage par défaut est le mode GeForce® Boost (Performances Boost). Vous n'avez plus à régler la configuration. 74 ASRock K10N78-1394 / K10N78 Motherboard - ASRock K10N78 | Quick Installation Guide - Page 75
l'icône Hybrid sur votre barre de tâches Windows®. Veuillez cliquer sur l'icône et choisir l'élément "Économiser de l'énergie". Français Étape 8. Cliquez sur le bureau. Votre système bascule ensuite en mode HybridPowerTM (Économiser de l'énergie). 75 ASRock K10N78-1394 / K10N78 Motherboard - ASRock K10N78 | Quick Installation Guide - Page 76
icône Hybrid sur votre barre de tâches Windows®. Veuillez cliquer sur l'icône et choisir l'élément "Affichages supplémentaires". Étape 6. Cliquez sur le bureau. Votre système bascule ensuite en mode Deux moniteurs (Affichages supplémentaires). Français 76 ASRock K10N78-1394 / K10N78 Motherboard - ASRock K10N78 | Quick Installation Guide - Page 77
avoir mis le BIOS à jour. Si vous avez besoin d'effacer la CMOS lorsque vous avez fini de mettre le BIOS à jour, vous devez d'abord initialiser le système, puis le mettre hors tension avant de procéder à l'opération d'effacement de la CMOS. Français 77 ASRock K10N78-1394 / K10N78 Motherboard - ASRock K10N78 | Quick Installation Guide - Page 78
vous reporter aux instructions du fabricant de votre connecte au connecteur eSATAII pour supporter eSATAII device. Veuillez lire "SATAII Interface Introduction" sur le page 33 pour details concernant eSATAII et les procedures d'installation de eSATAII. 78 ASRock K10N78-1394 / K10N78 Motherboard - ASRock K10N78 | Quick Installation Guide - Page 79
peut être utilisée (USB/WIFI br.11) pour prendre en charge 2 ports (voir p.2/3 No. 27) USB 2.0. Elle peut également servir à prendre en charge la fonction WiFi+AP avec le module ASRock WiFi-802.11g ou WiFi- 802.11n, un adaptateur réseau 7 9 ASRock K10N78-1394 / K10N78 Motherboard Français - ASRock K10N78 | Quick Installation Guide - Page 80
audio Realtek HD. Pour Windows® XP / XP 64-bit OS: Cliquer sur « E/S audio», sélectionner « Paramètres du connecteur » , choisir « Désactiver la détection de la prise du panneau de commande » et sauvegarder les changements en cliquant sur « OK ». 80 ASRock K10N78-1394 / K10N78 Motherboard Français - ASRock K10N78 | Quick Installation Guide - Page 81
Pour les SE Windows® VistaTM / offre un support de connecter le ventilateur de CPU à 3 broches au connecteur du ventilateur de CPU sur cette carte mère, veuillez le connecter aux broches 1-3. Installation de ventilateur à 3 broches Broches 1-3 connectées 81 ASRock K10N78-1394 / K10N78 Motherboard - ASRock K10N78 | Quick Installation Guide - Page 82
port COM. Header de IEEE 1394 (FRONT_1394 br. 9) (voir p.2 No. 30) Sauf un port de default IEEE 1394 sur le panel I/O, il y a un header de IEEE1394 (FRONT_1394) sur cette carte mere. Le header de IEEE 1394 peut supporter un port de IEEE 1394. Français 82 ASRock K10N78-1394 / K10N78 Motherboard - ASRock K10N78 | Quick Installation Guide - Page 83
me de se connecter au un télé briches) 2.8 Guide d'installation des Windows® XP / XP 64-bit sans fonctions RAID Si vous voulez installer Windows® XP / XP 64-bit sur vos disques durs SATA / SATAII sans fonctions RAID, veuillez suivre la procédure ci-dessous. 83 ASRock K10N78-1394 / K10N78 Motherboard - ASRock K10N78 | Quick Installation Guide - Page 84
Windows ?", veuillez insérer le CD Support d' ASRock dans votre lecteur optique, et cliquer sur le bouton "Charger le pilote" en bas à gauche pour charger les pilotes AHCI NVIDIA®. Les pilotes AHCI NVIDIA® sont sous le chemin 8 4 suivant du CD Support: ASRock K10N78-1394 / K10N78 Motherboard - ASRock K10N78 | Quick Installation Guide - Page 85
surcadençage plus stable. Veuillez vous reporter à l'avertissement en page 65 pour connaître les risques liés à l'overclocking avant d'appliquer la technologie Untied Overclocking. 85 ASRock K10N78-1394 / K10N78 Motherboard Français - ASRock K10N78 | Quick Installation Guide - Page 86
le BIOS, veuillez consulter le Guide de l'utilisateur (fichier PDF) dans le CD technique. 4. Informations sur le CD de support Cette carte mère supporte divers systèmes d'exploitation Microsoft® Windows®: -cliquez dessus pour afficher les menus. 86 ASRock K10N78-1394 / K10N78 Motherboard Français - ASRock K10N78 | Quick Installation Guide - Page 87
che si sta usando. www.asrock.com/support/index.asp 1.1 Contenuto della confezione Scheda madre ASRock K10N78-1394 / K10N78 (ATX Form Factor: 12.0-in x 8.4-in, 30.5 cm x 21.3 cm) Guida di installazione rapida ASRock K10N78-1394 / K10N78 CD di supporto ASRock K10N78-1394 / K10N78 Un cavo IDE 80-pin - ASRock K10N78 | Quick Installation Guide - Page 88
per alimentazione CPU (K10N78-1394) - Supporto per processori Socket AM2+ / AM2: AMD PhenomTM FX / Windows® VistaTM Premium Level (ALC888 Audio Codec) - Chipset HDMI Audio incorporato - Gigabit LAN 10/100/1000 Mb/s - Giga PHY Realtek RTL8211BCL-GR Italiano 88 ASRock K10N78-1394 / K10N78 Motherboard - ASRock K10N78 | Quick Installation Guide - Page 89
- 8Mb AMI BIOS - Suppor AMI legal BIOS - Supporta "Plug and Play" - Compatibile con ACPI 1.1 wake up events - Supporta jumperfree - Supporta SMBIOS 2.3.1 - Regolazione multipla HTT della tensione per CPU, DRAM, Chipset Core - Smart BIOS supportato 89 ASRock K10N78-1394 / K10N78 Motherboard Italiano - ASRock K10N78 | Quick Installation Guide - Page 90
Windows BIOS supportate, sul nostro sito, per informazioni dettagliate. Sito ASRock http://www.asrock.com 2. Questa scheda madre supporta la tecnologia overclocking "slegata". Per i dettagli leggere "Tecnologia di Untied Overclocking" a pagina 110. Italiano 90 ASRock K10N78-1394 / K10N78 Motherboard - ASRock K10N78 | Quick Installation Guide - Page 91
possono essere usati per supportare 2 porte USB 2.0. Possono anche essere usati per supportare la funzione WiFi+AP col modulo ASRock WiFi-802.11g o WiFi-802.11n una scheda WLAN (Wireless Local Area Network) facile da usare. Consente di creare un 91 ASRock K10N78-1394 / K10N78 Motherboard Italiano - ASRock K10N78 | Quick Installation Guide - Page 92
per tutte le configurazioni CPU/DRAM. Se il sistema è instabile dopo avere abilitato la funzione AM2 Boost, significa che la funzione non è adatta al sistema. Si può scegliere di disabilitare la funzione per mantenere la stabilità del sistema. 92 ASRock K10N78-1394 / K10N78 Motherboard Italiano - ASRock K10N78 | Quick Installation Guide - Page 93
componente. 5. Nell'usare i giraviti per fissare la scheda madre al telaio non serrare eccessivamente le viti! Altrimenti si rischia di danneggiare la scheda madre. 93 ASRock K10N78-1394 / K10N78 Motherboard Italiano - ASRock K10N78 | Quick Installation Guide - Page 94
due. Quindi collegare la ventolina CPU al connettore CPU FAN (CPU_FAN1, fare riferimento a pagina 2/3, Numero 3). Per eseguire un'installazione appropriata, fare riferimento al manuale d'istruzioni della ventolina CPU e del dispersore di calore. Italiano 94 ASRock K10N78-1394 / K10N78 Motherboard - ASRock K10N78 | Quick Installation Guide - Page 95
2.3 Installazione dei moduli di memoria (DIMM) La scheda madre K10N78-1394 / K10N78 fornisce quattro alloggiamenti DIMM DDR2 (Double Data Rate 2) a 240 pin, e supporta la DDR nello slot DDR2, altrimenti si possono danneggiare questa scheda madre e la DIMM. 95 ASRock K10N78-1394 / K10N78 Motherboard - ASRock K10N78 | Quick Installation Guide - Page 96
DIMM nello slot fino a far scattare completamente in posizione i fermagli di ritegno alle due estremità e fino ad installare correttamente la DIMM nella sua sede. 96 ASRock K10N78-1394 / K10N78 Motherboard - ASRock K10N78 | Quick Installation Guide - Page 97
supportata solamente dal sistema operativo Windows® VistaTM, e non è disponibile per altri sistemi operativi. In futuro, visitare il nostro sito web per il driver aggiornato. GeForce® Boost SLITM consente di migliorare le prestazioni aggiuntive. 97 ASRock K10N78-1394 / K10N78 Motherboard Italiano - ASRock K10N78 | Quick Installation Guide - Page 98
Modello Driver Gigabyte GV-NX84G256H 174.83 Foxconn FV-N84SM2DT 174.83 Leadtek WinFast PX8400 GS TDH 174.83 Gigabyte GV-NX85T256H 174.83 HybridPowerTM Fornitore Chipset NVIDIA GeForce 9800GX2 Modello Driver ASUS PCIE-ASUS-9800GX2/512M 174.83 98 ASRock K10N78-1394 / K10N78 Motherboard - ASRock K10N78 | Quick Installation Guide - Page 99
aggiornamenti. Riavviare il computer. L'icona di Hybrid viene visualizzata nella barra delle attività di Windows®. L'impostazione predefinita è la modalità GeForce® Boost (Prestazioni boost). Non è necessario eseguire ulteriori configurazioni. Italiano 99 ASRock K10N78-1394 / K10N78 Motherboard - ASRock K10N78 | Quick Installation Guide - Page 100
di Hybrid viene visualizzata nella barra delle attività di Windows®. Selezionare l'icona quindi selezionare la voce "Risparmio energetico". Italiano Fase 8. Fare clic sul desktop. Il sistema passa alla modalità HybridPowerTM (Risparmio energetico). 100 ASRock K10N78-1394 / K10N78 Motherboard - ASRock K10N78 | Quick Installation Guide - Page 101
icona di Hybrid viene visualizzata nella barra delle attività di Windows®. Selezionare l'icona quindi selezionare la voce "Display aggiuntivo". Fase 6. Fare clic sul desktop. Il sistema passa alla modalità Due monitor (Display aggiuntivo). Italiano ASRock K10N78-1394 / K10N78 Motherboard 101 - ASRock K10N78 | Quick Installation Guide - Page 102
cancellare la CMOS subito dopo aver aggiornato il BIOS. Se è necessario cancellare la CMOS una volta completato l'aggiornamento del BIOS, è necessario riavviare prima il sistema, e poi spegnerlo prima di procedere alla cancellazione della CMOS. Italiano 102 ASRock K10N78-1394 / K10N78 Motherboard - ASRock K10N78 | Quick Installation Guide - Page 103
(PORT5): vedi p.2/3 Nr. 11) SATAII_1 (PORT 0) SATAII_3 (PORT 2) SATAII_5 (PORT 4) SATAII_2 (PORT 1) SATAII_4 (PORT 3) SATAII_6 (PORT 5) Questi sei connettori Serial ATA (SATAII) procedure di installazione di eSATAII e di eSATAII. ASRock K10N78-1394 / K10N78 Motherboard 103 Italiano - ASRock K10N78 | Quick Installation Guide - Page 104
due porte USB 2.0. Italiano USB/WiFi Header Questo collettore può essere (11-pin USB/WIFI) usato per supportare 2 porte (vedi p.2/3 Nr. 27) USB 2.0. Può anche essere usato per supportare la funzione WiFi+AP col modulo 104 ASRock WiFi-802.11g o WiFiASRock K10N78-1394 / K10N78 Motherboard - ASRock K10N78 | Quick Installation Guide - Page 105
nostro manuale e del manuale del di impostazione BIOS. Entrare Windows® XP / XP 64-bit OS: Fare clic su "Audio I/O", selezionare "Impostazioni connettore" , scegliere "Disattiva rilevazione presa pannello anteriore" e salvare la modifica facendo clic su "OK". ASRock K10N78-1394 / K10N78 Motherboard - ASRock K10N78 | Quick Installation Guide - Page 106
icona "Muto" in "Microfono anteriore" di "Riproduzione". Per il sistema operative Windows® VistaTM / VistaTM 64-bit: Andare alla scheda "Microfono anteriore" nel pannello piedini 1-3. Piedini 1-3 collegati Installazione della ventola a 3 piedini 106 ASRock K10N78-1394 / K10N78 Motherboard Italiano - ASRock K10N78 | Quick Installation Guide - Page 107
porta di default (9-pin FRONT_1394) (vedi p.2 item 34 o p.3 item 33) IEEE 1394 sul pannello I/O, e' presente un'intestazione IEEE 1394 (FRONT_1394) sulla scheda madre. Questa intestazione IEEE 1394 puo' supportare una porta IEEE 1394. ati dini ASRock K10N78-1394 / K10N78 Motherboard 107 - ASRock K10N78 | Quick Installation Guide - Page 108
Se si desidera installare Windows® XP / Windows® XP 64 bit sui dischi rigidi SATA / SATAII senza funzioni RAID, seguire le istruzioni in basso. Utilizzo dei dischi rigidi SATA / SATAII / dei dispositivi eSATAII privi di funzioni NCQ e Hot Plug 108 ASRock K10N78-1394 / K10N78 Motherboard Italiano - ASRock K10N78 | Quick Installation Guide - Page 109
-bit.) .. \ I386 \ AHCI_Vista (per utenti Windows® VistaTM) .. \ AMD64 \ AHCI_Vista64 (per utenti Windows® VistaTM 64-bit) Dopodiché, inserire di nuovo il disco Windows® VistaTM / VistaTM 64-bit nell'unità ottica per continuare l'installazione. Italiano ASRock K10N78-1394 / K10N78 Motherboard 109 - ASRock K10N78 | Quick Installation Guide - Page 110
: ..\ RAID Installation Guide (Guida all'installazione il Setup del BIOS, fare riferimento al Manuale dell'Utente ( Windows®: XP / Centro multimediale XP / XP 64 bit / VistaTM / VistaTM 64-bit. Il CD di supporto a corredo della scheda madre contiene i driver ASRock K10N78-1394 / K10N78 Motherboard - ASRock K10N78 | Quick Installation Guide - Page 111
/ K10N78 Una cinta de datos IDE de conducción 80 Ultra ATA 66/100/133 Una cinta de datos para una unidad de disco de 3,5" Dos cables de datos Serial ATA (SATA) (Opcional) Un cables de alimentación HDD Serial ATA (SATA) (Opcional) Una protección I/O Español ASRock K10N78-1394 / K10N78 Motherboard - ASRock K10N78 | Quick Installation Guide - Page 112
ón de CPU (K10N78-1394) - Soporte para procesadores con zócalo AM2+ y AM2: AMD PhenomTM FX, Phenom Windows® VistaTM (Códec de sonido ALC888) - Chipset encajado en HDMI Audio - Gigabit LAN 10/100/1000 Mb/s - Giga PHY Realtek RTL8211BCL-GR Español 112 ASRock K10N78-1394 / K10N78 Motherboard - ASRock K10N78 | Quick Installation Guide - Page 113
(ver ATENCIÓN 13) - 8Mb AMI BIOS - AMI legal BIOS - Soporta "Plug and Play" - ACPI 1.1 compliance wake up events - Soporta "jumper free setup" - Soporta SMBIOS 2.3.1 - Multiajuste de CPU, DRAM, núcleo de conjunto de chips, Voltaje HTT ASRock K10N78-1394 / K10N78 Motherboard 113 Español - ASRock K10N78 | Quick Installation Guide - Page 114
OS - En conformidad con Microsoft® Windows® XP / XP Media Center / incluido el ajuste del BIOS, aplicando la tecnolog AM2+ que adopte. Consulte la lista de CPU compatible en nuestra página web para más información. Página web de ASRock http://www.asrock.com ASRock K10N78-1394 / K10N78 Motherboard - ASRock K10N78 | Quick Installation Guide - Page 115
admita o no se admita, depende de la configuración AM2+ Procesador que adopte. Si desea adoptar el módulo uso, consulte el "Hybrid SLITM Operation Guide" (Manual de uso de Hybrid SLITM) en la Windows® VistaTM 64 bits / VistaTM / XP 64 bits / XP SP1; SP2. ASRock K10N78-1394 / K10N78 Motherboard 115 - ASRock K10N78 | Quick Installation Guide - Page 116
la configuración de BIOS. Visite nuestro sitio apropiadamente y desconecte el cable de alimentación, a AM2 Boost, es posible que dicha función no se pueda aplicar a aquél. Si lo desea, puede deshabilitar la función para mantener la estabilidad del sistema. ASRock K10N78-1394 / K10N78 Motherboard - ASRock K10N78 | Quick Installation Guide - Page 117
instalar o extraer cualquier componente, asegúrese de que la alimentación está desactivada o de que el cable de alimentación está desconectado de la fuente de alimentación. Si no lo hace podría provocar serios da Eso podría dañar la placa madre. Español ASRock K10N78-1394 / K10N78 Motherboard 117 - ASRock K10N78 | Quick Installation Guide - Page 118
buen contacto entre sí. Conecte entonces el ventilador de la CPU al conector CPU FAN (CPU_FAN1, consulte Página 2/3, N. 3). Para realizar la instalación correctamente, consulte el manual de instrucciones del ventilador de la CPU y el radiador. Español 118 ASRock K10N78-1394 / K10N78 Motherboard - ASRock K10N78 | Quick Installation Guide - Page 119
2.3 Instalación de Memoria La placa K10N78-1394 / K10N78 ofrece cuatro ranuras DIMM DDR2 de 240 pines, y soporta Tecnología de Memoria de Doble Canal. Para la la ranura DDR2; si lo hace, esta placa base y los módulos DIMM pueden resultar dañados. Español ASRock K10N78-1394 / K10N78 Motherboard 119 - ASRock K10N78 | Quick Installation Guide - Page 120
de la ranura hasta que los clips de sujeción de ambos lados queden completamente introducidos en su sitio y la DIMM se haya asentado apropiadamente. 120 ASRock K10N78-1394 / K10N78 Motherboard - ASRock K10N78 | Quick Installation Guide - Page 121
de que la fuente de alimentación está apagada o el cable de alimentación desconectado. Lea la documentación que acompaña a actualidad, la tecnología NVIDIA® Hybrid SLITM sólo es compatible con Windows® OS, y no está. Visite nuestro sitio web para más ASRock K10N78-1394 / K10N78 Motherboard 121 - ASRock K10N78 | Quick Installation Guide - Page 122
CPU AMD Phenom Doble canal DDR2 800, 1024MB x 2 256Mb o 512MB de memoria compartida de GPU de placa base Windows® VistaTM o Windows® VistaTM 64 HybridPowerTM CPU Memoria SO sugeridos CPU AMD y configuración de acuerdo con el modo que desee utilizar. 122 ASRock K10N78-1394 / K10N78 Motherboard - ASRock K10N78 | Quick Installation Guide - Page 123
y salga de la configuración de BIOS. B. Apague su sistema. C. Cambie el cable de su monitor al conector de Windows®. La configuración predeterminada es el modo GeForce® Boost (rendimiento aumentado). No necesitará volver a ajustar la configuración. Español ASRock K10N78-1394 / K10N78 Motherboard - ASRock K10N78 | Quick Installation Guide - Page 124
ón de BIOS. Apague su sistema. Conecte el cable del monitor Windows®. Haga clic en el icono y seleccione la opción " Ahorro de energía". Español Paso 8. Haga clic en el escritorio. Su sistema habrá cambiado al modo HybridPowerTM (ahorro de energía). 124 ASRock K10N78-1394 / K10N78 Motherboard - ASRock K10N78 | Quick Installation Guide - Page 125
. Podrá ver el icono de Hybrid en la barra de tareas de Windows®. Haga clic en el icono y seleccione la opción "Additional Displays". Paso 6. Haga clic en el escritorio. Su sistema cambiará al modo Dual Monitors (pantallas adicionales). Español ASRock K10N78-1394 / K10N78 Motherboard 125 - ASRock K10N78 | Quick Installation Guide - Page 126
la fábrica, por favor apague el computador y desconecte el cable de la fuente de electricidad, utilice una cubierta de jumper para BIOS, debe arrancar primero el sistema y, a continuación, apagarlo antes de realizar la acción de borrado de CMOS. Español 126 ASRock K10N78-1394 / K10N78 Motherboard - ASRock K10N78 | Quick Installation Guide - Page 127
el contacto 1 Atención: Asegúrese que la banda roja del cable queda situado en el mismo lado que el contacto 1 de la 11) SATAII_1 (PORT 0) SATAII_3 (PORT 2) SATAII_5 (PORT 4) SATAII_2 (PORT 1) SATAII_4 (PORT 3) SATAII_6 (PORT 5) Estos ASRock K10N78-1394 / K10N78 Motherboard 127 Español - ASRock K10N78 | Quick Installation Guide - Page 128
duro de SATA / SATAII o el conectador de SATAII en esta placa base. Para K10N78-1394, pueda también utilizar el cable de los datos de SATA para conectar el conectador de SATAII_6 (PORT5) y el N. 27) 2.0. También puede usarse 128 para soportar la función ASRock K10N78-1394 / K10N78 Motherboard - ASRock K10N78 | Quick Installation Guide - Page 129
. En el panel de control frontal cambie la opción [Automático] a [Habilitado]. F. Entre en el sistema Windows. Haga clic en el icono de la barra de tareas situada en la parte inferior derecha para entrar en el Administrador de audio HD Realtek. ASRock K10N78-1394 / K10N78 Motherboard 129 Español - ASRock K10N78 | Quick Installation Guide - Page 130
operativo Windows® cable del ventilador del chasis a este conector y haga coincidir el cable negro con el conector de tierra. Conecte el cable del ventilador de la CPU a este conector y (4haga coincidir el cable negro con el conector de tierra. Español 130 ASRock K10N78-1394 / K10N78 Motherboard - ASRock K10N78 | Quick Installation Guide - Page 131
puerto COM (9-pin COM1) (vea p.2, No. 34 o p.3, No. 33) Este cabezal del puerto COM se utiliza para admitir un módulo de puerto COM. Español ASRock K10N78-1394 / K10N78 Motherboard 131 - ASRock K10N78 | Quick Installation Guide - Page 132
Cable HDMI_SPDIF (Opcional) C B A Además de un puerto de IEEE 1394 del defecto en el panel de I/O, hay un jefe de IEEE 1394 (FRONT_1394) en esta placa base. Este jefe de IEEE 1394 puede apoyar un puerto de IEEE 1394 funcionar correctamente. Español 132 ASRock K10N78-1394 / K10N78 Motherboard - ASRock K10N78 | Quick Installation Guide - Page 133
Utilidad de configuración de BIOS pantalla de Avanzada Configuración IDE. B. Establezca la opción "SATA Operation Mode"(Modo de funcionamiento SATA) en [IDE]. PASO 2: Instale el sistema operativo Windows® VistaTM / VistaTM 64 bits en su sistema. Español ASRock K10N78-1394 / K10N78 Motherboard 133 - ASRock K10N78 | Quick Installation Guide - Page 134
Windows® XP / XP 64-bit / VistaTM / VistaTM 64-bit OS en su disco duro SATA / SATAII con funciones RAID, consulte la documentación de la ruta siguiente del CD de soporte para conocer el procedimiento detallado: ..\ RAID Installation Guide Español 134 ASRock K10N78-1394 / K10N78 Motherboard - ASRock K10N78 | Quick Installation Guide - Page 135
la BIOS, por favor refiérase al Manual del Usuario (archivo PDF) contenido en el CD. 4.Información de Software Support CD Esta placa-base soporta diversos tipos de sistema operativo Windows®: el archivo ASSETUP.EXE para iniciar la instalación. Español ASRock K10N78-1394 / K10N78 Motherboard 135 - ASRock K10N78 | Quick Installation Guide - Page 136
136 ASRock K10N78-1394 / K10N78 Motherboard - ASRock K10N78 | Quick Installation Guide - Page 137
'' ® ® ® ® ® ASRock K10N78-1394 / K10N78 Motherboard 137 - ASRock K10N78 | Quick Installation Guide - Page 138
138 ASRock K10N78-1394 / K10N78 Motherboard - ASRock K10N78 | Quick Installation Guide - Page 139
® " " ASRock K10N78-1394 / K10N78 Motherboard 139 - ASRock K10N78 | Quick Installation Guide - Page 140
® ® ® ® ® " " ® " " " " " " ® 140 ASRock K10N78-1394 / K10N78 Motherboard - ASRock K10N78 | Quick Installation Guide - Page 141
ASRock K10N78-1394 / K10N78 Motherboard 141 - ASRock K10N78 | Quick Installation Guide - Page 142
142 ASRock K10N78-1394 / K10N78 Motherboard - ASRock K10N78 | Quick Installation Guide - Page 143
ASRock K10N78-1394 / K10N78 Motherboard 143 - ASRock K10N78 | Quick Installation Guide - Page 144
DDRII_1 DDRII_2 DDRII_3 DDRII_4 ( ) ( ) ( ) ( ) (1) - - (2) - - (3) " " 144 ASRock K10N78-1394 / K10N78 Motherboard - ASRock K10N78 | Quick Installation Guide - Page 145
ASRock K10N78-1394 / K10N78 Motherboard 145 - ASRock K10N78 | Quick Installation Guide - Page 146
® ® ® ® ® ® ® ® ® ® ® ® ® ® ® 146 ASRock K10N78-1394 / K10N78 Motherboard - ASRock K10N78 | Quick Installation Guide - Page 147
® ® ® ® ® ® ® ® ASRock K10N78-1394 / K10N78 Motherboard 147 - ASRock K10N78 | Quick Installation Guide - Page 148
® ® ® ® " " " " " " " " " ® ® ..\ \ ® \ ® 148 ASRock K10N78-1394 / K10N78 Motherboard - ASRock K10N78 | Quick Installation Guide - Page 149
" " " " " " " " " " ® ..\ \ \ ® " " ASRock K10N78-1394 / K10N78 Motherboard 149 - ASRock K10N78 | Quick Installation Guide - Page 150
" " " " " " " " ® ..\ \ " \ ® " 150 ASRock K10N78-1394 / K10N78 Motherboard - ASRock K10N78 | Quick Installation Guide - Page 151
"" "" "" "" ASRock K10N78-1394 / K10N78 Motherboard 151 - ASRock K10N78 | Quick Installation Guide - Page 152
152 ASRock K10N78-1394 / K10N78 Motherboard SATAII_1 (PORT 0) SATAII_3 (PORT 2) SATAII_5 (PORT 4) SATAII_2 (PORT 1) SATAII_4 (PORT 3) SATAII_6 (PORT 5) - ASRock K10N78 | Quick Installation Guide - Page 153
ASRock K10N78-1394 / K10N78 Motherboard eSATAII_TOP 153 - ASRock K10N78 | Quick Installation Guide - Page 154
CD1 154 ® ® ® ASRock K10N78-1394 / K10N78 Motherboard - ASRock K10N78 | Quick Installation Guide - Page 155
® " " " " " " ® " " " "" " 4 3 2 1 12 24 1 13 ASRock K10N78-1394 / K10N78 Motherboard 155 - ASRock K10N78 | Quick Installation Guide - Page 156
4 8 1 5 12 24 1 13 4 8 1 5 156 ASRock K10N78-1394 / K10N78 Motherboard - ASRock K10N78 | Quick Installation Guide - Page 157
12 24 1 13 4 8 1 5 C B A ® ® ® ® ® ® ® ® ASRock K10N78-1394 / K10N78 Motherboard 157 - ASRock K10N78 | Quick Installation Guide - Page 158
® ® ® ® ® ® ® ® ® \ \ \ \ ® ® ® ® 158 ® \ ASRock K10N78-1394 / K10N78 Motherboard - ASRock K10N78 | Quick Installation Guide - Page 159
" " " " " " \\ ASRock K10N78-1394 / K10N78 Motherboard 159 - ASRock K10N78 | Quick Installation Guide - Page 160
160 ASRock K10N78-1394 / K10N78 Motherboard - ASRock K10N78 | Quick Installation Guide - Page 161
'' ® ® ® ® ® ASRock K10N78-1394 / K10N78 Motherboard 161 - ASRock K10N78 | Quick Installation Guide - Page 162
162 ASRock K10N78-1394 / K10N78 Motherboard - ASRock K10N78 | Quick Installation Guide - Page 163
® ® ® " " ASRock K10N78-1394 / K10N78 Motherboard 163 - ASRock K10N78 | Quick Installation Guide - Page 164
® ® ® ® ® ® ® ® TM TM 164 ASRock K10N78-1394 / K10N78 Motherboard - ASRock K10N78 | Quick Installation Guide - Page 165
® ASRock K10N78-1394 / K10N78 Motherboard 165 - ASRock K10N78 | Quick Installation Guide - Page 166
166 ASRock K10N78-1394 / K10N78 Motherboard - ASRock K10N78 | Quick Installation Guide - Page 167
ASRock K10N78-1394 / K10N78 Motherboard 167 - ASRock K10N78 | Quick Installation Guide - Page 168
168 ASRock K10N78-1394 / K10N78 Motherboard - ASRock K10N78 | Quick Installation Guide - Page 169
ASRock K10N78-1394 / K10N78 Motherboard 169 - ASRock K10N78 | Quick Installation Guide - Page 170
® ® ® ® ® ® ® ® 170 ® ® ® ® ® ® ® ASRock K10N78-1394 / K10N78 Motherboard - ASRock K10N78 | Quick Installation Guide - Page 171
® ® ® ® ® ® ® ® ASRock K10N78-1394 / K10N78 Motherboard 171 - ASRock K10N78 | Quick Installation Guide - Page 172
® ® ® ® ® 172 \ \ ® ® \ ® ASRock K10N78-1394 / K10N78 Motherboard - ASRock K10N78 | Quick Installation Guide - Page 173
\ \ ® \ ® ASRock K10N78-1394 / K10N78 Motherboard 173 - ASRock K10N78 | Quick Installation Guide - Page 174
\ \ ® \ ® 174 ASRock K10N78-1394 / K10N78 Motherboard - ASRock K10N78 | Quick Installation Guide - Page 175
ASRock K10N78-1394 / K10N78 Motherboard 175 - ASRock K10N78 | Quick Installation Guide - Page 176
ASRock K10N78-1394 / K10N78 Motherboard 176 eSATAII_TOP SATAII_1 (PORT 0) SATAII_3 (PORT 2) SATAII_5 (PORT 4) SATAII_2 (PORT 1) SATAII_4 (PORT 3) SATAII_6 (PORT 5) - ASRock K10N78 | Quick Installation Guide - Page 177
CD1 ASRock K10N78-1394 / K10N78 Motherboard 177 - ASRock K10N78 | Quick Installation Guide - Page 178
® ® ® ® ® 178 ASRock K10N78-1394 / K10N78 Motherboard - ASRock K10N78 | Quick Installation Guide - Page 179
4 3 2 1 12 24 1 13 4 8 1 5 12 24 1 13 4 1 ASRock K10N78-1394 / K10N78 Motherboard 8 5 179 - ASRock K10N78 | Quick Installation Guide - Page 180
C B A 180 ® ® ASRock K10N78-1394 / K10N78 Motherboard - ASRock K10N78 | Quick Installation Guide - Page 181
® ® ® ® ® ® ® ® ® ® ® ASRock K10N78-1394 / K10N78 Motherboard 181 - ASRock K10N78 | Quick Installation Guide - Page 182
® \ \ \ \ ® \ ® ® ® ® 182 ASRock K10N78-1394 / K10N78 Motherboard - ASRock K10N78 | Quick Installation Guide - Page 183
® ® TM TM ASRock K10N78-1394 / K10N78 Motherboard 183 - ASRock K10N78 | Quick Installation Guide - Page 184
184 ASRock K10N78-1394 / K10N78 Motherboard - ASRock K10N78 | Quick Installation Guide - Page 185
'' ™ ® ® ® ® ® ASRock K10N78-1394 / K10N78 Motherboard 185 - ASRock K10N78 | Quick Installation Guide - Page 186
186 ASRock K10N78-1394 / K10N78 Motherboard - ASRock K10N78 | Quick Installation Guide - Page 187
® ® ® ® ® ® ASRock K10N78-1394 / K10N78 Motherboard 187 - ASRock K10N78 | Quick Installation Guide - Page 188
® ® ® ® 188 ASRock K10N78-1394 / K10N78 Motherboard - ASRock K10N78 | Quick Installation Guide - Page 189
ASRock K10N78-1394 / K10N78 Motherboard 189 - ASRock K10N78 | Quick Installation Guide - Page 190
190 ASRock K10N78-1394 / K10N78 Motherboard - ASRock K10N78 | Quick Installation Guide - Page 191
DDRII_1 DDRII_2 DDRII_3 DDRII_4 ( )( )( )( ) (1) - - (2) - - (3) ASRock K10N78-1394 / K10N78 Motherboard 191 - ASRock K10N78 | Quick Installation Guide - Page 192
192 ASRock K10N78-1394 / K10N78 Motherboard - ASRock K10N78 | Quick Installation Guide - Page 193
ASRock K10N78-1394 / K10N78 Motherboard 193 - ASRock K10N78 | Quick Installation Guide - Page 194
® ® ® ® ® ® ® ® ® ® ® ® ® ® ® ® ® ® ® ® ® 194 ASRock K10N78-1394 / K10N78 Motherboard - ASRock K10N78 | Quick Installation Guide - Page 195
-N84SM2DT Leadtek WinFast PX8400 GS TDH Gigabyte GV-NX85T256H ÅX°Êµ{§Ç 174.83 174.83 174.83 174.83 ¼t «¬¸¹ NVIDIA GeForce9800GX2 ASUSPCIE-ASUS-9800GX2/512M ÅX°Êµ{§Ç 174.83 ® ® ® ® ® ® ® ASRock K10N78-1394 / K10N78 Motherboard 195 - ASRock K10N78 | Quick Installation Guide - Page 196
® ® ® ® 196 ASRock K10N78-1394 / K10N78 Motherboard - ASRock K10N78 | Quick Installation Guide - Page 197
® ® ASRock K10N78-1394 / K10N78 Motherboard 197 - ASRock K10N78 | Quick Installation Guide - Page 198
198 ASRock K10N78-1394 / K10N78 Motherboard - ASRock K10N78 | Quick Installation Guide - Page 199
ASRock K10N78-1394 / K10N78 Motherboard 199 eSATAII_TOP SATAII_1 (PORT 0) SATAII_3 (PORT 2) SATAII_5 (PORT 4) SATAII_2 (PORT 1) SATAII_4 (PORT 3) SATAII_6 (PORT 5) - ASRock K10N78 | Quick Installation Guide - Page 200
CD1 200 ASRock K10N78-1394 / K10N78 Motherboard - ASRock K10N78 | Quick Installation Guide - Page 201
® ® ® ® 4 3 2 1 ASRock K10N78-1394 / K10N78 Motherboard 201 - ASRock K10N78 | Quick Installation Guide - Page 202
12 24 1 13 4 8 1 5 12 24 1 13 4 8 1 5 202 ASRock K10N78-1394 / K10N78 Motherboard - ASRock K10N78 | Quick Installation Guide - Page 203
12 24 1 13 4 8 1 5 C B A ® ® ® ® ® ® ® ® ® ® ® ® ASRock K10N78-1394 / K10N78 Motherboard 203 - ASRock K10N78 | Quick Installation Guide - Page 204
® ® ® ® ® ® ® ® ® ® ® ® ® ® ® 204 ASRock K10N78-1394 / K10N78 Motherboard - ASRock K10N78 | Quick Installation Guide - Page 205
® ® ASRock K10N78-1394 / K10N78 Motherboard 205 - ASRock K10N78 | Quick Installation Guide - Page 206
X O O O X O O O O: X: O O O O
-
 1
1 -
 2
2 -
 3
3 -
 4
4 -
 5
5 -
 6
6 -
 7
7 -
8
-
9
-
10
-
11
-
12
-
13
-
14
-
15
-
16
-
17
-
18
-
19
-
20
-
21
-
22
-
23
-
24
-
25
-
26
-
27
-
28
-
29
-
30
-
31
-
32
-
33
-
34
-
35
-
36
-
37
-
38
-
39
-
40
-
41
-
42
-
43
-
44
-
45
-
46
-
47
-
48
-
49
-
50
-
51
-
52
-
53
-
54
-
55
-
56
-
57
-
58
-
59
-
60
-
61
-
62
-
63
-
64
-
65
-
66
-
67
-
68
-
69
-
70
-
71
-
72
-
73
-
74
-
75
-
76
-
77
-
78
-
79
-
80
-
81
-
82
-
83
-
84
-
85
-
86
-
87
-
88
-
89
-
90
-
91
-
92
-
93
-
94
-
95
-
96
-
97
-
98
-
99
-
100
-
101
-
102
-
103
-
104
-
105
-
106
-
107
-
108
-
109
-
110
-
111
-
112
-
113
-
114
-
115
-
116
-
117
-
118
-
119
-
120
-
121
-
122
-
123
-
124
-
125
-
126
-
127
-
128
-
129
-
130
-
131
-
132
-
133
-
134
-
135
-
136
-
137
-
138
-
139
-
140
-
141
-
142
-
143
-
144
-
145
-
146
-
147
-
148
-
149
-
150
-
151
-
152
-
153
-
154
-
155
-
156
-
157
-
158
-
159
-
160
-
161
-
162
-
163
-
164
-
165
-
166
-
167
-
168
-
169
-
170
-
171
-
172
-
173
-
174
-
175
-
176
-
177
-
178
-
179
-
180
-
181
-
182
-
183
-
184
-
185
-
186
-
187
-
188
-
189
-
190
-
191
-
192
-
193
-
194
-
195
-
196
-
197
-
198
-
199
-
200
-
201
-
202
-
203
-
204
-
205
-
206
 |
 |
1
ASRock
K10N78-1394 / K10N78
Motherboard
English
English
English
English
English
Copyright Notice:
Copyright Notice:
Copyright Notice:
Copyright Notice:
Copyright Notice:
No part of this installation guide may be reproduced, transcribed, transmitted, or trans-
lated in any language, in any form or by any means, except duplication of documen-
tation by the purchaser for backup purpose, without written consent of ASRock Inc.
Products and corporate names appearing in this guide may or may not be registered
trademarks or copyrights of their respective companies, and are used only for identifica-
tion or explanation and to the owners’ benefit, without intent to infringe.
Disclaimer:
Disclaimer:
Disclaimer:
Disclaimer:
Disclaimer:
Specifications and information contained in this guide are furnished for informational
use only and subject to change without notice, and should not be constructed as a
commitment by ASRock. ASRock assumes no responsibility for any errors or omissions
that may appear in this guide.
With respect to the contents of this guide, ASRock does not provide warranty of any kind,
either expressed or implied, including but not limited to the implied warranties or
conditions of merchantability or fitness for a particular purpose. In no event shall
ASRock, its directors, officers, employees, or agents be liable for any indirect, special,
incidental, or consequential damages (including damages for loss of profits, loss of
business, loss of data, interruption of business and the like), even if ASRock has been
advised of the possibility of such damages arising from any defect or error in the guide
or product.
This device complies with Part 15 of the FCC Rules. Operation is subject to the
following two conditions:
(1)
this device may not cause harmful interference, and
(2)
this device must accept any interference received, including interference that
may cause undesired operation.
Published August 2008
Copyright
©
2008 ASRock INC. All rights reserved.
CALIFORNIA, USA ONLY
The Lithium battery adopted on this motherboard contains Perchlorate, a toxic
substance controlled in Perchlorate Best Management Practices (BMP) regulations
passed by the California Legislature. When you discard the Lithium battery in
California, USA, please follow the related regulations in advance.
“Perchlorate Material-special handling may apply, see
www
.dtsc.ca.gov/hazardouswa
ste/perchlorate”
ASRock Website: http://www.asrock.com