ASRock K10N78M Pro Quick Installation Guide
ASRock K10N78M Pro Manual
 |
View all ASRock K10N78M Pro manuals
Add to My Manuals
Save this manual to your list of manuals |
ASRock K10N78M Pro manual content summary:
- ASRock K10N78M Pro | Quick Installation Guide - Page 1
for backup purpose, without written consent of ASRock Inc. Products and corporate names appearing in this guide may or may not be registered trademarks or ASRock Website: http://www.asrock.com Published July 2009 Copyright©2009 ASRock INC. All rights reserved. 1 ASRock K10N78M Pro Motherboard - ASRock K10N78M Pro | Quick Installation Guide - Page 2
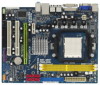
12 SATAII Connector (SATAII_3 (PORT 2), Red) 26 PCI Slots (PCI1- 2) 13 SPI BIOS Chip 27 PCI Express x16 Slot (PCIE2, Green) 14 Clear CMOS Jumper (CLRCMOS1) 28 PCI Express x1 Slot (PCIE1, White) 15 Chassis Fan Connector (CHA_FAN1) 29 NVIDIA GeForce 8100 Chipset 2 ASRock K10N78M Pro Motherboard - ASRock K10N78M Pro | Quick Installation Guide - Page 3
Audio Manager" on the system tray. Set "Speaker Configuration" to "Quadraphonic" or "Stereo". Click "Device advanced settings", choose "Make front and rear output devices playbacks two different audio streams simultaneously", and click "ok". Then reboot your system. 3 ASRock K10N78M Pro Motherboard - ASRock K10N78M Pro | Quick Installation Guide - Page 4
CPU support lists on ASRock website as well. ASRock website http://www.asrock.com If you require technical support related to this motherboard, please visit our website for specific information about the model you are using. www.asrock.com/support/index.asp 1.1 Package Contents ASRock K10N78M Pro - ASRock K10N78M Pro | Quick Installation Guide - Page 5
memory: 8GB (see CAUTION 4) - 1 x PCI Express 2.0 x16 slot (green @ x16 mode) - 1 x PCI Express x1 slot - 2 x PCI slots - Supports NVIDIA® Hybrid SLITM - Integrated NVIDIA® GeForce 8200 graphics - DX10 VGA, Pixel Shader 4.0 - Max. shared memory 512MB (see CAUTION 5) - Dual VGA Output: support DVI - ASRock K10N78M Pro | Quick Installation Guide - Page 6
Guard (B.F.G.) - ASRock AM2 Boost: ASRock Patented Technology to boost memory performance up to 12.5% (see CAUTION 15) Hardware - CPU Temperature Sensing Monitor - Chassis Temperature Sensing - CPU Fan Tachometer - Chassis Fan Tachometer - CPU Quiet Fan 6 ASRock K10N78M Pro Motherboard - ASRock K10N78M Pro | Quick Installation Guide - Page 7
installation. 3. Whether 1066MHz memory speed is supported depends on the AM2+ CPU you adopt. If you want to adopt DDR2 1066 memory module on this motherboard, please refer to the memory support list on our website for the compatible memory modules. ASRock website http://www.asrock.com 4. Due to - ASRock K10N78M Pro | Quick Installation Guide - Page 8
. 15. This motherboard supports ASRock AM2 Boost overclocking technology for AM2 CPU. If you enable this function in the BIOS setup, the memory performance will improve up to 12.5%, but the effect still depends on the AM2 CPU you adopt. Enabling this function will overclock the chipset/CPU reference - ASRock K10N78M Pro | Quick Installation Guide - Page 9
support on this motherboard requires the proper hardware configuration. Please refer to below table for the minimum hardware requirement. CPU VGA Memory Suggested OS AMD Athlon X2 4000+ Onboard VGA with DVI in this item. E. Click "OK" to save the change. English 9 ASRock K10N78M Pro Motherboard - ASRock K10N78M Pro | Quick Installation Guide - Page 10
Test DVD Film Name Format Type Blu- DVI-D port Memory Dual Channel DDR2 667, 1GB x 2 OS Windows® VistaTM or Windows® VistaTM 64 Playback Software CyberLink PowerDVD Ultra DVD Player Blu-ray-DVDRW-LG-GBW-H10N (BD) HD DVD-HP-TOSD-H802A-01 (HD-DVD) English 10 ASRock K10N78M Pro Motherboard - ASRock K10N78M Pro | Quick Installation Guide - Page 11
wall socket before touching any component. 2. To avoid damaging the motherboard components due to static electricity, NEVER place your motherboard the motherboard to the chassis, please do not over-tighten the screws! Doing so may damage the motherboard. 11 ASRock K10N78M Pro Motherboard English - ASRock K10N78M Pro | Quick Installation Guide - Page 12
heatsink are securely fastened and in good contact with each other. Then connect the CPU fan to the CPU FAN connector (CPU_FAN1, see Page 2, No. 6). For proper installation, please kindly refer to the instruction manuals of the CPU fan and the heatsink. English 12 ASRock K10N78M Pro Motherboard - ASRock K10N78M Pro | Quick Installation Guide - Page 13
Installation of Memory Modules (DIMM) K10N78M Pro motherboard provides two 240-pin DDR2 (Double Data Rate 2) DIMM slots, and supports Dual Channel Memory Technology. For dual channel configuration, you always need to install two identical (the same brand, speed, size and chiptype) memory modules in - ASRock K10N78M Pro | Quick Installation Guide - Page 14
and PCI Express Slots) There are 2 PCI slots and 2 PCI Express slots on this motherboard. PCI slots: PCI slots are used to install expansion cards that have the 32-bit PCI interface. PCIE slots: PCIE1 (PCIE x1 slot; White) is used for PCI Express cards with x1 lane width cards, such as Gigabit LAN - ASRock K10N78M Pro | Quick Installation Guide - Page 15
shared memory for motherboard GPU Suggested OS Windows® VistaTM or Windows® VistaTM 64 HybridPowerTM CPU Memory Suggested OS AMD Athlon X2 3800+ CPU Dual Channel DDR2 667, 1024MB x 2 256MB or 512MB shared memory for motherboard GPU Windows® VistaTM or Windows® VistaTM 64 15 ASRock K10N78M Pro - ASRock K10N78M Pro | Quick Installation Guide - Page 16
Supported PCI Express Card for Hybrid SLITM GeForce® Boost and HybridPowerTM features are supported only with certain set of discrete GPUs. Please refer to our website for the graphics cards update in the future. For GeForce® Boost Vendor Chipset NVIDIA GeForce 8400GS GeForce 8400GS GeForce 8400GS - ASRock K10N78M Pro | Quick Installation Guide - Page 17
* Currently, Hybrid SLITM driver only has VistaTM 32 version, please visit our website for future update. Step 7. Restart your computer. Then you will find the Hybrid icon on your Windows® taskbar. Please click the icon and select the item "Save Power". English 17 ASRock K10N78M Pro Motherboard - ASRock K10N78M Pro | Quick Installation Guide - Page 18
correspondent connector on the PCI Express graphics card on PCIE2 slot. Step 4. Boot into OS. Install Hybrid SLITM driver from our support CD to your system. Hybrid SLITM driver is in the following path of ASRock support CD: (There are two ASRock support CD in the motherboard gift box pack, please - ASRock K10N78M Pro | Quick Installation Guide - Page 19
will be displayed only in one of the two monitors instead of both monitors. 2. This motherboard does not support dual monitor feature under DOS because in this situation, the VGA/DVI-D output is not available. There is no such limitation under Windows® OS. 19 ASRock K10N78M Pro Motherboard English - ASRock K10N78M Pro | Quick Installation Guide - Page 20
capability of the system memory. If you do not adjust the BIOS setup, the default value of "Share Memory", [Auto], will disable VGA/D-Sub function when the add-on VGA card is inserted to this motherboard. 4. Install the onboard VGA driver and the add-on PCI Express VGA card driver to your system. If - ASRock K10N78M Pro | Quick Installation Guide - Page 21
to the increase in manufacturers employing HDCP in their equipment, it is highly recommended that the HDTV or LCD monitor you purchase is compatible. 21 ASRock K10N78M Pro Motherboard English - ASRock K10N78M Pro | Quick Installation Guide - Page 22
64-bit OS Step 1: Set up BIOS. A. Enter BIOS SETUP UTILITY Advanced screen Chipset Configuration. B. Set the option "OnBoard HDMI HD Audio" to [Auto]. Step 2: Install HDMI audio driver to your system. Install "Onboard HDMI HD Audio Driver" from ASRock Support CD to your system. Step 3: Reboot - ASRock K10N78M Pro | Quick Installation Guide - Page 23
for 5 seconds. However, please do not clear the CMOS right after you update the BIOS. If you need to clear the CMOS when you just finish updating the BIOS, you must boot up the system first, and then shut it down before you do the clearCMOS action. English 23 ASRock K10N78M Pro Motherboard - ASRock K10N78M Pro | Quick Installation Guide - Page 24
Serial ATAII (SATAII) connectors support SATA data cables for internal motherboard. Please connect the black end of SATA power cable to the power connector on each drive. Then connect the white end of SATA power cable to the power connector of the power supply. 24 ASRock K10N78M Pro Motherboard - ASRock K10N78M Pro | Quick Installation Guide - Page 25
manual to install your system. 2. If you use AC'97 audio panel, please install it to the front panel audio header as below: A. Connect Mic_IN (MIC) to MIC2_L. B. Connect Audio_R (RIN) to OUT2_R and Audio_L (LIN) to OUT2_L. C. Connect Ground (GND) to Ground (GND). 25 ASRock K10N78M Pro Motherboard - ASRock K10N78M Pro | Quick Installation Guide - Page 26
97 audio panel. E. Enter BIOS Setup Utility. Enter Advanced Settings, and then select Chipset CPU Fan Connector 1 (4-pin CPU_FAN1) 2 3 (see p.2, No. 6) 4 Please connect the CPU fan cable to this connector and match the black wire to the ground pin. 26 ASRock K10N78M Pro Motherboard - ASRock K10N78M Pro | Quick Installation Guide - Page 27
is necessary to connect a power supply with ATX 12V plug to this connector. Failing to do so will cause power up failure. This COM1 header supports a serial port module. English 27 ASRock K10N78M Pro Motherboard - ASRock K10N78M Pro | Quick Installation Guide - Page 28
Windows® VistaTM / VistaTM 64-bit OS on your system. Using SATA / SATAII HDDs with NCQ and Hot Plug functions STEP 1: Set Up BIOS. A. Enter BIOS SETUP UTILITY Advanced screen B. Set the "SATA Operation Mode" option to [AHCI]. IDE Configuration. English 28 ASRock K10N78M Pro Motherboard - ASRock K10N78M Pro | Quick Installation Guide - Page 29
during overclocking, but PCI / PCIE buses are in the fixed mode so that FSB can operate under a more stable overclocking environment. Please refer to the warning on page 7 for the possible overclocking risk before you apply Untied Overclocking Technology. 29 ASRock K10N78M Pro Motherboard English - ASRock K10N78M Pro | Quick Installation Guide - Page 30
your computer. If the Main Menu does not appear automatically, locate and double-click on the file "ASSETUP. EXE" from the "BIN" folder in the Support CD to display the menus. 30 ASRock K10N78M Pro Motherboard English - ASRock K10N78M Pro | Quick Installation Guide - Page 31
ötigen, besuchen Sie bitte unsere Webseite: www.asrock.com/support/index.asp 1.1 Kartoninhalt ASRock K10N78M Pro Motherboard (Micro ATX-Formfaktor: 24.4 cm x 19.1 cm; 9.6 Zoll x 7.5 Zoll) ASRock K10N78M Pro Schnellinstallationsanleitung ASRock K10N78M Pro Support-CD Ein 80-adriges Ultra-ATA 66/100 - ASRock K10N78M Pro | Quick Installation Guide - Page 32
mit DVI-D Port (siehe VORSICHT 6) - NVIDIA® PureVideoTM HD betriebsbereit - 5.1 CH Windows® VistaTM Premium Level HD Audio (ALC662 Audio Codec) - Chipsatz eingebettetes HDMI Audio - Gigabit LAN 10/100/1000 Mb/s - Giga PHY Realtek RTL8211CL - Unterstützt Wake-On-LAN ASRock K10N78M Pro Motherboard - ASRock K10N78M Pro | Quick Installation Guide - Page 33
) (siehe VORSICHT 11) - Sofortstart - ASRock Instant Flash (siehe VORSICHT 12) - Hybrid Booster: - Schrittloser CPU-Frequenz-Kontrolle (siehe VORSICHT 13) - ASRock U-COP (siehe VORSICHT 14) - Boot Failure Guard (B.F.G. - Systemstartfehlerschutz) 33 ASRock K10N78M Pro Motherboard Deutsch - ASRock K10N78M Pro | Quick Installation Guide - Page 34
wird. Unter Windows® XP 64-bit und Windows® Vista™ 64-bit mit 64-Bit-CPU besteht diese Einschränkung nicht. 5. Die Maximalspeichergröße ist von den Chipshändler definiert und umgetauscht. Bitte überprüfen Sie NVIDIA® website für die neuliche Information. 34 ASRock K10N78M Pro Motherboard Deutsch - ASRock K10N78M Pro | Quick Installation Guide - Page 35
der "Bedienungsanleitung" auf der Support-CD, um Ihre SATAII- CPU BIOS-Setup-Menü Zugang zu ASRock Instant Flash. Sie brauchen dieses Werkzeug einfach nur zu starten und die neue BIOS-Datei auf Ihrem USB-Flash-Laufwerk, Diskettenlaufwerk oder der Festplatte zu 35 ASRock K10N78M Pro Motherboard - ASRock K10N78M Pro | Quick Installation Guide - Page 36
bei allen CPU/DRAMKonfigurationen. Wird Ihr System nach dem Aktivieren der AM2 BoostFunktion unstabil, dann ist diese Funktion wahrscheinlich nicht für Ihr System geeignet. Sie können diese Funktion deaktivieren, um die Stabilität Ihres System zu bewahren. 36 ASRock K10N78M Pro Motherboard Deutsch - ASRock K10N78M Pro | Quick Installation Guide - Page 37
Unterlage, oder zurück in die Tüte, mit der die Komponente geliefert wurde. 5. Wenn Sie das Motherboard mit den Schrauben an dem Computergehäuse befestigen, überziehen Sie bitte die Schrauben nicht! Das Motherboard kann sonst beschädigt werden. Deutsch 37 ASRock K10N78M Pro Motherboard - ASRock K10N78M Pro | Quick Installation Guide - Page 38
befestigt sind und einen guten Kontakt zueinander haben. Verbinden Sie dann den CPULüfter mit dem CPU-LÜFTER-Anschluss (CPU_FAN1, siehe Seite 2, Nr. 6). Beziehen Sie sich für eine richtige Installation auf die Handbücher des CPULüfters und des Kühlkörpers. Deutsch 38 ASRock K10N78M Pro Motherboard - ASRock K10N78M Pro | Quick Installation Guide - Page 39
Clips nach außen drücken. Richten Sie das DIMM-Modul so über dem Slot aus, dass das Modul mit der Kerbe in den Slot passt. Deutsch Die DIMM-Module passen nur richtig herum eingelegt in die Steckplätze. einschnappen und das DIMM-Modul fest an Ort und Stelle sitzt. 39 ASRock K10N78M Pro Motherboard - ASRock K10N78M Pro | Quick Installation Guide - Page 40
2 PCI Express-Steckplätze am K10N78M Pro Motherboard. PCI-Slots: PCI-Slots werden zur Installation von Erweiterungskarten mit dem 32bit PCI-Interface genutzt. PCI Express-Slots: PCIE1 (PCIE x1-Steckplatz; Weiß) wird für PCI Express-Karten mit x1 Lane-Breite-Karten verwendet, z.B. Gigabit LAN - ASRock K10N78M Pro | Quick Installation Guide - Page 41
Sie nicht, den Jumper wieder zu entfernen, nachdem das CMOS gelöscht wurde. Wenn Sie den CMOSInhalt gleich nach dem Aktualisieren des BIOS löschen müssen, müssen Sie zuerst das System starten und dann wieder ausschalten, bevor Sie den CMOS-Inhalt löschen. Deutsch 41 ASRock K10N78M Pro Motherboard - ASRock K10N78M Pro | Quick Installation Guide - Page 42
(blau) (39-pin IDE1, siehe S.2, Punkt 8) Blauer Anschluss Schwarzer Anschluss zum Motherboard zur Festplatte 80-adriges ATA 66/100/133 Kabel Hinweis: Details entnehmen Sie bitte das SATAII Verbindungsstück auf dieser Hauptplatine angeschlossen werden. 42 ASRock K10N78M Pro Motherboard Deutsch - ASRock K10N78M Pro | Quick Installation Guide - Page 43
Ihnen Stereo- CD1 Signalquellen, wie z. B. CD-ROM, DVD-ROM, TV-Tuner oder MPEG-Karten mit Ihrem System zu verbinden. Dieses Interface zu einem Audio-Panel auf der Vorderseite Ihres Gehäuses, ermöglicht Ihnen eine bequeme Kontrolle über Audio-Geräte. 43 ASRock K10N78M Pro Motherboard Deutsch - ASRock K10N78M Pro | Quick Installation Guide - Page 44
Rufen Sie das BIOS-Setup-Dienstprogramm auf. Wechseln Sie zu Erweiterte Einstellungen und wählen Sie Chipset-Konfiguration. Setzen Realtek HD Audio-Manager aufzurufen. Für Windows® XP / XP 64-Bit Betriebssystem: Klicken Sie auf "Audio-E/A", wählen . Deutsch 44 ASRock K10N78M Pro Motherboard - ASRock K10N78M Pro | Quick Installation Guide - Page 45
angeschlossen werden; auch ohne Geschwindigkeitsregulierung. Wenn Sie einen dreipoligen CPU-Lüfter an den CPU-Lüferanschluss dieses Motherboards anschließen möchten, verbinden Sie ihn bitte mit den Andernfalls reicht der Strom nicht aus, das System zu starten. 45 ASRock K10N78M Pro Motherboard - ASRock K10N78M Pro | Quick Installation Guide - Page 46
/ SATAII-Festplatten ohne NCQ und Hot-PlugFunktionen SCHRITT 1: Konfigurieren Sie BIOS. A. Rufen Sie im BIOS-DIENSTPROGRAMM den Bildschirm „Erweitert" und „IDE-Konfiguration" auf. B. SATAII-Festplatten installieren, gehen Sie bitte wie folgt vor. 46 ASRock K10N78M Pro Motherboard Deutsch - ASRock K10N78M Pro | Quick Installation Guide - Page 47
Hot-Plug-Funktionen SCHRITT 1: Konfigurieren Sie BIOS. A. Rufen Sie im BIOS-DIENSTPROGRAMM den Bildschirm „Erweitert" und „IDE Sie Windows installieren?" erscheint, legen Sie bitte die ASRock Support CD in Ihr optisches Laufwerk ein. Klicken Sie anschlie Guide 47 ASRock K10N78M Pro Motherboard - ASRock K10N78M Pro | Quick Installation Guide - Page 48
der Support-CD, um die Menüs aufzurufen. Das SetupProgramm soll es Ihnen so leicht wie möglich machen. Es ist menügesteuert, d.h. Sie können in den verschiedenen Untermenüs Ihre Auswahl treffen und die Programme werden dann automatisch installiert. 48 ASRock K10N78M Pro Motherboard Deutsch - ASRock K10N78M Pro | Quick Installation Guide - Page 49
ATX: 9.6 pouces x 7.5 pouces, 24.4 cm x 19.1 cm) Guide d'installation rapide ASRock K10N78M Pro CD de soutien ASRock K10N78M Pro Un câble ruban IDE Ultra ATA 66/100/133 80 conducteurs Un câbles de données de série ATA (SATA) (en option) Un I/O Panel Shield 49 ASRock K10N78M Pro Motherboard Français - ASRock K10N78M Pro | Quick Installation Guide - Page 50
x slots PCI Express 2.0 x16 (vert @ mode x16) - 1 x slot PCI Express x1 - 2 x slots PCI - Pris en charge de NVIDIA® Hybrid SLITM - Graphiques intégrés à l'NVIDIA® GeForce 8200 - VGA DX10, nuanceur de pixels 4.0 - mémoire partagée max 512MB (voir ATTENTION 5) - Output de VGA Duel: supporter DVI-D et - ASRock K10N78M Pro | Quick Installation Guide - Page 51
(Version d'essai) - Tuner ASRock OC (voir ATTENTION 10) - Économiseur d'énergie intelligent (voir ATTENTION 11) - l'Instant Boot - ASRock Instant Flash (voir ATTENTION 12) - L'accélérateur hybride: - Contrôle direct de la fréquence CPU (voir ATTENTION 13) 51 ASRock K10N78M Pro Motherboard Français - ASRock K10N78M Pro | Quick Installation Guide - Page 52
effectuer l'overclocking, y compris ajuster les réglages du BIOS, appliquer la technologie Untied Overclocking, ou utiliser des outils de tiers pour l'overclocking. L'overclocking peut et Windows® VistaTM 64 bits avec CPU 64 bits, il n'y a pas ce genre de limitation. 52 ASRock K10N78M Pro Motherboard - ASRock K10N78M Pro | Quick Installation Guide - Page 53
actualizar o BIOS do sistema sem necessitar de entrar nos sistemas operativos, como o MS-DOS ou o Windows®. Com este utilitário, poderá premir a tecla durante o teste de arranque POST ou premir a tecla para exibir o menu de configuração do BIOS 53 ASRock K10N78M Pro Motherboard Français - ASRock K10N78M Pro | Quick Installation Guide - Page 54
les configurations CPU/DRAM. Si votre systèmes devient instable une fois la fonction AM2 Boost activée, il est possible qu'elle ne s'applique pas à votre système. Vous pouvez choisir de désactiver cette fonction pour conserver la stabilité de votre système. 54 ASRock K10N78M Pro Motherboard Fran - ASRock K10N78M Pro | Quick Installation Guide - Page 55
de composant, placez-le sur un support antistatique ou dans son sachet d'origine. 5. Lorsque vous placez les vis dans les orifices pour vis pour fixer la carte mère sur le châssis, ne serrez pas trop les vis ! Vous risquez sinon d'endommager la carte mère. 55 ASRock K10N78M Pro Motherboard Français - ASRock K10N78M Pro | Quick Installation Guide - Page 56
avec l'autre. Ensuite, connectez le ventilateur du CPU à la prise du VENTILATEUR DU CPU (CPU_FAN1, reportez-vous en page 2, No. 6). Pour une bonne installation, veuillez vous référer aux manuels d'instruction sur le ventilateur du CPU et le dissipateur. Français 56 ASRock K10N78M Pro Motherboard - ASRock K10N78M Pro | Quick Installation Guide - Page 57
DDR2 DIMM pour activer la technologie Dual Channel Memory. Sinon, le système fonctionnera en mode Canal unique. 1. Il n'est pas permis d'installer de la DDR sur le slot DDR2; la carte mère et les DIMM complètement et que le module DIMM soit inséré correctement. 57 ASRock K10N78M Pro Motherboard - ASRock K10N78M Pro | Quick Installation Guide - Page 58
mère K10N78M Pro. Slots PCI: Les slots PCI sont utilisés pour installer des cartes d'extension dotées d'une interface PCI 32 bits. Slots PCIE: PCIE1 (emplacement PCIE x1; Blanc) est utilisé pour les cartes PCI Express avec cartes graphiques de largeur x1 voies, telles que la carte Gigabit LAN, la - ASRock K10N78M Pro | Quick Installation Guide - Page 59
après avoir mis le BIOS à jour. Si vous avez besoin d'effacer la CMOS lorsque vous avez fini de mettre le BIOS à jour, vous devez d'abord initialiser le système, puis le mettre hors tension avant de procéder à l'opération d'effacement de la CMOS. Français 59 ASRock K10N78M Pro Motherboard - ASRock K10N78M Pro | Quick Installation Guide - Page 60
carte mère vers le disque dur Câble ATA 66/100/133 80 conducteurs Note: Veuillez vous reporter aux instructions du fabricant de votre IDE périphérique pour les détails. Connecteurs Série ATAII (SATAII_1 (PORT 0): connecteur SATAII sur la carte mere. Français 60 ASRock K10N78M Pro Motherboard - ASRock K10N78M Pro | Quick Installation Guide - Page 61
ériques d'impression. Cet en-tête supporte un module infrarouge optionnel de transfert et de réception sans fil. Ils vous permettent de gérer des CD1 entrées audio à partir de sources stéréo comme un CD-ROM, DVD-ROM, un tuner TV ou une carte MPEG. 61 ASRock K10N78M Pro Motherboard Français - ASRock K10N78M Pro | Quick Installation Guide - Page 62
suivre les instructions dans notre manuel et le manuel de châssis afin installer votre système. 2. Si vous utilisez le panneau audio AC'97, installez-le sur l'adaptateur audio du panneau pour faire du Mic Avant le dispositif d'enregistrement par défaut. 62 ASRock K10N78M Pro Motherboard Français - ASRock K10N78M Pro | Quick Installation Guide - Page 63
de terre. ien que cette carte mère offre un support de (Ventilateur silencieux) ventilateur de CPU à 4 broches , le ventilateur de CPU à 3 broches peut bien fonctionner même sans la fonction 13. 20-Installation de l'alimentation électrique ATX 1 13 63 ASRock K10N78M Pro Motherboard Français - ASRock K10N78M Pro | Quick Installation Guide - Page 64
2.8 Guide d'installation et sont listés sur la BIOS écran Avancé Configuration IDE. B. Réglez l'option "SATA Operation Mode"« Mode de fonctionnement SATA » sur [IDE]. ETAPE 2: Installer le système d'exploitation Windows® XP / XP 64-bit sur votre système. Français 64 ASRock K10N78M Pro Motherboard - ASRock K10N78M Pro | Quick Installation Guide - Page 65
le BIOS. A. Entrez dans UTILITAIRE DE CONFIGURATION BIOS écran instructions pour installer l'OS Windows® VistaTM / VistaTM 64-bits sur votre système. Lorsque vous voyez la page "Où souhaitez-vous installer Windows ?", veuillez insérer le CD Support d' ASRock ASRock K10N78M Pro Motherboard Français - ASRock K10N78M Pro | Quick Installation Guide - Page 66
de support pour connaître la procédure détaillée: ..\ RAID Installation Guide (Guide d'installation RAID) 3. Informations sur le BIOS La puce Flash Memory sur la carte mère stocke le Setup du BIOS. BIN et double-cliquez dessus pour afficher les menus. 66 ASRock K10N78M Pro Motherboard Français - ASRock K10N78M Pro | Quick Installation Guide - Page 67
di CPU supportate. ASRock website http://www.asrock.com Se si necessita dell'assistenza tecnica per questa scheda madre, visitare il nostro sito per informazioni specifiche sul modello che si sta usando. www.asrock.com/support/index.asp 1.1 Contenuto della confezione Scheda madre ASRock K10N78M Pro - ASRock K10N78M Pro | Quick Installation Guide - Page 68
à x16) espansione - 1 x slot PCI Express x1 - 2 x slot PCI - Supporto NVIDIA® Hybrid SLITM VGA su scheda - Grafica NVIDIA® GeForce 8200 integrata - VGA DX10, Pixel Shader 4.0 - Memoria massima condivisa 512MB (vedi ATTENZIONE 5) - Uscita VGA Doppia: supporto porte DVI-D e D-Sub tramite - ASRock K10N78M Pro | Quick Installation Guide - Page 69
Energy Saver (Risparmio intelligente dell'energia) (vedi ATTENZIONE 11) - Instant Boot - ASRock Instant Flash (vedi ATTENZIONE 12) - Booster ibrido: - Stepless control per frequenza del processore (vedi ATTENZIONE 13) - ASRock U-COP (vedi ATTENZIONE 14) 69 ASRock K10N78M Pro Motherboard Italiano - ASRock K10N78M Pro | Quick Installation Guide - Page 70
VistaTM 64-bit con CPU 64-bit, non c'è tale limitazione. 5. La dimensione massima della memoria condivisa viene stabilita dal venditore del chipset ed e' soggetta a modificazioni. Prego fare riferimento al sito internet NVIDIA® per le ultime informazioni. 70 ASRock K10N78M Pro Motherboard Italiano - ASRock K10N78M Pro | Quick Installation Guide - Page 71
da migliorare l'efficienza quando i nuclei della CPU sono inattivi. In alter parole, permette di BIOS per accedere ad ASRock Instant Flash. Avviare questo strumento e salvare il nuovo file BIOS nell'unità Flash USB, dischetto (disco floppy) o disco rigido; poi si 71 ASRock K10N78M Pro Motherboard - ASRock K10N78M Pro | Quick Installation Guide - Page 72
del sistema per tutte le configurazioni CPU/DRAM. Se il sistema è instabile dopo avere abilitato la funzione AM2 Boost, significa che la funzione non è adatta al sistema. Si può scegliere di disabilitare la funzione per mantenere la stabilità del sistema. 72 ASRock K10N78M Pro Motherboard Italiano - ASRock K10N78M Pro | Quick Installation Guide - Page 73
componente. 5. Nell'usare i giraviti per fissare la scheda madre al telaio non serrare eccessivamente le viti! Altrimenti si rischia di danneggiare la scheda madre. 73 ASRock K10N78M Pro Motherboard Italiano - ASRock K10N78M Pro | Quick Installation Guide - Page 74
tra i due. Quindi collegare la ventolina CPU al connettore CPU FAN (CPU_FAN1, fare riferimento a pagina 2, Numero 6). Per eseguire un'installazione appropriata, fare riferimento al manuale d'istruzioni della ventolina CPU e del dispersore di calore. Italiano 74 ASRock K10N78M Pro Motherboard - ASRock K10N78M Pro | Quick Installation Guide - Page 75
2.3 Installazione dei moduli di memoria (DIMM) La motherboard K10N78M Pro dispone di due slot DIMM DDR2 (Double Data Rate 2) a 240 pin e supporta la tecnologia Dual Channel Memory. Per attivare la configurazione Dual Channel Memory bisogna installare sempre due moduli di memoria identici (stessa - ASRock K10N78M Pro | Quick Installation Guide - Page 76
K10N78M Pro c'è 2 slot PCI ed 2 slot PCI Express. Slot PCI: Sono utilizzati per installare schede di espansione con Interfaccia PCI a 32-bit. Slot PCI Express: PCIE1 (slot PCIE x1; Bianco) usato per schede PCI Express con schede grafiche di larghezza x1, quali scheda Gigabit LAN, SATA2. PCIE2 (slot - ASRock K10N78M Pro | Quick Installation Guide - Page 77
. Non cancellare la CMOS subito dopo aver aggiornato il BIOS. Se è necessario cancellare la CMOS una volta completato l'aggiornamento del BIOS, è necessario riavviare prima il sistema, e poi spegnerlo prima di procedere alla cancellazione della CMOS. Italiano 77 ASRock K10N78M Pro Motherboard - ASRock K10N78M Pro | Quick Installation Guide - Page 78
/s. Una o altra estremità del cavo di dati SATA può essere collegata al disco rigido SATA / SATAII o al connettore di SATAII su questa cartolina base. 78 ASRock K10N78M Pro Motherboard Italiano - ASRock K10N78M Pro | Quick Installation Guide - Page 79
senza fili. Permettono di ricevere input CD1 stereo audio da fonti di suono come CD-ROM, DVD - ROM,TV tuner, o schede MPEG. È un'interfaccia per il cavo del pannello audio. Che consente (9connessione facile e controllo dei dispositivi audio. 79 ASRock K10N78M Pro Motherboard Italiano - ASRock K10N78M Pro | Quick Installation Guide - Page 80
audio HD. Non è necessario collegarli per il pannello audio AC'97. E. Entrare nel programma di impostazione BIOS. Entrare su Impostazioni avanzate, quindi selezionare Configurazione chipset connettore accoglie diverse funzioni del pannello frontale. Italiano 80 ASRock K10N78M Pro Motherboard - ASRock K10N78M Pro | Quick Installation Guide - Page 81
pin terra. Sebbene la presente scheda madre disponga di un supporto per ventola CPU a 4 piedini (ventola silenziosa), la ventola CPU a 3 piedini è in grado di funzionare anche senza la funzione di sufficiente. In caso contrario l'unità non si avvia. Italiano 81 ASRock K10N78M Pro Motherboard - ASRock K10N78M Pro | Quick Installation Guide - Page 82
driver compatibili con il sistema vengono rilevati automaticamente ed elencati nella pagina del driver del CD in dotazione. Per l'installazione dei driver e Hot Plug 1° PASSO: Configurare il BIOS. A. Entrare in UTILIT BIOS SETUP Avanzate Configurazione IDE. B. Impostare ASRock K10N78M Pro Motherboard - ASRock K10N78M Pro | Quick Installation Guide - Page 83
PASSO: Configurare il BIOS. A. Entrare in UTILIT BIOS SETUP Avanzate Configurazione IDE ASRock nell'unità ottica e fare clic sul pulsante "Carica driver" , in basso a sinistra, per caricare i driver NVIDIA® AHCI. I driver Guide (Guida all'installazione RAID) 83 ASRock K10N78M Pro Motherboard Italiano - ASRock K10N78M Pro | Quick Installation Guide - Page 84
BIOS La Flash Memory sulla scheda madre contiene le Setup Utility. Quando si avvia il computer, premi durante il Power-On-Self-Test (POST) della Setup utility del BIOS; altrimenti, POST continua con i suoi test di routine. Per entrare il BIOS i driver e ASRock K10N78M Pro Motherboard Italiano - ASRock K10N78M Pro | Quick Installation Guide - Page 85
Micro ATX: 24,4 cm x 19,1 cm, 9,6" x 7,5") Guía de instalación rápida de ASRock K10N78M Pro CD de soporte de ASRock K10N78M Pro Una cinta de datos IDE de conducción 80 Ultra ATA 66/100/133 Un cables de datos Serial ATA (SATA) (Opcional) Una protección I/O 85 ASRock K10N78M Pro Motherboard Español - ASRock K10N78M Pro | Quick Installation Guide - Page 86
de DVI-D (vea ATENCIÓN 6) - Listo de NVIDIA® PureVideoTM HD - Sonido HD de Nivel Superior 5.1 Canales Windows® VistaTM (Códec de sonido ALC662) - Chipset encajado en HDMI Audio - Gigabit LAN 10/100/1000 Mb/s - Giga PHY Realtek RTL8211CL - Soporta Wake-On-LAN 86 ASRock K10N78M Pro Motherboard Espa - ASRock K10N78M Pro | Quick Installation Guide - Page 87
de ASRock OC (vea ATENCIÓN 10) - Administrador de energía inteligente (vea ATENCIÓN 11) - Instant Boot - ASRock Instant Flash (vea ATENCIÓN 12) - Amplificador Híbrido: - Stepless control de frecuencia de CPU (vea ATENCIÓN 13) - ASRock U-COP (vea ATENCIÓN 14) 87 ASRock K10N78M Pro Motherboard Espa - ASRock K10N78M Pro | Quick Installation Guide - Page 88
, incluido el ajuste del BIOS, aplicando la tecnología de "Tecnología de Forzado de Reloj (Overclocking) no relacionado" en la página no se admita, depende de la configuración AM2+ Procesador que adopte. Si desea adoptar el CPU de 64-bit, no existe dicha limitación. 88 ASRock K10N78M Pro Motherboard - ASRock K10N78M Pro | Quick Installation Guide - Page 89
la memoria Flash ROM. Esta sencilla herramienta de actualización de BIOS le permitirá actualizar el BIOS del sistema sin necesidad de acceder a ningún sistema operativo, como MS-DOS o Windows®. Gracias a esta utilidad, sólo necesitará pulsar durante la 89 ASRock K10N78M Pro Motherboard Español - ASRock K10N78M Pro | Quick Installation Guide - Page 90
CPU ASRock AM2 Boost para aumento de la velocidad del reloj. Si habilita esta función en la configuración del BIOS AM2 Boost, es posible que dicha función no se pueda aplicar a aquél. Si lo desea, puede deshabilitar la función para mantener la estabilidad del sistema. 90 ASRock K10N78M Pro Motherboard - ASRock K10N78M Pro | Quick Installation Guide - Page 91
los tornillos en sus agujeros para fijar la placa madre en el chasis, no los apriete demasiado. Eso podría dañar la placa madre. 91 ASRock K10N78M Pro Motherboard Español - ASRock K10N78M Pro | Quick Installation Guide - Page 92
y hacen buen contacto entre sí. Conecte entonces el ventilador de la CPU al conector CPU FAN (CPU_FAN1, consulte Página 2, N. 6). Para realizar la instalación correctamente, consulte el manual de instrucciones del ventilador de la CPU y el radiador. Español 92 ASRock K10N78M Pro Motherboard - ASRock K10N78M Pro | Quick Installation Guide - Page 93
2.3 Instalación de Memoria La placa base K10N78M Pro proporciona dos ranuras DIMM DDR2 (Double Data Rate 2, es decir, Tasa doble de datos) de 240 de ambos lados queden completamente introducidos en su sitio y la DIMM se haya asentado apropiadamente. 93 ASRock K10N78M Pro Motherboard Español - ASRock K10N78M Pro | Quick Installation Guide - Page 94
ón (ranuras PCI y ranuras PCI Express) La placa madre K10N78M Pro cuenta con 2 ranuras PCI y 2 ranuras PCI Express. Ranura PCI: Para instalar tarjetas de expansión que tienen 32-bit Interface PCI. Ranura PCI Express: PCIE1 (ranura PCIE x1; Blanco) se utiliza para tarjetas PCI Express con tarjetas - ASRock K10N78M Pro | Quick Installation Guide - Page 95
acuérdase de quitar el jumper cap después de limpiar el COMS. Si necesita borrar la CMOS cuando acabe de finalizar la actualización de la BIOS, debe arrancar primero el sistema y, a continuación, apagarlo antes de realizar la acción de borrado de CMOS. Español 95 ASRock K10N78M Pro Motherboard - ASRock K10N78M Pro | Quick Installation Guide - Page 96
los datos de SATA puede ser conectado con el disco duro de SATA / SATAII o el conectador de SATAII en esta placa base. Español 96 ASRock K10N78M Pro Motherboard - ASRock K10N78M Pro | Quick Installation Guide - Page 97
ón wireless opcional. Permite recepción de input CD1 audio de fuente sónica como CD- ROM, DVD-ROM, TV tuner, o tarjeta MPEG. Este es una interface para cable de audio de panel frontal que permite conexión y control conveniente de apparatos de Audio. 97 ASRock K10N78M Pro Motherboard Español - ASRock K10N78M Pro | Quick Installation Guide - Page 98
sonido AC'97. E. Entre en la Utilidad de configuración del BIOS Entre en Configuración avanzada y, a continuación, seleccione Configuración del el Administrador de audio HD Realtek. Para Windows® XP / XP 64-bit OS: Haga clic en "E/S de audio", seleccione "Configuración ASRock K10N78M Pro Motherboard - ASRock K10N78M Pro | Quick Installation Guide - Page 99
con el conector de tierra. Conector del ventilador de la CPU 1 2 3 (4-pin CPU_FAN1) 4 (vea p.2, No. 6) Conecte el cable del ventilador de la CPU a este conector y haga coincidir el cable negro con electricidad. De lo contrario no se podrá encender. 99 ASRock K10N78M Pro Motherboard Español - ASRock K10N78M Pro | Quick Installation Guide - Page 100
SATAII sin funciones NCQ y de Conexión en Caliente PASO 1: Configure BIOS. A. Entre a la Utilidad de configuración de BIOS pantalla de Avanzada Configuración IDE. B. Establezca la opción "SATA sin funciones RAID, por favor siga los pasos siguientes. 100 ASRock K10N78M Pro Motherboard Español - ASRock K10N78M Pro | Quick Installation Guide - Page 101
de Conexión en Caliente PASO 1: Configure BIOS. A. Entre a la Utilidad de configuración de BIOS pantalla de Avanzada Configuración IDE. B. el CD de soporte de ASRock en la unidad óptica y haga clic en el botón "Load Driver" (Cargar controlador) situado en Guide ASRock K10N78M Pro Motherboard 101 - ASRock K10N78M Pro | Quick Installation Guide - Page 102
información detallada sobre como configurar la BIOS, por favor refiérase al Manual del Usuario (archivo PDF) contenido en el CD. 4.Información de Software Support CD Esta placa-base soporta diversos el archivo ASSETUP.EXE para iniciar la instalación. Español 102 ASRock K10N78M Pro Motherboard - ASRock K10N78M Pro | Quick Installation Guide - Page 103
ATX: 9,6 pol. x 7,5 pol., 24,4 cm x 19,1 cm) Guia de instalação rápida da ASRock K10N78M Pro CD de suporte da placa ASRock K10N78M Pro Um cabo-fita IDE Ultra ATA 66/100/133 de 80 condutores Um cabo de dados ATA Serial (SATA) (Opcional) Uma proteção I/O Português ASRock K10N78M Pro Motherboard 121 - ASRock K10N78M Pro | Quick Installation Guide - Page 104
AVISO 4) - 1 x slot de PCI Express 2.0 x16 (modo verde @ x16) - 1 x slot de PCI Express x1 - 2 x slots de PCI - Suporta NVIDIA® Hybrid SLITM - Placa gráfica NVIDIA® GeForce 8200 - VGA DX10, Pixel Shader 4.0 - Memória partilhada máxima 512MB (veja o AVISO 5) - Duplo VGA Saída: suportar DVI-D e D-Sub - ASRock K10N78M Pro | Quick Installation Guide - Page 105
Smart BIOS - Controladores, utilitários, software antivírus (Experimentacao Versao) - Sintonizador ASRock OC (veja o AVISO 10) - Poupança de Energia Inteligente (veja o AVISO 11) - Instant Boot - ASRock Instant Flash (veja o AVISO 12) - Booster híbrido Português ASRock K10N78M Pro Motherboard 123 - ASRock K10N78M Pro | Quick Installation Guide - Page 106
ajuste das definições do BIOS, à aplicação da tecnologia Untied Overclocking ou à utilização de ferramentas de overclocking de terceiros. O overclocking pode afectar a estabilidade do seu de memória compatíveis. Web site da ASRock http://www.asrock.com Português 124 ASRock K10N78M Pro Motherboard - ASRock K10N78M Pro | Quick Installation Guide - Page 107
ça de Energia, por favor active a opção Cool 'n' Quiet na configuração da BIOS primeiro. Por favor visite o nosso sítio Web para conhecer os procedimentos de funcionamento da Poupança de Energia Inteligente. Sítio Web da ASRock: http://www.asrock.com ASRock K10N78M Pro Motherboard 125 Português - ASRock K10N78M Pro | Quick Installation Guide - Page 108
do sistema para todas as configurações CPU/DRAM. Se o seu sistema ficar instável após a activação da função AM2 Boost é porque esta tecnologia pode não se aplicar ao seu sistema. Para manter a estabilidade do sistema, pode desactivar esta função. Português 126 ASRock K10N78M Pro Motherboard - ASRock K10N78M Pro | Quick Installation Guide - Page 109
2. Instalação K10N78M Pro é uma Micro ATX forma factor (9.6-in x 7.5-in, 24.4 cm x 19.1 cm) tábua principal. Antes de instalar a instalar parafusos nos furos para fixar a placa-mãe ao chassi, não os aperte excessivamente para não danificar a placa-mãe. Português ASRock K10N78M Pro Motherboard 127 - ASRock K10N78M Pro | Quick Installation Guide - Page 110
que o CPU e heatsink são apertados firmemente e no bom contacto com cada um. E depois ligue o ventilador de CPU e o ligador de CPU_FAN (CPU_FAN1, veja p.2 No.6). Para a instalação apropriada, Refera ao manual da instrução de CPU ventilador e heatsink. Português 128 ASRock K10N78M Pro Motherboard - ASRock K10N78M Pro | Quick Installation Guide - Page 111
no slot em uma orientação incorreta, haverá danos permanentes à placa-mãe e à DIMM. 3º passo: Insira a DIMM firmemente no slot até que os clipes de retenção em ambos os lados se encaixem totalmente em seus locais e a DIMM esteja encaixada de modo apropriado. ASRock K10N78M Pro Motherboard 129 - ASRock K10N78M Pro | Quick Installation Guide - Page 112
e 2 slots de PCI Express na placa-mãe do K10N78M Pro. Slots PCI: Os slots PCI se usam para instalar placas de expansão com uma interface de PCI de 32 bit. Slot PCI Express: A especificação PCIE1 (ranhura PCIE x1; branco) é utilizada para as placas PCI Express, como é o caso das placas Gigabit LAN - ASRock K10N78M Pro | Quick Installation Guide - Page 113
usando um jumper. Por favor lembrese de remover o jumper depois de limpar o COMS. Se precisar limpar o CMOS ao concluir a atualização do BIOS, deverá reiniciar o sistema primeiro e, em seguida, desligá-lo antes de executar a ação de limpeza o CMOS. Português ASRock K10N78M Pro Motherboard 131 - ASRock K10N78M Pro | Quick Installation Guide - Page 114
) (opcional) Tanto a saída do cabo de Serial dados SATA pode ser conectado ao disco rígido SATA / SATAII quanto o conector SATAII na placa mãe. Português 132 ASRock K10N78M Pro Motherboard - ASRock K10N78M Pro | Quick Installation Guide - Page 115
se receba entrada de CD1 áudio em estéreo de fontes de áudio como CD-ROM, DVD-ROM, placa sintonizadora de TV ou placa MPEG. ASRock K10N78M Pro Motherboard 133 Português - ASRock K10N78M Pro | Quick Installation Guide - Page 116
áudio AC'97. E. Entre no utilitário de configuração do BIOS. Vá até à opção Definições avançadas e escolha Configuração do chipset. Defina a opção Controlo do painel frontal de [Automático] para Frontal seja o dispositivo de gravação predefinido. Português 134 ASRock K10N78M Pro Motherboard - ASRock K10N78M Pro | Quick Installation Guide - Page 117
Conector do ventilador do chassis (CHA_FAN1 de 3 pinos) (veja a folha 2, No. 15) Conector do ventilador da CPU 1 2 (CPU_FAN1 de 4 pinos) 3 4 (veja a folha 2, No. 6) Ligue o alto-falante do ção da Fonte de alimentação ATX de 20 Pinos 1 13 Português ASRock K10N78M Pro Motherboard 135 - ASRock K10N78M Pro | Quick Installation Guide - Page 118
screen IDE Configuration (Utilitário de configuração da BIOS - Ecrã avançado - Configuração IDE). B. Defina a opção "SATA Operation Mode" (Modo de funcionamento SATA) para [IDE]. ETAPA 2: Instalar o Windows® XP / XP de 64 bits OS no seu sistema. 136 ASRock K10N78M Pro Motherboard Português - ASRock K10N78M Pro | Quick Installation Guide - Page 119
NCQ e Hot Plug funções ETAPA 1: Aceda à BIOS. A. Vá até BIOS SETUP UTILITY Advanced screen IDE Configuration (Utilitário de configuração da BIOS - Ecrã avançado - Configuração IDE). B. bits na unidade óptica para prosseguir com a instalação. Português ASRock K10N78M Pro Motherboard 137 - ASRock K10N78M Pro | Quick Installation Guide - Page 120
os procedimentos detalhados: ..\ RAID Installation Guide 3. Informações da BIOS A Memória Flash da placa-mãe armazena o utilitário de configuração da BIOS. Quando você ligar o computador explore o CD e execute o "ASSETUP.EXE" localizado na pasta "BIN". Português 138 ASRock K10N78M Pro Motherboard - ASRock K10N78M Pro | Quick Installation Guide - Page 121
ASRock K10N78M Pro Motherboard 139 - ASRock K10N78M Pro | Quick Installation Guide - Page 122
'' ® ® ® ® ® 140 ASRock K10N78M Pro Motherboard - ASRock K10N78M Pro | Quick Installation Guide - Page 123
ASRock K10N78M Pro Motherboard 141 - ASRock K10N78M Pro | Quick Installation Guide - Page 124
® " " ® ® ® ® ® 142 ASRock K10N78M Pro Motherboard - ASRock K10N78M Pro | Quick Installation Guide - Page 125
" " " " ® ® ASRock K10N78M Pro Motherboard 143 - ASRock K10N78M Pro | Quick Installation Guide - Page 126
144 ASRock K10N78M Pro Motherboard - ASRock K10N78M Pro | Quick Installation Guide - Page 127
ASRock K10N78M Pro Motherboard 145 - ASRock K10N78M Pro | Quick Installation Guide - Page 128
146 ASRock K10N78M Pro Motherboard - ASRock K10N78M Pro | Quick Installation Guide - Page 129
® ® ® ® ® ® ® ® ASRock K10N78M Pro Motherboard 147 - ASRock K10N78M Pro | Quick Installation Guide - Page 130
"" "" "" "" 148 ASRock K10N78M Pro Motherboard - ASRock K10N78M Pro | Quick Installation Guide - Page 131
ASRock K10N78M Pro Motherboard SATAII_3 SATAII_4 (PORT 2) (PORT 3) SATAII_1 SATAII_2 (PORT 0) (PORT 1) 149 - ASRock K10N78M Pro | Quick Installation Guide - Page 132
CD1 150 ASRock K10N78M Pro Motherboard - ASRock K10N78M Pro | Quick Installation Guide - Page 133
® ® ® ® " " " " " " ® " " " "" " ASRock K10N78M Pro Motherboard 151 - ASRock K10N78M Pro | Quick Installation Guide - Page 134
1 2 3 4 12 24 1 13 12 24 1 13 152 ASRock K10N78M Pro Motherboard - ASRock K10N78M Pro | Quick Installation Guide - Page 135
12 24 1 13 ® ® ® ® ® ® ® ® ® ® ® ASRock K10N78M Pro Motherboard 153 - ASRock K10N78M Pro | Quick Installation Guide - Page 136
® ® ® ® ® ® \ \ \ \ ® ® ® ® ® \ 154 ASRock K10N78M Pro Motherboard - ASRock K10N78M Pro | Quick Installation Guide - Page 137
" " " " \\ ASRock K10N78M Pro Motherboard 155 - ASRock K10N78M Pro | Quick Installation Guide - Page 138
156 ASRock K10N78M Pro Motherboard - ASRock K10N78M Pro | Quick Installation Guide - Page 139
'' ® ® ® ® ® ASRock K10N78M Pro Motherboard 157 - ASRock K10N78M Pro | Quick Installation Guide - Page 140
158 ASRock K10N78M Pro Motherboard - ASRock K10N78M Pro | Quick Installation Guide - Page 141
® ® ® " " ® ® ® ® ® ASRock K10N78M Pro Motherboard 159 - ASRock K10N78M Pro | Quick Installation Guide - Page 142
® ® TM TM ® ® 160 ASRock K10N78M Pro Motherboard - ASRock K10N78M Pro | Quick Installation Guide - Page 143
ASRock K10N78M Pro Motherboard 161 - ASRock K10N78M Pro | Quick Installation Guide - Page 144
162 ASRock K10N78M Pro Motherboard - ASRock K10N78M Pro | Quick Installation Guide - Page 145
ASRock K10N78M Pro Motherboard 163 - ASRock K10N78M Pro | Quick Installation Guide - Page 146
164 ASRock K10N78M Pro Motherboard - ASRock K10N78M Pro | Quick Installation Guide - Page 147
® ® ® ® ® ® ® ® ASRock K10N78M Pro Motherboard 165 - ASRock K10N78M Pro | Quick Installation Guide - Page 148
166 ASRock K10N78M Pro Motherboard - ASRock K10N78M Pro | Quick Installation Guide - Page 149
ASRock K10N78M Pro Motherboard SATAII_3 SATAII_4 (PORT 2) (PORT 3) SATAII_1 SATAII_2 (PORT 0) (PORT 1) 167 - ASRock K10N78M Pro | Quick Installation Guide - Page 150
CD1 168 ® ASRock K10N78M Pro Motherboard - ASRock K10N78M Pro | Quick Installation Guide - Page 151
® ® ® ® 1 2 3 4 ASRock K10N78M Pro Motherboard 169 - ASRock K10N78M Pro | Quick Installation Guide - Page 152
12 24 1 13 12 24 1 13 170 ® ® ASRock K10N78M Pro Motherboard - ASRock K10N78M Pro | Quick Installation Guide - Page 153
12 24 1 13 ® ® ® ® ® ® ® ® ® ® ® ASRock K10N78M Pro Motherboard 171 - ASRock K10N78M Pro | Quick Installation Guide - Page 154
® \ \ \ \ ® \ ® ® ® ® 172 ASRock K10N78M Pro Motherboard - ASRock K10N78M Pro | Quick Installation Guide - Page 155
® ® TM TM ASRock K10N78M Pro Motherboard 173 - ASRock K10N78M Pro | Quick Installation Guide - Page 156
174 ASRock K10N78M Pro Motherboard - ASRock K10N78M Pro | Quick Installation Guide - Page 157
'' ™ ® ® ® ® ® ASRock K10N78M Pro Motherboard 175 - ASRock K10N78M Pro | Quick Installation Guide - Page 158
176 ASRock K10N78M Pro Motherboard - ASRock K10N78M Pro | Quick Installation Guide - Page 159
® ® ® ® ® ® ® ASRock K10N78M Pro Motherboard 177 - ASRock K10N78M Pro | Quick Installation Guide - Page 160
® ® ® 178 ASRock K10N78M Pro Motherboard - ASRock K10N78M Pro | Quick Installation Guide - Page 161
ASRock K10N78M Pro Motherboard 179 - ASRock K10N78M Pro | Quick Installation Guide - Page 162
180 ASRock K10N78M Pro Motherboard - ASRock K10N78M Pro | Quick Installation Guide - Page 163
ASRock K10N78M Pro Motherboard 181 - ASRock K10N78M Pro | Quick Installation Guide - Page 164
® ® ® ® ® ® ® ® 182 ASRock K10N78M Pro Motherboard - ASRock K10N78M Pro | Quick Installation Guide - Page 165
ASRock K10N78M Pro Motherboard 183 - ASRock K10N78M Pro | Quick Installation Guide - Page 166
184 ASRock K10N78M Pro Motherboard SATAII_3 SATAII_4 (PORT 2) (PORT 3) SATAII_1 SATAII_2 (PORT 0) (PORT 1) - ASRock K10N78M Pro | Quick Installation Guide - Page 167
CD1 ASRock K10N78M Pro Motherboard 185 - ASRock K10N78M Pro | Quick Installation Guide - Page 168
® ® ® ® 186 ASRock K10N78M Pro Motherboard - ASRock K10N78M Pro | Quick Installation Guide - Page 169
1 2 3 4 12 24 1 13 12 24 1 13 ASRock K10N78M Pro Motherboard 187 - ASRock K10N78M Pro | Quick Installation Guide - Page 170
® ® ® ® ® ® ® ® ® ® ® ® 188 ® ASRock K10N78M Pro Motherboard - ASRock K10N78M Pro | Quick Installation Guide - Page 171
® ® ® ® ® ® ® ® ® ® ® ® ® ® ASRock K10N78M Pro Motherboard 189 - ASRock K10N78M Pro | Quick Installation Guide - Page 172
® ® 190 ASRock K10N78M Pro Motherboard - ASRock K10N78M Pro | Quick Installation Guide - Page 173
X O O O X O O O O: X: O O O O ASRock K10N78M Pro Motherboard 191 - ASRock K10N78M Pro | Quick Installation Guide - Page 174
192 ASRock K10N78M Pro Motherboard - ASRock K10N78M Pro | Quick Installation Guide - Page 175
® ® ® ® ® ASRock K10N78M Pro Motherboard 193 - ASRock K10N78M Pro | Quick Installation Guide - Page 176
194 ASRock K10N78M Pro Motherboard - ASRock K10N78M Pro | Quick Installation Guide - Page 177
® ® ® ® ® ® ® ASRock K10N78M Pro Motherboard 195 - ASRock K10N78M Pro | Quick Installation Guide - Page 178
® ® ® 196 ASRock K10N78M Pro Motherboard - ASRock K10N78M Pro | Quick Installation Guide - Page 179
ASRock K10N78M Pro Motherboard 197 - ASRock K10N78M Pro | Quick Installation Guide - Page 180
198 ASRock K10N78M Pro Motherboard - ASRock K10N78M Pro | Quick Installation Guide - Page 181
ASRock K10N78M Pro Motherboard 199 - ASRock K10N78M Pro | Quick Installation Guide - Page 182
® ® ® ® ® ® ® ® 200 ASRock K10N78M Pro Motherboard - ASRock K10N78M Pro | Quick Installation Guide - Page 183
ASRock K10N78M Pro Motherboard 201 - ASRock K10N78M Pro | Quick Installation Guide - Page 184
202 ASRock K10N78M Pro Motherboard SATAII_3 SATAII_4 (PORT 2) (PORT 3) SATAII_1 SATAII_2 (PORT 0) (PORT 1) - ASRock K10N78M Pro | Quick Installation Guide - Page 185
CD1 ® ASRock K10N78M Pro Motherboard 203 - ASRock K10N78M Pro | Quick Installation Guide - Page 186
® ® ® ® 1 2 3 4 204 ASRock K10N78M Pro Motherboard - ASRock K10N78M Pro | Quick Installation Guide - Page 187
12 24 1 13 12 24 1 13 ASRock K10N78M Pro Motherboard 205 - ASRock K10N78M Pro | Quick Installation Guide - Page 188
® ® ® ® ® ® ® ® ® ® ® ® 206 ® ASRock K10N78M Pro Motherboard - ASRock K10N78M Pro | Quick Installation Guide - Page 189
® ® ® ® ® ® ® ® ® ® ® ® ® ® ® ® ® ASRock K10N78M Pro Motherboard 207 - ASRock K10N78M Pro | Quick Installation Guide - Page 190
® ® ® 208 ASRock K10N78M Pro Motherboard
-
 1
1 -
 2
2 -
 3
3 -
 4
4 -
 5
5 -
 6
6 -
 7
7 -
8
-
9
-
10
-
11
-
12
-
13
-
14
-
15
-
16
-
17
-
18
-
19
-
20
-
21
-
22
-
23
-
24
-
25
-
26
-
27
-
28
-
29
-
30
-
31
-
32
-
33
-
34
-
35
-
36
-
37
-
38
-
39
-
40
-
41
-
42
-
43
-
44
-
45
-
46
-
47
-
48
-
49
-
50
-
51
-
52
-
53
-
54
-
55
-
56
-
57
-
58
-
59
-
60
-
61
-
62
-
63
-
64
-
65
-
66
-
67
-
68
-
69
-
70
-
71
-
72
-
73
-
74
-
75
-
76
-
77
-
78
-
79
-
80
-
81
-
82
-
83
-
84
-
85
-
86
-
87
-
88
-
89
-
90
-
91
-
92
-
93
-
94
-
95
-
96
-
97
-
98
-
99
-
100
-
101
-
102
-
103
-
104
-
105
-
106
-
107
-
108
-
109
-
110
-
111
-
112
-
113
-
114
-
115
-
116
-
117
-
118
-
119
-
120
-
121
-
122
-
123
-
124
-
125
-
126
-
127
-
128
-
129
-
130
-
131
-
132
-
133
-
134
-
135
-
136
-
137
-
138
-
139
-
140
-
141
-
142
-
143
-
144
-
145
-
146
-
147
-
148
-
149
-
150
-
151
-
152
-
153
-
154
-
155
-
156
-
157
-
158
-
159
-
160
-
161
-
162
-
163
-
164
-
165
-
166
-
167
-
168
-
169
-
170
-
171
-
172
-
173
-
174
-
175
-
176
-
177
-
178
-
179
-
180
-
181
-
182
-
183
-
184
-
185
-
186
-
187
-
188
-
189
-
190
 |
 |

1
ASRock
K10N78M Pro
Motherboard
English
English
English
English
English
Copyright Notice:
Copyright Notice:
Copyright Notice:
Copyright Notice:
Copyright Notice:
No part of this installation guide may be reproduced, transcribed, transmitted, or trans-
lated in any language, in any form or by any means, except duplication of documen-
tation by the purchaser for backup purpose, without written consent of ASRock Inc.
Products and corporate names appearing in this guide may or may not be registered
trademarks or copyrights of their respective companies, and are used only for identifica-
tion or explanation and to the owners’ benefit, without intent to infringe.
Disclaimer:
Disclaimer:
Disclaimer:
Disclaimer:
Disclaimer:
Specifications and information contained in this guide are furnished for informational
use only and subject to change without notice, and should not be constructed as a
commitment by ASRock. ASRock assumes no responsibility for any errors or omissions
that may appear in this guide.
With respect to the contents of this guide, ASRock does not provide warranty of any kind,
either expressed or implied, including but not limited to the implied warranties or
conditions of merchantability or fitness for a particular purpose. In no event shall
ASRock, its directors, officers, employees, or agents be liable for any indirect, special,
incidental, or consequential damages (including damages for loss of profits, loss of
business, loss of data, interruption of business and the like), even if ASRock has been
advised of the possibility of such damages arising from any defect or error in the guide
or product.
This device complies with Part 15 of the FCC Rules. Operation is subject to the
following two conditions:
(1)
this device may not cause harmful interference, and
(2)
this device must accept any interference received, including interference that
may cause undesired operation.
Published July 2009
Copyright
©
2009 ASRock INC. All rights reserved.
CALIFORNIA, USA ONLY
The Lithium battery adopted on this motherboard contains Perchlorate, a toxic
substance controlled in Perchlorate Best Management Practices (BMP) regulations
passed by the California Legislature. When you discard the Lithium battery in
California, USA, please follow the related regulations in advance.
“Perchlorate Material-special handling may apply, see
www
.dtsc.ca.gov/hazardouswa
ste/perchlorate”
ASRock Website: http://www.asrock.com