ASRock K7VM3 Quick Installation Guide
ASRock K7VM3 Manual
 |
View all ASRock K7VM3 manuals
Add to My Manuals
Save this manual to your list of manuals |
ASRock K7VM3 manual content summary:
- ASRock K7VM3 | Quick Installation Guide - Page 1
' benefit, without intent to infringe. Disclaimer: Specifications and information contained in this guide are furnished for informational use only and subject to ASRock Website: http://www.asrock.com Published March 2004 Copyright©2004 ASRock INC. All rights reserved. 1 ASRock K7VM3 Motherboard - ASRock K7VM3 | Quick Installation Guide - Page 2
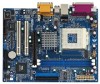
fan connector (CHA_FAN1) 16 Power LED Connector (PWR_LED1) 18 Clear CMOS (CLRCMOS2, 2-pin jumper) 20 USB 2.0 header (USB45, Blue) 22 AMR slot (AMR1) 24 JL1 jumper 26 Front panel audio connector (AUDIO1) 28 AUDIO CODEC 30 Internal audio connector: AUX1 (White) 2 ASRock K7VM3 Motherboard - ASRock K7VM3 | Quick Installation Guide - Page 3
ASRock I/OTM 1 Parallel port 3 Game port 5 Line In (Light Blue) 7 USB 2.0 ports 9 PS/2 keyboard port (Purple) 2 RJ-45 port 4 Microphone (Pink) 6 Line Out (Lime) 8 VGA port 10 PS/2 mouse port (Green) English 3 ASRock K7VM3 Motherboard - ASRock K7VM3 | Quick Installation Guide - Page 4
.asrock.com Specifications Platform: Micro ATX form factor (9.6" x 7.5", 24.4 x 19.1 cm) CPU: Supports Socket A (462 pins) for AMD AthlonTM / AthlonTM XP/ DuronTM processor Chipsets: North Bridge: VIA KM266Pro, FSB@200/266/333 MHz South Bridge: VIA VT8235, supports USB 2.0, ATA 133 Memory - ASRock K7VM3 | Quick Installation Guide - Page 5
USB 2.0: ASRock I/OTM: BIOS: OS: 4 default USB 2.0 ports and 1 extra set of header for two additional USB 2.0 ports upgrade (see CAUTION 3) PS/2: 1 keyboard port / 1 mouse port; 1 RJ 45 port; 4 rear default USB 2.0 ports; 1 VGA port; 1 parallel port: ECP/EPP support; Audio Jack: Line Out / Line In - ASRock K7VM3 | Quick Installation Guide - Page 6
while you push down the socket lever to secure the CPU. The lever clicks on the side tab to indicate that it is locked. Install CPU fan and heatsink. For proper installation, please kindly refer to the instruction manuals of your CPU fan and heatsink vendors. English 6 ASRock K7VM3 Motherboard - ASRock K7VM3 | Quick Installation Guide - Page 7
2.2 Installation of Memory Modules (DIMM) This motherboard provides two 184-pin DDR (Double Data Rate) DIMM slots. Installing a DIMM Step 1. Unlock a DIMM slot by pressing card is completely seated on the slot. Step 4. Fasten the card to the chassis with screws. 7 ASRock K7VM3 Motherboard English - ASRock K7VM3 | Quick Installation Guide - Page 8
USB wake up events. Note: To select +5VSB, it requires 2 Amp and higher standby current provided by power supply. JR1(see p.2 item 25) JL1(see p.2 item 24) Note: If the jumpers JL1 and JR1 are short , both front panel and rear panel audio connectors can work. English 8 ASRock K7VM3 Motherboard - ASRock K7VM3 | Quick Installation Guide - Page 9
: The set of FID jumpers are designed to adjust the multiplier of CPU. For detailed information, please refer to page 14 of user Manual in the Support CD. CLRCMOS1 (see p.2 item 13) Clear CMOS CLRCMOS2 solder points or the jumper cap after clearing the CMOS. English 9 ASRock K7VM3 Motherboard - ASRock K7VM3 | Quick Installation Guide - Page 10
infrared module. Internal audio connectors (4-pin CD1, 4-pin AUX1) (CD1: see p.2 item 29) (AUX1: see p.2 item 30) AUX1 CD1 These connectors allow you to receive stereo audio input from sound sources such as a CD-ROM, DVD-ROM, TV tuner card, or MPEG card. 10 ASRock K7VM3 Motherboard English - ASRock K7VM3 | Quick Installation Guide - Page 11
the fan cable to the connector matching the black wire to the ground pin. Connect an ATX power supply to the connector. This COM1 header supports a serial port module. Please connect a 3-pin power LED cable to this connector. English 11 ASRock K7VM3 Motherboard - ASRock K7VM3 | Quick Installation Guide - Page 12
about BIOS Setup, please refer to the User Manual (PDF file) contained in the Support CD. 4. Software Support CD information This motherboard supports various Microsoft® Windows® operating systems: 98 SE/ ME / 2000 / XP. The Support CD that came with the motherboard contains necessary drivers and - ASRock K7VM3 | Quick Installation Guide - Page 13
13 ASRock K7VM3 Motherboard - ASRock K7VM3 | Quick Installation Guide - Page 14
® ® 14 ASRock K7VM3 Motherboard - ASRock K7VM3 | Quick Installation Guide - Page 15
° 15 ASRock K7VM3 Motherboard - ASRock K7VM3 | Quick Installation Guide - Page 16
16 ASRock K7VM3 Motherboard - ASRock K7VM3 | Quick Installation Guide - Page 17
, 17 ASRock K7VM3 Motherboard - ASRock K7VM3 | Quick Installation Guide - Page 18
AUX1 CD1 18 ASRock K7VM3 Motherboard - ASRock K7VM3 | Quick Installation Guide - Page 19
® ® "PC-DIY Live Demo" ASRock PC "PC-DIY Live Demo" Microsoft® Media Player® ..\ MPEGAV \ AVSEQ01.DAT 19 ASRock K7VM3 Motherboard - ASRock K7VM3 | Quick Installation Guide - Page 20
ATX Formfaktor (9.6" x 7.5", 24.4 x 19.1 cm) CPU: Unterstützt Sockel A (462 Pin) für AMD AthlonTM / AthlonTM XP / DuronTM Prozessoren Chipsatz: North Bridge: VIA KM266Pro, FSB @ 200/266/333 MHz South Bridge: VIA VT8235, unterstützt USB 2.0, ATA 133 Speicher: 2 Steckplätze für DDR: DDR1 und - ASRock K7VM3 | Quick Installation Guide - Page 21
etwas Wärmeleitpaste zwischen CPU und Kühlkörper zu sprühen. 2. Bitte KEINE 3,3V AGP-Karte auf dem K7VM3 verwenden! Dies würde das System permanent beschädigen! 3. Das Power Management für USB 2.0 arbeitet unter Microsoft® Windows® XP einwandfrei. Unter Microsoft® Windows® 98/ME/2000 könnte - ASRock K7VM3 | Quick Installation Guide - Page 22
er hörbar einrastet. Installieren Sie einen aktiven CPU-Kühler, der die gesamte Fläche der CPU abdeckt und eine ausreichende Wärmeableitung für den von Ihnen verwendeten CPU-Typ bietet. Weitere Hinweise finden Sie der Installationsanleitung für Ihren CPU-Kühler. Deutsch 22 ASRock K7VM3 Motherboard - ASRock K7VM3 | Quick Installation Guide - Page 23
mit der Kerbe in den Slot passt. Schritt 3: Drücken Sie das DIMM-Modul in den Slot, bis die seitlichen Clips 2.3 Erweiterungssteckplätze: (PCI-, AMR-, und AGP-Slots) Es stehen 2 PCI-, 1 AMR-, und 1 AGP-Slot auf dem K7VM3-Motherboard zur Verfügung. PCI-Slots: PCI-Slots werden zur Installation von - ASRock K7VM3 | Quick Installation Guide - Page 24
S.2, Punkt 1) +5VSB (Standby) zu setzen und die PS/2 oder USB-Weckfunktionen zu aktivieren. Hinweis: Um +5VSB nutzen zu können, muss das -Jumpern dient zum Einstellen der Multiplier der CPU. Details sind im Handbuch auf Seite 14 auf der Support-CD angegeben. Deutsch 24 ASRock K7VM3 Motherboard - ASRock K7VM3 | Quick Installation Guide - Page 25
80 Pin ATA 100/133 Kabel Schwarzer Anschluss zur Festplatte Hinweis: Für optimale Kompatibilität und Leistung verbinden Sie bitte Ihre Festplatte mit dem primären IDE-Anschluss (IDE1, blau) und das CDROM-Laufwerk mit dem sekundären IDE-Anschluss (IDE2, schwarz). 25 ASRock K7VM3 Motherboard - ASRock K7VM3 | Quick Installation Guide - Page 26
Audio auf der Gehäusevorderseite (9-Pin AUDIO1) (siehe S.2, Punkt 26) System Panel Anschluss (9-Pin PANEL1) (siehe S.2, Punkt 17) ASRock I/OTM bietet bereits 4 USB 2.0-Ports auf der Rückseite Wenn die 4 USB der Anschlussbuchse mit dem schwarzen Lüfterkabel übereinstimmt. 26 ASRock K7VM3 Motherboard - ASRock K7VM3 | Quick Installation Guide - Page 27
Anschluss für CPU-Lüfter (3-pin CPU_FAN1) (siehe S.2, Punkt 3) Anschluss für ATX-Netzteil (20-pin ATXPWR1) (siehe S.2, Punkt 7) Anschluss für COM1unterstützt ein serielles Port-Modul. Verbinden Sie ein 3-pin. Kabel der Betriebsanzeige (LED) mit diesem Anschluss. Deutsch 27 ASRock K7VM3 Motherboard - ASRock K7VM3 | Quick Installation Guide - Page 28
Informationen zum BIOS-Setup, siehe bitte das Benutzerhandbuch (PDF Datei) auf der Support CD. 4. Software Support CD information Dieses Motherboard unterstützt eine Reiche von Microsoft Windows Betriebssystemen: 98 SE / ME / 2000 / XP. Die Ihrem Motherboard beigefügte Support-CD enth - ASRock K7VM3 | Quick Installation Guide - Page 29
.asrock.com Spécifications Format: Format Micro ATX (9.6" x 7.5", 24.4 x 19.1 cm) CPU: Socket A (462 broches) pour processeurs AMD AthlonTM / AthlonTM XP/DuronTM Chipsets: North Bridge: VIA KM266Pro, FSB de 200/266/333 MHz South Bridge: VIA VT8235, support de l'USB 2.0, et du mode ATA 133 - ASRock K7VM3 | Quick Installation Guide - Page 30
défaut et un module pour 2 ports USB 2.0 supplémentaires (voir ATTENTION 3) ASRock I/OTM: PS/2: clavier / souris; RJ 45; 4 ports USB 2.0 arrière; 1 port VGA; 1 port parallèle: support ECP/EPP; Jack audio:sortie ligne/ entrée ligne/ microphone + port jeux BIOS: BIOS AMI; Support du "Plug and - ASRock K7VM3 | Quick Installation Guide - Page 31
bloquer le CPU. Le verrouillage du levier dans son encoche latérale est annoncé par un clic. Etape 5. Installez le ventilateur et le radiateur du CPU. Pour une installation correcte, reportez-vous aux manuels du fabricant du ventilateur et du radiateur de CPU. 31 ASRock K7VM3 Motherboard Français - ASRock K7VM3 | Quick Installation Guide - Page 32
érieur. Etape 2. Alignez le module DIMM sur son emplacement en faisant correspondre les encoches du module DIMM aux trous du connecteur. Etape 3. Insérez fermement le module DIMM dans le connecteur jusqu'à ce 4. Fixez la carte sur le châssis à l'aide d'une vis. 32 ASRock K7VM3 Motherboard Français - ASRock K7VM3 | Quick Installation Guide - Page 33
les schémas pour régler la fréquence FSB du CPU. PS2_USB_PWR1 Court-circuitez les broches 2 (voir p.2 fig. ) et permettre aux périphériques PS/2 ou USB de réveiller le système. Note: Pour audio du panneau avant et du panneau arrière peuvent fonctionner. Français 33 ASRock K7VM3 Motherboard - ASRock K7VM3 | Quick Installation Guide - Page 34
obtenir des informations détaillées, veuillez vous référer à la page 14 du Manuel Utilisateur sur le CD de Support. CLRCMOS1 (voir p.2 fig. 13) Effacer la CMOS CLRCMOS2 points de soudure (voir p.2 fig. 18) , la date, l'heure, et les paramètres système. Français 34 ASRock K7VM3 Motherboard - ASRock K7VM3 | Quick Installation Guide - Page 35
dur Câble ATA 100/133 80 broches Note USB 2.0 supplémentaire est disponible pour le support de 2 ports USB 2.0 additionnels. Connecteur module infrarouge (IR1 br. 5) (voir p.2 fig. 21) Ce connecteur gère un module en option d'émission/réception sans fil infrarouge. 35 ASRock K7VM3 Motherboard - ASRock K7VM3 | Quick Installation Guide - Page 36
masse. Reliez le câble du au connecteur en faisant correspondre le fil noir à la broche de masse. Reliez-le à une alimentation ATX. Ce connecteur COM1 supporte un module port série. 36 ASRock K7VM3 Motherboard Français - ASRock K7VM3 | Quick Installation Guide - Page 37
BIOS, veuillez consulter le Guide de l'utilisateur (fichier PDF) dans le CD technique. 4. Informations sur le CD de support Cette carte mère supporte divers systèmes d'exploitation Microsoft Windows: 98 SE / ME / 2000 / XP via le chemin suivant: ..\ MPEGAV \ AVSEQ01.DAT 37 ASRock K7VM3 Motherboard - ASRock K7VM3 | Quick Installation Guide - Page 38
cm) Processore: Supporta zoccolo A (a 462 pin) per processori AMD AthlonTM / AthlonTM XP / DuronTM Chipset: North Bridge: VIA KM266Pro, FSB @ 200/266/333 MHz South Bridge: VIA VT8235, supporta porte USB 2.0, ATA 133 Memoria: 2 slot per DDR: DDR1 e DDR2 PC2100 (DDR266) / PC2700 (DDR333), Max - ASRock K7VM3 | Quick Installation Guide - Page 39
integrate e un adattatore per 2 porte USB 2.0 (vedi ATTENZIONE 3) ASRock I/OTM: PS/2: tastiera/ mouse; RJ 45; 4 porte USB 2.0 posteriori; 1 porta VGA; 1 porta parallela: supporto ECP/EPP; Audio Jack: Line Out/ Line In/ Microfono + porta Game BIOS: Suppor AMI legal BIOS; Supporta "Plug and Play - ASRock K7VM3 | Quick Installation Guide - Page 40
ventola del processore e l'heatsink. Per una corretta installazione, per favore fare riferimento ai manuali di istruzione dei produttori della ventola e dell'heatsink del processore. 40 ASRock K7VM3 Motherboard Italiano - ASRock K7VM3 | Quick Installation Guide - Page 41
. Lo slot AGP di ASRock ha uno speciale meccanismo di bloccaggio che trattiene in modo sicuro la scheda video inserita. NON usare schede AGP 3.3V su sullo slot AGP K7VM3! Potrebbe causare seri danni slot. Step 4. Agganciare la scheda allo chassis con le viti. 41 ASRock K7VM3 Motherboard Italiano - ASRock K7VM3 | Quick Installation Guide - Page 42
a +5VSB (standby) e abilitare PS/2 o USB wake up events. Nota: Per selezionare +5VSB, se i jumper JL1 e JR1 sono chiusi , funzionano sia i connettori audio frontali che posteriori. FID Jumpers (FID0, FID1, FID2, FID3, manuale dell'utente nel CD di supporto. Italiano 42 ASRock K7VM3 Motherboard - ASRock K7VM3 | Quick Installation Guide - Page 43
madre all'hard disk drive Cavo ATA 100/133 a 80 Pin Nota: per migliorare la compatibilitá e le prestazion, per favore connettere l'hard disk drive al connettore IDE primario (IDE1, colore blu) e il CD-ROM al connettore IDE secondario (IDE2, colore nero). 43 ASRock K7VM3 Motherboard Italiano - ASRock K7VM3 | Quick Installation Guide - Page 44
vedi p.2 item 30) Connettore audio sul pannello frontale (9-pin AUDIO1) (vedi p.2 item 26) ASRock I/OTM è dotata di quattro porte USB 2.0 sul pannello posteriore. Se le porte USB 2.0 sul pannello posteriore non sono verificando che il colore nero corrisponda alla massa. 44 ASRock K7VM3 Motherboard - ASRock K7VM3 | Quick Installation Guide - Page 45
colore nero corrisponda alla massa. Questa guida COM1 supporta un modulo porta seriale. Collegare il cavo del LED di accensione a 3 pin a questo connettore. Italiano 45 ASRock K7VM3 Motherboard - ASRock K7VM3 | Quick Installation Guide - Page 46
del BIOS, fare riferimento al Manuale dell'Utente (PDF file) contenuto nel cd di supporto. 4. Software di supporto e informazioni su CD Questa scheda madre supporta vari sistemi operativi Microsoft Windows: 98 SE / ME / 2000 / XP. Il CD di supporto a corredo della scheda madre contiene i driver - ASRock K7VM3 | Quick Installation Guide - Page 47
.asrock.com Especificación Plataforma: Formato Micro ATX (9.6" x 7.5", 24.4 x 19.1 cm) Procesador: Soporta procesador de Socket A (462 pins) para AMD AthlonTM / AthlonTM XP/ DuronTM Chipset: North Bridge: VIA KM266Pro, FSB @ 200/266/333 MHz South Bridge: VIA VT8235, soporta USB 2.0, ATA 133 - ASRock K7VM3 | Quick Installation Guide - Page 48
use tarjeta AGP de 3.3 V sobre la ranuna AGP de K7VM3. Podría causar dano permanente. 3. Power Management para USB 2.0 funciona bien bajo Microsoft® Windows® XP SP1/2000 SP4. Es posible que no funcione propiamente bajo Microsoft® Windows® 98/ME. Por favor consulte el documento oficial de Microsoft - ASRock K7VM3 | Quick Installation Guide - Page 49
del CPU. Si no puede encajar el CPU, examine su orientación o examine si los pins están ya encorvados. Paso 4. Encierre el zócalo bajando la palanca. Paso 5. Instale el disipador de calor con ventilador del CPU (consulte la documentación del disipador de calor). 49 ASRock K7VM3 Motherboard Espa - ASRock K7VM3 | Quick Installation Guide - Page 50
con v.92 Modem functionality. Ranura AGP: Para instalar trajeta gráfica. El slot AGP de ASRock tiene un mecanismo especial que puede seguramente sujetar la tarjeta gráfica. No use tarjeta AGP de 3. tarjeta en la ranura. Paso 4. Asegure la tarjeta con tornillos. 50 ASRock K7VM3 Motherboard Español - ASRock K7VM3 | Quick Installation Guide - Page 51
(standby) para PS/2 o USB wake up events. Atención: y JR1 son cortos, tanto el conector de audio del panel frontal como del panel posterior pueden CPU. Para obtener información detallada, consulte la página 14 del Manual de usuario en el CD de soporte. Español 51 ASRock K7VM3 Motherboard - ASRock K7VM3 | Quick Installation Guide - Page 52
a placa madre a aparato IDE Cable ATA100/133 de 80 pin Atención: Para optimizar la compatibilidad y la realización de la placa madre, por favor conecte el disco duro al IDE conector primario (IDE1 azul) y conecte CD-ROM al IDE conector secundario (IDE2 negro). 52 ASRock K7VM3 Motherboard Español - ASRock K7VM3 | Quick Installation Guide - Page 53
p.2, No. 30) Conector de audio de panel frontal (9-pin AUDIO1) (vea p.2, No. 26) ASRock I/OTM provee Usted 4 puertos USB 2.0 de la fábrica en el panel posterior. Si los puertos USB 2.0 en el panel posterior no speaker externo. Conector para ventilador de chasis. Español 53 ASRock K7VM3 Motherboard - ASRock K7VM3 | Quick Installation Guide - Page 54
No. 23) Conexión de LED de encendido (3-pin PWR_LED1) (vea p.2, No.16) Conector para ventilador de CPU. Conector para ATX power supply. El COM1 header soporta un Módulo de Puerto Serial. Conecte el cable de 3 contactos del LED de encendido en esta conexión. Español 54 ASRock K7VM3 Motherboard - ASRock K7VM3 | Quick Installation Guide - Page 55
la BIOS, por favor refiérase al Manual del Usuario (archivo PDF) contenido en el CD. 4.Información de Software Support CD Esta placa-base soporta diversos tipos de sistema operativo Windows: 98SE / ME / 2000 / XP El CD de instalación que acompaña la placa-base trae todos los drivers y programas - ASRock K7VM3 | Quick Installation Guide - Page 56
www.asrock.com Especificações Plataforma: Micro ATX, formato fator (9.6" x 7.5", 24.4 x 19.1 cm) CPU: Soquete A (462 pinos) para os processadores AMD AthlonTM / AthlonTM XP / DuronTM Chipsets: North Bridge: VIA KM266Pro, FSB@200/266/333 MHz South Bridge: VIA VT8235, suporta USB 2.0, ATA 133 - ASRock K7VM3 | Quick Installation Guide - Page 57
para extensão de outras 2 portas USB 2.0 (veja o AVISO 3) ASRock I/OTM: PS/2: teclado / mouse; RJ-45; 4 portas default USB 2.0; 1 porta VGA; 1 porta paralela: com suporte ECP/EPP; Áudio Jack: saída / entrada de linha / microfone + porta de jogos BIOS: BIOS AMI; suporta dispositivos "Plug and - ASRock K7VM3 | Quick Installation Guide - Page 58
ção correta, a alavanca clica na aba lateral, indicando que está travada. 5º passo: instale o ventilador da CPU e o dissipador de calor. Para fazer uma instalação correta, consulte antes os manuais de instrução dos fabricantes da CPU e do dissipador de calor. 58 ASRock K7VM3 Motherboard Português - ASRock K7VM3 | Quick Installation Guide - Page 59
funcionalidade v.92 de modem. Slot AGP: O slot AGP serve para instalar uma placa gráfica. Na placa-mãe K7VM3, há um desenho especial de trava no slot AGP, que permite fixar com segurança a placa gráfica 4º passo: Aparafuse a placa no chassis com os parafusos. 59 ASRock K7VM3 Motherboard Português - ASRock K7VM3 | Quick Installation Guide - Page 60
üência do barramento externo da CPU. PS2_USB_PWR1 Pin2, Pin3 curtos para (veja a folha 2, item 1) habilitar +5VSB (stand by) para PS/2 ou eventos de wake up na USB. Nota: Para escolher +5VSB conectores do painel frontal quanto do traseiro funcionarão. Português 60 ASRock K7VM3 Motherboard - ASRock K7VM3 | Quick Installation Guide - Page 61
identificador de campo (FID) dos jumpers são desenhados para ajustar o multiplicador da CPU. Para mais informações, dirija-se para a página 14 do Manual do usuário no suporte do CD. CLRCMOS1 (veja a folha 2, item remover o jumper cap depois de limpar o COMS. Português 61 ASRock K7VM3 Motherboard - ASRock K7VM3 | Quick Installation Guide - Page 62
IDE Cabo ATA 100/133, de 80 USB disponível para adicionar mais 2 portas USB 2.0 extra. Conector do módulo de infravermelho (IR1 de 5 pinos) (veja a folha 2, item 21) Este conector suporta um módulo opcional de transmissão sem fio e recepção em infravermelho. Português 62 ASRock K7VM3 Motherboard - ASRock K7VM3 | Quick Installation Guide - Page 63
) Conector do ventilador do chassis (CHA_FAN1 de 3 pinos) (veja a folha 2, item 14) Conector do ventilador da CPU (CPU_FAN1 de 3 pinos) (veja a folha 2, item 3) Conector de força do ATX (ATXPWR1 de 20 pinos) 23) O COM1 header suporta um Módulo de Porto Serial. Português 63 ASRock K7VM3 Motherboard - ASRock K7VM3 | Quick Installation Guide - Page 64
BIOS, consulte o manual do usuário (em pdf) contido no CD de instalação. 4. Informações do CD de Suporte Esta placa Mãe suporta vários sistemas operacionais: Microsoft Windows: 98 SE/ ME/2000/XP. O CD de instalação que acompanha a placa Mãe contem: drivers .DAT Português 64 ASRock K7VM3 Motherboard
-
 1
1 -
 2
2 -
 3
3 -
 4
4 -
 5
5 -
 6
6 -
 7
7 -
8
-
9
-
10
-
11
-
12
-
13
-
14
-
15
-
16
-
17
-
18
-
19
-
20
-
21
-
22
-
23
-
24
-
25
-
26
-
27
-
28
-
29
-
30
-
31
-
32
-
33
-
34
-
35
-
36
-
37
-
38
-
39
-
40
-
41
-
42
-
43
-
44
-
45
-
46
-
47
-
48
-
49
-
50
-
51
-
52
-
53
-
54
-
55
-
56
-
57
-
58
-
59
-
60
-
61
-
62
-
63
-
64
 |
 |

1
ASRock
K7VM3
Motherboard
English
English
English
English
English
Copyright Notice:
Copyright Notice:
Copyright Notice:
Copyright Notice:
Copyright Notice:
No part of this installation guide may be reproduced, transcribed, transmitted, or
translated in any language, in any form or by any means, except duplication of
documentation by the purchaser for backup purpose, without written consent of
ASRock Inc.
Products and corporate names appearing in this guide may or may not be registered
trademarks or copyrights of their respective companies, and are used only for
identification or explanation and to the owners’ benefit, without intent to infringe.
Disclaimer:
Disclaimer:
Disclaimer:
Disclaimer:
Disclaimer:
Specifications and information contained in this guide are furnished for informational
use only and subject to change without notice, and should not be constructed as a
commitment by ASRock. ASRock assumes no responsibility for any errors or
omissions that may appear in this guide.
With respect to the contents of this guide, ASRock does not provide warranty of any
kind, either expressed or implied, including but not limited to the implied warranties or
conditions of merchantability or fitness for a particular purpose.
In no event shall ASRock, its directors, officers, employees, or agents be liable for
any indirect, special, incidental, or consequential damages (including damages for
loss of profits, loss of business, loss of data, interruption of business and the like),
even if ASRock has been advised of the possibility of such damages arising from any
defect or error in the guide or product.
This device complies with Part 15 of the FCC Rules. Operation is subject to the
following two conditions:
(1)
this device may not cause harmful interference, and
(2)
this device must accept any interference received, including interference that
may cause undesired operation.
ASRock Website: http://www.asrock.com
Published March 2004
Copyright
©
2004 ASRock INC. All rights reserved.