ASRock K8A780LM Quick Installation Guide
ASRock K8A780LM Manual
 |
View all ASRock K8A780LM manuals
Add to My Manuals
Save this manual to your list of manuals |
ASRock K8A780LM manual content summary:
- ASRock K8A780LM | Quick Installation Guide - Page 1
Disclaimer: Specifications and information contained in this guide are motherboard contains Perchlorate, a toxic substance controlled in Perchlorate Best ASRock Website: http://www.asrock.com Published November 2009 Copyright©2009 ASRock INC. All rights reserved. 1 ASRock k8A780LM Motherboard - ASRock K8A780LM | Quick Installation Guide - Page 2
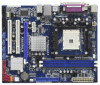
Motherboard Layout English 1 PS2_USB_PW1 Jumper 18 Primary SATAII Connector 2 ATX 12V Power Connector (ATX12V1) (SATAII_1 (PORT 0)) 3 CPU Heatsink Retention Module 19 USB 2.0 Header (USB4_5, Blue) 4 754-Pin CPU Socket 20 USB 2.0 Header (USB6_7, Blue) 5 CPU 1)) 2 ASRock K8A780LM Motherboard - ASRock K8A780LM | Quick Installation Guide - Page 3
will find "VIA HD Audio Deck" tool on your system. Please follow below instructions according to the OS you install. For Windows® XP / XP 64-bit OS: Please click "VIA HD Audio Deck" icon , and either Multi-Streaming function or Side Speaker function. 3 ASRock k8A780LM Motherboard English - ASRock K8A780LM | Quick Installation Guide - Page 4
guide to BIOS setup and information of the Support CD. Because the motherboard specifications and the BIOS software might be updated, the content of this manual will be subject to change without notice. In case any modifications of this manual occur, the updated version will be available on ASRock - ASRock K8A780LM | Quick Installation Guide - Page 5
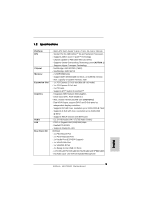
1.2 Specifications Platform CPU Chipset Memory Expansion Slot Graphics Audio LAN Rear Panel I/O - Micro ATX Form Factor: 9.6-in x 7.8-in, 24.4 cm x 19.8 cm - Socket 754 for AMD AthlonTM 64 and Sempron Processors - Supports AMD's Cool 'n' QuietTM Technology - Chipset capable to FSB 1000 MHz (2.0 GT - ASRock K8A780LM | Quick Installation Guide - Page 6
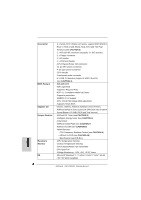
1.1 Compliance Wake Up Events - Supports jumperfree - SMBIOS 2.3.1 Support - CPU, VCCM, NB Voltage Multi-adjustment - Supports Smart BIOS - Drivers, Utilities, AntiVirus Software (Trial Version), ASRock Software Suite (CyberLink DVD Suite and Creative Sound Blaster X-Fi MB) (OEM and Trial Version - ASRock K8A780LM | Quick Installation Guide - Page 7
64-bit / XP SP1 or SP2. 5. It is a user-friendly ASRock overclocking tool which allows you to surveil your system by hardware monitor function and overclock your hardware devices to get the best system performance under Windows® environment. Please visit our website for the operation procedures of - ASRock K8A780LM | Quick Installation Guide - Page 8
entering operating systems first like MS-DOS or Windows®. With this utility, you can press key during the POST or press key to BIOS setup menu to access ASRock Instant Flash. Just launch this tool and save the new BIOS file to your USB flash drive, floppy disk or hard drive, then - ASRock K8A780LM | Quick Installation Guide - Page 9
while you push down the socket lever to secure the CPU. The lever clicks on the side tab to indicate that it is locked. Install CPU fan and heatsink. For proper installation, please kindly refer to the instruction manuals of your CPU fan and heatsink vendors. English 9 ASRock k8A780LM Motherboard - ASRock K8A780LM | Quick Installation Guide - Page 10
2.2 Installation of Memory Modules (DIMM) This motherboard is equipped with two 184-pin DDR (Double Data the slot. The DIMM only fits in one correct orientation. It will cause permanent damage to the motherboard and the DIMM if you force the DIMM into the slot at incorrect orientation. Step 3. Firmly - ASRock K8A780LM | Quick Installation Guide - Page 11
Slots (PCI and PCI Express Slots) There are 2 PCI slots and 2 PCI Express slots on this motherboard. PCI slots: PCI slots are used to install expansion cards that have the 32-bit PCI interface. on the slot. Step 4. Fasten the card to the chassis with screws. 11 ASRock k8A780LM Motherboard English - ASRock K8A780LM | Quick Installation Guide - Page 12
VGA driver yet, please install onboard VGA driver from our support CD to your system and restart your computer. Then you can start to use dual monitor function on this motherboard. When you playback HDCP-protected video -on PCI Express VGA card on PCIE2 slot. 12 ASRock K8A780LM Motherboard English - ASRock K8A780LM | Quick Installation Guide - Page 13
motherboard. 4. Install the onboard VGA driver and the add-on PCI Express VGA card driver to your system. If you have installed the drivers already, there is no need to install them again. 5. Set up a multi-monitor display. For Windows one monitor to another. 13 ASRock k8A780LM Motherboard English - ASRock K8A780LM | Quick Installation Guide - Page 14
function is supported on this motherboard. To use HDCP function with this motherboard, you need to adopt the monitor that supports HDCP function as well. Therefore, you can enjoy the superior display quality with high-definition HDCP encryption contents. Please refer to below instruction for more - ASRock K8A780LM | Quick Installation Guide - Page 15
5. Install the onboard VGA driver from our support CD to your system for both the onboard VGA and the discrete graphics card. Step 6. Restart your computer. Then you will find "ATI Catalyst Control Center" on your Windows® taskbar. English ATI Catalyst Control Center 15 ASRock k8A780LM Motherboard - ASRock K8A780LM | Quick Installation Guide - Page 16
used only for identification or explanation and to the owners' benefit, without intent to infringe. * For further information of ATITM Hybrid CrossFireXTM technology, please check AMD website for up dates and details. 16 ASRock K8A780LM Motherboard English - ASRock K8A780LM | Quick Installation Guide - Page 17
CLRCMOS1 for 5 seconds. However, please do not clear the CMOS right after you update the BIOS. If you need to clear the CMOS when you just finish updating the BIOS, you must boot up the system first, and then shut it down before you do the clearCMOS action. English 17 ASRock k8A780LM Motherboard - ASRock K8A780LM | Quick Installation Guide - Page 18
motherboard connect the black end to the IDE devices 80-conductor ATA 66/100/133 cable Note: Please refer to the instruction (PORT 1) These four Serial ATAII (SATAII) connectors support SATAII or SATA hard disk for internal storage devices. motherboard. English 18 ASRock K8A780LM Motherboard - ASRock K8A780LM | Quick Installation Guide - Page 19
module. This connector allows you to receive stereo audio input from sound sources such as a CD-ROM, DVD-ROM, TV tuner card, or MPEG card. This is an interface for the front panel audio cable that allows convenient connection and control of audio devices. English 19 ASRock k8A780LM Motherboard - ASRock K8A780LM | Quick Installation Guide - Page 20
) support, the 3-Pin CPU fan still can work successfully even without the fan speed control function. If you plan to connect the 3-Pin CPU fan to the CPU fan connector on this motherboard, please connect it to Pin 1-3. Pin 1-3 Connected 3-Pin Fan Installation 20 ASRock K8A780LM Motherboard English - ASRock K8A780LM | Quick Installation Guide - Page 21
COM1) (see p.2 No.32) 20-Pin ATX Power Supply Installation 1 13 Please note that it is necessary to connect a power supply with ATX 12V plug to this connector. Failing to do so will cause power up failure. This COM1 header supports a serial port module. English n 21 ASRock k8A780LM Motherboard - ASRock K8A780LM | Quick Installation Guide - Page 22
OS on your system. 2.10.2 Installing Windows® 7 / 7 64-bit / VistaTM / VistaTM 64-bit Without RAID Functions If you want to install Windows® 7 / 7 64-bit / VistaTM / VistaTM 64-bit on your SATA / SATAII HDDs without RAID functions, please follow below steps. 22 ASRock K8A780LM Motherboard English - ASRock K8A780LM | Quick Installation Guide - Page 23
instruction to install Windows® 7 / 7 64-bit / VistaTM / VistaTM 64-bit OS on your system. When you see "Where do you want to install Windows?" page, please insert the ASRock Support CD into your optical drive, and click the "Load Driver" button on the left on the bottom to load the AMD AHCI drivers - ASRock K8A780LM | Quick Installation Guide - Page 24
among the predetermined choices. For the detailed information about BIOS Setup, please refer to the User Manual (PDF file) contained in the Support CD. 4. Software Support CD information This motherboard supports various Microsoft® Windows® operating systems: 7 / 7 64-bit / VistaTM / VistaTM 64-bit - ASRock K8A780LM | Quick Installation Guide - Page 25
benötigen, besuchen Sie bitte unsere Webseite: www.asrock.com/support/index.asp 1.1 Kartoninhalt ASRock K8A780LM Motherboard (Micro ATX-Formfaktor: 24.4 cm x 19.8 cm; 9.6 Zoll x 7.8 Zoll) ASRock K8A780LM Schnellinstallationsanleitung ASRock K8A780LM Support-CD Ein 80-adriges Ultra-ATA 66/100/133 - ASRock K8A780LM | Quick Installation Guide - Page 26
Plattform CPU Chipsatz Speicher Erweiterungssteckplätze Onboard-VGA Audio LAN E/A-Anschlüsse an der Rückseite - Micro ATX-Formfaktor: 24.4 cm x 19.8 cm; 9.6 Zoll x 7.8 Zoll - Sockel 754 fur AMD AthlonTM 64- und Sempron-Prozessoren - Unterstützt Cool 'n' QuietTM-Technologie von AMD - Chipsatz - ASRock K8A780LM | Quick Installation Guide - Page 27
6) - Sofortstart - ASRock Instant Flash (siehe VORSICHT 7) - ASRock OC DNA (siehe VORSICHT 8) - Hybrid Booster: - Schrittloser CPU-Frequenz-Kontrolle (siehe VORSICHT 9) - ASRock U-COP (siehe VORSICHT 10) - Boot Failure Guard (B.F.G. - Systemstartfehlerschutz) Deutsch 27 ASRock k8A780LM Motherboard - ASRock K8A780LM | Quick Installation Guide - Page 28
-Monitor Funktion zu überblicken und Ihre Hardware-Geräte übertakten, um die beste Systemleistung unter der Windows® Umgebung zu erreichen. Besuchen Sie bitte unsere Website für die Operationsverfahren von ASRock OC Tuner. ASRock-Website: http://www.asrock.com 28 ASRock K8A780LM Motherboard Deutsch - ASRock K8A780LM | Quick Installation Guide - Page 29
Motherboard gemeinsam genutzt und funktionsfähig gemacht werden kann. Übertaktungseinstellungen wie Sie zu erhalten! Beachten Sie bitte, dass das Übertaktungsprofil nur bei einem identischen Motherboard gemeinsam genutzt und funktionsfähig gemacht werden kann. 29 ASRock k8A780LM Motherboard - ASRock K8A780LM | Quick Installation Guide - Page 30
Motherboard stufenlose Steuerung bietet, wird Overclocking nicht empfohlen. Frequenzen, die von den empfohlenen CPU-Busfrequenzen abweichen, können Instabilität des Systems verursachen oder die CPU beschädigen. 10. Wird eine Überhitzung der CPU abzufragen. 30 ASRock K8A780LM Motherboard Deutsch - ASRock K8A780LM | Quick Installation Guide - Page 31
Sie nicht, den Jumper wieder zu entfernen, nachdem das CMOS gelöscht wurde. Wenn Sie den CMOSInhalt gleich nach dem Aktualisieren des BIOS löschen müssen, müssen Sie zuerst das System starten und dann wieder ausschalten, bevor Sie den CMOS-Inhalt löschen. Deutsch 31 ASRock k8A780LM Motherboard - ASRock K8A780LM | Quick Installation Guide - Page 32
) (39-pin IDE1, siehe S.2, No. 10) Blauer Anschluss Schwarzer Anschluss zum Motherboard zur Festplatte 80-adriges ATA 66/100/133 Kabel Hinweis: Details entnehmen Sie bitte mit der SATA / SATAIIFestplatte oder dem SATAIIAnschluss am Mainboard verbinden. 32 ASRock K8A780LM Motherboard Deutsch - ASRock K8A780LM | Quick Installation Guide - Page 33
ermöglichen Ihnen StereoSignalquellen, wie z. B. CD-ROM, DVD-ROM, TV-Tuner oder MPEG-Karten mit Ihrem System zu verbinden. Dieses Interface zu einem Audio-Panel auf der Vorderseite Ihres Gehäuses, ermöglicht Ihnen eine bequeme Kontrolle über Audio-Geräte. 33 ASRock k8A780LM Motherboard Deutsch - ASRock K8A780LM | Quick Installation Guide - Page 34
High Definition Audio unterstützt AC'97-Audioleiste angeschlossen werden. E. Rufen Sie das BIOS-Setup-Dienstprogramm auf. Wechseln Sie zu Erweiterte Einstellungen und CPU Lüfterkabel mit diesem Anschluss und passen Sie den schwarzen Draht dem Erdungsstift an. 34 ASRock K8A780LM Motherboard Deutsch - ASRock K8A780LM | Quick Installation Guide - Page 35
mit ATX 12Volt-Stecker mit diesem Anschluss verbinden müssen, damit ausreichend Strom geliefert werden kann. Andernfalls reicht der Strom nicht aus, das System zu starten. Dieser COM-AnschlussHeader wird verwendet, um ein COM-Anschlussmodul zu unterstützen. Deutsch 35 ASRock k8A780LM Motherboard - ASRock K8A780LM | Quick Installation Guide - Page 36
Optionen auswählen können. Für detaillierte Informationen zum BIOS-Setup, siehe bitte das Benutzerhandbuch (PDF Datei) auf der Support CD. 3. Software Support CD information Dieses Motherboard unterstützt eine Reiche von Microsoft® Windows® Betriebssystemen: 7 / 7 64-Bit / VistaTM / VistaTM 64-Bit - ASRock K8A780LM | Quick Installation Guide - Page 37
ères au modèle que vous utilisez. www.asrock.com/support/index.asp 1.1 Contenu du paquet Carte mère ASRock K8A780LM (Facteur de forme Micro ATX: 9.6 pouces x 7.8 pouces, 24.4 cm x 19.8 cm) Guide d'installation rapide ASRock K8A780LM CD de soutien ASRock K8A780LM Un câble ruban IDE Ultra ATA 66/100 - ASRock K8A780LM | Quick Installation Guide - Page 38
1.2 Spécifications Format CPU Chipsets Mémoire Slot d'extension VGA sur carte Audio LAN Panneau arrière E/S - Facteur de forme Micro ATX: 9.6 pouces x 7.8 pouces, 24.4 cm x 19.8 cm - Socket 754 pour processeurs AMD AthlonTM 64 et Sempro - Supporte la technologie Cool 'n' Quiet™ d'AMD - Chipset est - ASRock K8A780LM | Quick Installation Guide - Page 39
réveil ACPI 1.1 - Gestion jumperless - Support SMBIOS 2.3.1 - CPU, VCCM, NB Tension Multi-ajustement - Prise en charge du Smart BIOS - Pilotes, utilitaires, logiciel anti-virus (Version d'essai), Suite logicielle ASRock (CyberLink DVD Suite et Creative Sound Blaster X-Fi MB) (Version OEM et d'essai - ASRock K8A780LM | Quick Installation Guide - Page 40
overclocker vos périphériques de matériels pour obtenir les meilleures performances du système sous environnement Windows®. S'il vous plaît visitez notre site web pour le fonctionnement des procédures de Tuner ASRock OC. ASRock website: http://www.asrock.com Français 40 ASRock K8A780LM Motherboard - ASRock K8A780LM | Quick Installation Guide - Page 41
Windows®. Com este utilitário, poderá premir a tecla durante o teste de arranque POST ou premir a tecla para exibir o menu de configuração do BIOS para aceder ao ASRock de la pâte thermique entre le CPU le dissipateur lors de l'installation du PC. 41 ASRock k8A780LM Motherboard Français - ASRock K8A780LM | Quick Installation Guide - Page 42
de courant. Pour choisir une alimentation électrique conforme à la norme EuP, nous vous recommandons de consulter votre fournisseur de courant pour plus de détails. 42 ASRock K8A780LM Motherboard Français - ASRock K8A780LM | Quick Installation Guide - Page 43
de suite après avoir mis le BIOS à jour. Si vous avez besoin d'effacer la CMOS lorsque vous avez fini de mettre le BIOS à jour, vous devez d'abord initialiser le système, puis le mettre hors tension avant de procéder à l'opération d'effacement de la CMOS. Français 43 ASRock k8A780LM Motherboard - ASRock K8A780LM | Quick Installation Guide - Page 44
re vers le disque dur Câble ATA 66/100/133 80 conducteurs Note: Veuillez vous reporter aux instructions du fabricant de votre IDE périphérique pour les détails. Connecteurs Série ATAII (SATAII_1 (PORT0 / SATAIIou au connecteur SATAII sur la carte mère. 44 ASRock K8A780LM Motherboard Français - ASRock K8A780LM | Quick Installation Guide - Page 45
. Ils vous permettent de gérer des entrées audio à partir de sources stéréo comme un CD-ROM, DVD-ROM, un tuner TV ou une carte MPEG. C'est une interface pour un câble audio en façade qui permet le branchement et le contrôle commodes de périphériques audio. 45 ASRock k8A780LM Motherboard Français - ASRock K8A780LM | Quick Installation Guide - Page 46
instructions dans notre manuel et le manuel de châssis afin installer votre système. 2. Si vous utilisez le panneau audio AC'97, installez-le sur l'adaptateur audio PWR_FAN1 br. 3) (voir p.2 No. 31) Connecteur pour ventilateur CPU (CPU_FAN1 br. 4) (voir p.2 fig. 5) 1 2 3 ASRock K8A780LM Motherboard - ASRock K8A780LM | Quick Installation Guide - Page 47
unité d'alimentation électrique avec prise ATX 12V sur ce connecteur afin d'avoir une alimentation suffisante. Faute de quoi, il ne sera pas possible de mettre sous tension. Cette en-tête de port COM est utilisée pour prendre en charge un module de port COM. Français 47 ASRock k8A780LM Motherboard - ASRock K8A780LM | Quick Installation Guide - Page 48
sur le BIOS, veuillez consulter le Guide de l'utilisateur (fichier PDF) dans le CD technique. 3. Informations sur le CD de support Cette carte mère supporte divers systèmes d'exploitation Microsoft® Windows®: 7 et double-cliquez dessus pour afficher les menus. 48 ASRock K8A780LM Motherboard Français - ASRock K8A780LM | Quick Installation Guide - Page 49
madre ASRock K8A780LM (Micro ATX Form Factor: 9.6-in x 7.8-in, 24.4 cm x 19.8 cm) Guida di installazione rapida ASRock K8A780LM CD di supporto ASRock K8A780LM Un cavo IDE 80-pin Ultra ATA 66/100/133 Due cavo dati Serial ATA (SATA) (Opzionale) Un I/O Shield 49 ASRock k8A780LM Motherboard Italiano - ASRock K8A780LM | Quick Installation Guide - Page 50
scheda Audio LAN Pannello posteriore I/O - Micro ATX Form Factor: 9.6-in x 7.8-in, 24.4 cm x 19.8 cm - Connettore 754 per processori AMD AthlonTM 64 e Sempron - Supporto tecnologia AMD Cool 'n' QuietTM - Chipset con capacità FSB di 1000 MHz (2.0 GT/s) - Supporta la tecnologia overclocking "slegata - ASRock K8A780LM | Quick Installation Guide - Page 51
jumperfree - Supporta SMBIOS 2.3.1 - Regolazione multi-voltaggio CPU, VCCM, NB - Smart BIOS supportato CD di - Driver, utilità, software antivirus (Versione dimostrativa), supporto Suite software ASRock (Suite CyberLink DVD e Creative Sound Blaster X-Fi MB) (OEM e Versione demo) Caratteris - ASRock K8A780LM | Quick Installation Guide - Page 52
di hardware monitor e sincronizzare le Vostre unita' hardware per ottenere la migliore prestazione in Windows®. Prego visitare il nostro sito Internet per ulteriori dettagli circa l'uso del Sintonizzatore ASRock OC. ASRock website: http://www.asrock.com Italiano 52 ASRock K8A780LM Motherboard - ASRock K8A780LM | Quick Installation Guide - Page 53
CPU della scheda madre funzioni correttamente; scollegare e ricollegare il cavo d'alimentazione. Per migliorare la dissipazione del calore, ricordare di applicare l'apposita pasta siliconica tra il processore e il dissipatore quando si installa il sistema. 53 ASRock k8A780LM Motherboard Italiano - ASRock K8A780LM | Quick Installation Guide - Page 54
% con un consumo di corrente di 100 mA. Per la scelta di un'alimentatore predisposto EuP consigliamo di verificare ulteriori dettagli con il produttore. 54 ASRock K8A780LM Motherboard Italiano - ASRock K8A780LM | Quick Installation Guide - Page 55
jumper. Non cancellare la CMOS subito dopo aver aggiornato il BIOS. Se è necessario cancellare la CMOS una volta completato l'aggiornamento del BIOS, è necessario riavviare prima il sistema, e poi spegnerlo prima di procedere alla cancellazione della CMOS. Italiano 55 ASRock k8A780LM Motherboard - ASRock K8A780LM | Quick Installation Guide - Page 56
Serial ATA (SATA) (Opzionale) Entrambe le estremità del cavo dati SATA possono collegarsi all'hard disk SATA / SATAII o al connettore SATAII sulla scheda madre. 56 ASRock K8A780LM Motherboard Italiano - ASRock K8A780LM | Quick Installation Guide - Page 57
e la ricezione senza fili. Permettono di ricevere input stereo audio da fonti di suono come CD-ROM, DVD ROM,TV tuner, o schede MPEG. È un'interfaccia per il cavo del pannello audio. Che consente connessione facile e controllo dei dispositivi audio. 57 ASRock k8A780LM Motherboard Italiano - ASRock K8A780LM | Quick Installation Guide - Page 58
ai corrispondenti connettori facendo combaciare il cavo nero col pin di terra. Connettore ventolina CPU (4-pin CPU_FAN1) (vedi p.2 item 5) 1 2 3 4 Collegare il cavo della ventolina CPU a questo connettore e far combaciare il filo nero al pin terra. Italiano 58 ASRock K8A780LM Motherboard - ASRock K8A780LM | Quick Installation Guide - Page 59
la ventola CPU a 3 piedini al connettore della ventola CPU su questa ATX a questo connettore in modo che possa fornire energia sufficiente. In caso contrario l'unità non si avvia. Questo collettore porta COM è utilizzato per supportare il modulo porta COM. Italiano 59 ASRock k8A780LM Motherboard - ASRock K8A780LM | Quick Installation Guide - Page 60
las opciones predeterminadas. Per informazioni più dettagliate circa il Setup del BIOS, fare riferimento al Manuale dell'Utente (PDF file) contenuto nel cd di supporto. 3. Software di supporto e CD di supporto e cliccare due volte per visualizzare i menù. 60 ASRock K8A780LM Motherboard Italiano - ASRock K8A780LM | Quick Installation Guide - Page 61
mero de modelo específico de su placa. www.asrock.com/support/index.asp 1.1 Contenido de la caja Placa base ASRock K8A780LM (Factor forma Micro ATX: 24,4 cm x 17,8 cm, 9,6" x 7,8") Guía de instalación rápida de ASRock K8A780LM CD de soporte de ASRock K8A780LM Una cinta de datos IDE de conducción 80 - ASRock K8A780LM | Quick Installation Guide - Page 62
Audio LAN Entrada/Salida de Panel Trasero 62 - Factor forma Micro ATX: 24,4 cm x 17,8 cm, 9,6" x 7,8" - Zocalo 754 para procesadores AMD AMD RS780L (760G) - South Bridge: AMD AMD Radeon 3000 - iGPU de clase DX10 Gigabit LAN 10/100/1000 Mb/s - Realtek RTL8111DL - ASRock K8A780LM Motherboard Español - ASRock K8A780LM | Quick Installation Guide - Page 63
Híbrido: - Stepless control de frecuencia de CPU (vea ATENCIÓN 9) - ASRock U-COP (vea ATENCIÓN 10) - Protección de Falla de Inicio (B.F.G..) Monitor Hardware - Sensibilidad a la temperatura del procesador - Sensibilidad a la temperatura de la placa madre 63 ASRock k8A780LM Motherboard - ASRock K8A780LM | Quick Installation Guide - Page 64
"Manual overclock sus dispositivos de hardware para obtener el mejor funcionamiento del sistema bajo el entorno de Windows®. Por favor visite nuestro sitio web para los procedimientos de operación de Sintonizador de ASRock OC. Sitio web de ASRock: http://www.asrock.com 64 ASRock K8A780LM Motherboard - ASRock K8A780LM | Quick Installation Guide - Page 65
mejorar la eficiencia cuando los núcleos de la CPU están inactivos. En otras palabras, permite Windows®. Gracias a esta utilidad, sólo necesitará pulsar durante la fase POST o pulsar para acceder al menú de configuración del BIOS y a la utilidad ASRock ASRock k8A780LM Motherboard Español - ASRock K8A780LM | Quick Installation Guide - Page 66
una fuente de alimentación que cumpla la directiva EuP, le recomendamos que consulte con el fabricante de la fuente de alimentación para obtener más detalles. 66 ASRock K8A780LM Motherboard Español - ASRock K8A780LM | Quick Installation Guide - Page 67
acuérdase de quitar el jumper cap después de limpiar el COMS. Si necesita borrar la CMOS cuando acabe de finalizar la actualización de la BIOS, debe arrancar primero el sistema y, a continuación, apagarlo antes de realizar la acción de borrado de CMOS. Español 67 ASRock k8A780LM Motherboard - ASRock K8A780LM | Quick Installation Guide - Page 68
de serie ATA (SATA) (Opcional) Ambos extremos del cable pueden conectarse al disco duro SATA / SATAII o la conexión de la placa base. Español 68 ASRock K8A780LM Motherboard - ASRock K8A780LM | Quick Installation Guide - Page 69
ón y recepción wireless opcional. Permite recepción de input audio de fuente sónica como CD-ROM, DVD-ROM, TV tuner, o tarjeta MPEG. Este es una interface para cable de audio de panel frontal que permite conexión y control conveniente de apparatos de Audio. 69 ASRock k8A780LM Motherboard Español - ASRock K8A780LM | Quick Installation Guide - Page 70
con la patilla de (3-pin PWR_FAN1) masa. (vea p.2, N. 31) Conector del ventilador de la CPU (4-pin CPU_FAN1) (vea p.2, No. 5) 1 2 3 4 Conecte el cable del ventilador de la CPU a este conector y haga coincidir el cable negro con el conector de tierra. Español 70 ASRock K8A780LM Motherboard - ASRock K8A780LM | Quick Installation Guide - Page 71
cuenta que es necesario conectar este conector a una toma de corriente con el enchufe ATX 12V, de modo que proporcione suficiente electricidad. De lo contrario no se podrá encender. Este cabezal del puerto COM se utiliza para admitir un módulo de puerto COM. Español 71 ASRock k8A780LM Motherboard - ASRock K8A780LM | Quick Installation Guide - Page 72
configurar la BIOS, por favor refiérase al Manual del Usuario (archivo PDF) contenido en el CD. 3.Información de Software Support CD Esta placa-base soporta diversos tipos de sistema operativo Windows®: 7 en el archivo ASSETUP.EXE para iniciar la instalación. 72 ASRock K8A780LM Motherboard Español - ASRock K8A780LM | Quick Installation Guide - Page 73
acerca do modelo que está a utilizar. www.asrock.com/support/index.asp 1.1 Este pacote contém Placa-mãe ASRock K8A780LM (Formato Micro ATX: 9,6 pol. x 7,8 pol., 24,4 cm x 19,8 cm) Guia de instalação rápida da ASRock K8A780LM CD de suporte da placa ASRock K8A780LM Um cabo-fita IDE Ultra ATA 66/100 - ASRock K8A780LM | Quick Installation Guide - Page 74
5.1 (Codec de áudio VIA® VT1705) - Chipset encravado HDMI Audição - PCIE x1 Gigabit LAN 10/100/1000 Mb/s - Realtek RTL8111DL - Suporta Wake-On-LAN I/O Panel - 1 x porta para mouse PS/2 - 1 x porta para teclado PS/2 - 1 x porta paralela (com suporte ECP/EPP) Português 85 ASRock k8A780LM Motherboard - ASRock K8A780LM | Quick Installation Guide - Page 75
e Creative Sound Blaster X-Fi MB) (OEM e versão de demonstração) - Sintonizador ASRock OC (veja o AVISO 5) - Intelligent Energy Saver (veja o AVISO 6) - Instant Boot - ASRock Instant Flash (veja o AVISO 7) - ASRock OC DNA (veja o AVISO 8) - Booster híbrido: Português 86 ASRock K8A780LM Motherboard - ASRock K8A780LM | Quick Installation Guide - Page 76
es do BIOS, à aplicação da tecnologia Untied Overclocking ou à utilização de ferramentas de overclocking de terceiros. O overclocking pode afectar embaixo de Microsoft® Windows® 7 de 64 bits / 7 / VistaTM de 64 bits / VistaTM / XP de 64 bits / XP SP1; SP2. Português 87 ASRock k8A780LM Motherboard - ASRock K8A780LM | Quick Installation Guide - Page 77
na mesma placa-mãe. 9. Apesar de esta placa-mãe oferecer controle continuamente variável, não se recomenda efetuar over-clock. Freqüências de barramento diferentes das recomendadas para a CPU podem provocar instabilidade do sistema ou danos à CPU. 88 ASRock K8A780LM Motherboard Português - ASRock K8A780LM | Quick Installation Guide - Page 78
automaticamente e o botão de energia do chassis fica inativo. Cheque o ventilador da CPU na placa-mãe, para verificar se está funcionando corretamente antes de religar o sistema. Para confirme com o fabricante da fonte de alimentação para mais detalhes. 89 ASRock k8A780LM Motherboard Português - ASRock K8A780LM | Quick Installation Guide - Page 79
o CMOS usando um jumper. Por favor lembrese de remover o jumper depois de limpar o COMS. Se precisar limpar o CMOS ao concluir a atualização do BIOS, deverá reiniciar o sistema primeiro e, em seguida, desligá-lo antes de executar a ação de limpeza o CMOS. Português 90 ASRock K8A780LM Motherboard - ASRock K8A780LM | Quick Installation Guide - Page 80
) (opcional) Tanto a saída do cabo de Serial dados SATA pode ser conectado ao disco rígido SATA / SATAII quanto o conector SATAII na placa mãe. Português 91 ASRock k8A780LM Motherboard - ASRock K8A780LM | Quick Installation Guide - Page 81
TV ou placa MPEG. Esta é uma interface para o cabo de áudio no painel frontal, que permite uma conexão e controle convenientes dos dispositivos de áudio. 92 ASRock K8A780LM Motherboard Português - ASRock K8A780LM | Quick Installation Guide - Page 82
. Siga s instruções que aparecem no manual e no manual do chassis para instalar o sistema. 2. udio AC'97. E. Entre no utilitário de configuração do BIOS. Vá até à opção Definições avançadas e escolha CPU, coincidindo o fio preto com o pino de aterramento. Português 93 ASRock k8A780LM Motherboard - ASRock K8A780LM | Quick Installation Guide - Page 83
veja a folha 2, No. 32) Note que é necessário ligar uma fonte de alimentação com conector ATX 12V neste conector para fornecer alimentação suficiente. Do contrário, haverá falhas de funcionamento. Este conector é usado para suportar um módulo de porta COM. Português 94 ASRock K8A780LM Motherboard - ASRock K8A780LM | Quick Installation Guide - Page 84
configuração da BIOS, consulte o manual do usuário (em pdf) contido no CD de instalação. 3. Informações do CD de Suporte Esta placa Mãe suporta vários sistemas operacionais: Microsoft® Windows®: 7 / o CD e execute o "ASSETUP.EXE" localizado na pasta "BIN". Português 95 ASRock k8A780LM Motherboard
-
 1
1 -
 2
2 -
 3
3 -
 4
4 -
 5
5 -
 6
6 -
 7
7 -
8
-
9
-
10
-
11
-
12
-
13
-
14
-
15
-
16
-
17
-
18
-
19
-
20
-
21
-
22
-
23
-
24
-
25
-
26
-
27
-
28
-
29
-
30
-
31
-
32
-
33
-
34
-
35
-
36
-
37
-
38
-
39
-
40
-
41
-
42
-
43
-
44
-
45
-
46
-
47
-
48
-
49
-
50
-
51
-
52
-
53
-
54
-
55
-
56
-
57
-
58
-
59
-
60
-
61
-
62
-
63
-
64
-
65
-
66
-
67
-
68
-
69
-
70
-
71
-
72
-
73
-
74
-
75
-
76
-
77
-
78
-
79
-
80
-
81
-
82
-
83
-
84
 |
 |
1
ASRock
k8A780LM
Motherboard
English
English
English
English
English
Copyright Notice:
Copyright Notice:
Copyright Notice:
Copyright Notice:
Copyright Notice:
No part of this installation guide may be reproduced, transcribed, transmitted, or trans-
lated in any language, in any form or by any means, except duplication of documen-
tation by the purchaser for backup purpose, without written consent of ASRock Inc.
Products and corporate names appearing in this guide may or may not be registered
trademarks or copyrights of their respective companies, and are used only for identifica-
tion or explanation and to the owners’ benefit, without intent to infringe.
Disclaimer:
Disclaimer:
Disclaimer:
Disclaimer:
Disclaimer:
Specifications and information contained in this guide are furnished for informational
use only and subject to change without notice, and should not be constructed as a
commitment by ASRock. ASRock assumes no responsibility for any errors or omissions
that may appear in this guide.
With respect to the contents of this guide, ASRock does not provide warranty of any kind,
either expressed or implied, including but not limited to the implied warranties or
conditions of merchantability or fitness for a particular purpose. In no event shall
ASRock, its directors, officers, employees, or agents be liable for any indirect, special,
incidental, or consequential damages (including damages for loss of profits, loss of
business, loss of data, interruption of business and the like), even if ASRock has been
advised of the possibility of such damages arising from any defect or error in the guide
or product.
This device complies with Part 15 of the FCC Rules. Operation is subject to the
following two conditions:
(1)
this device may not cause harmful interference, and
(2)
this device must accept any interference received, including interference that
may cause undesired operation.
Published November 2009
Copyright
©
2009 ASRock INC. All rights reserved.
CALIFORNIA, USA ONLY
The Lithium battery adopted on this motherboard contains Perchlorate, a toxic
substance controlled in Perchlorate Best Management Practices (BMP) regulations
passed by the California Legislature. When you discard the Lithium battery in
California, USA, please follow the related regulations in advance.
“Perchlorate Material-special handling may apply, see
www
.dtsc.ca.gov/hazardouswa
ste/perchlorate”
ASRock Website: http://www.asrock.com