ASRock M3A-GLAN RAID Installation Guide
ASRock M3A-GLAN Manual
 |
View all ASRock M3A-GLAN manuals
Add to My Manuals
Save this manual to your list of manuals |
ASRock M3A-GLAN manual content summary:
- ASRock M3A-GLAN | RAID Installation Guide - Page 1
ATI RAID Installation Guide 1. ATI BIOS RAID Installation Guide 2 1.1 Introduction to RAID 2 1.2 RAID Configurations Precautions 2 1.3 Create Disk Array 3 2. ATI Windows RAID Installation Guide 8 2.1 Components of WebPAM Installation Software 8 2.2 Browser Support 8 2.3 Installing WebPAM 8 - ASRock M3A-GLAN | RAID Installation Guide - Page 2
by using the onboard FastBuild BIOS utility under BIOS environment. After you make a SATA / SATAII driver diskette, press to enter BIOS setup to set the option to RAID mode by following the detailed instruction of the "User Manual" in our support CD or "Quick Installation Guide", then you can - ASRock M3A-GLAN | RAID Installation Guide - Page 3
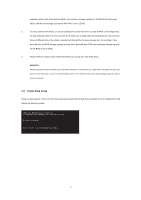
on your system. If this is the first time you have booted with the disk drives installed, the ATI onboard BIOS will display the following screen. AHCI (tm) BIOS Version 2 . 5 . 1540 . 12 (c) 2004-2005 ATI Technology, Inc. All rights reserved. No Array is defined... Press to enter FastBuild - ASRock M3A-GLAN | RAID Installation Guide - Page 4
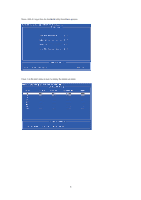
Press keys, then the FastBuild Utility Main Menu appears. Press 2 on the Main Menu screen to display the Define LD Menu. 4 - ASRock M3A-GLAN | RAID Installation Guide - Page 5
Press the arrow keys to highlight a logical drive number you want to define and press to select it. The Define LD Menu for the logical drive number you selected will next appear. Choose the RAID level you want. In the Define LD Menu section, press the spacebar to cycle through logical drive - ASRock M3A-GLAN | RAID Installation Guide - Page 6
a new RAID logical drive. Please install the operating system to your computer by following the detailed instruction of the "User Manual" in our support CD or "Quick Installation Guide". Two Logical Drives After selecting the logical drive in Disk Assignments as the above-mentioned procedures, press - ASRock M3A-GLAN | RAID Installation Guide - Page 7
. 6. Press to restart the computer. You have successfully created a new RAID logical drive. Please install the operating system to your computer by following the detailed instruction of the "User Manual" in our support CD or "Quick Installation Guide". 7 - ASRock M3A-GLAN | RAID Installation Guide - Page 8
brands of RAID controllers are not supported. Please read this guide carefully and follow the instructions below to configure and manage RAID it the default browser. Then install WebPAM. You must use one of the browsers listed above on your networked PC in order to access WebPAM over the network. 2.3 - ASRock M3A-GLAN | RAID Installation Guide - Page 9
5. Follow the prompts in the installation dialog box. The first WebPAM installation dialog box appears as shown below. 6. Select an installer language from the dropdown menu and click the OK button. 7. Click the Next button when the Introduction screen appears. 8. Click on the "I accept the terms of - ASRock M3A-GLAN | RAID Installation Guide - Page 10
MIS Administrator for guidance. Click the Next button when you have made your choice. 11. Review your choices when the Pre-Installation Summary screen appears. Click the Previous button to make changes or . Then you can start to log-in to WebPAM. Please read the instruction below for details. 10 - ASRock M3A-GLAN | RAID Installation Guide - Page 11
Sign in button. This is the default login for the Administrator. The Login ID and Password are case sensitive. Click the WebPAM online help for instructions on adding users and changing passwords. 11 - ASRock M3A-GLAN | RAID Installation Guide - Page 12
4. After you successfully log-in to WebPAM, you are allowed to click the button on the top such as "Language", "Help", or "Logout" for other requirement. 2.5 Create RAID in WebPAM After you log-in to WebPAM, you can click the button on the left. Click 127.0.01., ATI SB600 SATA Controller, and then - ASRock M3A-GLAN | RAID Installation Guide - Page 13
Click Logical Drive View. Click the Create button to create RAID array. Then you can start to select RAID level. After selecting the RAID level that you wish, click Next for the next page. Here we take RAID 1 for example. 13 - ASRock M3A-GLAN | RAID Installation Guide - Page 14
You can select drive group. Please select a free drive(s) for one logical drive that has free space. Click Next. Select drives. You can choose to use maximum capacity or key in the logical drive size in (GB). Then select the drives that you plan to create RAID. Click Next for the next page. 14 - ASRock M3A-GLAN | RAID Installation Guide - Page 15
assign is supposed to contain 1 to 32 characters. After that, please click Next. In the Final Settings page, please confirm your choices in the following list. Or you may make any changes here. If you have confirmed the information in the - ASRock M3A-GLAN | RAID Installation Guide - Page 16
Finally, in Logical Drive Overview page, you can see the RAID configuration you just made on your system, including Assigned Name, RAID Level, Status, Background Activity, and Capacity. In the future, if you plan to configure other RAID functions, you may click the Delete or Synchronization Schedule
-
 1
1 -
 2
2 -
 3
3 -
 4
4 -
 5
5 -
 6
6 -
 7
7 -
8
-
9
-
10
-
11
-
12
-
13
-
14
-
15
-
16
 |
 |

1
ATI RAID Installation Guide
1.
ATI BIOS RAID Installation Guide …………………………………………………………. 2
1.1
Introduction to RAID …………………………………………………………………… 2
1.2
RAID Configurations Precautions ……………………………………………………. 2
1.3
Create Disk Array ……………………………………………………………………… 3
2.
ATI Windows RAID Installation Guide …………………………………………………….. 8
2.1
Components of WebPAM Installation Software ……………………………………. 8
2.2
Browser Support ………………………………………………………………………. 8
2.3
Installing WebPAM ……………………………………………………………………. 8
2.4
Log-in to WebPAM ……………………………………………………………………. 11
2.5
Create RAID in WebPAM ……………………………………………………………. 12