ASRock M3A UCC Quick Installation Guide
ASRock M3A UCC Manual
 |
View all ASRock M3A UCC manuals
Add to My Manuals
Save this manual to your list of manuals |
ASRock M3A UCC manual content summary:
- ASRock M3A UCC | Quick Installation Guide - Page 1
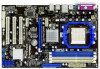
for backup purpose, without written consent of ASRock Inc. Products and corporate names appearing in this guide may or may not be registered trademarks or ASRock Website: http://www.asrock.com Published September 2011 Copyright©2011 ASRock INC. All rights reserved. 1 ASRock M3A UCC Motherboard - ASRock M3A UCC | Quick Installation Guide - Page 2
(PORT1)) 30 Internal Audio Connector: CD1 (Black) 14 Primary SATAII Connector (SATAII_1 (PORT0)) 31 Infrared Module Header (IR1) 15 USB 2.0 Header (USB6_7, Blue) 32 USB_PW2 Jumper 16 USB 2.0 Header (USB8_9, Blue) 33 CPU Fan Connector (CPU_FAN1) 17 USB_PW1 Jumper 2 ASRock M3A UCC Motherboard - ASRock M3A UCC | Quick Installation Guide - Page 3
. For Windows® 7 / 7 64-bit / VistaTM / VistaTM 64-bit OS: Please click "VIA HD Audio Deck" icon , and click "Advanced Options" on the left side on the bottom. In "Advanced Options" screen, select "Independent Headphone", and click "OK" to save your change. 3 ASRock M3A UCC Motherboard English - ASRock M3A UCC | Quick Installation Guide - Page 4
of this manual occur, the updated version will be available on ASRock website without further notice. You may find the latest VGA cards and CPU support lists on ASRock website as well. ASRock website http://www.asrock.com If you require technical support related to this motherboard, please visit - ASRock M3A UCC | Quick Installation Guide - Page 5
Platform CPU Chipset Memory Expansion Slot Audio LAN Rear Panel I/O Connector - ATX Form Factor: 12.0-in x 7.8-in, 30.5 cm x 19.8 cm - Support for Socket AM3 processors: AMD PhenomTM II X4 / X3 / X2 (except 920 / 940) / Athlon II X4 / X3 / X2 / Sempron processors - Six-Core CPU Ready - Supports UCC - ASRock M3A UCC | Quick Installation Guide - Page 6
audio connector - 2 x USB 2.0 headers (support 4 USB 2.0 ports) (see CAUTION 7) BIOS Feature - 4Mb AMI BIOS - AMI Legal BIOS - Supports "Plug and Play" - ACPI 1.1 Compliance Wake Up Events - Supports jumperfree - SMBIOS 2.3.1 Support - CPU Voltage Multi-adjustment Support CD - Drivers - ASRock M3A UCC | Quick Installation Guide - Page 7
memory speed is supported depends on the AM3 CPU you adopt. If you want to adopt DDR3 1800/1600 memory module on this motherboard, please refer to the memory support list on our website for the compatible memory modules. ASRock website http://www.asrock.com 5. Due to the chipset limitation, if you - ASRock M3A UCC | Quick Installation Guide - Page 8
BIOS update tool allows you to update system BIOS without entering operating systems first like MS-DOS or Windows®. With this utility, you can press key during the POST or press key to BIOS setup menu to access ASRock Instant Flash. Just launch this tool and save the new BIOS file - ASRock M3A UCC | Quick Installation Guide - Page 9
wall socket before touching any component. 2. To avoid damaging the motherboard components due to static electricity, NEVER place your motherboard directly the motherboard to the chassis, please do not over-tighten the screws! Doing so may damage the motherboard. 9 ASRock M3A UCC Motherboard English - ASRock M3A UCC | Quick Installation Guide - Page 10
the heatsink are securely fastened and in good contact with each other. Then connect the CPU fan to the CPU FAN connector (CPU_FAN1, see Page 2, No. 33). For proper installation, please kindly refer to the instruction manuals of the CPU fan and the heatsink. English 10 ASRock M3A UCC Motherboard - ASRock M3A UCC | Quick Installation Guide - Page 11
This motherboard provides four 240-pin DDR3 (Double Data Rate 3) DIMM slots, and supports motherboard and DIMM may be damaged. 5. If you adopt DDR3 1800/1600 memory modules on this motherboard, it is recommended to install them on DDR3_A2 and DDR3_B2 slots. English 11 ASRock M3A UCC Motherboard - ASRock M3A UCC | Quick Installation Guide - Page 12
cause permanent damage to the motherboard and the DIMM if you force the DIMM into the slot at incorrect orientation. Step 3. Firmly insert the DIMM into the slot until the retaining clips at both ends fully snap back in place and the DIMM is properly seated. 12 ASRock M3A UCC Motherboard English - ASRock M3A UCC | Quick Installation Guide - Page 13
slot that you intend to use. Keep the screws for later use. Step 4. Align the card connector with the slot and press firmly until the card is completely seated on the slot. Step 5. Fasten the card to the chassis with screws. Step 6. Replace the system cover. 13 ASRock M3A UCC Motherboard English - ASRock M3A UCC | Quick Installation Guide - Page 14
system under S3 (Suspend to RAM) state. To support ErP/EuP requirement, please set update the BIOS. If you need to clear the CMOS when you just finish updating the BIOS, you must boot up the system first, and then shut it down before you do the clear-CMOS action. 14 ASRock M3A UCC Motherboard - ASRock M3A UCC | Quick Installation Guide - Page 15
four Serial ATAII (SATAII) connectors support SATAII or SATA hard disk for internal storage devices. SATA) Data Cable (Optional) Either end of the SATA data cable can be connected to the SATA / SATAII hard disk or the SATAII connector on this motherboard. English 15 ASRock M3A UCC Motherboard - ASRock M3A UCC | Quick Installation Guide - Page 16
(MIC) to MIC2_L. B. Connect Audio_R (RIN) to OUT2_R and Audio_L (LIN) to OUT2_L. C. Connect Ground (GND) to Ground (GND). D. MIC_RET and OUT_RET are for HD audio panel only. You don't need to connect them for AC'97 audio panel. English 16 ASRock M3A UCC Motherboard - ASRock M3A UCC | Quick Installation Guide - Page 17
this motherboard provides 24-pin ATX power connector, 12 24 it can still work if you adopt a traditional 20-pin ATX power supply. To use the 20-pin ATX power supply, please plug your power supply along with Pin 1 and Pin 13. 20-Pin ATX Power Supply Installation 1 ASRock M3A UCC Motherboard 13 - ASRock M3A UCC | Quick Installation Guide - Page 18
ATX 12V Power Connector (4-pin ATX12V1) (see p.2 No. 2) Please note that it is necessary to connect a power supply with ATX 12V plug to this connector. Failing to do so will cause power up failure. English 18 ASRock M3A UCC Motherboard - ASRock M3A UCC | Quick Installation Guide - Page 19
SATA / SATAII HDDs without NCQ and Hot Plug functions STEP 1: Set up BIOS. A. Enter BIOS SETUP UTILITY Advanced screen Storage Configuration. B. Set the "SATA Operation Mode" option to [IDE]. STEP 2: Install Windows® XP / XP 64-bit OS on your system. English 19 ASRock M3A UCC Motherboard - ASRock M3A UCC | Quick Installation Guide - Page 20
Up BIOS. A. Enter BIOS SETUP UTILITY Advanced screen Storage Configuration. B. Set the "SATA Operation Mode" option to [AHCI]. STEP 2: Install Windows® 7 / 7 64-bit / VistaTM / VistaTM 64-bit OS on your system. 2.10 Untied Overclocking Technology This motherboard supports Untied Overclocking - ASRock M3A UCC | Quick Installation Guide - Page 21
BIOS Setup, please refer to the User Manual (PDF file) contained in the Support CD. 4. Software Support CD information This motherboard supports various Microsoft® Windows on the file "ASSETUP.EXE" from the "BIN" folder in the Support CD to display the menus. 21 ASRock M3A UCC Motherboard English - ASRock M3A UCC | Quick Installation Guide - Page 22
: www.asrock.com/support/index.asp 1.1 Kartoninhalt ASRock M3A UCC Motherboard (ATX-Formfaktor: 30.5 cm x 19.8 cm; 12.0 Zoll x 7.8 Zoll) ASRock M3A UCC Schnellinstallationsanleitung ASRock M3A UCC Support-CD Zwei Seriell-ATA- (SATA) Datenkabel (Option) Ein I/O Shield 22 ASRock M3A UCC Motherboard - ASRock M3A UCC | Quick Installation Guide - Page 23
ätze Audio LAN E/A-Anschlüsse an der Rückseite - ATX-Formfaktor: 30.5 cm x 19.8 cm; 12.0 Zoll x 7.8 Zoll - Unterstützung von Socket AM3-Prozessoren: AMD PhenomTM II X4 / X3 / X2 (außer 920 / 940) / Athlon X4 / X3 / X2 / Sempron-Prozessor - Sechs-Kern-CPU-bereit - Unterstützt UCC (Unlock CPU Core - ASRock M3A UCC | Quick Installation Guide - Page 24
- Drehzahlmessung für CPU/Gehäuse/Stromlüfter - CPU-Lüftergeräuschdämpfung - Spannungsüberwachung: +12V, +5V, +3.3V, Vcore Betriebssysteme - Unterstützt Microsoft® Windows® 7 / 7 64-Bit / VistaTM / VistaTM 64-Bit / XP / XP Media Center / XP 64-Bit 24 ASRock M3A UCC Motherboard - ASRock M3A UCC | Quick Installation Guide - Page 25
verursacht wurden. VORSICHT! 1. Die ASRock UCC-Funktion (Unlock CPU Core; zu Deutsch: CPU-Kern freigeben) vereinfacht die AMD-CPU-Aktivierung. Zur Freigabe des zusätzlichen CPU-Kerns müssen Sie lediglich die BIOS-Option „Unlock CPU Core" (zu Deutsch: CPU-Kern freigeben) umschalten - schon - ASRock M3A UCC | Quick Installation Guide - Page 26
Ihr BIOS mit nur wenigen Klickvorgängen ohne Bereitstellung einer zusätzlichen Diskette oder eines anderen komplizierten Flash-Programms aktualisieren. Achten Sie darauf, dass das USB-Flash-Laufwerk oder die Festplatte das Dateisystem FAT32/16/12 benutzen muss. 26 ASRock M3A UCC Motherboard Deutsch - ASRock M3A UCC | Quick Installation Guide - Page 27
. Bevor Sie das System neu starten, prüfen Sie bitte, ob der CPU-Lüfter am Motherboard richtig funktioniert, und stecken Sie bitte den Stromkabelstecker aus und dann wieder ein. empfehlen wir Ihnen, weitere Details beim Hersteller der Stromversorgung abzufragen. 27 ASRock M3A UCC Motherboard Deutsch - ASRock M3A UCC | Quick Installation Guide - Page 28
Sie +5V_DUAL auswahlen, konnen USB-Gerate das System aus dem S3-Zustand (Suspend to RAM) aufwecken. USB_PW1 Überbrücken Sie Pin2, Pin3, um (siehe S.2, No. 17 -Passwort, Datum, Zeit und die verschiedenen BIOS-Parameter. Um die Systemparameter zu löschen und auf die 28 ASRock M3A UCC Motherboard - ASRock M3A UCC | Quick Installation Guide - Page 29
Wenn Sie den CMOSInhalt gleich nach dem Aktualisieren des BIOS löschen müssen, müssen Sie zuerst das System SATA II) -Anschlüsse unterstützen interne SATAoder SATA II-Festplatten. Die aktuelle SATAII-Schnittstelle ermöglicht eine Datenübertragungsrate bis 3,0 Gb/s. 29 ASRock M3A UCC Motherboard - ASRock M3A UCC | Quick Installation Guide - Page 30
) (siehe S.2 - No. 15) SJedes Ende des SATA Datenkabels kann an die SATA / SATAII Festplatte oder das SATAII Verbindungsstück auf dieser - No. 31) Interne Audio-Anschlüsse (4-Pin CD1) (CD1: siehe S.2, No. 30) Anschluss für Audio auf der Gehäusevorderseite (9-Pin ASRock M3A UCC Motherboard Deutsch - ASRock M3A UCC | Quick Installation Guide - Page 31
auch ohne Geschwindigkeitsregulierung. Wenn Sie einen dreipoligen CPU-Lüfter an den CPU-Lüferanschluss dieses Motherboards anschließen möchten, verbinden Sie ihn bitte mit den Pins 1 - 3. Pins 1-3 anschließen Lüfter mit dreipoligem Anschluss installieren Deutsch 31 ASRock M3A UCC Motherboard - ASRock M3A UCC | Quick Installation Guide - Page 32
eines 20-pol. ATX-Netzteils 1 13 Beachten Sie bitte, dass Sie eine Stromversorgung mit ATX 12Volt-Stecker mit diesem Anschluss verbinden müssen, damit ausreichend Strom geliefert werden kann. Andernfalls reicht der Strom nicht aus, das System zu starten. Deutsch 32 ASRock M3A UCC Motherboard - ASRock M3A UCC | Quick Installation Guide - Page 33
Verzeichnis der Support-CD, um die Menüs aufzurufen. Das Setup-Programm soll es Ihnen so leicht wie möglich machen. Es ist menügesteuert, d.h. Sie können in den verschiedenen Untermenüs Ihre Auswahl treffen und die Programme werden dann automatisch installiert. 33 ASRock M3A UCC Motherboard Deutsch - ASRock M3A UCC | Quick Installation Guide - Page 34
.asp 1.1 Contenu du paquet Carte mère ASRock M3A UCC (Facteur de forme ATX: 12.0 pouces x 7.8 pouces, 30.5 cm x 19.8 cm) Guide d'installation rapide ASRock M3A UCC CD de soutien ASRock M3A UCC Deux câble de données Serial ATA (SATA) (Optionnelle) Un écran I/O 34 ASRock M3A UCC Motherboard Français - ASRock M3A UCC | Quick Installation Guide - Page 35
Format CPU Chipsets Mémoire Slot d'extension Audio LAN Panneau arrière E/S - Facteur de forme ATX: 12.0 pouces x 7.8 pouces, 30.5 cm x 19.8 cm - Prise en charge des processeurs sur socket AM3: Processeur PhenomTM II X4 / X3 / X2 (sauf 920 / 940) / Athlon II X4 / X3 / X2 / Sempron d'AMD - Pr - ASRock M3A UCC | Quick Installation Guide - Page 36
13) - Garde d'échec au démarrage (B.F.G.) - Contrôle de la température CPU - Mesure de température de la carte mère - Tachéomètre ventilateur CPU/Châssis/Ventilateur - Ventilateur silencieux d'unité centrale - Monitoring de la tension: +12V, +5V, +3.3V, Vcore Français 36 ASRock M3A UCC Motherboard - ASRock M3A UCC | Quick Installation Guide - Page 37
du CPU AM3 que vous choisissez. Si vous choisissez des barrettes de mémoire DDR3 1800/1600 sur cette carte mère, veuillez vous référer à la liste des mémoires prises en charge sur notre site Web pour connaître barrettes de mémoire compatibles. Site Web ASRock http://www.asrock.com 37 ASRock M3A UCC - ASRock M3A UCC | Quick Installation Guide - Page 38
rígido, em seguida, poderá actualizar o BIOS com apenas alguns cliques sem ter de utilizar outra disquete ou outro complicado utilitário de flash. Note que a unidade flash USB ou a unidade de disco rígido devem utilizar o sistema de ficheiros FAT32/16/12. 38 ASRock M3A UCC Motherboard Français - ASRock M3A UCC | Quick Installation Guide - Page 39
UC recommandées risquent de déstabiliser le système ou d'endommager l'UC. 13. Lorsqu'une surchauffe du CPU est détectée, le système s'arrête automatiquement. Avant de redémarrer le système, veuillez vé votre fournisseur de courant pour plus de détails. 39 ASRock M3A UCC Motherboard Français - ASRock M3A UCC | Quick Installation Guide - Page 40
. Lorsque vous selectionnez +5V_DUAL, les peripheriques USB reveillent le systeme en etat S3 (Suspension a la RAM). USB_PW1 Court-circuitez les broches 2 (voir p.2 fig. 17) et 3 pour choisir +5VSB ( CMOS. Les données dans la CMOS comprennent les informations de 40 ASRock M3A UCC Motherboard - ASRock M3A UCC | Quick Installation Guide - Page 41
après avoir mis le BIOS à jour. Si vous avez besoin d'effacer la CMOS lorsque vous avez fini de mettre le BIOS à jour, vous devez 66/100/133 80 conducteurs Note: Veuillez vous reporter aux instructions du fabricant de votre IDE périphérique pour les détails 3,0 Gb/s. 41 ASRock M3A UCC Motherboard - ASRock M3A UCC | Quick Installation Guide - Page 42
le panneau audio AC'97, installez-le sur l'adaptateur audio du panneau avant conformément à la procédure ci-dessous : A. Connectez Mic_IN (MIC) à MIC2_L. B. Connectez Audio_R (RIN) à OUT2_R et Audio_L (LIN) à OUT2_L. C. Connectez Ground (GND) à Ground (GND). 42 ASRock M3A UCC Motherboard Français - ASRock M3A UCC | Quick Installation Guide - Page 43
pour le panneau audio AC'97. re offre un support de (Ventilateur silencieux) ventilateur de CPU à 4 broches , le ventilateur de CPU à 3 broches ATX (ATXPWR1 br. 24) (voir p.2 fig. 7) 12 24 1 13 Veuillez connecter une unité d'alimentation ATX sur ce connecteur. 43 ASRock M3A UCC Motherboard - ASRock M3A UCC | Quick Installation Guide - Page 44
br. 4) (voir p.2 fig. 2) Veuillez noter qu'il est nécessaire de connecter une unité d'alimentation électrique avec prise ATX 12V sur ce connecteur afin d'avoir une alimentation suffisante. Faute de quoi, il ne sera pas possible de mettre sous tension. Français 44 ASRock M3A UCC Motherboard - ASRock M3A UCC | Quick Installation Guide - Page 45
sur le BIOS, veuillez consulter le Guide de l'utilisateur (fichier PDF) dans le CD technique. 3. Informations sur le CD de support Cette carte mère supporte divers systèmes d'exploitation Microsoft® Windows®: 7 et double-cliquez dessus pour afficher les menus. 45 ASRock M3A UCC Motherboard Français - ASRock M3A UCC | Quick Installation Guide - Page 46
.com/support/index.asp 1.1 Contenuto della confezione Scheda madre ASRock M3A UCC (ATX Form Factor: 12.0-in x 7.8-in, 30.5 cm x 19.8 cm) Guida di installazione rapida ASRock M3A UCC CD di supporto ASRock M3A UCC Due cavo dati Serial ATA (SATA) (Opzionale) Un I/O Shield 46 ASRock M3A UCC Motherboard - ASRock M3A UCC | Quick Installation Guide - Page 47
Chipset Memoria Slot di espansione Audio LAN Pannello posteriore I/O - ATX Form Factor: 12.0-in x 7.8-in, 30.5 cm x 19.8 cm - Supporto di processori Socket AM3: AMD PhenomTM II X4 / X3 / X2 (fatta eccezione per 920 / 940) / Athlon II X4 / X3 / X2 / Sempron - CPU Six-Core Ready - Supporto UCC - ASRock M3A UCC | Quick Installation Guide - Page 48
Guard (B.F.G.) Monitor- - Sensore per la temperatura del processore aggio - Sensore temperatura scheda madre Hardware - Indicatore di velocita per la ventola del CPU/Chassis/ Alimentazione - Ventola CPU silenziosa - Voltaggio: +12V, +5V, +3.3V, Vcore Italiano 48 ASRock M3A UCC Motherboard - ASRock M3A UCC | Quick Installation Guide - Page 49
quali sono i moduli compatibili. Sito web ASRock http://www.asrock.com 5. A causa delle limitazioni del chipset, le dimensioni effettive della memoria possono essere inferiori a 4GB per l'accantonamento riservato all'uso del sistema sotto Windows® OS. Italiano 49 ASRock M3A UCC Motherboard - ASRock M3A UCC | Quick Installation Guide - Page 50
efficienza quando i nuclei della CPU sono inattivi. In alter Windows®. Con questa utilità, si può premere il tasto durante il POST, oppure il tasto nel menu BIOS per accedere ad ASRock Instant Flash. Avviare questo strumento e salvare il nuovo file BIOS ASRock M3A UCC Motherboard Italiano - ASRock M3A UCC | Quick Installation Guide - Page 51
sistema si chiude automaticamente. Prima di riavviare il sistema, assicurarsi che la ventolina CPU della scheda madre funzioni correttamente; scollegare e ricollegare il cavo d'alimentazione. Per consigliamo di verificare ulteriori dettagli con il produttore. 51 ASRock M3A UCC Motherboard Italiano - ASRock M3A UCC | Quick Installation Guide - Page 52
si seleziona +5V_DUAL, i dispositivi USB possono riattivare il sistema dallo stato S3 (Suspend to RAM). USB_PW1 Cortocircuitare pin2, pin3 per (vedi p.2 item 17) settare a +5VSB (standby) 3 su CLRCMOS1 per 5 secondi. Dopo aver cortocircuitato il jumper Clear CMOS 52 ASRock M3A UCC Motherboard - ASRock M3A UCC | Quick Installation Guide - Page 53
le periferiche di archiviazione HD SATA o SATAII per le funzioni di archiviazione interna. ATAII (SATAII) supportano cavi SATAII per dispositivi di memoria interni. L'interfaccia SATAII attuale permette velocità di trasferimento dati fino a 3.0 Gb/s. Italiano 53 ASRock M3A UCC Motherboard - ASRock M3A UCC | Quick Installation Guide - Page 54
del cavo di dati SATA può essere collegata al disco rigido SATA / SATAII o al manuale e del manuale del telaio per installare il sistema. 2. Se si utilizza un pannello audio AC'97, installarlo nell'intestazione audio del pannello anteriore, come indicato di seguito: 54 ASRock M3A UCC Motherboard - ASRock M3A UCC | Quick Installation Guide - Page 55
ventola CPU su questa scheda madre, collegarla ai piedini 1-3. Piedini 1-3 collegati Installazione della ventola a 3 piedini Collettore alimentazione ATX (24-pin ATXPWR1) (vedi p.2 item 7) 12 24 1 13 Collegare la sorgente d'alimentazione ATX a questo collettore. 55 ASRock M3A UCC Motherboard - ASRock M3A UCC | Quick Installation Guide - Page 56
(4-pin ATX12V1) (vedi p.2 item 2) Installazione dell'alimentatore ATX a 20 pin 1 13 È necessario collegare una alimentazione con spinotto da 12V ATX a questo connettore in modo che possa fornire energia sufficiente. In caso contrario l'unità non si avvia. Italiano 56 ASRock M3A UCC Motherboard - ASRock M3A UCC | Quick Installation Guide - Page 57
> durante il Power-On-Self-Test (POST) della Setup utility del BIOS; altrimenti, POST continua con i suoi test di routine. Per entrare il BIOS Setup dopo il POST, riavvia file ASSETUP.EXE nel CESTINO del CD di supporto e cliccare due volte per visualizzare i menù. 57 ASRock M3A UCC Motherboard - ASRock M3A UCC | Quick Installation Guide - Page 58
.com/support/index.asp 1.1 Contenido de la caja Placa base ASRock M3A UCC (Factor forma ATX: 30,5 cm x 19,8 cm, 12,0" x 7,8") Guía de instalación rápida de ASRock M3A UCC CD de soporte de ASRock M3A UCC Dos Cable de Datos Serial ATA (SATA) (Opcional) Una protección I/O 58 ASRock M3A UCC Motherboard - ASRock M3A UCC | Quick Installation Guide - Page 59
Chipset Memoria Ranuras de Expansión Audio LAN Entrada/Salida de Panel Trasero - Factor forma ATX: 30,5 cm x 19,8 cm, 12,0" x 7,8" - Compatibilidad con procesadores con conector AM3: procesador AMD PhenomTM II X4 / X3 / X2 (excepto 920 / 940) / Athlon II X4 / X3 / X2 / Sempron - Compatible con CPU - ASRock M3A UCC | Quick Installation Guide - Page 60
Sensibilidad a la temperatura del procesador - Sensibilidad a la temperatura de la placa madre - Taquimetros de los ventiladores del procesador y del CPU / chasis / alimentacion - Ventilador silencioso para procesador - Monitor de Voltaje: +12V, +5V, +3.3V, Vcore 60 ASRock M3A UCC Motherboard - ASRock M3A UCC | Quick Installation Guide - Page 61
ón AM3 Procesador que adopte. Si desea adoptar el módulo de memoria DDR3 1800/1600 en esta placa base, consulte la lista de compatibilidad de memorias en nuestro sitio Web para obtener los módulos de memoria compatibles. Sitio Web de ASRock: http://www.asrock.com 61 ASRock M3A UCC Motherboard Espa - ASRock M3A UCC | Quick Installation Guide - Page 62
el BIOS con sólo pulsar un par de botones, sin necesidad de preparar un disco flexible adicional ni utilizar complicadas utilidades de programación. Recuerde que la unidad flash USB o disco duro utilizado debe disponer del sistema de archivos FAT32/16/12. 62 ASRock M3A UCC Motherboard Espa - ASRock M3A UCC | Quick Installation Guide - Page 63
va a apagarse automaticamente. Antes de reanudar el sistema, compruebe si el ventilador de la CPU de la placa base funciona apropiadamente y desconecte el cable de alimentación, a continuación, vuelva de la fuente de alimentación para obtener más detalles. 63 ASRock M3A UCC Motherboard Español - ASRock M3A UCC | Quick Installation Guide - Page 64
los dispositivos USB podran reactivar el sistema siempre que se encuentre en el estado S3 (Suspension a RAM). USB_PW1 Ponga en cortocircuito pin 2, (vea p.2, No. 17) pin 3 para habilitar +5VSB ( las agujas pin2 y pin3 en CLRCMOS1 durante 5 segundos. Por 64 ASRock M3A UCC Motherboard Español - ASRock M3A UCC | Quick Installation Guide - Page 65
la CMOS cuando acabe de finalizar la actualización de la BIOS, debe arrancar primero el sistema y, a continuación, apagarlo SATA o SATAII para dispositivos de almacenamiento interno. La interfaz SATAII actual permite una velocidad de transferencia de 3.0 Gb/s. Español 65 ASRock M3A UCC Motherboard - ASRock M3A UCC | Quick Installation Guide - Page 66
manual y en el manual de chasis para instalar su sistema. 2. Si utiliza el panel de sonido AC'97, instálelo en la cabecera de sonido del panel frontal de la siguiente manera: A. Conecte Mic_IN (MIC) a MIC2_L. B. Conecte Audio_R (RIN) a OUT2_R y Audio_L (LIN) en OUT2_L. 66 ASRock M3A UCC Motherboard - ASRock M3A UCC | Quick Installation Guide - Page 67
de masa. Conector del ventilador de la CPU (4-pin CPU_FAN1) (vea p.2, No. 33) Conecte el cable del ventilador 4 de la CPU a este conector y 3 2 haga ATX (24-pin ATXPWR1) (vea p.2, No. 7) 12 24 Conecte la fuente de alimentación ATX a su cabezal. 1 13 Español 67 ASRock M3A UCC Motherboard - ASRock M3A UCC | Quick Installation Guide - Page 68
1 13 Conector de ATX 12V power (4-pin ATX12V1) (vea p.2, No. 2) Tenga en cuenta que es necesario conectar este conector a una toma de corriente con el enchufe ATX 12V, de modo que proporcione suficiente electricidad. De lo contrario no se podrá encender. Español 68 ASRock M3A UCC Motherboard - ASRock M3A UCC | Quick Installation Guide - Page 69
ón detallada sobre como configurar la BIOS, por favor refiérase al Manual del Usuario (archivo PDF) contenido en el CD. 3.Información de Software Support CD Esta placa-base soporta diversos y doblepulse en el archivo ASSETUP.EXE para iniciar la instalación. 69 ASRock M3A UCC Motherboard Español - ASRock M3A UCC | Quick Installation Guide - Page 70
. . ASRock. ASRock ( - ATX: 12,0 x 7,8 / 30,5 x 19,8 ) ASRock ASRock Serial ATA (SATA) ( ) - I/O 70 ASRock M3A UCC Motherboard - ASRock M3A UCC | Quick Installation Guide - Page 71
12,0 x 7,8 / 30,5 x 19,8 Hot-Plug 71 ASRock M3A UCC Motherboard - ASRock M3A UCC | Quick Installation Guide - Page 72
72 ASRock M3A UCC Motherboard - ASRock M3A UCC | Quick Installation Guide - Page 73
73 ASRock M3A UCC Motherboard - ASRock M3A UCC | Quick Installation Guide - Page 74
74 ASRock M3A UCC Motherboard - ASRock M3A UCC | Quick Installation Guide - Page 75
75 ASRock M3A UCC Motherboard - ASRock M3A UCC | Quick Installation Guide - Page 76
Short Open CMOS CMOS 76 ASRock M3A UCC Motherboard - ASRock M3A UCC | Quick Installation Guide - Page 77
la banda roja debe quedar en el mismo lado que el contacto 1 IDE SATAII_4 (PORT3) SATAII_3 (PORT2) SATAII_2 (PORT1) SATAII_1 (PORT0) 77 ASRock M3A UCC Motherboard - ASRock M3A UCC | Quick Installation Guide - Page 78
(5- IR1) CD1 78 ASRock M3A UCC Motherboard - ASRock M3A UCC | Quick Installation Guide - Page 79
(9PANEL1) 4 3 2 1 ATX 12 24 1 13 ATX. 79 ASRock M3A UCC Motherboard - ASRock M3A UCC | Quick Installation Guide - Page 80
12V-ATX 12 24 1 13 , ATX 12 , . . 80 ASRock M3A UCC Motherboard - ASRock M3A UCC | Quick Installation Guide - Page 81
F POST 3 BIOS Setup Power-On-Self-Test - POST BIOS Setup POST Ctrl> + + - ASRock M3A UCC | Quick Installation Guide - Page 82
82 ASRock M3A UCC Motherboard - ASRock M3A UCC | Quick Installation Guide - Page 83
'' ® 83 ASRock M3A UCC Motherboard - ASRock M3A UCC | Quick Installation Guide - Page 84
® 84 ASRock M3A UCC Motherboard - ASRock M3A UCC | Quick Installation Guide - Page 85
" " " " ® " " " " ® 85 ASRock M3A UCC Motherboard - ASRock M3A UCC | Quick Installation Guide - Page 86
® 86 ASRock M3A UCC Motherboard - ASRock M3A UCC | Quick Installation Guide - Page 87
"" "" "" "" "" 87 ASRock M3A UCC Motherboard - ASRock M3A UCC | Quick Installation Guide - Page 88
SATAII_4 (PORT3) SATAII_3 (PORT2) SATAII_2 (PORT1) SATAII_1 (PORT0) 88 ASRock M3A UCC Motherboard - ASRock M3A UCC | Quick Installation Guide - Page 89
CD1 89 ASRock M3A UCC Motherboard - ASRock M3A UCC | Quick Installation Guide - Page 90
4 3 2 1 12 24 1 13 12 24 1 13 90 ASRock M3A UCC Motherboard - ASRock M3A UCC | Quick Installation Guide - Page 91
91 ASRock M3A UCC Motherboard - ASRock M3A UCC | Quick Installation Guide - Page 92
" " \\ " " 92 ASRock M3A UCC Motherboard - ASRock M3A UCC | Quick Installation Guide - Page 93
93 ASRock M3A UCC Motherboard - ASRock M3A UCC | Quick Installation Guide - Page 94
'' ® 94 ASRock M3A UCC Motherboard - ASRock M3A UCC | Quick Installation Guide - Page 95
® ® 95 ASRock M3A UCC Motherboard - ASRock M3A UCC | Quick Installation Guide - Page 96
® ® ® 96 ASRock M3A UCC Motherboard - ASRock M3A UCC | Quick Installation Guide - Page 97
® ® 97 ASRock M3A UCC Motherboard - ASRock M3A UCC | Quick Installation Guide - Page 98
98 ASRock M3A UCC Motherboard - ASRock M3A UCC | Quick Installation Guide - Page 99
SATAII_4 (PORT3) SATAII_3 (PORT2) SATAII_2 (PORT1) SATAII_1 (PORT0) 99 ASRock M3A UCC Motherboard - ASRock M3A UCC | Quick Installation Guide - Page 100
CD1 100 ASRock M3A UCC Motherboard - ASRock M3A UCC | Quick Installation Guide - Page 101
4 3 2 1 12 24 1 13 12 24 1 13 ASRock M3A UCC Motherboard 101 - ASRock M3A UCC | Quick Installation Guide - Page 102
® ® 102 ASRock M3A UCC Motherboard - ASRock M3A UCC | Quick Installation Guide - Page 103
X O O O X O O O O: X: O O O O ASRock M3A UCC Motherboard 103
-
 1
1 -
 2
2 -
 3
3 -
 4
4 -
 5
5 -
 6
6 -
 7
7 -
8
-
9
-
10
-
11
-
12
-
13
-
14
-
15
-
16
-
17
-
18
-
19
-
20
-
21
-
22
-
23
-
24
-
25
-
26
-
27
-
28
-
29
-
30
-
31
-
32
-
33
-
34
-
35
-
36
-
37
-
38
-
39
-
40
-
41
-
42
-
43
-
44
-
45
-
46
-
47
-
48
-
49
-
50
-
51
-
52
-
53
-
54
-
55
-
56
-
57
-
58
-
59
-
60
-
61
-
62
-
63
-
64
-
65
-
66
-
67
-
68
-
69
-
70
-
71
-
72
-
73
-
74
-
75
-
76
-
77
-
78
-
79
-
80
-
81
-
82
-
83
-
84
-
85
-
86
-
87
-
88
-
89
-
90
-
91
-
92
-
93
-
94
-
95
-
96
-
97
-
98
-
99
-
100
-
101
-
102
-
103
 |
 |

1
ASRock
M3A UCC
Motherboard
English
English
English
English
English
Copyright Notice:
Copyright Notice:
Copyright Notice:
Copyright Notice:
Copyright Notice:
No part of this installation guide may be reproduced, transcribed, transmitted, or trans-
lated in any language, in any form or by any means, except duplication of documen-
tation by the purchaser for backup purpose, without written consent of ASRock Inc.
Products and corporate names appearing in this guide may or may not be registered
trademarks or copyrights of their respective companies, and are used only for identifica-
tion or explanation and to the owners’ benefit, without intent to infringe.
Disclaimer:
Disclaimer:
Disclaimer:
Disclaimer:
Disclaimer:
Specifications and information contained in this guide are furnished for informational
use only and subject to change without notice, and should not be constructed as a
commitment by ASRock. ASRock assumes no responsibility for any errors or omissions
that may appear in this guide.
With respect to the contents of this guide, ASRock does not provide warranty of any kind,
either expressed or implied, including but not limited to the implied warranties or
conditions of merchantability or fitness for a particular purpose. In no event shall
ASRock, its directors, officers, employees, or agents be liable for any indirect, special,
incidental, or consequential damages (including damages for loss of profits, loss of
business, loss of data, interruption of business and the like), even if ASRock has been
advised of the possibility of such damages arising from any defect or error in the guide
or product.
This device complies with Part 15 of the FCC Rules. Operation is subject to the
following two conditions:
(1)
this device may not cause harmful interference, and
(2)
this device must accept any interference received, including interference that
may cause undesired operation.
Published September 2011
Copyright
©
2011 ASRock INC. All rights reserved.
CALIFORNIA, USA ONLY
The Lithium battery adopted on this motherboard contains Perchlorate, a toxic
substance controlled in Perchlorate Best Management Practices (BMP) regulations
passed by the California Legislature. When you discard the Lithium battery in
California, USA, please follow the related regulations in advance.
“Perchlorate Material-special handling may apply, see
www
.dtsc.ca.gov/hazardouswa
ste/perchlorate”
ASRock Website: http://www.asrock.com