ASRock M3N78D FX Quick Installation Guide
ASRock M3N78D FX Manual
 |
View all ASRock M3N78D FX manuals
Add to My Manuals
Save this manual to your list of manuals |
ASRock M3N78D FX manual content summary:
- ASRock M3N78D FX | Quick Installation Guide - Page 1
purchaser for backup purpose, without written consent of ASRock Inc. Products and corporate names appearing in this guide may or may not be registered trademarks or ASRock Website: http://www.asrock.com Published December 2011 Copyright©2011 ASRock INC. All rights reserved. 1 ASRock M3N78D FX - ASRock M3N78D FX | Quick Installation Guide - Page 2
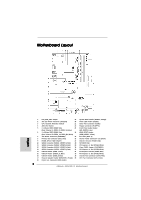
Header (Dual Channel B: DDR3_A2, DDR3_B2; White) (HDMI_SPDIF1, Yellow) 7 ATX Power Connector (ATXPWR1) 25 PCI Slots (PCI1- 3) 8 Primary IDE Connector (IDE1, Blue) 26 Internal Audio Connector: CD1 (Black) 9 NVIDIA nForce 720D Chipset 27 Chassis Intrusion Header (CI1) 10 SATAII Connector - ASRock M3N78D FX | Quick Installation Guide - Page 3
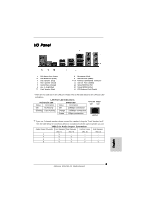
In (Light Blue) ** 7 Front Speaker (Lime) 8 9 *** 10 11 12 13 14 Microphone (Pink) USB 2.0 Ports (USB01) Powered Channels Front Speaker Rear Speaker Central / Bass Side Speaker (No. 7) (No. 4) (No. 5) (No. 3) 2 V -- -- -- 4 V V -- -- 6 V V V -- 8 V V V V 3 ASRock M3N78D FX - ASRock M3N78D FX | Quick Installation Guide - Page 4
support CD or the quick installation guide for the detail steps of making a SATA driver diskette. If you want to install Windows® 7 / 7 64-bit / VistaTM 64-bit / VistaTM in RAID / AHCI mode, please install the OS directly, and you can enjoy the benefit of powered eSATA2 function. 4 ASRock M3N78D FX - ASRock M3N78D FX | Quick Installation Guide - Page 5
the BIOS software might be updated, the content of this manual will be subject to change without notice. In case any modifications of this manual occur, the updated version will be available on ASRock website without further notice. You may find the latest VGA cards and CPU support lists on ASRock - ASRock M3N78D FX | Quick Installation Guide - Page 6
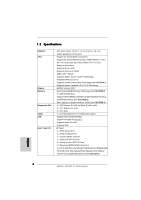
- Supports 8-Core CPU - Supports CPU up to 140W - AMD LIVE!TM Ready - Supports AMD's Cool 'n' QuietTM Technology - FSB 2600 MHz (5.2 GT/s) - Supports Untied Overclocking Technology (see CAUTION 1) - Supports Hyper-Transport 3.0 (HT 3.0) Technology - NVIDIA® nForce 720D - Dual Channel DDR3 Memory - ASRock M3N78D FX | Quick Installation Guide - Page 7
NB Voltage Multi-adjustment - Supports NVIDIA® NVCC (NVIDIA® Clock Calibration) - Drivers, Utilities, AntiVirus Software (Trial Version), CyberLink MediaEspresso 6.5 Trial, ASRock Software Suite (CyberLink DVD Suite - OEM and Trial; Creative Sound Blaster X-Fi MB Trial; ASRock MAGIX Multimedia Suite - ASRock M3N78D FX | Quick Installation Guide - Page 8
SATAII hard disk to SATAII connector, please read the "SATAII Hard Disk Setup Guide" on page 26 of "User Manual" in the support CD to adjust your SATAII hard disk drive to SATAII mode. You can also connect SATA hard disk to SATAII connector directly. 8 ASRock M3N78D FX Motherboard English - ASRock M3N78D FX | Quick Installation Guide - Page 9
of Intelligent Energy Saver. ASRock website: http://www.asrock.com 9. ASRock Instant Flash is a BIOS flash utility embedded in Flash ROM. This convenient BIOS update tool allows you to update system BIOS without entering operating systems first like MS-DOS or Windows®. With this utility, you - ASRock M3N78D FX | Quick Installation Guide - Page 10
. Real-Time Analysis of Your Data: With the status window, you can easily recognize which data streams you are currently To improve heat dissipation, remember to spray thermal grease between the CPU and the heatsink when you install the PC system. 17. EuP, 10 ASRock M3N78D FX Motherboard English - ASRock M3N78D FX | Quick Installation Guide - Page 11
2. Installation This is an ATX form factor (12.0-in x 7.5-in, 30.5 , peripherals, and/or components. 1. Unplug the power cord from the wall socket before touching any component. 2. To avoid damaging the motherboard components due to damage the motherboard. 11 ASRock M3N78D FX Motherboard English - ASRock M3N78D FX | Quick Installation Guide - Page 12
the CPU and the heatsink are securely fastened and in good contact with each other. Then connect the CPU fan to the CPU FAN connector (CPU_FAN1, see Page 2, No. 35). For proper installation, please kindly refer to the instruction manuals of the CPU fan and the heatsink. English 12 ASRock M3N78D FX - ASRock M3N78D FX | Quick Installation Guide - Page 13
, installing a pair of memory modules in DDR3_A1 and DDR3_A2, it is unable to activate the Dual Channel Memory Technology . 4. It is not allowed to install a DDR or DDR2 memory module into DDR3 slot; otherwise, this motherboard and DIMM may be damaged. English 13 ASRock M3N78D FX Motherboard - ASRock M3N78D FX | Quick Installation Guide - Page 14
insert the DIMM into the slot until the retaining clips at both ends fully snap back in place and the DIMM is properly seated. 14 ASRock M3N78D FX Motherboard English - ASRock M3N78D FX | Quick Installation Guide - Page 15
firmly until the card is completely seated on the slot. Step 5. Fasten the card to the chassis with screws. Step 6. Replace the system cover. 15 ASRock M3N78D FX Motherboard English - ASRock M3N78D FX | Quick Installation Guide - Page 16
CLRCMOS1 for 5 seconds. However, please do not clear the CMOS right after you update the BIOS. If you need to clear the CMOS when you just finish updating the BIOS, you must boot up the system first, and then shut it down before you do the clearCMOS action. English 16 ASRock M3N78D FX Motherboard - ASRock M3N78D FX | Quick Installation Guide - Page 17
80-conductor ATA 66/100/133 cable Note: Please refer to the instruction of your IDE device vendor for the details. Serial ATA II p.2, No. 10) SATAII_4 (PORT 3) SATAII_3 (PORT 2) SATAII_2 (PORT 1) These four Serial ATAII (SATAII) connectors support SATA data cables ASRock M3N78D FX Motherboard - ASRock M3N78D FX | Quick Installation Guide - Page 18
TV supports Jack Sensing, but the panel wire on the chassis must support HDA to function correctly. Please follow the instruction in our manual and chassis manual to install your system. 2. If you use AC'97 audio panel, please install it to the front panel audio header as below: 18 ASRock M3N78D FX - ASRock M3N78D FX | Quick Installation Guide - Page 19
Fan Connectors (3-pin CHA_FAN1) (see p.2 No. 34) (3-pin PWR_FAN1) (see p.2 No. 18) CPU Fan Connector (4-pin CPU_FAN1) (see p.2, No. 35) 4 3 2 1 Please connect the chassis the CPU fan cable to this connector and match the black wire to the ground pin. English 19 ASRock M3N78D FX Motherboard - ASRock M3N78D FX | Quick Installation Guide - Page 20
pin ATX 12V power supply. To use the 4-pin ATX power supply, please plug your power supply along with 8 5 Pin 1 and Pin 5. 4-Pin ATX 12V Power Supply Installation 4 1 Serial port Header (9-pin COM1) (see p.2, No.21) This COM1 header supports a serial port module. English 20 ASRock M3N78D FX - ASRock M3N78D FX | Quick Installation Guide - Page 21
header, providing SPDIF audio output to HDMI VGA card, allows the system to connect HDMI Digital TV/ projector/LCD devices. Please connect the HDMI_SPDIF connector of HDMI VGA card to this header. Please VGA card. B. white end (2-pin) C. white end (3-pin) English 21 ASRock M3N78D FX Motherboard - ASRock M3N78D FX | Quick Installation Guide - Page 22
/ SATAII HDDs without NCQ and Hot Plug functions STEP 1: Set Up BIOS. A. Enter BIOS SETUP UTILITY Advanced screen Storage Configuration. B. Set the "SATA Operation Mode" option to [IDE]. STEP 2: Install Windows® VistaTM / VistaTM 64-bit OS on your system. 22 ASRock M3N78D FX Motherboard English - ASRock M3N78D FX | Quick Installation Guide - Page 23
the instruction to install Windows® 7 / 7 64-bit / VistaTM / VistaTM 64-bit OS on your system. When you see "Where do you want to install Windows?" page, please insert the ASRock Support CD into your optical drive, and click the "Load Driver" button on the left on the bottom to load the NVIDIA® AHCI - ASRock M3N78D FX | Quick Installation Guide - Page 24
about BIOS Setup, please refer to the User Manual (PDF file) contained in the Support CD. 4. Software Support CD information This motherboard supports various Microsoft® Windows® operating " from the "BIN" folder in the Support CD to display the menus. 24 ASRock M3N78D FX Motherboard English - ASRock M3N78D FX | Quick Installation Guide - Page 25
ötigen, besuchen Sie bitte unsere Webseite: www.asrock.com/support/index.asp 1.1 Kartoninhalt ASRock M3N78D FX Motherboard (ATX-Formfaktor: 30.5 cm x 19.1 cm; 12.0 Zoll x 7.5 Zoll) ASRock M3N78D FX Schnellinstallationsanleitung ASRock M3N78D FX Support-CD Zwei Serial ATA (SATA) -Datenkabel (optional - ASRock M3N78D FX | Quick Installation Guide - Page 26
CPU bis 140W - AMD LIVE!TM-bereit - Unterstützt Cool 'n' QuietTM-Technologie von AMD - FSB 2600 MHz (5.2 GT/s) - Unterstützt Untied-Übertaktungstechnologie (siehe VORSICHT 1) - Unterstützt Hyper-Transport- 3.0 (HT 3.0) Technologie - NVIDIA® nForce 720D LED) Deutsch 26 ASRock M3N78D FX Motherboard - ASRock M3N78D FX | Quick Installation Guide - Page 27
VORSICHT 8) - ASRock Sofortstart - ASRock Instant Flash (siehe VORSICHT 9) - ASRock OC DNA (siehe VORSICHT 10) - ASRock APP Charger (siehe VORSICHT 11) - ASRock SmartView (siehe VORSICHT 12) - ASRock XFast USB (siehe VORSICHT 13) - ASRock XFast LAN (siehe VORSICHT 14) 27 ASRock M3N78D FX Motherboard - ASRock M3N78D FX | Quick Installation Guide - Page 28
wird, hängt von der von Ihnen eingesetzten AM3/AM3+-CPU ab. Schauen Sie bitte auf unseren Internetseiten in der Liste mit unterstützten Speichermodulen nach, wenn Sie DDR3 1800/1600-Speichermodule einsetzen möchten. ASRock-Internetseite: http://www.asrock.com 28 ASRock M3N78D FX Motherboard Deutsch - ASRock M3N78D FX | Quick Installation Guide - Page 29
Sie Ihr BIOS mit nur wenigen Klickvorgängen ohne Bereitstellung einer zusätzlichen Diskette oder eines anderen komplizierten Flash-Programms aktualisieren. Achten Sie darauf, dass das USB-Flash-Laufwerk oder die Festplatte das Dateisystem FAT32/16/12 benutzen muss. 29 ASRock M3N78D FX Motherboard - ASRock M3N78D FX | Quick Installation Guide - Page 30
Explorer ab Version 8 nutzen. ASRock-Website: http://www. asrock.com/Feature/SmartView/index.asp 13. ASRocks XFast USB dient der Steigerung der Leistungsfähigkeit Ihrer USB-Speichergeräte. Die Leistung kann je nach Eigenschaften des Gerätes variieren. 30 ASRock M3N78D FX Motherboard Deutsch - ASRock M3N78D FX | Quick Installation Guide - Page 31
Obwohl dieses Motherboard stufenlose Steuerung bietet, wird Overclocking nicht empfohlen. Frequenzen, die über den Wärmeableitung zu verbessern, bitte nicht vergessen, etwas Wärmeleitpaste zwischen CPU und Kühlkörper zu sprühen. 17. EuP steht für abzufragen. 31 ASRock M3N78D FX Motherboard Deutsch - ASRock M3N78D FX | Quick Installation Guide - Page 32
Sie nicht, den Jumper wieder zu entfernen, nachdem das CMOS gelöscht wurde. Wenn Sie den CMOSInhalt gleich nach dem Aktualisieren des BIOS löschen müssen, müssen Sie zuerst das System starten und dann wieder ausschalten, bevor Sie den CMOS-Inhalt löschen. Deutsch 32 ASRock M3N78D FX Motherboard - ASRock M3N78D FX | Quick Installation Guide - Page 33
No. 12) (SATAII_3 (PORT 2): siehe S.2 - No. 11) (SATAII_4 (PORT 3): siehe S.2 - No. 10) SATAII_4 (PORT 3) SATAII_3 (PORT 2) SATAII_2 (PORT 1) SATAII_1 (PORT 0) Diese vier Serial ATAII(SATAII-)Verbínder ück auf dieser Hauptplatine angeschlossen werden. Deutsch 33 ASRock M3N78D FX Motherboard - ASRock M3N78D FX | Quick Installation Guide - Page 34
ermöglichen Ihnen StereoSignalquellen, wie z. B. CD-ROM, DVD-ROM, TV-Tuner oder MPEG-Karten mit Ihrem System zu verbinden. Dieses Interface zu einem Audio-Panel auf der Vorderseite Ihres Gehäuses, ermöglicht Ihnen eine bequeme Kontrolle über Audio-Geräte. 34 ASRock M3N78D FX Motherboard Deutsch - ASRock M3N78D FX | Quick Installation Guide - Page 35
- oder S5Zustand (ausgeschaltet) leuchtet die LED nicht. Verbinden Sie die Lüfterkabel mit den Lüfteranschlüssen, wobei der schwarze Draht an den Schutzleiterstift angeschlossenwird. Deutsch 35 ASRock M3N78D FX Motherboard - ASRock M3N78D FX | Quick Installation Guide - Page 36
dreipoligen CPU-Lüfter an den CPU-Lü ATX 12V Energieversorgung adoptieren. Um die 4-Pin ATX Energieversorgung zu verwenden, stecken Sie bitte Ihre Energieversorgung zusammen mit dem Pin 1 und Pin 5 ein. 8 5 Installation der 4-Pin ATX 12V Energieversorgung 4 1 Deutsch 36 ASRock M3N78D FX - ASRock M3N78D FX | Quick Installation Guide - Page 37
(B oder C) des HDMI_SPDIF-Kabels an den HDMI_SPDIF-Anschluss der HDMI-VGA-Karte an. A. Schwarzes Ende B. Weißes Ende (zweipolig) C. Weißes Ende (dreipolig) Deutsch 37 ASRock M3N78D FX Motherboard - ASRock M3N78D FX | Quick Installation Guide - Page 38
der Support-CD, um die Menüs aufzurufen. Das Setup-Programm soll es Ihnen so leicht wie möglich machen. Es ist menügesteuert, d.h. Sie können in den verschiedenen Untermenüs Ihre Auswahl treffen und die Programme werden dann automatisch installiert. 38 ASRock M3N78D FX Motherboard Deutsch - ASRock M3N78D FX | Quick Installation Guide - Page 39
ères au modèle que vous utilisez. www.asrock.com/support/index.asp 1.1 Contenu du paquet Carte mère ASRock M3N78D FX (Facteur de forme ATX: 12.0 pouces x 7.5 pouces, 30.5 cm x 19.1 cm) Guide d'installation rapide ASRock M3N78D FX CD de soutien ASRock M3N78D FX Deux câbles de données de série ATA - ASRock M3N78D FX | Quick Installation Guide - Page 40
AMD - FSB 2600 MHz (5.2 GT/s) - Prend en charge la technologie Untied Overclocking (voir ATTENTION 1) - Prise en charge de la technologie Hyper Transport 3.0 (HT 3.0) - NVIDIA® nForce 720D - Compatible avec la Technologie de Mémoire à Canal Double (voir ATTENTION 2) - 4 x slots DIMM DDR3 - Supporte - ASRock M3N78D FX | Quick Installation Guide - Page 41
d'essai; Creative Sound Blaster X-Fi MB - Version d'essai; Suite multimédia ASRock MAGIX OEM) - Tuner ASRock OC (voir ATTENTION 7) - ASRock Économiseur d'énergie intelligent (voir ATTENTION 8) - ASRock l'Instant Boot - ASRock Instant Flash (voir ATTENTION 9) 41 ASRock M3N78D FX Motherboard Français - ASRock M3N78D FX | Quick Installation Guide - Page 42
. 2. Cette carte mère supporte la Technologie de Mémoire à Canal Double. Avant d'intégrer la Technologie de Mémoire à Canal Double, assurezvous de bien lire le guide d'installation des modules mémoire en page 13 pour réaliser une installation correcte. Français 42 ASRock M3N78D FX Motherboard - ASRock M3N78D FX | Quick Installation Guide - Page 43
option Cool 'n' Quiet dans l'outil de configuration du BIOS par avance. Veuillez visiter notre site Web pour connaître les procédures d'utilisation de l' Intelligent Energy Saver (L'économiseur d'énergie intelligent). Site Web d'ASRock: http://www.asrock.com 43 ASRock M3N78D FX Motherboard Français - ASRock M3N78D FX | Quick Installation Guide - Page 44
de entrar nos sistemas operativos, como o MS-DOS ou o Windows®. Com este utilitário, poderá premir a tecla durante o teste de arranque POST ou premir a tecla para exibir o menu de configuração do BIOS para aceder ao ASRock Instant Flash. Execute esta ferramenta para guardar o novo ficheiro - ASRock M3N78D FX | Quick Installation Guide - Page 45
Windows® 7 / 7 64 bits / VistaTM ou VistaTM 64 bits, et que la version de votre navigateur est IE8. Site web ASRock : http://www.asrock.com/Feature/SmartView/index.asp 13. ASRock mettre de la pâte thermique entre le CPU le dissipateur lors de l'installation du PC ASRock M3N78D FX Motherboard Français - ASRock M3N78D FX | Quick Installation Guide - Page 46
suite après avoir mis le BIOS à jour. Si vous avez besoin d'effacer la CMOS lorsque vous avez fini de mettre le BIOS à jour, vous devez d'abord initialiser le système, puis le mettre hors tension avant de procéder à l'opération d'effacement de la CMOS. Français 46 ASRock M3N78D FX Motherboard - ASRock M3N78D FX | Quick Installation Guide - Page 47
ATA 66/100/133 80 conducteurs Note: Veuillez vous reporter aux instructions du fabricant de votre IDE périphérique pour les détails. PORT 2): voir p.2 fig. 11) (SATAII_4 (PORT 3): voir p.2 fig. 10) SATAII_4 (PORT 3) SATAII_3 (PORT 2) SATAII_2 (PORT 1) SATAII_1 (PORT ASRock M3N78D FX Motherboard - ASRock M3N78D FX | Quick Installation Guide - Page 48
es audio à partir de sources stéréo comme un CD-ROM, DVD-ROM, un tuner TV ou une carte MPEG. C'est une interface pour un câble audio en façade qui . Veuillez suivre les instructions dans notre manuel et le manuel de châssis afin installer votre système. 48 ASRock M3N78D FX Motherboard Français - ASRock M3N78D FX | Quick Installation Guide - Page 49
ventilateur (CHA_FAN1 br. 3) (voir p.2 No. 34) (PWR_FAN1 br. 3) (voir p.2 No. 18) Connecteur pour ventilateur CPU (CPU_FAN1 br. 4) (voir p.2 fig. 35) 4 3 2 1 Veuillez connecter le hautparleur de châssis sur ce brancher le fil noir sur la broche de terre. Français 49 ASRock M3N78D FX Motherboard - ASRock M3N78D FX | Quick Installation Guide - Page 50
support de (Ventilateur silencieux) ventilateur de CPU à 4 broches , le ventilateur de CPU à 3 broches peut bien fonctionner même sans la fonction de commande de vitesse du ventilateur. Si vous prévoyez de connecter le ventilateur de CPU se connecter au un téléviseur 50 ASRock M3N78D FX Motherboard - ASRock M3N78D FX | Quick Installation Guide - Page 51
HDMI_SPDIF de la carte-mère. Connectez ensuite l'extrémité blanche (B ou C) du câble HDMI_SPDIF au connecteur HDMI_SPDIF de la carte VGA HDMI. Français 51 ASRock M3N78D FX Motherboard - ASRock M3N78D FX | Quick Installation Guide - Page 52
sur le BIOS, veuillez consulter le Guide de l'utilisateur (fichier PDF) dans le CD technique. 3. Informations sur le CD de support Cette carte mère supporte divers systèmes d'exploitation Microsoft® Windows®: 7 double-cliquez dessus pour afficher les menus. 52 ASRock M3N78D FX Motherboard Français - ASRock M3N78D FX | Quick Installation Guide - Page 53
CPU supportate. ASRock website http://www.asrock.com Se si necessita dell'assistenza tecnica per questa scheda madre, visitare il nostro sito per informazioni specifiche sul modello che si sta usando. www.asrock.com/support/index.asp 1.1 Contenuto della confezione Scheda madre ASRock M3N78D FX (ATX - ASRock M3N78D FX | Quick Installation Guide - Page 54
tecnologia AMD Cool 'n' QuietTM - FSB 2600 MHz (5.2 GT/s) - Supporta la tecnologia overclocking "slegata" (vedi ATTENZIONE 1) - Supporta la tecnologia Hyper-Transport 3.0 (HT 3.0) - NVIDIA® nForce 720D - Supporto tecnologia Dual Channel Memory (vedi ATTENZIONE 2) - 4 x slot DDR3 DIMM - Supporta DDR3 - ASRock M3N78D FX | Quick Installation Guide - Page 55
Flash (vedi ATTENZIONE 9) - ASRock OC DNA (vedi ATTENZIONE 10) - Caricatore ASRock APP Charger (vedi ATTENZIONE 11) - ASRock SmartView (vedi ATTENZIONE 12) - ASRock XFast USB (vedi ATTENZIONE 13) - ASRock XFast LAN (vedi ATTENZIONE 14) - Booster ibrido: 55 ASRock M3N78D FX Motherboard Italiano - ASRock M3N78D FX | Quick Installation Guide - Page 56
://www.asrock.com 4. A causa delle limitazioni del sistema operativo, le dimensioni effettive della memoria possono essere inferiori a 4GB per l'accantonamento riservato all'uso del sistema sotto Windows® 7 / VistaTM / XP. Per Windows® OS con CPU 64-bit, non c'è tale limitazione. 56 ASRock M3N78D FX - ASRock M3N78D FX | Quick Installation Guide - Page 57
a pagina 26 del "Manuale utente" nel CD in i nuclei della CPU sono inattivi. BIOS con pochi clic, senza preparare altri dischetti (dischi floppy) o altre complicate utilità Flash. Si prega di notare che l'unità Flash USB o il disco rigido devono usare il File System FAT32/ 16/12. 57 ASRock M3N78D FX - ASRock M3N78D FX | Quick Installation Guide - Page 58
10. Il nome stesso del software - OC DNA - dice di cosa è capace. OC DNA, una utilità esclusiva sviluppata da ASRock, fornisce un modo comodo per registrare le impostazioni OC e condividerle con gli altri. Aiuta a salvare le registrazioni di overclocking . 58 ASRock M3N78D FX Motherboard Italiano - ASRock M3N78D FX | Quick Installation Guide - Page 59
il controllo stepless, non si consiglia di effettuare l'overclocking. Frequenze del bus del processore diverse da quelle raccomandate di riavviare il sistema, assicurarsi che la ventolina CPU della scheda madre funzioni correttamente; scollegare e ricollegare ASRock M3N78D FX Motherboard Italiano - ASRock M3N78D FX | Quick Installation Guide - Page 60
jumper. Non cancellare la CMOS subito dopo aver aggiornato il BIOS. Se è necessario cancellare la CMOS una volta completato l'aggiornamento del BIOS, è necessario riavviare prima il sistema, e poi spegnerlo prima di procedere alla cancellazione della CMOS. Italiano 60 ASRock M3N78D FX Motherboard - ASRock M3N78D FX | Quick Installation Guide - Page 61
p.2 Nr. 12) (SATAII_3 (PORT 2): vedi p.2 Nr. 11) (SATAII_4 (PORT 3): vedi p.2 Nr. 10) SATAII_4 (PORT 3) SATAII_3 (PORT 2) SATAII_2 (PORT 1) SATAII_1 (PORT 0) Questi quattro connettori Serial ATA ( SATAII o al connettore di SATAII su questa cartolina base. 61 ASRock M3N78D FX Motherboard Italiano - ASRock M3N78D FX | Quick Installation Guide - Page 62
Permettono di ricevere input stereo audio da fonti di suono come CD-ROM, DVD ROM,TV tuner, o schede MPEG. È un'interfaccia per il cavo del pannello audio. Che operi in modo corretto. Attenersi alle istruzioni del nostro manuale e del manuale del telaio per 62 ASRock M3N78D FX Motherboard Italiano - ASRock M3N78D FX | Quick Installation Guide - Page 63
(vedi p.2 Nr. 34) (3-pin PWR_FAN1) (vedi p.2 Nr. 18) Connettore ventolina CPU (4-pin CPU_FAN1) (vedi p.2 item 35) 4 3 2 1 Collegare le casse del . Collegare il cavo della ventolina CPU a questo connettore e far combaciare il filo nero al pin terra. Italiano 63 ASRock M3N78D FX Motherboard - ASRock M3N78D FX | Quick Installation Guide - Page 64
4-pin ATX 12V, prego collegare la presa elettrica al Pin 1 e Pin 5. 8 5 Installazione elettrica 4-Pin ATX 12V 4 1 Collettore porta COM (9-pin COM1) (voir p.2 Nr. 21) Questo collettore porta COM è utilizzato per supportare il modulo porta COM. Italiano 64 ASRock M3N78D FX Motherboard - ASRock M3N78D FX | Quick Installation Guide - Page 65
con uscita audio SPDIF su scheda HDMI VGA, consente al sistema di collegare dispositivi per TV digitale HDMI/proiettori/ LCD . Collegare il connettore HDMI_SPDIF della scheda VGA HDMI a questo cavo HDMI_SPDIF al connettore HDMI_SPDIF della scheda HDMI VGA. Italiano 65 ASRock M3N78D FX Motherboard - ASRock M3N78D FX | Quick Installation Guide - Page 66
più dettagliate circa il Setup del BIOS, fare riferimento al Manuale dell'Utente (PDF file) contenuto nel Windows®: 7 / 7 64 bit / VistaTM / VistaTM 64-bit / XP / Centro multimediale XP / XP 64 bit. Il CD di supporto a corredo della scheda madre contiene i driver ASRock M3N78D FX Motherboard Italiano - ASRock M3N78D FX | Quick Installation Guide - Page 67
de modelo específico de su placa. w.asrock.com/support/index.asp 1.1 Contenido de la caja Placa base ASRock M3N78D FX (Factor forma ATX: 30,5 cm x 19,1 cm, 12,0" x 7,5") Guía de instalación rápida de ASRock M3N78D FX CD de soporte de ASRock M3N78D FX Dos cables de datos Serial ATA (SATA) (Opcional - ASRock M3N78D FX | Quick Installation Guide - Page 68
QuietTM de AMD - FSB 2600 MHz (5.2 GT/s) - Admite tecnología de aumento de velocidad liberada (vea ATENCIÓN 1) - Soporta Tecnología de Hiper-Transporte 3.0 (HT 3.0) - NVIDIA® nForce 720D - Soporte de Tecnología de Memoria de Doble Canal (ver ATENCIÓN 2) - 4 x DDR3 DIMM slots - Soporta DDR3 1800(OC - ASRock M3N78D FX | Quick Installation Guide - Page 69
(vea ATENCIÓN 8) - ASRock Instant Boot - ASRock Instant Flash (vea ATENCIÓN 9) - ASRock OC DNA (vea ATENCIÓN 10) - ASRock APP Charger (vea ATENCIÓN 11) - ASRock SmartView (vea ATENCIÓN 12) - ASRock XFast USB (vea ATENCIÓN 13) - ASRock XFast LAN (vea ATENCIÓN 14) 69 ASRock M3N78D FX Motherboard Espa - ASRock M3N78D FX | Quick Installation Guide - Page 70
CPU / chasis / alimentación - Ventilador silencioso para procesador - Control de APERTURA DE CARCASA - Monitor de Voltaje: +12V, +5V, +3.3V, Vcore OS - En conformidad con Microsoft® Windows ajuste del BIOS, aplicando la Forzado de Reloj (Overclocking) no relacionado" ASRock M3N78D FX Motherboard - ASRock M3N78D FX | Quick Installation Guide - Page 71
la configuración AM3/AM3+ Procesador que adopte. Si desea adoptar el módulo de memoria DDR3 1800/1600 BIOS. Visite nuestro sitio web para conocer los procedimientos de uso de Intelligent Energy Saver (Economizador de energía inteligente). Sitio web de ASRock: http://www.asrock.com 71 ASRock M3N78D FX - ASRock M3N78D FX | Quick Installation Guide - Page 72
mejorada para disfrutar de una experiencia en Internet más personal. Las placas base ASRock están exclusivamente equipadas con la utilidad SmartView que le ayuda a seguir en contacto con sus amigos sobre la marcha. Para utilizar la función SmartView asegúrese 72 ASRock M3N78D FX Motherboard Español - ASRock M3N78D FX | Quick Installation Guide - Page 73
Windows® 7 / 7 64 bits / VistaTM / VistaTM 64 bits y que la versión de su explorador es IE8. Sitio Web de ASRock: http://www.asrock.com/Feature/SmartView/index.asp 13. ASRock sistema, compruebe si el ventilador de la CPU de la placa base funciona apropiadamente y ASRock M3N78D FX Motherboard Español - ASRock M3N78D FX | Quick Installation Guide - Page 74
acuérdase de quitar el jumper cap después de limpiar el COMS. Si necesita borrar la CMOS cuando acabe de finalizar la actualización de la BIOS, debe arrancar primero el sistema y, a continuación, apagarlo antes de realizar la acción de borrado de CMOS. Español 74 ASRock M3N78D FX Motherboard - ASRock M3N78D FX | Quick Installation Guide - Page 75
(PORT 1): vea p.2, N. 12) (SATAII_3 (PORT 2): vea p.2, N. 11) (SATAII_4 (PORT 3): vea p.2, N. 10) SATAII_4 (PORT 3) SATAII_3 (PORT 2) SATAII_2 (PORT 1) SATAII_1 (PORT 0) Estos cuatro conectores de la Serie ATA ( el conectador de SATAII en esta placa base. Español 75 ASRock M3N78D FX Motherboard - ASRock M3N78D FX | Quick Installation Guide - Page 76
detección de intrusión en el chasis. Permite recepción de input audio de fuente sónica como CDROM, DVD-ROM, TV tuner, o tarjeta MPEG. Este es una interface para cable de audio de panel frontal que permite conexión y control conveniente de apparatos de Audio. Español 76 ASRock M3N78D FX Motherboard - ASRock M3N78D FX | Quick Installation Guide - Page 77
panel en el chasis debe soportar HDA para operar correctamente. Por favor, siga las instrucciones en nuestro manual y en el manual de chasis para instalar su sistema. 2. Si utiliza el panel de sonido AC'97, instá el cable negro con la patilla de masa. Español 77 ASRock M3N78D FX Motherboard - ASRock M3N78D FX | Quick Installation Guide - Page 78
1 Conecte el cable del ventilador de la CPU a este conector y haga coincidir el cable ATX 12V. Para usar el fuente de energía de 4-pin ATX 12V, por favor conecte su fuente de energía junto con Pin 1 y Pin 5. 8 5 Instalación de Fuente de Energía de 4-Pin ATX 12V 4 1 Español 78 ASRock M3N78D FX - ASRock M3N78D FX | Quick Installation Guide - Page 79
Ofrece una salida SPDIF la tarjeta VGA HDMI, permite al sistema conectarse a dispositivos de TV Digital HDMI / proyectores / Dispositivos LCD. Conecte el conector HDMI_SPDIF de la tarjeta VGA negro B. Extremo blanco (2 patillas) C. Extremo blanco (3 patillas) Español 79 ASRock M3N78D FX Motherboard - ASRock M3N78D FX | Quick Installation Guide - Page 80
configurar la BIOS, por favor refiérase al Manual del Usuario (archivo PDF) contenido en el CD. 3.Información de Software Support CD Esta placa-base soporta diversos tipos de sistema operativo Windows®: 7 en el archivo ASSETUP.EXE para iniciar la instalación. 80 ASRock M3N78D FX Motherboard Español - ASRock M3N78D FX | Quick Installation Guide - Page 81
81 ASRock M3N78D FX Motherboard - ASRock M3N78D FX | Quick Installation Guide - Page 82
82 ASRock M3N78D FX Motherboard - ASRock M3N78D FX | Quick Installation Guide - Page 83
83 ASRock M3N78D FX Motherboard - ASRock M3N78D FX | Quick Installation Guide - Page 84
84 ASRock M3N78D FX Motherboard - ASRock M3N78D FX | Quick Installation Guide - Page 85
85 ASRock M3N78D FX Motherboard - ASRock M3N78D FX | Quick Installation Guide - Page 86
86 ASRock M3N78D FX Motherboard - ASRock M3N78D FX | Quick Installation Guide - Page 87
Short Open 87 ASRock M3N78D FX Motherboard - ASRock M3N78D FX | Quick Installation Guide - Page 88
SATAII_4 (PORT 3) SATAII_3 (PORT 2) SATAII_2 (PORT 1) SATAII_1 (PORT 0) 88 ASRock M3N78D FX Motherboard - ASRock M3N78D FX | Quick Installation Guide - Page 89
CD1 89 ASRock M3N78D FX Motherboard - ASRock M3N78D FX | Quick Installation Guide - Page 90
90 ASRock M3N78D FX Motherboard - ASRock M3N78D FX | Quick Installation Guide - Page 91
4 3 2 1 12 24 1 13 8 5 4 1 12 24 1 13 8 4 ASRock M3N78D FX Motherboard 5 1 91 - ASRock M3N78D FX | Quick Installation Guide - Page 92
C B A 92 ASRock M3N78D FX Motherboard - ASRock M3N78D FX | Quick Installation Guide - Page 93
93 ASRock M3N78D FX Motherboard - ASRock M3N78D FX | Quick Installation Guide - Page 94
Türkçe 94 ASRock M3N78D FX Motherboard - ASRock M3N78D FX | Quick Installation Guide - Page 95
Türkçe 95 ASRock M3N78D FX Motherboard - ASRock M3N78D FX | Quick Installation Guide - Page 96
Türkçe 96 ASRock M3N78D FX Motherboard - ASRock M3N78D FX | Quick Installation Guide - Page 97
Türkçe 97 ASRock M3N78D FX Motherboard - ASRock M3N78D FX | Quick Installation Guide - Page 98
Türkçe 98 ASRock M3N78D FX Motherboard - ASRock M3N78D FX | Quick Installation Guide - Page 99
Türkçe 99 ASRock M3N78D FX Motherboard - ASRock M3N78D FX | Quick Installation Guide - Page 100
Short Open Default Clear CMOS Türkçe 100 ASRock M3N78D FX Motherboard - ASRock M3N78D FX | Quick Installation Guide - Page 101
SATAII_4 (PORT 3) SATAII_3 (PORT 2) SATAII_2 (PORT 1) SATAII_1 (PORT 0) Türkçe ASRock M3N78D FX Motherboard 101 - ASRock M3N78D FX | Quick Installation Guide - Page 102
CD1 Türkçe 102 ASRock M3N78D FX Motherboard - ASRock M3N78D FX | Quick Installation Guide - Page 103
4 3 2 1 Türkçe ASRock M3N78D FX Motherboard 103 - ASRock M3N78D FX | Quick Installation Guide - Page 104
12 24 1 13 8 5 4 1 12 24 1 13 8 5 4 1 Türkçe 104 ASRock M3N78D FX Motherboard - ASRock M3N78D FX | Quick Installation Guide - Page 105
C B A Türkçe ASRock M3N78D FX Motherboard 105 - ASRock M3N78D FX | Quick Installation Guide - Page 106
Türkçe 106 ASRock M3N78D FX Motherboard - ASRock M3N78D FX | Quick Installation Guide - Page 107
ASRock M3N78D FX Motherboard 107 - ASRock M3N78D FX | Quick Installation Guide - Page 108
'' ® ® 108 ASRock M3N78D FX Motherboard - ASRock M3N78D FX | Quick Installation Guide - Page 109
® ® ASRock M3N78D FX Motherboard 109 - ASRock M3N78D FX | Quick Installation Guide - Page 110
® " " ® ® 110 " " " " ASRock M3N78D FX Motherboard - ASRock M3N78D FX | Quick Installation Guide - Page 111
® ® ASRock M3N78D FX Motherboard 111 - ASRock M3N78D FX | Quick Installation Guide - Page 112
® 112 ASRock M3N78D FX Motherboard - ASRock M3N78D FX | Quick Installation Guide - Page 113
"" "" "" "" ASRock M3N78D FX Motherboard 113 - ASRock M3N78D FX | Quick Installation Guide - Page 114
SATAII_4 (PORT 3) SATAII_3 (PORT 2) SATAII_2 (PORT 1) SATAII_1 (PORT 0) 114 ASRock M3N78D FX Motherboard - ASRock M3N78D FX | Quick Installation Guide - Page 115
CD1 ASRock M3N78D FX Motherboard 115 - ASRock M3N78D FX | Quick Installation Guide - Page 116
116 ASRock M3N78D FX Motherboard - ASRock M3N78D FX | Quick Installation Guide - Page 117
4 3 2 1 12 24 1 13 8 5 4 1 12 24 1 13 8 5 4 1 ASRock M3N78D FX Motherboard 117 - ASRock M3N78D FX | Quick Installation Guide - Page 118
C B A 118 ASRock M3N78D FX Motherboard - ASRock M3N78D FX | Quick Installation Guide - Page 119
" " \\ " " ASRock M3N78D FX Motherboard 119 - ASRock M3N78D FX | Quick Installation Guide - Page 120
120 ASRock M3N78D FX Motherboard - ASRock M3N78D FX | Quick Installation Guide - Page 121
'' ® ® ASRock M3N78D FX Motherboard 121 - ASRock M3N78D FX | Quick Installation Guide - Page 122
® ® 122 ASRock M3N78D FX Motherboard - ASRock M3N78D FX | Quick Installation Guide - Page 123
® ® ® " " ® ® ASRock M3N78D FX Motherboard 123 - ASRock M3N78D FX | Quick Installation Guide - Page 124
® ® - 124 ASRock M3N78D FX Motherboard - ASRock M3N78D FX | Quick Installation Guide - Page 125
® ASRock M3N78D FX Motherboard 125 - ASRock M3N78D FX | Quick Installation Guide - Page 126
126 ASRock M3N78D FX Motherboard - ASRock M3N78D FX | Quick Installation Guide - Page 127
ASRock M3N78D FX Motherboard 127 - ASRock M3N78D FX | Quick Installation Guide - Page 128
SATAII_4 (PORT 3) SATAII_3 (PORT 2) SATAII_2 (PORT 1) SATAII_1 (PORT 0) 128 ASRock M3N78D FX Motherboard - ASRock M3N78D FX | Quick Installation Guide - Page 129
CD1 ASRock M3N78D FX Motherboard 129 - ASRock M3N78D FX | Quick Installation Guide - Page 130
130 ASRock M3N78D FX Motherboard - ASRock M3N78D FX | Quick Installation Guide - Page 131
4 3 2 1 12 24 1 13 8 5 4 1 12 24 1 13 8 5 4 1 ASRock M3N78D FX Motherboard 131 - ASRock M3N78D FX | Quick Installation Guide - Page 132
C B A 132 ASRock M3N78D FX Motherboard - ASRock M3N78D FX | Quick Installation Guide - Page 133
® ® TM TM ASRock M3N78D FX Motherboard 133 - ASRock M3N78D FX | Quick Installation Guide - Page 134
134 ASRock M3N78D FX Motherboard - ASRock M3N78D FX | Quick Installation Guide - Page 135
'' ™ ® ® ASRock M3N78D FX Motherboard 135 - ASRock M3N78D FX | Quick Installation Guide - Page 136
® ® 136 ASRock M3N78D FX Motherboard - ASRock M3N78D FX | Quick Installation Guide - Page 137
® ® ® ® ® ASRock M3N78D FX Motherboard 137 - ASRock M3N78D FX | Quick Installation Guide - Page 138
® ® 138 ASRock M3N78D FX Motherboard - ASRock M3N78D FX | Quick Installation Guide - Page 139
® ASRock M3N78D FX Motherboard 139 - ASRock M3N78D FX | Quick Installation Guide - Page 140
140 ASRock M3N78D FX Motherboard - ASRock M3N78D FX | Quick Installation Guide - Page 141
SATAII_4 (PORT 3) SATAII_3 (PORT 2) SATAII_2 (PORT 1) SATAII_1 (PORT 0) ASRock M3N78D FX Motherboard 141 - ASRock M3N78D FX | Quick Installation Guide - Page 142
CD1 142 ASRock M3N78D FX Motherboard - ASRock M3N78D FX | Quick Installation Guide - Page 143
4 3 2 1 12 24 1 13 ASRock M3N78D FX Motherboard 143 - ASRock M3N78D FX | Quick Installation Guide - Page 144
8 5 4 1 12 24 1 13 8 5 4 1 144 ASRock M3N78D FX Motherboard - ASRock M3N78D FX | Quick Installation Guide - Page 145
C B A ® ® ASRock M3N78D FX Motherboard 145 - ASRock M3N78D FX | Quick Installation Guide - Page 146
X O O O X O O O O: X: O O O O 146 ASRock M3N78D FX Motherboard - ASRock M3N78D FX | Quick Installation Guide - Page 147
ASRock M3N78D FX Motherboard 147 - ASRock M3N78D FX | Quick Installation Guide - Page 148
® ® 148 ASRock M3N78D FX Motherboard - ASRock M3N78D FX | Quick Installation Guide - Page 149
® ® ASRock M3N78D FX Motherboard 149 - ASRock M3N78D FX | Quick Installation Guide - Page 150
® ® ® ® 150 ® ASRock M3N78D FX Motherboard - ASRock M3N78D FX | Quick Installation Guide - Page 151
® ® ASRock M3N78D FX Motherboard 151 - ASRock M3N78D FX | Quick Installation Guide - Page 152
® 152 ASRock M3N78D FX Motherboard - ASRock M3N78D FX | Quick Installation Guide - Page 153
ASRock M3N78D FX Motherboard 153 - ASRock M3N78D FX | Quick Installation Guide - Page 154
SATAII_4 (PORT 3) SATAII_3 (PORT 2) SATAII_2 (PORT 1) SATAII_1 (PORT 0) 154 ASRock M3N78D FX Motherboard - ASRock M3N78D FX | Quick Installation Guide - Page 155
CD1 CD-L GND GND CD-R ASRock M3N78D FX Motherboard 155 - ASRock M3N78D FX | Quick Installation Guide - Page 156
4 3 2 1 156 12 24 1 13 ASRock M3N78D FX Motherboard - ASRock M3N78D FX | Quick Installation Guide - Page 157
8 5 4 1 12 24 1 13 8 5 4 1 C B A ASRock M3N78D FX Motherboard 157 - ASRock M3N78D FX | Quick Installation Guide - Page 158
® ® ® 158 ASRock M3N78D FX Motherboard - ASRock M3N78D FX | Quick Installation Guide - Page 159
Support CD. Karena spesifikasi papan induk dan software BIOS CPU pada website ASRock. Website ASRock http://www.asrock.com 1.1 Isi Paket Papan Induk M3N78D FX ASRock (Faktor Form ATX: 12.0-in x 7.5-in, 30.5 cm x 19.1 cm) Pemimpin Instalasi Cepat M3N78D FX ASRock Support CD M3N78D FX ASRock - ASRock M3N78D FX | Quick Installation Guide - Page 160
CPU hingga 140 W - AMD LIVE!TM Dipersiapkan - Dapat digunakan AM's Cool 'n' QuietTM Technology - FSB 2600 MHz (5.2 GT/s) - Menggunakan Teknologi Untied Overclocking - Dapat digunakan Hyper-Transport 3.0 (HT 3.0) Technology - NVIDIA® nForce 720D - Teknologi ingatan DDR3 dwisaluran - 4 x Alur DDR3 - ASRock M3N78D FX | Quick Installation Guide - Page 161
Pintar - ASRock Instant Boot - ASRock Instant Flash - ASRock OC DNA - ASRock APP Charger - ASRock SmartView - ASRock XFast USB - ASRock XFast LAN - Hybrid Booster: - Kontrol tanpa langkah Frekwensi CPU - ASRock U-COP - Penjaga kegagalan input (B.F.G.) Bahasa Indonesia ASRock M3N78D FX Motherboard - ASRock M3N78D FX | Quick Installation Guide - Page 162
susunan BIOS, penggunaan Untied Overclocking Technology, atau pemakaian perlengkapan overclocking lain. Overclocking barangkali mengganggu stabilitas sistem Anda, atau menimbulkan kerusakan terhadap komponen dan alat sistem Anda. Anda seharusnya. Bahasa Indonesia 162 ASRock M3N78D FX Motherboard
-
 1
1 -
 2
2 -
 3
3 -
 4
4 -
 5
5 -
 6
6 -
 7
7 -
8
-
9
-
10
-
11
-
12
-
13
-
14
-
15
-
16
-
17
-
18
-
19
-
20
-
21
-
22
-
23
-
24
-
25
-
26
-
27
-
28
-
29
-
30
-
31
-
32
-
33
-
34
-
35
-
36
-
37
-
38
-
39
-
40
-
41
-
42
-
43
-
44
-
45
-
46
-
47
-
48
-
49
-
50
-
51
-
52
-
53
-
54
-
55
-
56
-
57
-
58
-
59
-
60
-
61
-
62
-
63
-
64
-
65
-
66
-
67
-
68
-
69
-
70
-
71
-
72
-
73
-
74
-
75
-
76
-
77
-
78
-
79
-
80
-
81
-
82
-
83
-
84
-
85
-
86
-
87
-
88
-
89
-
90
-
91
-
92
-
93
-
94
-
95
-
96
-
97
-
98
-
99
-
100
-
101
-
102
-
103
-
104
-
105
-
106
-
107
-
108
-
109
-
110
-
111
-
112
-
113
-
114
-
115
-
116
-
117
-
118
-
119
-
120
-
121
-
122
-
123
-
124
-
125
-
126
-
127
-
128
-
129
-
130
-
131
-
132
-
133
-
134
-
135
-
136
-
137
-
138
-
139
-
140
-
141
-
142
-
143
-
144
-
145
-
146
-
147
-
148
-
149
-
150
-
151
-
152
-
153
-
154
-
155
-
156
-
157
-
158
-
159
-
160
-
161
-
162
 |
 |
1
ASRock
M3N78D FX
Motherboard
English
English
English
English
English
Copyright Notice:
Copyright Notice:
Copyright Notice:
Copyright Notice:
Copyright Notice:
No part of this installation guide may be reproduced, transcribed, transmitted, or trans-
lated in any language, in any form or by any means, except duplication of documen-
tation by the purchaser for backup purpose, without written consent of ASRock Inc.
Products and corporate names appearing in this guide may or may not be registered
trademarks or copyrights of their respective companies, and are used only for identifica-
tion or explanation and to the owners’ benefit, without intent to infringe.
Disclaimer:
Disclaimer:
Disclaimer:
Disclaimer:
Disclaimer:
Specifications and information contained in this guide are furnished for informational
use only and subject to change without notice, and should not be constructed as a
commitment by ASRock. ASRock assumes no responsibility for any errors or omissions
that may appear in this guide.
With respect to the contents of this guide, ASRock does not provide warranty of any kind,
either expressed or implied, including but not limited to the implied warranties or
conditions of merchantability or fitness for a particular purpose. In no event shall
ASRock, its directors, officers, employees, or agents be liable for any indirect, special,
incidental, or consequential damages (including damages for loss of profits, loss of
business, loss of data, interruption of business and the like), even if ASRock has been
advised of the possibility of such damages arising from any defect or error in the guide
or product.
This device complies with Part 15 of the FCC Rules. Operation is subject to the
following two conditions:
(1)
this device may not cause harmful interference, and
(2)
this device must accept any interference received, including interference that
may cause undesired operation.
Published December 2011
Copyright
©
2011 ASRock INC. All rights reserved.
CALIFORNIA, USA ONLY
The Lithium battery adopted on this motherboard contains Perchlorate, a toxic
substance controlled in Perchlorate Best Management Practices (BMP) regulations
passed by the California Legislature. When you discard the Lithium battery in
California, USA, please follow the related regulations in advance.
“Perchlorate Material-special handling may apply, see
www
.dtsc.ca.gov/hazardouswa
ste/perchlorate”
ASRock Website: http://www.asrock.com