ASRock M3N78D Quick Installation Guide
ASRock M3N78D Manual
 |
View all ASRock M3N78D manuals
Add to My Manuals
Save this manual to your list of manuals |
ASRock M3N78D manual content summary:
- ASRock M3N78D | Quick Installation Guide - Page 1
' benefit, without intent to infringe. Disclaimer: Specifications and information contained in this guide are furnished for informational use only and subject ASRock Website: http://www.asrock.com Published December 2009 Copyright©2009 ASRock INC. All rights reserved. 1 ASRock M3N78D Motherboard - ASRock M3N78D | Quick Installation Guide - Page 2
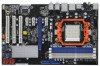
Motherboard Layout English 1 PS2_USB_PW1 Jumper 19 System Panel Header (PANEL1, Orange) 2 ATX 12V Power Connector (ATX12V1) 20 Power LED Header (PLED1) 3 CPU Heatsink Retention Module 21 Serial Port Connector (COM1) 4 AM3 CPU Socket 22 Floppy Connector (FLOPPY1) 5 2 x 240-pin DDR3 DIMM - ASRock M3N78D | Quick Installation Guide - Page 3
/ Bass (Orange) 6 Line In (Light Blue) ** 7 Front Speaker (Lime) 8 9 *** 10 11 12 13 14 Microphone (Pink) USB 2.0 Ports (USB01) Powered eSATAII/USB Connector USB 2.0 Ports . 4) (No. 5) (No. 3) 2 V -- -- -- 4 V V -- -- 6 V V V -- 8 V V V V 3 ASRock M3N78D Motherboard English - ASRock M3N78D | Quick Installation Guide - Page 4
quick installation guide for the detail steps of making a SATA driver diskette. If you want to install Windows® 7 / 7 64-bit / VistaTM 64-bit / VistaTM in RAID / AHCI mode, please install the OS directly, and you can enjoy the benefit of powered eSATAII function. 4 ASRock M3N78D Motherboard English - ASRock M3N78D | Quick Installation Guide - Page 5
introduction of the motherboard and step-bystep installation guide. More detailed information of the motherboard can be found in the user manual presented in the Support CD. Because the motherboard specifications and the BIOS software might be updated, the content of this manual will be subject - ASRock M3N78D | Quick Installation Guide - Page 6
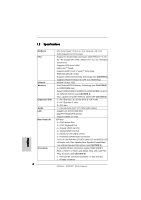
processors - Supports CPU up to 140W - AMD LIVE!TM Ready - Supports AMD's Cool 'n' QuietTM Technology - FSB 2600 MHz (5.2 GT/s) - Supports Untied Overclocking Technology (see CAUTION 1) - Supports Hyper-Transport 3.0 (HT 3.0) Technology - NVIDIA® nForce 720D - Dual Channel DDR3 Memory Technology - ASRock M3N78D | Quick Installation Guide - Page 7
- CASE OPEN detection - Voltage Monitoring: +12V, +5V, +3.3V, CPU Vcore - Microsoft® Windows® 7 / 7 64-bit / VistaTM / VistaTM 64-bit / XP / XP Media Center / XP 64-bit compliant - FCC, CE, WHQL - EuP Ready (EuP ready power supply is required) (see CAUTION 14) 7 ASRock M3N78D Motherboard English - ASRock M3N78D | Quick Installation Guide - Page 8
. 3. Whether 1800 / 1600MHz memory speed is supported depends on the AM3 CPU you adopt. If you want to adopt DDR3 1600 memory module on this motherboard, please refer to the memory support list on our website for the compatible memory modules. ASRock website http://www.asrock.com 4. Due to the - ASRock M3N78D | Quick Installation Guide - Page 9
of Intelligent Energy Saver. ASRock website: http://www.asrock.com 10. ASRock Instant Flash is a BIOS flash utility embedded in Flash ROM. This convenient BIOS update tool allows you to update system BIOS without entering operating systems first like MS-DOS or Windows®. With this utility, you - ASRock M3N78D | Quick Installation Guide - Page 10
wall socket before touching any component. 2. To avoid damaging the motherboard components due to static electricity, NEVER place your motherboard directly the motherboard to the chassis, please do not over-tighten the screws! Doing so may damage the motherboard. 10 ASRock M3N78D Motherboard English - ASRock M3N78D | Quick Installation Guide - Page 11
the heatsink are securely fastened and in good contact with each other. Then connect the CPU fan to the CPU FAN connector (CPU_FAN1, see Page 2, No. 35). For proper installation, please kindly refer to the instruction manuals of the CPU fan and the heatsink. English 11 ASRock M3N78D Motherboard - ASRock M3N78D | Quick Installation Guide - Page 12
example, installing a pair of memory modules in DDR3_A1 and DDR3_A2, it is unable to activate the Dual Channel Memory Technology . 4. It is not allowed to install a DDR or DDR2 memory module into DDR3 slot; otherwise, this motherboard and DIMM may be damaged. English 12 ASRock M3N78D Motherboard - ASRock M3N78D | Quick Installation Guide - Page 13
notch on the DIMM matches the break on the slot. The DIMM only fits in one correct orientation. It will cause permanent damage to the motherboard and the DIMM if you force the DIMM into the slot at incorrect orientation. Step 3. Firmly insert the DIMM into the slot until the retaining - ASRock M3N78D | Quick Installation Guide - Page 14
for the card before you start the installation. Step 2. Remove the system unit cover (if your motherboard is already installed in a chassis). Step 3. Remove the bracket facing the slot that you intend to the chassis with screws. Step 6. Replace the system cover. 14 ASRock M3N78D Motherboard English - ASRock M3N78D | Quick Installation Guide - Page 15
on CLRCMOS1 for 5 seconds. However, please do not clear the CMOS right after you update the BIOS. If you need to clear the CMOS when you just finish updating the BIOS, you must boot up the system first, and then shut it down before you do the clearCMOS action. English 15 ASRock M3N78D Motherboard - ASRock M3N78D | Quick Installation Guide - Page 16
motherboard connect the black end to the IDE devices 80-conductor ATA 66/100/133 cable Note: Please refer to the instruction No. 10) SATAII_4 (PORT 3) SATAII_3 (PORT 2) SATAII_2 (PORT 1) These four Serial ATAII (SATAII) connectors support SATA motherboard. English 16 ASRock M3N78D Motherboard - ASRock M3N78D | Quick Installation Guide - Page 17
Sensing, but the panel wire on the chassis must support HDA to function correctly. Please follow the instruction in our manual and chassis manual to install your system. 2. If you use AC'97 audio panel, please install it to the front panel audio header as below: 17 ASRock M3N78D Motherboard English - ASRock M3N78D | Quick Installation Guide - Page 18
only. You don't need to connect them for AC'97 audio panel. E. Enter BIOS Setup Utility. Enter Advanced Settings, and then select Chipset Configuration. Set the Front Panel connect the CPU fan cable to this connector and match the black wire to the ground pin. English 18 ASRock M3N78D Motherboard - ASRock M3N78D | Quick Installation Guide - Page 19
your power supply along with Pin 1 and Pin 5. 8 5 4-Pin ATX 12V Power Supply Installation 4 1 Serial port Header (9-pin COM1) (see p.2, No.21) This COM1 header supports a serial port module. English 19 ASRock M3N78D Motherboard - ASRock M3N78D | Quick Installation Guide - Page 20
the HDMI_SPDIF connector of HDMI VGA card to this header. Please connect the black end (A) of HDMI_SPDIF cable to the HDMI_SPDIF header on the motherboard. Then connect the white end (B or C) of HDMI_SPDIF cable to the HDMI_SPDIF connector of HDMI VGA card. B. white end (2-pin) C. white end (3-pin - ASRock M3N78D | Quick Installation Guide - Page 21
SATA / SATAII HDDs without NCQ and Hot Plug functions STEP 1: Set Up BIOS. A. Enter BIOS SETUP UTILITY Advanced screen Storage Configuration. B. Set the "SATA Operation Mode" option to [IDE]. STEP 2: Install Windows® VistaTM / VistaTM 64-bit OS on your system. 21 ASRock M3N78D Motherboard English - ASRock M3N78D | Quick Installation Guide - Page 22
RAID Installation Guide 2.10 Untied Overclocking Technology This motherboard supports Untied Overclocking Technology, which means during overclocking, FSB enjoys better margin due to fixed PCI / PCIE buses. Before you enable Untied Overclocking function, please enter "Overclock Mode" option of BIOS - ASRock M3N78D | Quick Installation Guide - Page 23
among the predetermined choices. For the detailed information about BIOS Setup, please refer to the User Manual (PDF file) contained in the Support CD. 4. Software Support CD information This motherboard supports various Microsoft® Windows® operating systems: 7 / 7 64-bit / VistaTM / VistaTM 64-bit - ASRock M3N78D | Quick Installation Guide - Page 24
benötigen, besuchen Sie bitte unsere Webseite: www.asrock.com/support/index.asp 1.1 Kartoninhalt ASRock M3N78D Motherboard (ATX-Formfaktor: 30.5 cm x 19.1 cm; 12.0 Zoll x 7.5 Zoll) ASRock M3N78D Schnellinstallationsanleitung ASRock M3N78D Support-CD Zwei Serial ATA (SATA) -Datenkabel (optional) Ein - ASRock M3N78D | Quick Installation Guide - Page 25
Festkondensator für CPU-Leistung - Unterstützung von Socket AM3-Prozessoren: nForce 720D - Unterstützung von Dual-Kanal-Speichertechnologie (siehe VORSICHT 2) - 4 x Steckplätze für DDR3 - Unterstützt DDR3 VT1718S Audio Codec) - Gigabit LAN 10/100/1000 Mb/s - Giga PHY Realtek ASRock M3N78D Motherboard - ASRock M3N78D | Quick Installation Guide - Page 26
CPU-Frequenz-Kontrolle (siehe VORSICHT 12) - ASRock U-COP (siehe VORSICHT 13) - Boot Failure Guard (B.F.G. - Systemstartfehlerschutz) Hardware Monitor - Überwachung der CPU-Temperatur - Motherboardtemperaturerkennung - Drehzahlmessung für CPU/Gehäuse/Stromlüfter 26 ASRock M3N78D Motherboard - ASRock M3N78D | Quick Installation Guide - Page 27
die aufgrund von Overclocking verursacht wurden. VORSICHT! 1. Dieses Motherboard unterstützt die AM3-CPU ab. Schauen Sie bitte auf unseren Internetseiten in der Liste mit unterstützten Speichermodulen nach, wenn Sie DDR3 1600-Speichermodule einsetzen möchten. ASRock-Internetseite: http://www.asrock - ASRock M3N78D | Quick Installation Guide - Page 28
der Support-CD, CPU asrock.com 10. ASRock Instant Flash ist ein im Flash-ROM eingebettetes BIOS-FlashProgramm. Mithilfe dieses praktischen BIOS-Aktualisierungswerkzeugs können Sie das System-BIOS aktualisieren, ohne dafür zuerst Betriebssysteme wie MS-DOS oder Windows ASRock M3N78D Motherboard Deutsch - ASRock M3N78D | Quick Installation Guide - Page 29
Motherboard stufenlose Steuerung bietet, wird Overclocking nicht empfohlen. Frequenzen, die über den für den jeweiligen Prozessor vorgesehenen liegen, können das System instabil werden lassen oder die CPU Details beim Hersteller der Stromversorgung abzufragen. 29 ASRock M3N78D Motherboard Deutsch - ASRock M3N78D | Quick Installation Guide - Page 30
beinhalten das System-Passwort, Datum, Zeit und die verschiedenen BIOS-Parameter. Um die Systemparameter zu löschen und auf die BIOS löschen müssen, müssen Sie zuerst das System starten und dann wieder ausschalten, bevor Sie den CMOS-Inhalt löschen. Deutsch 30 ASRock M3N78D Motherboard - ASRock M3N78D | Quick Installation Guide - Page 31
No. 12) (SATAII_3 (PORT 2): siehe S.2 - No. 11) (SATAII_4 (PORT 3): siehe S.2 - No. 10) SATAII_4 (PORT 3) SATAII_3 (PORT 2) SATAII_2 (PORT 1) SATAII_1 (PORT 0) Diese vier Serial ATAII(SATAII-)Verbínder ück auf dieser Hauptplatine angeschlossen werden. Deutsch 31 ASRock M3N78D Motherboard - ASRock M3N78D | Quick Installation Guide - Page 32
vier üblichen USB 2.0-Ports an den I/O-Anschlüssen befinden sich drei USB 2.0-Anschlussleisten am Motherboard. Pro USB 2.0Anschlussleiste werden zwei USB 2.0-Ports unterstützt. Verteiler für Gehäuseeindringversuche (2-pin bequeme Kontrolle über Audio-Geräte. 32 ASRock M3N78D Motherboard Deutsch - ASRock M3N78D | Quick Installation Guide - Page 33
nicht an die AC'97-Audioleiste angeschlossen werden. E. Rufen Sie das BIOS-Setup-Dienstprogramm auf. Wechseln Sie zu Erweiterte Einstellungen und wählen Sie Chipset mit den Lüfteranschlüssen, wobei der schwarze Draht an den Schutzleiterstift angeschlossenwird. 33 ASRock M3N78D Motherboard Deutsch - ASRock M3N78D | Quick Installation Guide - Page 34
werden; auch ohne Geschwindigkeitsregulierung. Wenn Sie einen dreipoligen CPU-Lüfter an den CPU-Lüferanschluss dieses Motherboards anschließen möchten, verbinden Sie ihn bitte mit Pin 5 ein. 8 5 Installation der 4-Pin ATX 12V Energieversorgung 4 1 Deutsch 34 ASRock M3N78D Motherboard - ASRock M3N78D | Quick Installation Guide - Page 35
mit diesem Anschluss. HDMI_SPDIF-Kabel (Option) C B A Bitte verbinden Sie das schwarze Ende (A) des HDMI_SPDIF-Kabels mit dem HDMI_SPDIF-Anschluss am Motherboard. Schließen Sie dann das weiße Ende (B oder C) des HDMI_SPDIF-Kabels an den HDMI_SPDIF-Anschluss der HDMI-VGA-Karte an. A. Schwarzes - ASRock M3N78D | Quick Installation Guide - Page 36
Optionen auswählen können. Für detaillierte Informationen zum BIOS-Setup, siehe bitte das Benutzerhandbuch (PDF Datei) auf der Support CD. 3. Software Support CD information Dieses Motherboard unterstützt eine Reiche von Microsoft® Windows® Betriebssystemen: 7 / 7 64-Bit / VistaTM / VistaTM 64-Bit - ASRock M3N78D | Quick Installation Guide - Page 37
1.1 Contenu du paquet Carte mère ASRock M3N78D (Facteur de forme ATX: 12.0 pouces x 7.5 pouces, 30.5 cm x 19.1 cm) Guide d'installation rapide ASRock M3N78D CD de soutien ASRock M3N78D Deux câbles de données de série ATA (SATA) (en option) Un I/O Panel Shield 37 ASRock M3N78D Motherboard Français - ASRock M3N78D | Quick Installation Guide - Page 38
la technologie Untied Overclocking (voir ATTENTION 1) - Prise en charge de la technologie Hyper Transport 3.0 (HT 3.0) Chipsets - NVIDIA® nForce 720D Mémoire - Compatible avec la Technologie de Mémoire à Canal Double (voir ATTENTION 2) - 4 x slots DIMM DDR3 - Supporte DDR3 1800(OC)/1600 - ASRock M3N78D | Quick Installation Guide - Page 39
10) - ASRock OC DNA (voir ATTENTION 11) - L'accélérateur hybride: - Contrôle direct de la fréquence CPU (voir ATTENTION 12) - ASRock U-COP (voir ATTENTION 13) - Garde d'échec au démarrage (B.F.G.) - Contrôle de la température CPU - Mesure de température de la carte mère 39 ASRock M3N78D Motherboard - ASRock M3N78D | Quick Installation Guide - Page 40
. 3. La prise en charge de fréquences de mémoire de 1800 / 1600MHz dépend du CPU AM3 que vous choisissez. Si vous choisissez des barrettes de mémoire DDR3 1600 sur cette carte mère, veuillez vous référer à la liste des mémoires prises en charge sur notre site Web pour connaître barrettes de mémoire - ASRock M3N78D | Quick Installation Guide - Page 41
o Windows®. Com este utilitário, poderá premir a tecla durante o teste de arranque POST ou premir a tecla para exibir o menu de configuração do BIOS para aceder ao ASRock Instant Flash simplifie le processus compliqué d'enregistrement des paramètres 41 ASRock M3N78D Motherboard Français - ASRock M3N78D | Quick Installation Guide - Page 42
améliorer la dissipation de la chaleur, n'oubliez pas de mettre de la pâte thermique entre le CPU le dissipateur lors de l'installation du PC. 14. EuP, qui signifie Energy Using Product (Produit de consulter votre fournisseur de courant pour plus de détails. 42 ASRock M3N78D Motherboard Français - ASRock M3N78D | Quick Installation Guide - Page 43
de suite après avoir mis le BIOS à jour. Si vous avez besoin d'effacer la CMOS lorsque vous avez fini de mettre le BIOS à jour, vous devez d'abord initialiser le système, puis le mettre hors tension avant de procéder à l'opération d'effacement de la CMOS. Français 43 ASRock M3N78D Motherboard - ASRock M3N78D | Quick Installation Guide - Page 44
ATA 66/100/133 80 conducteurs Note: Veuillez vous reporter aux instructions du fabricant de votre IDE périphérique pour les détails. PORT 2): voir p.2 fig. 11) (SATAII_4 (PORT 3): voir p.2 fig. 10) SATAII_4 (PORT 3) SATAII_3 (PORT 2) SATAII_2 (PORT 1) SATAII_1 (PORT 0) ASRock M3N78D Motherboard - ASRock M3N78D | Quick Installation Guide - Page 45
la détection de fiche, mais le fil de panneau sur le châssis doit prendre en charge le HDA pour fonctionner correctement. Veuillez suivre les instructions dans notre manuel et le manuel de châssis afin installer votre système. 45 ASRock M3N78D Motherboard Français - ASRock M3N78D | Quick Installation Guide - Page 46
audio AC'97. E. Entrer dans l'utilitaire de configuration du BIOS. Saisir les Paramètres avancés puis sélectionner Configuration du jeu 34) (PWR_FAN1 br. 3) (voir p.2 No. 18) Connecteur pour ventilateur CPU (CPU_FAN1 br. 4) (voir p.2 fig. 35) 4 3 2 1 Veuillez ASRock M3N78D Motherboard Français - ASRock M3N78D | Quick Installation Guide - Page 47
oche de terre. ien que cette carte mère offre un support de (Ventilateur silencieux) ventilateur de CPU à 4 broches , le ventilateur de CPU à 3 broches peut bien fonctionner même sans la fonction de et permettant au système de se connecter au un téléviseur 47 ASRock M3N78D Motherboard Français - ASRock M3N78D | Quick Installation Guide - Page 48
es sur le BIOS, veuillez consulter le Guide de l'utilisateur (fichier PDF) dans le CD technique. 3. Informations sur le CD de support Cette carte mère supporte divers systèmes d'exploitation Microsoft® Windows®: 7 / -cliquez dessus pour afficher les menus. Français 48 ASRock M3N78D Motherboard - ASRock M3N78D | Quick Installation Guide - Page 49
.com/support/index.asp 1.1 Contenuto della confezione Scheda madre ASRock M3N78D (ATX Form Factor: 12.0-in x 7.5-in, 30.5 cm x 19.1 cm) Guida di installazione rapida ASRock M3N78D CD di supporto ASRock M3N78D Due cavi dati Serial ATA (SATA) (opzionali) Un I/O Shield 49 ASRock M3N78D Motherboard - ASRock M3N78D | Quick Installation Guide - Page 50
- FSB 2600 MHz (5.2 GT/s) - Supporta la tecnologia overclocking "slegata" (vedi ATTENZIONE 1) - Supporta la tecnologia Hyper-Transport 3.0 (HT 3.0) - NVIDIA® nForce 720D - Supporto tecnologia Dual Channel Memory (vedi ATTENZIONE 2) - 4 x slot DDR3 DIMM - Supporta DDR3 1800(OC)/1600(OC)/1333/1066/800 - ASRock M3N78D | Quick Installation Guide - Page 51
frequenza del processore (vedi ATTENZIONE 12) - ASRock U-COP (vedi ATTENZIONE 13) - Boot Failure Guard (B.F.G.) - Sensore per la temperatura del processore - Sensore temperatura scheda madre - Indicatore di velocità per la ventola del CPU/Chassis/ Alimentazione 51 ASRock M3N78D Motherboard Italiano - ASRock M3N78D | Quick Installation Guide - Page 52
o meno, dipende dagli AM3 CPU utilizzati. Se si desidera adottare il modulo di memoria DDR3 1600 su questa scheda madre, fare riferimento all'elenco delle memorie supportate nel nostro sito web per scoprire quali sono i moduli compatibili. Sito web ASRock http://www.asrock.com 4. A causa delle - ASRock M3N78D | Quick Installation Guide - Page 53
madre. 12. Anche se questa motherboard offre il controllo stepless, non si consiglia di effettuare l'overclocking. Frequenze del bus del processore diverse da quelle raccomandate possono causare instabilità al sistema o danni al processore e alla scheda madre. 53 ASRock M3N78D Motherboard Italiano - ASRock M3N78D | Quick Installation Guide - Page 54
sistema si chiude automaticamente. Prima di riavviare il sistema, assicurarsi che la ventolina CPU della scheda madre funzioni correttamente; scollegare e ricollegare il cavo d'alimentazione. Per consigliamo di verificare ulteriori dettagli con il produttore. 54 ASRock M3N78D Motherboard Italiano - ASRock M3N78D | Quick Installation Guide - Page 55
jumper. Non cancellare la CMOS subito dopo aver aggiornato il BIOS. Se è necessario cancellare la CMOS una volta completato l'aggiornamento del BIOS, è necessario riavviare prima il sistema, e poi spegnerlo prima di procedere alla cancellazione della CMOS. Italiano 55 ASRock M3N78D Motherboard - ASRock M3N78D | Quick Installation Guide - Page 56
p.2 Nr. 12) (SATAII_3 (PORT 2): vedi p.2 Nr. 11) (SATAII_4 (PORT 3): vedi p.2 Nr. 10) SATAII_4 (PORT 3) SATAII_3 (PORT 2) SATAII_2 (PORT 1) SATAII_1 (PORT 0) Questi quattro connettori Serial ATA ( / SATAII o al connettore di SATAII su questa cartolina base. 56 ASRock M3N78D Motherboard Italiano - ASRock M3N78D | Quick Installation Guide - Page 57
dei cavi sul telaio deve supportare la funzione HDA (High Definition Audio) per far sì che questa operi in modo corretto. Attenersi alle istruzioni del nostro manuale e del manuale del telaio per 57 ASRock M3N78D Motherboard Italiano - ASRock M3N78D | Quick Installation Guide - Page 58
il pannello audio AC'97. E. Entrare nel programma di impostazione BIOS. Entrare su Impostazioni avanzate, quindi selezionare Configurazione chipset. Impostare Collegare il cavo della ventolina CPU a questo connettore e far combaciare il filo nero al pin terra. 58 ASRock M3N78D Motherboard Italiano - ASRock M3N78D | Quick Installation Guide - Page 59
della velocità della ventola. Se si intende collegare la ventola CPU a 3 piedini al connettore della ventola CPU su questa scheda madre, collegarla ai piedini 1-3. Piedini 1-3 . 21) Questo collettore porta COM è utilizzato per supportare il modulo porta COM. Italiano 59 ASRock M3N78D Motherboard - ASRock M3N78D | Quick Installation Guide - Page 60
user-friendly". Es un programa guido al menu, es decir, puede enrollarse a sus varios su-menues y elegir las opciones predeterminadas. Per informazioni più dettagliate circa il Setup del BIOS, fare riferimento al Manuale dell'Utente (PDF due volte per visualizzare i menù. 60 ASRock M3N78D Motherboard - ASRock M3N78D | Quick Installation Guide - Page 61
.com/support/index.asp 1.1 Contenido de la caja Placa base ASRock M3N78D (Factor forma ATX: 30,5 cm x 19,1 cm, 12,0" x 7,5") Guía de instalación rápida de ASRock M3N78D CD de soporte de ASRock M3N78D Dos cables de datos Serial ATA (SATA) (Opcional) Una protección I/O 61 ASRock M3N78D Motherboard - ASRock M3N78D | Quick Installation Guide - Page 62
de CPU - Compatibilidad con procesadores con conector AM3: nForce 720D - Soporte de Tecnología de Memoria de Doble Canal (ver ATENCIÓN 2) - 4 x DDR3 DIMM slots - Soporta DDR3 dec de sonido VIA® VT1718S) - Gigabit LAN 10/100/1000 Mb/s - Giga PHY Realtek RTL8211CL ASRock M3N78D Motherboard Español - ASRock M3N78D | Quick Installation Guide - Page 63
ÓN 11) - Amplificador Híbrido: - Stepless control de frecuencia de CPU (vea ATENCIÓN 12) - ASRock U-COP (vea ATENCIÓN 13) - Protección de Falla de Inicio (B.F.G..) - Sensibilidad a la temperatura del procesador - Sensibilidad a la temperatura de la placa madre 63 ASRock M3N78D Motherboard Español - ASRock M3N78D | Quick Installation Guide - Page 64
: http://www.asrock.com 4. Debido a las limitaciones del sistema, el tamaño real de la memoria debe ser inferior a 4GB para que el sistema pueda funcionar bajo Windows® 7 / VistaTM / XP. Para equipos con Windows® OS con CPU de 64bit, no existe dicha limitación. Español 64 ASRock M3N78D Motherboard - ASRock M3N78D | Quick Installation Guide - Page 65
.asrock.com 10. ASRock Instant Flash es una utilidad de programación del BIOS que se encuentra almacenada en la memoria Flash ROM. Esta sencilla herramienta de actualización de BIOS le permitirá actualizar el BIOS del sistema sin necesidad de acceder a ningún sistema operativo, como MS-DOS o Windows - ASRock M3N78D | Quick Installation Guide - Page 66
va a apagarse automaticamente. Antes de reanudar el sistema, compruebe si el ventilador de la CPU de la placa base funciona apropiadamente y desconecte el cable de alimentación, a continuación, vuelva de la fuente de alimentación para obtener más detalles. 66 ASRock M3N78D Motherboard Español - ASRock M3N78D | Quick Installation Guide - Page 67
acuérdase de quitar el jumper cap después de limpiar el COMS. Si necesita borrar la CMOS cuando acabe de finalizar la actualización de la BIOS, debe arrancar primero el sistema y, a continuación, apagarlo antes de realizar la acción de borrado de CMOS. Español 67 ASRock M3N78D Motherboard - ASRock M3N78D | Quick Installation Guide - Page 68
(PORT 1): vea p.2, N. 12) (SATAII_3 (PORT 2): vea p.2, N. 11) (SATAII_4 (PORT 3): vea p.2, N. 10) SATAII_4 (PORT 3) SATAII_3 (PORT 2) SATAII_2 (PORT 1) SATAII_1 (PORT 0) Estos cuatro conectores de la Serie ATA ( el conectador de SATAII en esta placa base. Español 68 ASRock M3N78D Motherboard - ASRock M3N78D | Quick Installation Guide - Page 69
, TV tuner, o tarjeta MPEG. Este es una interface para cable de audio de panel frontal que permite conexión y control conveniente de apparatos de Audio. 69 ASRock M3N78D Motherboard Español - ASRock M3N78D | Quick Installation Guide - Page 70
correctamente. Por favor, siga las instrucciones en nuestro manual y en el manual de chasis para instalar su sistema. 2. Si utiliza AC'97. E. Entre en la Utilidad de configuración del BIOS Entre en Configuración avanzada y, a continuación, seleccione Configuración ASRock M3N78D Motherboard Español - ASRock M3N78D | Quick Installation Guide - Page 71
el n la patilla de Conector del ventilador de la CPU (4-pin CPU_FAN1) (vea p.2, No. 35) 4 3 2 1 Conecte el cable del ventilador de la CPU a este conector y haga coincidir el cable negro y Pin 5. 8 5 Instalación de Fuente de Energía de 4-Pin ATX 12V 4 1 71 ASRock M3N78D Motherboard Español - ASRock M3N78D | Quick Installation Guide - Page 72
extremo blanco (B o C) del cable HDMI_SPDIF en el conector HDMI_SPDIF de la tarjeta VGA HDMI. A. Extremo negro B. Extremo blanco (2 patillas) C. Extremo blanco (3 patillas) Español 72 ASRock M3N78D Motherboard - ASRock M3N78D | Quick Installation Guide - Page 73
configurar la BIOS, por favor refiérase al Manual del Usuario (archivo PDF) contenido en el CD. 3.Información de Software Support CD Esta placa-base soporta diversos tipos de sistema operativo Windows®: 7 en el archivo ASSETUP.EXE para iniciar la instalación. 73 ASRock M3N78D Motherboard Español - ASRock M3N78D | Quick Installation Guide - Page 74
86 ASRock M3N78D Motherboard - ASRock M3N78D | Quick Installation Guide - Page 75
'' ® ® 87 ASRock M3N78D Motherboard - ASRock M3N78D | Quick Installation Guide - Page 76
® ® ® 88 ASRock M3N78D Motherboard - ASRock M3N78D | Quick Installation Guide - Page 77
" " ® ® " " " " ® 89 ASRock M3N78D Motherboard - ASRock M3N78D | Quick Installation Guide - Page 78
® 90 ASRock M3N78D Motherboard - ASRock M3N78D | Quick Installation Guide - Page 79
"" "" "" "" 91 ASRock M3N78D Motherboard - ASRock M3N78D | Quick Installation Guide - Page 80
SATAII_4 (PORT 3) SATAII_3 (PORT 2) SATAII_2 (PORT 1) SATAII_1 (PORT 0) 92 ASRock M3N78D Motherboard - ASRock M3N78D | Quick Installation Guide - Page 81
CD1 93 ASRock M3N78D Motherboard - ASRock M3N78D | Quick Installation Guide - Page 82
94 ASRock M3N78D Motherboard - ASRock M3N78D | Quick Installation Guide - Page 83
4 3 2 1 12 24 1 13 8 5 4 1 12 24 1 13 8 5 4 1 95 ASRock M3N78D Motherboard - ASRock M3N78D | Quick Installation Guide - Page 84
C B A 96 ASRock M3N78D Motherboard - ASRock M3N78D | Quick Installation Guide - Page 85
" " \\ " " 97 ASRock M3N78D Motherboard - ASRock M3N78D | Quick Installation Guide - Page 86
98 ASRock M3N78D Motherboard - ASRock M3N78D | Quick Installation Guide - Page 87
'' ® ® 99 ASRock M3N78D Motherboard - ASRock M3N78D | Quick Installation Guide - Page 88
® ® 100 ASRock M3N78D Motherboard - ASRock M3N78D | Quick Installation Guide - Page 89
® ® ® " " ® ® 101 ASRock M3N78D Motherboard - ASRock M3N78D | Quick Installation Guide - Page 90
TM TM ® ® ® ® - 102 ASRock M3N78D Motherboard - ASRock M3N78D | Quick Installation Guide - Page 91
103 ASRock M3N78D Motherboard - ASRock M3N78D | Quick Installation Guide - Page 92
104 ASRock M3N78D Motherboard - ASRock M3N78D | Quick Installation Guide - Page 93
SATAII_4 (PORT 3) SATAII_3 (PORT 2) SATAII_2 (PORT 1) SATAII_1 (PORT 0) 105 ASRock M3N78D Motherboard - ASRock M3N78D | Quick Installation Guide - Page 94
CD1 106 ASRock M3N78D Motherboard - ASRock M3N78D | Quick Installation Guide - Page 95
4 3 2 1 107 ASRock M3N78D Motherboard - ASRock M3N78D | Quick Installation Guide - Page 96
12 24 1 13 8 5 4 1 12 24 1 13 8 5 4 1 108 ASRock M3N78D Motherboard - ASRock M3N78D | Quick Installation Guide - Page 97
12 24 1 13 8 5 4 1 C B A 109 ASRock M3N78D Motherboard - ASRock M3N78D | Quick Installation Guide - Page 98
® ® TM TM 110 ASRock M3N78D Motherboard - ASRock M3N78D | Quick Installation Guide - Page 99
111 ASRock M3N78D Motherboard - ASRock M3N78D | Quick Installation Guide - Page 100
'' ™ ® ® 112 ASRock M3N78D Motherboard - ASRock M3N78D | Quick Installation Guide - Page 101
® ® ® ® ASRock M3N78D Motherboard 113 - ASRock M3N78D | Quick Installation Guide - Page 102
® ® ® ® 114 ASRock M3N78D Motherboard - ASRock M3N78D | Quick Installation Guide - Page 103
® ® 115 ASRock M3N78D Motherboard - ASRock M3N78D | Quick Installation Guide - Page 104
116 ASRock M3N78D Motherboard - ASRock M3N78D | Quick Installation Guide - Page 105
SATAII_4 (PORT 3) SATAII_3 (PORT 2) SATAII_2 (PORT 1) SATAII_1 (PORT 0) 117 ASRock M3N78D Motherboard - ASRock M3N78D | Quick Installation Guide - Page 106
CD1 118 ASRock M3N78D Motherboard - ASRock M3N78D | Quick Installation Guide - Page 107
4 3 2 1 12 24 1 13 ASRock M3N78D Motherboard 119 - ASRock M3N78D | Quick Installation Guide - Page 108
8 5 4 1 12 24 1 13 8 5 4 1 120 ASRock M3N78D Motherboard - ASRock M3N78D | Quick Installation Guide - Page 109
12 24 1 13 8 5 4 1 C B A ® ® 121 ASRock M3N78D Motherboard - ASRock M3N78D | Quick Installation Guide - Page 110
X O O O X O O O O: X: O O O O 122 ASRock M3N78D Motherboard - ASRock M3N78D | Quick Installation Guide - Page 111
O O 123 ASRock M3N78D Motherboard - ASRock M3N78D | Quick Installation Guide - Page 112
® ® 124 ASRock M3N78D Motherboard - ASRock M3N78D | Quick Installation Guide - Page 113
® ® ® ® ASRock M3N78D Motherboard 125 - ASRock M3N78D | Quick Installation Guide - Page 114
® ® ® ® 126 ASRock M3N78D Motherboard - ASRock M3N78D | Quick Installation Guide - Page 115
® ® 127 ASRock M3N78D Motherboard - ASRock M3N78D | Quick Installation Guide - Page 116
128 ASRock M3N78D Motherboard - ASRock M3N78D | Quick Installation Guide - Page 117
SATAII_4 (PORT 3) SATAII_3 (PORT 2) SATAII_2 (PORT 1) SATAII_1 (PORT 0) 129 ASRock M3N78D Motherboard - ASRock M3N78D | Quick Installation Guide - Page 118
CD-L GND GND CD-R CD1 130 ASRock M3N78D Motherboard - ASRock M3N78D | Quick Installation Guide - Page 119
4 3 2 1 12 24 1 13 12 24 8 5 4 1 ASRock M3N78D Motherboard 1 13 131 - ASRock M3N78D | Quick Installation Guide - Page 120
8 5 4 1 C B A 132 ASRock M3N78D Motherboard - ASRock M3N78D | Quick Installation Guide - Page 121
8 5 4 1 ® ® ® 133 ASRock M3N78D Motherboard
-
 1
1 -
 2
2 -
 3
3 -
 4
4 -
 5
5 -
 6
6 -
 7
7 -
8
-
9
-
10
-
11
-
12
-
13
-
14
-
15
-
16
-
17
-
18
-
19
-
20
-
21
-
22
-
23
-
24
-
25
-
26
-
27
-
28
-
29
-
30
-
31
-
32
-
33
-
34
-
35
-
36
-
37
-
38
-
39
-
40
-
41
-
42
-
43
-
44
-
45
-
46
-
47
-
48
-
49
-
50
-
51
-
52
-
53
-
54
-
55
-
56
-
57
-
58
-
59
-
60
-
61
-
62
-
63
-
64
-
65
-
66
-
67
-
68
-
69
-
70
-
71
-
72
-
73
-
74
-
75
-
76
-
77
-
78
-
79
-
80
-
81
-
82
-
83
-
84
-
85
-
86
-
87
-
88
-
89
-
90
-
91
-
92
-
93
-
94
-
95
-
96
-
97
-
98
-
99
-
100
-
101
-
102
-
103
-
104
-
105
-
106
-
107
-
108
-
109
-
110
-
111
-
112
-
113
-
114
-
115
-
116
-
117
-
118
-
119
-
120
-
121
 |
 |

1
ASRock
M3N78D
Motherboard
English
English
English
English
English
Copyright Notice:
Copyright Notice:
Copyright Notice:
Copyright Notice:
Copyright Notice:
No part of this installation guide may be reproduced, transcribed, transmitted, or trans-
lated in any language, in any form or by any means, except duplication of documen-
tation by the purchaser for backup purpose, without written consent of ASRock Inc.
Products and corporate names appearing in this guide may or may not be registered
trademarks or copyrights of their respective companies, and are used only for identifica-
tion or explanation and to the owners’ benefit, without intent to infringe.
Disclaimer:
Disclaimer:
Disclaimer:
Disclaimer:
Disclaimer:
Specifications and information contained in this guide are furnished for informational
use only and subject to change without notice, and should not be constructed as a
commitment by ASRock. ASRock assumes no responsibility for any errors or omissions
that may appear in this guide.
With respect to the contents of this guide, ASRock does not provide warranty of any kind,
either expressed or implied, including but not limited to the implied warranties or
conditions of merchantability or fitness for a particular purpose. In no event shall
ASRock, its directors, officers, employees, or agents be liable for any indirect, special,
incidental, or consequential damages (including damages for loss of profits, loss of
business, loss of data, interruption of business and the like), even if ASRock has been
advised of the possibility of such damages arising from any defect or error in the guide
or product.
This device complies with Part 15 of the FCC Rules. Operation is subject to the
following two conditions:
(1)
this device may not cause harmful interference, and
(2)
this device must accept any interference received, including interference that
may cause undesired operation.
Published December 2009
Copyright
©
2009 ASRock INC. All rights reserved.
CALIFORNIA, USA ONLY
The Lithium battery adopted on this motherboard contains Perchlorate, a toxic
substance controlled in Perchlorate Best Management Practices (BMP) regulations
passed by the California Legislature. When you discard the Lithium battery in
California, USA, please follow the related regulations in advance.
“Perchlorate Material-special handling may apply, see
www
.dtsc.ca.gov/hazardouswa
ste/perchlorate”
ASRock Website: http://www.asrock.com