ASRock N68-VS3 UCC Quick Installation Guide
ASRock N68-VS3 UCC Manual
 |
View all ASRock N68-VS3 UCC manuals
Add to My Manuals
Save this manual to your list of manuals |
ASRock N68-VS3 UCC manual content summary:
- ASRock N68-VS3 UCC | Quick Installation Guide - Page 1
backup purpose, without written consent of ASRock Inc. Products and corporate names appearing in this guide may or may not be registered ASRock Website: http://www.asrock.com Published February 2011 Copyright©2011 ASRock INC. All rights reserved. 1 ASRock N68-VGS3 UCC / N68-VS3 UCC Motherboard - ASRock N68-VS3 UCC | Quick Installation Guide - Page 2
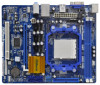
Chassis Fan Connector (CHA_FAN1) 20 Serial Port Connector (COM1) 21 PCI Slot (PCI1) 22 PCI Express x16 Slot (PCIE1) 23 Front Panel Audio Header (HD_AUDIO1, Lime) 24 ATX 12V Power Connector (ATX12V1) 25 AM3 CPU Socket 26 ATX Power Connector (ATXPWR1) 2 ASRock N68-VGS3 UCC / N68-VS3 UCC Motherboard - ASRock N68-VS3 UCC | Quick Installation Guide - Page 3
7 64-bit / VistaTM / VistaTM 64-bit OS: Please click "VIA HD Audio Deck" icon , and click "Advanced Options" on the left side on the bottom. In "Advanced Options" screen, select "Independent Headphone", and click "OK" to save your change. 3 ASRock N68-VGS3 UCC / N68-VS3 UCC Motherboard English - ASRock N68-VS3 UCC | Quick Installation Guide - Page 4
7 64-bit / VistaTM / VistaTM 64-bit OS: Please click "VIA HD Audio Deck" icon , and click "Advanced Options" on the left side on the bottom. In "Advanced Options" screen, select "Independent Headphone", and click "OK" to save your change. 4 ASRock N68-VGS3 UCC / N68-VS3 UCC Motherboard English - ASRock N68-VS3 UCC | Quick Installation Guide - Page 5
are using. www.asrock.com/support/index.asp 1.1 Package Contents One ASRock N68-VGS3 UCC / N68-VS3 UCC Motherboard (Micro ATX Form Factor: 8.5-in x 7.0-in, 21.6 cm x 17.8 cm) One ASRock N68-VGS3 UCC / N68-VS3 UCC Quick Installation Guide One ASRock N68-VGS3 UCC / N68-VS3 UCC Support CD Two Serial - ASRock N68-VS3 UCC | Quick Installation Guide - Page 6
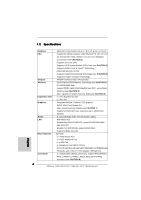
Audio LAN Rear Panel I/O Connector - Micro ATX Form Factor: 8.5-in x 7.0-in, 21.6 cm x 17.8 cm - Support for AM3 processors: AMD PhenomTM II X6 / X4 / X3 / X2 (except 920 / 940) / Athlon II X4 / X3 / X2 / Sempron processors (see CAUTION 1) - Supports Six-Core CPU - Supports UCC feature (Unlock CPU - ASRock N68-VS3 UCC | Quick Installation Guide - Page 7
: +12V, +5V, +3.3V, Vcore OS - Microsoft® Windows® 7 / 7 64-bit / VistaTM / VistaTM 64-bit / XP / XP 64-bit compliant Certifications - FCC, CE, WHQL * For detailed product information, please visit our website: http://www.asrock.com English 7 ASRock N68-VGS3 UCC / N68-VS3 UCC Motherboard - ASRock N68-VS3 UCC | Quick Installation Guide - Page 8
by overclocking. CAUTION! 1. This motherboard supports CPU up to 95W. Please refer to our website for CPU support list. ASRock website http://www.asrock.com 2. UCC (Unlock CPU Core) feature simplifies AMD CPU activation. As long as a simple switch of the BIOS option "ASRock UCC", you can unlock the - ASRock N68-VS3 UCC | Quick Installation Guide - Page 9
motion controlled games. Also, please do not forget to pay attention to ASRock official website regularly, we will continuously provide you the most up-do-date supported games! ASRock website: http://www.asrock.com/Feature/Aiwi/index.asp 9 ASRock N68-VGS3 UCC / N68-VS3 UCC Motherboard English - ASRock N68-VS3 UCC | Quick Installation Guide - Page 10
check if the CPU fan on the motherboard functions properly and unplug the power cord, then plug it back again. To improve heat dissipation, remember to spray thermal grease between the CPU and the heatsink when you install the PC system. 10 ASRock N68-VGS3 UCC / N68-VS3 UCC Motherboard English - ASRock N68-VS3 UCC | Quick Installation Guide - Page 11
it on a grounded antistatic pad or in the bag that comes with the component. 5. When placing screws into the screw holes to secure the motherboard to the chassis, please do not over-tighten the screws! Doing so may damage the motherboard. 11 ASRock N68-VGS3 UCC / N68-VS3 UCC Motherboard English - ASRock N68-VS3 UCC | Quick Installation Guide - Page 12
securely fastened and in good contact with each other. Then connect the CPU fan to the CPU FAN connector (CPU_FAN1, see Page 2, No. 2). For proper installation, please kindly refer to the instruction manuals of the CPU fan and the heatsink. English 12 ASRock N68-VGS3 UCC / N68-VS3 UCC Motherboard - ASRock N68-VS3 UCC | Quick Installation Guide - Page 13
Modules (DIMM) N68-VGS3 UCC / N68-VS3 UCC motherboard provides two 240-pin DDR3 (Double Data Rate 3) DIMM slots, and supports Dual Channel Memory power supply before adding or removing DIMMs or the system components. Step 1. Unlock a DIMM slot by pressing the retaining clips outward. Step 2. Align a - ASRock N68-VS3 UCC | Quick Installation Guide - Page 14
There are 1 PCI slot and 1 PCI Express slot on this motherboard. PCI slot: PCI slot is used to install expansion cards that have the 32-bit PCI interface. PCIE slot: PCIE1 (PCIE x16 slot) is used Fasten the card to the chassis with screws. 14 ASRock N68-VGS3 UCC / N68-VS3 UCC Motherboard English - ASRock N68-VS3 UCC | Quick Installation Guide - Page 15
64-bit / VistaTM / VistaTM 64-bit OS: Right click the desktop, choose "Personalize", and select the "Display Settings" tab so that you can adjust the parameters of the multi-monitor according to the steps below. A. Click the number "2" icon. 15 ASRock N68-VGS3 UCC / N68-VS3 UCC Motherboard English - ASRock N68-VS3 UCC | Quick Installation Guide - Page 16
waiting for 15 seconds, use a jumper cap to short pin2 and pin3 on CLRCMOS1 for 5 seconds. However, please do not clear the CMOS right 16 ASRock N68-VGS3 UCC / N68-VS3 UCC Motherboard English - ASRock N68-VS3 UCC | Quick Installation Guide - Page 17
) Data Cable (Optional) Either end of the SATA data cable can be connected to the SATA / SATAII hard disk or the SATAII connector on the motherboard. English 17 ASRock N68-VGS3 UCC / N68-VS3 UCC Motherboard - ASRock N68-VS3 UCC | Quick Installation Guide - Page 18
(MIC) to MIC2_L. B. Connect Audio_R (RIN) to OUT2_R and Audio_L (LIN) to OUT2_L. C. Connect Ground (GND) to Ground (GND). D. MIC_RET and OUT_RET are for HD audio panel only. You don't need to connect them for AC'97 audio panel. English 18 ASRock N68-VGS3 UCC / N68-VS3 UCC Motherboard - ASRock N68-VS3 UCC | Quick Installation Guide - Page 19
ATX power connector, 12 24 it can still work if you adopt a traditional 20-pin ATX power supply. To use the 20-pin ATX power supply, please plug your power supply along with Pin 1 and Pin 13. 20-Pin ATX Power Supply Installation 1 13 English 19 ASRock N68-VGS3 UCC / N68-VS3 UCC Motherboard - ASRock N68-VS3 UCC | Quick Installation Guide - Page 20
If you want to install Windows® 7 / 7 64-bit / VistaTM / VistaTM 64-bit on your SATA / SATAII HDDs with RAID functions, please refer to the document at the following path in the Support CD for detailed procedures: ..\ RAID Installation Guide English 20 ASRock N68-VGS3 UCC / N68-VS3 UCC Motherboard - ASRock N68-VS3 UCC | Quick Installation Guide - Page 21
the User Manual (PDF file) contained in the Support CD. 4. Software Support CD information This motherboard supports various Microsoft® Windows® operating systems: 7 / 7 64-bit / VistaTM / VistaTM 64-bit / XP / XP 64-bit. The Support CD that came with the motherboard contains necessary drivers and - ASRock N68-VS3 UCC | Quick Installation Guide - Page 22
UCC / N68-VS3 UCC Motherboard (Micro ATX-Formfaktor: 21.6 cm x 17.8 cm; 8.5 Zoll x 7.0 Zoll) ASRock N68-VGS3 UCC / N68-VS3 UCC Schnellinstallationsanleitung ASRock N68-VGS3 UCC / N68-VS3 UCC Support-CD Zwei Seriell-ATA- (SATA) Datenkabel (Option) Ein I/O Shield 22 ASRock N68-VGS3 UCC / N68-VS3 UCC - ASRock N68-VS3 UCC | Quick Installation Guide - Page 23
Rückseite - Micro ATX-Formfaktor: 21.6 cm x 17.8 cm; 8.5 Zoll x 7.0 Zoll - Unterstützung von Socket AM3-Prozessoren: AMD PhenomTM II X6 / X4 / X3 / X2 (außer 920 / 940) / Athlon X4 / X3 / X2 / Sempron-Prozessor (siehe VORSICHT 1) - Sechs-Kern-CPU-bereit - Unterstützt UCC (Unlock CPU Core) (siehe - ASRock N68-VS3 UCC | Quick Installation Guide - Page 24
16) - Hybrid Booster: - Schrittloser CPU-Frequenz-Kontrolle (siehe VORSICHT 17) - ASRock U-COP (siehe VORSICHT 18) - Boot Failure Guard (B.F.G. - Systemstartfehlerschutz) Hardware Monitor - CPU-Temperatursensor - Motherboardtemperaturerkennung 24 ASRock N68-VGS3 UCC / N68-VS3 UCC Motherboard - ASRock N68-VS3 UCC | Quick Installation Guide - Page 25
ngt von der von Ihnen eingesetzten AM3-CPU ab. Schauen Sie bitte auf unseren Internetseiten in der Liste mit unterstützten Speichermodulen nach, wenn Sie DDR3 1600-Speichermodule einsetzen möchten. ASRock-Internetseite: http://www.asrock.com 25 ASRock N68-VGS3 UCC / N68-VS3 UCC Motherboard Deutsch - ASRock N68-VS3 UCC | Quick Installation Guide - Page 26
Windows® 7 / Vista™ / XP etwas Speicher zur Nutzung durch das System reserviert wird. Unter Windows® OS mit 64-Bit-CPU " auf der Support-CD, um Ihre ASRock exklusiv entwickeltes Dienstprogramm, das Nutzern eine bequeme Möglichkeit bietet, 26 ASRock N68-VGS3 UCC / N68-VS3 UCC Motherboard Deutsch - ASRock N68-VS3 UCC | Quick Installation Guide - Page 27
to RAM-Modus (S3) oder Tiefschlafmodus ( ASRock-Webseite: http:// www.asrock.com/Feature/AppCharger/index.asp 15. SmartView, eine neue Internetbrowserfunktion, ist eine intelligente IEStartseite, die meist besuchte Internetseiten, Ihren Browserverlauf, 27 ASRock N68-VGS3 UCC / N68-VS3 UCC Motherboard - ASRock N68-VS3 UCC | Quick Installation Guide - Page 28
Windows®-Betriebssystemen 7 / 7, 64 Bit / VistaTM / VistaTM 64 Bit und dem Internet Explorer ab Version 8 nutzen. ASRock-Website: http://www.asrock.com/Feature/SmartView/index.asp 16. ASRocks auf dieser Leitung 2A oder mehr leisten können. Deutsch 28 ASRock N68-VGS3 UCC / N68-VS3 UCC Motherboard - ASRock N68-VS3 UCC | Quick Installation Guide - Page 29
Wenn Sie den CMOSInhalt gleich nach dem Aktualisieren des BIOS löschen müssen, müssen Sie zuerst das Motherboard zur Festplatte 80-adriges ATA 66/100/133 Kabel Hinweis: Details entnehmen Sie bitte den Anweisungen Ihres IDE-Gerätehändlers. Deutsch 29 ASRock N68-VGS3 UCC / N68-VS3 UCC Motherboard - ASRock N68-VS3 UCC | Quick Installation Guide - Page 30
1.1): siehe S.2, No. 10) Serial ATA- (SATA-) Audio auf der Gehäusevorderseite (9-Pin HD_AUDIO1) (siehe S.2, No. 23) Dieses Interface zu einem Audio-Panel auf der Vorderseite Ihres Gehäuses, ermöglicht Ihnen eine bequeme Kontrolle über Audio-Geräte. 30 ASRock N68-VGS3 UCC / N68-VS3 UCC Motherboard - ASRock N68-VS3 UCC | Quick Installation Guide - Page 31
1. High Definition Audio unterstützt Jack Sensing (automatische Erkennung falsch angeschlossener Geräte Draht dem Erdungsstift an. Verbinden Sie das CPU Lüfterkabel mit diesem Anschluss und passen Sie den schwarzen Draht dem Erdungsstift an. Deutsch 31 ASRock N68-VGS3 UCC / N68-VS3 UCC Motherboard - ASRock N68-VS3 UCC | Quick Installation Guide - Page 32
an den CPU-Lüferanschluss dieses Motherboards anschließen möchten, verbinden Sie ihn bitte mit den Pins 1 - 3. Pins 1-3 anschließen Lüfter mit dreipoligem Anschluss installieren ATX-Netz-Header um ein COM-Anschlussmodul zu unterstützen. Deutsch 32 ASRock N68-VGS3 UCC / N68-VS3 UCC Motherboard - ASRock N68-VS3 UCC | Quick Installation Guide - Page 33
der Support-CD, um die Menüs aufzurufen. Das Setup-Programm soll es Ihnen so leicht wie möglich machen. Es ist menügesteuert, d.h. Sie können in den verschiedenen Untermenüs Ihre Auswahl treffen und die Programme werden dann automatisch installiert. 33 ASRock N68-VGS3 UCC / N68-VS3 UCC Motherboard - ASRock N68-VS3 UCC | Quick Installation Guide - Page 34
de forme Micro ATX: 8.5 pouces x 7.0 pouces, 21.6 cm x 17.8 cm) Guide d'installation rapide ASRock N68-VGS3 UCC / N68-VS3 UCC CD de soutien ASRock N68-VGS3 UCC / N68-VS3 UCC Deux câble de données Serial ATA (SATA) (Optionnelle) Un écran I/O 34 ASRock N68-VGS3 UCC / N68-VS3 UCC Motherboard Français - ASRock N68-VS3 UCC | Quick Installation Guide - Page 35
Micro ATX: 8.5 pouces x 7.0 pouces, 21.6 cm x 17.8 cm CPU - Prise en charge des processeurs sur socket AM3: Processeur PhenomTM II X6 / X4 / X3 / X2 (sauf 920 / 940) / Athlon II X4 / X3 / X2 / Sempron d'AMD (voir ATTENTION 1) - Prêt pour processeurs Six-Core - Supporte UCC (Unlock CPU Core - ASRock N68-VS3 UCC | Quick Installation Guide - Page 36
14) - SmartView (voir ATTENTION 15) - ASRock XFast USB (voir ATTENTION 16) - L'accélérateur hybride: - Contrôle direct de la fréquence CPU (voir ATTENTION 17) - ASRock U-COP (voir ATTENTION 18) - Garde d'échec au démarrage (B.F.G.) Français 36 ASRock N68-VGS3 UCC / N68-VS3 UCC Motherboard - ASRock N68-VS3 UCC | Quick Installation Guide - Page 37
carte mère supporte la Technologie de Mémoire à Canal Double. Avant d'intégrer la Technologie de Mémoire à Canal Double, assurezvous de bien lire le guide d'installation des modules mémoire en page 13 pour réaliser une installation correcte. 37 ASRock N68-VGS3 UCC / N68-VS3 UCC Motherboard Français - ASRock N68-VS3 UCC | Quick Installation Guide - Page 38
a tecla durante o teste de arranque POST ou premir a tecla para exibir o menu de configuração do BIOS para aceder ao ASRock Instant Flash. Execute esta ferramenta para guardar o novo ficheiro de BIOS numa unidade flash USB, numa 38 ASRock N68-VGS3 UCC / N68-VS3 UCC Motherboard Français - ASRock N68-VS3 UCC | Quick Installation Guide - Page 39
, em seguida, poderá actualizar o BIOS com apenas alguns cliques sem ter de pris en charge lorsque le PC passe en mode Veille (S1), Suspension à la RAM (S3), hibernation (S4) ou hors tension (S5). Lorsque le pilote du chargeur APP est en 39 ASRock N68-VGS3 UCC / N68-VS3 UCC Motherboard Français - ASRock N68-VS3 UCC | Quick Installation Guide - Page 40
Windows® 7 / 7 64 bits / VistaTM ou VistaTM 64 bits, et que la version de votre navigateur est IE8. Site web ASRock : http://www.asrock.com/Feature/SmartView/index.asp 16. ASRock entre le CPU le dissipateur lors de l'installation du PC. 40 ASRock N68-VGS3 UCC / N68-VS3 UCC Motherboard Français - ASRock N68-VS3 UCC | Quick Installation Guide - Page 41
la broche 2 et la broche 3 sur CLRCMOS1 pendant 5 secondes. Après avoir court-circuité le cavalier Effacer la CMOS, veuillez enlever le capuchon de cavalier. 41 ASRock N68-VGS3 UCC / N68-VS3 UCC Motherboard Français - ASRock N68-VS3 UCC | Quick Installation Guide - Page 42
BIOS à jour. Si vous avez besoin d'effacer la CMOS lorsque vous avez fini de mettre le BIOS Note: Veuillez vous reporter aux instructions du fabricant de votre IDE périph (SATAII_4 (PORT 1.1): voir p.2 fig. 10) SATAII_1 SATAII_2 (PORT 0.0) (PORT 0.1) ASRock N68-VGS3 UCC / N68-VS3 UCC Motherboard - ASRock N68-VS3 UCC | Quick Installation Guide - Page 43
audio AC'97, installez-le sur l'adaptateur audio du panneau avant conformément à la procédure ci-dessous : A. Connectez Mic_IN (MIC) à MIC2_L. B. Connectez Audio_R (RIN) à OUT2_R et Audio_L (LIN) à OUT2_L. C. Connectez Ground (GND) à Ground (GND). 43 ASRock N68-VGS3 UCC / N68-VS3 UCC Motherboard - ASRock N68-VS3 UCC | Quick Installation Guide - Page 44
le panneau audio AC'97 un support de (Ventilateur silencieux) ventilateur de CPU à 4 broches , le ventilateur de CPU à ATX 12 24 (ATXPWR1 br. 24) (voir p.2 fig. 26) Veuillez connecter une unité d'alimentation ATX sur ce connecteur. 1 13 Français 44 ASRock N68-VGS3 UCC / N68-VS3 UCC Motherboard - ASRock N68-VS3 UCC | Quick Installation Guide - Page 45
électrique avec prise ATX 12V sur ce connecteur afin d'avoir une alimentation suffisante. Faute de quoi, il ne sera pas possible de mettre sous tension. Cette en-tête de port COM est utilisée pour prendre en charge un module de port COM. Français 45 ASRock N68-VGS3 UCC / N68-VS3 UCC Motherboard - ASRock N68-VS3 UCC | Quick Installation Guide - Page 46
n'apparaît pas automatiquement, localisez dans le CD technique le fichier "ASSETUP.EXE" dans le dossier BIN et double-cliquez dessus pour afficher les menus. 46 ASRock N68-VGS3 UCC / N68-VS3 UCC Motherboard Français - ASRock N68-VS3 UCC | Quick Installation Guide - Page 47
UCC / N68-VS3 UCC (Micro ATX Form Factor: 8.5-in x 7.0-in, 21.6 cm x 17.8 cm) Guida di installazione rapida ASRock N68-VGS3 UCC / N68-VS3 UCC CD di supporto ASRock N68-VGS3 UCC / N68-VS3 UCC Due cavo dati Serial ATA (SATA) (Opzionale) Un I/O Shield 47 ASRock N68-VGS3 UCC / N68-VS3 UCC Motherboard - ASRock N68-VS3 UCC | Quick Installation Guide - Page 48
- Micro ATX Form Factor: 8.5-in x 7.0-in, 21.6 cm x 17.8 cm Processore - Supporto di processori Socket AM3: AMD PhenomTM II X6 / X4 / X3 / X2 (fatta eccezione per 920 / 940) / Athlon II X4 / X3 / X2 / Sempron (vedi ATTENZIONE 1) - CPU Six-Core Ready - Supporto UCC (Unlock CPU Core) (vedi - ASRock N68-VS3 UCC | Quick Installation Guide - Page 49
del processore aggio - Sensore temperatura scheda madre Hardware - Indicatore di velocità per la ventola del processore - Indicatore di velocità per la ventola di raffreddamento - Ventola CPU silenziosa - Voltaggio: +12V, +5V, +3.3V, Vcore 49 ASRock N68-VGS3 UCC / N68-VS3 UCC Motherboard - ASRock N68-VS3 UCC | Quick Installation Guide - Page 50
del sistema operativo, le dimensioni effettive della memoria possono essere inferiori a 4GB per l'accantonamento riservato all'uso del sistema sotto Windows® 7 / VistaTM / XP. Per Windows® OS con CPU 64-bit, non c'è tale limitazione. 50 ASRock N68-VGS3 UCC / N68-VS3 UCC Motherboard Italiano - ASRock N68-VS3 UCC | Quick Installation Guide - Page 51
di overclocking nel sistema operativo e semplifica la complicata procedura di registrazione delle impostazioni di overclocking. Con OC DNA, puoi salvare le impostazioni OC come un profilo da condividere con gli amici! I tuoi amici possono scaricare il 51 ASRock N68-VGS3 UCC / N68-VS3 UCC Motherboard - ASRock N68-VS3 UCC | Quick Installation Guide - Page 52
. 17. Anche se questa motherboard offre il controllo stepless, non si consiglia di effettuare l'overclocking. L'uso di frequenze diverse da quelle raccomandate per il bus CPU possono provocare l'instabilità del sistema o danneggiare la CPU. 52 ASRock N68-VGS3 UCC / N68-VS3 UCC Motherboard Italiano - ASRock N68-VS3 UCC | Quick Installation Guide - Page 53
madre funzioni correttamente; scollegare e ricollegare il cavo d'alimentazione. Per migliorare la dissipazione del calore, ricordare di applicare l'apposita pasta siliconica tra il processore e il dissipatore quando si installa il sistema. 53 ASRock N68-VGS3 UCC / N68-VS3 UCC Motherboard Italiano - ASRock N68-VS3 UCC | Quick Installation Guide - Page 54
la CMOS subito dopo aver aggiornato il BIOS. Se è necessario cancellare la CMOS una volta completato l'aggiornamento del BIOS, è necessario riavviare prima il sistema, e poi spegnerlo prima di procedere alla cancellazione della CMOS. Italiano 54 ASRock N68-VGS3 UCC / N68-VS3 UCC Motherboard - ASRock N68-VS3 UCC | Quick Installation Guide - Page 55
Nr. 9) (SATAII_3 (PORT 1.0): vedi p.2 Nr. 11) (SATAII_4 (PORT 1.1): vedi p.2 Nr. 10) Cavi dati Serial ATA (SATA) (Opzionale) SATAII_1 SATAII_2 (PORT 0.0) (PORT 0.1) SATAII_3 SATAII_4 ( SATAII o al connettore SATAII sulla scheda madre. Italiano 55 ASRock N68-VGS3 UCC / N68-VS3 UCC Motherboard - ASRock N68-VS3 UCC | Quick Installation Guide - Page 56
manuale e del manuale del telaio per installare il sistema. 2. Se si utilizza un pannello audio AC'97, installarlo nell'intestazione audio e OUT_RET sono solo per il pannello audio HD. Non è necessario collegarli per il pannello audio AC'97. 56 ASRock N68-VGS3 UCC / N68-VS3 UCC Motherboard Italiano - ASRock N68-VS3 UCC | Quick Installation Guide - Page 57
elettrico ATX a 24 pin, ma può funzionare lo stesso se si adotta un alimentatore ATX a 20 pin. Per usare l'alimentatore ATX a 20 pin, collegare l'alimentatore con il Pin 1 e il Pin 13. Installazione dell'alimentatore ATX a 20 pin 1 13 Italiano 57 ASRock N68-VGS3 UCC / N68-VS3 UCC Motherboard - ASRock N68-VS3 UCC | Quick Installation Guide - Page 58
collegare una alimentazione con spinotto da 12V ATX a questo connettore in modo che possa fornire energia sufficiente. In caso contrario l'unità non si avvia. Questo collettore porta COM è utilizzato per supportare il modulo porta COM. Italiano 58 ASRock N68-VGS3 UCC / N68-VS3 UCC Motherboard - ASRock N68-VS3 UCC | Quick Installation Guide - Page 59
. Se il Menù principale non appare automaticamente, posizionarsi sul file ASSETUP. EXE nel CESTINO del CD di supporto e cliccare due volte per visualizzare i menù. 59 ASRock N68-VGS3 UCC / N68-VS3 UCC Motherboard Italiano - ASRock N68-VS3 UCC | Quick Installation Guide - Page 60
N68-VS3 UCC (Factor forma Micro ATX: 21,6 cm x 17,8 cm, 8,5" x 7,0") Guía de instalación rápida de ASRock N68-VGS3 UCC / N68-VS3 UCC CD de soporte de ASRock N68-VGS3 UCC / N68-VS3 UCC Dos Cable de Datos Serial ATA (SATA) (Opcional) Una protección I/O 60 ASRock N68-VGS3 UCC / N68-VS3 UCC Motherboard - ASRock N68-VS3 UCC | Quick Installation Guide - Page 61
- Con soporte UCC (Unlock CPU Core) (vea ATENCIÓN 2) - Con soporte para tecnología Cool 'n' QuietTM de AMD - FSB 1000 MHz (2.0 GT/s) - Admite tecnología de aumento de velocidad liberada (vea ATENCIÓN 3) - Soporta Tecnología de Hiper-Transporte Chipset - NVIDIA® GeForce 7025 / nForce 630a - ASRock N68-VS3 UCC | Quick Installation Guide - Page 62
Stepless control de frecuencia de CPU (vea ATENCIÓN 17) - ASRock U-COP (vea ATENCIÓN 18) - Protección de Falla de Inicio (B.F.G..) Monitor Hardware - Sensibilidad a la temperatura del procesador - Sensibilidad a la temperatura de la placa madre 62 ASRock N68-VGS3 UCC / N68-VS3 UCC Motherboard - ASRock N68-VS3 UCC | Quick Installation Guide - Page 63
en la página 13 para su correcta instalación. 5. Que la velocidad de memoria de 1600 MHz se admita o no se admita, depende de la configuración AM3 Procesador que adopte. Si desea adoptar 63 ASRock N68-VGS3 UCC / N68-VS3 UCC Motherboard Español - ASRock N68-VS3 UCC | Quick Installation Guide - Page 64
ASRock: http://www.asrock.com 6. Debido a las limitaciones del sistema, el tamaño real de la memoria debe ser inferior a 4GB para que el sistema pueda funcionar bajo Windows® 7 / VistaTM / XP. Para equipos con Windows® OS con CPU de 64-bit 12. 64 ASRock N68-VGS3 UCC / N68-VS3 UCC Motherboard Español - ASRock N68-VS3 UCC | Quick Installation Guide - Page 65
en modo de espera (S1), suspendido en RAM (S3), modo de hibernación (S4) o se apague ( Windows® 7 / 7 64 bits / VistaTM / VistaTM 64 bits y que la versión de su explorador es IE8. Sitio Web de ASRock: http://www.asrock.com/Feature/SmartView/index.asp 65 ASRock N68-VGS3 UCC / N68-VS3 UCC Motherboard - ASRock N68-VS3 UCC | Quick Installation Guide - Page 66
va a apagarse automaticamente. Antes de reanudar el sistema, compruebe si el ventilador de la CPU de la placa base funciona apropiadamente y desconecte el cable de alimentación, a continuación, vuelva , fecha, tiempo, y parámetros de la configuración 66 ASRock N68-VGS3 UCC / N68-VS3 UCC Motherboard - ASRock N68-VS3 UCC | Quick Installation Guide - Page 67
la CMOS cuando acabe de finalizar la actualización de la BIOS, debe arrancar primero el sistema y, a continuación, apagarlo vea p.2, No. 11) (SATAII_4 (PORT 1.1): vea p.2, No. 10) SATAII_1 SATAII_2 (PORT 0.0) (PORT 0.1) SATAII_3 SATAII_4 (PORT 1.0) ASRock N68-VGS3 UCC / N68-VS3 UCC Motherboard - ASRock N68-VS3 UCC | Quick Installation Guide - Page 68
Audio. 1. El Audio de Alta Definición soporta la detección de conector, pero el cable de panel en el chasis debe soportar HDA para operar correctamente. Por favor, siga las instrucciones en nuestro manual y en el manual de sonido AC'97. 68 ASRock N68-VGS3 UCC / N68-VS3 UCC Motherboard Español - ASRock N68-VS3 UCC | Quick Installation Guide - Page 69
fuente de alimentación ATX de 20 pins tradicional. Para usar una fuente de alimentación ATX de 20 pins, por favor, conecte su fuente de alimentación usando los Pins 1 y 13. Instalación de una Fuente de Alimentación ATX de 20 Pins 1 13 Español 69 ASRock N68-VGS3 UCC / N68-VS3 UCC Motherboard - ASRock N68-VS3 UCC | Quick Installation Guide - Page 70
érase al Manual del Usuario (archivo PDF) contenido en el CD. 3.Información de Software Support CD Esta placa-base soporta diversos tipos de sistema operativo Windows®: 7 / 7 64 bits / VistaTM / VistaTM 64 bits / XP / XP 64 bits El CD de instalación que acompaña la placabase trae todos los drivers - ASRock N68-VS3 UCC | Quick Installation Guide - Page 71
71 ASRock N68-VGS3 UCC / N68-VS3 UCC Motherboard - ASRock N68-VS3 UCC | Quick Installation Guide - Page 72
72 ASRock N68-VGS3 UCC / N68-VS3 UCC Motherboard - ASRock N68-VS3 UCC | Quick Installation Guide - Page 73
1 x 73 ASRock N68-VGS3 UCC / N68-VS3 UCC Motherboard - ASRock N68-VS3 UCC | Quick Installation Guide - Page 74
74 ASRock N68-VGS3 UCC / N68-VS3 UCC Motherboard - ASRock N68-VS3 UCC | Quick Installation Guide - Page 75
75 ASRock N68-VGS3 UCC / N68-VS3 UCC Motherboard - ASRock N68-VS3 UCC | Quick Installation Guide - Page 76
76 ASRock N68-VGS3 UCC / N68-VS3 UCC Motherboard - ASRock N68-VS3 UCC | Quick Installation Guide - Page 77
Short Open 77 ASRock N68-VGS3 UCC / N68-VS3 UCC Motherboard - ASRock N68-VS3 UCC | Quick Installation Guide - Page 78
78 ASRock N68-VGS3 UCC / N68-VS3 UCC Motherboard SATAII_1 SATAII_2 (PORT 0.0) (PORT 0.1) SATAII_3 SATAII_4 (PORT 1.0) (PORT 1.1) - ASRock N68-VS3 UCC | Quick Installation Guide - Page 79
79 ASRock N68-VGS3 UCC / N68-VS3 UCC Motherboard - ASRock N68-VS3 UCC | Quick Installation Guide - Page 80
1 2 3 4 12 24 1 13 12 24 1 13 80 ASRock N68-VGS3 UCC / N68-VS3 UCC Motherboard - ASRock N68-VS3 UCC | Quick Installation Guide - Page 81
81 ASRock N68-VGS3 UCC / N68-VS3 UCC Motherboard - ASRock N68-VS3 UCC | Quick Installation Guide - Page 82
82 ASRock N68-VGS3 UCC / N68-VS3 UCC Motherboard - ASRock N68-VS3 UCC | Quick Installation Guide - Page 83
UCC (Formato Micro ATX: 8,5 pol. x 7,0 pol., 21,6 cm x 17,8 cm) Guia de instalação rápida da ASRock N68-VGS3 UCC / N68-VS3 UCC CD de suporte da placa ASRock N68-VGS3 UCC / N68-VS3 UCC Dois cabo de dados ATA Serial (SATA) (Opcional) Uma proteção I/O 83 ASRock N68-VGS3 UCC / N68-VS3 UCC Motherboard - ASRock N68-VS3 UCC | Quick Installation Guide - Page 84
de seis núcleos - Suporta UCC (Unlock CPU Core) (veja o AVISO 2) - Suporta a tecnologia AMD Cool 'n' QuietTM - FSB de 1000 MHz (2,0 GT/s) - Suporta a tecnologia Untied Overclocking (veja o AVISO 3) - Suporta a tecnologia Hyper-Transport Chipsets - NVIDIA® GeForce 7025 / nForce 630a Memória - ASRock N68-VS3 UCC | Quick Installation Guide - Page 85
AVISO 15) - ASRock XFast USB (veja o AVISO 16) - Booster híbrido - Frequência da CPU com controle contínuo (veja o AVISO 17) - ASRock U-COP (veja o AVISO 18) - B.F.G. (Boot Failure Guard) Monitor do HW - Sensores de temperature do procesador 85 ASRock N68-VGS3 UCC / N68-VS3 UCC Motherboard - ASRock N68-VS3 UCC | Quick Installation Guide - Page 86
memória com uma velocidade de 1600 MHz depende da CPU AM3 que adoptar. Se quiser adoptar um módulo de memória DDR3 1600 para utilização com esta placa principal, consulte a lista de memória suportada no nosso web site para saber quais os 86 ASRock N68-VGS3 UCC / N68-VS3 UCC Motherboard Português - ASRock N68-VS3 UCC | Quick Installation Guide - Page 87
à jour votre BIOS en quelques clics seulement, sans préparer de disquette supplémentaire ni d'autre utilitaire flash compliqué. Veuillez noter que le lecteur flash USB ou le disque dur doit utiliser le système de fichiers FAT32/16/12. 87 ASRock N68-VGS3 UCC / N68-VS3 UCC Motherboard Português - ASRock N68-VS3 UCC | Quick Installation Guide - Page 88
das definições de "overclocking". Com OC DNA, Suspender para a RAM (S3), modo de hibernação Windows® 7 / 7 64 bit / VistaTM / VistaTM 64 bit, e que a versão do seu navegador é IE8. Página Web da ASRock: http://www.asrock.com/Feature/SmartView/index.asp 88 ASRock N68-VGS3 UCC / N68-VS3 UCC Motherboard - ASRock N68-VS3 UCC | Quick Installation Guide - Page 89
barramento diferentes das recomendadas para a CPU podem provocar instabilidade do sistema ou danos à CPU. 18. Assim que se detecta um superaquecimento na CPU, o sistema se desliga automaticamente e o cabo de força, ponha em curto-circuito os pin 2 89 ASRock N68-VGS3 UCC / N68-VS3 UCC Motherboard - ASRock N68-VS3 UCC | Quick Installation Guide - Page 90
Se precisar limpar o CMOS ao concluir a atualização do BIOS, deverá reiniciar o sistema primeiro e, em seguida, No. 11) (SATAII_4 (PORT 1.1): veja a folha 2, No. 10) SATAII_1 SATAII_2 (PORT 0.0) (PORT 0.1) SATAII_3 SATAII_4 (PORT 1.0) ASRock N68-VGS3 UCC / N68-VS3 UCC Motherboard Português - ASRock N68-VS3 UCC | Quick Installation Guide - Page 91
chassis tem de suportar HDA para funcionar correctamente. Siga s instruções que aparecem no manual e no manual do chassis para instalar o sistema. 2. Se utilizar o painel de áudio AC . Não necessita de os ligar para o painel de áudio AC'97. 91 ASRock N68-VGS3 UCC / N68-VS3 UCC Motherboard Português - ASRock N68-VS3 UCC | Quick Installation Guide - Page 92
de esta placa-mãe possuir 4 apoios para uma ventoinha de CPU (Ventoinha silenciosa), uma ventoinha de 3 pinos para CPU poderá funcionar mesmo sem a função de controlo de Pino 13. Instalação da Fonte de alimentação ATX de 20 Pinos 1 13 Português 92 ASRock N68-VGS3 UCC / N68-VS3 UCC Motherboard - ASRock N68-VS3 UCC | Quick Installation Guide - Page 93
computador. Automaticamente iniciará o menu principal, casa o "AUTORUN" esteja ativado. Se o menu principal não aparecer automaticamente, explore o CD e execute o "ASSETUP.EXE" localizado na pasta "BIN". Português 93 ASRock N68-VGS3 UCC / N68-VS3 UCC Motherboard - ASRock N68-VS3 UCC | Quick Installation Guide - Page 94
Türkçe 94 ASRock N68-VGS3 UCC / N68-VS3 UCC Motherboard - ASRock N68-VS3 UCC | Quick Installation Guide - Page 95
Türkçe 95 ASRock N68-VGS3 UCC / N68-VS3 UCC Motherboard - ASRock N68-VS3 UCC | Quick Installation Guide - Page 96
Türkçe 96 ASRock N68-VGS3 UCC / N68-VS3 UCC Motherboard - ASRock N68-VS3 UCC | Quick Installation Guide - Page 97
Türkçe 97 ASRock N68-VGS3 UCC / N68-VS3 UCC Motherboard - ASRock N68-VS3 UCC | Quick Installation Guide - Page 98
Türkçe 98 ASRock N68-VGS3 UCC / N68-VS3 UCC Motherboard - ASRock N68-VS3 UCC | Quick Installation Guide - Page 99
Türkçe 99 ASRock N68-VGS3 UCC / N68-VS3 UCC Motherboard - ASRock N68-VS3 UCC | Quick Installation Guide - Page 100
Short Open Türkçe Default Clear CMOS 100 ASRock N68-VGS3 UCC / N68-VS3 UCC Motherboard - ASRock N68-VS3 UCC | Quick Installation Guide - Page 101
ASRock N68-VGS3 UCC / N68-VS3 UCC Motherboard SATAII_1 SATAII_2 (PORT 0.0) (PORT 0.1) SATAII_3 SATAII_4 (PORT 1.0) (PORT 1.1) 101 Türkçe - ASRock N68-VS3 UCC | Quick Installation Guide - Page 102
Türkçe 102 ASRock N68-VGS3 UCC / N68-VS3 UCC Motherboard - ASRock N68-VS3 UCC | Quick Installation Guide - Page 103
1 2 3 4 Türkçe 12 24 1 13 12 24 1 13 ASRock N68-VGS3 UCC / N68-VS3 UCC Motherboard 103 - ASRock N68-VS3 UCC | Quick Installation Guide - Page 104
Türkçe 104 ASRock N68-VGS3 UCC / N68-VS3 UCC Motherboard - ASRock N68-VS3 UCC | Quick Installation Guide - Page 105
ASRock N68-VGS3 UCC / N68-VS3 UCC Motherboard 105 - ASRock N68-VS3 UCC | Quick Installation Guide - Page 106
'' ® ® ® 106 ASRock N68-VGS3 UCC / N68-VS3 UCC Motherboard - ASRock N68-VS3 UCC | Quick Installation Guide - Page 107
® ASRock N68-VGS3 UCC / N68-VS3 UCC Motherboard 107 - ASRock N68-VS3 UCC | Quick Installation Guide - Page 108
" " " " ® ® " " " ® " 108 ® ASRock N68-VGS3 UCC / N68-VS3 UCC Motherboard - ASRock N68-VS3 UCC | Quick Installation Guide - Page 109
® ASRock N68-VGS3 UCC / N68-VS3 UCC Motherboard 109 - ASRock N68-VS3 UCC | Quick Installation Guide - Page 110
® "" "" "" "" "" 110 ASRock N68-VGS3 UCC / N68-VS3 UCC Motherboard - ASRock N68-VS3 UCC | Quick Installation Guide - Page 111
ASRock N68-VGS3 UCC / N68-VS3 UCC Motherboard SATAII_1 SATAII_2 (PORT 0.0) (PORT 0.1) SATAII_3 SATAII_4 (PORT 1.0) (PORT 1.1) 111 - ASRock N68-VS3 UCC | Quick Installation Guide - Page 112
112 ASRock N68-VGS3 UCC / N68-VS3 UCC Motherboard - ASRock N68-VS3 UCC | Quick Installation Guide - Page 113
1 2 3 4 12 24 1 13 12 24 1 13 ASRock N68-VGS3 UCC / N68-VS3 UCC Motherboard 113 - ASRock N68-VS3 UCC | Quick Installation Guide - Page 114
" " \\ " " 114 ASRock N68-VGS3 UCC / N68-VS3 UCC Motherboard - ASRock N68-VS3 UCC | Quick Installation Guide - Page 115
ASRock N68-VGS3 UCC / N68-VS3 UCC Motherboard 115 - ASRock N68-VS3 UCC | Quick Installation Guide - Page 116
'' ® ® ® 116 ASRock N68-VGS3 UCC / N68-VS3 UCC Motherboard - ASRock N68-VS3 UCC | Quick Installation Guide - Page 117
ASRock N68-VGS3 UCC / N68-VS3 UCC Motherboard 117 - ASRock N68-VS3 UCC | Quick Installation Guide - Page 118
® ® " " 118 ® ® ® ASRock N68-VGS3 UCC / N68-VS3 UCC Motherboard - ASRock N68-VS3 UCC | Quick Installation Guide - Page 119
® ® - ASRock N68-VGS3 UCC / N68-VS3 UCC Motherboard 119 - ASRock N68-VS3 UCC | Quick Installation Guide - Page 120
® 120 ASRock N68-VGS3 UCC / N68-VS3 UCC Motherboard - ASRock N68-VS3 UCC | Quick Installation Guide - Page 121
ASRock N68-VGS3 UCC / N68-VS3 UCC Motherboard 121 - ASRock N68-VS3 UCC | Quick Installation Guide - Page 122
122 ASRock N68-VGS3 UCC / N68-VS3 UCC Motherboard SATAII_1 SATAII_2 (PORT 0.0) (PORT 0.1) SATAII_3 SATAII_4 (PORT 1.0) (PORT 1.1) - ASRock N68-VS3 UCC | Quick Installation Guide - Page 123
ASRock N68-VGS3 UCC / N68-VS3 UCC Motherboard 123 - ASRock N68-VS3 UCC | Quick Installation Guide - Page 124
1 2 3 4 12 24 1 13 12 24 1 13 124 ASRock N68-VGS3 UCC / N68-VS3 UCC Motherboard - ASRock N68-VS3 UCC | Quick Installation Guide - Page 125
® ® TM TM ASRock N68-VGS3 UCC / N68-VS3 UCC Motherboard 125 - ASRock N68-VS3 UCC | Quick Installation Guide - Page 126
126 ASRock N68-VGS3 UCC / N68-VS3 UCC Motherboard - ASRock N68-VS3 UCC | Quick Installation Guide - Page 127
'' ™ ® ® ® ASRock N68-VGS3 UCC / N68-VS3 UCC Motherboard 127 - ASRock N68-VS3 UCC | Quick Installation Guide - Page 128
® ® 128 ASRock N68-VGS3 UCC / N68-VS3 UCC Motherboard - ASRock N68-VS3 UCC | Quick Installation Guide - Page 129
® ® ® ® ASRock N68-VGS3 UCC / N68-VS3 UCC Motherboard 129 - ASRock N68-VS3 UCC | Quick Installation Guide - Page 130
® ® 130 ASRock N68-VGS3 UCC / N68-VS3 UCC Motherboard - ASRock N68-VS3 UCC | Quick Installation Guide - Page 131
ASRock N68-VGS3 UCC / N68-VS3 UCC Motherboard 131 - ASRock N68-VS3 UCC | Quick Installation Guide - Page 132
132 ASRock N68-VGS3 UCC / N68-VS3 UCC Motherboard SATAII_1 SATAII_2 (PORT 0.0) (PORT 0.1) SATAII_3 SATAII_4 (PORT 1.0) (PORT 1.1) - ASRock N68-VS3 UCC | Quick Installation Guide - Page 133
ASRock N68-VGS3 UCC / N68-VS3 UCC Motherboard 133 - ASRock N68-VS3 UCC | Quick Installation Guide - Page 134
1 2 3 4 12 24 1 13 12 24 1 13 134 ASRock N68-VGS3 UCC / N68-VS3 UCC Motherboard - ASRock N68-VS3 UCC | Quick Installation Guide - Page 135
® ® ASRock N68-VGS3 UCC / N68-VS3 UCC Motherboard 135 - ASRock N68-VS3 UCC | Quick Installation Guide - Page 136
X O O O X O O O O: X: O O O O 136 ASRock N68-VGS3 UCC / N68-VS3 UCC Motherboard - ASRock N68-VS3 UCC | Quick Installation Guide - Page 137
ASRock N68-VGS3 UCC / N68-VS3 UCC Motherboard 137 - ASRock N68-VS3 UCC | Quick Installation Guide - Page 138
® ® ® 138 ASRock N68-VGS3 UCC / N68-VS3 UCC Motherboard - ASRock N68-VS3 UCC | Quick Installation Guide - Page 139
® ® ASRock N68-VGS3 UCC / N68-VS3 UCC Motherboard 139 - ASRock N68-VS3 UCC | Quick Installation Guide - Page 140
® ® ® ® 140 ASRock N68-VGS3 UCC / N68-VS3 UCC Motherboard - ASRock N68-VS3 UCC | Quick Installation Guide - Page 141
® ® ASRock N68-VGS3 UCC / N68-VS3 UCC Motherboard 141 - ASRock N68-VS3 UCC | Quick Installation Guide - Page 142
142 ASRock N68-VGS3 UCC / N68-VS3 UCC Motherboard - ASRock N68-VS3 UCC | Quick Installation Guide - Page 143
ASRock N68-VGS3 UCC / N68-VS3 UCC Motherboard SATAII_1 SATAII_2 (PORT 0.0) (PORT 0.1) SATAII_3 SATAII_4 (PORT 1.0) (PORT 1.1) 143 - ASRock N68-VS3 UCC | Quick Installation Guide - Page 144
144 1 2 3 4 ASRock N68-VGS3 UCC / N68-VS3 UCC Motherboard - ASRock N68-VS3 UCC | Quick Installation Guide - Page 145
12 24 1 13 12 24 1 13 ASRock N68-VGS3 UCC / N68-VS3 UCC Motherboard 145 - ASRock N68-VS3 UCC | Quick Installation Guide - Page 146
® ® ® 146 ASRock N68-VGS3 UCC / N68-VS3 UCC Motherboard
-
 1
1 -
 2
2 -
 3
3 -
 4
4 -
 5
5 -
 6
6 -
 7
7 -
8
-
9
-
10
-
11
-
12
-
13
-
14
-
15
-
16
-
17
-
18
-
19
-
20
-
21
-
22
-
23
-
24
-
25
-
26
-
27
-
28
-
29
-
30
-
31
-
32
-
33
-
34
-
35
-
36
-
37
-
38
-
39
-
40
-
41
-
42
-
43
-
44
-
45
-
46
-
47
-
48
-
49
-
50
-
51
-
52
-
53
-
54
-
55
-
56
-
57
-
58
-
59
-
60
-
61
-
62
-
63
-
64
-
65
-
66
-
67
-
68
-
69
-
70
-
71
-
72
-
73
-
74
-
75
-
76
-
77
-
78
-
79
-
80
-
81
-
82
-
83
-
84
-
85
-
86
-
87
-
88
-
89
-
90
-
91
-
92
-
93
-
94
-
95
-
96
-
97
-
98
-
99
-
100
-
101
-
102
-
103
-
104
-
105
-
106
-
107
-
108
-
109
-
110
-
111
-
112
-
113
-
114
-
115
-
116
-
117
-
118
-
119
-
120
-
121
-
122
-
123
-
124
-
125
-
126
-
127
-
128
-
129
-
130
-
131
-
132
-
133
-
134
-
135
-
136
-
137
-
138
-
139
-
140
-
141
-
142
-
143
-
144
-
145
-
146
 |
 |

1
ASRock
N68-VGS3 UCC / N68-VS3 UCC
Motherboard
English
English
English
English
English
Copyright Notice:
Copyright Notice:
Copyright Notice:
Copyright Notice:
Copyright Notice:
No part of this installation guide may be reproduced, transcribed, transmitted, or trans-
lated in any language, in any form or by any means, except duplication of documen-
tation by the purchaser for backup purpose, without written consent of ASRock Inc.
Products and corporate names appearing in this guide may or may not be registered
trademarks or copyrights of their respective companies, and are used only for identifica-
tion or explanation and to the owners’ benefit, without intent to infringe.
Disclaimer:
Disclaimer:
Disclaimer:
Disclaimer:
Disclaimer:
Specifications and information contained in this guide are furnished for informational
use only and subject to change without notice, and should not be constructed as a
commitment by ASRock. ASRock assumes no responsibility for any errors or omissions
that may appear in this guide.
With respect to the contents of this guide, ASRock does not provide warranty of any kind,
either expressed or implied, including but not limited to the implied warranties or
conditions of merchantability or fitness for a particular purpose. In no event shall
ASRock, its directors, officers, employees, or agents be liable for any indirect, special,
incidental, or consequential damages (including damages for loss of profits, loss of
business, loss of data, interruption of business and the like), even if ASRock has been
advised of the possibility of such damages arising from any defect or error in the guide
or product.
This device complies with Part 15 of the FCC Rules. Operation is subject to the
following two conditions:
(1)
this device may not cause harmful interference, and
(2)
this device must accept any interference received, including interference that
may cause undesired operation.
Published February 2011
Copyright
©
2011 ASRock INC. All rights reserved.
CALIFORNIA, USA ONLY
The Lithium battery adopted on this motherboard contains Perchlorate, a toxic
substance controlled in Perchlorate Best Management Practices (BMP) regulations
passed by the California Legislature. When you discard the Lithium battery in
California, USA, please follow the related regulations in advance.
“Perchlorate Material-special handling may apply, see
www
.dtsc.ca.gov/hazardouswa
ste/perchlorate”
ASRock Website: http://www.asrock.com