ASRock N68C-S Quick Installation Guide
ASRock N68C-S Manual
 |
View all ASRock N68C-S manuals
Add to My Manuals
Save this manual to your list of manuals |
ASRock N68C-S manual content summary:
- ASRock N68C-S | Quick Installation Guide - Page 1
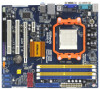
for backup purpose, without written consent of ASRock Inc. Products and corporate names appearing in this guide may or may not be registered trademarks or ASRock Website: http://www.asrock.com Published November 2009 Copyright©2009 ASRock INC. All rights reserved. 1 ASRock N68C-S Motherboard - ASRock N68C-S | Quick Installation Guide - Page 2
1.1)) 27 PCI Slots (PCI1- 2) 13 Secondary SATAII Connector 28 PCI Express x16 Slot (PCIE2) (SATAII_2 (PORT 0.1)) 29 PCI Express x1 Slot (PCIE1) 14 SPI Flash Memory (8Mb) 30 NVIDIA GeForce 7025 / nForce 630a 15 USB 2.0 Header (USB8_9, Blue) 2 ASRock N68C-S Motherboard - ASRock N68C-S | Quick Installation Guide - Page 3
audio cable to the front panel audio header. After restarting your computer, you will find "VIA HD Audio Deck" tool on your system. Please follow below instructions will be disabled. You can only choose to enable either Multi-Streaming function or Side Speaker function. 3 ASRock N68C-S Motherboard - ASRock N68C-S | Quick Installation Guide - Page 4
guide to BIOS setup and information of the Support CD. Because the motherboard specifications and the BIOS software might be updated, the content of this manual will be subject to change without notice. In case any modifications of this manual occur, the updated version will be available on ASRock - ASRock N68C-S | Quick Installation Guide - Page 5
1.2 Specifications Platform CPU Chipset Memory Expansion Slot Graphics Audio LAN Rear Panel I/O - Micro ATX Form Factor: 9.6-in x 8.2-in, 24.4 cm x 20.8 cm - Support for Socket AM2+ / AM2 processors: AMD PhenomTM FX / Phenom / Athlon 64 FX / Athlon 64 X2 Dual-Core / Athlon X2 Dual-Core / Athlon 64 - ASRock N68C-S | Quick Installation Guide - Page 6
Wake Up Events - Supports jumperfree - SMBIOS 2.3.1 Support - CPU, VCCM, NB Voltage Multi-adjustment - Supports Smart BIOS Support CD - Drivers, Utilities, AntiVirus Software (Trial Version), ASRock Software Suite (CyberLink DVD Suite and Creative Sound Blaster X-Fi MB) (OEM and Trial - ASRock N68C-S | Quick Installation Guide - Page 7
installation. 4. Whether 1600MHz memory speed is supported depends on the AM3 CPU you adopt. If you want to adopt DDR3 1600 memory module on this motherboard, please refer to the memory support list on our website for the compatible memory modules. ASRock website http://www.asrock.com 5. Due to the - ASRock N68C-S | Quick Installation Guide - Page 8
resume the system, please check if the CPU fan on the motherboard functions properly and unplug the power cord, then plug it back again. To improve heat dissipation, remember to spray thermal grease between the CPU and the heatsink when you install the PC system. 8 ASRock N68C-S Motherboard English - ASRock N68C-S | Quick Installation Guide - Page 9
16. This motherboard supports ASRock AM2 Boost overclocking technology. If you enable this function in the BIOS setup, the memory performance will improve up to 12.5%, but the effect still depends on the AM2 CPU you adopt. Enabling this function will overclock the chipset/CPU reference clock. - ASRock N68C-S | Quick Installation Guide - Page 10
wall socket before touching any component. 2. To avoid damaging the motherboard components due to static electricity, NEVER place your motherboard directly the motherboard to the chassis, please do not over-tighten the screws! Doing so may damage the motherboard. 10 ASRock N68C-S Motherboard English - ASRock N68C-S | Quick Installation Guide - Page 11
and the heatsink are securely fastened and in good contact with each other. Then connect the CPU fan to the CPU FAN connector (CPU_FAN1, see Page 2, No. 2). For proper installation, please kindly refer to the instruction manuals of the CPU fan and the heatsink. English 11 ASRock N68C-S Motherboard - ASRock N68C-S | Quick Installation Guide - Page 12
. 3. It is not allowed to install a DDR3 memory module into DDR2 slot or install a DDR2 memory module into DDR3 slot; otherwise, this motherboard and DIMM may be damaged. 4. DDR2 and DDR3 memory modules cannot be installed on this motherboard at the same time. English 12 ASRock N68C-S Motherboard - ASRock N68C-S | Quick Installation Guide - Page 13
cause permanent damage to the motherboard and the DIMM if you force the DIMM into the slot at incorrect orientation. Step 3. Firmly insert the DIMM into the slot until the retaining clips at both ends fully snap back in place and the DIMM is properly seated. 13 ASRock N68C-S Motherboard English - ASRock N68C-S | Quick Installation Guide - Page 14
Slots (PCI and PCI Express Slots) There are 2 PCI slots and 2 PCI Express slots on this motherboard. PCI slots: PCI slots are used to install expansion cards that have the 32-bit PCI interface. on the slot. Step 4. Fasten the card to the chassis with screws. 14 ASRock N68C-S Motherboard English - ASRock N68C-S | Quick Installation Guide - Page 15
than the total capability of the system memory. If you do not adjust the BIOS setup, the default value of "Share Memory", [Auto], will disable onboard VGA/D-Sub function when the add-on VGA card is inserted to this motherboard. 4. Install the onboard VGA driver to your system. If you have installed - ASRock N68C-S | Quick Installation Guide - Page 16
on CLRCMOS1 for 5 seconds. However, please do not clear the CMOS right after you update the BIOS. If you need to clear the CMOS when you just finish updating the BIOS, you must boot up the system first, and then shut it down before you do the clear-CMOS action. English 16 ASRock N68C-S Motherboard - ASRock N68C-S | Quick Installation Guide - Page 17
connectors will cause permanent dam- age of the motherboard! • motherboard connect the black end to the IDE devices 80-conductor ATA 66/100/133 cable Note: Please refer to the instruction ATAII (SATAII) connectors support SATAII or SATA hard motherboard. English 17 ASRock N68C-S Motherboard - ASRock N68C-S | Quick Installation Guide - Page 18
follow the instruction in our manual and chassis manual to install your system. 2. If you use AC'97 audio panel, please install it to the front panel audio header as below: A. Connect Mic_IN (MIC) to MIC2_L. B. Connect Audio_R (RIN) to OUT2_R and Audio_L (LIN) to OUT2_L. 18 ASRock N68C-S Motherboard - ASRock N68C-S | Quick Installation Guide - Page 19
the 3-Pin CPU fan to the CPU fan connector on this motherboard, please connect it to Pin 1-3. Pin 1-3 Connected 3-Pin Fan Installation ATX Power Connector (24-pin ATXPWR1) (see p.2 No. 8) 12 24 1 13 Please connect an ATX power supply to this connector. 19 ASRock N68C-S Motherboard English - ASRock N68C-S | Quick Installation Guide - Page 20
Though this motherboard provides 24-pin ATX power connector, 12 24 it can still work if you adopt a traditional 20-pin ATX note that it is necessary to connect a power supply with ATX 12V plug to this connector. Failing to do so will cause power up failure. English 20 ASRock N68C-S Motherboard - ASRock N68C-S | Quick Installation Guide - Page 21
Installation Guide 2.11 Untied Overclocking Technology This motherboard supports Untied Overclocking Technology, which means during overclocking, FSB enjoys better margin due to fixed PCI / PCIE buses. Before you enable Untied Overclocking function, please enter "Overclock Mode" option of BIOS setup - ASRock N68C-S | Quick Installation Guide - Page 22
your CDROM drive. It will display the Main Menu automatically if "AUTORUN" is enabled in your computer. If the Main Menu does not appear automatically, locate and doubleclick on the file "ASSETUP.EXE" from the "BIN" folder in the Support CD to display the menus. 22 ASRock N68C-S Motherboard English - ASRock N68C-S | Quick Installation Guide - Page 23
benötigen, besuchen Sie bitte unsere Webseite: www.asrock.com/support/index.asp 1.1 Kartoninhalt ASRock N68C-S Motherboard (Micro ATX-Formfaktor: 24.4 cm x 20.8 cm; 9.6 Zoll x 8.2 Zoll) ASRock N68C-S Schnellinstallationsanleitung ASRock N68C-S Support-CD Zwei Seriell-ATA- (SATA) Datenkabel (Option - ASRock N68C-S | Quick Installation Guide - Page 24
1.2 Spezifikationen Plattform CPU Chipsatz Speicher Erweiterungssteckplätze Onboard-VGA Audio LAN - Micro ATX-Formfaktor: 24.4 cm x 20.8 cm; 9.6 Zoll x 8.2 Zoll - Unterstützung für Socket AM2+ / AM2-Prozessoren: AMD PhenomTM FX / Phenom / Athlon 64 FX / Athlon 64 X2 Dualkern / Athlon X2 Dualkern / - ASRock N68C-S | Quick Installation Guide - Page 25
JumperFree-Modus - SMBIOS 2.3.1 - CPU, VCCM, NB Stromspannung Multianpassung - Unterstützt Smart BIOS - Treiber, Dienstprogramme, Antivirussoftware (Probeversion), ASRock-Software-Suite (CyberLink DVD Suite und Creative Sound Blaster X-Fi MB) (OEM- und Testversion) - ASRock OC Tuner (siehe VORSICHT - ASRock N68C-S | Quick Installation Guide - Page 26
asrock.com WARNUNG Beachten Sie bitte, dass Overclocking, einschließlich der Einstellung im BIOS, Anwenden der Untied Overclocking-Technologie oder Verwenden von Overclocking reserviert wird. Unter Windows® OS mit 64-Bit-CPU besteht diese Einschränkung nicht. 26 ASRock N68C-S Motherboard Deutsch - ASRock N68C-S | Quick Installation Guide - Page 27
Ihr BIOS mit nur wenigen Klickvorgängen ohne Bereitstellung einer zusätzlichen Diskette oder eines anderen komplizierten Flash-Programms aktualisieren. Achten Sie darauf, dass das USB-Flash-Laufwerk oder die Festplatte das Dateisystem FAT32/16/12 benutzen muss. 27 ASRock N68C-S Motherboard Deutsch - ASRock N68C-S | Quick Installation Guide - Page 28
. Um die Wärmeableitung zu verbessern, bitte nicht vergessen, etwas Wärmeleitpaste zwischen CPU und Kühlkörper zu sprühen. 16. Dieses Motherboard unterstützt die ASRock AM2 Boost Übertaktungstechnologie. Wenn Sie diese Funktion im BIOS-Setup aktivieren, wird die Arbeitsspeicherleistung um bis zu 12 - ASRock N68C-S | Quick Installation Guide - Page 29
beinhalten das System-Passwort, Datum, Zeit und die verschiedenen BIOS-Parameter. Um die Systemparameter zu löschen und auf die BIOS löschen müssen, müssen Sie zuerst das System starten und dann wieder ausschalten, bevor Sie den CMOS-Inhalt löschen. Deutsch 29 ASRock N68C-S Motherboard - ASRock N68C-S | Quick Installation Guide - Page 30
(blau) (39-pin IDE1, siehe S.2, No. 9) Blauer Anschluss Schwarzer Anschluss zum Motherboard zur Festplatte 80-adriges ATA 66/100/133 Kabel Hinweis: Details entnehmen Sie bitte den SATA / SATAIIFestplatte oder dem SATAII-Anschluss am Mainboard verbinden. 30 ASRock N68C-S Motherboard Deutsch - ASRock N68C-S | Quick Installation Guide - Page 31
Sie passende Drucker auf einfache Weise anschließen können. Interne Audio-Anschlüsse (4-Pin CD1) (CD1: siehe S.2 - No. 25) Anschluss für Audio auf der Gehäusevorderseite (9-Pin HD_AUDIO1) (siehe S.2, No die Anweisungen in unserem Handbuch und im Gehäusehandbuch. 31 ASRock N68C-S Motherboard Deutsch - ASRock N68C-S | Quick Installation Guide - Page 32
an die AC'97-Audioleiste angeschlossen werden. E. Rufen Sie das BIOS-Setup-Dienstprogramm auf. Wechseln Sie zu Erweiterte Einstellungen und wählen . Verbinden Sie das CPU Lüfterkabel mit diesem Anschluss und passen Sie den schwarzen Draht dem Erdungsstift an. Deutsch 32 ASRock N68C-S Motherboard - ASRock N68C-S | Quick Installation Guide - Page 33
angeschlossen werden; auch ohne Geschwindigkeitsregulierung. Wenn Sie einen dreipoligen CPU-Lüfter an den CPU-Lüferanschluss dieses Motherboards anschließen möchten, verbinden Sie ihn bitte mit den reicht der Strom nicht aus, das System zu starten. Deutsch 33 ASRock N68C-S Motherboard - ASRock N68C-S | Quick Installation Guide - Page 34
-Verzeichnis der Support-CD, um die Menüs aufzurufen. Das Setup-Programm soll es Ihnen so leicht wie möglich machen. Es ist menügesteuert, d.h. Sie können in den verschiedenen Untermenüs Ihre Auswahl treffen und die Programme werden dann automatisch installiert. 34 ASRock N68C-S Motherboard Deutsch - ASRock N68C-S | Quick Installation Guide - Page 35
.asp 1.1 Contenu du paquet Carte mère ASRock N68C-S (Facteur de forme Micro ATX: 9.6 pouces x 8.2 pouces, 24.4 cm x 20.8 cm) Guide d'installation rapide ASRock N68C-S CD de soutien ASRock N68C-S Deux câble de données Serial ATA (SATA) (Optionnelle) Un écran I/O 35 ASRock N68C-S Motherboard Français - ASRock N68C-S | Quick Installation Guide - Page 36
II X4 / X3 / X2 d'AMD - Supporte la technologie Cool 'n' Quiet™ d'AMD - FSB 1000 MHz (2.0 GT/s) - Prend en charge la technologie Untied Overclocking (voir ATTENTION 2) - Prise en charge de la technologie Hyper Transport - NVIDIA® GeForce 7025 / nForce 630a - Compatible avec la Technologie de Mémoire - ASRock N68C-S | Quick Installation Guide - Page 37
Blaster X-Fi MB) (Version OEM et d'essai) - Tuner ASRock OC (voir ATTENTION 10) - Économiseur d'énergie intelligent (voir ATTENTION 11) - l'Instant Boot - ASRock Instant Flash (voir ATTENTION 12) - ASRock OC DNA (voir ATTENTION 13) - L'accélérateur hybride: 37 ASRock N68C-S Motherboard Français - ASRock N68C-S | Quick Installation Guide - Page 38
CPU AM3 que vous choisissez. Si vous choisissez des barrettes de mémoire DDR3 1600 sur cette carte mère, veuillez vous référer à la liste des mémoires prises en charge sur notre site Web pour connaître barrettes de mémoire compatibles. Site Web ASRock http://www.asrock.com Français 38 ASRock N68C - ASRock N68C-S | Quick Installation Guide - Page 39
-lhe actualizar o BIOS do sistema sem necessitar de entrar nos sistemas operativos, como o MS-DOS ou o Windows®. Com este utilitário, poderá premir a tecla durante o teste de arranque POST ou premir a tecla para exibir o menu de configuração do BIOS 39 ASRock N68C-S Motherboard Français - ASRock N68C-S | Quick Installation Guide - Page 40
les configurations CPU/DRAM. Si votre systèmes devient instable une fois la fonction AM2 Boost activée, il est possible qu'elle ne s'applique pas à votre système. Vous pouvez choisir de désactiver cette fonction pour conserver la stabilité de votre système. 40 ASRock N68C-S Motherboard Français - ASRock N68C-S | Quick Installation Guide - Page 41
de suite après avoir mis le BIOS à jour. Si vous avez besoin d'effacer la CMOS lorsque vous avez fini de mettre le BIOS à jour, vous devez d'abord initialiser le système, puis le mettre hors tension avant de procéder à l'opération d'effacement de la CMOS. Français 41 ASRock N68C-S Motherboard - ASRock N68C-S | Quick Installation Guide - Page 42
mère vers le disque dur Câble ATA 66/100/133 80 conducteurs Note: Veuillez vous reporter aux instructions du fabricant de votre IDE périphérique pour les détails. Connecteurs Série ATAII (SATAII_1 (PORT / SATAIIou au connecteur SATAII sur la carte mère. Français 42 ASRock N68C-S Motherboard - ASRock N68C-S | Quick Installation Guide - Page 43
correctement. Veuillez suivre les instructions dans notre manuel et le manuel de châssis afin installer votre système. 2. Si vous utilisez le panneau audio AC'97, installez-le sur l'adaptateur audio du panneau avant conformément à la procédure ci-dessous : 43 ASRock N68C-S Motherboard Français - ASRock N68C-S | Quick Installation Guide - Page 44
commande de vitesse du ventilateur. Si vous prévoyez de connecter le ventilateur de CPU à 3 broches au connecteur du ventilateur de CPU sur cette carte mère, veuillez le connecter aux broches 1-3. Installation de ventilateur à 3 broches Broches 1-3 connectées 44 ASRock N68C-S Motherboard Français - ASRock N68C-S | Quick Installation Guide - Page 45
12V sur ce connecteur afin d'avoir une alimentation suffisante. Faute de quoi, il ne sera pas possible de mettre sous tension. Français es 45 ASRock N68C-S Motherboard - ASRock N68C-S | Quick Installation Guide - Page 46
détaillées sur le BIOS, veuillez consulter le Guide de l'utilisateur (fichier PDF) dans le CD technique. 3. Informations sur le CD de support Cette carte mère supporte divers systèmes d'exploitation et double-cliquez dessus pour afficher les menus. 46 ASRock N68C-S Motherboard Français - ASRock N68C-S | Quick Installation Guide - Page 47
.com/support/index.asp 1.1 Contenuto della confezione Scheda madre ASRock N68C-S (Micro ATX Form Factor: 9.6-in x 8.2-in, 24.4 cm x 20.8 cm) Guida di installazione rapida ASRock N68C-S CD di supporto ASRock N68C-S Due cavo dati Serial ATA (SATA) (Opzionale) Un I/O Shield 47 ASRock N68C-S Motherboard - ASRock N68C-S | Quick Installation Guide - Page 48
X3 / X2 - Supporto tecnologia AMD Cool 'n' QuietTM - FSB 1000 MHz (2.0 GT/s) - Supporta la tecnologia overclocking "slegata" (vedi ATTENZIONE 2) - Supporta la tecnologia Hyper-Transport - NVIDIA® GeForce 7025 / nForce 630a - Supporto tecnologia Dual Channel Memory (vedi ATTENZIONE 3) - 2 x slot DDR3 - ASRock N68C-S | Quick Installation Guide - Page 49
- Supporta SMBIOS 2.3.1 - Regolazione multi-voltaggio CPU, VCCM, NB - Smart BIOS supportato CD di - Driver, utilità, software antivirus (Versione dimostrativa), supporto Suite software ASRock (Suite CyberLink DVD e Creative Sound Blaster X-Fi MB) (OEM e Versione demo) Caratteristica - ASRock N68C-S | Quick Installation Guide - Page 50
l'elenco delle CPU supportate. Sito web ASRock http://www.asrock.com 2. Questa scheda madre supporta la tecnologia overclocking "slegata". Per i dettagli leggere "Tecnologia di Untied Overclocking" a pagina 21. 3. Questa scheda madre supporta la tecnologia Dual Channel Memory. Prima di implementare - ASRock N68C-S | Quick Installation Guide - Page 51
o meno, dipende dagli AM2+ CPU utilizzati. Se si desidera adottare il modulo di memoria DDR2 1066 su questa scheda madre, fare riferimento all'elenco delle memorie supportate nel nostro sito web per scoprire quali sono i moduli compatibili. Sito web ASRock http://www.asrock.com 7. La dimensione - ASRock N68C-S | Quick Installation Guide - Page 52
ASRock AM2 Boost. Se si abilita questa funzione nel Setup del BIOS, le prestazioni della memoria miglioreranno fino al 12,5%, per gli effetti dipendono sempre dalla CPU AM2 che si adotta. Abilitare questa funzione provocherà l'overclock della frequenza di case del chipset/CPU. Tuttavia, non - ASRock N68C-S | Quick Installation Guide - Page 53
jumper. Non cancellare la CMOS subito dopo aver aggiornato il BIOS. Se è necessario cancellare la CMOS una volta completato l'aggiornamento del BIOS, è necessario riavviare prima il sistema, e poi spegnerlo prima di procedere alla cancellazione della CMOS. Italiano 53 ASRock N68C-S Motherboard - ASRock N68C-S | Quick Installation Guide - Page 54
Serial ATA (SATA) Entrambe le estremità del cavo (Opzionale) dati SATA possono collegarsi all'hard disk SATA / SATAII o al connettore SATAII sulla scheda madre. 54 ASRock N68C-S Motherboard Italiano - ASRock N68C-S | Quick Installation Guide - Page 55
dei connettori, però il pannello dei cavi sul telaio deve supportare la funzione HDA (High Definition Audio) per far sì che questa operi in modo corretto. Attenersi alle istruzioni del nostro manuale e del manuale del telaio per installare il sistema. 55 ASRock N68C-S Motherboard Italiano - ASRock N68C-S | Quick Installation Guide - Page 56
senza la funzione di controllo della velocità della ventola. Se si intende collegare la ventola CPU a 3 piedini al connettore della ventola CPU su questa scheda madre, collegarla ai piedini 1-3. Piedini 1-3 collegati Installazione della ventola a 3 piedini Italiano 56 ASRock N68C-S Motherboard - ASRock N68C-S | Quick Installation Guide - Page 57
alimentazione con spinotto da 12V ATX a questo connettore in modo che possa fornire energia sufficiente. In caso contrario l'unità non si avvia. Italiano ni 57 ASRock N68C-S Motherboard - ASRock N68C-S | Quick Installation Guide - Page 58
più dettagliate circa il Setup del BIOS, fare riferimento al Manuale dell'Utente (PDF file) contenuto nel 64-bit. Il CD di supporto a corredo della scheda madre contiene i driver e utilità necessari a potenziare le caratteristiche della scheda. Inserire il CD di ASRock N68C-S Motherboard Italiano - ASRock N68C-S | Quick Installation Guide - Page 59
.com/support/index.asp 1.1 Contenido de la caja Placa base ASRock N68C-S (Factor forma Micro ATX: 24,4 cm x 20,8 cm, 9,6" x 8,2") Guía de instalación rápida de ASRock N68C-S CD de soporte de ASRock N68C-S Dos Cable de Datos Serial ATA (SATA) (Opcional) Una protección I/O 59 ASRock N68C-S Motherboard - ASRock N68C-S | Quick Installation Guide - Page 60
con AM3: procesador AMD PhenomTM II X4 / X3 / X2 y Athlon II X4 / X3 / X2 - Con soporte para tecnología Cool 'n' QuietTM de AMD - FSB 1000 MHz (2.0 GT/s) - Admite tecnología de aumento de velocidad liberada (vea ATENCIÓN 2) - Soporta Tecnología de Hiper-Transporte - NVIDIA® GeForce 7025 / nForce - ASRock N68C-S | Quick Installation Guide - Page 61
Blaster X-Fi MB) (OEM y versión de prueba) - Sintonizador de ASRock OC (vea ATENCIÓN 10) - Administrador de energía inteligente (vea ATENCIÓN 11) - Instant Boot - ASRock Instant Flash (vea ATENCIÓN 12) - ASRock OC DNA (vea ATENCIÓN 13) - Amplificador Híbrido: 61 ASRock N68C-S Motherboard Español - ASRock N68C-S | Quick Installation Guide - Page 62
configuración AM3 Procesador que adopte. Si desea adoptar el módulo de memoria DDR3 1600 en esta placa base, consulte la lista de compatibilidad de memorias en nuestro sitio Web para obtener los módulos de memoria compatibles. Sitio Web de ASRock: http://www.asrock.com 62 ASRock N68C-S Motherboard - ASRock N68C-S | Quick Installation Guide - Page 63
de BIOS le permitirá actualizar el BIOS del sistema sin necesidad de acceder a ningún sistema operativo, como MS-DOS o Windows®. Gracias a esta utilidad, sólo necesitará pulsar durante la fase POST o pulsar para acceder al menú de configuración del BIOS 63 ASRock N68C-S Motherboard Espa - ASRock N68C-S | Quick Installation Guide - Page 64
CPU de ASRock AM2 Boost para aumento de la velocidad del reloj. Si habilita esta función en la configuración del BIOS AM2 Boost, es posible que dicha función no se pueda aplicar a aquél. Si lo desea, puede deshabilitar la función para mantener la estabilidad del sistema. 64 ASRock N68C-S Motherboard - ASRock N68C-S | Quick Installation Guide - Page 65
acuérdase de quitar el jumper cap después de limpiar el COMS. Si necesita borrar la CMOS cuando acabe de finalizar la actualización de la BIOS, debe arrancar primero el sistema y, a continuación, apagarlo antes de realizar la acción de borrado de CMOS. Español 65 ASRock N68C-S Motherboard - ASRock N68C-S | Quick Installation Guide - Page 66
de serie ATA (SATA) (Opcional) Ambos extremos del cable pueden conectarse al disco duro SATA / SATAII o la conexión de la placa base. Español 66 ASRock N68C-S Motherboard - ASRock N68C-S | Quick Installation Guide - Page 67
soportar HDA para operar correctamente. Por favor, siga las instrucciones en nuestro manual y en el manual de chasis para instalar su sistema. 2. Si utiliza el panel de sonido AC'97, instálelo en la cabecera de sonido del panel frontal de la siguiente manera: 67 ASRock N68C-S Motherboard Español - ASRock N68C-S | Quick Installation Guide - Page 68
de sonido AC'97. E. Entre en la Utilidad de configuración del BIOS Entre en Configuración avanzada y, a continuación, seleccione Configuración del conjunto de patilla de masa. Conecte el cable del ventilador de la CPU a este conector y haga coincidir el cable negro con 68 ASRock N68C-S Motherboard - ASRock N68C-S | Quick Installation Guide - Page 69
toma de corriente con el enchufe ATX 12V, de modo que proporcione suficiente electricidad. De lo contrario no se podrá encender. Español os 69 ASRock N68C-S Motherboard - ASRock N68C-S | Quick Installation Guide - Page 70
información detallada sobre como configurar la BIOS, por favor refiérase al Manual del Usuario (archivo PDF) contenido en el CD. 3.Información de Software Support CD Esta placa-base soporta diversos tipos en el archivo ASSETUP.EXE para iniciar la instalación. 70 ASRock N68C-S Motherboard Español - ASRock N68C-S | Quick Installation Guide - Page 71
/support/index.asp 1.1 Este pacote contém Placa-mãe ASRock N68C-S (Formato Micro ATX: 9,6 pol. x 8,2 pol., 24,4 cm x 20,8 cm) Guia de instalação rápida da ASRock N68C-S CD de suporte da placa ASRock N68C-S Dois cabo de dados ATA Serial (SATA) (Opcional) Uma proteção I/O 82 ASRock N68C-S Motherboard - ASRock N68C-S | Quick Installation Guide - Page 72
para processadores AM3: Processador AMD PhenomTM II X4 / X3 / X2 e Athlon II X4 / X3 / X2 - Suporta a tecnologia AMD Cool 'n' QuietTM - FSB de 1000 MHz (2,0 GT/s) - Suporta a tecnologia Untied Overclocking (veja o AVISO 2) - Suporta a tecnologia Hyper-Transport - NVIDIA® GeForce 7025 / nForce 630a - ASRock N68C-S | Quick Installation Guide - Page 73
ça de Energia Inteligente (veja o AVISO 11) - Instant Boot - ASRock Instant Flash (veja o AVISO 12) - ASRock OC DNA (veja o AVISO 13) - Booster híbrido - Frequência da CPU com controle contínuo (veja o AVISO 14) - ASRock U-COP (veja o AVISO 15) - B.F.G. (Boot Failure Guard) ASRock N68C-S Motherboard - ASRock N68C-S | Quick Installation Guide - Page 74
1600 MHz depende da CPU AM3 que adoptar. Se quiser adoptar um módulo de memória DDR3 1600 para utilização com esta placa principal, consulte a lista de memória suportada no nosso web site para saber quais os módulos de memória compatíveis. Web site da ASRock http://www.asrock.com 5. Devido às limita - ASRock N68C-S | Quick Installation Guide - Page 75
, avant de pouvoir mettre à jour votre BIOS en quelques clics seulement, sans préparer de disquette supplémentaire ni d'autre utilitaire flash compliqué. Veuillez noter que le lecteur flash USB ou le disque dur doit utiliser le système de fichiers FAT32/16/12. 86 ASRock N68C-S Motherboard Português - ASRock N68C-S | Quick Installation Guide - Page 76
placa principal suporta a tecnologia de overclocking ASRock AM2 Boost. Se activar esta função na configuração do BIOS, o desempenho da memória sofrerá um melhoramento até 12,5%, no entanto tal dependerá da CPU AM2 que adoptar. A activação desta função irá fazer o overclocking do chipset/do relógio - ASRock N68C-S | Quick Installation Guide - Page 77
o CMOS usando um jumper. Por favor lembrese de remover o jumper depois de limpar o COMS. Se precisar limpar o CMOS ao concluir a atualização do BIOS, deverá reiniciar o sistema primeiro e, em seguida, desligá-lo antes de executar a ação de limpeza o CMOS. Português 88 ASRock N68C-S Motherboard - ASRock N68C-S | Quick Installation Guide - Page 78
(SATA) (opcional) Tanto a saída do cabo de Serial dados SATA pode ser conectado ao disco rígido SATA / SATAII quanto o conector SATAII na placa mãe. 89 ASRock N68C-S Motherboard Português - ASRock N68C-S | Quick Installation Guide - Page 79
ção que suporta a sensibilidade da tomada, mas o fio do painel existente no chassis tem de suportar HDA para funcionar correctamente. Siga s instruções que aparecem no manual e no manual do chassis para instalar o sistema. 90 ASRock N68C-S Motherboard - ASRock N68C-S | Quick Installation Guide - Page 80
áudio AC'97. E. Entre no utilitário de configuração do BIOS. Vá até à opção Definições avançadas e escolha Configuração CPU ao conector de ventoinha do CPU nesta placa-mãe, por favor, ligue-a aos pinos 1-3. Pinos 1-3 ligados Instalação de Ventoinha de 3 pinos Português 91 ASRock N68C-S Motherboard - ASRock N68C-S | Quick Installation Guide - Page 81
ário ligar uma fonte de alimentação com conector ATX 12V neste conector para fornecer alimentação suficiente. Do contrário, haverá falhas de funcionamento. Português 92 ASRock N68C-S Motherboard - ASRock N68C-S | Quick Installation Guide - Page 82
máquina e ligando-a novamente. Para informações mais detalhadas sobre a configuração da BIOS, consulte o manual do usuário (em pdf) contido no CD de instalação. 3. Informações do , explore o CD e execute o "ASSETUP.EXE" localizado na pasta "BIN". Português 93 ASRock N68C-S Motherboard - ASRock N68C-S | Quick Installation Guide - Page 83
94 ASRock N68C-S Motherboard - ASRock N68C-S | Quick Installation Guide - Page 84
'' ® ® ® 95 ASRock N68C-S Motherboard - ASRock N68C-S | Quick Installation Guide - Page 85
96 ASRock N68C-S Motherboard - ASRock N68C-S | Quick Installation Guide - Page 86
® " " ® ® ® " " " " 97 ASRock N68C-S Motherboard - ASRock N68C-S | Quick Installation Guide - Page 87
® ® 98 ASRock N68C-S Motherboard - ASRock N68C-S | Quick Installation Guide - Page 88
99 ASRock N68C-S Motherboard - ASRock N68C-S | Quick Installation Guide - Page 89
"" "" "" "" 100 ASRock N68C-S Motherboard - ASRock N68C-S | Quick Installation Guide - Page 90
SATAII_1 SATAII_3 (PORT 0.0) (PORT 1.0) SATAII_2 SATAII_4 (PORT 0.1) (PORT 1.1) ASRock N68C-S Motherboard 101 - ASRock N68C-S | Quick Installation Guide - Page 91
CD1 CD-L GND GND CD-R 102 ASRock N68C-S Motherboard - ASRock N68C-S | Quick Installation Guide - Page 92
4 3 2 1 12 24 1 13 12 24 1 13 ASRock N68C-S Motherboard 103 - ASRock N68C-S | Quick Installation Guide - Page 93
104 ASRock N68C-S Motherboard - ASRock N68C-S | Quick Installation Guide - Page 94
" " \\ " " ASRock N68C-S Motherboard 105 - ASRock N68C-S | Quick Installation Guide - Page 95
106 ASRock N68C-S Motherboard - ASRock N68C-S | Quick Installation Guide - Page 96
'' ® ® ® ASRock N68C-S Motherboard 107 - ASRock N68C-S | Quick Installation Guide - Page 97
108 ASRock N68C-S Motherboard - ASRock N68C-S | Quick Installation Guide - Page 98
® ® ® " " ® ® ASRock N68C-S Motherboard 109 - ASRock N68C-S | Quick Installation Guide - Page 99
® TM TM ® ® ® ® 110 ASRock N68C-S Motherboard - ASRock N68C-S | Quick Installation Guide - Page 100
- ASRock N68C-S Motherboard 111 - ASRock N68C-S | Quick Installation Guide - Page 101
112 ASRock N68C-S Motherboard - ASRock N68C-S | Quick Installation Guide - Page 102
SATAII_1 SATAII_3 (PORT 0.0) (PORT 1.0) SATAII_2 SATAII_4 (PORT 0.1) (PORT 1.1) ASRock N68C-S Motherboard 113 - ASRock N68C-S | Quick Installation Guide - Page 103
CD1 CD-L GND GND CD-R 114 ASRock N68C-S Motherboard - ASRock N68C-S | Quick Installation Guide - Page 104
4 3 2 1 ASRock N68C-S Motherboard 115 - ASRock N68C-S | Quick Installation Guide - Page 105
12 24 1 13 12 24 1 13 116 ASRock N68C-S Motherboard - ASRock N68C-S | Quick Installation Guide - Page 106
12 24 1 13 ® ® TM TM ASRock N68C-S Motherboard 117 - ASRock N68C-S | Quick Installation Guide - Page 107
118 ASRock N68C-S Motherboard - ASRock N68C-S | Quick Installation Guide - Page 108
'' ™ ® ® ® ASRock N68C-S Motherboard 119 - ASRock N68C-S | Quick Installation Guide - Page 109
120 ASRock N68C-S Motherboard - ASRock N68C-S | Quick Installation Guide - Page 110
® ® ® ® ® ® ® ASRock N68C-S Motherboard 121 - ASRock N68C-S | Quick Installation Guide - Page 111
® 122 ASRock N68C-S Motherboard - ASRock N68C-S | Quick Installation Guide - Page 112
ASRock N68C-S Motherboard 123 - ASRock N68C-S | Quick Installation Guide - Page 113
SATAII_1 SATAII_3 (PORT 0.0) (PORT 1.0) SATAII_2 SATAII_4 (PORT 0.1) (PORT 1.1) 124 ASRock N68C-S Motherboard - ASRock N68C-S | Quick Installation Guide - Page 114
CD1 CD-L GND GND CD-R ASRock N68C-S Motherboard 125 - ASRock N68C-S | Quick Installation Guide - Page 115
4 3 2 1 126 12 24 1 13 12 24 1 13 ASRock N68C-S Motherboard - ASRock N68C-S | Quick Installation Guide - Page 116
12 24 1 13 ASRock N68C-S Motherboard 127 - ASRock N68C-S | Quick Installation Guide - Page 117
® ® 128 ASRock N68C-S Motherboard - ASRock N68C-S | Quick Installation Guide - Page 118
X O O O X O O O O: X: O O O O ASRock N68C-S Motherboard 129 - ASRock N68C-S | Quick Installation Guide - Page 119
130 ASRock N68C-S Motherboard - ASRock N68C-S | Quick Installation Guide - Page 120
® ® ® ASRock N68C-S Motherboard 131 - ASRock N68C-S | Quick Installation Guide - Page 121
132 ASRock N68C-S Motherboard - ASRock N68C-S | Quick Installation Guide - Page 122
® ® ® ® ® ® ® ASRock N68C-S Motherboard 133 - ASRock N68C-S | Quick Installation Guide - Page 123
® 134 ASRock N68C-S Motherboard - ASRock N68C-S | Quick Installation Guide - Page 124
ASRock N68C-S Motherboard 135 - ASRock N68C-S | Quick Installation Guide - Page 125
SATAII_1 SATAII_3 (PORT 0.0) (PORT 1.0) SATAII_2 SATAII_4 (PORT 0.1) (PORT 1.1) 136 ASRock N68C-S Motherboard - ASRock N68C-S | Quick Installation Guide - Page 126
CD1 CD-L GND GND CD-R ASRock N68C-S Motherboard 137 - ASRock N68C-S | Quick Installation Guide - Page 127
4 3 2 1 12 24 1 13 12 24 1 13 138 ASRock N68C-S Motherboard - ASRock N68C-S | Quick Installation Guide - Page 128
12 24 1 13 ® ® ® ASRock N68C-S Motherboard 139
-
 1
1 -
 2
2 -
 3
3 -
 4
4 -
 5
5 -
 6
6 -
 7
7 -
8
-
9
-
10
-
11
-
12
-
13
-
14
-
15
-
16
-
17
-
18
-
19
-
20
-
21
-
22
-
23
-
24
-
25
-
26
-
27
-
28
-
29
-
30
-
31
-
32
-
33
-
34
-
35
-
36
-
37
-
38
-
39
-
40
-
41
-
42
-
43
-
44
-
45
-
46
-
47
-
48
-
49
-
50
-
51
-
52
-
53
-
54
-
55
-
56
-
57
-
58
-
59
-
60
-
61
-
62
-
63
-
64
-
65
-
66
-
67
-
68
-
69
-
70
-
71
-
72
-
73
-
74
-
75
-
76
-
77
-
78
-
79
-
80
-
81
-
82
-
83
-
84
-
85
-
86
-
87
-
88
-
89
-
90
-
91
-
92
-
93
-
94
-
95
-
96
-
97
-
98
-
99
-
100
-
101
-
102
-
103
-
104
-
105
-
106
-
107
-
108
-
109
-
110
-
111
-
112
-
113
-
114
-
115
-
116
-
117
-
118
-
119
-
120
-
121
-
122
-
123
-
124
-
125
-
126
-
127
-
128
 |
 |

1
ASRock
N68C-S
Motherboard
English
English
English
English
English
Copyright Notice:
Copyright Notice:
Copyright Notice:
Copyright Notice:
Copyright Notice:
No part of this installation guide may be reproduced, transcribed, transmitted, or trans-
lated in any language, in any form or by any means, except duplication of documen-
tation by the purchaser for backup purpose, without written consent of ASRock Inc.
Products and corporate names appearing in this guide may or may not be registered
trademarks or copyrights of their respective companies, and are used only for identifica-
tion or explanation and to the owners’ benefit, without intent to infringe.
Disclaimer:
Disclaimer:
Disclaimer:
Disclaimer:
Disclaimer:
Specifications and information contained in this guide are furnished for informational
use only and subject to change without notice, and should not be constructed as a
commitment by ASRock. ASRock assumes no responsibility for any errors or omissions
that may appear in this guide.
With respect to the contents of this guide, ASRock does not provide warranty of any kind,
either expressed or implied, including but not limited to the implied warranties or
conditions of merchantability or fitness for a particular purpose. In no event shall
ASRock, its directors, officers, employees, or agents be liable for any indirect, special,
incidental, or consequential damages (including damages for loss of profits, loss of
business, loss of data, interruption of business and the like), even if ASRock has been
advised of the possibility of such damages arising from any defect or error in the guide
or product.
This device complies with Part 15 of the FCC Rules. Operation is subject to the
following two conditions:
(1)
this device may not cause harmful interference, and
(2)
this device must accept any interference received, including interference that
may cause undesired operation.
Published November 2009
Copyright
©
2009 ASRock INC. All rights reserved.
CALIFORNIA, USA ONLY
The Lithium battery adopted on this motherboard contains Perchlorate, a toxic
substance controlled in Perchlorate Best Management Practices (BMP) regulations
passed by the California Legislature. When you discard the Lithium battery in
California, USA, please follow the related regulations in advance.
“Perchlorate Material-special handling may apply, see
www
.dtsc.ca.gov/hazardouswa
ste/perchlorate”
ASRock Website: http://www.asrock.com