ASRock N73V-S Quick Installation Guide
ASRock N73V-S Manual
 |
View all ASRock N73V-S manuals
Add to My Manuals
Save this manual to your list of manuals |
ASRock N73V-S manual content summary:
- ASRock N73V-S | Quick Installation Guide - Page 1
follow the related regulations in advance. "Perchlorate Material-special handling may apply, see www.dtsc.ca.gov/hazardouswaste/perchlorate" ASRock Website: http://www.asrock.com Published December 2008 Copyright©2008 ASRock INC. All rights reserved. 1 ASRock N73PV-S / N73V-S Motherboard English - ASRock N73V-S | Quick Installation Guide - Page 2
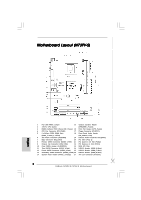
24 USB 2.0 Header (USB8_9, Blue) 12 Fourth SATAII Connector (SATAII_4; Red) 25 USB 2.0 Header (USB6_7, Blue) 13 Secondary SATAII Connector (SATAII_2; Red) 26 USB 2.0 Header (USB4_5, Blue) 14 System Panel Header (PANEL1, Orange) 27 ATX 12V Connector (ATX12V1) 2 ASRock N73PV-S / N73V-S Motherboard - ASRock N73V-S | Quick Installation Guide - Page 3
Connector (SATAII_3; Red) 24 USB 2.0 Header (USB6_7, Blue) 12 Fourth SATAII Connector (SATAII_4; Red) 25 USB 2.0 Header (USB4_5, Blue) 13 Secondary SATAII Connector (SATAII_2; Red) 26 ATX 12V Connector (ATX12V1) 14 System Panel Header (PANEL1, Orange) 3 ASRock N73PV-S / N73V-S Motherboard - ASRock N73V-S | Quick Installation Guide - Page 4
Ports (USB01) 8 VGA Port 9 COM Port 10 PS/2 Keyboard Port (Purple) * To enable Multi-Streaming function, you need to connect a front panel audio cable to the front panel audio header. Please refer to below steps for the software setting of Multi-Streaming. For Windows® XP: After restarting your - ASRock N73V-S | Quick Installation Guide - Page 5
Contents ASRock N73PV-S / N73V-S Motherboard (Micro ATX Form Factor: 9.6-in x 7.0-in, 24.4 cm x 17.8 cm) ASRock N73PV-S / N73V-S Quick Installation Guide ASRock N73PV-S / N73V-S Support CD One 80-conductor Ultra ATA 66/100/133 IDE Ribbon Cable (Optional) One Serial ATA (SATA) Data Cable (Optional - ASRock N73V-S | Quick Installation Guide - Page 6
(N73PV-S) - Integrated NVIDIA® GeForce 7050 (N73V-S) - DX9.0 VGA, Pixel Shader 3.0 - Max. shared memory 256MB (see CAUTION 4) - 5.1 CH Windows® VistaTM Premium Level HD Audio (ALC662 Audio Codec) - Realtek PHY RTL8201EL - Speed: 10/100 Ethernet - Supports Wake-On-LAN I/O Panel - 1 x PS/2 Mouse Port - ASRock N73V-S | Quick Installation Guide - Page 7
Supports Smart BIOS Support CD - Drivers, Utilities, AntiVirus Software (Trial Version) Unique Feature - ASRock OC Tuner (see CAUTION 7) - Intelligent Energy Saver (see CAUTION 8) - Instant Boot - Hybrid Booster: - CPU Frequency Stepless Control (see CAUTION 9) - ASRock U-COP (see CAUTION 10 - ASRock N73V-S | Quick Installation Guide - Page 8
Manual" in the support CD. 2. This motherboard supports Untied Overclocking Technology. Please read "Untied Overclocking Technology" on page 21 for details. 3. Due to the operating system limitation, the actual memory size may be less than 4GB for the reservation for system usage under Windows® XP - ASRock N73V-S | Quick Installation Guide - Page 9
you insert the 775-LAND CPU into the socket, please check if the CPU surface is unclean or if there is any bent pin on the socket. Do not force to insert the CPU into the socket if above situation is found. Otherwise, the CPU will be seriously damaged. 9 ASRock N73PV-S / N73V-S Motherboard English - ASRock N73V-S | Quick Installation Guide - Page 10
. Step 2. Insert the 775-LAND CPU: Step 2-1. Hold the CPU by the edges where are marked with black support the load plate edge, engage PnP cap with right hand thumb and peel the cap from the socket while pressing on center of PnP cap to assist in removal. 10 ASRock N73PV-S / N73V-S Motherboard - ASRock N73V-S | Quick Installation Guide - Page 11
cap must be placed if returning the motherboard for after service. Step 4. Close the socket: Step CPU Fan and Heatsink For proper installation, please kindly refer to the instruction manuals of your CPU motherboard. Step 5. Step 6. Connect fan header with the CPU fan connector on the motherboard - ASRock N73V-S | Quick Installation Guide - Page 12
2.3 Installation of Memory Modules (DIMM) This motherboard provides two 240-pin DDR2 (Double Data Rate 2) DIMM slots. Please make DIMM only fits in one correct orientation. It will cause permanent damage to the motherboard and the DIMM if you force the DIMM into the slot at incorrect orientation. - ASRock N73V-S | Quick Installation Guide - Page 13
: PCIE1 (PCIE x1 slot) is used for PCI Express cards with x1 lane width cards, such as Gigabit LAN card, SATA2 card, etc. PCIE2 (PCIE x16 slot) is used for PCI Express cards with x16 lane width slot. Step 4. Fasten the card to the chassis with screws. 13 ASRock N73PV-S / N73V-S Motherboard English - ASRock N73V-S | Quick Installation Guide - Page 14
than the total capability of the system memory. If you do not adjust the BIOS setup, the default value of "Share Memory", [Auto], will disable onboard VGA/D-Sub function when the add-on VGA card is inserted to this motherboard. 4. Install the onboard VGA driver to your system. If you have installed - ASRock N73V-S | Quick Installation Guide - Page 15
for 5 seconds. However, please do not clear the CMOS right after you update the BIOS. If you need to clear the CMOS when you just finish updating the BIOS, you must boot up the system first, and then shut it down before you do the clearCMOS action. English 15 ASRock N73PV-S / N73V-S Motherboard - ASRock N73V-S | Quick Installation Guide - Page 16
ATAII (SATAII) connectors support SATA data cables for internal storage devices. The current SATAII interface allows up to 3.0 Gb/s data transfer rate. Either end of the SATA data cable can be connected to the SATA / SATAII hard disk or the SATAII connector on this motherboard. Serial ATA (SATA - ASRock N73V-S | Quick Installation Guide - Page 17
Besides four default USB 2.0 ports on the I/O panel, there are two USB 2.0 headers on this motherboard. Each USB 2.0 header can support two USB 2.0 ports. This is an interface for print port cable that allows convenient connection of printer devices. English 17 ASRock N73PV-S / N73V-S Motherboard - ASRock N73V-S | Quick Installation Guide - Page 18
audio devices. 1. High Definition Audio supports Jack Sensing, but the panel wire on the chassis must support HDA to function correctly. Please follow the instruction in our manual and chassis manual several system front panel functions. English 18 ASRock N73PV-S / N73V-S Motherboard - ASRock N73V-S | Quick Installation Guide - Page 19
fan (Quiet Fan) support, the 3-Pin CPU fan still can work successfully even without the fan speed control function. If you plan to connect the 3-Pin CPU fan to the CPU fan connector on this motherboard, please connect it to Pin 1-3. Pin 1-3 Connected 3-Pin Fan Installation ATX Power Connector (24 - ASRock N73V-S | Quick Installation Guide - Page 20
Install Windows® VistaTM / VistaTM 64-bit OS on your system. Using SATA / SATAII HDDs with NCQ and Hot Plug functions STEP 1: Set Up BIOS. A. Enter BIOS SETUP UTILITY Advanced screen IDE Configuration. B. Set the "SATA Operation Mode" option to [AHCI]. 20 ASRock N73PV-S / N73V-S Motherboard - ASRock N73V-S | Quick Installation Guide - Page 21
load the NVIDIA® AHCI drivers. NVIDIA® AHCI drivers are in the following path in our Support CD: (There are two ASRock Support CD in the motherboard gift box pack, please choose the one for Windows® VistaTM / VistaTM 64-bit.) .. \ I386 \ AHCI_Vista (For Windows® VistaTM OS) .. \ AMD64\ AHCI_Vista64 - ASRock N73V-S | Quick Installation Guide - Page 22
the User Manual (PDF file) contained in the Support CD. 4. Software Support CD information This motherboard supports various Microsoft® Windows® operating systems: XP / XP 64-bit / VistaTM / VistaTM 64-bit. The Support CD that came with the motherboard contains necessary drivers and useful utilities - ASRock N73V-S | Quick Installation Guide - Page 23
, besuchen Sie bitte unsere Webseite: www.asrock.com/support/index.asp 1.1 Kartoninhalt ASRock N73PV-S / N73V-S Motherboard (Micro ATX-Formfaktor: 24.4 cm x 17.8 cm; 9.6 Zoll x 7.0 Zoll) ASRock N73PV-S / N73V-S Schnellinstallationsanleitung ASRock N73PV-S / N73V-S Support-CD Ein 80-adriges Ultra-ATA - ASRock N73V-S | Quick Installation Guide - Page 24
Integrierte NVIDIA® GeForce7050 (N73V-S) - DX9.0 VGA, Pixel Shader 3.0 - Maximal gemeinsam genutzter Speicher 256 MB (siehe VORSICHT 4) - 5.1 CH Windows® VistaTM Premium Level HD Audio (ALC662 Audio Codec) - Realtek PHY RTL8201EL - Speed: 10/100 Ethernet - Unterstützt Wake-On-LAN I/O Panel - 1 x PS - ASRock N73V-S | Quick Installation Guide - Page 25
überwachung: +12V, +5V, +3.3V, Vcore Betriebssysteme - Unterstützt Microsoft® Windows® XP / XP 64-Bit / VistaTM / VistaTM 64-Bit Zertifizierungen - FCC, CE * Für die ausführliche Produktinformation, besuchen Sie bitte unsere Website: http://www.asrock.com 25 ASRock N73PV-S / N73V-S Motherboard - ASRock N73V-S | Quick Installation Guide - Page 26
unter Windows® XP und Windows® Vista™ etwas Speicher zur Nutzung durch das System reserviert wird. Unter Windows® XP 64-bit und Windows® Vista™ 64-bit mit 64-Bit-CPU besteht des Intelligent Energy Saver. ASRock-Website: http://www.asrock.com 26 ASRock N73PV-S / N73V-S Motherboard Deutsch - ASRock N73V-S | Quick Installation Guide - Page 27
CPU beschädigen. 10. Wird eine Überhitzung der CPU registriert, führt das System einen automatischen Shutdown durch. Bevor Sie das System neu starten, prüfen Sie bitte, ob der CPU-Lüfter am Motherboard Zeit und die verschiedenen BIOS-Parameter. Um die ASRock N73PV-S / N73V-S Motherboard Deutsch - ASRock N73V-S | Quick Installation Guide - Page 28
Inhalt gleich nach dem Aktualisieren des BIOS löschen müssen, müssen Sie zuerst das System starten und dann wieder ausschalten, bevor Sie (Option) / SATAII Festplatte oder das SATAII Verbindungsstück auf dieser Hauptplatine angeschlossen werden. 28 ASRock N73PV-S / N73V-S Motherboard Deutsch - ASRock N73V-S | Quick Installation Guide - Page 29
S.3 - Nr. 25) (9-pol. USB6_7) (siehe S.3 - Nr. 24) Zusätzlich zu den vier üblichen USB 2.0-Ports an den I/O-Anschlüssen befinden sich zwei USB 2.0-Anschlussleisten am Motherboard. Pro USB 2.0Anschlussleiste werden zwei USB 2.0-Ports unterstützt. Deutsch 29 ASRock N73PV-S / N73V-S Motherboard - ASRock N73V-S | Quick Installation Guide - Page 30
BIOS- Audio-Manager aufzurufen. Für Windows® XP / XP 64-Bit Betriebssystem: Klicken Sie auf "Audio-E/A", wählen Sie die "Anschlusseinstellungen" , wählen Sie "Erkennung der Frontleistenbuchse deaktivieren" und speichern Sie die Änderung durch Klicken auf "OK". 30 ASRock N73PV-S / N73V-S Motherboard - ASRock N73V-S | Quick Installation Guide - Page 31
Für Windows® VistaTM / VistaTM Sie einen dreipoligen CPU-Lüfter an den CPU-Lüferanschluss dieses Motherboards anschließen möchten ATX-Netz-Header (24-pin ATXPWR1) (siehe S.2/3, Punkt 6) 12 24 Verbinden Sie die ATXStromversorgung mit diesem Header. 1 13 31 ASRock N73PV-S / N73V-S Motherboard - ASRock N73V-S | Quick Installation Guide - Page 32
20-pol. ATX-Netzteils 1 13 Beachten Sie bitte, dass Sie eine Stromversorgung mit ATX 12Volt-Stecker mit diesem Anschluss verbinden müssen, damit ausreichend Strom geliefert werden kann. Andernfalls reicht der Strom nicht aus, das System zu starten. Deutsch 32 ASRock N73PV-S / N73V-S Motherboard - ASRock N73V-S | Quick Installation Guide - Page 33
Optionen auswählen können. Für detaillierte Informationen zum BIOS-Setup, siehe bitte das Benutzerhandbuch (PDF Datei) auf der Support CD. 3. Software Support CD information Dieses Motherboard unterstützt eine Reiche von Microsoft® Windows® Betriebssystemen: XP / XP 64-Bit / VistaTM / VistaTM 64-Bit - ASRock N73V-S | Quick Installation Guide - Page 34
èle que vous utilisez. www.asrock.com/support/index.asp 1.1 Contenu du paquet Carte mère ASRock N73PV-S / N73V-S (Facteur de forme Micro ATX: 9.6 pouces x 7.0 pouces, 24.4 cm x 17.8 cm) Guide d'installation rapide ASRock N73PV-S / N73V-S CD de soutien ASRock N73PV-S / N73V-S Un câble ruban IDE Ultra - ASRock N73V-S | Quick Installation Guide - Page 35
- Vitesse: 10/100 Ethernet - Support du Wake-On-LAN I/O Panel - 1 x port souris PS/2 - 1 x port clavier PS/2 - 1 x port série: COM 1 - 1 x port VGA - 4 x ports USB 2.0 par défaut - 1 x port LAN RJ-45 avec LED (ACT/LED CLIGNOTANTE et LED VITESSE) 35 ASRock N73PV-S / N73V-S Motherboard Français - ASRock N73V-S | Quick Installation Guide - Page 36
d'alimentation 12V ATX - Connecteurs audio internes - Connecteur audio panneau avant - 3 x En-tête USB 2.0 (Prend en charge 6 ports USB 2.0) (N73PV-S) (voir ATTENTION 6) - 2 x En-tête USB 2.0 (Prend en charge 4 ports USB 2.0) (N73V-S) (voir ATTENTION 6) - 4Mb BIOS AMI - BIOS AMI - Support du "Plug - ASRock N73V-S | Quick Installation Guide - Page 37
asrock.com ATTENTION Il est important que vous réalisiez qu'il y a un certain risque à effectuer l'overclocking, y compris ajuster les réglages du BIOS Windows® XP et Windows® VistaTM. Avec Windows® XP 64 bits et Windows® VistaTM 64 bits avec CPU «Guide ASRock N73PV-S / N73V-S Motherboard Français - ASRock N73V-S | Quick Installation Guide - Page 38
système instable ou d'endommager le CPU et la carte mère. 10. Lorsqu'une surchauffe du CPU est détectée, le système s'arrête automatiquement. Avant de redémarrer le système, veuillez vérifier de l'alimentation électrique. Attendez 15 secondes, puis 38 ASRock N73PV-S / N73V-S Motherboard Français - ASRock N73V-S | Quick Installation Guide - Page 39
après avoir mis le BIOS à jour. Si vous avez besoin d'effacer la CMOS lorsque vous avez fini de mettre le BIOS à jour, vous ATA 66/100/133 80 conducteurs Note: Veuillez vous reporter aux instructions du fabricant de votre IDE périphérique pour les détails. ASRock N73PV-S / N73V-S Motherboard - ASRock N73V-S | Quick Installation Guide - Page 40
ble de données Série ATA (SATA) (en option) Toute cote du cable de data SATA peut etre connecte au disque dur SATA / SATAII ou au connecteur SATAII sur la embases USB 2.0 sur cette carte mère. Chaque embase USB 2.0 peut prendre en charge 2 ports USB 2.0. 40 ASRock N73PV-S / N73V-S Motherboard - ASRock N73V-S | Quick Installation Guide - Page 41
audio Realtek HD. Pour Windows® XP / XP 64-bit OS: Cliquer sur « E/S audio», Windows® VistaTM / VistaTM 64-bit OS: Cliquer droit "Fichier" icone , selectionner" la detection incapable de jack de panel d'avant " et sauvegarder le changement par cliquer"ok". 41 ASRock N73PV-S / N73V-S Motherboard - ASRock N73V-S | Quick Installation Guide - Page 42
fonctionner si vous adopter une alimentation traditionnelle ATX 20 broches. Pour utiliser une alimentation ATX 20 broches, branchez à l'alimentation électrique ainsi qu'aux broches 1 et 13. 20-Installation de l'alimentation électrique ATX 1 13 42 ASRock N73PV-S / N73V-S Motherboard Français - ASRock N73V-S | Quick Installation Guide - Page 43
terminés. Pour des informations détaillées sur le BIOS, veuillez consulter le Guide de l'utilisateur (fichier PDF) dans le CD technique. 3. Informations sur le CD de support Cette carte mère supporte divers systèmes d'exploitation Microsoft® Windows®: XP / XP 64 bits / VistaTM / VistaTM 64 bits. Le - ASRock N73V-S | Quick Installation Guide - Page 44
modello che si sta usando. www.asrock.com/support/index.asp 1.1 Contenuto della confezione Scheda madre ASRock N73PV-S / N73V-S (Micro ATX Form Factor: 9.6-in x 7.0-in, 24.4 cm x 17.8 cm) Guida di installazione rapida ASRock N73PV-S / N73V-S CD di supporto ASRock N73PV-S / N73V-S Un cavo IDE 80-pin - ASRock N73V-S | Quick Installation Guide - Page 45
- Scheda NVIDIA® GeForce 7050 (N73V-S) - VGA DX9.0, Pixel Shader 3.0 - Memoria massima condivisa 256MB (vedi ATTENZIONE 4) - 5.1 Audio HD CH Windows® VistaTM Premium Level (ALC662 Audio Codec) - Realtek PHY RTL8201EL - Velocità: 10/100 Ethernet - Supporta Wake-On-LAN I/O Panel - 1 x Porta PS/2 per - ASRock N73V-S | Quick Installation Guide - Page 46
- Voltaggio: +12V, +5V, +3.3V, Vcore Compatibi- - Microsoft® Windows® XP / XP 64 bit / VistaTM / VistaTM 64 bit lità SO Certificazioni - FCC, CE * Per ulteriori informazioni, prego visitare il nostro sito internet: http://www.asrock.com Italiano 46 ASRock N73PV-S / N73V-S Motherboard - ASRock N73V-S | Quick Installation Guide - Page 47
BIOS, del Manuale dell'utente Windows® XP e Windows® VistaTM. Per Windows® XP 64-bit e Windows® VistaTM 64-bit con CPU Windows?. Prego visitare il nostro sito Internet per ulteriori dettagli circa l'uso del Sintonizzatore ASRock OC. ASRock website: http://www.asrock.com 8. Anche se questa motherboard - ASRock N73V-S | Quick Installation Guide - Page 48
. Non cancellare la CMOS subito dopo aver aggiornato il BIOS. Se è necessario cancellare la CMOS una volta completato l'aggiornamento del BIOS, è necessario riavviare prima il sistema, e poi spegnerlo prima di procedere alla cancellazione della CMOS. Italiano 48 ASRock N73PV-S / N73V-S Motherboard - ASRock N73V-S | Quick Installation Guide - Page 49
) Una o altra estremità del cavo di dati SATA può essere collegata al disco rigido SATA / SATAII o al connettore di SATAII su questa cartolina base. 49 ASRock N73PV-S / N73V-S Motherboard Italiano - ASRock N73V-S | Quick Installation Guide - Page 50
2.0. Ciascuna intestazione USB 2.0 supporta due porte USB 2.0. (9-pin USB8_9) (vedi p.2 No. 24) N73V-S: Collettore USB 2.0 (9-pin USB4_5) (vedi p.3 No. 25) (9-pin USB6_7) (vedi p.3 No. 2.0. Ciascuna intestazione USB 2.0 supporta due porte USB 2.0. Italiano 50 ASRock N73PV-S / N73V-S Motherboard - ASRock N73V-S | Quick Installation Guide - Page 51
per entrare su Realtek HD Audio Manager. Per Windows® XP / XP 64-bit OS: Fare clic su "Audio I/O", selezionare "Impostazioni connettore" , scegliere "Disattiva rilevazione presa pannello anteriore" e salvare la modifica facendo clic su "OK". 51 ASRock N73PV-S / N73V-S Motherboard Italiano - ASRock N73V-S | Quick Installation Guide - Page 52
Per Windows® VistaTM / di un supporto per ventola CPU a 4 piedini (ventola silenziosa), la ventola CPU a 3 piedini è in grado ATX (24-pin ATXPWR1) (vedi p.2/3 item 6) 12 24 Collegare la sorgente d'alimentazione ATX a questo collettore. 1 13 Italiano 52 ASRock N73PV-S / N73V-S Motherboard - ASRock N73V-S | Quick Installation Guide - Page 53
27 o p.3 item 26) È necessario collegare una alimentazione con spinotto da 12V ATX a questo connettore in modo che possa fornire energia sufficiente. In caso contrario l'unità non si avvia. 2. Informazioni sul BIOS La Flash Memory sulla scheda madre contiene le Setup Utility. Quando si avvia il - ASRock N73V-S | Quick Installation Guide - Page 54
específico de su placa. www.asrock.com/support/index.asp 1.1 Contenido de la caja Placa base ASRock N73PV-S / N73V-S (Factor forma Micro ATX: 24,4 cm x 17,8 cm, 9,6" x 7,0") Guía de instalación rápida de ASRock N73PV-S / N73V-S CD de soporte de ASRock N73PV-S / N73V-S Una cinta de datos IDE de - ASRock N73V-S | Quick Installation Guide - Page 55
1 x puerto de teclado PS/2 - 1 x puerto serial: COM1 - 1 x Puerto VGA - 4 x puertos USB 2.0 predeterminados - 1 x Puerto LAN RJ-45 con LED (LED de ACCIÓN/ENLACE y LED de VELOCIDAD) - Conexión de HD audio: Entrada de línea / Altavoz frontal / Micrófono Español 55 ASRock N73PV-S / N73V-S Motherboard - ASRock N73V-S | Quick Installation Guide - Page 56
) (N73V-S) (vea ATENCIÓN 6) - 4Mb AMI BIOS - AMI legal BIOS - Soporta "Plug and Play" - ACPI 1.1 compliance wake up events - Soporta "jumper free setup" - Soporta SMBIOS 2.3.1 - Compatible con Smart BIOS - Controladores, Utilerías, Software de Anti Virus (Versión de prueba) - Sintonizador de ASRock - ASRock N73V-S | Quick Installation Guide - Page 57
. ATENCIÓN ! 1. Por favor consulte página 39 del Manual del Usuario en el soporte CD sobre la configuración de sistema pueda funcionar bajo Windows® XP y Windows® VistaTM. Para equipos con Windows® XP 64-bit y Windows® VistaTM 64-bit con CPU de 64-bit, no ASRock N73PV-S / N73V-S Motherboard Español - ASRock N73V-S | Quick Installation Guide - Page 58
ñar la CPU. 10. Cuando la temperatura de CPU está sobre-elevada, el sistema va a apagarse automaticamente. Antes de reanudar el sistema, compruebe si el ventilador de la CPU de la configuración de la fábrica, por favor apague el computador y desconecte 58 ASRock N73PV-S / N73V-S Motherboard Español - ASRock N73V-S | Quick Installation Guide - Page 59
limpiar el COMS. Si necesita borrar la CMOS cuando acabe de finalizar la actualización de la BIOS, debe arrancar primero el sistema y, a continuación, apagarlo antes de realizar la acción de borrado actual permite una velocidad de transferencia de 3.0 Gb/s. 59 ASRock N73PV-S / N73V-S Motherboard - ASRock N73V-S | Quick Installation Guide - Page 60
una de estas bases de conexiones admite dos puertos USB 2.0. (9-pin USB8_9) (ver p.2, No. 24) Español N73V-S: Cabezal USB 2.0 (9-pin USB4_5) (ver p.3, No. 25) (9-pin USB6_7) (ver p.3, No. 24) Además de estas bases de conexiones admite dos puertos USB 2.0. 60 ASRock N73PV-S / N73V-S Motherboard - ASRock N73V-S | Quick Installation Guide - Page 61
el cambio haciendo clic en "Aceptar". Para Windows® VistaTM / VistaTM 64-bit OS: Haga el clic el icono de la "Carpeta" de derecho-superior , eliga "Inhabilitable la detección del gato del panel delantero" y ahorre el cambio por chascando "OK". 61 ASRock N73PV-S / N73V-S Motherboard Español - ASRock N73V-S | Quick Installation Guide - Page 62
utiliza una fuente de alimentación ATX de 20 pins tradicional. Para usar una fuente de alimentación ATX de 20 pins, por favor, conecte su fuente de alimentación usando los Pins 1 y 13. Instalación de una Fuente de Alimentación ATX de 20 Pins 1 13 62 ASRock N73PV-S / N73V-S Motherboard Español - ASRock N73V-S | Quick Installation Guide - Page 63
BIOS, consulte el Manual del usuario (archivo PDF), que se encuentra en el CD de soporte. 3.Información de Software Support CD Esta placa-base soporta diversos tipos de sistema operativo Windows®: XP / XP "ASSETUP.EXE" para iniciar la instalación. 63 ASRock N73PV-S / N73V-S Motherboard Español - ASRock N73V-S | Quick Installation Guide - Page 64
modelo que está a utilizar. www.asrock.com/support/index.asp 1.1 Este pacote contém Placa-mãe ASRock N73PV-S / N73V-S (Formato Micro ATX: 9,6 pol. x 7,0 pol., 24,4 cm x 17,8 cm) Guia de instalação rápida da ASRock N73PV-S / N73V-S CD de suporte da placa ASRock N73PV-S / N73V-S Um cabo-fita IDE Ultra - ASRock N73V-S | Quick Installation Guide - Page 65
NVIDIA® GeForce7050 (N73V-S) - VGA DX9.0, Pixel Shader 3.0 - Memória partilhada máxima 256MB (veja o AVISO 4) - Áudio de alta definição de canal 5.1 através do Windows® VistaTM (Codec de áudio ALC662) - Realtek PHY RTL8201EL - Velocidade: 10 / 100 Ethernet - Suporta Wake-On-LAN I/O Panel - 1 x porta - ASRock N73V-S | Quick Installation Guide - Page 66
CPU/chassis - Conector de força do ATX de 24 pinos - Conector ATX Windows® XP / XP de 64 bits / VistaTM / Operacional VistaTM de 64 bits Certificações - FCC, CE * Para informações mais detalhadas por favor visite o nosso sítio Web: http://www.asrock.com 76 ASRock N73PV-S / N73V-S Motherboard - ASRock N73V-S | Quick Installation Guide - Page 67
definições do BIOS, à aplicação da Windows® XP e do Windows® VistaTM. No caso da CPU de 64 bits do Windows® XP de 64 bits e do Windows do Disco duro SATAII" na página 24 do Manual do Usuário no CD de suporte, para definir ASRock: http://www.asrock.com 77 ASRock N73PV-S / N73V-S Motherboard Português - ASRock N73V-S | Quick Installation Guide - Page 68
CPU podem provocar instabilidade do sistema ou danos à CPU. 10. Assim que se detecta um superaquecimento na CPU a senha do sistema, data, tempo, e os BIOS, deverá reiniciar o sistema primeiro e, em seguida, desligá-lo antes de executar a ação de limpeza o CMOS. 78 ASRock N73PV-S / N73V-S Motherboard - ASRock N73V-S | Quick Installation Guide - Page 69
) (opcional) Tanto a saída do cabo de Serial dados SATA pode ser conectado ao disco rígido SATA / SATAII quanto o conector SATAII na placa mãe. Português 79 ASRock N73PV-S / N73V-S Motherboard - ASRock N73V-S | Quick Installation Guide - Page 70
ãe. Cada ligação USB 2.0 pode suportar duas portas USB 2.0. (USB8_9 de 9 pinos) (veja a folha 2, No. 24) N73V-S: Cabezal USB 2.0 (USB4_5 de 9 pinos) (veja a folha 3, No. 25) (USB6_7 de 9 pinos) (veja a USB 2.0 pode suportar duas portas USB 2.0. Português 80 ASRock N73PV-S / N73V-S Motherboard - ASRock N73V-S | Quick Installation Guide - Page 71
no manual e no manual do Audio Manager. Para Windows® XP / XP 64-bit OS: Clique em "Entrada/Saída de áudio", seleccione "Definições do conector" , escolha a opção "Desactivar detecção da tomada do painel frontal" e guarde a alteração clicando em "OK". 81 ASRock N73PV-S / N73V-S Motherboard - ASRock N73V-S | Quick Installation Guide - Page 72
do CPU nesta placa-mãe, por favor, ligue-a aos pinos 1-3. Pinos 1-3 ligados Instalação de Ventoinha de 3 pinos Conector de força do ATX (ATXPWR1 de 24 pinos) (veja a folha 2/3, No. 6) 12 24 Ligue a fonte de alimentação ATX neste conector. 1 13 Português 82 ASRock N73PV-S / N73V-S Motherboard - ASRock N73V-S | Quick Installation Guide - Page 73
ção, introduza o CD na leitora de CD-ROM do computador. Automaticamente iniciará o menu principal, casa o AUTORUN esteja ativado. Se o menu principal não aparecer automaticamente, explore o CD e execute o "ASSETUP.EXE" localizado na pasta BIN. Português 83 ASRock N73PV-S / N73V-S Motherboard - ASRock N73V-S | Quick Installation Guide - Page 74
84 ASRock N73PV-S / N73V-S Motherboard - ASRock N73V-S | Quick Installation Guide - Page 75
® ® ® ® ® ® ® ® ® 85 ASRock N73PV-S / N73V-S Motherboard - ASRock N73V-S | Quick Installation Guide - Page 76
® 86 ASRock N73PV-S / N73V-S Motherboard - ASRock N73V-S | Quick Installation Guide - Page 77
" ® " " ® ® ® ® ® 87 ASRock N73PV-S / N73V-S Motherboard - ASRock N73V-S | Quick Installation Guide - Page 78
"" "" "" "" 88 ASRock N73PV-S / N73V-S Motherboard - ASRock N73V-S | Quick Installation Guide - Page 79
SATAII_1 SATAII_3 SATAII_2 SATAII_4 89 ASRock N73PV-S / N73V-S Motherboard - ASRock N73V-S | Quick Installation Guide - Page 80
CD1 90 ASRock N73PV-S / N73V-S Motherboard - ASRock N73V-S | Quick Installation Guide - Page 81
® ® ® 91 ASRock N73PV-S / N73V-S Motherboard - ASRock N73V-S | Quick Installation Guide - Page 82
1 2 3 4 12 24 1 13 12 24 1 13 92 ASRock N73PV-S / N73V-S Motherboard - ASRock N73V-S | Quick Installation Guide - Page 83
" " 12 24 1 13 " " \\ 93 ASRock N73PV-S / N73V-S Motherboard - ASRock N73V-S | Quick Installation Guide - Page 84
94 ASRock N73PV-S / N73V-S Motherboard - ASRock N73V-S | Quick Installation Guide - Page 85
® ® ® ® ® ® ® ® ® 95 ASRock N73PV-S / N73V-S Motherboard - ASRock N73V-S | Quick Installation Guide - Page 86
® ® 96 ASRock N73PV-S / N73V-S Motherboard - ASRock N73V-S | Quick Installation Guide - Page 87
® ® ® ® ® ® ® 97 ASRock N73PV-S / N73V-S Motherboard - ASRock N73V-S | Quick Installation Guide - Page 88
98 ASRock N73PV-S / N73V-S Motherboard - ASRock N73V-S | Quick Installation Guide - Page 89
SATAII_1 SATAII_3 SATAII_2 SATAII_4 99 ASRock N73PV-S / N73V-S Motherboard - ASRock N73V-S | Quick Installation Guide - Page 90
100 CD1 ASRock N73PV-S / N73V-S Motherboard - ASRock N73V-S | Quick Installation Guide - Page 91
® ® ASRock N73PV-S / N73V-S Motherboard 101 - ASRock N73V-S | Quick Installation Guide - Page 92
1 2 3 4 12 24 1 13 12 24 1 13 102 ASRock N73PV-S / N73V-S Motherboard - ASRock N73V-S | Quick Installation Guide - Page 93
12 24 1 13 ® ® ASRock N73PV-S / N73V-S Motherboard 103 - ASRock N73V-S | Quick Installation Guide - Page 94
X O O O X O O O O: X: O O O O 104 ASRock N73PV-S / N73V-S Motherboard - ASRock N73V-S | Quick Installation Guide - Page 95
O O ASRock N73PV-S / N73V-S Motherboard 105 - ASRock N73V-S | Quick Installation Guide - Page 96
® ® ® ® ® ® ® ® ® 106 ASRock N73PV-S / N73V-S Motherboard - ASRock N73V-S | Quick Installation Guide - Page 97
® ® ASRock N73PV-S / N73V-S Motherboard 107 - ASRock N73V-S | Quick Installation Guide - Page 98
" ® ® " ® ® ® ® ® TM TM ® 108 ASRock N73PV-S / N73V-S Motherboard - ASRock N73V-S | Quick Installation Guide - Page 99
ASRock N73PV-S / N73V-S Motherboard 109 - ASRock N73V-S | Quick Installation Guide - Page 100
SATAII_1 SATAII_3 SATAII_2 SATAII_4 110 ASRock N73PV-S / N73V-S Motherboard - ASRock N73V-S | Quick Installation Guide - Page 101
CD1 ASRock N73PV-S / N73V-S Motherboard 111 - ASRock N73V-S | Quick Installation Guide - Page 102
® ® ® 112 ASRock N73PV-S / N73V-S Motherboard - ASRock N73V-S | Quick Installation Guide - Page 103
1 2 3 4 12 24 1 13 12 24 1 13 ASRock N73PV-S / N73V-S Motherboard 113 - ASRock N73V-S | Quick Installation Guide - Page 104
® ® TM TM 114 ASRock N73PV-S / N73V-S Motherboard - ASRock N73V-S | Quick Installation Guide - Page 105
the window. 1. Right-click the desktop and select NVIDIA Control Panel. 2. Click Display and click Change Flat Panel Scaling. 3. In the option When using a resolution lower than my display's native resolution, please select Use my display's built-in scaling. ASRock N73PV-S / N73V-S Motherboard 115
-
 1
1 -
 2
2 -
 3
3 -
 4
4 -
 5
5 -
 6
6 -
 7
7 -
8
-
9
-
10
-
11
-
12
-
13
-
14
-
15
-
16
-
17
-
18
-
19
-
20
-
21
-
22
-
23
-
24
-
25
-
26
-
27
-
28
-
29
-
30
-
31
-
32
-
33
-
34
-
35
-
36
-
37
-
38
-
39
-
40
-
41
-
42
-
43
-
44
-
45
-
46
-
47
-
48
-
49
-
50
-
51
-
52
-
53
-
54
-
55
-
56
-
57
-
58
-
59
-
60
-
61
-
62
-
63
-
64
-
65
-
66
-
67
-
68
-
69
-
70
-
71
-
72
-
73
-
74
-
75
-
76
-
77
-
78
-
79
-
80
-
81
-
82
-
83
-
84
-
85
-
86
-
87
-
88
-
89
-
90
-
91
-
92
-
93
-
94
-
95
-
96
-
97
-
98
-
99
-
100
-
101
-
102
-
103
-
104
-
105
 |
 |
1
ASRock
N73PV-S / N73V-S
Motherboard
English
English
English
English
English
Copyright Notice:
Copyright Notice:
Copyright Notice:
Copyright Notice:
Copyright Notice:
No part of this installation guide may be reproduced, transcribed, transmitted, or trans-
lated in any language, in any form or by any means, except duplication of documen-
tation by the purchaser for backup purpose, without written consent of ASRock Inc.
Products and corporate names appearing in this guide may or may not be registered
trademarks or copyrights of their respective companies, and are used only for identifica-
tion or explanation and to the owners’ benefit, without intent to infringe.
Disclaimer:
Disclaimer:
Disclaimer:
Disclaimer:
Disclaimer:
Specifications and information contained in this guide are furnished for informational
use only and subject to change without notice, and should not be constructed as a
commitment by ASRock. ASRock assumes no responsibility for any errors or omissions
that may appear in this guide.
With respect to the contents of this guide, ASRock does not provide warranty of any kind,
either expressed or implied, including but not limited to the implied warranties or
conditions of merchantability or fitness for a particular purpose. In no event shall
ASRock, its directors, officers, employees, or agents be liable for any indirect, special,
incidental, or consequential damages (including damages for loss of profits, loss of
business, loss of data, interruption of business and the like), even if ASRock has been
advised of the possibility of such damages arising from any defect or error in the guide
or product.
This device complies with Part 15 of the FCC Rules. Operation is subject to the
following two conditions:
(1)
this device may not cause harmful interference, and
(2)
this device must accept any interference received, including interference that
may cause undesired operation.
CALIFORNIA, USA ONLY
The Lithium battery adopted on this motherboard contains Perchlorate, a toxic
substance controlled in Perchlorate Best Management Practices (BMP) regulations
passed by the California Legislature. When you discard the Lithium battery in
California, USA, please follow the related regulations in advance.
“Perchlorate Material-special handling may apply, see
www
.dtsc.ca.gov/hazardouswa
ste/perchlorate”
ASRock Website: http://www.asrock.com
Published December 2008
Copyright
©
2008 ASRock INC. All rights reserved.