ASRock P43 Pro/USB3 Quick Installation Guide
ASRock P43 Pro/USB3 Manual
 |
View all ASRock P43 Pro/USB3 manuals
Add to My Manuals
Save this manual to your list of manuals |
ASRock P43 Pro/USB3 manual content summary:
- ASRock P43 Pro/USB3 | Quick Installation Guide - Page 1
purchaser for backup purpose, without written consent of ASRock Inc. Products and corporate names appearing in this guide may or may not be registered trademarks or ASRock Website: http://www.asrock.com Published April 2010 Copyright©2010 ASRock INC. All rights reserved. 1 ASRock P43 Pro/USB3 - ASRock P43 Pro/USB3 | Quick Installation Guide - Page 2
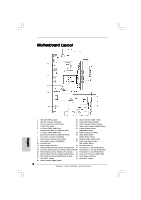
(PLED1) 3 CPU Fan Connector (CPU_FAN1) 21 USB 2.0 Header (USB10_11, Blue) 4 775-Pin CPU Socket 22 System Panel Header (PANEL1, White) 5 2 x 240-pin DDR3 DIMM Slots 23 Bridge Controller 17 USB_PWR3 Jumper 34 USB_PWR2 Jumper 18 USB 2.0 Header (USB8_9, Blue) 2 ASRock P43 Pro/USB3 Motherboard - ASRock P43 Pro/USB3 | Quick Installation Guide - Page 3
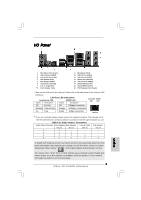
(Light Blue) ** 8 Front Speaker (Lime) 9 Microphone (Pink) 10 USB 2.0 Port (USB4) 11 USB 3.0 Port (USB5) 12 eSATAII Port (eSATAII1) 13 USB 2.0 Ports (USB01) 14 Optical SPDIF Out Port 15 Coaxial SPDIF Out Port Audio 2nd output" to use front panel audio. 3 ASRock P43 Pro/USB3 Motherboard English - ASRock P43 Pro/USB3 | Quick Installation Guide - Page 4
asrock.com/support/index.asp 1.1 Package Contents ASRock P43 Pro/USB3 Motherboard (ATX Form Factor: 12.0-in x 8.0-in, 30.5 cm x 20.3 cm) ASRock P43 Pro/USB3 Quick Installation Guide ASRock P43 Pro/USB3 Support CD Two Serial ATA (SATA) Data Cables (Optional) One I/O Panel Shield 4 ASRock P43 Pro/USB3 - ASRock P43 Pro/USB3 | Quick Installation Guide - Page 5
Hyper-Threading Technology (see CAUTION 1) - Supports Untied Overclocking Technology (see CAUTION 2) - Supports EM64T CPU - Northbridge: Intel® P43 - Southbridge: Intel® ICH10 - Dual Channel DDR3 Memory Technology (see CAUTION 3) - 4 x DDR3 DIMM slots - Support DDR3 1600/1333/1066/800 non-ECC, un - ASRock P43 Pro/USB3 | Quick Installation Guide - Page 6
Chassis Temperature Sensing - CPU/Chassis/Power Fan Tachometer - CPU Quiet Fan - CPU/Chassis Fan Multi-Speed Control - Voltage Monitoring: +12V, +5V, +3.3V, CPU Vcore OS - Microsoft® Windows® 7 / 7 64-bit / VistaTM / VistaTM 64-bit / XP / XP 64-bit compliant 6 ASRock P43 Pro/USB3 Motherboard - ASRock P43 Pro/USB3 | Quick Installation Guide - Page 7
please read the "SATAII Hard Disk Setup Guide" on page 24 of "User Manual" in the support CD to adjust your SATAII hard disk drive to SATAII mode. You can also connect SATA hard disk to SATAII connector directly. 8. It is a user-friendly ASRock overclocking tool which allows you to surveil your - ASRock P43 Pro/USB3 | Quick Installation Guide - Page 8
key during the POST or press key to BIOS setup menu to access ASRock Instant Flash. Just launch this tool and save the new BIOS file to your USB flash drive, floppy disk or hard drive, then you can update your BIOS only in a few clicks without preparing an additional floppy diskette or - ASRock P43 Pro/USB3 | Quick Installation Guide - Page 9
Socket Overview Before you insert the 775-LAND CPU into the socket, please check if the CPU surface is unclean or if there is any bent pin on the socket. Do not force to insert the CPU into the socket if above situation is found. Otherwise, the CPU will be seriously damaged. 9 ASRock P43 Pro/USB3 - ASRock P43 Pro/USB3 | Quick Installation Guide - Page 10
approximately 100 degrees. Step 2. Insert the 775-LAND CPU: Step 2-1. Hold the CPU by the edges where are marked with support the load plate edge, engage PnP cap with right hand thumb and peel the cap from the socket while pressing on center of PnP cap to assist in removal. 10 ASRock P43 Pro/USB3 - ASRock P43 Pro/USB3 | Quick Installation Guide - Page 11
, the heatsink cannot be secured on the motherboard. Step 5. Step 6. Connect fan header with the CPU fan connector on the motherboard. Secure excess cable with tie-wrap to ensure cable does not interfere with fan operation or contact other components. 11 ASRock P43 Pro/USB3 Motherboard English - ASRock P43 Pro/USB3 | Quick Installation Guide - Page 12
the Dual Channel Memory Technology . 4. It is not allowed to install a DDR or DDR2 memory module into DDR3 slot;otherwise, this motherboard and DIMM may be damaged. 5. If you adopt a DDR3 1600 memory module, you can only install it on DDR3_A2 slot. English 12 ASRock P43 Pro/USB3 Motherboard - ASRock P43 Pro/USB3 | Quick Installation Guide - Page 13
insert the DIMM into the slot until the retaining clips at both ends fully snap back in place and the DIMM is properly seated. 13 ASRock P43 Pro/USB3 Motherboard English - ASRock P43 Pro/USB3 | Quick Installation Guide - Page 14
as Gigabit LAN card, SATA2 card, etc. PCIE2 (PCIE x16 slot; Blue) is used for PCI Express x16 lane width graphics cards. Installing an expansion card Step 1. Before installing the expansion card, the chassis with screws. Step 6. Replace the system cover. 14 ASRock P43 Pro/USB3 Motherboard English - ASRock P43 Pro/USB3 | Quick Installation Guide - Page 15
+5V_DUAL, USB devices can wake up the system under S3 (Suspend to RAM) state. To support ErP/EuP BIOS. If you need to clear the CMOS when you just finish updating the BIOS, you must boot up the system first, and then shut it down before you do the clear-CMOS action. 15 ASRock P43 Pro/USB3 - ASRock P43 Pro/USB3 | Quick Installation Guide - Page 16
cable can be connected to the SATA / SATAII hard disk or the SATAII connector on this motherboard. Besides five default USB 2.0 ports on the I/O panel, there are three USB 2.0 headers on this motherboard. Each USB 2.0 header can support two USB 2.0 ports. English 16 ASRock P43 Pro/USB3 Motherboard - ASRock P43 Pro/USB3 | Quick Installation Guide - Page 17
. 1. High Definition Audio supports Jack Sensing, but the panel wire on the chassis must support HDA to function correctly. Please follow the instruction in our manual and chassis manual to install your system. is off in S3/S4 state or S5 state (power off). 17 ASRock P43 Pro/USB3 Motherboard - ASRock P43 Pro/USB3 | Quick Installation Guide - Page 18
4-Pin CPU fan (Quiet Fan) support, the 3-Pin CPU fan still can work successfully even without the fan speed control function. If you plan to connect the 3-Pin CPU fan to the CPU fan 8 5 4 1 Please connect an ATX 12V power supply to this connector. English 18 ASRock P43 Pro/USB3 Motherboard - ASRock P43 Pro/USB3 | Quick Installation Guide - Page 19
Power Supply Installation 4 1 Serial port Header (9-pin COM1) (see p.2 No. 24) This COM1 header supports a serial port module. HDMI_SPDIF Header (2-pin HDMI_SPDIF1) (see p.2 No. 25) HDMI_SPDIF header, providing SPDIF of HDMI VGA card to this header. English 19 ASRock P43 Pro/USB3 Motherboard - ASRock P43 Pro/USB3 | Quick Installation Guide - Page 20
BIOS SETUP UTILITY Advanced screen Storage Configuration. B. Set "SATAII Configuration" to [Enhanced], and then in the option "Configure SATAII as", please set the option to [IDE]. STEP 2: Install Windows® 7 / 7 64-bit / VistaTM / VistaTM 64-bit OS on your system. 20 ASRock P43 Pro/USB3 Motherboard - ASRock P43 Pro/USB3 | Quick Installation Guide - Page 21
, CPU FSB is untied during overclocking, but PCI / PCIE buses are in the fixed mode so that FSB can operate under a more stable overclocking environment. Please refer to the warning on page 7 for the possible overclocking risk before you apply Untied Overclocking Technology. 21 ASRock P43 Pro/USB3 - ASRock P43 Pro/USB3 | Quick Installation Guide - Page 22
CDROM drive. It will display the Main Menu automatically if "AUTORUN" is enabled in your computer. If the Main Menu does not appear automatically, locate and doubleclick on the file "ASSETUP.EXE" from the BIN folder in the Support CD to display the menus. 22 ASRock P43 Pro/USB3 Motherboard English - ASRock P43 Pro/USB3 | Quick Installation Guide - Page 23
asrock.com/support/index.asp 1.1 Kartoninhalt ASRock P43 Pro/USB3 Motherboard (ATX-Formfaktor: 30.5 cm x 20.3 cm; 12.0 Zoll x 8.0 Zoll) ASRock P43 Pro/USB3 Schnellinstallationsanleitung ASRock P43 Pro/USB3 Support-CD Zwei Serial ATA (SATA) -Datenkabel (optional) Ein I/O Shield 23 ASRock P43 Pro/USB3 - ASRock P43 Pro/USB3 | Quick Installation Guide - Page 24
Gigabit LAN 10/100/1000 Mb/s - Realtek RTL8111E - Unterstützt Wake-On-LAN I/O Panel - 1 x PS/2-Mausanschluss - 1 x PS/2-Tastaturanschluss - 1 x Koaxial-SPDIF-Ausgang - 1 x optischer SPDIF-Ausgang - 5 x Standard-USB 2.0-Anschlüsse - 1 x eSATAII-Anschluss 24 ASRock P43 Pro/USB3 Motherboard Deutsch - ASRock P43 Pro/USB3 | Quick Installation Guide - Page 25
9) - Sofortstart - ASRock Instant Flash (siehe VORSICHT 10) - ASRock OC DNA (siehe VORSICHT 11) - Hybrid Booster: - Schrittloser CPU-Frequenz-Kontrolle (siehe VORSICHT 12) - ASRock U-COP (siehe VORSICHT 13) - Boot Failure Guard (B.F.G. - Systemstartfehlerschutz) 25 ASRock P43 Pro/USB3 Motherboard - ASRock P43 Pro/USB3 | Quick Installation Guide - Page 26
CPU FSB-Frequenz entnehmen Sie bitte der nachstehenden Tabelle. CPU FSB-Frequenz Unterstützte Arbeitsspeicherfrequenz 1600 DDR3 800, DDR3 1066, DDR3 1333, DDR3 1600 1333 DDR3 800, DDR3 1066, DDR3 1333 1066 DDR3 800, DDR3 1066 800 DDR3 800 Deutsch 26 ASRock P43 Pro/USB3 Motherboard - ASRock P43 Pro/USB3 | Quick Installation Guide - Page 27
Windows® OS mit 64-Bit-CPU besteht diese Einschränkung nicht. "Bedienungsanleitung" auf der Support-CD, um Ihre SATAII BIOS-Setup-Menü Zugang zu ASRock Instant Flash. Sie brauchen dieses Werkzeug einfach nur zu starten und die neue BIOS-Datei auf Ihrem USB-Flash ASRock P43 Pro/USB3 Motherboard Deutsch - ASRock P43 Pro/USB3 | Quick Installation Guide - Page 28
stufenlose Steuerung bietet, wird Overclocking nicht empfohlen. Frequenzen, verbessern, bitte nicht vergessen, etwas Wärmeleitpaste zwischen CPU und Kühlkörper zu sprühen. 14. erforderlich. Gemäß einer Empfehlung von Intel muss eine EuP-fähige Stromversorgung dem ASRock P43 Pro/USB3 Motherboard - ASRock P43 Pro/USB3 | Quick Installation Guide - Page 29
Leitung 2A oder mehr leisten können. Wenn Sie +5V_DUAL auswahlen, konnen USB-Gerate das System aus dem S3-Zustand (Suspend to RAM) aufwecken. BIOS löschen müssen, müssen Sie zuerst das System starten und dann wieder ausschalten, bevor Sie den CMOS-Inhalt löschen. Deutsch 29 ASRock P43 Pro/USB3 - ASRock P43 Pro/USB3 | Quick Installation Guide - Page 30
bis 3,0 Gb/s. Serial ATA- (SATA-) Datenkabel (Option) USB 2.0-Header (9-pol. USB10_11) (siehe S.2 - No. USB 2.0-Ports an den I/O-Anschlüssen befinden sich drei USB 2.0-Anschlussleisten am Motherboard. Pro USB 2.0Anschlussleiste werden zwei USB 2.0-Ports unterstützt. Deutsch 30 ASRock P43 Pro/USB3 - ASRock P43 Pro/USB3 | Quick Installation Guide - Page 31
Sie die „Recording Volume" (Aufnahmelautstärke) an. System Panel-Header (9-pin PANEL1) (siehe S.2 - No. 22) Dieser Header unterstützt mehrere Funktion der Systemvorderseite. Deutsch 31 ASRock P43 Pro/USB3 Motherboard - ASRock P43 Pro/USB3 | Quick Installation Guide - Page 32
Draht an den Schutzleiterstift angeschlossenwird. CPU-Lüfteranschluss (4-pin CPU_FAN1) (siehe S.2 - No. 3) 1 2 3 4 Verbinden Sie das CPU Lüfterkabel mit diesem Anschluss und 12 24 1 13 Verbinden Sie die ATXStromversorgung mit diesem Header. Deutsch 32 ASRock P43 Pro/USB3 Motherboard - ASRock P43 Pro/USB3 | Quick Installation Guide - Page 33
wie Fernsehgeräten, Projektoren, LCD-Geräten an das System. Bitte verbinden Sie den HDMI_SPDIF-Anschluss der HDMI-VGA-Karte mit diesem Anschluss. Deutsch 33 ASRock P43 Pro/USB3 Motherboard - ASRock P43 Pro/USB3 | Quick Installation Guide - Page 34
der Support-CD, um die Menüs aufzurufen. Das Setup-Programm soll es Ihnen so leicht wie möglich machen. Es ist menügesteuert, d.h. Sie können in den verschiedenen Untermenüs Ihre Auswahl treffen und die Programme werden dann automatisch installiert. 34 ASRock P43 Pro/USB3 Motherboard Deutsch - ASRock P43 Pro/USB3 | Quick Installation Guide - Page 35
res au modèle que vous utilisez. www.asrock.com/support/index.asp 1.1 Contenu du paquet Carte mère ASRock P43 Pro/USB3 (Facteur de forme ATX: 12.0 pouces x 8.0 pouces, 30.5 cm x 20.3 cm) Guide d'installation rapide ASRock P43 Pro/USB3 CD de soutien ASRock P43 Pro/USB3 Deux câbles de données de série - ASRock P43 Pro/USB3 | Quick Installation Guide - Page 36
Blu-ray - PCIE x1 Gigabit LAN 10/100/1000 Mb/s - Realtek RTL8111E - Support du Wake-On-LAN I/O Panel - 1 x port souris PS/2 - 1 x port clavier PS/2 - 1 x Port de sortie coaxial SPDIF - 1 x Port de sortie optique SPDIF - 5 x ports USB 2.0 par défaut 36 ASRock P43 Pro/USB3 Motherboard Français - ASRock P43 Pro/USB3 | Quick Installation Guide - Page 37
X-Fi MB) (Version OEM et d'essai) - Tuner ASRock OC (voir ATTENTION 8) - Économiseur d'énergie intelligent (voir ATTENTION 9) - l'Instant Boot - ASRock Instant Flash (voir ATTENTION 10) - ASRock OC DNA (voir ATTENTION 11) - L'accélérateur hybride: Français 37 ASRock P43 Pro/USB3 Motherboard - ASRock P43 Pro/USB3 | Quick Installation Guide - Page 38
équences de prise en charge mémoire et les fréquences FSB UC correspondantes. Fréquence FSB UC Fréquence de prise en charge mémoire 1600 DDR3 800, DDR3 1066, DDR3 1333, DDR3 1600 1333 DDR3 800, DDR3 1066, DDR3 1333 1066 DDR3 800, DDR3 1066 800 DDR3 800 38 ASRock P43 Pro/USB3 Motherboard - ASRock P43 Pro/USB3 | Quick Installation Guide - Page 39
teste de arranque POST ou premir a tecla para exibir o menu de configuração do BIOS para aceder ao ASRock Instant Flash. Execute esta ferramenta para guardar o novo ficheiro de BIOS numa unidade flash USB compliqué d'enregistrement des paramètres 39 ASRock P43 Pro/USB3 Motherboard Français - ASRock P43 Pro/USB3 | Quick Installation Guide - Page 40
pas de mettre de la pâte thermique entre le CPU le dissipateur lors de l'installation du PC. 14. carte mère EuP et une alimentation EuP sont requises. Selon les suggestions d'Intel', l'alimentation électrique EuP doit correspondre à la norme, qui est que ASRock P43 Pro/USB3 Motherboard Français - ASRock P43 Pro/USB3 | Quick Installation Guide - Page 41
courant standby supérieur fourni par l'alimentation. Lorsque vous selectionnez +5V_DUAL, les peripheriques USB reveillent le systeme en etat S3 (Suspension a la RAM). USB_PW3 Court-circuitez les courant standby supérieur fourni par l'alimentation. Français 41 ASRock P43 Pro/USB3 Motherboard - ASRock P43 Pro/USB3 | Quick Installation Guide - Page 42
suite après avoir mis le BIOS à jour. Si vous avez besoin d'effacer la CMOS lorsque vous avez fini de mettre le BIOS à jour, vous devez d'abord initialiser le système, puis le mettre hors tension avant de procéder à l'opération d'effacement de la CMOS. Français 42 ASRock P43 Pro/USB3 Motherboard - ASRock P43 Pro/USB3 | Quick Installation Guide - Page 43
peut etre connecte au disque dur SATA / SATAII ou au connecteur SATAII sur la carte mere. A côté des cinq ports USB 2.0 par défaut sur le panneau E/S, il y a trois embases USB 2.0 sur cette carte mère. Chaque embase USB 2.0 peut prendre en charge 2 ports USB 2.0. 43 ASRock P43 Pro/USB3 Motherboard - ASRock P43 Pro/USB3 | Quick Installation Guide - Page 44
(HD_AUDIO1 br. 9) (voir p.2 No. 27) Cet en-tête supporte un module infrarouge optionnel de transfert et de réception sans fil. en charge le HDA pour fonctionner correctement. Veuillez suivre les instructions dans notre manuel et le manuel de châssis afin installer ). ASRock P43 Pro/USB3 Motherboard - ASRock P43 Pro/USB3 | Quick Installation Guide - Page 45
de terre. ien que cette carte mère offre un support de (Ventilateur silencieux) ventilateur de CPU à 4 broches , le ventilateur de CPU à 3 broches peut bien fonctionner même sans la fonction unité d'alimentation électrique ATX 12V sur ce connecteur. Français 45 ASRock P43 Pro/USB3 Motherboard - ASRock P43 Pro/USB3 | Quick Installation Guide - Page 46
numérique HDMI /un projecteur / un périphérique LCD. Veuillez brancher le connecteur HDMI_SPDIF de la carte VGA HDMI sur ce connecteur. Français 46 ASRock P43 Pro/USB3 Motherboard - ASRock P43 Pro/USB3 | Quick Installation Guide - Page 47
détaillées sur le BIOS, veuillez consulter le Guide de l'utilisateur (fichier PDF) dans le CD technique. 3. Informations sur le CD de support Cette carte mère supporte divers systèmes d'exploitation BIN et double-cliquez dessus pour afficher les menus. 47 ASRock P43 Pro/USB3 Motherboard Français - ASRock P43 Pro/USB3 | Quick Installation Guide - Page 48
di CPU supportate. ASRock website http://www.asrock.com Se si necessita dell'assistenza tecnica per questa scheda madre, visitare il nostro sito per informazioni specifiche sul modello che si sta usando. www.asrock.com/support/index.asp 1.1 Contenuto della confezione Scheda madre ASRock P43 Pro/USB3 - ASRock P43 Pro/USB3 | Quick Installation Guide - Page 49
100/1000 Mb/s - Realtek RTL8111E - Supporta Wake-On-LAN I/O Panel - 1 x porta PS/2 per mouse - 1 x porta PS/2 per tastiera - 1 x Porta coassiale SPDIF Out - 1 x Porta ottica SPDIF Out - 5 x porte USB 2.0 già integrate - 1 x Connettore eSATAII - 1 x porte USB 3.0 già integrate 49 ASRock P43 Pro/USB3 - ASRock P43 Pro/USB3 | Quick Installation Guide - Page 50
9) - Instant Boot - ASRock Instant Flash (vedi ATTENZIONE 10) - ASRock OC DNA (vedi ATTENZIONE 11) - Booster ibrido: - Stepless control per frequenza del processore (vedi ATTENZIONE 12) - ASRock U-COP (vedi ATTENZIONE 13) - Boot Failure Guard (B.F.G.) Italiano 50 ASRock P43 Pro/USB3 Motherboard - ASRock P43 Pro/USB3 | Quick Installation Guide - Page 51
DDR3 800 5. A causa delle limitazioni del sistema operativo, le dimensioni effettive della memoria possono essere inferiori a 4GB per l'accantonamento riservato all'uso del sistema sotto Windows® 7 / VistaTM / XP. Per Windows® OS con CPU 64-bit, non c'è tale limitazione. 51 ASRock P43 Pro/USB3 - ASRock P43 Pro/USB3 | Quick Installation Guide - Page 52
pagina 24 del "Manuale utente" nel CD BIOS per accedere ad ASRock Instant Flash. Avviare questo strumento e salvare il nuovo file BIOS nell'unità Flash USB, dischetto (disco floppy) o disco rigido; poi si può aggiornare il BIOS ASRock: http://www.asrock.com 52 ASRock P43 Pro/USB3 Motherboard Italiano - ASRock P43 Pro/USB3 | Quick Installation Guide - Page 53
il sistema, assicurarsi che la ventolina CPU della scheda madre funzioni correttamente; scollegare e una scheda elettrica predisposti EuP. In base ai suggerimenti Intel l'alimentatore predisposto EuP deve soddisfare lo standard secondo cui l'efficienza ASRock P43 Pro/USB3 Motherboard Italiano - ASRock P43 Pro/USB3 | Quick Installation Guide - Page 54
il consumo di corrente in standby sarà maggiore. Quando si seleziona +5V_DUAL, i dispositivi USB possono riattivare il sistema dallo stato S3 (Suspend to RAM). USB_PW3 Cortocircuitare pin2, pin3 e il consumo di corrente in standby sarà maggiore. Italiano 54 ASRock P43 Pro/USB3 Motherboard - ASRock P43 Pro/USB3 | Quick Installation Guide - Page 55
. Non cancellare la CMOS subito dopo aver aggiornato il BIOS. Se è necessario cancellare la CMOS una volta completato l'aggiornamento del BIOS, è necessario riavviare prima il sistema, e poi spegnerlo prima di procedere alla cancellazione della CMOS. Italiano 55 ASRock P43 Pro/USB3 Motherboard - ASRock P43 Pro/USB3 | Quick Installation Guide - Page 56
al disco rigido SATA / SATAII o al connettore di SATAII su questa cartolina base. Oltre alle cinque porte USB 2.0 predefinite nel pannello I/O, la scheda madre dispone di tre intestazioni USB 2.0. Ciascuna intestazione USB 2.0 supporta due porte USB 2.0. Italiano 56 ASRock P43 Pro/USB3 Motherboard - ASRock P43 Pro/USB3 | Quick Installation Guide - Page 57
) per far sì che questa operi in modo corretto. Attenersi alle istruzioni del nostro manuale e del manuale del telaio per installare il sistema. 2. Se si utilizza un pannello audio AC'97 lampeggiare in stato S1. Il LED è spento in stato S3/S4 o S5 (spegnimento). 57 ASRock P43 Pro/USB3 Motherboard - ASRock P43 Pro/USB3 | Quick Installation Guide - Page 58
Sebbene la presente scheda madre disponga di un supporto per ventola CPU a 4 piedini (ventola silenziosa), la ventola CPU a 3 piedini è in grado di funzionare anche senza la pin 1 13 8 5 4 1 Collegare un alimentatore ATX 12 V a questo connettore. Italiano 58 ASRock P43 Pro/USB3 Motherboard - ASRock P43 Pro/USB3 | Quick Installation Guide - Page 59
VGA, consente al sistema di collegare dispositivi per TV digitale HDMI/proiettori/ LCD . Collegare il connettore HDMI_SPDIF della scheda VGA HDMI a questo header. Italiano 59 ASRock P43 Pro/USB3 Motherboard - ASRock P43 Pro/USB3 | Quick Installation Guide - Page 60
BIOS La Flash Memory sulla scheda madre contiene le Setup Utility. Quando si avvia il computer, premi durante il Power-On-Self-Test (POST) della Setup utility del BIOS; altrimenti, POST continua con i suoi test di routine. Per entrare il BIOS i driver e ASRock P43 Pro/USB3 Motherboard Italiano - ASRock P43 Pro/USB3 | Quick Installation Guide - Page 61
de modelo específico de su placa. www.asrock.com/support/index.asp 1.1 Contenido de la caja Placa base ASRock P43 Pro/USB3 (Factor forma ATX: 30,5 cm x 20,3 cm, 12,0" x 8,0") Guía de instalación rápida de ASRock P43 Pro/USB3 CD de soporte de ASRock P43 Pro/USB3 Dos cables de datos Serial ATA (SATA - ASRock P43 Pro/USB3 | Quick Installation Guide - Page 62
- LGA 775 para Intel® CoreTM CPU EM64T - North Bridge: Intel® P43 - South Bridge: Intel® ICH10 - Soporte de Tecnología de Memoria de Doble Canal (ver ATENCIÓN 3) - 4 x DDR3 DIMM slots - Apoya DDR3 USB 2.0 predeterminados - 1 x Conector eSATAII - 1 x puertos USB 3.0 predeterminados ASRock P43 Pro/USB3 - ASRock P43 Pro/USB3 | Quick Installation Guide - Page 63
ÓN 9) - Instant Boot - ASRock Instant Flash (vea ATENCIÓN 10) - ASRock OC DNA (vea ATENCIÓN 11) - Amplificador Híbrido: - Stepless control de frecuencia de CPU (vea ATENCIÓN 12) - ASRock U-COP (vea ATENCIÓN 13) - Protección de Falla de Inicio (B.F.G..) 63 ASRock P43 Pro/USB3 Motherboard Español - ASRock P43 Pro/USB3 | Quick Installation Guide - Page 64
del BIOS, gina 39 del Manual del Usuario de Reloj (Overclocking) no CPU correspondiente. Frecuencia FSB CPU Frecuencia de soporte de memoria 1600 DDR3 800, DDR3 1066, DDR3 1333, DDR3 1600 1333 DDR3 800, DDR3 1066, DDR3 1333 1066 DDR3 800, DDR3 1066 800 DDR3 800 64 ASRock P43 Pro/USB3 - ASRock P43 Pro/USB3 | Quick Installation Guide - Page 65
con Windows® OS con CPU de 64-bit, del "Manual de usuario overclocking de ASRock de usuario-fácil que le BIOS y a la utilidad ASRock Instant Flash. Ejecute esta herramienta y guarde el archivo correspondiente al sistema BIOS nuevo en su unidad flash USB ASRock P43 Pro/USB3 Motherboard Español - ASRock P43 Pro/USB3 | Quick Installation Guide - Page 66
reanudar el sistema, compruebe si el ventilador de la CPU de la placa base funciona apropiadamente y desconecte el alimentación que cumplan con la directiva EuP. Según las directrices de Intel, una fuente de alimentación que cumpla con la directiva EuP debe ASRock P43 Pro/USB3 Motherboard Español - ASRock P43 Pro/USB3 | Quick Installation Guide - Page 67
mas que 2 Amp proveida por la fuente de electricidad. Si selecciona +5V_DUAL, los dispositivos USB podran reactivar el sistema siempre que se encuentre en el estado S3 (Suspension a RAM). USB_PW3 las agujas pin2 y pin3 en CLRCMOS1 durante 5 segundos. Por 67 ASRock P43 Pro/USB3 Motherboard - ASRock P43 Pro/USB3 | Quick Installation Guide - Page 68
acabe de finalizar la actualización de la BIOS, debe arrancar primero el sistema y, a continuaci USB 2.0 predeterminados en el panel de E/S, hay tres bases de conexiones USB 2.0 en esta placa base. Cada una de estas bases de conexiones admite dos puertos USB 2.0. Español 68 ASRock P43 Pro/USB3 - ASRock P43 Pro/USB3 | Quick Installation Guide - Page 69
chasis debe soportar HDA para operar correctamente. Por favor, siga las instrucciones en nuestro manual y en el manual de chasis para instalar su sistema. 2. Si utiliza el panel de sonido AC'97 control deslizante "Recording Volume" (Volumen de grabación). 69 ASRock P43 Pro/USB3 Motherboard Español - ASRock P43 Pro/USB3 | Quick Installation Guide - Page 70
patilla de masa. Conector del ventilador de la CPU (4-pin CPU_FAN1) (vea p.2, N. 3) 1 2 3 4 Conecte el cable del ventilador de la CPU a este conector y haga coincidir el cable negro 1-3. Contacto 1-3 conectado Instalación del ventilador de 3 contactos 70 ASRock P43 Pro/USB3 Motherboard Español - ASRock P43 Pro/USB3 | Quick Installation Guide - Page 71
) HDMI, permite al sistema conectarse a dispositivos de TV Digital HDMI / proyectores / Dispositivos LCD. Conecte el conector HDMI_SPDIF de la tarjeta VGA HDMI a esta cabecera. 71 ASRock P43 Pro/USB3 Motherboard - ASRock P43 Pro/USB3 | Quick Installation Guide - Page 72
información detallada sobre como configurar la BIOS, por favor refiérase al Manual del Usuario (archivo PDF) contenido en el CD. 3.Información de Software Support CD Esta placa-base soporta diversos tipos archivo "ASSETUP.EXE" para iniciar la instalación. 72 ASRock P43 Pro/USB3 Motherboard Español - ASRock P43 Pro/USB3 | Quick Installation Guide - Page 73
. . ASRock. ( - ASRock ATX: 12,0 x 8,0 / 30,5 x 20,3 ) ASRock ASRock 73 ASRock P43 Pro/USB3 Motherboard - ASRock P43 Pro/USB3 | Quick Installation Guide - Page 74
- ATX: 12,0 x 8,0 / 30,5 x 20,3 74 ASRock P43 Pro/USB3 Motherboard - ASRock P43 Pro/USB3 | Quick Installation Guide - Page 75
Hot-Plug 75 ASRock P43 Pro/USB3 Motherboard - ASRock P43 Pro/USB3 | Quick Installation Guide - Page 76
76 ASRock P43 Pro/USB3 Motherboard - ASRock P43 Pro/USB3 | Quick Installation Guide - Page 77
77 ASRock P43 Pro/USB3 Motherboard - ASRock P43 Pro/USB3 | Quick Installation Guide - Page 78
Short Open 78 ASRock P43 Pro/USB3 Motherboard - ASRock P43 Pro/USB3 | Quick Installation Guide - Page 79
CMOS CMOS 79 ASRock P43 Pro/USB3 Motherboard - ASRock P43 Pro/USB3 | Quick Installation Guide - Page 80
80 ASRock P43 Pro/USB3 Motherboard SATAII_3 (Port 2) SATAII_1 (Port 0) SATAII_5 (Port 4) SATAII_4 (Port 3) SATAII_2 (Port 1) - ASRock P43 Pro/USB3 | Quick Installation Guide - Page 81
(5- IR1) (9- PANEL1) 81 ASRock P43 Pro/USB3 Motherboard - ASRock P43 Pro/USB3 | Quick Installation Guide - Page 82
1 2 3 4 ATX 12 24 1 13 ATX. 12 24 1 13 82 ASRock P43 Pro/USB3 Motherboard - ASRock P43 Pro/USB3 | Quick Installation Guide - Page 83
12V-ATX 8 5 4 1 , ATX 12 , . . COM- 8 5 4 1 83 ASRock P43 Pro/USB3 Motherboard - ASRock P43 Pro/USB3 | Quick Installation Guide - Page 84
F POST 3 BIOS Setup Power-On-Self-Test - POST BIOS Setup POST Ctrl> + + - ASRock P43 Pro/USB3 | Quick Installation Guide - Page 85
85 ASRock P43 Pro/USB3 Motherboard - ASRock P43 Pro/USB3 | Quick Installation Guide - Page 86
® ® ® ® ® ® ® 86 ASRock P43 Pro/USB3 Motherboard - ASRock P43 Pro/USB3 | Quick Installation Guide - Page 87
87 ASRock P43 Pro/USB3 Motherboard - ASRock P43 Pro/USB3 | Quick Installation Guide - Page 88
® " " ® ® " " " " 88 ASRock P43 Pro/USB3 Motherboard - ASRock P43 Pro/USB3 | Quick Installation Guide - Page 89
® ® 89 ASRock P43 Pro/USB3 Motherboard - ASRock P43 Pro/USB3 | Quick Installation Guide - Page 90
"" "" "" "" "" 90 ASRock P43 Pro/USB3 Motherboard - ASRock P43 Pro/USB3 | Quick Installation Guide - Page 91
91 ASRock P43 Pro/USB3 Motherboard SATAII_3 (Port 2) SATAII_1 (Port 0) SATAII_5 (Port 4) SATAII_4 (Port 3) SATAII_2 (Port 1) - ASRock P43 Pro/USB3 | Quick Installation Guide - Page 92
® " " " " ® " " " " " " 92 ASRock P43 Pro/USB3 Motherboard - ASRock P43 Pro/USB3 | Quick Installation Guide - Page 93
1 2 3 4 12 24 1 13 8 5 4 1 12 24 1 13 8 4 ASRock P43 Pro/USB3 Motherboard 5 1 93 - ASRock P43 Pro/USB3 | Quick Installation Guide - Page 94
" " \\ " " 94 ASRock P43 Pro/USB3 Motherboard - ASRock P43 Pro/USB3 | Quick Installation Guide - Page 95
95 ASRock P43 Pro/USB3 Motherboard - ASRock P43 Pro/USB3 | Quick Installation Guide - Page 96
® ® ® ® ® ® ® 96 ASRock P43 Pro/USB3 Motherboard - ASRock P43 Pro/USB3 | Quick Installation Guide - Page 97
97 ASRock P43 Pro/USB3 Motherboard - ASRock P43 Pro/USB3 | Quick Installation Guide - Page 98
® ® ® " " ® ® 98 ASRock P43 Pro/USB3 Motherboard - ASRock P43 Pro/USB3 | Quick Installation Guide - Page 99
® ® - 99 ASRock P43 Pro/USB3 Motherboard - ASRock P43 Pro/USB3 | Quick Installation Guide - Page 100
100 ASRock P43 Pro/USB3 Motherboard - ASRock P43 Pro/USB3 | Quick Installation Guide - Page 101
ASRock P43 Pro/USB3 Motherboard 101 - ASRock P43 Pro/USB3 | Quick Installation Guide - Page 102
102 ASRock P43 Pro/USB3 Motherboard SATAII_3 (Port 2) SATAII_1 (Port 0) SATAII_5 (Port 4) SATAII_4 (Port 3) SATAII_2 (Port 1) - ASRock P43 Pro/USB3 | Quick Installation Guide - Page 103
® " " " ® " " " " " " " ASRock P43 Pro/USB3 Motherboard 103 - ASRock P43 Pro/USB3 | Quick Installation Guide - Page 104
1 2 3 4 12 24 1 13 8 5 4 1 12 24 1 13 104 ASRock P43 Pro/USB3 Motherboard - ASRock P43 Pro/USB3 | Quick Installation Guide - Page 105
8 5 4 1 ASRock P43 Pro/USB3 Motherboard 105 - ASRock P43 Pro/USB3 | Quick Installation Guide - Page 106
® ® TM TM 106 ASRock P43 Pro/USB3 Motherboard - ASRock P43 Pro/USB3 | Quick Installation Guide - Page 107
ASRock P43 Pro/USB3 Motherboard 107 - ASRock P43 Pro/USB3 | Quick Installation Guide - Page 108
® ® ® ® ® ® ® 108 ASRock P43 Pro/USB3 Motherboard - ASRock P43 Pro/USB3 | Quick Installation Guide - Page 109
ASRock P43 Pro/USB3 Motherboard 109 - ASRock P43 Pro/USB3 | Quick Installation Guide - Page 110
® ® ® ® 110 ® ASRock P43 Pro/USB3 Motherboard - ASRock P43 Pro/USB3 | Quick Installation Guide - Page 111
® ® ASRock P43 Pro/USB3 Motherboard 111 - ASRock P43 Pro/USB3 | Quick Installation Guide - Page 112
112 ASRock P43 Pro/USB3 Motherboard - ASRock P43 Pro/USB3 | Quick Installation Guide - Page 113
ASRock P43 Pro/USB3 Motherboard SATAII_3 (Port 2) SATAII_1 (Port 0) SATAII_5 (Port 4) SATAII_4 (Port 3) SATAII_2 (Port 1) 113 - ASRock P43 Pro/USB3 | Quick Installation Guide - Page 114
® ® 114 ASRock P43 Pro/USB3 Motherboard - ASRock P43 Pro/USB3 | Quick Installation Guide - Page 115
1 2 3 4 12 24 1 13 12 24 8 5 4 1 1 13 8 5 4 1 ASRock P43 Pro/USB3 Motherboard 115 - ASRock P43 Pro/USB3 | Quick Installation Guide - Page 116
® ® 116 ASRock P43 Pro/USB3 Motherboard - ASRock P43 Pro/USB3 | Quick Installation Guide - Page 117
X O O O X O O O O: X: O O O O ASRock P43 Pro/USB3 Motherboard 117 - ASRock P43 Pro/USB3 | Quick Installation Guide - Page 118
118 ASRock P43 Pro/USB3 Motherboard - ASRock P43 Pro/USB3 | Quick Installation Guide - Page 119
® ® ® ® ® ® ® ASRock P43 Pro/USB3 Motherboard 119 - ASRock P43 Pro/USB3 | Quick Installation Guide - Page 120
120 ® ® ASRock P43 Pro/USB3 Motherboard - ASRock P43 Pro/USB3 | Quick Installation Guide - Page 121
® ® ® ASRock P43 Pro/USB3 Motherboard 121 - ASRock P43 Pro/USB3 | Quick Installation Guide - Page 122
® ® 122 ASRock P43 Pro/USB3 Motherboard - ASRock P43 Pro/USB3 | Quick Installation Guide - Page 123
ASRock P43 Pro/USB3 Motherboard 123 - ASRock P43 Pro/USB3 | Quick Installation Guide - Page 124
124 ASRock P43 Pro/USB3 Motherboard SATAII_3 (Port 2) SATAII_1 (Port 0) SATAII_5 (Port 4) SATAII_4 (Port 3) SATAII_2 (Port 1) - ASRock P43 Pro/USB3 | Quick Installation Guide - Page 125
® ® ASRock P43 Pro/USB3 Motherboard 125 - ASRock P43 Pro/USB3 | Quick Installation Guide - Page 126
1 2 3 4 126 12 24 1 13 8 5 4 1 12 24 1 13 ASRock P43 Pro/USB3 Motherboard - ASRock P43 Pro/USB3 | Quick Installation Guide - Page 127
8 5 4 1 ® ® ® ASRock P43 Pro/USB3 Motherboard 127
-
 1
1 -
 2
2 -
 3
3 -
 4
4 -
 5
5 -
 6
6 -
 7
7 -
8
-
9
-
10
-
11
-
12
-
13
-
14
-
15
-
16
-
17
-
18
-
19
-
20
-
21
-
22
-
23
-
24
-
25
-
26
-
27
-
28
-
29
-
30
-
31
-
32
-
33
-
34
-
35
-
36
-
37
-
38
-
39
-
40
-
41
-
42
-
43
-
44
-
45
-
46
-
47
-
48
-
49
-
50
-
51
-
52
-
53
-
54
-
55
-
56
-
57
-
58
-
59
-
60
-
61
-
62
-
63
-
64
-
65
-
66
-
67
-
68
-
69
-
70
-
71
-
72
-
73
-
74
-
75
-
76
-
77
-
78
-
79
-
80
-
81
-
82
-
83
-
84
-
85
-
86
-
87
-
88
-
89
-
90
-
91
-
92
-
93
-
94
-
95
-
96
-
97
-
98
-
99
-
100
-
101
-
102
-
103
-
104
-
105
-
106
-
107
-
108
-
109
-
110
-
111
-
112
-
113
-
114
-
115
-
116
-
117
-
118
-
119
-
120
-
121
-
122
-
123
-
124
-
125
-
126
-
127
 |
 |

1
ASRock
P43 Pro/USB3
Motherboard
English
English
English
English
English
Copyright Notice:
Copyright Notice:
Copyright Notice:
Copyright Notice:
Copyright Notice:
No part of this installation guide may be reproduced, transcribed, transmitted, or trans-
lated in any language, in any form or by any means, except duplication of documen-
tation by the purchaser for backup purpose, without written consent of ASRock Inc.
Products and corporate names appearing in this guide may or may not be registered
trademarks or copyrights of their respective companies, and are used only for identifica-
tion or explanation and to the owners’ benefit, without intent to infringe.
Disclaimer:
Disclaimer:
Disclaimer:
Disclaimer:
Disclaimer:
Specifications and information contained in this guide are furnished for informational
use only and subject to change without notice, and should not be constructed as a
commitment by ASRock. ASRock assumes no responsibility for any errors or omissions
that may appear in this guide.
With respect to the contents of this guide, ASRock does not provide warranty of any kind,
either expressed or implied, including but not limited to the implied warranties or
conditions of merchantability or fitness for a particular purpose. In no event shall
ASRock, its directors, officers, employees, or agents be liable for any indirect, special,
incidental, or consequential damages (including damages for loss of profits, loss of
business, loss of data, interruption of business and the like), even if ASRock has been
advised of the possibility of such damages arising from any defect or error in the guide
or product.
This device complies with Part 15 of the FCC Rules. Operation is subject to the
following two conditions:
(1)
this device may not cause harmful interference, and
(2)
this device must accept any interference received, including interference that
may cause undesired operation.
CALIFORNIA, USA ONLY
The Lithium battery adopted on this motherboard contains Perchlorate, a toxic
substance controlled in Perchlorate Best Management Practices (BMP) regulations
passed by the California Legislature. When you discard the Lithium battery in
California, USA, please follow the related regulations in advance.
“Perchlorate Material-special handling may apply, see
www
.dtsc.ca.gov/hazardouswa
ste/perchlorate”
ASRock Website: http://www.asrock.com
Published April 2010
Copyright
©
2010 ASRock INC. All rights reserved.