ASRock P43Twins1600 Quick Installation Guide
ASRock P43Twins1600 Manual
 |
View all ASRock P43Twins1600 manuals
Add to My Manuals
Save this manual to your list of manuals |
ASRock P43Twins1600 manual content summary:
- ASRock P43Twins1600 | Quick Installation Guide - Page 1
purchaser for backup purpose, without written consent of ASRock Inc. Products and corporate names appearing in this guide may or may not be registered trademarks or copyrights USA ONLY The Lithium battery adopted on this motherboard contains Perchlorate, a toxic substance controlled in Perchlorate - ASRock P43Twins1600 | Quick Installation Guide - Page 2
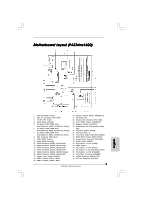
Motherboard Layout (P43D1600Twins-1394 / P43D1600Twins) English 1 PS2_USB_PWR1 Jumper 2 CPU Fan Connector (CPU_FAN1) 3 775-Pin CPU Socket 4 North Bridge Controller 5 2 x 240-pin DDR2 DIMM Slots (Dual Channel A: DDRII_A1, DDRII_B1; Yellow) 6 2 x 240-pin DDR2 DIMM Slots (Dual Channel B: DDRII_A2, - ASRock P43Twins1600 | Quick Installation Guide - Page 3
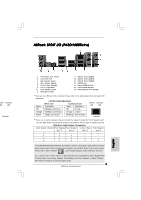
Motherboard Layout (P43Twins1600) English 1 PS2_USB_PWR1 Jumper 2 CPU Fan Connector (CPU_FAN1) 3 775-Pin CPU Socket 4 North Bridge Controller 5 2 x 240-pin DDR2 DIMM Slots (Dual Channel A: DDRII_A1, DDRII_B1; Yellow) 6 2 x 240-pin DDR2 Internal Audio Connector: CD1 (Black) 31 WiFi/E Header (WIFI/E) - ASRock P43Twins1600 | Quick Installation Guide - Page 4
**8 Front Speaker (Lime) 9 Microphone (Pink) 10 USB 2.0 Ports (USB01) 11 USB 2.0 Ports (USB23) 12 USB 2.0 Ports (USB89) 13 eSATAII Port 14 Optical SPDIF Out Port 15 Coaxial SPDIF Out Port 16 PS/2 Keyboard Port (Purple) * HDA Audio 2nd output" to use front panel audio. 4 ASRock Motherboard English - ASRock P43Twins1600 | Quick Installation Guide - Page 5
ASRock SPDIF I/O (P43D1600Twins) PEED ACT/LINK LED LED LAN Port 1 PS/2 Mouse Port (Green) * 2 LAN RJ-45 Port 3 Side Speaker (Gray) 4 Rear Speaker (Black) 5 Central / Bass (Orange) 6 Line In (Light Blue) **7 Front Speaker (Lime) 8 Microphone (Pink) 9 USB 2.0 Ports (USB01) 10 USB 2.0 Ports ( - ASRock P43Twins1600 | Quick Installation Guide - Page 6
ASRock SPDIF I/O (P43Twins1600) 1 PS/2 Mouse Port (Green) 2 LAN RJ-45 Port 3 Side Speaker (Gray) 4 Rear Speaker (Black) 5 Central / Bass (Orange) 6 Line In (Light Blue) * 7 Front Speaker (Lime) 8 Microphone (Pink) 9 USB 2.0 Ports (USB01) 10 " to use front panel audio. 6 ASRock Motherboard English - ASRock P43Twins1600 | Quick Installation Guide - Page 7
of this manual occur, the updated version will be available on ASRock website without further notice. You may find the latest VGA cards and CPU support lists on ASRock website as well. ASRock website http://www.asrock.com If you require technical support related to this motherboard, please visit - ASRock P43Twins1600 | Quick Installation Guide - Page 8
-Threading Technology (see CAUTION 2) - Supports Untied Overclocking Technology (see CAUTION 3) - Supports EM64T CPU - Northbridge: Intel® P43 - Southbridge: Intel® ICH10 - Dual Channel DDR3/DDR2 Memory Technology (see CAUTION 4) - 2 x DDR3 DIMM slots - Support DDR3 1333/1066 non-ECC, un-buffered - ASRock P43Twins1600 | Quick Installation Guide - Page 9
(support 4 USB 2.0 ports) (see CAUTION 10) - 1 x WiFi/E header (see CAUTION 11) - 8Mb AMI BIOS (P43D1600Twins-1394 / P43D1600Twins) - 4Mb AMI BIOS (P43Twins1600) - AMI Legal BIOS - Supports "Plug and Play" - ACPI 1.1 Compliance Wake Up Events - Supports jumperfree 9 ASRock Motherboard English - ASRock P43Twins1600 | Quick Installation Guide - Page 10
- AMBIOS 2.3.1 Support - CPU, DRAM, NB, SB, VTT Voltage Multi-adjustment - Supports I. O. T. (Intelligent Overclocking Technology) Support CD - Drivers, Utilities, AntiVirus Software (Trial Version) Unique Feature - ASRock OC Tuner (see CAUTION 12) - Hybrid Booster: - CPU Frequency Stepless - ASRock P43Twins1600 | Quick Installation Guide - Page 11
guide of memory modules on page 16 for proper installation. 5. Please check the table below for the CPU FSB frequency and its corresponding memory support frequency. CPU FSB Frequency Memory Support Frequency 1600 DDR2 800, DDR2 1066, DDR3 1066, DDR3 1333 1333 DDR2 667, DDR2 800, DDR2 - ASRock P43Twins1600 | Quick Installation Guide - Page 12
(Basic) DX10 with WDDM Driver with 128bit VGA memory (Premium) with 64bit VGA memory (Basic) * After June 1, 2008, all Windows® VistaTM systems are required to meet above minimum hardware requirements in order to qualify for Windows® VistaTM Premium 2008 logo. English 12 ASRock Motherboard - ASRock P43Twins1600 | Quick Installation Guide - Page 13
over-tighten the screws! Doing so may damage the motherboard. 2.1 CPU Installation For the installation of Intel 775-LAND CPU, please follow the steps below. 775-Pin Socket Overview Before you insert the 775-LAND CPU into the socket, please check if the CPU surface is unclean or if there is any bent - ASRock P43Twins1600 | Quick Installation Guide - Page 14
approximately 100 degrees. Step 2. Insert the 775-LAND CPU: Step 2-1. Hold the CPU by the edges where are marked with support the load plate edge, engage PnP cap with right hand thumb and peel the cap from the socket while pressing on center of PnP cap to assist in removal. 14 ASRock Motherboard - ASRock P43Twins1600 | Quick Installation Guide - Page 15
if returning the motherboard for after service. Step 4. Close the socket: Step 4-1. Rotate instruction manuals of your CPU fan and heatsink. Below is an example to illustrate the installation of the heatsink for 775-LAND CPU. Step 1. Apply thermal interface material onto center of IHS on the socket - ASRock P43Twins1600 | Quick Installation Guide - Page 16
motherboard provides four 240-pin DDR2 (Double Data Rate 2) DIMM slots and two 240-pin DDR3 (Double Data Rate 3) DIMM slots, and supports Dual Channel Memory Technology. For dual channel configuration, you always need to install identical (the same brand, speed, size and chip-type) DDR2/DDR3 DIMM - ASRock P43Twins1600 | Quick Installation Guide - Page 17
DDR3 memory module into DDR2 slot or install a DDR2 memory module into DDR3 slot; otherwise, this motherboard and DIMM may be damaged. 5. DDR2 and DDR3 memory modules cannot be installed on this motherboard . It will cause permanent damage to the motherboard and the DIMM if you force the DIMM - ASRock P43Twins1600 | Quick Installation Guide - Page 18
Express cards with x1 lane width cards, such as Gigabit LAN card, SATA2 card, etc. If you want to use ASRock DeskExpress function on this motherboard, please install ASRock PCIE_DE card on PCIE1/DE slot. Installing an expansion card Step 1. Before installing the expansion card, please make sure that - ASRock P43Twins1600 | Quick Installation Guide - Page 19
However, please do not clear the CMOS right after you update the BIOS. If you need to clear the CMOS when you just finish updating the BIOS, you must boot up the system first, and then shut , see p.2/3 No. 9) FSB3 Jumper (FSB3, 5-pin jumper, see p.2/3 No. 9) Default English 19 ASRock Motherboard - ASRock P43Twins1600 | Quick Installation Guide - Page 20
BIOS setting) you may face the problem, that DRAM frequency will be overclocked very high. Please use jumper to force NB to be strapped at higher frequency, so the DRAM can work at lower frequency. If you want to overclock the CPU you adopt to FSB1066 on this motherboard of the motherboard! FDD - ASRock P43Twins1600 | Quick Installation Guide - Page 21
motherboard connect the black end to the IDE devices 80-conductor ATA 66/100/133 cable Note: Please refer to the instruction support SATA data cables for internal storage internal storage device or be connected to eSATAII connector to support This eSATAII connector supports SATA data cable for - ASRock P43Twins1600 | Quick Installation Guide - Page 22
on the I/O panel, there are two USB 2.0 headers on this motherboard. Each USB 2.0 header can support two USB 2.0 ports. WiFi/E Header (15-pin WIFI/E) (see p.2 No. 32 or p.3, No. 31) This header supports WiFi+AP function with ASRock WiFi-802.11g or WiFi-802.11n module, an easy-to-use wireless local - ASRock P43Twins1600 | Quick Installation Guide - Page 23
voice through front mic, please deselect "Mute" icon in "Front Mic" of "Playback" portion. For Windows® VistaTM / VistaTM 64-bit OS: Go to the "Front Mic" Tab in the Realtek Control panel. Click "Set Default Device" to make the Front Mic as the default record device. 23 ASRock Motherboard English - ASRock P43Twins1600 | Quick Installation Guide - Page 24
fan (Quiet Fan) support, the 3-Pin CPU fan still can work successfully even without the fan speed control function. If you plan to connect the 3-Pin CPU fan to the CPU fan connector on this motherboard, please connect it to Pin 1-3. Pin 1-3 Connected 3-Pin Fan Installation ATX Power Connector (24 - ASRock P43Twins1600 | Quick Installation Guide - Page 25
5. 4-Pin ATX 12V Power Supply Installation 8 4 ATX 12V Power Connector (4-pin ATX12V1) (see p.3 No. 39) Please connect an ATX 12V power supply header (FRONT_1394) on this motherboard. This IEEE 1394 header can support one IEEE 1394 port. This COM1 header supports a serial port module. HDMI_SPDIF - ASRock P43Twins1600 | Quick Installation Guide - Page 26
TV/projector/LCD devices. To use HDMI function on this motherboard, please refer to page 30 of "User Manual" in the support CD for detailed installation procedures. 2.8 eSATAII Interface Introduction NOTE: 1. If you set "Configure SATAII as" option in BIOS setup to AHCI mode, Hot Plug function is - ASRock P43Twins1600 | Quick Installation Guide - Page 27
of the eSATAII device cable to eSATAII device Connect the other end of the eSATAII device cable to eSATAII port of the I/O shield English 27 ASRock Motherboard - ASRock P43Twins1600 | Quick Installation Guide - Page 28
vendor, AHCI function is not supported under Windows® 2000. 2.11.1 Installing Windows® 2000 / XP / XP 64-bit Without RAID Functions If you want to install Windows® 2000 / XP / XP 64-bit OS on your SATA / SATAII HDDs without RAID functions, please follow below steps. 28 ASRock Motherboard English - ASRock P43Twins1600 | Quick Installation Guide - Page 29
1: Set up BIOS. A. Enter BIOS SETUP UTILITY Advanced screen IDE Configuration. B. Set "SATAII Configuration" to [Enhanced], and then in the option "Configure SATAII as", please set the option to [IDE]. STEP 2: Install Windows® 2000 / XP / XP 64-bit OS on your system. 29 ASRock Motherboard English - ASRock P43Twins1600 | Quick Installation Guide - Page 30
the instruction to install Windows® VistaTM / VistaTM 64-bit OS on your system. When you see "Where do you want to install Windows?" page, please insert the ASRock Support CD into your optical drive, and click the "Load Driver" button on the left on the bottom to load the Intel® AHCI drivers. Intel - ASRock P43Twins1600 | Quick Installation Guide - Page 31
to the User Manual (PDF file) contained in the Support CD. 4. Software Support CD information This motherboard supports various Microsoft® Windows® operating systems: 2000 / XP / XP 64-bit / VistaTM / VistaTM 64-bit. The Support CD that came with the motherboard contains necessary drivers and useful - ASRock P43Twins1600 | Quick Installation Guide - Page 32
Webseite: www.asrock.com/support/index.asp 1.1 Kartoninhalt ASRock P43D1600Twins-1394 / P43D1600Twins / P43Twins1600 Motherboard (ATX-Formfaktor: 30.5 cm x 24.4 cm; 12.0 Zoll x 9.6 Zoll) ASRock P43D1600Twins-1394 / P43D1600Twins / P43Twins1600 Schnellinstallationsanleitung ASRock P43D1600Twins-1394 - ASRock P43Twins1600 | Quick Installation Guide - Page 33
- FSB 1600/1333/1066/800 MHz (siehe VORSICHT 1) - Unterstützt Hyper-Threading-Technologie (siehe VORSICHT 2) - Unterstützt Untied-Übertaktungstechnologie (siehe VORSICHT 3) - Unterstützt EM64T-CPU - Northbridge: Intel® P43 - Southbridge: Intel® ICH10 - Unterstützung von Dual-Kanal-DDR3/DDR2 - ASRock P43Twins1600 | Quick Installation Guide - Page 34
) - 4-pin anschluss für 12V-ATX-Netzteil (P43Twins1600) - Interne Audio-Anschlüsse - Anschluss für Audio auf der Gehäusevorderseite - 2 x USB 2.0-Anschlüsse (Unterstützung 4 zusätzlicher USB 2.0-Anschlüsse) (siehe VORSICHT 10) - 1 x WiFi/E-Anschlüsse (siehe VORSICHT 11) ASRock Motherboard - ASRock P43Twins1600 | Quick Installation Guide - Page 35
Unterstützt Microsoft® Windows® 2000 / XP / XP 64-Bit / VistaTM / VistaTM 64-Bit (siehe VORSICHT 15) Zertifizierungen - FCC, CE, WHQL * Für die ausführliche Produktinformation, besuchen Sie bitte unsere Website: http://www.asrock.com WARNUNG Beachten Sie bitte, dass Overclocking, einschließlich - ASRock P43Twins1600 | Quick Installation Guide - Page 36
1066, DDR3 1066, DDR3 1333 1333 DDR2 667, DDR2 800, DDR2 1066, DDR3 1066, DDR3 1333 1066 DDR2 667, DDR2 800, DDR2 1066, DDR3 1066 800 DDR2 667, DDR2 800 6. Durch Betriebssystem-Einschränkungen kann die tatsächliche Speichergröße weniger als 4 GB betragen, da unter Windows® XP und Windows - ASRock P43Twins1600 | Quick Installation Guide - Page 37
um die beste Systemleistung unter der Windows® Umgebung zu erreichen. Besuchen Sie bitte unsere Website für die Operationsverfahren von ASRock OC Tuner. ASRock-Website: http://www.asrock.com 13. Obwohl dieses Motherboard stufenlose Steuerung bietet, wird Overclocking nicht empfohlen. Frequenzen, die - ASRock P43Twins1600 | Quick Installation Guide - Page 38
) (Sockel) 775-Pin Sockel Übersicht Bevor Sie die 775-Pin CPU in den Sockel sitzen, prüfen Sie bitte, ob die CPU-Oberfläche sauber ist und keine der Kontakte verbogen sind. Setzen Sie die CPU nicht mit Gewalt in den Sockel, dies kann die CPU schwer beschädigen. Deutsch 38 ASRock Motherboard - ASRock P43Twins1600 | Quick Installation Guide - Page 39
Orientierungskerbe 775-Pin Sockel 775-Pin CPU Um die CPU ordnungsgemäß einsetzen zu können, richten Sie die zwei Orientierungskerben der CPU mit den beiden Markierungen des Sockels aus. Schritt 2-3. Drücken Sie die CPU vorsichtig in vertikaler Richtung in den Sockel. 39 ASRock Motherboard - ASRock P43Twins1600 | Quick Installation Guide - Page 40
Schritt 2-4. Prüfen Sie, dass die CPU ordnungsgemäß im Sockel sitzt und die Orientierungskerben einwandfrei in den entsprechenden Auskerbungen sitzen. Schritt schließen Sie den Ladehebel. Schritt 4-3. Sichern Sie Ladehebel und Ladeplatte mithilfe des Hebelverschlusses. 40 ASRock Motherboard Deutsch - ASRock P43Twins1600 | Quick Installation Guide - Page 41
den 775-Pin CPU. Schritt 1. Geben Sie Wärmeleitmaterial auf die Mitte des IHS, auf die Sockeloberfläche. (Tragen Sie Wärmeleitmaterial auf. ) Schritt 2. Setzen Sie den Kühlkörper auf den Sockel. Prüfen Sie, dass die Lüfterkabel auf der Seite am nächsten zum CPU-LüfterAnschluss des Motherboards - ASRock P43Twins1600 | Quick Installation Guide - Page 42
Marke, Geschwindigkeit, Größe und gleicher Chiptyp) DDR2/DDR3 DIMM-Paare in den Steckplätzen gleicher Farbe DS Doppelkanal DDR3 Speicherkonfigurationen (DS: Doppelseitig, SS: Einseitig) 2 Speichermodule 2 Speichermodule DDR3_A1 (grün) SS DS DDR3_B1 (grün) SS DS Deutsch 42 ASRock Motherboard - ASRock P43Twins1600 | Quick Installation Guide - Page 43
zu aktivieren. 4. Es wird nicht erlaubt, ein DDR3 Speichermodul in DDR2 Steckplatz zu installieren oder ein DDR2 Speichermodul ins DDR3 Steckplatz zu installieren; sonst können diese Hauptplatine und aus, dass das Modul mit der Kerbe in den Slot passt. Deutsch 43 ASRock Motherboard - ASRock P43Twins1600 | Quick Installation Guide - Page 44
ExpressKarten mit x1 Lane-Breite-Karten verwendet, z.B. Gigabit LANKarte, SATA2-Karte. Möchten Sie die ASRock DeskExpress-Funktion auf diesem Motherboard verwenden, dann installieren Sie bitte die ASRock PCIE_DE-Karte im PCIE1/DE-Steckplatz. Einbau einer Erweiterungskarte Schritt 1: Bevor Sie die - ASRock P43Twins1600 | Quick Installation Guide - Page 45
vergessen Sie nicht, den Jumper wieder zu entfernen, nachdem das CMOS gelöscht wurde. Wenn Sie den CMOS-Inhalt gleich nach dem Aktualisieren des BIOS löschen müssen, müssen Sie zuerst das System starten und dann wieder ausschalten, bevor Sie den CMOS-Inhalt löschen. Deutsch 45 ASRock Motherboard - ASRock P43Twins1600 | Quick Installation Guide - Page 46
- oder FSB1066-CPU installieren und versuchen, (mithilfe einer BIOS-Einstellung) auf FSB1333 oder FSB1600 zu übertakten, könnte das Problem auftreten, dass kurz. Andernfalls funktioniert die CPU nicht richtig auf diesem Motherboard. Siehe die nachstehenden Jumper-Einstellungen. 46 ASRock Motherboard - ASRock P43Twins1600 | Quick Installation Guide - Page 47
ück kann für interne Speichervorrichtung benutzt werden oder an eSATAII Verbindungsstück angeschlossen werden, um eSATAII Vorrichtung zu unterstützen. Bitte lesen Sie „SATAII Schnittstellen Einleitung" auf Seite 26 für Details über eSATAII-und eSATAIIInstallationsverfahren. 47 ASRock Motherboard - ASRock P43Twins1600 | Quick Installation Guide - Page 48
des SATAStromversorgungskabels mit dem Stromanschluss des Netzteils. Zusätzlich zu den sechs üblichen USB 2.0-Ports an den I/O-Anschlüssen befinden sich zwei USB 2.0-Anschlussleisten am Motherboard. Pro USB 2.0Anschlussleiste werden zwei USB 2.0-Ports unterstützt. Deutsch 48 ASRock Motherboard - ASRock P43Twins1600 | Quick Installation Guide - Page 49
öglichkeiten zu genießen. Mochten Sie die WiFi+AP-Funktion nicht auf diesem Motherboard verwenden, kann dieser Sockel als 4-pol. S.3 - No. 25) Diese Kopf unterstützt die heiße Stecker Untersuchungsfunktion für ASRock DeskExpress. Interne Audio-Anschlüsse (4-Pin CD1) (siehe S.2 - No. 31 oder S.3 - ASRock P43Twins1600 | Quick Installation Guide - Page 50
BIOS-Setup-Dienstprogramm auf. Wechseln Sie zu Erweiterte Einstellungen und wählen Sie Chipset-Konfiguration. Setzen Sie die Option Frontleistenkontrolle von [Automatisch] auf [Aktiviert]. F. Rufen Sie das Windows Manager aufzurufen. Für Windows® 2000 / XP / XP 64-Bit Betriebssystem ASRock Motherboard - ASRock P43Twins1600 | Quick Installation Guide - Page 51
, wenn Sie einen traditionellen 4-Pin ATX 12V Energieversorgung adoptieren. Um die 4-Pin ATX Energieversorgung zu verwenden, stecken Sie bitte Ihre Energieversorgung zusammen mit dem Pin 1 8 4 und Pin 5 ein. Installation der 4-Pin ATX 12V Energieversorgung Deutsch 51 ASRock Motherboard - ASRock P43Twins1600 | Quick Installation Guide - Page 52
No. 27 oder S.3 - No. 26) Bitte schließen Sie an diesen Anschluss die ATX 12V Stromversorgung an. Außer einem vorgegebenem IEEE-1394 Port auf dem Ein-/ Ausgabe Paneel schwarze Ende (A) des HDMI_SPDIF-Kabels mit dem HDMI_SPDIF-Anschluss am Motherboard. Schließen Sie dann das weiße Ende (B oder C) - ASRock P43Twins1600 | Quick Installation Guide - Page 53
Serial ATAII- (SATAII) Festplatteninstallation Motherboard nutzt den Intel® ICH10 south bridge-Chipsatz zur Unterstützung von Serial ATA- (SATA-) / Serial ATAII- (SATAII-). Sie können SATA / SATAII-Festplatten als interne Speichergeräte mit diesem Motherboard verbinden. In diesem Abschnitt erfahren - ASRock P43Twins1600 | Quick Installation Guide - Page 54
10 Windows® 2000 / XP / XP 64-Bit / VistaTM / VistaTM 64-Bit ohne RAID-Funktionalität installieren Wenn Sie Windows® 2000 / XP / XP Legen Sie die ASRock Support-CD in Ihr driver diskette [Y/N]?" [Serial ATATreiberdiskette erstellen [Y/N]?] bestätigen Sie mit . 54 ASRock Motherboard Deutsch - ASRock P43Twins1600 | Quick Installation Guide - Page 55
Windows XP)" oder "Intel(R) ICH10 SATA AHCI Controller (Desktop - Windows XP64)". Verwendung von SATA / SATAII-Festplatten und eSATAII-Geräten ohne NCQFunktionen SCHRITT 1: BIOS einrichten. A. Rufen Sie das BIOS Sie Windows® 2000 / XP / XP 64-Bit in Ihrem System. 55 ASRock Motherboard Deutsch - ASRock P43Twins1600 | Quick Installation Guide - Page 56
. Wenn die Frage "Wo möchten Sie Windows installieren?" erscheint, legen Sie bitte die ASRock Support CD in Ihr optisches Laufwerk ein. Klicken Sie anschließend die "Treiber laden"-Schaltfläche links unten, um die Intel® AHCI-Treiber zu installieren. Die Intel® AHCI-Treiber befinden sich in dem - ASRock P43Twins1600 | Quick Installation Guide - Page 57
auswählen können. Für detaillierte Informationen zum BIOS-Setup, siehe bitte das Benutzerhandbuch (PDF Datei) auf der Support CD. 4. Software Support CD information Dieses Motherboard unterstützt eine Reiche von Microsoft® Windows® Betriebssystemen: 2000 / XP / XP 64-Bit / VistaTM / VistaTM 64-Bit - ASRock P43Twins1600 | Quick Installation Guide - Page 58
utilisez. www.asrock.com/support/index.asp 1.1 Contenu du paquet Carte mère ASRock P43D1600Twins-1394 / P43D1600Twins / P43Twins1600 (Facteur de forme ATX: 12.0 pouces x 9.6 pouces, 30.5 cm x 24.4 cm) Guide d'installation rapide ASRock P43D1600Twins-1394 / P43D1600Twins / P43Twins1600 CD de soutien - ASRock P43Twins1600 | Quick Installation Guide - Page 59
la technologie Untied Overclocking (voir ATTENTION 3) - Prise en charge de la technologie EM64T par le CPU - Northbridge: Intel® P43 - Southbridge: Intel® ICH10 - Compatible avec la Technologie de Mémoire à Canal Double (voir ATTENTION 4) - 2 x slots DIMM DDR3 - Supporter DDR3 1333/1066 non-ECC - ASRock P43Twins1600 | Quick Installation Guide - Page 60
d'alimentation 12V ATX (P43D1600Twins-1394 / P43D1600Twins) - br. 4 connecteur d'alimentation 12V ATX (P43Twins1600) - Connecteurs audio internes - Connecteur audio panneau avant - 2 x En-tête USB 2.0 (prendre en charge 4 ports USB 2.0 supplémentaires) (voir ATTENTION 10) ASRock Motherboard - ASRock P43Twins1600 | Quick Installation Guide - Page 61
P43D1600Twins) - 4Mb BIOS AMI (P43Twins1600) - BIOS AMI - Support du "Plug and Play" - Compatible pour événements de réveil ACPI 1.1 - Gestion jumperless - Support SMBIOS 2.3.1 - CPU, DRAM, NB, SB, VTT Tension Multi-ajustement - Supporter I. O. T. (Technologie d'Overclocking Intelligent) CD - ASRock P43Twins1600 | Quick Installation Guide - Page 62
DDR3 1066, DDR3 1333 1333 DDR2 667, DDR2 800, DDR2 1066, DDR3 1066, DDR3 1333 1066 DDR2 667, DDR2 800, DDR2 1066, DDR3 1066 800 DDR2 667, DDR2 800 6. Du fait des limites du système d'exploitation, la taille mémoire réelle réservée au système pourra être inférieure à 4 Go sous Windows® XP - ASRock P43Twins1600 | Quick Installation Guide - Page 63
lors de l'installation du PC. 15. Les fonctions de AHCI ne sont pas Supporté sous Windows® 2000 OS. Il est recommandé d'utiliser le mode IDE sous Windows® 2000. Veuillez consulter la page 51 du "Guide d'utilisation" dans le CD de support pour le détail des réglages. 63 ASRock Motherboard Français - ASRock P43Twins1600 | Quick Installation Guide - Page 64
2008 et Basic de Windows® sont invités à support antistatique ou dans son sachet d'origine. 5. Lorsque vous placez les vis dans les orifices pour vis pour fixer la carte mère sur le châssis, ne serrez pas trop les vis ! Vous risquez sinon d'endommager la carte mère. Français 64 ASRock Motherboard - ASRock P43Twins1600 | Quick Installation Guide - Page 65
2.1 Installation du CPU Pour l'installation du processeur Intel 775 broches, veuillez suivre la procédure (Plaque de chargement) ci-dessous. (Barrette de contact) (Corps du socket) Vue d'ensemble du socket 775 broches Avant d'insérer le processeur 775 broches dans le socket, veuillez vérifier que - ASRock P43Twins1600 | Quick Installation Guide - Page 66
775 broches Socket 775 broches Pour une insertion correcte, veuillez vérifier que vous faites bien correspondre les deux encoches d'orientation sur le processeur avec les deux détrompeurs du socket si vous renvoyez la carte mère pour service après vente. Français Etape 4. ASRock Motherboard - ASRock P43Twins1600 | Quick Installation Guide - Page 67
manuels d'instructions de thermique pour un processeur 775 broches. (Appliquez le Etape 2. Placez le dissipateur thermique sur le socket. Vérifiez que les câbles du ventilateur une montre, le dissipateur thermique ne sera pas fixé sur la carte mère. Etape 5. ASRock Motherboard Français - ASRock P43Twins1600 | Quick Installation Guide - Page 68
Installation des modules m émoire [DIMM] La carte mère dispose de quatre emplacements DIMM DDR2 (Double Data Rate 2) de 240-broches, deux emplacements DIMM DDR3 (Double Data Rate 3) de 240-broches, et supporte la Technologie de Mémoire à Canal Double. Pour effectuer une configuration à canal double - ASRock P43Twins1600 | Quick Installation Guide - Page 69
autorisé à installer un module de mémoire DDR3 en DDR2 slot ou d'installer un module de mémoire DDR2 en DDR3 slot, sinon, cette carte mère et DIMM peuvent être endommagé. 5. DDR2 et DDR3 modules de mémoire ne peuvent pas être du module DIMM aux trous du connecteur. Français 69 ASRock Motherboard - ASRock P43Twins1600 | Quick Installation Guide - Page 70
PCI Express avec les cartes de largeur x1 voie, comme la carte Gigabit LAN, la carte SATA2 et la carte ASRock PCIE_DE. PCIE2 (slot PCIE x16; Vert) est utilisé pour les cartes PCI Express avec cartes graphiques de largeur la carte sur le châssis à l'aide d'une vis. Français 70 ASRock Motherboard - ASRock P43Twins1600 | Quick Installation Guide - Page 71
CMOS tout de suite après avoir mis le BIOS à jour. Si vous avez besoin d'effacer la CMOS lorsque vous avez fini de mettre le BIOS à jour, vous devez d'abord initialiser le système, puis le mettre hors tension avant de procéder à l'opération d'effacement de la CMOS. Français 71 ASRock Motherboard - ASRock P43Twins1600 | Quick Installation Guide - Page 72
ou FSB1600 (en réglant le BIOS) Vous pouvez faire face le équence plus basse. Si vous voulez overclocker le CPU que vous avez choisi vers un FSB1066 CPU peut ne pas fonctionner correctement sur cette carte mère. Veuillez vous référer ci-dessous pour les réglages des cavaliers. 72 ASRock Motherboard - ASRock P43Twins1600 | Quick Installation Guide - Page 73
Veuillez vous reporter aux instructions du fabricant de votre interne ou etre connecte au connecteur eSATAII pour supporter eSATAII device. Veuillez lire "SATAII Interface Introduction" sur le page 26 pour details concernant eSATAII et les procedures d'installation de eSATAII. 73 ASRock Motherboard - ASRock P43Twins1600 | Quick Installation Guide - Page 74
38) Câble de données Série ATA (SATA) (en option) eSATAII_TOP Le connecteur eSATAII supporte le cable de data SATA pour la fonction externe SATAII. L'interface present eSATAII permet d'atteindre le re. Chaque embase USB 2.0 peut prendre en charge 2 ports USB 2.0. Français 74 ASRock Motherboard - ASRock P43Twins1600 | Quick Installation Guide - Page 75
WiFi/E Header (WIFI/E br.15) (voir p.2 No. 32 ou p.3 No. 31) Cet en-tête supporte les fonctions WiFi+AP avec le module ASRock WiFi-802.11g ou WiFi-802 prendre en charge le HDA pour fonctionner correctement. Veuillez suivre les instructions dans notre manuel et le manuel de châssis afin installer - ASRock P43Twins1600 | Quick Installation Guide - Page 76
BIOS. Saisir les Paramètres avancés puis sélectionner Configuration du jeu de puces. Définir l'option panneau de commande de [Auto] à [Activé]. F. Entrer dans le système Windows entrer dans le Gestionnaire audio Realtek HD. Pour Windows® 2000 / XP / XP 64-bit OS: Cliquer sur « E/S ASRock Motherboard - ASRock P43Twins1600 | Quick Installation Guide - Page 77
broches ATX, branchez votre alimentation avec la broche 1 et la broche 5. 4-Installation d'alimentation à 4 broches ATX 12V 8 4 Connecteur ATX 12V (ATX12V1 br.4) (voir p.3 No. 39) Veuillez connecter une unité d'alimentation électrique ATX 12V sur ce connecteur. Français 77 ASRock Motherboard - ASRock P43Twins1600 | Quick Installation Guide - Page 78
(FRONT_1394) sur cette carte mere. Le header de IEEE 1394 peut supporter un port de IEEE 1394. Cette en-tête de port COM est 30 ou p.3 No. 29) Connecteur HDMI_SPDIF, fournissant une sortie audio SPDIF vers la carte VGA HDMI, et permettant au système de se ) Français 78 ASRock Motherboard - ASRock P43Twins1600 | Quick Installation Guide - Page 79
SPDIF Manual" (Manuel d'utilisation) sur le CD de support Intel® ICH10 Southbridge qui prend en charge les disques dur Serial ATA (SATA) / Serial ATAII (SATAII). Vous pouvez installer un disque dur SATA / SATAII avec cette carte mère en tant que stockage interne 2.9 Guide ASRock Motherboard Français - ASRock P43Twins1600 | Quick Installation Guide - Page 80
supportées sous Windows® 2000. 2.10.1 Installation de Windows® 2000 / XP / XP 64-bit sans fonctions RAID Si vous voulez installer Windows® 2000 / XP / XP s'afficher sur l'écran le message "Generate Serial ATA driver diskette [Y/N]?" (Voulez-vous générer une disquette de ASRock Motherboard Français - ASRock P43Twins1600 | Quick Installation Guide - Page 81
-bits dans le lecteur optique pour démarrer votre système, et suivez les instructions pour installer l'OS Windows® VistaTM / VistaTM 64-bits sur votre système. Lorsque vous voyez la page "Où souhaitez-vous installer Windows ?", veuillez insérer le CD Support d' ASRock 81 ASRock Motherboard Français - ASRock P43Twins1600 | Quick Installation Guide - Page 82
bus PCI / PCIE sont en mode fixé de sorte que FSB peut opérer sous un environnement de surcadençage plus stable. Veuillez vous reporter à l'avertissement en page 61 pour connaître les risques liés à l'overclocking avant d'appliquer la technologie Untied Overclocking. 82 ASRock Motherboard Français - ASRock P43Twins1600 | Quick Installation Guide - Page 83
BIOS, veuillez consulter le Guide de l'utilisateur (fichier PDF) dans le CD technique. 4. Informations sur le CD de support Cette carte mère supporte divers systèmes d'exploitation Microsoft® Windows®: 2000 / XP / XP et double-cliquez dessus pour afficher les menus. 83 ASRock Motherboard Français - ASRock P43Twins1600 | Quick Installation Guide - Page 84
. Nel caso in cui questo manuale sia modificato, la versione aggiornata sarà disponibile sul sito di ASRock senza altro avviso. Sul sito ASRock si possono anche trovare le più recenti schede VGA e gli elenchi di CPU supportate. ASRock website http://www.asrock.com Se si necessita dell'assistenza - ASRock P43Twins1600 | Quick Installation Guide - Page 85
ATTENZIONE 2) - Supporta la tecnologia overclocking "slegata" (vedi ATTENZIONE 3) - Supporto CPU EM64T - Northbridge: Intel® P43 - Southbridge: Intel® ICH10 - Supporto tecnologia Dual Channel DDR3/DDR2 Memory (vedi ATTENZIONE 4) - 2 x slot DDR3 DIMM - Supporto DDR3 1333/1066 non-ECC, momoria senza - ASRock P43Twins1600 | Quick Installation Guide - Page 86
(P43D1600Twins-1394 / P43D1600Twins) - 4-pin connettore ATX 12V (P43Twins1600) - Connettori audio interni - Connettore audio sul pannello frontale - 2 x Collettore USB 2.0 (supporta 4 porte USB 2.0) (vedi ATTENZIONE 10) - 1 x connettore WiFi/E (vedi ATTENZIONE 11) Italiano 86 ASRock Motherboard - ASRock P43Twins1600 | Quick Installation Guide - Page 87
AMI BIOS (P43Twins1600) - Suppor AMI legal BIOS - Supporta "Plug and Play" - Compatibile con ACPI 1.1 wake up events - Supporta jumperfree - Supporta SMBIOS 2.3.1 - Regolazione multi-voltaggio CPU, DRAM, NB, SB, VTT - Supporto I. O. T. (Intelligent Overclocking Technology) CD di - Driver - ASRock P43Twins1600 | Quick Installation Guide - Page 88
DDR2 1066, DDR3 1066, DDR3 1333 1066 DDR2 667, DDR2 800, DDR2 1066, DDR3 1066 800 DDR2 667, DDR2 800 6. A causa delle limitazioni del sistema operativo, le dimensioni effettive della memoria possono essere inferiori a 4GB per l'accantonamento riservato all'uso del sistema sotto Windows® XP - ASRock P43Twins1600 | Quick Installation Guide - Page 89
la migliore prestazione in Windows?. Prego visitare il nostro sito Internet per ulteriori dettagli circa l'uso del Sintonizzatore ASRock OC. ASRock website: http://www.asrock.com 13. Anche se questa motherboard offre il controllo stepless, non si consiglia di effettuare l'overclocking. Frequenze del - ASRock P43Twins1600 | Quick Installation Guide - Page 90
componente. 5. Nell'usare i giraviti per fissare la scheda madre al telaio non serrare eccessivamente le viti! Altrimenti si rischia di danneggiare la scheda madre. 90 ASRock Motherboard Italiano - ASRock P43Twins1600 | Quick Installation Guide - Page 91
CPU Intel 775-Pin. (Disposizione comandi) (Corpo socket) Vista del socket 775-Pin Prima da inserire la CPU da 775-Pin nel socket, verificare che la superficie della CPU CPU 775-Pin: Fase 2-1. Tenere la CPU dai bordi segnati con linee nere. Linea nera Linea nera Italiano 91 ASRock Motherboard - ASRock P43Twins1600 | Quick Installation Guide - Page 92
Dente di orientamento Pin1 Dente di Tacca di allineamento orientamento Tacca di allineamento CPU da 775-Pin Socket da 775-Pin Per il corretto inserimento, verificare di far combaciare i due denti di la leva di carico mentre si preme leggermente sulla piastra di carico. ASRock Motherboard - ASRock P43Twins1600 | Quick Installation Guide - Page 93
il cavo di alimentazione della ventola al connettore ventola della CPU sulla scheda madre. Fase 6. fissare il cavo in eccesso con fascette per assicurare che il cavo non interferisca con il funzionamento della ventola o che venga a contatto con gli altri componenti. 93 ASRock Motherboard Italiano - ASRock P43Twins1600 | Quick Installation Guide - Page 94
configurazione Memoria Canale Duale di seguito. Dual Channel DDR2 Memory Configurations (DS: Double Side, SS: Single DDR3 Memory Configurations (DS: Double Side, SS: Single Side) 2 moduli di memoria 2 moduli di memoria DDR3_A1 (verde) SS DS DDR3_B1 (verde) SS DS Italiano 94 ASRock Motherboard - ASRock P43Twins1600 | Quick Installation Guide - Page 95
Channel. 4. L'installazione del modulo di memoria DDR3 non puo' effettuata nella presa DDR2 oppure l'installazione del modulo di memoria DDR2 nella presa DDR3; altrimenti questa schedamare ed il DIMM potrebbero il pettine della DIMM combaci con la sua sede sullo slot. Italiano 95 ASRock Motherboard - ASRock P43Twins1600 | Quick Installation Guide - Page 96
(PCIE x1; bianco) è usato per le schede PCI Express x1 lane, come schede Gigabit LAN, SATA2 e ASRock PCIE_DE. PCIE2 (slot PCIE x16; Verde) usato per schede PCI Express con schede grafiche di larghezza x16. L'alloggio 4. Agganciare la scheda allo chassis con le viti. Italiano 96 ASRock Motherboard - ASRock P43Twins1600 | Quick Installation Guide - Page 97
jumper. Non cancellare la CMOS subito dopo aver aggiornato il BIOS. Se è necessario cancellare la CMOS una volta completato l'aggiornamento del BIOS, è necessario riavviare prima il sistema, e poi spegnerlo prima di procedere alla cancellazione della CMOS. Italiano 97 ASRock Motherboard - ASRock P43Twins1600 | Quick Installation Guide - Page 98
l'overclock della CPU adottata a FSB1600, è necessario regolare i jumper. Ridurre pin3, pin4 per jumper FSB2 e pin3, pin4 per jumper FSB3. In caso contrario la CPU potrebbe non funzionare correttamente su questa scheda madre. Fare riferimento alle seguenti impostazioni jumper. 98 ASRock Motherboard - ASRock P43Twins1600 | Quick Installation Guide - Page 99
di eSATAII di sostegno. Leggere "Introduzione Dell'Interfaccia Di SATAII" alla pagina 26 per i particolari circa le procedure di installazione di eSATAII e di eSATAII. 99 ASRock Motherboard - ASRock P43Twins1600 | Quick Installation Guide - Page 100
. Oltre alle sei porte USB 2.0 predefinite nel pannello I/O, la scheda madre dispone di due intestazioni USB 2.0. Ciascuna intestazione USB 2.0 supporta due porte USB 2.0. Italiano 100 ASRock Motherboard - ASRock P43Twins1600 | Quick Installation Guide - Page 101
WiFi/E Header (15-pin WIFI/E) (vedi p.2 Nr. 32 o p.3 Nr. 31) Questo header supporta la funzione WiFi+AP con il modulo WiFi-802.11g o WiFi-802.11n ASRock corretto. Attenersi alle istruzioni del nostro manuale e del manuale del telaio per installare il sistema. '97. ASRock Motherboard 101 Italiano - ASRock P43Twins1600 | Quick Installation Guide - Page 102
delle applicazioni per entrare su Realtek HD Audio Manager. Per Windows® 2000 / XP / XP 64-bit OS: Fare clic su "Audio I/O", selezionare " al pin terra. Collegare il cavo della ventolina 4 CPU a questo connettore e far 3 2 combaciare il filo nero al pin 1 terra. ASRock Motherboard - ASRock P43Twins1600 | Quick Installation Guide - Page 103
CPU a 3 piedini al connettore della ventola CPU ATX 12V, prego collegare la presa elettrica 5 1 al Pin 1 e Pin 5. Installazione elettrica 4-Pin ATX 12V 8 4 Connettore ATX 12 V (4-pin ATX12V1) (vedi p.3 Nr. 39) Collegare un alimentatore ATX 12 V a questo connettore. Italiano ASRock Motherboard - ASRock P43Twins1600 | Quick Installation Guide - Page 104
) (vedi p.2 Nr. 30 o p.3 Nr. 29) Header HDMI_SPDIF, con uscita audio SPDIF su scheda HDMI VGA, consente al sistema di collegare dispositivi per TV digitale HDMI/proiettori/ LCD HDMI VGA. A. estremità nera B. estremità bianca (2 pin) C. estremità bianca (3 pin) Italiano 104 ASRock Motherboard - ASRock P43Twins1600 | Quick Installation Guide - Page 105
con il sistema vengono rilevati automaticamente ed elencati nella pagina del driver del CD in dotazione. Per l'installazione dei driver necessari, procedere in base ad un ordine dall'alto verso il basso. In tal modo, i driver installati funzioneranno correttamente. Italiano ASRock Motherboard 105 - ASRock P43Twins1600 | Quick Installation Guide - Page 106
driver di Windows® 2000 AHCI non viene fornito dal venditore, le funzioni AHCI non sono supportate in Windows® 2000. 2.10.1 Installazione di Windows® 2000 / XP / XP 64-bit senza funzioni RAID Se si desidera installare Windows® 2000 / XP / XP un tasto qualsiasi. 106 ASRock Motherboard Italiano - ASRock P43Twins1600 | Quick Installation Guide - Page 107
.) Dopo la configurazione del BIOS, è possibile procedere all'installazione di Windows® XP / Windows® XP 64 bit sul sistema. All'inizio dell'impostazione di Windows®, premere F6 per installare un driver AHCI di terzi. Al termine, inserire un floppy con il driver Intel® AHCI. Una volta letto - ASRock P43Twins1600 | Quick Installation Guide - Page 108
supporto ASRock nell'unità ottica e fare clic sul pulsante "Carica driver" , in basso a sinistra, per caricare i driver Intel® AHCI. I driver Intel® AHCI si trova sul seguente percorso del CD di supporto: .. \ I386 (per utenti Windows® VistaTM) .. \ AMD64 (per utenti Windows® VistaTM 64-bit) - ASRock P43Twins1600 | Quick Installation Guide - Page 109
BIOS, fare riferimento al Manuale dell'Utente (PDF file) contenuto nel cd di supporto. 4. Software di supporto e informazioni su CD Questa scheda madre supporta vari sistemi operativi Microsoft® Windows®: 2000 / XP / XP e cliccare due volte per visualizzare i menù. Italiano ASRock Motherboard 109 - ASRock P43Twins1600 | Quick Installation Guide - Page 110
esta placa base, visite nuestra página web con el número de modelo específico de su placa. www.asrock.com/support/index.asp 1.1 Contenido de la caja Placa base ASRock P43D1600Twins-1394 / P43D1600Twins / P43Twins1600 (Factor forma ATX: 30,5 cm x 24,4 cm, 12,0" x 9,6") Guía de instalación rápida de - ASRock P43Twins1600 | Quick Installation Guide - Page 111
tecnología de aumento de velocidad liberada (vea ATENCIÓN 3) - Admite CPU EM64T - North Bridge: Intel® P43 - South Bridge: Intel® ICH10 - Soporte de Tecnología de Memoria de Doble Canal (ver ATENCIÓN 4) - 2 x DDR3 DIMM slots - Apoya DDR3 1333/1066 non-ECC, memoria de un-buffered (vea ATENCI - ASRock P43Twins1600 | Quick Installation Guide - Page 112
P43D1600Twins / P43Twins1600 ASRock SPDIF I/O - CPU/chasis - 24-pin cabezal de alimentación ATX - 8-pin conector de ATX 12V power (P43D1600Twins-1394 / P43D1600Twins) - 4-pin conector de ATX 12V power (P43Twins1600) - Conector de Audio Interno - Conector de audio de panel frontal ASRock Motherboard - ASRock P43Twins1600 | Quick Installation Guide - Page 113
- 2 x Cabezal USB 2.0 (admite 4 puertos USB 2.0 adicionales) (vea ATENCIÓN 10) - 1 x cabecera WiFi/E (vea ATENCIÓN 11) BIOS - 8Mb AMI BIOS (P43D1600Twins-1394 / P43D1600Twins) - 4Mb AMI BIOS (P43Twins1600) - AMI legal BIOS - Soporta "Plug and Play" - ACPI 1.1 compliance wake up events - - ASRock P43Twins1600 | Quick Installation Guide - Page 114
1066, DDR3 1333 1333 DDR2 667, DDR2 800, DDR2 1066, DDR3 1066, DDR3 1333 1066 DDR2 667, DDR2 800, DDR2 1066, DDR3 1066 800 DDR2 667, DDR2 800 6. Debido a las limitaciones del sistema, el tamaño real de la memoria debe ser inferior a 4GB para que el sistema pueda funcionar bajo Windows® XP - ASRock P43Twins1600 | Quick Installation Guide - Page 115
ASRock WiFi-802.11g o WiFi-802.11n. Sitio web de ASRock http://www.asrock.com 12. Es una herramienta de overclocking de ASRock si el ventilador de la CPU de la placa base funciona Windows® 2000 OS. Se recomienda utilizar el modo IDE con Windows® 2000. Por favor, consulte la página 51 del "Manual - ASRock P43Twins1600 | Quick Installation Guide - Page 116
la CPU de 775 agujas en el socket, compruebe que la superficie de la CPU se encuentra limpia y no hay ninguna aguja torcida en el socket. No introduzca la CPU en el socket por la fuerza si se produce la situación anterior. Si lo hace, puede producir daños graves en la CPU. ASRock Motherboard - ASRock P43Twins1600 | Quick Installation Guide - Page 117
ón de la CPU coinciden con las teclas de alineación del socket. Step 2-3. Coloque con cuidado la CPU en el socket con un movimiento totalmente vertical. Step 2-4. Compruebe que la CPU se encuentra en el socket y la orientación coincide con la indicada por las muescas. ASRock Motherboard 117 Espa - ASRock P43Twins1600 | Quick Installation Guide - Page 118
de la CPU. A continuación se ofrece un ejemplo para ilustrar la instalación del disipador para la CPU de 775 agujas. (Aplique el material termal de interfaz) Paso 1. Aplique el material termal de interfaz en el centro del IHS de la superficie del socket. Español 118 ASRock Motherboard - ASRock P43Twins1600 | Quick Installation Guide - Page 119
6. Conecte el cabezal del ventilador con el conector del ventilador de la CPU en la placa madre. Fije el cable que sobre con un lazo para asegurarse de que el cable no interfiere en el funcionamiento del ventilador y tampoco entra en contacto con otros componentes. Español ASRock Motherboard 119 - ASRock P43Twins1600 | Quick Installation Guide - Page 120
que se muestra a continuación. Configuraciones de Memoria de Dual Canal DDR2 (DS: Doble cara, SS: Una cara) DDRII_A1 (Ranura DDR3 (DS: Doble cara, SS: Una cara) DDR3_A1 (Ranura Verde) 2 módulos de memoria SS 2 módulos de memoria DS DDR3_B1 (Ranura Verde) SS DS Español 120 ASRock Motherboard - ASRock P43Twins1600 | Quick Installation Guide - Page 121
Dual Canal. 4. No se permite a instalar un módulo de memoria de DDR3 en la ranura de DDR2 o instalar un módulo de memoria de DDR2 en la ranura de DDR3, de lo contrario, esta placa base y DIMM pueden ser dañados. 5. , provocará daños permanentes en la placa base y en la DIMM. ASRock Motherboard 121 - ASRock P43Twins1600 | Quick Installation Guide - Page 122
se utiliza con tarjetas PCI Express con ancho de banda x1, como las tarjetas Gigabit LAN, SATA2, y ASRock PCIE_DE etc. PCIE2 (ranura PCIE x16; Verde) se utiliza para tarjetas PCI Express con tarjetas gráficas con la ranura. Paso 4. Asegure la tarjeta con tornillos. Español 122 ASRock Motherboard - ASRock P43Twins1600 | Quick Installation Guide - Page 123
acuérdase de quitar el jumper cap después de limpiar el COMS. Si necesita borrar la CMOS cuando acabe de finalizar la actualización de la BIOS, debe arrancar primero el sistema y, a continuación, apagarlo antes de realizar la acción de borrado de CMOS. Español ASRock Motherboard 123 - ASRock P43Twins1600 | Quick Installation Guide - Page 124
del reloj a FSB1333 o FSB1600 (mediante la configuración del BIOS) puede encontrarse el problema de que la frecuencia de la memoria De lo contrario, la CPU no funcionará correctamente en esta placa base. Por favor, consulte la configuración de los puentes a continuación. 124 ASRock Motherboard - ASRock P43Twins1600 | Quick Installation Guide - Page 125
eSATAII . Por favor lea "Introducción del interfaz de SATAII" en la página 26 para los detalles sobre eSATAII y los procedimientos de la instalación del eSATAII. ASRock Motherboard 125 - ASRock P43Twins1600 | Quick Installation Guide - Page 126
de E/S, hay dos bases de conexiones USB 2.0 en esta placa base. Cada una de estas bases de conexiones admite dos puertos USB 2.0. Español 126 ASRock Motherboard - ASRock P43Twins1600 | Quick Installation Guide - Page 127
WiFi/E (15-pin WIFI/E) (vea p.2, N. 32 o p.3, N. 31) Este conector es compatible con la función WiFi+AP con el módulo ASRock WiFi-802.11g y WiFi correctamente. Por favor, siga las instrucciones en nuestro manual y en el manual de chasis para instalar su sistema. 2. Si ASRock Motherboard 127 Español - ASRock P43Twins1600 | Quick Installation Guide - Page 128
en el Administrador de audio HD Realtek. Para Windows® 2000 / XP / XP 64-bit OS: Haga clic en "E/S de CPU (4-pin CPU_FAN1) (vea p.2/3, N. 2) 128 Conecte el cable del ventilador 4 3 de la CPU a este conector y 2 1 haga coincidir el cable negro con el conector de tierra. ASRock Motherboard - ASRock P43Twins1600 | Quick Installation Guide - Page 129
ATX 12V 8 4 Español Conector de ATX 12V power (4-pin ATX12V1) (vea p.3, N. 39) Tenga en cuenta que es necesario conectar este conector a una toma de corriente con el enchufe ATX 12V, de modo que proporcione suficiente electricidad. De lo contrario no se podrá encender. ASRock Motherboard - ASRock P43Twins1600 | Quick Installation Guide - Page 130
o p.3, N. 29) Cable HDMI_SPDIF (Opcional) C B A Cabecera HDMI_SPDIF. Ofrece una salida SPDIF la tarjeta VGA HDMI, permite al sistema conectarse a dispositivos de TV Digital HDMI / proyectores / negro B. Extremo blanco (2 patillas) C. Extremo blanco (3 patillas) Español 130 ASRock Motherboard - ASRock P43Twins1600 | Quick Installation Guide - Page 131
una salida de sonido SPDIF a la tarjeta VGA Manual de usuario)" en el CD de soporte para consultar una explicación detallada del procedimiento de instalación. 2 . 8 Instalación de discos duro ATA serie (SATA) / ATAII serie (SATAII) / Configuración RAID Adopta el chipset Intel ASRock Motherboard 131 - ASRock P43Twins1600 | Quick Installation Guide - Page 132
Windows® 2000. 2.10.1 Instalación de Windows® 2000 / XP / XP 64 bits sin funciones RAID Si desea instalar Windows® 2000 / XP / 64 bits en sus discos duros SATA / SATAII sin funciones RAID pantalla el mensaje: "Generate Serial ATA driver diskette [Y/N]? (¿Desea generar un disquete ASRock Motherboard - ASRock P43Twins1600 | Quick Installation Guide - Page 133
aparece en "Configure SATAII as" ("Configurar SATAII como") a [IDE]. PASO 2: Instale Windows® 2000 / XP / XP 64 bits en su sistema. 2.10.2 Instalación de Windows® VistaTM / VistaTM 64 bits sin funciones RAID Si desea instalar Windows® VistaTM / VistaTM 64 bits en sus discos duros SATA / SATAII sin - ASRock P43Twins1600 | Quick Installation Guide - Page 134
Forzado de Reloj (Overclocking) no relacionado, por favor entre a la opción de "Modo de Forzado de Reloj" de la configuración de BIOS para establecer la selección de [Auto] a [Manual]. Por lo tanto, FSB de CPU no está la tecnología de aumento de velocidad liberada. Español 134 ASRock Motherboard - ASRock P43Twins1600 | Quick Installation Guide - Page 135
la BIOS, por favor refiérase al Manual del Usuario (archivo PDF) contenido en el CD. 4.Información de Software Support CD Esta placa-base soporta diversos tipos de sistema operativo Windows®: 2000 / XP / XP 64 en el archivo "ASSETUP.EXE" para iniciar la instalación. Español ASRock Motherboard 135 - ASRock P43Twins1600 | Quick Installation Guide - Page 136
162 ASRock Motherboard - ASRock P43Twins1600 | Quick Installation Guide - Page 137
® ® ® ® ® ® ASRock Motherboard 163 - ASRock P43Twins1600 | Quick Installation Guide - Page 138
164 ASRock Motherboard - ASRock P43Twins1600 | Quick Installation Guide - Page 139
® ASRock Motherboard 165 - ASRock P43Twins1600 | Quick Installation Guide - Page 140
" " ® ® ® ® " " " " " " 166 ASRock Motherboard - ASRock P43Twins1600 | Quick Installation Guide - Page 141
® ® ® " " ® ® ® ® ASRock Motherboard 167 - ASRock P43Twins1600 | Quick Installation Guide - Page 142
168 ASRock Motherboard - ASRock P43Twins1600 | Quick Installation Guide - Page 143
Pin1 Pin1 ASRock Motherboard 169 - ASRock P43Twins1600 | Quick Installation Guide - Page 144
170 ASRock Motherboard - ASRock P43Twins1600 | Quick Installation Guide - Page 145
( ) ( ) ( ) ( ) ASRock Motherboard 171 - ASRock P43Twins1600 | Quick Installation Guide - Page 146
172 ASRock Motherboard - ASRock P43Twins1600 | Quick Installation Guide - Page 147
ASRock Motherboard 173 - ASRock P43Twins1600 | Quick Installation Guide - Page 148
"" "" "" "" 174 ASRock Motherboard - ASRock P43Twins1600 | Quick Installation Guide - Page 149
ASRock Motherboard 175 - ASRock P43Twins1600 | Quick Installation Guide - Page 150
176 ASRock Motherboard SATAII_5 SATAII_3 SATAII_1 (Port4) (Port2) (Port0) SATAII_6 SATAII_4 SATAII_2 (Port5) (Port3) (Port1) - ASRock P43Twins1600 | Quick Installation Guide - Page 151
eSATAII_TOP ASRock Motherboard 177 - ASRock P43Twins1600 | Quick Installation Guide - Page 152
CD1 178 ® ® ASRock Motherboard - ASRock P43Twins1600 | Quick Installation Guide - Page 153
® ® " " " " " " ® " " " "" " 4 3 2 1 13 1 24 12 ASRock Motherboard 179 - ASRock P43Twins1600 | Quick Installation Guide - Page 154
5 1 8 4 13 1 24 12 5 1 8 4 180 ASRock Motherboard - ASRock P43Twins1600 | Quick Installation Guide - Page 155
13 1 24 12 5 1 8 4 C B A " " ASRock Motherboard 181 - ASRock P43Twins1600 | Quick Installation Guide - Page 156
® 182 ® ® ® ® ® ® ASRock Motherboard - ASRock P43Twins1600 | Quick Installation Guide - Page 157
® ® ® ® ® ® ASRock Motherboard 183 - ASRock P43Twins1600 | Quick Installation Guide - Page 158
® ® ® ® ® ® ® \ ® \ ® ® ® 184 ASRock Motherboard - ASRock P43Twins1600 | Quick Installation Guide - Page 159
" " " " " " \\ ASRock Motherboard 185 - ASRock P43Twins1600 | Quick Installation Guide - Page 160
186 ASRock Motherboard - ASRock P43Twins1600 | Quick Installation Guide - Page 161
® ® ® ® ® ® ASRock Motherboard 187 - ASRock P43Twins1600 | Quick Installation Guide - Page 162
188 ASRock Motherboard - ASRock P43Twins1600 | Quick Installation Guide - Page 163
® ® ® ASRock Motherboard 189 - ASRock P43Twins1600 | Quick Installation Guide - Page 164
" " ® ® ® ® 190 ® ® TM TM ASRock Motherboard - ASRock P43Twins1600 | Quick Installation Guide - Page 165
® ® ® ® TM ® TM ® ASRock Motherboard ® 191 - ASRock P43Twins1600 | Quick Installation Guide - Page 166
192 ASRock Motherboard - ASRock P43Twins1600 | Quick Installation Guide - Page 167
ASRock Motherboard 193 - ASRock P43Twins1600 | Quick Installation Guide - Page 168
194 ASRock Motherboard - ASRock P43Twins1600 | Quick Installation Guide - Page 169
ASRock Motherboard 195 - ASRock P43Twins1600 | Quick Installation Guide - Page 170
196 ASRock Motherboard - ASRock P43Twins1600 | Quick Installation Guide - Page 171
ASRock Motherboard 197 - ASRock P43Twins1600 | Quick Installation Guide - Page 172
198 ASRock Motherboard - ASRock P43Twins1600 | Quick Installation Guide - Page 173
ASRock Motherboard 199 - ASRock P43Twins1600 | Quick Installation Guide - Page 174
200 eSATAII_TOP ASRock Motherboard SATAII_5 SATAII_3 SATAII_1 (Port4) (Port2) (Port0) SATAII_6 SATAII_4 SATAII_2 (Port5) (Port3) (Port1) - ASRock P43Twins1600 | Quick Installation Guide - Page 175
CD1 ASRock Motherboard 201 - ASRock P43Twins1600 | Quick Installation Guide - Page 176
202 ASRock Motherboard - ASRock P43Twins1600 | Quick Installation Guide - Page 177
4 3 2 1 13 1 24 12 5 1 8 4 ASRock Motherboard 13 1 24 12 203 - ASRock P43Twins1600 | Quick Installation Guide - Page 178
5 1 8 4 204 C B A ASRock Motherboard - ASRock P43Twins1600 | Quick Installation Guide - Page 179
5 1 8 4 ® ASRock Motherboard 205 - ASRock P43Twins1600 | Quick Installation Guide - Page 180
® ® ® ® ® ® 206 ASRock Motherboard - ASRock P43Twins1600 | Quick Installation Guide - Page 181
® ® ® ® ® ® ® ® ® ® ® ® ASRock Motherboard 207 - ASRock P43Twins1600 | Quick Installation Guide - Page 182
® ® \ ® \ ® ® ® 208 ASRock Motherboard - ASRock P43Twins1600 | Quick Installation Guide - Page 183
® ® TM TM ASRock Motherboard 209 - ASRock P43Twins1600 | Quick Installation Guide - Page 184
210 ASRock Motherboard - ASRock P43Twins1600 | Quick Installation Guide - Page 185
® ® ® ® ® ® ASRock Motherboard 211 - ASRock P43Twins1600 | Quick Installation Guide - Page 186
212 ASRock Motherboard - ASRock P43Twins1600 | Quick Installation Guide - Page 187
® ® ASRock Motherboard 213 - ASRock P43Twins1600 | Quick Installation Guide - Page 188
® ® ® ® 214 ® ® ASRock Motherboard - ASRock P43Twins1600 | Quick Installation Guide - Page 189
® ® ® ® ® ® ASRock Motherboard 215 - ASRock P43Twins1600 | Quick Installation Guide - Page 190
216 ASRock Motherboard - ASRock P43Twins1600 | Quick Installation Guide - Page 191
ASRock Motherboard 217 - ASRock P43Twins1600 | Quick Installation Guide - Page 192
218 ASRock Motherboard - ASRock P43Twins1600 | Quick Installation Guide - Page 193
DDRII_A1 ( ) SS DS X X SS DS DDRII_A2 ( ) X X SS DS SS DS DDRII_B1 ( ) SS DS X X SS DS DDRII_B2 ( ) X X SS DS SS DS DDR3_A1 ( ) SS DS DDR3_B1 ( ) SS DS ASRock Motherboard 219 - ASRock P43Twins1600 | Quick Installation Guide - Page 194
220 ASRock Motherboard - ASRock P43Twins1600 | Quick Installation Guide - Page 195
ASRock Motherboard 221 - ASRock P43Twins1600 | Quick Installation Guide - Page 196
222 ASRock Motherboard - ASRock P43Twins1600 | Quick Installation Guide - Page 197
ASRock Motherboard 223 - ASRock P43Twins1600 | Quick Installation Guide - Page 198
224 eSATAII_TOP ASRock Motherboard SATAII_5 SATAII_3 SATAII_1 (Port4) (Port2) (Port0) SATAII_6 SATAII_4 SATAII_2 (Port5) (Port3) (Port1) - ASRock P43Twins1600 | Quick Installation Guide - Page 199
CD1 ASRock Motherboard 225 - ASRock P43Twins1600 | Quick Installation Guide - Page 200
® ® ® ® 226 4 3 2 1 ASRock Motherboard - ASRock P43Twins1600 | Quick Installation Guide - Page 201
13 1 24 12 5 1 8 4 13 1 24 12 5 1 8 4 ASRock Motherboard 227 - ASRock P43Twins1600 | Quick Installation Guide - Page 202
C B A ® 228 ASRock Motherboard - ASRock P43Twins1600 | Quick Installation Guide - Page 203
® ® ® ® ® ® ® ® ® ® ® ® ASRock Motherboard 229 - ASRock P43Twins1600 | Quick Installation Guide - Page 204
® ® ® ® ® ® ® ® ® ® ® ® 230 ® ® ® ® ® ASRock Motherboard - ASRock P43Twins1600 | Quick Installation Guide - Page 205
® ® ® ® ® ASRock Motherboard 231 - ASRock P43Twins1600 | Quick Installation Guide - Page 206
® ® 232 ASRock Motherboard - ASRock P43Twins1600 | Quick Installation Guide - Page 207
X O O O X O O O O: X: O O O O ASRock Motherboard 233
-
 1
1 -
 2
2 -
 3
3 -
 4
4 -
 5
5 -
 6
6 -
 7
7 -
8
-
9
-
10
-
11
-
12
-
13
-
14
-
15
-
16
-
17
-
18
-
19
-
20
-
21
-
22
-
23
-
24
-
25
-
26
-
27
-
28
-
29
-
30
-
31
-
32
-
33
-
34
-
35
-
36
-
37
-
38
-
39
-
40
-
41
-
42
-
43
-
44
-
45
-
46
-
47
-
48
-
49
-
50
-
51
-
52
-
53
-
54
-
55
-
56
-
57
-
58
-
59
-
60
-
61
-
62
-
63
-
64
-
65
-
66
-
67
-
68
-
69
-
70
-
71
-
72
-
73
-
74
-
75
-
76
-
77
-
78
-
79
-
80
-
81
-
82
-
83
-
84
-
85
-
86
-
87
-
88
-
89
-
90
-
91
-
92
-
93
-
94
-
95
-
96
-
97
-
98
-
99
-
100
-
101
-
102
-
103
-
104
-
105
-
106
-
107
-
108
-
109
-
110
-
111
-
112
-
113
-
114
-
115
-
116
-
117
-
118
-
119
-
120
-
121
-
122
-
123
-
124
-
125
-
126
-
127
-
128
-
129
-
130
-
131
-
132
-
133
-
134
-
135
-
136
-
137
-
138
-
139
-
140
-
141
-
142
-
143
-
144
-
145
-
146
-
147
-
148
-
149
-
150
-
151
-
152
-
153
-
154
-
155
-
156
-
157
-
158
-
159
-
160
-
161
-
162
-
163
-
164
-
165
-
166
-
167
-
168
-
169
-
170
-
171
-
172
-
173
-
174
-
175
-
176
-
177
-
178
-
179
-
180
-
181
-
182
-
183
-
184
-
185
-
186
-
187
-
188
-
189
-
190
-
191
-
192
-
193
-
194
-
195
-
196
-
197
-
198
-
199
-
200
-
201
-
202
-
203
-
204
-
205
-
206
-
207
 |
 |
1
ASRock
Motherboard
English
English
English
English
English
Copyright Notice:
Copyright Notice:
Copyright Notice:
Copyright Notice:
Copyright Notice:
No part of this installation guide may be reproduced, transcribed, transmitted, or trans-
lated in any language, in any form or by any means, except duplication of documen-
tation by the purchaser for backup purpose, without written consent of ASRock Inc.
Products and corporate names appearing in this guide may or may not be registered
trademarks or copyrights of their respective companies, and are used only for identifica-
tion or explanation and to the owners’ benefit, without intent to infringe.
Disclaimer:
Disclaimer:
Disclaimer:
Disclaimer:
Disclaimer:
Specifications and information contained in this guide are furnished for informational
use only and subject to change without notice, and should not be constructed as a
commitment by ASRock. ASRock assumes no responsibility for any errors or omissions
that may appear in this guide.
With respect to the contents of this guide, ASRock does not provide warranty of any kind,
either expressed or implied, including but not limited to the implied warranties or
conditions of merchantability or fitness for a particular purpose. In no event shall
ASRock, its directors, officers, employees, or agents be liable for any indirect, special,
incidental, or consequential damages (including damages for loss of profits, loss of
business, loss of data, interruption of business and the like), even if ASRock has been
advised of the possibility of such damages arising from any defect or error in the guide
or product.
This device complies with Part 15 of the FCC Rules. Operation is subject to the
following two conditions:
(1)
this device may not cause harmful interference, and
(2)
this device must accept any interference received, including interference that
may cause undesired operation.
CALIFORNIA, USA ONLY
The Lithium battery adopted on this motherboard contains Perchlorate, a toxic
substance controlled in Perchlorate Best Management Practices (BMP) regulations
passed by the California Legislature. When you discard the Lithium battery in
California, USA, please follow the related regulations in advance.
“Perchlorate Material-special handling may apply, see
www
.dtsc.ca.gov/hazardouswa
ste/perchlorate”
ASRock Website: http://www.asrock.com
Published May 2008
Copyright
©
2008 ASRock INC. All rights reserved.