ASRock P4VM900-SATA2 Quick Installation Guide
ASRock P4VM900-SATA2 Manual
 |
View all ASRock P4VM900-SATA2 manuals
Add to My Manuals
Save this manual to your list of manuals |
ASRock P4VM900-SATA2 manual content summary:
- ASRock P4VM900-SATA2 | Quick Installation Guide - Page 1
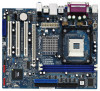
benefit, without intent to infringe. Disclaimer: Specifications and information contained in this guide are furnished for informational use only and subject ASRock Website: http://www.asrock.com Published August 2007 Copyright©2007 ASRock INC. All rights reserved. 1 ASRock P4VM900-SATA2 Motherboard - ASRock P4VM900-SATA2 | Quick Installation Guide - Page 2
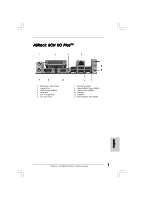
HDMR Slot (HDMR1) 21 Front Panel Audio Header (HD_AUDIO1) 22 Internal Audio Connector: CD1 (Black) 23 3 x PCI Slots (PCI1- 3) 24 PCI Express x16 Slot (PCIE1) 25 ATX Power Connector (ATXPWR1) 26 Shared USB 2.0 Header (USB4_5, Blue) 27 CPU Fan Connector (CPU_FAN1) 2 ASRock P4VM900-SATA2 Motherboard - ASRock P4VM900-SATA2 | Quick Installation Guide - Page 3
) 2 Parallel Port 3 USB 2.0 Ports (USB23) 4 RJ-45 Port 5 Line In (Light Blue) 6 Line Out (Lime) 7 Microphone (Pink) 8 Shared USB 2.0 Ports (USB45) 9 USB 2.0 Ports (USB01) 10 VGA Port 11 COM Port 12 PS/2 Keyboard Port (Purple) English 3 ASRock P4VM900-SATA2 Motherboard - ASRock P4VM900-SATA2 | Quick Installation Guide - Page 4
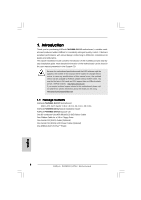
our website for specific information about the model you are using. www.asrock.com/support/index.asp 1.1 Package Contents ASRock P4VM900-SATA2 Motherboard (Micro ATX Form Factor: 9.6-in x 8.0-in, 24.4 cm x 20.3 cm) ASRock P4VM900-SATA2 Quick Installation Guide ASRock P4VM900-SATA2 Support CD One 80 - ASRock P4VM900-SATA2 | Quick Installation Guide - Page 5
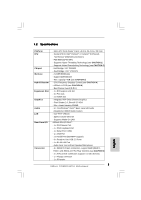
x16 slot - 3 x PCI slots - 1 x HDMR slot - Integrated VIA® Delta Chrome Graphics - Pixel Shader 2.0, DirectX 9.0 VGA - Max. shared memory 256MB - 5.1 CH Windows® VistaTM Basic Level HD Audio (Realtek ALC660VD Audio Codec) - VIA® PHY VT6103 - Speed: 10/100 Ethernet - Supports Wake-On-LAN ASRock 6CH - ASRock P4VM900-SATA2 | Quick Installation Guide - Page 6
overclocking tools. Overclocking may affect your system stability, or even cause damage to the components and devices of your system. It should be done at your own risk and expense. We are not responsible for possible damage caused by overclocking. English 6 ASRock P4VM900-SATA2 Motherboard - ASRock P4VM900-SATA2 | Quick Installation Guide - Page 7
® Windows® VistaTM driver keeps on updating now. As long as we have the latest driver, we will update it to our website in the future. Please visit our website for Microsoft® Windows® VistaTM driver and related information. ASRock website http://www.asrock.com 7 ASRock P4VM900-SATA2 Motherboard - ASRock P4VM900-SATA2 | Quick Installation Guide - Page 8
logo, please adjust the shared memory size of onboard VGA to 64MB. If you use onboard VGA with total system memory size above 512MB and plan to submit Windows® VistaTM Basic logo, please adjust the shared memory size of onboard VGA to 128MB or above. English 8 ASRock P4VM900-SATA2 Motherboard - ASRock P4VM900-SATA2 | Quick Installation Guide - Page 9
motherboard components or change any motherboard settings. 1. Unplug the power cord from the wall socket before touching any component. 2. To avoid damaging the motherboard do so may cause severe damage to the motherboard, peripherals, and/or components. 9 ASRock P4VM900-SATA2 Motherboard English - ASRock P4VM900-SATA2 | Quick Installation Guide - Page 10
the heatsink are securely fastened and in good contact with each other. Then connect the CPU fan to the CPU_FAN connector (CPU_FAN1, see p.2 No. 27). For proper installation, please kindly refer to the instruction manuals of the CPU fan and the heatsink. English 10 ASRock P4VM900-SATA2 Motherboard - ASRock P4VM900-SATA2 | Quick Installation Guide - Page 11
2.3 Installation of Memory Modules (DIMM) P4VM900-SATA2 motherboard provides two 184-pin DDR (Double Data Rate) DIMM slots. Please make sure to disconnect power supply before adding or removing DIMMs or the system - ASRock P4VM900-SATA2 | Quick Installation Guide - Page 12
x16 slot) is used for PCI Express cards with x16 lane width graphics cards. If you install the add-on PCI Express VGA card to PCIE1 (PCIE x16 slot), the onboard VGA will be disabled. Installing an chassis with screws. Step 6. Replace the system cover. 12 ASRock P4VM900-SATA2 Motherboard English - ASRock P4VM900-SATA2 | Quick Installation Guide - Page 13
unplug the power cord from the power supply. After waiting for 15 seconds, use a jumper cap to short 2 pins on CLRCMOS1 for 5 seconds. English 13 ASRock P4VM900-SATA2 Motherboard - ASRock P4VM900-SATA2 | Quick Installation Guide - Page 14
motherboard, please set the IDE device as "Master". Please refer to the instruction support SATAII or SATA SATA) Data Cable (Optional) Either end of the SATA data cable can be connected to the SATA / SATAII hard disk or the SATAII connector on the motherboard. 14 ASRock P4VM900-SATA2 Motherboard - ASRock P4VM900-SATA2 | Quick Installation Guide - Page 15
connection and control of audio devices. English 1. High Definition Audio supports Jack Sensing, but the panel wire on the chassis must support HDA to function correctly. Please follow the instruction in our manual and chassis manual to install your system. 15 ASRock P4VM900-SATA2 Motherboard - ASRock P4VM900-SATA2 | Quick Installation Guide - Page 16
speaker to this header. Please connect the chassis fan cable to this connector and match the black wire to the ground pin. Please connect the CPU fan cable to this connector and match the black wire to the ground pin. 16 ASRock P4VM900-SATA2 Motherboard - ASRock P4VM900-SATA2 | Quick Installation Guide - Page 17
connector so that it can provides sufficient power. Failing to do so will cause the failure to power up. Please install the heatsink and the CPU fan before installing ATX 12V connector; otherwise, it may cause permanent damage! English 17 ASRock P4VM900-SATA2 Motherboard - ASRock P4VM900-SATA2 | Quick Installation Guide - Page 18
.hitachigst.com/hdd/support/download.htm The above examples are just for your reference. For different SATAII hard disk products of different vendors, the jumper pin setting methods may not be the same. Please visit the vendors' website for the updates. 18 ASRock P4VM900-SATA2 Motherboard English - ASRock P4VM900-SATA2 | Quick Installation Guide - Page 19
's SATAII connector. STEP 4: Connect the other end of the SATA data cable to the SATA / SATAII hard disk. 2.9 Hot Plug and Hot Swap Functions for SATA / SATAII HDDs P4VM900-SATA2 motherboard supports Hot Plug and Hot Swap functions for SATA / SATAII Devices. NOTE What is Hot Plug Function? If - ASRock P4VM900-SATA2 | Quick Installation Guide - Page 20
. Please select CD- ROM as the boot device. C. When you see the message on the screen, "Generate Serial ATA driver diskette [YN]?", press . D. Then you will see these messages, Please insert a blank formatted diskette into floppy drive A: 20 ASRock P4VM900-SATA2 Motherboard English - ASRock P4VM900-SATA2 | Quick Installation Guide - Page 21
your system, and follow the instruction to install Windows® VistaTM OS on your system. When you see "Where do you want to install Windows?" page, please insert the ASRock Support CD into your optical drive, and click the "Load Driver" button on the left on the 21 ASRock P4VM900-SATA2 Motherboard - ASRock P4VM900-SATA2 | Quick Installation Guide - Page 22
to install Windows® 2000 / XP / VistaTM on your system. 2.14 Untied Overclocking Technology This motherboard supports Untied Overclocking Technology, which means during overclocking, FSB enjoys better margin due to fixed PCI / PCIE bus. You may set "CPU Host Frequency" option of BIOS setup to - ASRock P4VM900-SATA2 | Quick Installation Guide - Page 23
about BIOS Setup, please refer to the User Manual (PDF file) contained in the Support CD. 4. Software Support CD information This motherboard supports various Microsoft® Windows® operating systems: 2000 / XP / VistaTM. The Support CD that came with the motherboard contains necessary drivers and - ASRock P4VM900-SATA2 | Quick Installation Guide - Page 24
24 ASRock P4VM900-SATA2 Motherboard - ASRock P4VM900-SATA2 | Quick Installation Guide - Page 25
® ® ® ® ® ® ® ® 25 ASRock P4VM900-SATA2 Motherboard - ASRock P4VM900-SATA2 | Quick Installation Guide - Page 26
® ® 26 ASRock P4VM900-SATA2 Motherboard - ASRock P4VM900-SATA2 | Quick Installation Guide - Page 27
® ® ® ® ® ® ® 27 ASRock P4VM900-SATA2 Motherboard - ASRock P4VM900-SATA2 | Quick Installation Guide - Page 28
® ® ® ® ® 28 ASRock P4VM900-SATA2 Motherboard - ASRock P4VM900-SATA2 | Quick Installation Guide - Page 29
29 ASRock P4VM900-SATA2 Motherboard - ASRock P4VM900-SATA2 | Quick Installation Guide - Page 30
90° 90° ® ® ® 30 ASRock P4VM900-SATA2 Motherboard - ASRock P4VM900-SATA2 | Quick Installation Guide - Page 31
31 ASRock P4VM900-SATA2 Motherboard - ASRock P4VM900-SATA2 | Quick Installation Guide - Page 32
32 ASRock P4VM900-SATA2 Motherboard - ASRock P4VM900-SATA2 | Quick Installation Guide - Page 33
33 ASRock P4VM900-SATA2 Motherboard - ASRock P4VM900-SATA2 | Quick Installation Guide - Page 34
" " SATAII_2 SATAII_1 34 ASRock P4VM900-SATA2 Motherboard - ASRock P4VM900-SATA2 | Quick Installation Guide - Page 35
CD1 35 ASRock P4VM900-SATA2 Motherboard - ASRock P4VM900-SATA2 | Quick Installation Guide - Page 36
® ® 36 ASRock P4VM900-SATA2 Motherboard - ASRock P4VM900-SATA2 | Quick Installation Guide - Page 37
37 ASRock P4VM900-SATA2 Motherboard - ASRock P4VM900-SATA2 | Quick Installation Guide - Page 38
® 38 ASRock P4VM900-SATA2 Motherboard - ASRock P4VM900-SATA2 | Quick Installation Guide - Page 39
® ® ® ® ® ® 39 ASRock P4VM900-SATA2 Motherboard - ASRock P4VM900-SATA2 | Quick Installation Guide - Page 40
® ® 40 ASRock P4VM900-SATA2 Motherboard - ASRock P4VM900-SATA2 | Quick Installation Guide - Page 41
X O O O X O O O O: X: O O O O 41 ASRock P4VM900-SATA2 Motherboard - ASRock P4VM900-SATA2 | Quick Installation Guide - Page 42
P4VM900-SATA2 Support-CD Ein 80-adriges Ultra-ATA 66/100/133 IDE-Flachbandkabel Ein Flachbandkabel für ein 3,5-Zoll-Diskettenlaufwerk Ein Seriell-ATA- (SATA) Datenkabel (Option) Ein Seriell-ATA (SATA) Festplattennetzkabel (Option) Ein ASRock 6CH I/O PlusTM Shield 42 ASRock P4VM900-SATA2 Motherboard - ASRock P4VM900-SATA2 | Quick Installation Guide - Page 43
-LAN ASRock 6CH I/O PlusTM - 1 x PS/2 Mouse Port - 1 x PS/2 Keyboard Port - 1 x Serieller port: COM 1 - 1 x VGA Port - 1 x Parallel Port (ECP/EPP Support) - 6 x Ready-to-Use USB 2.0 Ports - 1 x RJ-45 Port - Audioanschlüsse: Line In / Line Out / Mikrofon Deutsch 43 ASRock P4VM900-SATA2 Motherboard - ASRock P4VM900-SATA2 | Quick Installation Guide - Page 44
äte Ihres Systems beschädigen. Es geschieht dann auf eigene Gefahr und auf Ihre Kosten. Wir übernehmen keine Verantwortung für mögliche Schäden, die aufgrund von Overclocking verursacht wurden. Deutsch 44 ASRock P4VM900-SATA2 Motherboard - ASRock P4VM900-SATA2 | Quick Installation Guide - Page 45
ständig aktualisiert. Sobald wir den neuesten Treiber haben, stellen wir ihn auf unserer Website zur Verfügung. Bitte besuchen Sie unsere Website für den Microsoft® Windows® VistaTM Treiber und verwandte Informationen. ASRock-Website http://www.asrock.com 45 ASRock P4VM900-SATA2 Motherboard Deutsch - ASRock P4VM900-SATA2 | Quick Installation Guide - Page 46
VGA-Chip mit einer Gesamtsystemspeichergröße von 512MB verwenden und das Windows® VistaTM Basic Logo vorlegen möchten, dann stellen Sie bitte die Größe des dem integrierten VGA-Chip freizugebenden Arbeitsspeichers auf 128MB oder noch mehr ein. Deutsch 46 ASRock P4VM900-SATA2 Motherboard - ASRock P4VM900-SATA2 | Quick Installation Guide - Page 47
2. Installation P4VM900-SATA2 ist ein Mikro ATX Formfaktor (9.6-in x 8.0-in, 24.4 cm x 20.3 cm) Hauptplatine. Bevor Sie die Hauptplatine ist. Fehler dabei kann zum schwerwiegenden Schaden an Hauptplatine, Peripherien und/oder Bauteile führen. Deutsch 47 ASRock P4VM900-SATA2 Motherboard - ASRock P4VM900-SATA2 | Quick Installation Guide - Page 48
und in gutem Kontakt miteinanderen sind. Danach verbinden Sie die CPU Ventilator mit der CPU_Ventilator Anschlußstück (CPU_FAN1, siehe S.2 No. 27). Für die korrekte Installation bitte lesen Sie die Gebrauchanweisung der CPU Ventilator und der Kühlwinkel. Deutsch 48 ASRock P4VM900-SATA2 Motherboard - ASRock P4VM900-SATA2 | Quick Installation Guide - Page 49
2.3 Installation der Speichermodule (DIMM) Das P4VM900-SATA2-Motherboard hat zwei 184-pol. DDR- (Double Data Rate) DIMMSteckplätze. Achten Sie darauf, das Netzteil abzustecken Enden des Moduls einschnappen und das DIMM-Modul fest an Ort und Stelle sitzt. 49 ASRock P4VM900-SATA2 Motherboard Deutsch - ASRock P4VM900-SATA2 | Quick Installation Guide - Page 50
2.4 Erweiterungssteckplätze: (PCI-, HDMR-, und PCI ExpressSlots): Es stehen 3 PCI-, 1 HDMR-, und 1 PCI Express-Slot auf dem P4VM900-SATA2 Motherboard zur Verfügung. PCI-Slots: PCI-Slots werden zur Installation von Erweiterungskarten mit dem 32bit PCI-Interface genutzt. HDMR-Slot: Der HDMR-Steckplatz - ASRock P4VM900-SATA2 | Quick Installation Guide - Page 51
Default-Werte wiederherzustellen, schalten Sie den Computer aus, ziehen Sie den Netzstecker und überbrücken Sie 2-pin von CLRCMOS1 mithilfe des Jumpers für 5 Sekunden. Deutsch 51 ASRock P4VM900-SATA2 Motherboard - ASRock P4VM900-SATA2 | Quick Installation Guide - Page 52
: siehe S.2, Nr. 13) (SATAII_2: siehe S.2, Nr. 14) SATAII_2 SATAII_1 Diese beiden Serial ATA (SATA II) -Anschlüsse unterstützen interne SATAoder SATA II-Festplatten. Die aktuelle SATAII-Schnittstelle ermöglicht eine Datenübertragungsrate bis 3,0 Gb/s. Deutsch 52 ASRock P4VM900-SATA2 Motherboard - ASRock P4VM900-SATA2 | Quick Installation Guide - Page 53
ATA- (SATA-) Stromversorgungskabel (Option) Verbindung zum SATA-HDD-Stromanschluss Verbindung zum Netzteil Verbinden Sie das schwarze Ende des SATA-Netzkabels mit S.2 - Nr. 6) Dieser Anschluss unterstützt einen optionalen InfrarotSender/Empfänger. Deutsch 53 ASRock P4VM900-SATA2 Motherboard - ASRock P4VM900-SATA2 | Quick Installation Guide - Page 54
" und speichern Sie die Änderung durch Klicken auf "OK". Für Windows® VistaTM Betriebssystem: Die Rechtoberseite „Dateiordner" Ikone anklicken , „Schalttafel Buchse Entdeckung sperren" wählen und die Änderung speichern, indem Sie „OKAY" klicken. Deutsch 54 ASRock P4VM900-SATA2 Motherboard - ASRock P4VM900-SATA2 | Quick Installation Guide - Page 55
Sie den schwarzen Draht dem Erdungsstift an. Verbinden Sie das CPU Lüfterkabel mit diesem Anschluss und passen Sie den schwarzen Draht dem den CPU-Lüfter, bevor Sie den ATX 12-V-Anschluss installieren. Andernfalls könnten dauerhafte Schäden auftreten! Deutsch 55 ASRock P4VM900-SATA2 Motherboard - ASRock P4VM900-SATA2 | Quick Installation Guide - Page 56
oben dienen lediglich Ihrer Referenz. Die Steckbrückeneinstellungen können bei unterschiedlichen SATA II Festplatten verschiedener Hersteller abweichen. Aktualisierungen und ergänzende Informationen finden Sie auf der Internetseite des Herstellers. 56 ASRock P4VM900-SATA2 Motherboard Deutsch - ASRock P4VM900-SATA2 | Quick Installation Guide - Page 57
Ende des SATA-Datenkabels an die SATA / SATAII-Festplatte an. 2 . 9 Hot-Plug- und Hot-Swap-Funktion für SATA / SATAIIFestplatten Das Motherboard P4VM900-SATA2 unterstützt Hot-Plug-Funktion für SATA / die von Ihnen installierten Treiber richtig arbeiten. 57 ASRock P4VM900-SATA2 Motherboard Deutsch - ASRock P4VM900-SATA2 | Quick Installation Guide - Page 58
" auf. B. Setzen Sie die Option "SATA Operation Mode" (SATA-Betriebsmodus) auf [non-RAID]. SCHRITT 2: Installieren Sie Windows® 2000 / XP / VistaTM in Ihrem System. Sie das Betriebssystem Windows® 2000 / XP / VistaTM auf Ihrem System installieren. Deutsch 58 ASRock P4VM900-SATA2 Motherboard - ASRock P4VM900-SATA2 | Quick Installation Guide - Page 59
der PCI / PCIE-Bus in einem fixierten Modus, so dass der FSB in einer stabileren Übertaktungsumgebung arbeiten kann. Beziehen Sie sich auf die Warnung vor möglichen Overclocking-Risiken auf Seite 44, bevor Sie die Untied Overclocking-Technologie anwenden. 59 ASRock P4VM900-SATA2 Motherboard Deutsch - ASRock P4VM900-SATA2 | Quick Installation Guide - Page 60
der Support-CD, um die Menüs aufzurufen. Das Setup-Programm soll es Ihnen so leicht wie möglich machen. Es ist menügesteuert, d.h. Sie können in den verschiedenen Untermenüs Ihre Auswahl treffen und die Programme werden dann automatisch installiert. 60 ASRock P4VM900-SATA2 Motherboard Deutsch - ASRock P4VM900-SATA2 | Quick Installation Guide - Page 61
modèle que vous utilisez. www.asrock.com/support/index.asp 1.1 Contenu du paquet Carte mère ASRock P4VM900-SATA2 (Facteur de forme Micro ATX : 9.6 pouces x 8.0 pouces, 24.4 cm x 20.3 cm) Guide d'installation rapide ASRock P4VM900-SATA2 CD de soutien ASRock P4VM900-SATA2 Un câble ruban IDE Ultra ATA - ASRock P4VM900-SATA2 | Quick Installation Guide - Page 62
-LAN ASRock 6CH I/O PlusTM - 1 x port souris PS/2 - 1 x port clavier PS/2 - 1 x port série: COM 1 - 1 x port VGA - 1 x port parallèle: Support ECP/EPP - 6 x ports USB 2.0 par défaut - 1 x port RJ-45 - Jack audio: entrée ligne / sortie ligne / microphone Français 62 ASRock P4VM900-SATA2 Motherboard - ASRock P4VM900-SATA2 | Quick Installation Guide - Page 63
carte mère - Tachéomètre ventilateur CPU - Tachéomètre ventilateur châssis - Monitoring de la tension: +12V, +5V, +3.3V, Vcore - Microsoft® Windows® 2000 / XP / VistaTM (voir ATTENTION 8) - FCC des dommages possibles causés par l'overclocking. Français 63 ASRock P4VM900-SATA2 Motherboard - ASRock P4VM900-SATA2 | Quick Installation Guide - Page 64
mis à jour. Dès que nous aurons un nouveau pilote, nous mettrons à jour notre site Web à l'avenir. Veuillez visite notre site Web pour obtenir le pilote Microsoft® Windows® VistaTM et les informations liées. Site Web ASRock http://www.asrock.com 64 ASRock P4VM900-SATA2 Motherboard Français - ASRock P4VM900-SATA2 | Quick Installation Guide - Page 65
vous utilisez un VGA intégré à la carte mère avec une mémoire système totale supérieure à 512MB et que vous envisagez de vous soumettre au logo Windows® VistaTM Basic, veuillez régler la taille de la mémoire partagée du VGA intégrée sur 128MB ou plus. Français 65 ASRock P4VM900-SATA2 Motherboard - ASRock P4VM900-SATA2 | Quick Installation Guide - Page 66
2. Installation P4VM900-SATA2 est une carte mère micro de facteur de forme d'ATX (9.6-po x 8.0po, 24.4 cm x 20.3 cm ). Avant que vous d'énergie. Le manque de faire ainsi peut endommager sérieusement la carte mère, les périphériques, et/ou les composants. 66 ASRock P4VM900-SATA2 Motherboard Français - ASRock P4VM900-SATA2 | Quick Installation Guide - Page 67
adopte douille de CPU de 478-goupille pour soutenir le CPU de Intel® CPU au connecteur de CPU_FAN (CPU_FAN1, voient p.2 No. 27). Pour l'installation appropriée, veuillez référer-vous aux manuels d'instruction du ventilateur de CPU et du radiateur. Français 67 ASRock P4VM900-SATA2 Motherboard - ASRock P4VM900-SATA2 | Quick Installation Guide - Page 68
2.3 Installation des modules mémoire (DIMM) La carte mère P4VM900-SATA2 propose deux emplacements DIMM DDR (Double Débit de données) à 184 broches. Ayez bien le soin de aux deux extrémités se ferment complètement et que le module DIMM soit inséré correctement. 68 ASRock P4VM900-SATA2 Motherboard - ASRock P4VM900-SATA2 | Quick Installation Guide - Page 69
cartes graphiques de largeur x16 voies. Si vous installez la carte VGA PCI Express sur le connecteur PCIE1 (connecteur PCIE x16), le connecteur VGA intégré à la carte mère sera désactivé. Installation 4. Fixez la carte sur le châssis à l'aide d'une vis. 69 ASRock P4VM900-SATA2 Motherboard Français - ASRock P4VM900-SATA2 | Quick Installation Guide - Page 70
hors tension et débrancher le cordon d'alimentation, puis utilisez un capuchon de cavalier pour court-circuiter la 2 broches sur CLRCMOS1 pendant 5 secondes. Français 70 ASRock P4VM900-SATA2 Motherboard - ASRock P4VM900-SATA2 | Quick Installation Guide - Page 71
comme "Maître". Veuillez vous reporter aux instructions du fabricant de votre IDE périphérique SATA ou SATAII pour les dispositifs de stockage interne. L'interface SATAII actuelle permet des taux transferts de données pouvant aller jusqu'à 3,0 Go/s. Français 71 ASRock P4VM900-SATA2 Motherboard - ASRock P4VM900-SATA2 | Quick Installation Guide - Page 72
é noire du cordon d'alimentation SATA sur le connecteur d'alimentation de l'unité. Connectez ensuite l'extrémité blanche du cordon d'alimentation SATA sur le connecteur d'alimentation de gère un module en option d'émission/réception sans fil infrarouge. Français 72 ASRock P4VM900-SATA2 Motherboard - ASRock P4VM900-SATA2 | Quick Installation Guide - Page 73
Gestionnaire audio Realtek HD. Pour Windows® 2000 / XP OS: Cliquer sur « E/S audio», sé Windows® VistaTM OS: Cliquer droit "Fichier" icone , selectionner" la detection incapable de jack de panel d'avant " et sauvegarder le changement par cliquer"ok". Français 73 ASRock P4VM900-SATA2 Motherboard - ASRock P4VM900-SATA2 | Quick Installation Guide - Page 74
le dissipateur thermique et le ventilateur à processeur avant d'installer le connecteur ATX 12V; vous risquez sinon de causer des dommages irréversibles! Français 74 ASRock P4VM900-SATA2 Motherboard - ASRock P4VM900-SATA2 | Quick Installation Guide - Page 75
le présent guide d'installation du disque , veuillez suivre les instructions ci-dessous avec les en mode SATAII. Western Digital Pour activer SATA 1.5 Go/s, raccourcir les broches 5 et . http://www.hitachigst.com/hdd/support/download.htm Les exemples donnés pr ASRock P4VM900-SATA2 Motherboard Français - ASRock P4VM900-SATA2 | Quick Installation Guide - Page 76
ées SATA au disque dur SATA / SATAII. 2.9 Fonction "Hot Plug" et "Hot Swap" pour les Disques Durs SATA / SATAII La Carte Mère P4VM900-SATA2 supporte la fonction "Hot Plug" pour les périphériques SATA / vous installez peuvent fonctionner correctement. 76 ASRock P4VM900-SATA2 Motherboard Français - ASRock P4VM900-SATA2 | Quick Installation Guide - Page 77
option "SATA Operation Mode"« Mode de fonctionnement SATA » sur [non-RAID]. ETAPE 2: Installer le système d'exploitation Windows® 2000 / XP / VistaTM sur votre système. Vous pouvez démarrer l'installation du SE Windows® 2000 / XP / VistaTM sur votre système. 77 ASRock P4VM900-SATA2 Motherboard Fran - ASRock P4VM900-SATA2 | Quick Installation Guide - Page 78
BIOS, veuillez consulter le Guide de l'utilisateur (fichier PDF) dans le CD technique. 4. Informations sur le CD de support Cette carte mère supporte divers systèmes d'exploitation Microsoft® Windows®: 2000 / XP -cliquez dessus pour afficher les menus. 78 ASRock P4VM900-SATA2 Motherboard Français - ASRock P4VM900-SATA2 | Quick Installation Guide - Page 79
ASRock P4VM900-SATA2 CD di supporto ASRock P4VM900-SATA2 Un cavo IDE 80-pin Ultra ATA 66/100/133 Un cavo per floppy drive a 1,44 Mb Un cavo dati Serial ATA (SATA) (Opzionale) Un cavo alimentatore HDD Serial ATA (SATA) (Opzionale) Un ASRock 6CH I/O PlusTM Shield 79 ASRock P4VM900-SATA2 Motherboard - ASRock P4VM900-SATA2 | Quick Installation Guide - Page 80
-LAN ASRock 6CH I/O PlusTM - 1 x porta PS/2 per mouse - 1 x porta PS/2 per tastiera - 1 x Porta COM - 1 x Porta VGA - 1 x Porta parallela: supporto ECP/EPP - 6 x porte USB 2.0 già integrate - 1 x Porta RJ-45 - Audio Jack: Line In / Line Out / Microfono Italiano 80 ASRock P4VM900-SATA2 Motherboard - ASRock P4VM900-SATA2 | Quick Installation Guide - Page 81
BIOS - 4Mb AMI BIOS - Suppor AMI legal BIOS - Supporta "Plug and Play" - Compatibile con ACPI 1.1 wake up events - Supporta jumperfree - Supporta SMBIOS 2.3.1 CD di - Driver Compatibi- - Microsoft® Windows® 2000 / XP / VistaTM (vedi overclocking. Italiano 81 ASRock P4VM900-SATA2 Motherboard - ASRock P4VM900-SATA2 | Quick Installation Guide - Page 82
continuo aggiornamento. Fintanto che saremo in possesso del driver più recente, terremo aggiornata la versione sul nostro sito. Visitare il nostro sito per il driver Microsoft® Windows® VistaTM e relative informazioni. Sito ASRock http://www.asrock.com 82 ASRock P4VM900-SATA2 Motherboard Italiano - ASRock P4VM900-SATA2 | Quick Installation Guide - Page 83
a 64MB. Se si usa una scheda VGA integrata con dimensioni totali di memoria superiori a 512MB, e si pianifica di sottoporre il logo Windows® VistaTM Basic, regolare le dimensioni della memoria condivisa della scheda VGA integrata su 128MB o più. Italiano 83 ASRock P4VM900-SATA2 Motherboard - ASRock P4VM900-SATA2 | Quick Installation Guide - Page 84
2. Installazione P4VM900-SATA2 e' una scheda madre fattore forma Micro ATX (9.6-in x 8.0-in, 24.4 cm x 20.3 cm). Prima di effettuare non vengono rispettate, potrebbero verificarsi seri danni alla scheda madre, alle periferiche e/o alle componenti. 84 ASRock P4VM900-SATA2 Motherboard Italiano - ASRock P4VM900-SATA2 | Quick Installation Guide - Page 85
l'uno con l'altro. Quindi collegare la ventola del CPU al connettore del CPU_FAN (CPU_FAN1, vedere pg.2 N. 27). Al fine di eseguire un'installazione corretta, prego fare riferimento al manuale d'istruzioni della ventola del CPU e del dissipatore. Italiano 85 ASRock P4VM900-SATA2 Motherboard - ASRock P4VM900-SATA2 | Quick Installation Guide - Page 86
2.3 Installazione dei moduli di memoria (DIMM) La motherboard P4VM900-SATA2 mette a disposizione due slot DIMM DDR (Double Data Rate) da 184 pin. Scollegare l'alimentazione elettrica alle due estremità e fino ad installare correttamente la DIMM nella sua sede. 86 ASRock P4VM900-SATA2 Motherboard - ASRock P4VM900-SATA2 | Quick Installation Guide - Page 87
Slot PCI Express: PCIE1 (slot PCIE x16) usato per schede PCI Express con schede grafiche di larghezza x16. Se si aggiunge una scheda PCI Express VGA al PCIE1 (slot PCIE x16), la VGA della slot. Step 4. Agganciare la scheda allo chassis con le viti. 87 ASRock P4VM900-SATA2 Motherboard Italiano - ASRock P4VM900-SATA2 | Quick Installation Guide - Page 88
di sistema all'impostazione predefinita, spegnere il computer e scollegare il cavo d'alimentazione: utilizzare un cappuccio jumper per cortocircuitare i 2 pin su CLRCMOS1 per 5 secondi. Italiano 88 ASRock P4VM900-SATA2 Motherboard - ASRock P4VM900-SATA2 | Quick Installation Guide - Page 89
le periferiche di archiviazione HD SATA o SATAII per le funzioni di archiviazione interna. ATAII (SATAII) supportano cavi SATAII per dispositivi di memoria interni. L'interfaccia SATAII attuale permette velocità di trasferimento dati fino a 3.0 Gb/s. Italiano 89 ASRock P4VM900-SATA2 Motherboard - ASRock P4VM900-SATA2 | Quick Installation Guide - Page 90
. Poi connettete l'estremità Connettere al gruppo dialimentazione bianca del cavo di alimentazione SATA al connettore power dell'alimentatore. Collettore USB 2.0 (9-pin USB67) (vedi p.2 una wireless opzionale che trasmette e riceve moduli infrarossi. Italiano 90 ASRock P4VM900-SATA2 Motherboard - ASRock P4VM900-SATA2 | Quick Installation Guide - Page 91
facendo clic su "OK". Per Windows® VistaTM OS: Cliccare sull'icona in alto a destra "Folder" ("Cartella") , selezionare "Disable front panel jack detection" "Disabilitare individuazione presa pannello frontale") e cliccare "OK" per memorizzare. Italiano 91 ASRock P4VM900-SATA2 Motherboard - ASRock P4VM900-SATA2 | Quick Installation Guide - Page 92
questo connettore in modo che possa fornire energia sufficiente. In caso contrario l'unità non si avvia. Installare il dispersore di calore e la ventolina CPU prima di installare il connettore ATX 12V; diversamente si provocheranno danni irreparabili! Italiano 92 ASRock P4VM900-SATA2 Motherboard - ASRock P4VM900-SATA2 | Quick Installation Guide - Page 93
download.htm n Gli esempi di cui sopra sono solo per riferimento. Per dischi rigidi SATAII di r diversi produttori, i metodi di impostazione dei pin del jumper possono non essere gli stessi. Visitare i siti web dei produttori per gli aggiornamenti. Italiano 93 ASRock P4VM900-SATA2 Motherboard - ASRock P4VM900-SATA2 | Quick Installation Guide - Page 94
vengono rilevati automaticamente ed elencati nella pagina del driver del CD in dotazione. Per l'installazione dei driver necessari, procedere in base ad un ordine dall'alto verso il basso. In tal modo, i driver installati funzioneranno correttamente. 94 ASRock P4VM900-SATA2 Motherboard Italiano - ASRock P4VM900-SATA2 | Quick Installation Guide - Page 95
di tutti i driver, ma in futuro SATA Operation Mode" (Modalità operativa SATA) su [non-RAID]. 2° PASSO: Installazione di Windows® 2000 / XP / VistaTM sul sistema. Si può iniziare ad installare il sistema operativo Windows® 2000 / XP / VistaTM sul sistema. 95 ASRock P4VM900-SATA2 Motherboard - ASRock P4VM900-SATA2 | Quick Installation Guide - Page 96
Setup del BIOS, fare riferimento al Manuale dell'Utente (PDF file) contenuto nel cd di supporto. 4. Software di supporto e informazioni su CD Questa scheda madre supporta vari sistemi operativi Microsoft® Windows®: 2000 / XP / VistaTM. Il CD di supporto a corredo della scheda madre contiene i driver - ASRock P4VM900-SATA2 | Quick Installation Guide - Page 97
IDE de conducción 80 Ultra ATA 66/100/133 Una cinta de datos para una unidad de disco de 3,5" Un Cable de Datos Serial ATA (SATA) (Opcional) Un cable serie ATA (SATA) de alimentación de disco duro (Opcional) Una protección ASRock 6CH I/O PlusTM 97 ASRock P4VM900-SATA2 Motherboard Español - ASRock P4VM900-SATA2 | Quick Installation Guide - Page 98
6CH I/O PlusTM - 1 x puerto de ratón PS/2 - 1 x puerto de teclado PS/2 - 1 x puerto serial: COM1 - 1 x Puerto VGA - 1 x Puerto paralelo: soporta ECP/EPP - 6 x puertos USB 2.0 predeterminados - 1 x Puerto RJ-45 - Audio Jack: Line In / Line Out / Micrófono Español 98 ASRock P4VM900-SATA2 Motherboard - ASRock P4VM900-SATA2 | Quick Installation Guide - Page 99
del ventilador del CPU/chasis - 20-pin cabezal de alimentación ATX - 4-pin conector de ATX 12V power - Conector de Audio Interno - Conector de audio de panel frontal conformidad con Microsoft® Windows® 2000 / XP / VistaTM (vea ATENCIÓN 8) - FCC, CE, WHQL Español 99 ASRock P4VM900-SATA2 Motherboard - ASRock P4VM900-SATA2 | Quick Installation Guide - Page 100
el controlador más reciente, lo actualizaremos en nuestro sitio Web en el futuro. Visite nuestro sitio Web si desea obtener el controlador para Microsoft® Windows® VistaTM así como la información relacionada. Sitio Web de ASRock: http://www.asrock.com Español 100 ASRock P4VM900-SATA2 Motherboard - ASRock P4VM900-SATA2 | Quick Installation Guide - Page 101
VGA en placa a 64MB. Si utiliza una tarjeta VGA integrada con un tamaño de memoria del sistema superior a 512 MB y pretende presentar el logotipo de Windows® VistaTM Basic, ajuste el tamaño de la memoria compartida de la tarjeta VGA a 128 MB como mínimo. Español ASRock P4VM900-SATA2 Motherboard - ASRock P4VM900-SATA2 | Quick Installation Guide - Page 102
2. Instalación P4VM900-SATA2 es una placa matriz del factor de la forma de Micro ATX (9.6-in x 8.0in, 24.4 cm x 20.3 cm). Antes de de alimentación. La falta de hacerlo puede causar daño severo a la placa matriz, a los periférico, y/o a los componentes. Español 102 ASRock P4VM900-SATA2 Motherboard - ASRock P4VM900-SATA2 | Quick Installation Guide - Page 103
a otro. Entonces conectar el ventilador de CPU con el conectador de CPU_FAN (CPU_FAN1, consulte a p.2 de No. 27). Para la instalación apropiada, por favor refiera amablemente a los manuales de instrucción del ventilador de CPU y del disipador de calor. Español ASRock P4VM900-SATA2 Motherboard 103 - ASRock P4VM900-SATA2 | Quick Installation Guide - Page 104
2.3 Instalación de Memoria La placa base P4VM900-SATA2 proporciona dos zócalos DIMM DDR (Doble velocidad de datos) de 184 contactos Asegúrese de desconectar la ambos lados queden completamente introducidos en su sitio y la DIMM se haya asentado apropiadamente. 104 ASRock P4VM900-SATA2 Motherboard - ASRock P4VM900-SATA2 | Quick Installation Guide - Page 105
ficas con una anchura de 16 carriles. Si instala la tarjeta complemento VGA PCI Express para PCIE1 (ranura PCIE x16), se desactivará VGA en placa. Instalación de Tarjetas de Expansión Paso 1. Antes de la slot. Paso 4. Asegure la tarjeta con tornillos. Español ASRock P4VM900-SATA2 Motherboard 105 - ASRock P4VM900-SATA2 | Quick Installation Guide - Page 106
y desenchúfelo de la toma de corriente. A continuación, utilice una cubierta de jumper para aislar las agujas 2 pins en CLRCMOS1 durante 5 segundos. Español 106 ASRock P4VM900-SATA2 Motherboard - ASRock P4VM900-SATA2 | Quick Installation Guide - Page 107
almacenamiento interno. La interfaz SATAII actual permite una velocidad de transferencia de 3.0 Gb/s. Cable de datos de serie ATA (SATA) (Opcional) Ambos extremos del cable pueden conectarse al disco duro SATA / SATAII o la conexión de la placa base. ASRock P4VM900-SATA2 Motherboard 107 Español - ASRock P4VM900-SATA2 | Quick Installation Guide - Page 108
extremo blanco del dealimentación cable de alimentación SATA a la conexión de alimentación de la audio interno (4-pin CD1) (CD1: vea p. 2, N. 22) Permite recepción de input CD1 audio de fuente sónica como CD- ROM, DVD-ROM, TV tuner, o tarjeta MPEG. Español 108 ASRock P4VM900-SATA2 Motherboard - ASRock P4VM900-SATA2 | Quick Installation Guide - Page 109
AC'97. E. Entre en la Utilidad de configuración del BIOS Entre en Configuración avanzada y, a continuación, seleccione Configuración del en el Administrador de audio HD Realtek. Para Windows® 2000 / XP OS: Haga clic en "E/S de audio", seleccione "Configuración ASRock P4VM900-SATA2 Motherboard 109 - ASRock P4VM900-SATA2 | Quick Installation Guide - Page 110
cable negro con el conector de tierra. Conecte el cable del ventilador de la CPU a este conector y haga coincidir el cable negro con el conector de tierra. de la CPU antes de instalar el conector ATX 12V; de lo contrario puede causar daños permanentes. Español 110 ASRock P4VM900-SATA2 Motherboard - ASRock P4VM900-SATA2 | Quick Installation Guide - Page 111
. Western Digital Si las patillas 5 y 6 están en corto, se activará SATA 1.5Gb/s. Por otro lado, si desea activar SATAII 3.0Gb/s, por favor retire los para detalles. http://www.hitachigst.com/hdd/support/download.htm Los ejemplos anteriores son sólo para ASRock P4VM900-SATA2 Motherboard 111 - ASRock P4VM900-SATA2 | Quick Installation Guide - Page 112
bridge VIA® VT8237S que soporta los discos duros de serie ATA (SATA) / serie ATAII (SATAII), y soporta funciones RAID (RAID 0, RAID 1 y JBOD). Puede instalar discos duros SATA / SATAII requeridos. Los controladores que instale pueden funcionar correctamente. 112 ASRock P4VM900-SATA2 Motherboard - ASRock P4VM900-SATA2 | Quick Installation Guide - Page 113
ón IDE. B. Establezca la opción "SATA Operation Mode"(Modo de funcionamiento SATA) en [non-RAID]. PASO 2: Instale el sistema operativo Windows® 2000 / XP / VistaTM en su sistema. Puede comenzar a instalar Windows® 2000 / XP / VistaTM en su sistema. Español ASRock P4VM900-SATA2 Motherboard 113 - ASRock P4VM900-SATA2 | Quick Installation Guide - Page 114
la BIOS, por favor refiérase al Manual del Usuario (archivo PDF) contenido en el CD. 4.Información de Software Support CD Esta placa-base soporta diversos tipos de sistema operativo Windows®: 2000 / XP / VistaTM El CD de instalación que acompaña la placa-base trae todos los drivers y programas
-
 1
1 -
 2
2 -
 3
3 -
 4
4 -
 5
5 -
 6
6 -
 7
7 -
8
-
9
-
10
-
11
-
12
-
13
-
14
-
15
-
16
-
17
-
18
-
19
-
20
-
21
-
22
-
23
-
24
-
25
-
26
-
27
-
28
-
29
-
30
-
31
-
32
-
33
-
34
-
35
-
36
-
37
-
38
-
39
-
40
-
41
-
42
-
43
-
44
-
45
-
46
-
47
-
48
-
49
-
50
-
51
-
52
-
53
-
54
-
55
-
56
-
57
-
58
-
59
-
60
-
61
-
62
-
63
-
64
-
65
-
66
-
67
-
68
-
69
-
70
-
71
-
72
-
73
-
74
-
75
-
76
-
77
-
78
-
79
-
80
-
81
-
82
-
83
-
84
-
85
-
86
-
87
-
88
-
89
-
90
-
91
-
92
-
93
-
94
-
95
-
96
-
97
-
98
-
99
-
100
-
101
-
102
-
103
-
104
-
105
-
106
-
107
-
108
-
109
-
110
-
111
-
112
-
113
-
114
 |
 |
1
ASRock
P4VM900-SATA2
Motherboard
English
English
English
English
English
Copyright Notice:
Copyright Notice:
Copyright Notice:
Copyright Notice:
Copyright Notice:
No part of this installation guide may be reproduced, transcribed, transmitted, or trans-
lated in any language, in any form or by any means, except duplication of documen-
tation by the purchaser for backup purpose, without written consent of ASRock Inc.
Products and corporate names appearing in this guide may or may not be registered
trademarks or copyrights of their respective companies, and are used only for identifica-
tion or explanation and to the owners’ benefit, without intent to infringe.
Disclaimer:
Disclaimer:
Disclaimer:
Disclaimer:
Disclaimer:
Specifications and information contained in this guide are furnished for informational
use only and subject to change without notice, and should not be constructed as a
commitment by ASRock. ASRock assumes no responsibility for any errors or omissions
that may appear in this guide.
With respect to the contents of this guide, ASRock does not provide warranty of any kind,
either expressed or implied, including but not limited to the implied warranties or
conditions of merchantability or fitness for a particular purpose. In no event shall
ASRock, its directors, officers, employees, or agents be liable for any indirect, special,
incidental, or consequential damages (including damages for loss of profits, loss of
business, loss of data, interruption of business and the like), even if ASRock has been
advised of the possibility of such damages arising from any defect or error in the guide
or product.
This device complies with Part 15 of the FCC Rules. Operation is subject to the
following two conditions:
(1)
this device may not cause harmful interference, and
(2)
this device must accept any interference received, including interference that
may cause undesired operation.
Published August 2007
Copyright
©
2007 ASRock INC. All rights reserved.
CALIFORNIA, USA ONLY
The Lithium battery adopted on this motherboard contains Perchlorate, a toxic
substance controlled in Perchlorate Best Management Practices (BMP) regulations
passed by the California Legislature. When you discard the Lithium battery in
California, USA, please follow the related regulations in advance.
“Perchlorate Material-special handling may apply, see
www
.dtsc.ca.gov/hazardouswa
ste/perchlorate”
ASRock Website: http://www.asrock.com