ASRock P5B Pro Quick Installation Guide
ASRock P5B Pro Manual
 |
View all ASRock P5B Pro manuals
Add to My Manuals
Save this manual to your list of manuals |
ASRock P5B Pro manual content summary:
- ASRock P5B Pro | Quick Installation Guide - Page 1
without written consent of ASRock Inc. Products and corporate names appearing in this guide may or may not be registered trademarks or copyrights of perchlorate" ASRock Website: http://www.asrock.com Published April 2009 Copyright©2009 ASRock INC. All rights reserved. 1 ASRock P5B Pro Motherboard - ASRock P5B Pro | Quick Installation Guide - Page 2
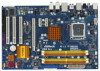
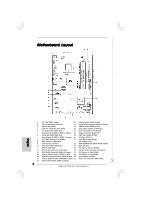
ATX 12V Connector (ATX12V1) 18 Fourth SATAII Connector (SATAII_4; Orange) 3 775 3) 7 ATX Power Connector (ATXPWR1) 25 Front Panel Audio Header 8 BIOS SPI Chip (FRONT_1394; Red) 28 PCI Express x16 Slot (PCIE3) 11 Chassis Fan Connector (CHA_FAN1) 29 Internal Audio ASRock P5B Pro Motherboard - ASRock P5B Pro | Quick Installation Guide - Page 3
accordance with the type of speaker you use. TABLE for Audio Output Connection Audio Output Channels Front Speaker Rear Speaker Central / Bass Side Speaker (No. 8) (No. 5) (No. 6) (No. 4) 2 V -- -- -- 4 V V -- -- 6 V V V -- 8 V V V V 3 ASRock P5B Pro Motherboard English - ASRock P5B Pro | Quick Installation Guide - Page 4
connect a front panel audio cable to the front panel audio header. After restarting your computer, you will find "VIA HD Audio Deck" tool on your system. Please follow below instructions according to the OS Multi-Streaming function or Side Speaker function. English 4 ASRock P5B Pro Motherboard - ASRock P5B Pro | Quick Installation Guide - Page 5
for specific information about the model you are using. www.asrock.com/support/index.asp 1.1 Package Contents ASRock P5B Pro Motherboard (ATX Form Factor: 12.0-in x 8.0-in, 30.5 cm x 20.3 cm) ASRock P5B Pro Quick Installation Guide ASRock P5B Pro Support CD One 80-conductor Ultra ATA 66/100/133 IDE - ASRock P5B Pro | Quick Installation Guide - Page 6
Penryn Quad Core Yorkfield and Dual Core Wolfdale processors - Compatible with all FSB1333/1066/800/533MHz CPUs - Supports Hyper-Threading Technology (see CAUTION 1) - Supports Untied Overclocking Technology (see CAUTION 2) - Supports EM64T CPU - Northbridge: Intel® P965 - Southbridge: Intel® ICH8 - ASRock P5B Pro | Quick Installation Guide - Page 7
- ACPI 1.1 Compliance Wake Up Events - Supports jumperfree - AMBIOS 2.3.1 Support - CPU, DRAM, NB, SB, VTT Voltage Multi-adjustment - Supports Smart BIOS Support CD - Drivers, Utilities, AntiVirus Software (Trial Version) Unique Feature - ASRock OC Tuner (see CAUTION 9) - Intelligent Energy - ASRock P5B Pro | Quick Installation Guide - Page 8
your system by hardware monitor function and overclock your hardware devices to get the best system performance under Windows® environment. Please visit our website for the operation procedures of ASRock OC Tuner. ASRock website: http://www.asrock.com English 8 ASRock P5B Pro Motherboard - ASRock P5B Pro | Quick Installation Guide - Page 9
Saver. ASRock website: http://www.asrock.com 11. ASRock Instant Flash is a BIOS flash utility embedded in Flash ROM. This convenient BIOS update tool allows you to update system BIOS without entering the CPU and the heatsink when you install the PC system. 9 ASRock P5B Pro Motherboard English - ASRock P5B Pro | Quick Installation Guide - Page 10
insert the 775-LAND CPU into the socket, please check if the CPU surface is unclean or if there is any bent pin on the socket. Do not force to insert the CPU into the socket if above situation is found. Otherwise, the CPU will be seriously damaged. 10 ASRock P5B Pro Motherboard English - ASRock P5B Pro | Quick Installation Guide - Page 11
orientation key notch Pin1 alignment key alignment key 775-LAND CPU 775-Pin Socket For proper inserting, please ensure to support the load plate edge, engage PnP cap with right hand thumb and peel the cap from the socket while pressing on center of PnP cap to assist in removal. 11 ASRock P5B Pro - ASRock P5B Pro | Quick Installation Guide - Page 12
cap. 2. This cap must be placed if returning the motherboard for after service. Step 4. Close the socket: Step 4-1. Rotate the load plate onto the instruction manuals of your CPU fan and heatsink. Below is an example to illustrate the installation of the heatsink for 775- ASRock P5B Pro Motherboard - ASRock P5B Pro | Quick Installation Guide - Page 13
240-pin DDR2 (Double Data Rate 2) DIMM slots, and supports Dual Channel Memory Technology. For dual channel configuration, you . 1. If you want to install two memory modules, for optimal compatibility and reliability, it is recommended to install them in the slots of 13 ASRock P5B Pro Motherboard - ASRock P5B Pro | Quick Installation Guide - Page 14
insert the DIMM into the slot until the retaining clips at both ends fully snap back in place and the DIMM is properly seated. 14 ASRock P5B Pro Motherboard English - ASRock P5B Pro | Quick Installation Guide - Page 15
with the slot and press firmly until the card is completely seated on the slot. Step 4. Fasten the card to the chassis with screws. 15 ASRock P5B Pro Motherboard English - ASRock P5B Pro | Quick Installation Guide - Page 16
unplug the power cord from the power supply. After waiting for 15 seconds, use a jumper cap to short 2 pins on CLRCMOS1 for 5 seconds. English 16 ASRock P5B Pro Motherboard - ASRock P5B Pro | Quick Installation Guide - Page 17
conductor ATA 66/100/133 cable Note: Please refer to the instruction of your IDE device vendor for the details. Serial ATAII Connectors SATAII_1 SATAII_4 SATAII_2 These Serial ATAII (SATAII) connectors support SATAII or SATA hard disk for internal storage devices. ASRock P5B Pro Motherboard English - ASRock P5B Pro | Quick Installation Guide - Page 18
D. MIC_RET and OUT_RET are for HD audio panel only. You don't need to connect them for AC'97 audio panel. E. Enter BIOS Setup Utility. Enter Advanced Settings, and then select Chipset Configuration. Set the Front Panel Control option from [Auto] to [Enabled]. 18 ASRock P5B Pro Motherboard English - ASRock P5B Pro | Quick Installation Guide - Page 19
(Quiet Fan) support, the 3-Pin ATX power connector, 12 24 it can still work if you adopt a traditional 20-pin ATX power supply. To use the 20-pin ATX power supply, please plug your power supply along with Pin 1 and Pin 13. 20-Pin ATX Power Supply Installation 1 13 English 19 ASRock P5B Pro - ASRock P5B Pro | Quick Installation Guide - Page 20
IEEE 1394 header can support one IEEE 1394 port. HDMI_SPDIF header, providing SPDIF audio output to HDMI VGA card, allows the system to con nect HDMI Digital TV/ projector/LCD devices. Please connect the HDMI_SPDIF connector of HDMI VGA card to this header. English 20 ASRock P5B Pro Motherboard - ASRock P5B Pro | Quick Installation Guide - Page 21
during overclocking, but PCI / PCIE buses are in the fixed mode so that FSB can operate under a more stable overclocking environment. Please refer to the warning on page 8 for the possible overclocking risk before you apply Untied Overclocking Technology. English 21 ASRock P5B Pro Motherboard - ASRock P5B Pro | Quick Installation Guide - Page 22
press during the Power-On-Self-Test (POST) to enter BIOS Setup utility; otherwise, POST continues with its test routines. If you wish to enter BIOS Setup after POST, please restart the system by " from the BIN folder in the Support CD to display the menus. 22 ASRock P5B Pro Motherboard English - ASRock P5B Pro | Quick Installation Guide - Page 23
Modell benötigen, besuchen Sie bitte unsere Webseite: www.asrock.com/support/index.asp 1.1 Kartoninhalt ASRock P5B Pro Motherboard (ATX-Formfaktor: 30.5 cm x 20.3 cm; 12.0 Zoll x 8.0 Zoll) ASRock P5B Pro Schnellinstallationsanleitung ASRock P5B Pro_ Support-CD Ein 80-adriges Ultra-ATA 66/100/133 IDE - ASRock P5B Pro | Quick Installation Guide - Page 24
Audio LAN E/A-Anschlüsse an der Rückseite - ATX-Formfaktor: 30.5 cm x 20.3 cm; 12.0 Zoll x 8.0 Zoll - Alle Feste Kondensatordesign (100% in Japan gefertigte, erstklassige leitfähige Polymer-Kondensatoren) - LGA 775 für Intel® CoreTM 2 Extreme / CoreTM 2 Quad ) Deutsch 24 ASRock P5B Pro Motherboard - ASRock P5B Pro | Quick Installation Guide - Page 25
Booster: - Schrittloser CPU-Frequenz-Kontrolle (siehe VORSICHT 12) - ASRock U-COP (siehe VORSICHT 13) - Boot Failure Guard (B.F.G. - Systemstartfehlerschutz) - CPU-Temperatursensor - Motherboardtemperaturerkennung - Drehzahlmessung für CPU/Gehäuse/Stromlüfter 25 ASRock P5B Pro Motherboard Deutsch - ASRock P5B Pro | Quick Installation Guide - Page 26
Produktinformation, besuchen Sie bitte unsere Website: http://www.asrock.com WARNUNG Beachten Sie bitte, dass Overclocking, einschließlich der Einstellung im BIOS, Anwenden der Untied Overclocking-Technologie oder Verwenden von Overclocking-Werkzeugen von Dritten, mit einem gewissen Risiko behaftet - ASRock P5B Pro | Quick Installation Guide - Page 27
Support- ASRock OC Tuner. ASRock-Website: http://www.asrock des POST-Vorgangs oder durch Drücken der -Taste im BIOS-Setup-Menü Zugang zu ASRock Overclocking nicht empfohlen. Frequenzen, die von den empfohlenen CPU-Busfrequenzen abweichen, können Instabilität des ASRock P5B Pro Motherboard Deutsch - ASRock P5B Pro | Quick Installation Guide - Page 28
die Einstellungen zu löschen und Default-Werte wiederherzustellen, schalten Sie den Computer aus, ziehen Sie den Netzstecker und überbrücken Sie 2-pin von CLRCMOS1 mithilfe des Jumpers für 5 Sekunden. Deutsch 28 ASRock P5B Pro Motherboard - ASRock P5B Pro | Quick Installation Guide - Page 29
aktuelle SATAII-Schnittstelle ermöglicht eine Datenübertragungsrate bis 3,0 Gb/s. Serial ATA- (SATA-) Datenkabel (Option) Sie können beide Enden des SATA-Datenkabels entweder mit der SATA / SATAIIFestplatte oder dem SATAII-Anschluss am Mainboard verbinden. Deutsch 29 ASRock P5B Pro Motherboard - ASRock P5B Pro | Quick Installation Guide - Page 30
, wie z. B. CD1 CD-ROM, DVD-ROM, TV-Tuner oder MPEG-Karten mit Ihrem System zu verbinden. Dieses Interface zu einem Audio-Panel auf der Vorderseite Ihres Gehäuses, ermöglicht Ihnen eine bequeme Anschlussmöglichkeit und Kontrolle über Audio-Geräte. 30 ASRock P5B Pro Motherboard Deutsch - ASRock P5B Pro | Quick Installation Guide - Page 31
1. High Definition Audio unterstützt Jack Sensing (automatische Erkennung an die AC'97-Audioleiste angeschlossen werden. E. Rufen Sie das BIOS-Setup-Dienstprogramm auf. Wechseln Sie zu Erweiterte Einstellungen und wählen Sie schwarzen Draht dem Erdungsstift an. 31 ASRock P5B Pro Motherboard Deutsch - ASRock P5B Pro | Quick Installation Guide - Page 32
Energieversorgung 8 5 zusammen mit dem Pin 1 und Pin 5 ein. Installation der 4-Pin ATX 12V Energieversorgung 4 1 COM-Anschluss-Header (9-pin COM1) (siehe S.2 - No. 23) Dieser COM-AnschlussHeader wird verwendet, um ein COM-Anschlussmodul zu unterstützen. Deutsch 32 ASRock P5B Pro Motherboard - ASRock P5B Pro | Quick Installation Guide - Page 33
des HDMI_SPDIF-Kabels mit dem HDMI_SPDIF-Anschluss am Motherboard. Schließen Sie dann das weiße Ende (B oder C) des HDMI_SPDIF-Kabels an den HDMI_SPDIF-Anschluss der HDMI-VGA-Karte an. A. Schwarzes Ende B. Weißes Ende (zweipolig) C. Weißes Ende (dreipolig) Deutsch 33 ASRock P5B Pro Motherboard - ASRock P5B Pro | Quick Installation Guide - Page 34
Verzeichnis der Support-CD, um die Menüs aufzurufen. Das Setup-Programm soll es Ihnen so leicht wie möglich machen. Es ist menügesteuert, d.h. Sie können in den verschiedenen Untermenüs Ihre Auswahl treffen und die Programme werden dann automatisch installiert. 34 ASRock P5B Pro Motherboard Deutsch - ASRock P5B Pro | Quick Installation Guide - Page 35
particulières au modèle que vous utilisez. www.asrock.com/support/index.asp 1.1 Contenu du paquet Carte mère ASRock P5B Pro (Facteur de forme ATX : 12.0 pouces x 8.0 pouces, 30.5 cm x 20.3 cm) Guide d'installation rapide ASRock P5B Pro CD de soutien ASRock P5B Pro Un câble ruban IDE Ultra ATA 66/100 - ASRock P5B Pro | Quick Installation Guide - Page 36
en charge la technologie Untied Overclocking (voir ATTENTION 2) - Prise en charge de la technologie EM64T par le CPU - Northbridge: Intel® P965 - Southbridge: Intel® ICH8 - Compatible avec la Technologie de Mémoire à Canal Double (voir ATTENTION 3) - 4 x slots DIMM DDR2 - Supporte DDR2 800/667/533 - ASRock P5B Pro | Quick Installation Guide - Page 37
connecteur d'alimentation ATX - br. 8 connecteur d'alimentation 12V ATX - Connecteurs audio internes - Connecteur audio panneau avant - 2 x en-tête USB 2.0 (accepte 4 ports USB 2.0) (voir ATTENTION 8) - 4Mb BIOS AMI - BIOS AMI - Support du "Plug and Play" - Compatible pour événements de réveil ACPI - ASRock P5B Pro | Quick Installation Guide - Page 38
l'entrée microphone, cette carte mère supporte les deux modes stéréo et mono. Pour la sortie audio, cette carte mère supporte les modes 2-canaux, 4-canaux, 6-canaux et 8-canaux. Veuillez vous référer au tableau en page 3 pour effectuer la bonne connexion. 38 ASRock P5B Pro Motherboard Français - ASRock P5B Pro | Quick Installation Guide - Page 39
d'UC sur la carte mère fonctionne correctement et débranchez le cordon d'alimentation, puis rebranchez-le. Pour améliorer la dissipation de la chaleur, n'oubliez pas de mettre de la pâte thermique entre le CPU le dissipateur lors de l'installation du PC. 39 ASRock P5B Pro Motherboard Français - ASRock P5B Pro | Quick Installation Guide - Page 40
pour choisir +5VSB (standby) et permettre aux périphériques PS/2 ou USB de réveiller le système. Note: Pour sélectionner +5VSB, il faut obligatoirement 2 CLRCMOS1 pendant 5 secondes. N'oubliez pas de retirer le cavalier avant après avoir restauré le CMOS. Français 40 ASRock P5B Pro Motherboard - ASRock P5B Pro | Quick Installation Guide - Page 41
instructions du fabricant de des taux transferts de données pouvant aller jusqu'à 3,0 Go/s. Câble de données Série ATA (SATA) (en option) L'une des deux extrémités du câble de données SATA peut être connectée au disque dur SATA / SATAIIou au connecteur SATAII sur la carte mère. 41 ASRock P5B Pro - ASRock P5B Pro | Quick Installation Guide - Page 42
vous permettent de gérer des entrées audio à partir de sources CD1 stéréo comme un CD-ROM, DVD-ROM, un tuner TV ou une carte MPEG. C'est une interface pour un câble audio en façade qui permet le branchement et le contrôle commodes de périphériques audio. 42 ASRock P5B Pro Motherboard Fran - ASRock P5B Pro | Quick Installation Guide - Page 43
le haut-parleur de châssis sur cet en-tête. Branchez les câbles du ventilateur aux connecteurs pour ventilateur et faites correspondre le fil noir à la broche de terre. Veuillez connecter le câble de ventilateur d'UC sur ce connecteur et brancher le fil Français 43 ASRock P5B Pro Motherboard - ASRock P5B Pro | Quick Installation Guide - Page 44
ATX, branchez votre alimentation 8 5 avec la broche 1 et la broche 5. 4-Installation d'alimentation à 4 broches ATX 12V 4 1 En-tête de port COM (COM1 br.9) (voir p.2 No. 23) Cette en-tête de port COM est utilisée pour prendre en charge un module de port COM. Français 44 ASRock P5B Pro - ASRock P5B Pro | Quick Installation Guide - Page 45
mité noire (A) du câble HDMI_SPDIF au collecteur HDMI_SPDIF de la carte-mère. Connectez ensuite l'extrémité blanche (B ou C) du câble HDMI_SPDIF au connecteur HDMI_SPDIF de la carte VGA HDMI. B. extrémité blanche (2 briches) C. extrémité blanche (3 briches) Français 45 ASRock P5B Pro Motherboard - ASRock P5B Pro | Quick Installation Guide - Page 46
par ses divers sousmenus et de choisir parmi les choix prédéterminés. Pour des informations détaillées sur le BIOS, veuillez consulter le Guide de l'utilisateur (fichier PDF) dans le CD technique. 3. Informations sur le CD de support Cette carte mère supporte divers systèmes d'exploitation Microsoft - ASRock P5B Pro | Quick Installation Guide - Page 47
specifiche sul modello che si sta usando. www.asrock.com/support/index.asp 1.1 Contenuto della confezione Scheda madre ASRock P5B Pro (ATX Form Factor: 12.0-in x 8.0-in, 30.5 cm x 20.3 cm) Guida di installazione rapida ASRock P5B Pro CD di supporto ASRock P5B Pro Un cavo IDE 80-pin Ultra ATA 66/100 - ASRock P5B Pro | Quick Installation Guide - Page 48
Piattaforma Processore Chipset Memoria Slot di espansione Audio LAN Pannello posteriore I/O - ATX Form Factor: 12.0-in x 8.0-in, 30.5 cm x 20.3 cm - Design condensatore compatto (condensatori a conduttore in polimero di alta qualità realizzati al 100% in Giappone) - LGA 775 per Intel® CoreTM - ASRock P5B Pro | Quick Installation Guide - Page 49
ASRock U-COP (vedi ATTENZIONE 13) - Boot Failure Guard (B.F.G.) Monitor- - Sensore per la temperatura del processore aggio - Sensore temperatura scheda madre Hardware - Indicatore di velocita per la ventola del CPU/Chassis/Alimentazione - Ventola CPU silenziosa 49 ASRock P5B Pro Motherboard - ASRock P5B Pro | Quick Installation Guide - Page 50
asrock.com AVVISO Si prega di prendere atto che la procedura di overclocking implica dei rischi, come anche la regolazione delle impostazioni del BIOS, l'applicazione della tecnologia Untied Overclocking UC Fréquence de prise en charge audio. "Manuale utente ASRock P5B Pro Motherboard Italiano - ASRock P5B Pro | Quick Installation Guide - Page 51
ASRock OC. ASRock website: http://www.asrock overclocking. Frequenze del bus del processore diverse da quelle raccomandate possono causare instabilità al sistema o danni al processore e alla scheda madre. 13. Se il processore processore e il dissipatore quando si installa il sistema. 51 ASRock P5B Pro - ASRock P5B Pro | Quick Installation Guide - Page 52
. Per pulire I parametri di sistema e resettare ai parametri di default, spegnere il computer e scollegare l'alimentatore, poi collegare il jumper sul CLRCMOS1 per 5 secondi. Italiano 52 ASRock P5B Pro Motherboard - ASRock P5B Pro | Quick Installation Guide - Page 53
Serial ATA (SATA) (Opzionale) Entrambe le estremità del cavo dati SATA possono collegarsi all'hard disk SATA / SATAII o al connettore SATAII sulla scheda madre. 53 ASRock P5B Pro Motherboard Italiano - ASRock P5B Pro | Quick Installation Guide - Page 54
) (vedi p.2 Nr. 25) Permettono di ricevere input stereo audio da fonti di CD1 suono come CD-ROM, DVD - ROM,TV tuner, o schede MPEG. È un'interfaccia per il cavo del pannello audio. Che consente connessione facile e controllo dei dispositivi audio. 54 ASRock P5B Pro Motherboard Italiano - ASRock P5B Pro | Quick Installation Guide - Page 55
manuale e del manuale del telaio per installare il sistema. 2. Se si utilizza un pannello audio AC'97, installarlo nell'intestazione audio pannello audio HD. Non è necessario collegarli per il pannello audio AC'97. E. Entrare nel programma di impostazione BIOS. 55 ASRock P5B Pro Motherboard - ASRock P5B Pro | Quick Installation Guide - Page 56
4-pin ATX 12V, prego collegare la presa elettrica al Pin 1 e Pin 5. 8 5 Collettore porta COM (9-pin COM1) (vedi p.2 Nr. 23) Installazione elettrica 4-Pin ATX 12V 4 1 Questo collettore porta COM è utilizzato per supportare il modulo porta COM. Italiano 56 ASRock P5B Pro Motherboard - ASRock P5B Pro | Quick Installation Guide - Page 57
intestazione IEEE 1394 puo' supportare una porta IEEE 1394. Header HDMI_SPDIF, con uscita audio SPDIF su scheda HDMI VGA, consente al sistema di collegare dispositivi per TV HDMI VGA. A. estremità nera B. estremità bianca (2 pin) C. estremità bianca (3 pin) Italiano 57 ASRock P5B Pro Motherboard - ASRock P5B Pro | Quick Installation Guide - Page 58
test di routine. Per entrare il BIOS Setup dopo il POST, riavvia il sistema premendo + + , o premi il tasto di reset sullo chassis del sistema. Per informazioni più dettagliate circa il Setup del BIOS, fare riferimento al Manuale i menù. 58 ASRock P5B Pro Motherboard Italiano - ASRock P5B Pro | Quick Installation Guide - Page 59
con el número de modelo específico de su placa. www.asrock.com/support/index.asp 1.1 Contenido de la caja Placa base ASRock P5B Pro (Factor forma ATX: 30,5 cm x 20,3 cm, 12,0" x 8,0") Guía de instalación rápida de ASRock P5B Pro CD de soporte de ASRock P5B Pro Una cinta de datos IDE de conducción 80 - ASRock P5B Pro | Quick Installation Guide - Page 60
forma ATX: 30,5 cm x 20,3 cm, 12,0" x 8,0" - Todo diseño de Capacitor Sólido (condensadores de polímero conductor de alta calidad 100% fabricados en Japón) - LGA 775 para Intel® CoreTM 2 Extreme / CoreTM 2 Quad / CoreTM 2 Duo / Pentium® Doble Núcleo / Celeron® Doble Núcleo / Celeron® compatible con - ASRock P5B Pro | Quick Installation Guide - Page 61
/ chasis / alimentacion - 24-pin cabezal de alimentación ATX - 8-pin conector de ATX 12V power - Conector de Audio Interno - Conector de audio de panel frontal - 2 x Conector USB 2.0 (compatible con 4 puertos USB 2.0) (vea ATENCIÓN 8) - 4Mb AMI BIOS - AMI legal BIOS - Soporta "Plug and Play" - ACPI - ASRock P5B Pro | Quick Installation Guide - Page 62
la entrada de micrófono, esta placa madre ofrece soporte para modos estéreo y mono. Para salida de audio, este placa madre ofrece soporte para modos de 2 canales, 4 canales, 6 canales y 8 canales. Consulte la tabla en la página 3 para una conexión correcta. Español 62 ASRock P5B Pro Motherboard - ASRock P5B Pro | Quick Installation Guide - Page 63
la función de monitor de hardware y overclock sus dispositivos de hardware para obtener el mejor funcionamiento del sistema bajo el entorno de Windows®. Por favor visite nuestro sitio web para los procedimientos de operación de Sintonizador de ASRock OC. Sitio web de ASRock: http://www.asrock.com 10 - ASRock P5B Pro | Quick Installation Guide - Page 64
Para limpiar y reconfigurar los parametros del sistema a la configuración de la fábrica, por favor apague el computador y desconecte el cable de la fuente de electricidad, ponga en cortocircuito los pins de CLRCMOS1 por más que 5 segundos usando un jumper cap. Español 64 ASRock P5B Pro Motherboard - ASRock P5B Pro | Quick Installation Guide - Page 65
dispositivos de almacenamiento interno. La interfaz SATAII actual permite una velocidad de transferencia de 3.0 Gb/s. Cable de datos de serie ATA (SATA) (Opcional) Ambos extremos del cable pueden conectarse al disco duro SATA / SATAII o la conexión de la placa base. Español 65 ASRock P5B Pro - ASRock P5B Pro | Quick Installation Guide - Page 66
pin HD_AUDIO1) (vea p.2, N. 25) Permite recepción de input audio de fuente sónica como CDCD1 ROM, DVD-ROM, TV tuner, o tarjeta MPEG. Este es una interface para cable de audio de panel frontal que permite conexión y control conveniente de apparatos de Audio. 66 ASRock P5B Pro Motherboard Español - ASRock P5B Pro | Quick Installation Guide - Page 67
cabezal. Por favor, conecte los cables del ventilador a los conectores de ventilador, haciendo coincidir el cable negro con la patilla de masa. Conecte el cable del ventilador de la CPU a este conector y haga coincidir el cable negro con el conector de tierra. Español 67 ASRock P5B Pro Motherboard - ASRock P5B Pro | Quick Installation Guide - Page 68
pin ATX 12V, por favor conecte su fuente de 8 5 energía junto con Pin 1 y Pin 5. Instalación de Fuente de Energía de 4-Pin ATX 12V 4 1 Cabezal del puerto COM (9-pin COM1) (vea p.2, N. 23) Este cabezal del puerto COM se utiliza para admitir un módulo de puerto COM. Español 68 ASRock P5B Pro - ASRock P5B Pro | Quick Installation Guide - Page 69
del cable HDMI_SPDIF en la cabecera HDMI_SPDIF de la placa base. Conecte después el extremo blanco (B o C) del cable HDMI_SPDIF en el conector HDMI_SPDIF de la tarjeta VGA HDMI. A. Extremo negro B. Extremo blanco (2 patillas) C. Extremo blanco (3 patillas) Español 69 ASRock P5B Pro Motherboard - ASRock P5B Pro | Quick Installation Guide - Page 70
sistema. Para obtener información detalladas sobre la Utilidad de configuración de la BIOS, consulte el Manual del usuario (archivo PDF), que se encuentra en el CD de soporte. 3.Información de Software Support CD Esta placa-base soporta diversos tipos de sistema operativo Windows®: 2000 / XP / XP 64 - ASRock P5B Pro | Quick Installation Guide - Page 71
83 ASRock P5B Pro Motherboard - ASRock P5B Pro | Quick Installation Guide - Page 72
® ® / ® ® ® ® ® ® 84 ASRock P5B Pro Motherboard - ASRock P5B Pro | Quick Installation Guide - Page 73
® 85 ASRock P5B Pro Motherboard - ASRock P5B Pro | Quick Installation Guide - Page 74
" " ® ® ® ® " " " " ® 86 ASRock P5B Pro Motherboard - ASRock P5B Pro | Quick Installation Guide - Page 75
® 87 ASRock P5B Pro Motherboard - ASRock P5B Pro | Quick Installation Guide - Page 76
"" "" "" "" 88 ASRock P5B Pro Motherboard - ASRock P5B Pro | Quick Installation Guide - Page 77
SATAII_3 SATAII_1 SATAII_4 SATAII_2 89 ASRock P5B Pro Motherboard - ASRock P5B Pro | Quick Installation Guide - Page 78
CD1 90 ASRock P5B Pro Motherboard - ASRock P5B Pro | Quick Installation Guide - Page 79
4 3 2 1 12 24 1 13 12 24 1 13 91 ASRock P5B Pro Motherboard - ASRock P5B Pro | Quick Installation Guide - Page 80
8 5 4 1 8 5 4 1 92 ASRock P5B Pro Motherboard - ASRock P5B Pro | Quick Installation Guide - Page 81
8 5 4 1 C B A " " " " \\ 93 ASRock P5B Pro Motherboard
-
 1
1 -
 2
2 -
 3
3 -
 4
4 -
 5
5 -
 6
6 -
 7
7 -
8
-
9
-
10
-
11
-
12
-
13
-
14
-
15
-
16
-
17
-
18
-
19
-
20
-
21
-
22
-
23
-
24
-
25
-
26
-
27
-
28
-
29
-
30
-
31
-
32
-
33
-
34
-
35
-
36
-
37
-
38
-
39
-
40
-
41
-
42
-
43
-
44
-
45
-
46
-
47
-
48
-
49
-
50
-
51
-
52
-
53
-
54
-
55
-
56
-
57
-
58
-
59
-
60
-
61
-
62
-
63
-
64
-
65
-
66
-
67
-
68
-
69
-
70
-
71
-
72
-
73
-
74
-
75
-
76
-
77
-
78
-
79
-
80
-
81
 |
 |

1
ASRock
P5B Pro
Motherboard
English
English
English
English
English
Copyright Notice:
Copyright Notice:
Copyright Notice:
Copyright Notice:
Copyright Notice:
No part of this installation guide may be reproduced, transcribed, transmitted, or trans-
lated in any language, in any form or by any means, except duplication of documen-
tation by the purchaser for backup purpose, without written consent of ASRock Inc.
Products and corporate names appearing in this guide may or may not be registered
trademarks or copyrights of their respective companies, and are used only for identifica-
tion or explanation and to the owners’ benefit, without intent to infringe.
Disclaimer:
Disclaimer:
Disclaimer:
Disclaimer:
Disclaimer:
Specifications and information contained in this guide are furnished for informational
use only and subject to change without notice, and should not be constructed as a
commitment by ASRock. ASRock assumes no responsibility for any errors or omissions
that may appear in this guide.
With respect to the contents of this guide, ASRock does not provide warranty of any kind,
either expressed or implied, including but not limited to the implied warranties or
conditions of merchantability or fitness for a particular purpose. In no event shall
ASRock, its directors, officers, employees, or agents be liable for any indirect, special,
incidental, or consequential damages (including damages for loss of profits, loss of
business, loss of data, interruption of business and the like), even if ASRock has been
advised of the possibility of such damages arising from any defect or error in the guide
or product.
This device complies with Part 15 of the FCC Rules. Operation is subject to the
following two conditions:
(1)
this device may not cause harmful interference, and
(2)
this device must accept any interference received, including interference that
may cause undesired operation.
Published April 2009
Copyright
©
2009 ASRock INC. All rights reserved.
CALIFORNIA, USA ONLY
The Lithium battery adopted on this motherboard contains Perchlorate, a toxic
substance controlled in Perchlorate Best Management Practices (BMP) regulations
passed by the California Legislature. When you discard the Lithium battery in
California, USA, please follow the related regulations in advance.
“Perchlorate Material-special handling may apply, see
www
.dtsc.ca.gov/hazardouswa
ste/perchlorate”
ASRock Website: http://www.asrock.com