ASRock PV530A Quick Installation Guide
ASRock PV530A Manual
 |
View all ASRock PV530A manuals
Add to My Manuals
Save this manual to your list of manuals |
ASRock PV530A manual content summary:
- ASRock PV530A | Quick Installation Guide - Page 1
for backup purpose, without written consent of ASRock Inc. Products and corporate names appearing in this guide may or may not be registered trademarks or ASRock Website: http://www.asrock.com Published November 2011 Copyright©2011 ASRock INC. All rights reserved. 1 ASRock PV530A Motherboard - ASRock PV530A | Quick Installation Guide - Page 2
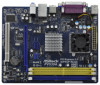
PS2_USB_PWR1 Jumper 14 Clear CMOS Jumper (CLRCMOS1) 3 ATX Power Connector (ATXPWR1) 15 PCI Slot (PCI1) 4 VIA VX900 A3 Chipset 10 BIOS SPI Chip 22 USB_PWR2 Jumper 11 Chassis Fan Connector (CHA_FAN1) 23 CPU Fan Connector (CPU_FAN1) 12 System Panel Header (PANEL1, White) 2 ASRock PV530A - ASRock PV530A | Quick Installation Guide - Page 3
follow below instructions according to the OS you install. For Windows® XP OS: Please click "VIA HD Audio Deck" icon , and click "Speaker". Then you are allowed to select "2 Channel" or "4 Channel". Click "Power" to save your change. For Windows® 7 / VistaTM OS: Please click "VIA HD Audio - ASRock PV530A | Quick Installation Guide - Page 4
specific information about the model you are using. www.asrock.com/support/index.asp 1.1 Package Contents ASRock PV530A Motherboard (Micro ATX Form Factor: 8.5-in x 6.7-in, 21.6 cm x 17.0 cm) ASRock PV530A Quick Installation Guide ASRock PV530A Support CD Two Serial ATA (SATA) Data Cables (Optional - ASRock PV530A | Quick Installation Guide - Page 5
Rear Panel I/O Connector - Micro ATX Form Factor: 8.5-in x 6.7-in, 21.6 cm x 17.0 cm - Solid Capacitor for CPU power - VIA® PV530 Processor (1.8 GHz) - Supports FSB800 MHz - Supports Untied Overclocking Technology (see CAUTION 1) - VIA® VX900 A3 - 1 x DDR3 DIMM slot - Supports DDR3 800 non-ECC, un - ASRock PV530A | Quick Installation Guide - Page 6
+5V, +3.3V, Vcore OS - Microsoft® Windows® 7 / VistaTM / XP compliant Certifications - FCC, CE, WHQL - ErP/EuP Ready (ErP/EuP ready power supply is required) (see CAUTION 14) * For detailed product information, please visit our website: http://www.asrock.com WARNING Please realize that there - ASRock PV530A | Quick Installation Guide - Page 7
the chipset vendor and is subject to change. Please check VIA® website for the latest information. 4. Before installing SATAII hard disk to SATAII connector, please read the "SATAII Hard Disk Setup Guide" on page 18 of "User Manual" in the support CD to adjust your SATAII hard disk drive to SATAII - ASRock PV530A | Quick Installation Guide - Page 8
Data: With the status window, you can easily power supply must meet the standard of 5v standby power efficiency is higher than 50% under 100 mA current consumption. For EuP ready power supply selection, we recommend you checking with the power supply manufacturer for more details. 8 ASRock PV530A - ASRock PV530A | Quick Installation Guide - Page 9
bag that comes with the component. Before you install or remove any component, ensure that the power is switched off or the power cord is detached from the power supply. Failure to do so may cause severe damage to the motherboard, peripherals, and/or components. 9 ASRock PV530A Motherboard English - ASRock PV530A | Quick Installation Guide - Page 10
do not use the DDR2 slots and DDR3 slot at the same time. You can choose to install either DDR2 or DDR3 memory module. Installing a DIMM Please make sure to disconnect power supply before adding or removing DIMMs or in place and the DIMM is properly seated. 10 ASRock PV530A Motherboard English - ASRock PV530A | Quick Installation Guide - Page 11
card Step 1. Before installing the expansion card, please make sure that the power supply is switched off or the power cord is unplugged. Please read the documentation of the expansion card and make to the chassis with screws. Step 6. Replace the system cover. 11 ASRock PV530A Motherboard English - ASRock PV530A | Quick Installation Guide - Page 12
USB4_5/6_7 wake up events. Note: To select +5VSB, it requires 2 Amp and higher standby current provided by power supply. Clear CMOS Jumper (CLRCMOS1) (see p.2, No. 14) Default Clear CMOS Note: CLRCMOS1 allows you to before you do the clear-CMOS action. English 12 ASRock PV530A Motherboard - ASRock PV530A | Quick Installation Guide - Page 13
Audio supports Jack Sensing, but the panel wire on the chassis must support HDA to function correctly. Please follow the instruction in our manual and chassis manual to install your system. 2. If you use AC'97 audio panel, please install it to the front panel audio header as below: 13 ASRock PV530A - ASRock PV530A | Quick Installation Guide - Page 14
provides 24-pin ATX power connector, it can still work if you adopt a traditional 20-pin ATX power supply. To use the 20-pin ATX power supply, please plug your power supply along with Pin 1 and Pin 13. 24 13 20-Pin ATX Power Supply Installation 12 1 English 14 ASRock PV530A Motherboard - ASRock PV530A | Quick Installation Guide - Page 15
Driver Installation Guide To install the drivers to your system, please insert the support CD to your optical drive first. Then, the drivers compatible to your system can be auto-detected and listed on the support CD driver apply Untied Overclocking Technology. 15 ASRock PV530A Motherboard English - ASRock PV530A | Quick Installation Guide - Page 16
refer to the User Manual (PDF file) contained in the Support CD. 4. Software Support CD information This motherboard supports various Microsoft® Windows® operating systems: 7 / VistaTM / XP. The Support CD that came with the motherboard contains necessary drivers and useful utilities that will - ASRock PV530A | Quick Installation Guide - Page 17
benötigen, besuchen Sie bitte unsere Webseite: www.asrock.com/support/index.asp 1.1 Kartoninhalt ASRock PV530A Motherboard (Micro ATX-Formfaktor: 21.6 cm x 17.0 cm; 8.5 Zoll x 6.7 Zoll) ASRock PV530A Schnellinstallationsanleitung ASRock PV530A Support-CD Zwei Seriell-ATA- (SATA) Datenkabel (Option - ASRock PV530A | Quick Installation Guide - Page 18
ATX-Formfaktor: 21.6 cm x 17.0 cm; 8.5 Zoll x 6.7 Zoll - Festkondensator für CPU-Leistung - VIA® PV530-Prozessor (1.8 GHz) - Unterstützt FSB800 MHz - Unterstützt Untied-Übertaktungstechnologie (siehe VORSICHT 1) - VIA® VX900 A3 - 1 x Steckplätze für DDR3 - Unterstützt DDR3 VIA VIA (ECP/EPP Support) - 1 - ASRock PV530A | Quick Installation Guide - Page 19
ATX- XP Zertifizierungen - FCC, CE, WHQL - Gemäß Ökodesign-Richtlinie (ErP/EuP) (Stromversorgung gemäß Ökodesign-Richtlinie (ErP/EuP) erforderlich) (siehe VORSICHT 14) * Für die ausführliche Produktinformation, besuchen Sie bitte unsere Website: http://www.asrock.com Deutsch 19 ASRock PV530A - ASRock PV530A | Quick Installation Guide - Page 20
Bitte überprüfen Sie VIA® website für die "Bedienungsanleitung" auf der Support-CD, um Ihre SATAII Windows® Umgebung zu erreichen. Besuchen Sie bitte unsere Website für die Operationsverfahren von ASRock OC Tuner. ASRock-Website: http://www.asrock.com 6. ASRock ASRock PV530A Motherboard Deutsch - ASRock PV530A | Quick Installation Guide - Page 21
sorgt, dass Sie immer mit Ihren Freunden in Verbindung bleiben. Die SmartView-Funktionen konnen Sie mit den Windows®Betriebssystemen 7 / VistaTM und dem Internet Explorer ab Version 8 nutzen. ASRock-Website: http://www.asrock.com/Feature/SmartView/ index.asp 21 ASRock PV530A Motherboard Deutsch - ASRock PV530A | Quick Installation Guide - Page 22
Die Leistung kann je nach Eigenschaften des Gerätes variieren. 11. ASRock XFast LAN bietet einen schnelleren Internetzugang mit den nachfolgenden Vorteilen. LAN-Anwendungspriorisierung wir Ihnen, weitere Details beim Hersteller der Stromversorgung abzufragen. 22 ASRock PV530A Motherboard Deutsch - ASRock PV530A | Quick Installation Guide - Page 23
die USB4_5/6_7- Weckfunktionen zu aktivieren. Hinweis: Um +5VSB nutzen zu können, muss das Netzteil auf dieser Leitung 2A oder mehr leisten können. Deutsch 23 ASRock PV530A Motherboard - ASRock PV530A | Quick Installation Guide - Page 24
nach dem Aktualisieren des BIOS löschen müssen, müssen Sie zuerst das System starten und dann wieder ausschalten, bevor Sie den CMOS-Inhalt löschen. Deutsch 24 ASRock PV530A Motherboard - ASRock PV530A | Quick Installation Guide - Page 25
Interface zu einem Audio-Panel auf der Vorderseite Ihres Gehäuses, ermöglicht Ihnen eine bequeme Anschlussmöglichkeit und Kontrolle über Audio-Geräte. 25 ASRock PV530A Motherboard - ASRock PV530A | Quick Installation Guide - Page 26
11) (3-pin PWR_FAN1) (siehe S.2, No. 1) CPU-Lüfteranschluss (3-pin CPU_FAN1) (siehe S.2 - No. 23) ATX-Netz-Header 24 13 (24-pin ATXPWR1) 12 1 (siehe S.2 - No. 3) Schließen Sie den Gehä an. Verbinden Sie die ATXStromversorgung mit diesem Header. 26 ASRock PV530A Motherboard Deutsch - ASRock PV530A | Quick Installation Guide - Page 27
pol. ATX-Stromanschluss bietet, kann es auch mit einem modifizierten traditionellen 20-pol. ATX-Netzteil verwendet werden. Um ein 20-pol. ATX-Netzteil zu verwenden, stecken Sie den Stecker mit Pin 1 und Pin 13 ein. 24 13 Installation eines 20-pol. ATX-Netzteils 12 1 Deutsch 27 ASRock PV530A - ASRock PV530A | Quick Installation Guide - Page 28
> während des POST (Power-On-Self-Test) um Support CD. 3. Software Support CD information Dieses Motherboard unterstützt eine Reiche von Microsoft® Windows® Betriebssystemen: 7 / VistaTM / XP. Die Ihrem Motherboard beigefügte Support .EXE im BIN-Verzeichnis der Support-CD, um die Menüs aufzurufen - ASRock PV530A | Quick Installation Guide - Page 29
ères au modèle que vous utilisez. www.asrock.com/support/index.asp 1.1 Contenu du paquet Carte mère ASRock PV530A (Facteur de forme Micro ATX : 8.5 pouces x 6.7 pouces, 21.6 cm x 17.0 cm) Guide d'installation rapide ASRock PV530A CD de soutien ASRock PV530A Deux câble de données Serial ATA (SATA - ASRock PV530A | Quick Installation Guide - Page 30
de forme Micro ATX : 8.5 pouces x 6.7 pouces, 21.6 cm x 17.0 cm - Condensateur résistant pour alimentation de processeur - Processeur VIA® PV530 (1.8 GHz) - FSB800 MHz - Prend en charge la technologie Untied Overclocking (voir ATTENTION 1) - VIA® VX900 A3 - 1 x slot DIMM DDR3 - Supporte DDR3 800 non - ASRock PV530A | Quick Installation Guide - Page 31
Support SMBIOS 2.3.1 CD d'assistance - Pilotes, utilitaires, logiciel anti-virus (Version d'essai), CyberLink MediaEspresso 6.5 Trial, Suite logicielle ASRock la tension: +12V, +5V, +3.3V, Vcore OS - Microsoft® Windows® 7 / VistaTM / XP Certifications - FCC, CE, WHQL - Prêt pour ErP/EuP ( - ASRock PV530A | Quick Installation Guide - Page 32
lire le Guide « Installation du disque dur SATAII » à la page 18 du « Manuel de l'utilisateur » qui se trouve sur le CD de support pour régler Windows®. S'il vous plaît visitez notre site web pour le fonctionnement des procédures de Tuner ASRock OC. ASRock website: http://www.asrock.com 6. O ASRock - ASRock PV530A | Quick Installation Guide - Page 33
fonction SmartView, veuillez vous as surer que votre système d'exploitation est Windows® 7 / VistaTM, et que la version de votre navigateur est IE8. Site web ASRock : http://www.asrock.com/Feature/SmartView/index.asp 10. ASRock XFast USB permet d'améliorer les performances de votre périphérique de - ASRock PV530A | Quick Installation Guide - Page 34
11. ASRock XFast LAN fournit un acces Internet plus rapide, avec les avantages suivants. Priorisation d¡¦application LAN : Vous pouvez confi lectrique conforme à la norme EuP, nous vous recommandons de consulter votre fournisseur de courant pour plus de détails. 34 ASRock PV530A Motherboard Français - ASRock PV530A | Quick Installation Guide - Page 35
de réveiller le système. Note: Pour sélectionner +5VSB, il faut obligatoirement 2 Amp et un courant standby supérieur fourni par l'alimentation. Français 35 ASRock PV530A Motherboard - ASRock PV530A | Quick Installation Guide - Page 36
, vous devez d'abord initialiser le système, puis le mettre hors tension avant de procéder à l'opération d'effacement de la CMOS. Français 36 ASRock PV530A Motherboard - ASRock PV530A | Quick Installation Guide - Page 37
2.0 par défaut sur le panneau E/S, il y a deux embases USB 2.0 sur cette carte mère. Chaque embase USB 2.0 peut prendre en charge 2 ports USB 2.0. Français 37 ASRock PV530A Motherboard - ASRock PV530A | Quick Installation Guide - Page 38
de panneau sur le châssis doit prendre en charge le HDA pour fonctionner correctement. Veuillez suivre les instructions dans notre manuel et le manuel de châssis afin installer votre système. 2. Si vous utilisez de ventilateur d'UC sur ce connecteur et brancher le fil 38 ASRock PV530A Motherboard - ASRock PV530A | Quick Installation Guide - Page 39
fonctionner si vous adopter une alimentation traditionnelle ATX 20 broches. Pour utiliser une alimentation ATX 20 broches, branchez à l'alimentation électrique ainsi qu'aux broches 1 et 13. 24 13 20-Installation de l'alimentation électrique ATX 12 1 e. Français 39 ASRock PV530A Motherboard - ASRock PV530A | Quick Installation Guide - Page 40
presser pendant le POST (Power-On-Self-Test) pour entrer dans Guide de l'utilisateur (fichier PDF) dans le CD technique. 3. Informations sur le CD de support Cette carte mère supporte divers systèmes d'exploitation Microsoft® Windows®: 7 / VistaTM / XP ASRock PV530A Motherboard Français - ASRock PV530A | Quick Installation Guide - Page 41
sul modello che si sta usando. www.asrock.com/support/index.asp 1.1 Contenuto della confezione Scheda madre ASRock PV530A (Micro ATX Form Factor: 8.5-in x 6.7-in, 21.6 cm x 17.0 cm) Guida di installazione rapida ASRock PV530A CD di supporto ASRock PV530A Due cavo dati Serial ATA (SATA) (Opzionale - ASRock PV530A | Quick Installation Guide - Page 42
ATX Form Factor: 8.5-in x 6.7-in, 21.6 cm x 17.0 cm - Condensatore solido per alimentazione CPU Processore - Processore VIA® PV530 (1.8 GHz) - FSB800 MHz - Supporta la tecnologia overclocking "slegata" (vedi ATTENZIONE 1) Chipset - VIA® VX900 A3 Memoria - 1 x slot DDR3 DIMM - Supporto DDR3 - ASRock PV530A | Quick Installation Guide - Page 43
Monitor- - Sensore per la temperatura del processore aggio - Sensore temperatura scheda madre Hardware - Indicatore di velocita per la ventola del CPU/Chassis/ Alimentazione - Voltaggio: +12V, +5V, +3.3V, Vcore Compatibi- - Microsoft® Windows® 7 / VistaTM / XP lità SO Certifica- - FCC, CE - ASRock PV530A | Quick Installation Guide - Page 44
riferimento al sito internet VIA® per le ultime " a pagina 18 del "Manuale utente" nel CD in dotazione Windows®. Prego visitare il nostro sito Internet per ulteriori dettagli circa l'uso del Sintonizzatore ASRock OC. ASRock website: http://www.asrock.com 6. ASRock ASRock PV530A Motherboard Italiano - ASRock PV530A | Quick Installation Guide - Page 45
, come iPhone/iPod/iPad Touch, ASRock ha preparato una soluzione meravigliosa: ASRock APP Charger. Basta installare il driver APP Charger per caricare l'iPhone pi l'apposita pasta siliconica tra il processore e il dissipatore quando si installa il sistema. 45 ASRock PV530A Motherboard Italiano - ASRock PV530A | Quick Installation Guide - Page 46
a +5VSB (standby) e abilitare USB4_5/6_7 wake up events. Nota: Per selezionare +5VSB, si richiedono almeno 2 Ampere e il consumo di corrente in standby sarà maggiore. 46 ASRock PV530A Motherboard Italiano - ASRock PV530A | Quick Installation Guide - Page 47
ATA (SATA) (Opzionale) Entrambe le estremità del cavo dati SATA possono collegarsi all'hard disk SATA / SATAII o al connettore SATAII sulla scheda madre. Italiano 47 ASRock PV530A Motherboard - ASRock PV530A | Quick Installation Guide - Page 48
) per far sì che questa operi in modo corretto. Attenersi alle istruzioni del nostro manuale e del manuale del telaio per installare il sistema. 2. Se si utilizza un pannello audio AC'97 ) (vedi p.2 Nr. 13) Collegare le casse del telaio a questo collettore. 48 ASRock PV530A Motherboard Italiano - ASRock PV530A | Quick Installation Guide - Page 49
un connettore elettrico ATX a 24 pin, ma può funzionare lo stesso se si adotta un alimentatore ATX a 20 pin. Per usare l'alimentatore ATX a 20 pin, collegare l'alimentatore con il Pin 1 e il Pin 13. 24 13 Installazione dell'alimentatore ATX a 20 pin 12 1 Italiano 49 ASRock PV530A Motherboard - ASRock PV530A | Quick Installation Guide - Page 50
Manuale dell'Utente (PDF file) contenuto nel cd di supporto. 3. Software di supporto e informazioni su CD Questa scheda madre supporta vari sistemi operativi Microsoft® Windows®: 7 / VistaTM / XP. Il CD di supporto a corredo della scheda madre contiene i driver 50 ASRock PV530A Motherboard Italiano - ASRock PV530A | Quick Installation Guide - Page 51
mero de modelo específico de su placa. www.asrock.com/support/index.asp 1.1 Contenido de la caja Placa base ASRock PV530A (Factor forma Micro ATX: 21,6 cm x 17,0 cm, 8,5" x 6,7") Guía de instalación rápida de ASRock PV530A CD de soporte de ASRock PV530A Dos Cable de Datos Serial ATA (SATA) (Opcional - ASRock PV530A | Quick Installation Guide - Page 52
ATX: 21,6 cm x 17,0 cm, 8,5" x 6,7" - Condensador sólido para alimentación de CPU - Procesador VIA® PV530 (1.8 GHz) - FSB800 MHz - Admite tecnología de aumento de velocidad liberada (vea ATENCIÓN 1) - VIA® VX900 A3 - 1 x DDR3 DIMM slots - Soporta DDR3 Micrófono Español 52 ASRock PV530A Motherboard - ASRock PV530A | Quick Installation Guide - Page 53
/ XP Certificaciones - FCC, CE, WHQL - Cumple con la directiva ErP/EuP (se requiere una fuente de alimentación que cumpla con la directiva ErP/EuP) (vea ATENCIÓN 14) * Para más información sobre los productos, por favor visite nuestro sitio web: http://www.asrock.com Español 53 ASRock PV530A - ASRock PV530A | Quick Installation Guide - Page 54
compruebe el Web site de VIA® para la información más la página 18 del "Manual de usuario" que se Windows®. Por favor visite nuestro sitio web para los procedimientos de operación de Sintonizador de ASRock OC. Sitio web de ASRock: http://www.asrock.com 6. ASRock ASRock PV530A Motherboard Español - ASRock PV530A | Quick Installation Guide - Page 55
ón SmartView asegúrese de que la versión de su sistema operativo es Windows® 7 / VistaTM y que la versión de su explorador es IE8. Sitio Web de ASRock: http://www.asrock.com/Feature/SmartView/index.asp 10. ASRock XFast USB puede aumentar el rendimiento de los dispositivos de almacenamiento USB. El - ASRock PV530A | Quick Installation Guide - Page 56
11. ASRock XFast LAN proporciona un acceso a Internet mas rapido, que incluye las ventajas que se indican a continuacion. Priorizacion de la directiva EuP, le recomendamos que consulte con el fabricante de la fuente de alimentación para obtener más detalles. 56 ASRock PV530A Motherboard Español - ASRock PV530A | Quick Installation Guide - Page 57
) para USB4_5/6_7 wake up events. Atención: Para elegir +5VSB, se necesita corriente mas que 2 Amp proveida por la fuente de electricidad. Español 57 ASRock PV530A Motherboard - ASRock PV530A | Quick Installation Guide - Page 58
finalizar la actualización de la BIOS, debe arrancar primero el sistema y, a continuación, apagarlo antes de realizar la acción de borrado de CMOS. Español 58 ASRock PV530A Motherboard - ASRock PV530A | Quick Installation Guide - Page 59
) (vea p.2, N. 18) Este es una interface para cable de audio de panel frontal que permite conexión y control conveniente de apparatos de Audio. Español 59 ASRock PV530A Motherboard - ASRock PV530A | Quick Installation Guide - Page 60
panel en el chasis debe soportar HDA para operar correctamente. Por favor, siga las instrucciones en nuestro manual y en el manual de chasis para instalar su sistema. 2. Si utiliza el panel de sonido AC'97, instálelo el cable negro con el conector de tierra. Español 60 ASRock PV530A Motherboard - ASRock PV530A | Quick Installation Guide - Page 61
si utiliza una fuente de alimentación ATX de 20 pins tradicional. Para usar una fuente de alimentación ATX de 20 pins, por favor, conecte su fuente de alimentación usando los Pins 1 y 13. 24 13 Instalación de una Fuente de Alimentación ATX de 20 Pins 12 1 Español 61 ASRock PV530A Motherboard - ASRock PV530A | Quick Installation Guide - Page 62
Manual del usuario (archivo PDF), que se encuentra en el CD de soporte. 3.Información de Software Support CD Esta placa-base soporta diversos tipos de sistema operativo Windows®: 7 / VistaTM / XP El CD de instalación que acompaña la placa-base trae todos los drivers ASRock PV530A Motherboard Español - ASRock PV530A | Quick Installation Guide - Page 63
63 ASRock PV530A Motherboard - ASRock PV530A | Quick Installation Guide - Page 64
64 ASRock PV530A Motherboard - ASRock PV530A | Quick Installation Guide - Page 65
65 ASRock PV530A Motherboard - ASRock PV530A | Quick Installation Guide - Page 66
66 ASRock PV530A Motherboard - ASRock PV530A | Quick Installation Guide - Page 67
67 ASRock PV530A Motherboard - ASRock PV530A | Quick Installation Guide - Page 68
Short Open 68 ASRock PV530A Motherboard - ASRock PV530A | Quick Installation Guide - Page 69
SATAII_2 SATAII_1 69 ASRock PV530A Motherboard - ASRock PV530A | Quick Installation Guide - Page 70
70 ASRock PV530A Motherboard - ASRock PV530A | Quick Installation Guide - Page 71
24 13 12 1 24 13 12 1 71 ASRock PV530A Motherboard - ASRock PV530A | Quick Installation Guide - Page 72
72 ASRock PV530A Motherboard - ASRock PV530A | Quick Installation Guide - Page 73
ífica acerca do modelo que está a utilizar. www.asrock.com/support/index.asp 1.1 Este pacote contém Placa-mãe ASRock PV530A (Formato Micro ATX: 8,5 pol. x 6,7 pol., 21,6 cm x 17,0 cm) Guia de instalação rápida da ASRock PV530A CD de suporte da placa ASRock PV530A Dois cabo de dados ATA Serial (SATA - ASRock PV530A | Quick Installation Guide - Page 74
ATX: 8,5 pol. x 6,7 pol., 21,6 cm x 17,0 cm - Condensador Solid para alimentação da CPU - Processador VIA® PV530 (1.8 GHz) - FSB800 MHz - Suporta a tecnologia Untied Overclocking (veja o AVISO 1) - VIA® VX900 A3 - 1 x slot de DDR3 / microfone + porta de jogos 74 ASRock PV530A Motherboard Português - ASRock PV530A | Quick Installation Guide - Page 75
do ATX de 24 Windows® 7 / VistaTM / XP Operacional Certificações - FCC, CE, WHQL - "ErP/EuP Ready" (é necessária alimentação eléctrica "ErP/ EuP Ready") (veja o AVISO 14) * Para informações mais detalhadas por favor visite o nosso sítio Web: http://www.asrock.com Português 75 ASRock PV530A - ASRock PV530A | Quick Installation Guide - Page 76
permite vigiar i seu sistema via a função de monitorização de hardware e proceder ao overclock dos dispositivos de hardware para obter o melhor desempenho em ambiente Windows®. Por favor visite o nosso sítio Web para conhecer os procedimentos de funcionamento do Sintonizador ASRock OC. Sítio Web da - ASRock PV530A | Quick Installation Guide - Page 77
versão de SO é Windows® 7 / VistaTM, e que a versão do seu navegador é IE8. Página Web da ASRock: http://www.asrock.com/Feature/SmartView/ index.asp 10. O ASRock XFast USB pode aumentar a facilmente os fluxos de dados das suas transferências actuais. 77 ASRock PV530A Motherboard Português - ASRock PV530A | Quick Installation Guide - Page 78
mA. Para selecção da fonte de alimentação em conformidade com a norma EuP, recomendamos que confirme com o fabricante da fonte de alimentação para mais detalhes. 78 ASRock PV530A Motherboard Português - ASRock PV530A | Quick Installation Guide - Page 79
(stand by) para eventos de wake up na USB4_5/6_7. Nota: Para escolher +5VSB, é preciso uma corrente de stand by de 2 A ou mais. Português 79 ASRock PV530A Motherboard - ASRock PV530A | Quick Installation Guide - Page 80
. Se precisar limpar o CMOS ao concluir a atualização do BIOS, deverá reiniciar o sistema primeiro e, em seguida, desligá-lo antes de executar a ação de limpeza o CMOS. Português 80 ASRock PV530A Motherboard - ASRock PV530A | Quick Installation Guide - Page 81
USB 2.0 por defeito no painel de entrada/saída, há dois ligações USB 2.0 nesta placamãe. Cada ligação USB 2.0 pode suportar dois portas USB 2.0. Português 81 ASRock PV530A Motherboard - ASRock PV530A | Quick Installation Guide - Page 82
no chassis tem de suportar HDA para funcionar correctamente. Siga s instruções que aparecem no manual e no manual do chassis para instalar o sistema. 2. Se utilizar o painel de áudio AC'97, instale CPU, coincidindo o fio preto com o pino de aterramento. Português 82 ASRock PV530A Motherboard - ASRock PV530A | Quick Installation Guide - Page 83
usar a fonte de alimentação de 29 pinos, por favor ligue a sua fonte de alimentação com o Pino 1 e o Pino 13. 24 13 Instalação da Fonte de alimentação ATX de 20 Pinos 12 1 Português 83 ASRock PV530A Motherboard - ASRock PV530A | Quick Installation Guide - Page 84
Manual do Usuário (arquivo PDF) no CD de suporte. 3. Informações do CD de Suporte Esta placa Mãe suporta vários sistemas operacionais: Microsoft® Windows®: 7 / VistaTM / XP. O CD de instalação que acompanha a placa Mãe contem: drivers " localizado na pasta BIN. 84 ASRock PV530A Motherboard Português - ASRock PV530A | Quick Installation Guide - Page 85
Türkçe 85 ASRock PV530A Motherboard - ASRock PV530A | Quick Installation Guide - Page 86
Türkçe 86 ASRock PV530A Motherboard - ASRock PV530A | Quick Installation Guide - Page 87
Türkçe 87 ASRock PV530A Motherboard - ASRock PV530A | Quick Installation Guide - Page 88
Türkçe 88 ASRock PV530A Motherboard - ASRock PV530A | Quick Installation Guide - Page 89
Türkçe 89 ASRock PV530A Motherboard - ASRock PV530A | Quick Installation Guide - Page 90
Short Open Türkçe Default Clear CMOS 90 ASRock PV530A Motherboard - ASRock PV530A | Quick Installation Guide - Page 91
SATAII_2 SATAII_1 91 ASRock PV530A Motherboard Türkçe - ASRock PV530A | Quick Installation Guide - Page 92
Türkçe 24 13 12 1 24 13 12 1 92 ASRock PV530A Motherboard - ASRock PV530A | Quick Installation Guide - Page 93
Türkçe 93 ASRock PV530A Motherboard - ASRock PV530A | Quick Installation Guide - Page 94
94 ASRock PV530A Motherboard - ASRock PV530A | Quick Installation Guide - Page 95
® ® ® ® ® 95 ASRock PV530A Motherboard - ASRock PV530A | Quick Installation Guide - Page 96
® 96 ASRock PV530A Motherboard - ASRock PV530A | Quick Installation Guide - Page 97
" " ® ® " " " " ® ® 97 ASRock PV530A Motherboard - ASRock PV530A | Quick Installation Guide - Page 98
® 98 ASRock PV530A Motherboard - ASRock PV530A | Quick Installation Guide - Page 99
"" "" "" "" "" 99 ASRock PV530A Motherboard - ASRock PV530A | Quick Installation Guide - Page 100
SATAII_2 SATAII_1 100 ASRock PV530A Motherboard - ASRock PV530A | Quick Installation Guide - Page 101
24 13 12 1 24 12 ASRock PV530A Motherboard 13 1 101 - ASRock PV530A | Quick Installation Guide - Page 102
" " " " \\ 102 ASRock PV530A Motherboard
-
 1
1 -
 2
2 -
 3
3 -
 4
4 -
 5
5 -
 6
6 -
 7
7 -
8
-
9
-
10
-
11
-
12
-
13
-
14
-
15
-
16
-
17
-
18
-
19
-
20
-
21
-
22
-
23
-
24
-
25
-
26
-
27
-
28
-
29
-
30
-
31
-
32
-
33
-
34
-
35
-
36
-
37
-
38
-
39
-
40
-
41
-
42
-
43
-
44
-
45
-
46
-
47
-
48
-
49
-
50
-
51
-
52
-
53
-
54
-
55
-
56
-
57
-
58
-
59
-
60
-
61
-
62
-
63
-
64
-
65
-
66
-
67
-
68
-
69
-
70
-
71
-
72
-
73
-
74
-
75
-
76
-
77
-
78
-
79
-
80
-
81
-
82
-
83
-
84
-
85
-
86
-
87
-
88
-
89
-
90
-
91
-
92
-
93
-
94
-
95
-
96
-
97
-
98
-
99
-
100
-
101
-
102
 |
 |

1
ASRock
PV530A
Motherboard
English
English
English
English
English
Copyright Notice:
Copyright Notice:
Copyright Notice:
Copyright Notice:
Copyright Notice:
No part of this installation guide may be reproduced, transcribed, transmitted, or trans-
lated in any language, in any form or by any means, except duplication of documen-
tation by the purchaser for backup purpose, without written consent of ASRock Inc.
Products and corporate names appearing in this guide may or may not be registered
trademarks or copyrights of their respective companies, and are used only for identifica-
tion or explanation and to the owners’ benefit, without intent to infringe.
Disclaimer:
Disclaimer:
Disclaimer:
Disclaimer:
Disclaimer:
Specifications and information contained in this guide are furnished for informational
use only and subject to change without notice, and should not be constructed as a
commitment by ASRock. ASRock assumes no responsibility for any errors or omissions
that may appear in this guide.
With respect to the contents of this guide, ASRock does not provide warranty of any kind,
either expressed or implied, including but not limited to the implied warranties or
conditions of merchantability or fitness for a particular purpose. In no event shall
ASRock, its directors, officers, employees, or agents be liable for any indirect, special,
incidental, or consequential damages (including damages for loss of profits, loss of
business, loss of data, interruption of business and the like), even if ASRock has been
advised of the possibility of such damages arising from any defect or error in the guide
or product.
This device complies with Part 15 of the FCC Rules. Operation is subject to the
following two conditions:
(1)
this device may not cause harmful interference, and
(2)
this device must accept any interference received, including interference that
may cause undesired operation.
Published November 2011
Copyright
©
2011 ASRock INC. All rights reserved.
CALIFORNIA, USA ONLY
The Lithium battery adopted on this motherboard contains Perchlorate, a toxic
substance controlled in Perchlorate Best Management Practices (BMP) regulations
passed by the California Legislature. When you discard the Lithium battery in
California, USA, please follow the related regulations in advance.
“Perchlorate Material-special handling may apply, see
www
.dtsc.ca.gov/hazardouswa
ste/perchlorate”
ASRock Website: http://www.asrock.com