ASRock Wolfdale1333-DVI Quick Installation Guide
ASRock Wolfdale1333-DVI Manual
 |
View all ASRock Wolfdale1333-DVI manuals
Add to My Manuals
Save this manual to your list of manuals |
ASRock Wolfdale1333-DVI manual content summary:
- ASRock Wolfdale1333-DVI | Quick Installation Guide - Page 1
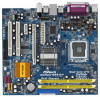
for backup purpose, without written consent of ASRock Inc. Products and corporate names appearing in this guide may or may not be registered trademarks or ASRock Website: http://www.asrock.com Published October 2007 Copyright©2007 ASRock INC. All rights reserved. 1 ASRock Wolfdale1333-DVI Motherboard - ASRock Wolfdale1333-DVI | Quick Installation Guide - Page 2
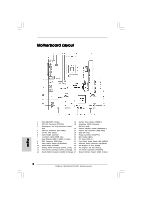
x1 Slot (PCIE2) 11 Primary SATAII Connector (SATAII_1; Red) 25 PCI Express x16 Slot (PCIE1) 12 Third SATAII Connector (SATAII_3; Orange) 26 ATX Power Connector (ATXPWR1) 13 Fourth SATAII Connector (SATAII_4; Orange) 27 Shared USB 2.0 Header (USB4_5, Blue) 2 ASRock Wolfdale1333-DVI Motherboard - ASRock Wolfdale1333-DVI | Quick Installation Guide - Page 3
1 PS/2 Mouse Port (Green) 2 Parallel Port 3 USB 2.0 Ports (USB23) 4 RJ-45 Port 5 Line In (Light Blue) 6 Line Out (Lime) 7 Microphone (Pink) 8 Shared USB 2.0 Ports (USB45) 9 USB 2.0 Ports (USB01) 10 VGA Port 11 COM Port 12 PS/2 Keyboard Port (Purple) English 3 ASRock Wolfdale1333-DVI Motherboard - ASRock Wolfdale1333-DVI | Quick Installation Guide - Page 4
Wolfdale1333-DVI Motherboard (Micro ATX Form Factor: 9.6-in x 8.7-in, 24.4 cm x 22.1 cm) ASRock Wolfdale1333-DVI Quick Installation Guide ASRock Wolfdale1333-DVI Support CD One 80-conductor Ultra ATA 66/100 IDE Ribbon Cable One Ribbon Cable for a 3.5-in Floppy Drive One Serial ATA (SATA) Data Cable - ASRock Wolfdale1333-DVI | Quick Installation Guide - Page 5
8101E - Speed: 10/100 Ethernet - Supports Wake-On-LAN ASRock 6CH I/O Plus - 1 x PS/2 Mouse Port - 1 x PS/2 Keyboard Port - 1 x Serial Port: COM1 - 1 x VGA Port - 1 x Parallel Port (ECP/EPP Support) - 6 x Ready-to-Use USB 2.0 Ports - 1 x RJ-45 LAN Port English 5 ASRock Wolfdale1333-DVI Motherboard - ASRock Wolfdale1333-DVI | Quick Installation Guide - Page 6
ATA100 IDE connector (supports 2 x IDE devices) - 1 x Floppy connector - 1 x DeskExpress Hot Plug Detection header - CPU/Chassis FAN connector - 24 pin ATX power connector - 4 pin 12V power connector - CD in header - Front panel audio connector - 1 x USB 2.0 header (supports 2 USB 2.0 ports; shared - ASRock Wolfdale1333-DVI | Quick Installation Guide - Page 7
your SATAII hard disk drive to SATAII mode. You can also connect SATA hard disk to SATAII connector directly. 11. Power Management for USB 2.0 works fine under Microsoft® Windows® VistaTM 64-bit / VistaTM / XP 64-bit / XP SP1 or SP2 / 2000 SP4. English 7 ASRock Wolfdale1333-DVI Motherboard - ASRock Wolfdale1333-DVI | Quick Installation Guide - Page 8
(WLAN) adapter. It allows you to create a wireless environment and enjoy the convenience of wireless network connectivity. Please visit our website for the availability of ASRock WiFi-802.11g / WiFi-802.11n module. ASRock website http://www.asrock.com 8 ASRock Wolfdale1333-DVI Motherboard English - ASRock Wolfdale1333-DVI | Quick Installation Guide - Page 9
placing screws into the screw holes to secure the motherboard to the chassis, please do not over-tighten the screws! Doing so may damage the motherboard. 2.1 CPU Installation For the installation of Intel . Otherwise, the CPU will be seriously damaged. 9 ASRock Wolfdale1333-DVI Motherboard English - ASRock Wolfdale1333-DVI | Quick Installation Guide - Page 10
orient keys. Step 3. Remove PnP Cap (Pick and Place Cap): Use your left hand index finger and thumb to support the load plate edge, engage PnP cap with right hand thumb and peel the cap from the socket while pressing on center of PnP cap to assist in removal. 10 ASRock Wolfdale1333-DVI Motherboard - ASRock Wolfdale1333-DVI | Quick Installation Guide - Page 11
refer to the instruction manuals of your CPU motherboard. Step 5. Step 6. Connect fan header with the CPU fan connector on the motherboard. Secure excess cable with tie-wrap to ensure cable does not interfere with fan operation or contact other components. 11 ASRock Wolfdale1333-DVI Motherboard - ASRock Wolfdale1333-DVI | Quick Installation Guide - Page 12
2.3 Installation of Memory Modules (DIMM) Wolfdale1333-DVI motherboard provides two 240-pin DDRII (Double Data Rate) DIMM slots, and supports Dual Channel Memory Technology. For dual channel configuration, you always need to install two identical (the same brand, speed, size and chip-type) memory - ASRock Wolfdale1333-DVI | Quick Installation Guide - Page 13
the bracket facing the slot that you intend to use. Keep the screws for later use. Step 3. Align the card connector with the slot and press firmly until the card is completely seated on the slot. Step 4. Fasten the card to the chassis with screws. 13 ASRock Wolfdale1333-DVI Motherboard English - ASRock Wolfdale1333-DVI | Quick Installation Guide - Page 14
Guide With the onboard VGA/D-Sub output and the external installation of our DVI Graphics-SI card, this motherboard provides users with dual VGA output support: DVI-D and D-Sub. You can easily enjoy the benefits of dual VGA output support by connecting the D-Sub monitor to the VGA/D-Sub port - ASRock Wolfdale1333-DVI | Quick Installation Guide - Page 15
. If you haven't installed Intel® VGA driver yet, please install Intel® VGA driver from our support CD to your system and restart your computer. Then you can start to use DVI-D output function with this motherboard. English utput connector Graphics-SI card 15 ASRock Wolfdale1333-DVI Motherboard - ASRock Wolfdale1333-DVI | Quick Installation Guide - Page 16
unplug the power cord from the power supply. After waiting for 15 seconds, use a jumper cap to short 2 pins on CLRCMOS1 for 5 seconds. English 16 ASRock Wolfdale1333-DVI Motherboard - ASRock Wolfdale1333-DVI | Quick Installation Guide - Page 17
) connect to the SATA HDD power connector connect to the power supply Please connect the black end of SATA power cable to the power connector on each drive. Then connect the white end of SATA power cable to the power connector of the power supply. 17 ASRock Wolfdale1333-DVI Motherboard English - ASRock Wolfdale1333-DVI | Quick Installation Guide - Page 18
connector allows you CD1 to receive stereo audio input from sound sources such as a CD-ROM, DVD-ROM, TV tuner card, or MPEG card. This is an interface for front panel audio cable that allows convenient connection and control of audio devices. English 18 ASRock Wolfdale1333-DVI Motherboard - ASRock Wolfdale1333-DVI | Quick Installation Guide - Page 19
No. 4) 4 3 2 1 Please connect the chassis speaker to this header. Please connect a chassis fan cable to this connector and match the black wire to the ground pin. Please connect a CPU fan cable to this connector and match the black wire to the ground pin. 19 ASRock Wolfdale1333-DVI Motherboard - ASRock Wolfdale1333-DVI | Quick Installation Guide - Page 20
(see p.2 No. 2) 20-Pin ATX Power Supply Installation 12 1 Please note that it is necessary to connect a power supply with ATX 12V plug to this connector so that it can provides sufficient power. Failing to do so will cause the failure to power up. English 20 ASRock Wolfdale1333-DVI Motherboard - ASRock Wolfdale1333-DVI | Quick Installation Guide - Page 21
.com/hdd/support/download.htm The above examples are just for your reference. For different SATAII hard disk products of different vendors, the jumper pin setting methods may not be the same. Please visit the vendors' website for the updates. English 21 ASRock Wolfdale1333-DVI Motherboard - ASRock Wolfdale1333-DVI | Quick Installation Guide - Page 22
Connect one end of the SATA data cable to the motherboard's SATAII connector. STEP 4: Connect the other end of the SATA data cable to the SATA / SATAII hard disk. 2.10 Driver Installation Guide To install the drivers to your system, please insert the support CD to your optical drive first. Then, the - ASRock Wolfdale1333-DVI | Quick Installation Guide - Page 23
drive. It will display the Main Menu automatically if "AUTORUN" is enabled in your computer. If the Main Menu does not appear automatically, locate and double-click on the file "ASSETUP. EXE" from the BIN folder in the Support CD to display the menus. 23 ASRock Wolfdale1333-DVI Motherboard English - ASRock Wolfdale1333-DVI | Quick Installation Guide - Page 24
24 ASRock Wolfdale1333-DVI Motherboard - ASRock Wolfdale1333-DVI | Quick Installation Guide - Page 25
® ® ® ® ® ® 25 ASRock Wolfdale1333-DVI Motherboard - ASRock Wolfdale1333-DVI | Quick Installation Guide - Page 26
® ® 26 ASRock Wolfdale1333-DVI Motherboard - ASRock Wolfdale1333-DVI | Quick Installation Guide - Page 27
® ® ® ® ® ® ® 27 ASRock Wolfdale1333-DVI Motherboard - ASRock Wolfdale1333-DVI | Quick Installation Guide - Page 28
28 ASRock Wolfdale1333-DVI Motherboard - ASRock Wolfdale1333-DVI | Quick Installation Guide - Page 29
29 ASRock Wolfdale1333-DVI Motherboard - ASRock Wolfdale1333-DVI | Quick Installation Guide - Page 30
30 ASRock Wolfdale1333-DVI Motherboard - ASRock Wolfdale1333-DVI | Quick Installation Guide - Page 31
31 ASRock Wolfdale1333-DVI Motherboard - ASRock Wolfdale1333-DVI | Quick Installation Guide - Page 32
32 ASRock Wolfdale1333-DVI Motherboard - ASRock Wolfdale1333-DVI | Quick Installation Guide - Page 33
33 ASRock Wolfdale1333-DVI Motherboard - ASRock Wolfdale1333-DVI | Quick Installation Guide - Page 34
34 ASRock Wolfdale1333-DVI Motherboard - ASRock Wolfdale1333-DVI | Quick Installation Guide - Page 35
® ® ® 35 ASRock Wolfdale1333-DVI Motherboard - ASRock Wolfdale1333-DVI | Quick Installation Guide - Page 36
SATAII_3 SATAII_1 SATAII_4 SATAII_2 36 ASRock Wolfdale1333-DVI Motherboard - ASRock Wolfdale1333-DVI | Quick Installation Guide - Page 37
CD1 37 ASRock Wolfdale1333-DVI Motherboard - ASRock Wolfdale1333-DVI | Quick Installation Guide - Page 38
® ® 4 3 2 1 38 ASRock Wolfdale1333-DVI Motherboard - ASRock Wolfdale1333-DVI | Quick Installation Guide - Page 39
24 13 12 1 24 13 12 1 39 ASRock Wolfdale1333-DVI Motherboard - ASRock Wolfdale1333-DVI | Quick Installation Guide - Page 40
40 ASRock Wolfdale1333-DVI Motherboard - ASRock Wolfdale1333-DVI | Quick Installation Guide - Page 41
® 41 ASRock Wolfdale1333-DVI Motherboard - ASRock Wolfdale1333-DVI | Quick Installation Guide - Page 42
® ® 42 ASRock Wolfdale1333-DVI Motherboard - ASRock Wolfdale1333-DVI | Quick Installation Guide - Page 43
X O O O X O O O O: X: O O O O 43 ASRock Wolfdale1333-DVI Motherboard - ASRock Wolfdale1333-DVI | Quick Installation Guide - Page 44
-DVI Motherboard (Micro ATX-Formfaktor: 24.4 cm x 22.1 cm; 9.6 Zoll x 8.7 Zoll) ASRock Wolfdale1333-DVI Schnellinstallationsanleitung ASRock Wolfdale1333-DVI_ Support-CD Ein 80-adriges Ultra-ATA 66/100 IDE-Flachbandkabel Ein Flachbandkabel für ein 3,5-Zoll-Diskettenlaufwerk Ein Seriell-ATA- (SATA - ASRock Wolfdale1333-DVI | Quick Installation Guide - Page 45
Booster Erweiterungssteckplätze Onboard-VGA Audio LAN E/A-Anschlüsse Audio (Realtek ALC660VD Audio Codec) - Realtek PCIE x1 LAN 8101E - Speed: 10/100 Ethernet - Unterstützt Wake-On-LAN ASRock 6CH I/O Plus - 1 x PS/2 Mouse Port - 1 x PS/2 Keyboard Port Deutsch 45 ASRock Wolfdale1333-DVI Motherboard - ASRock Wolfdale1333-DVI | Quick Installation Guide - Page 46
- Drehzahlmessung für Gehäuselüfter - CPU-Lüftergeräuschdämpfung - Spannungsüberwachung: +12V, +5V, +3.3V, Vcore Betriebssysteme - Unterstützt Microsoft® Windows® 2000 / XP / XP 64-Bit / VistaTM / VistaTM 64-Bit Zertifizierungen - FCC, CE, WHQL Deutsch 46 ASRock Wolfdale1333-DVI Motherboard - ASRock Wolfdale1333-DVI | Quick Installation Guide - Page 47
, ob der CPU-Lüfter am Motherboard richtig funktioniert, und stecken Sie bitte den Stromkabelstecker aus und dann wieder ein. Um die Wärmeableitung zu verbessern, bitte nicht vergessen, etwas Wärmeleitpaste zwischen CPU und Kühlkörper zu sprühen. Deutsch 47 ASRock Wolfdale1333-DVI Motherboard - ASRock Wolfdale1333-DVI | Quick Installation Guide - Page 48
sind Sie in der Lage, ein drahtloses Netzwerk aufzubauen und die Vorzüge drahtloser Anschlussmöglichkeiten zu genießen. Für Verfügbarkeit des ASRock WiFi-802.11g / WiFi-802.11n Moduls, siehe bitte unsere Webseite. ASRock Webseite http://www.asrock.com 48 ASRock Wolfdale1333-DVI Motherboard Deutsch - ASRock Wolfdale1333-DVI | Quick Installation Guide - Page 49
vom Stromnetz, bevor Sie eine ystemkomponente berühren, da es sonst zu schweren Schäden am Motherboard oder den sonstigen internen, bzw. externen omponenten kommen kann. 2. Um Schäden aufgrund von den Sockel, dies kann die CPU schwer beschädigen. Deutsch 49 ASRock Wolfdale1333-DVI Motherboard - ASRock Wolfdale1333-DVI | Quick Installation Guide - Page 50
zwei Orientierungskerben der CPU mit den beiden Markierungen des Sockels aus. Schritt 2-3. Drücken Sie die CPU vorsichtig in vertikaler Richtung in den Sockel. 50 ASRock Wolfdale1333-DVI Motherboard - ASRock Wolfdale1333-DVI | Quick Installation Guide - Page 51
Abreißen der PnP-Kappe. 2. Diese Kappe muss angebracht werden, falls Sie das Motherboard zur Reparatur bringen. Schritt 4. Sockel schließen: Schritt 4-1. Drehen Sie die Ladeplatte auf Sichern Sie Ladehebel und Ladeplatte mithilfe des Hebelverschlusses. 51 ASRock Wolfdale1333-DVI Motherboard Deutsch - ASRock Wolfdale1333-DVI | Quick Installation Guide - Page 52
ordnungsgemäß am Motherboard befestigt. Schritt 5. Schließen Sie den Lüfter an den CPULüfteranschluss des Motherboards. Schritt 6. Befestigen Sie überschüssiges Kabel mit Band, um eine Störung des Lüfters oder Kontakt mit anderen Teilen zu vermeiden. Deutsch 52 ASRock Wolfdale1333-DVI Motherboard - ASRock Wolfdale1333-DVI | Quick Installation Guide - Page 53
2.3 Installation der Speichermodule (DIMM) Das Wolfdale1333-DVI Motherboard bietet zwei 240polige DDRII (Double Data Rate) DIMM-Steckplätze und unterstützt Zweikanal-Speichertechnologie. Es des Moduls einschnappen und das DIMM-Modul fest an Ort und Stelle sitzt. 53 ASRock Wolfdale1333-DVI Motherboard - ASRock Wolfdale1333-DVI | Quick Installation Guide - Page 54
VGA-Karte in PCIE1 (PCIE x16Steckplatz) installieren, wird das integrierte VGA deaktiviert. Installieren Sie die zusätzliche PCI Express-VGA-Karte in PCIE1 (PCIE x16-Steckplatz) und setzen Sie die BIOS Sie die Karte mit der Schraube aus Schritt 2. 54 ASRock Wolfdale1333-DVI Motherboard Deutsch - ASRock Wolfdale1333-DVI | Quick Installation Guide - Page 55
auf Seite 54 angegeben. DVI Graphics-SI-Karte Schritt 2: Verbinden Sie den DVI-D-Anschluss des DVI-D-Eingangsmonitors mit dem DVI-D-Ausgang der DVI Graphics-SI-Karte, die in PCIE1 (PCIE x16Steckplatz) auf diesem Motherboard eingefügt ist. Deutsch 55 ASRock Wolfdale1333-DVI Motherboard - ASRock Wolfdale1333-DVI | Quick Installation Guide - Page 56
Intel® VGA-Treiber noch nicht installiert, dann installieren Sie bitte den Intel® VGA-Treiber von unserer Support-CD auf Ihrem System und starten Sie Ihren Computer neu. Hiernach können Sie die DVI-DAusgangsfunktion mit diesem Motherboard verwenden. Deutsch 56 ASRock Wolfdale1333-DVI Motherboard - ASRock Wolfdale1333-DVI | Quick Installation Guide - Page 57
Ausgang der DVI GraphicsSI-Karte 2.6 Einstellung der Jumper Die Abbildung verdeutlicht, wie Jumper gesetzt werden. Werden Pins durch Jumperkappen verdeckt Sie den Netzstecker und überbrücken Sie 2-pin von CLRCMOS1 mithilfe des Jumpers für 5 Sekunden. Deutsch 57 ASRock Wolfdale1333-DVI Motherboard - ASRock Wolfdale1333-DVI | Quick Installation Guide - Page 58
SATAII-Schnittstelle ermöglicht eine Datenübertragungsrate bis 3,0 Gb/s. Serial ATA- (SATA-) Datenkabel (Option) Sie können beide Enden des SATA-Datenkabels entweder mit der SATA / SATAIIFestplatte oder dem SATAII-Anschluss am Mainboard verbinden. Deutsch 58 ASRock Wolfdale1333-DVI Motherboard - ASRock Wolfdale1333-DVI | Quick Installation Guide - Page 59
SATA- ASRock WiFi-802.11g / WiFi-802.11n Modul, einem einfach zu bedienenden Wireless Local Area Network (WLAN) Adapter. Damit sind Sie in der Lage, ein drahtloses Netzwerk aufzubauen und die Vorzüge drahtloser Anschlussmöglichkeiten zu genießen. Deutsch 59 ASRock Wolfdale1333-DVI Motherboard - ASRock Wolfdale1333-DVI | Quick Installation Guide - Page 60
Audio-Geräte. 1. High Definition Audio das BIOS-Setup- Windows® VistaTM / VistaTM 64-Bit Betriebssystem: Die Rechtoberseite „Dateiordner" Ikone anklicken , „Schalttafel Buchse Entdeckung sperren" wählen und die Änderung speichern, indem Sie „OKAY" klicken. 60 ASRock Wolfdale1333-DVI Motherboard - ASRock Wolfdale1333-DVI | Quick Installation Guide - Page 61
) Verbinden Sie die ATX- 24 13 Stromversorgung mit diesem 12 1 Header. Obwohl dieses Motherboard einen 24-pol. ATX-Stromanschluss bietet, kann es auch mit einem modifizierten traditionellen 20-pol eines 20-pol. ATX-Netzteils 12 1 61 ASRock Wolfdale1333-DVI Motherboard Deutsch - ASRock Wolfdale1333-DVI | Quick Installation Guide - Page 62
und 6 ab. SAMSUNG Deutsch Falls die Pins 3 und 4 verbunden werden, wird SATA mit 1,5 Gb/s aktiviert. Wenn Sie andererseits SATA II mit 3,0 Gb/s aktivieren möchten, ziehen Sie bitte die Steckbrücke (Jumper : http://www.hitachigst.com/hdd/support/download.htm 62 ASRock Wolfdale1333-DVI Motherboard - ASRock Wolfdale1333-DVI | Quick Installation Guide - Page 63
SATA-Datenkabels am SATAII-Anschluss des Motherboards an. SCHRITT 4: Schließen Sie das andere Ende des SATA-Datenkabels an die SATA , stellen Sie bitte die Option "Overclock Mode" (Übertaktungsmodus) im BIOS von [Auto] auf [CPU, PCIE, Async.] um. Dadurch ASRock Wolfdale1333-DVI Motherboard Deutsch - ASRock Wolfdale1333-DVI | Quick Installation Guide - Page 64
der Support-CD, um die Menüs aufzurufen. Das Setup-Programm soll es Ihnen so leicht wie möglich machen. Es ist menügesteuert, d.h. Sie können in den verschiedenen Untermenüs Ihre Auswahl treffen und die Programme werden dann automatisch installiert. 64 ASRock Wolfdale1333-DVI Motherboard Deutsch - ASRock Wolfdale1333-DVI | Quick Installation Guide - Page 65
vous utilisez. www.asrock.com/support/index.asp 1.1 Contenu du paquet Carte mère ASRock Wolfdale1333-DVI (Facteur de forme Micro ATX : 9.6 pouces x 8.7 pouces, 24.4 cm x 22.1 cm) Guide d'installation rapide ASRock Wolfdale1333-DVI CD de soutien ASRock Wolfdale1333-DVI Un câble ruban IDE Ultra ATA 66 - ASRock Wolfdale1333-DVI | Quick Installation Guide - Page 66
independants - 5.1 Son haute définition de CH (codec audio Realtek ALC660VD) - Realtek PCIE x1 LAN 8101E - Vitesse: 10/100 Ethernet - Support du Wake-On-LAN ASRock 6CH I/O Plus - 1 x port souris PS/2 - 1 x port clavier PS/2 - 1 x port série: COM 1 Français 66 ASRock Wolfdale1333-DVI Motherboard - ASRock Wolfdale1333-DVI | Quick Installation Guide - Page 67
BIOS CD d'assistance Surveillance système OS Certifications - 1 x port VGA - 1 x port parallèle: Support ECP/EPP - 6 x ports USB 2.0 par défaut - 1 x port RJ-45 - Jack audio ® Windows® 2000 / XP / XP 64-bit / VistaTM / VistaTM 64-bit - FCC, CE, WHQL Français 67 ASRock Wolfdale1333-DVI Motherboard - ASRock Wolfdale1333-DVI | Quick Installation Guide - Page 68
les réglages du BIOS, appliquer la . 4. Cette carte mère supporte la Technologie de Mémoire à de bien lire le guide d'installation des modules mémoire 4 Go sous Windows® 2000, Windows® XP, Windows® XP 64-bit, Windows® VistaTM et Windows® VistaTM 64-bit ASRock Wolfdale1333-DVI Motherboard Français - ASRock Wolfdale1333-DVI | Quick Installation Guide - Page 69
veuillez lire le «Guide d'Installation du disque dur SATA directement sur le connecteur SATAII. 11. La gestion de l'alimentation pour l'USB 2.0 fonctionne bien sous Microsoft® Windows ASRock WiFi-802.11g / WiFi802.11n. Site ASRock http://www.asrock.com 69 ASRock Wolfdale1333-DVI Motherboard Français - ASRock Wolfdale1333-DVI | Quick Installation Guide - Page 70
, placez-le sur un support antistatique ou dans son sachet d'origine. 5. Lorsque vous placez les vis dans les orifices pour vis pour fixer la carte mère sur le châssis, ne serrez pas trop les vis ! Vous risquez sinon d'endommager la carte mère. 70 ASRock Wolfdale1333-DVI Motherboard Français - ASRock Wolfdale1333-DVI | Quick Installation Guide - Page 71
noires. Etape 2-2. Orientez le paquet avec le dissipateur thermique intégré (IHS) vers le haut. Repérez la broche 1 et les deux encoches d'orientation. 71 ASRock Wolfdale1333-DVI Motherboard Français Ligne noire Ligne noire - ASRock Wolfdale1333-DVI | Quick Installation Guide - Page 72
le capuchon PnP. 2. Ce capuchon doit être mis en place si vous renvoyez la carte mère pour service après vente. Français Etape 4. Refermez le socle : Etape 4-1. Faites pivoter la plaque de chargement sur sous la languette de retenue du levier de chargement. 72 ASRock Wolfdale1333-DVI Motherboard - ASRock Wolfdale1333-DVI | Quick Installation Guide - Page 73
dissipateur thermique Pour une installation correcte, veuillez vous reporter aux manuels d'instructions de votre ventilateur de processeur et de votre dissipateur thermique. L'exemple ventilateur ou n'entrera pas en contact avec les autres composants. 73 ASRock Wolfdale1333-DVI Motherboard Français - ASRock Wolfdale1333-DVI | Quick Installation Guide - Page 74
2.3 Installation des modules mémoire (DIMM) La carte mère Wolfdale1333-DVI possède deux emplacements DIMM DDRII (Double Débit de données) 240 broches, et prend en aux deux extrémités se ferment complètement et que le module DIMM soit inséré correctement. 74 ASRock Wolfdale1333-DVI Motherboard - ASRock Wolfdale1333-DVI | Quick Installation Guide - Page 75
le connecteur VGA intégré à la carte mère sera désactivé. Si vous installez la carte VGA PCI Express sur le connecteur PCIE1 (connecteur PCIE x16) et que vous réglez l'option du BIOS «Internal Graphics Fixez la carte sur le châssis à l'aide d'une vis. 75 ASRock Wolfdale1333-DVI Motherboard Français - ASRock Wolfdale1333-DVI | Quick Installation Guide - Page 76
Branchez le moniteur à connexion DVI-D sur la sortie DVI-D de la carte DVI Graphics-SI installée sur le connecteur PCIE1 (connecteur PCIE x16) de la carte mère. Connecteur de Connecteur DVI-D du moniteur sortie DVI-D de la carte DVI Graphics-SI 76 ASRock Wolfdale1333-DVI Motherboard Français - ASRock Wolfdale1333-DVI | Quick Installation Guide - Page 77
D-Sub avec VGA/D-Sub port sur I/O panel de la carte mere. Si vous avez déjà installé le pilote VGA de Intel® à partir de notre CD, vous pourrez apprécier les avantages de la connexion DVI-D de la le cavalier avant après avoir restauré le CMOS. 77 ASRock Wolfdale1333-DVI Motherboard Français - ASRock Wolfdale1333-DVI | Quick Installation Guide - Page 78
Note: Veuillez vous reporter aux instructions du fabricant de votre IDE périphérique pour les détails SATA) (en option) L'une des deux extrémités du câble de données SATA peut être connectée au disque dur SATA / SATAIIou au connecteur SATAII sur la carte mère. 78 ASRock Wolfdale1333-DVI Motherboard - ASRock Wolfdale1333-DVI | Quick Installation Guide - Page 79
+AP avec le module ASRock WiFi-802.11g / WiFi-802.11n, c'est un adaptateur de réseau local sansfil (WLAN) facile d'utilisation. Il vous permettra de créer un environnement sans fil et de bénéficier des avantages de la connectivité au réseau sans fil. Français 79 ASRock Wolfdale1333-DVI Motherboard - ASRock Wolfdale1333-DVI | Quick Installation Guide - Page 80
» et sauvegarder les changements en cliquant sur « OK ». Pour Windows® VistaTM / VistaTM 64-bit OS: Cliquer droit "Fichier" icone , selectionner" la detection incapable de jack de panel d'avant " et sauvegarder le changement par cliquer"ok". 80 ASRock Wolfdale1333-DVI Motherboard Français - ASRock Wolfdale1333-DVI | Quick Installation Guide - Page 81
ventilateur d'UC sur ce connecteur et brancher le fil ien que cette carte mère offre un support de (Ventilateur silencieux) ventilateur de CPU à 4 broches , le ventilateur de CPU à 3 broches 13 20-Installation de l'alimentation électrique ATX 12 ASRock Wolfdale1333-DVI Motherboard 1 81 Français - ASRock Wolfdale1333-DVI | Quick Installation Guide - Page 82
le présent guide d'installation du disque , veuillez suivre les instructions ci-dessous avec les en mode SATAII. Western Digital Pour activer SATA 1.5 Go/s, raccourcir les broches 5 et . http://www.hitachigst.com/hdd/support/download.htm Les exemples donnés pr ASRock Wolfdale1333-DVI Motherboard - ASRock Wolfdale1333-DVI | Quick Installation Guide - Page 83
mité du câble de données SATA au disque dur SATA / SATAII. 2.10 Guide d'installation des pilotes Pour installer les volée, veuillez entrer l'option "Mode de surcadençage" de la configuration du BIOS pour établir la sélection de [Auto] à [CPU, PCIE, Async.]. ASRock Wolfdale1333-DVI Motherboard - ASRock Wolfdale1333-DVI | Quick Installation Guide - Page 84
le BIOS, veuillez consulter le Guide de l'utilisateur (fichier PDF) dans le CD technique. 4. Informations sur le CD de support Cette carte mère supporte divers systèmes d'exploitation Microsoft® Windows®: double-cliquez dessus pour afficher les menus. 84 ASRock Wolfdale1333-DVI Motherboard Français - ASRock Wolfdale1333-DVI | Quick Installation Guide - Page 85
ASRock Wolfdale1333-DVI Un cavo IDE 80-pin Ultra ATA 66/100 Un cavo per floppy drive a 1,44 Mb Un cavo dati Serial ATA (SATA) (Opzionale) Un cavo alimentatore HDD Serial ATA (SATA) (Opzionale) Un ASRock 6CH I/O Plus Shield Una scheda grafica SI DVI 85 ASRock Wolfdale1333-DVI Motherboard Italiano - ASRock Wolfdale1333-DVI | Quick Installation Guide - Page 86
- 5.1 Audio High Definition CH (Realtek ALC660VD Audio Codec) - Realtek PCIE x1 LAN 8101E - Velocità: 10/100 Ethernet - Supporta Wake-On-LAN ASRock 6CH I/O Plus - 1 x porta PS/2 per mouse - 1 x porta PS/2 per tastiera - 1 x Porta COM - 1 x Porta VGA Italiano 86 ASRock Wolfdale1333-DVI Motherboard - ASRock Wolfdale1333-DVI | Quick Installation Guide - Page 87
- Indicatore di velocità per la ventola di raffreddamento - Ventola CPU silenziosa - Voltaggio: +12V, +5V, +3.3V, Vcore Compatibi- - Microsoft® Windows® 2000 / XP / XP 64 bit / VistaTM / lità SO VistaTM 64 bit Certificazioni- FCC, CE, WHQL Italiano 87 ASRock Wolfdale1333-DVI Motherboard - ASRock Wolfdale1333-DVI | Quick Installation Guide - Page 88
delle impostazioni del BIOS, l'applicazione della favore controllare pagina 30 del Manuale dell'utente all'interno del Windows® 2000, Windows® XP, Windows® XP 64-bit, Windows® VistaTM and Windows® VistaTM 64-bit. 7. Anche se questa motherboard ASRock Wolfdale1333-DVI Motherboard Italiano - ASRock Wolfdale1333-DVI | Quick Installation Guide - Page 89
anche connettere il disco rigido SATA al connettore SATAII direttamente. 11. La Gestione Risorse per USB 2.0 funziona perfettamente con Microsoft® Windows® VistaTM 64-bit / ASRock WiFi-802.11g / WiFi-802.11n. Sito web ASRock http://www.asrock.com 89 ASRock Wolfdale1333-DVI Motherboard Italiano - ASRock Wolfdale1333-DVI | Quick Installation Guide - Page 90
componente. 5. Nell'usare i giraviti per fissare la scheda madre al telaio non serrare eccessivamente le viti! Altrimenti si rischia di danneggiare la scheda madre. 90 ASRock Wolfdale1333-DVI Motherboard Italiano - ASRock Wolfdale1333-DVI | Quick Installation Guide - Page 91
per aprirla completamente. Fase 2. Inserire la CPU 775-Pin: Fase 2-1. Tenere la CPU dai bordi segnati con linee nere. Linea nera Linea nera Italiano 91 ASRock Wolfdale1333-DVI Motherboard - ASRock Wolfdale1333-DVI | Quick Installation Guide - Page 92
la presa: Fase 4-1. Ruotare la piastra di carico sull'IHS. Fase 4-2. Bloccare la leva di carico mentre si preme leggermente sulla piastra di carico. 92 ASRock Wolfdale1333-DVI Motherboard - ASRock Wolfdale1333-DVI | Quick Installation Guide - Page 93
cavo in eccesso con fascette per assicurare che il cavo non interferisca con il funzionamento della ventola o che venga a contatto con gli altri componenti. 93 ASRock Wolfdale1333-DVI Motherboard Italiano - ASRock Wolfdale1333-DVI | Quick Installation Guide - Page 94
2.3 Installazione dei moduli di memoria (DIMM) La motherboard Wolfdale1333-DVI dispone di due slot DIMM DDRII (Double Data Rate) a 240 pin e supporta la tecnologia i fermagli di ritegno alle due estremità e fino ad installare correttamente la DIMM nella sua sede. ASRock Wolfdale1333-DVI Motherboard - ASRock Wolfdale1333-DVI | Quick Installation Guide - Page 95
SATA 2, ecc. 1. Se si aggiunge una scheda PCI Express VGA al PCIE1 (slot PCIE x16), la VGA della scheda madre viene disattivata. Se si installa la PCI Express VGA su PCIE1 (slot PCIE x16) e si setta l'opzione nel BIOS scheda allo chassis con le viti. 95 ASRock Wolfdale1333-DVI Motherboard Italiano - ASRock Wolfdale1333-DVI | Quick Installation Guide - Page 96
DVI-D dell'ingresso per monitor DVI-D al connettore di uscita DVI-D della scheda grafica SI DVI inserita in PCIE1 (slot PCIE x16) di questa scheda madre. Connettore DVI-D per ingresso monitor DVI-D Connettore uscita DVI-D della scheda grafica SI DVI 96 ASRock Wolfdale1333-DVI Motherboard - ASRock Wolfdale1333-DVI | Quick Installation Guide - Page 97
il driver Intel® VGA dal CD, è possibile utilizzare le funzioni dell'uscita DVI-D con la scheda madre, dopo l'avvio del sistema. Se non è stato ancora installato il driver Intel® VGA, alimentatore, poi collegare il jumper sul CLRCMOS1 per 5 secondi. 97 ASRock Wolfdale1333-DVI Motherboard Italiano - ASRock Wolfdale1333-DVI | Quick Installation Guide - Page 98
SATAII attuale permette velocità di trasferimento dati fino a 3.0 Gb/s. Cavi dati Serial ATA (SATA) (Opzionale) Entrambe le estremità del cavo dati SATA possono collegarsi all'hard disk SATA / SATAII o al connettore SATAII sulla scheda madre. 98 ASRock Wolfdale1333-DVI Motherboard Italiano - ASRock Wolfdale1333-DVI | Quick Installation Guide - Page 99
à di rete wireless. Intestazione Di Rilevazione Di DeskExpress Hot Plug (5-pin IR1) (vedi p.2 Nr. 3) Questa intestazione sostiene la funzione di rilevazione di Hot Plug per ASRock DeskExpress. Italiano 99 ASRock Wolfdale1333-DVI Motherboard - ASRock Wolfdale1333-DVI | Quick Installation Guide - Page 100
OK". Per Windows® VistaTM / VistaTM 64-bit OS: Cliccare sull'icona in alto a destra "Folder" ("Cartella") , selezionare "Disable front panel jack detection" "Disabilitare individuazione presa pannello frontale") e cliccare "OK" per memorizzare. Italiano 100 ASRock Wolfdale1333-DVI Motherboard - ASRock Wolfdale1333-DVI | Quick Installation Guide - Page 101
pin. Per usare l'alimentatore ATX a 20 pin, collegare l'alimentatore con il Pin 1 e il Pin 13. 24 13 Installazione dell'alimentatore ATX a 20 pin 12 1 Italiano ASRock Wolfdale1333-DVI Motherboard 101 - ASRock Wolfdale1333-DVI | Quick Installation Guide - Page 102
SATA support/download.htm 102 Gli esempi di cui sopra sono solo per riferimento. Per dischi rigidi SATAII di diversi produttori, i metodi di impostazione dei pin del jumper possono non essere gli stessi. Visitare i siti web dei produttori per gli aggiornamenti. ASRock Wolfdale1333-DVI Motherboard - ASRock Wolfdale1333-DVI | Quick Installation Guide - Page 103
SATA al connettore SATAII della motherboard. 4° PASSO: Collegare l'altra estremità del cavo dati SATA all'hard disk SATA / SATAII. 2.10 Guida installazione del driver Per installare i driver à Overclock" nelle impostazioni del BIOS per impostare la selezione da ASRock Wolfdale1333-DVI Motherboard 103 - ASRock Wolfdale1333-DVI | Quick Installation Guide - Page 104
il Menù principale non appare automaticamente, posizionarsi sul file "ASSETUP.EXE" nel CESTINO del CD di supporto e cliccare due volte per visualizzare i menù. Italiano 104 ASRock Wolfdale1333-DVI Motherboard - ASRock Wolfdale1333-DVI | Quick Installation Guide - Page 105
80 Ultra ATA 66/100 Una cinta de datos para una unidad de disco de 3,5" Un Cable de Datos Serial ATA (SATA) (Opcional) Un cable serie ATA (SATA) de alimentación de disco duro (Opcional) Una protección ASRock 6CH I/O Plus Una tarjeta gráfica SI DVI Español ASRock Wolfdale1333-DVI Motherboard 105 - ASRock Wolfdale1333-DVI | Quick Installation Guide - Page 106
Chipset Memoria Amplificador Híbrido Ranuras de Expansión VGA OnBoard Audio LAN Entrada/Salida de Panel Trasero - Factor forma ASRock 6CH I/O Plus - 1 x puerto de ratón PS/2 - 1 x puerto de teclado PS/2 - 1 x puerto serial: COM1 - 1 x Puerto VGA Español 106 ASRock Wolfdale1333-DVI Motherboard - ASRock Wolfdale1333-DVI | Quick Installation Guide - Page 107
ímetros de los ventiladores del procesador y del chasis - Ventilador silencioso para procesador - Monitor de Voltaje: +12V, +5V, +3.3V, Vcore - En conformidad con Microsoft® Windows® 2000 / XP / XP 64 bits / VistaTM / VistaTM 64 bits - FCC, CE, WHQL Español ASRock Wolfdale1333-DVI Motherboard 107 - ASRock Wolfdale1333-DVI | Quick Installation Guide - Page 108
apropiadamente y desconecte el cable de alimentación, a continuación, vuelva a conectarlo. Para mejorar la disipación de calor, acuérdese de aplicar thermal grease entre el procesador y el disipador de calor cuando usted instala el sistema de PC. ASRock Wolfdale1333-DVI Motherboard Español - ASRock Wolfdale1333-DVI | Quick Installation Guide - Page 109
También puede conectar el disco duro SATA al conector SATAII directamente. 11. Power Management para USB 2.0 funciona bien bajo Microsoft® Windows® VistaTM 64 bits / VistaTM ASRock WiFi-802.11g / WiFi-802.11n. Sitio web de ASRock http://www.asrock.com Español ASRock Wolfdale1333-DVI Motherboard - ASRock Wolfdale1333-DVI | Quick Installation Guide - Page 110
de la placa base o cambiar cualquier configuración de la placa base. 1. Desconecte el cable de electricidad antes de tocar cualquier componente. 2. Para prevenir daño del componente de la placa anterior. Si lo hace, puede producir daños graves en la CPU. ASRock Wolfdale1333-DVI Motherboard - ASRock Wolfdale1333-DVI | Quick Installation Guide - Page 111
socket con un movimiento totalmente vertical. Step 2-4. Compruebe que la CPU se encuentra en el socket y la orientación coincide con la indicada por las muescas. ASRock Wolfdale1333-DVI Motherboard 111 Español - ASRock Wolfdale1333-DVI | Quick Installation Guide - Page 112
2.2 Instalación del ventilador y el disipador de la CPU Para una correcta instalación, consulte los manuales de instrucciones del ventilador y el disipador de la CPU. A continuación se ofrece un ejemplo . (Aplique el material termal de interfaz) Español 112 ASRock Wolfdale1333-DVI Motherboard - ASRock Wolfdale1333-DVI | Quick Installation Guide - Page 113
del ventilador con el conector del ventilador de la CPU en la placa madre. Fije el cable que sobre con un lazo para asegurarse de que el cable no interfiere en el funcionamiento del ventilador y tampoco entra en contacto con otros componentes. Español ASRock Wolfdale1333-DVI Motherboard 113 - ASRock Wolfdale1333-DVI | Quick Installation Guide - Page 114
2.3 Instalación de Memoria La placa base Wolfdale1333-DVI proporciona dos ranuras DIMM DDRII (Double Data Rate, es decir, Tasa doble de datos) de 240 de ambos lados queden completamente introducidos en su sitio y la DIMM se haya asentado apropiadamente. 114 ASRock Wolfdale1333-DVI Motherboard - ASRock Wolfdale1333-DVI | Quick Installation Guide - Page 115
tarjetas Gigabit LAN, SATA 2, etc. 1. Si instala la tarjeta complemento VGA PCI Express para PCIE1 (ranura PCIE x16), se desactivará VGA en placa. Si instala la tarjeta complemento VGA PCI Express en PCIE1 . Paso 4. Asegure la tarjeta con tornillos. Español ASRock Wolfdale1333-DVI Motherboard 115 - ASRock Wolfdale1333-DVI | Quick Installation Guide - Page 116
DVI-D del monitor de entrada DVI-D al conector de salida DVI-D de la tarjeta gráfica SI DVI, que está insertada en PCIE1 (ranura PCIE x16) en esta placa base. 116 Conector DVI-D del monitor de entrada DVI-D Conector de salida DVI-D de tarjeta gráfica SI DVI ASRock Wolfdale1333-DVI Motherboard - ASRock Wolfdale1333-DVI | Quick Installation Guide - Page 117
DVI-D con esta placa base tras iniciar el sistema. Si no ha instalado aún el controlador Intel® VGA, instale el controlador Intel® VGA cable de la fuente de electricidad, ponga en cortocircuito los pins de CLRCMOS1 por más que 5 segundos usando un jumper cap. ASRock Wolfdale1333-DVI Motherboard - ASRock Wolfdale1333-DVI | Quick Installation Guide - Page 118
interno. La interfaz SATAII actual permite una velocidad de transferencia de 3.0 Gb/s. Cable de datos de serie ATA (SATA) (Opcional) Ambos extremos del cable pueden conectarse al disco duro SATA / SATAII o la conexión de la placa base. Español 118 ASRock Wolfdale1333-DVI Motherboard - ASRock Wolfdale1333-DVI | Quick Installation Guide - Page 119
negro del de cable de alimentación SATA en la conexión de alimentación de cada unidad. A continuación, conecte el extremo blanco del cable de alimentación SATA a la conexi apoya la función de la detección del Enchufe Caliente para ASRock DeskExpress. ASRock Wolfdale1333-DVI Motherboard 119 Español - ASRock Wolfdale1333-DVI | Quick Installation Guide - Page 120
el cambio haciendo clic en "Aceptar". Para Windows® VistaTM / VistaTM 64-bit OS: Haga el clic el icono de la "Carpeta" de derecho-superior , eliga "Inhabilitable la detección del gato del panel delantero" y ahorre el cambio por chascando "OK". Español 120 ASRock Wolfdale1333-DVI Motherboard - ASRock Wolfdale1333-DVI | Quick Installation Guide - Page 121
del chasis (3-pin CHA_FAN1) (vea p.2, N. 17) Conecte el cable del ventilador del chasis a este conector y haga coincidir el cable negro con el conector de tierra. Conector del ventilador de la CPU una Fuente de Alimentación ATX de 20 Pins 12 1 ASRock Wolfdale1333-DVI Motherboard 121 Español - ASRock Wolfdale1333-DVI | Quick Installation Guide - Page 122
Western Digital Si las patillas 5 y 6 están en corto, se activará SATA 1.5Gb/s. Por otro lado, si desea activar SATAII 3.0Gb/s, por favor retire Hitachi para detalles. http://www.hitachigst.com/hdd/support/download.htm 122 Los ejemplos anteriores son sólo para ASRock Wolfdale1333-DVI Motherboard - ASRock Wolfdale1333-DVI | Quick Installation Guide - Page 123
cable de alimentación SATA al disco duro SATA / SATAII. PASO 3: Conecte un extremo del cable de datos SATA al conector SATAII de la placa base. PASO 4: Conecte el otro extremo del cable de datos SATA al disco duro SATA configuración de BIOS para establecer la ASRock Wolfdale1333-DVI Motherboard 123 - ASRock Wolfdale1333-DVI | Quick Installation Guide - Page 124
de la BIOS, consulte el Manual del usuario (archivo PDF), que se encuentra en el CD de soporte. 4.Información de Software Support CD Esta placa-base soporta diversos tipos de sistema operativo Windows®: 2000 "ASSETUP.EXE" para iniciar la instalación. Español 124 ASRock Wolfdale1333-DVI Motherboard
-
 1
1 -
 2
2 -
 3
3 -
 4
4 -
 5
5 -
 6
6 -
 7
7 -
8
-
9
-
10
-
11
-
12
-
13
-
14
-
15
-
16
-
17
-
18
-
19
-
20
-
21
-
22
-
23
-
24
-
25
-
26
-
27
-
28
-
29
-
30
-
31
-
32
-
33
-
34
-
35
-
36
-
37
-
38
-
39
-
40
-
41
-
42
-
43
-
44
-
45
-
46
-
47
-
48
-
49
-
50
-
51
-
52
-
53
-
54
-
55
-
56
-
57
-
58
-
59
-
60
-
61
-
62
-
63
-
64
-
65
-
66
-
67
-
68
-
69
-
70
-
71
-
72
-
73
-
74
-
75
-
76
-
77
-
78
-
79
-
80
-
81
-
82
-
83
-
84
-
85
-
86
-
87
-
88
-
89
-
90
-
91
-
92
-
93
-
94
-
95
-
96
-
97
-
98
-
99
-
100
-
101
-
102
-
103
-
104
-
105
-
106
-
107
-
108
-
109
-
110
-
111
-
112
-
113
-
114
-
115
-
116
-
117
-
118
-
119
-
120
-
121
-
122
-
123
-
124
 |
 |

1
ASRock
Wolfdale1333-DVI
Motherboard
English
English
English
English
English
Copyright Notice:
Copyright Notice:
Copyright Notice:
Copyright Notice:
Copyright Notice:
No part of this installation guide may be reproduced, transcribed, transmitted, or trans-
lated in any language, in any form or by any means, except duplication of documen-
tation by the purchaser for backup purpose, without written consent of ASRock Inc.
Products and corporate names appearing in this guide may or may not be registered
trademarks or copyrights of their respective companies, and are used only for identifica-
tion or explanation and to the owners’ benefit, without intent to infringe.
Disclaimer:
Disclaimer:
Disclaimer:
Disclaimer:
Disclaimer:
Specifications and information contained in this guide are furnished for informational
use only and subject to change without notice, and should not be constructed as a
commitment by ASRock. ASRock assumes no responsibility for any errors or omissions
that may appear in this guide.
With respect to the contents of this guide, ASRock does not provide warranty of any kind,
either expressed or implied, including but not limited to the implied warranties or
conditions of merchantability or fitness for a particular purpose. In no event shall
ASRock, its directors, officers, employees, or agents be liable for any indirect, special,
incidental, or consequential damages (including damages for loss of profits, loss of
business, loss of data, interruption of business and the like), even if ASRock has been
advised of the possibility of such damages arising from any defect or error in the guide
or product.
This device complies with Part 15 of the FCC Rules. Operation is subject to the
following two conditions:
(1)
this device may not cause harmful interference, and
(2)
this device must accept any interference received, including interference that
may cause undesired operation.
Published October 2007
Copyright
©
2007 ASRock INC. All rights reserved.
CALIFORNIA, USA ONLY
The Lithium battery adopted on this motherboard contains Perchlorate, a toxic
substance controlled in Perchlorate Best Management Practices (BMP) regulations
passed by the California Legislature. When you discard the Lithium battery in
California, USA, please follow the related regulations in advance.
“Perchlorate Material-special handling may apply, see
www
.dtsc.ca.gov/hazardouswa
ste/perchlorate”
ASRock Website: http://www.asrock.com