ASRock X99M Extreme4 RAID Installation Guide
ASRock X99M Extreme4 Manual
 |
View all ASRock X99M Extreme4 manuals
Add to My Manuals
Save this manual to your list of manuals |
ASRock X99M Extreme4 manual content summary:
- ASRock X99M Extreme4 | RAID Installation Guide - Page 1
2.3 Installing Windows® 8.1 / 8.1 64-bit / 8 / 8 64-bit / 7 / 7 64-bit With RAID Functions 7 2.4 Coniguring a RAID array 8 2.4.1 Coniguring a RAID array Using UEFI Setup Utility ...... 9 2.4.2 Coniguring a RAID array Using Intel RAID BIOS ...... 13 3. Installing Windows® on a HDD under 2TB in - ASRock X99M Extreme4 | RAID Installation Guide - Page 2
Disks Installation Intel chipset supports Serial ATA (SATA) hard disks with RAID functions, including RAID 0, RAID 1, RAID 5, RAID 10 and Intel Rapid Storage. Please read the RAID conigurations in this guide carefully according to the Intel southbridge chipset that your motherboard adopts. You may - ASRock X99M Extreme4 | RAID Installation Guide - Page 3
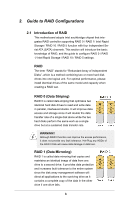
RAID This motherboard adopts Intel southbridge chipset that integrates RAID controller supporting RAID 0 / RAID 1/ Intel Rapid Storage / RAID 10 / RAID 5 function with four independent Serial ATA (SATA) channels. This section will introduce the basic knowledge of RAID, and the guide to conigure RAID - ASRock X99M Extreme4 | RAID Installation Guide - Page 4
each hard disk drive to create a virtual RAID 0 and RAID 1 sets. This technology also allows you to change the hard disk drive partition size without losing any data. RAID 10 RAID 10 is a striped coniguration with RAID 1 segments whose segments are RAID 1 arrays. This coniguration has the same fault - ASRock X99M Extreme4 | RAID Installation Guide - Page 5
better HDD performance, fault tolerance, and higher storage capacity. The RAID 5 coniguration is best suited for transaction processing, relational database applications, enterprise resource planning, and other business systems. Use a minimum of three identical hard disk drives for this setup. 5 - ASRock X99M Extreme4 | RAID Installation Guide - Page 6
60GB. 3. Please verify the status of your hard disks before you set up your new RAID array. WARNING!! Please backup your data irst before you create RAID functions. In the process you create RAID, the system will ask if you want to "Clear Disk Data" or not. It is recommended to select "Yes", and - ASRock X99M Extreme4 | RAID Installation Guide - Page 7
Boot your system, and press key to enter BIOS setup utility. Go to Advanced Storage Coniguration and set the option SATA Mode Selection to [RAID]. Press key to save your change before you exit BIOS setup. STEP 2: Use ASRock Easy RAID Installer Easy RAID Installer can copy the RAID driver - ASRock X99M Extreme4 | RAID Installation Guide - Page 8
. OS HDD Capacity Ultra Fast Boot Over 2.2 TB Not supported Windows 7 Under 2.2 TB Not supported Option ROM Setting UEFI SETUP UTILITY\Boot\ CSM [Launch Storage n/a OpROM policy] = [UEFI only] Required RAID Utility UEFI Setup Utility Intel® RAID BIOS setup utility OS HDD Capacity Ultra - ASRock X99M Extreme4 | RAID Installation Guide - Page 9
2.4.1 Coniguring a RAID array Using UEFI Setup Utility STEP 1: Enter the UEFI Setup Utility by pressing or right after you power on the computer. STEP 2: Enter Intel(R) Rapid Storage Technology in Advanced page. STEP 3: Select the option Create RAID Volume and press . 9 - ASRock X99M Extreme4 | RAID Installation Guide - Page 10
STEP 4: Key-in a a volume name and press , or simply press to accept the default name. STEP 5: Select your desired RAID Level and press . 10 - ASRock X99M Extreme4 | RAID Installation Guide - Page 11
STEP 6: Select the hard drives to be included in the RAID array and press . STEP 7: Select a stripe size for the RAID array and press . 11 - ASRock X99M Extreme4 | RAID Installation Guide - Page 12
press to start creating the RAID array. If you want to delete a RAID volume, select the option Delete on the RAID volume info page and press . *Please note that the UEFI screenshots shown in this installation guide are for reference only. The actual screen may differ by model on the - ASRock X99M Extreme4 | RAID Installation Guide - Page 13
Intel RAID BIOS Reboot your computer. Wait until you see the RAID software prompting you to press . Press . Then, the Intel RAID Utility - Create RAID Volume window appears. In the Create Volume Menu, under Name item, please key-in a unique name with 1-16 letters for your RAID volume - ASRock X99M Extreme4 | RAID Installation Guide - Page 14
your RAID 0 array then press . The available values range from 8 KB to 128 KB. The default selection is 128 KB. The strip value should be chosen based on the planned drive usage. •8/16 KB - low disk usage •64 KB - typical disk usage •128 KB - performance disk usage After you set disk - ASRock X99M Extreme4 | RAID Installation Guide - Page 15
Volume0 After setting up Capacity, please press . Volume0 Press under the Create Volume item. The utility prompts a conirmation message as below. Volume0 15 - ASRock X99M Extreme4 | RAID Installation Guide - Page 16
Press to complete the setup of RAID. After the completion, you will see the detailed information about the RAID that you set up. Please note that you are only allowed to create one RAID partition at a time under BIOS RAID environment. If you want to create an extra RAID partition, please use the - ASRock X99M Extreme4 | RAID Installation Guide - Page 17
3. Installing Windows® on a HDD under 2TB in RAID mode After the UEFI and RAID BIOS setup you may start installing Windows® 8.1 / 8.1 64-bit / 8 / 8 64-bit / 7 / 7 64-bit OS as usual. 17 - ASRock X99M Extreme4 | RAID Installation Guide - Page 18
8.1 64-bit. After the UEFI and RAID BIOS setup, please follow the steps below. STEP 1: Copy Intel® RAID drivers into a USB lash disk You can download the drivers from ASRock's website and unzip the iles into a USB lash disk or copy the iles from ASRock's motherboard support CD. (Please copy the iles - ASRock X99M Extreme4 | RAID Installation Guide - Page 19
Start Windows® Installation. When you see "Where do you want to install Windows?" page, please click "Load Driver". Plug the USB flash disk into your USB port; select "Browse" to find the RAID driver. Then choose the directory you have copied in the irst step. Please keep the USB flash disk - ASRock X99M Extreme4 | RAID Installation Guide - Page 20
large hard disk (ex. Disk volume > 2TB), it may take more time to boot into Windows® or install driver/utilities. If you encounter this problem, you will need to follow the instructions below to ix this problem. Windows® 7 64-bit / 8 64-bit / 8.1 64-bit: A. Please request the hotix KB2505454 through
-
 1
1 -
 2
2 -
 3
3 -
 4
4 -
 5
5 -
 6
6 -
 7
7 -
8
-
9
-
10
-
11
-
12
-
13
-
14
-
15
-
16
-
17
-
18
-
19
-
20
 |
 |

1
Guide to SATA Hard Disks
Installation and RAID Con±guration
1.
Guide to SATA Hard Disks Installation
..............................
2
1.1
Serial ATA (SATA) Hard Disks Installation
................
2
2.
Guide to RAID Con±gurations
...........................................
3
2.1
Introduction of RAID
.................................................
3
2.2
RAID Con±guration Precautions
..............................
6
2.3
Installing Windows
®
8.1 / 8.1 64-bit / 8 / 8 64-bit / 7 / 7
64-bit With RAID Functions
......................................
7
2.4
Con±guring a RAID array
.........................................
8
2.4.1
Con±guring a RAID array Using UEFI Setup Utility
......
9
2.4.2
Con±guring a RAID array Using Intel RAID BIOS
......
13
3.
Installing Windows
®
on a HDD under 2TB in RAID
mode
..................................................................
17
4.
Installing Windows
®
on a HDD larger than 2TB in
RAID mode
..................................................................
18