ASRock Z68 Extreme3 Gen3 Quick Installation Guide
ASRock Z68 Extreme3 Gen3 Manual
 |
View all ASRock Z68 Extreme3 Gen3 manuals
Add to My Manuals
Save this manual to your list of manuals |
ASRock Z68 Extreme3 Gen3 manual content summary:
- ASRock Z68 Extreme3 Gen3 | Quick Installation Guide - Page 1
written consent of ASRock Inc. Products and corporate names appearing in this guide may or may The Lithium battery adopted on this motherboard contains ASRock Website: http://www.asrock.com Published July 2011 Copyright©2011 ASRock INC. All rights reserved. 1 ASRock Z68 Extreme3 Gen3 Motherboard - ASRock Z68 Extreme3 Gen3 | Quick Installation Guide - Page 2
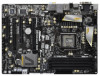
1 64Mb BIOS PANEL1 PLED PWRBTN 1 HDLED RESET RSTBTN PWRBTN 16 17 18 19 34 33 32 31 30 29 28 27 26 25 24 23 22 21 20 1 ATX 12V Power Connector (ATX12V1) 22 64Mb SPI Flash 2 1155-Pin CPU Socket 23 Chassis Fan Connector (CHA_FAN1) 3 Power Fan Connector (PWR_FAN1) 24 Dr. Debug 4 CPU Fan - ASRock Z68 Extreme3 Gen3 | Quick Installation Guide - Page 3
type of speaker you use. TABLE for Audio Output Connection Audio Output Channels Front Speaker Rear Speaker Central / Bass Line In or (No. 9) (No. 6) (No. 5) Side Speaker (No. 8) 2 V -- -- -- 4 V V -- -- 6 V V V -- 8 V V V V English 3 ASRock Z68 Extreme3 Gen3 Motherboard - ASRock Z68 Extreme3 Gen3 | Quick Installation Guide - Page 4
"8CH" and then you are allowed to select "Realtek HDA Primary output" to use Rear Speaker, Central/Bass, and Front Speaker, or select "Realtek HDA Audio 2nd output" to use front panel audio. *** eSATA3 connector supports SATA Gen3 in cable 1M. English 4 ASRock Z68 Extreme3 Gen3 Motherboard - ASRock Z68 Extreme3 Gen3 | Quick Installation Guide - Page 5
. www.asrock.com/support/index.asp 1.1 Package Contents ASRock Z68 Extreme3 Gen3 Motherboard (ATX Form Factor: 12.0-in x 8.6-in, 30.5 cm x 21.8 cm) ASRock Z68 Extreme3 Gen3 Quick Installation Guide ASRock Z68 Extreme3 Gen3 Support CD 2 x Serial ATA (SATA) Data Cables (Optional) 1 x 3.5mm Audio Cable - ASRock Z68 Extreme3 Gen3 | Quick Installation Guide - Page 6
Specifications Platform CPU Chipset Memory Expansion Slot Graphics - ATX Form Factor: 12.0-in x 8.6-in, 30.5 cm x 21.8 cm - Premium Gold Capacitor design (100% Japan-made high-quality Conductive Polymer Capacitors) - Supports 2nd Generation Intel® CoreTM i7 / i5 / i3 in LGA1155 Package - Advanced - ASRock Z68 Extreme3 Gen3 | Quick Installation Guide - Page 7
) - 2 x USB 3.0 ports by ASMedia ASM1042, support USB 1.0/2.0/3.0 up to 5Gb/s - 4 x SATA2 3.0 Gb/s connectors, support RAID (RAID 0, RAID 1, RAID 10, RAID 5, Intel Rapid Storage and Intel Smart Response Technology), NCQ, AHCI and Hot Plug functions English 7 ASRock Z68 Extreme3 Gen3 Motherboard - ASRock Z68 Extreme3 Gen3 | Quick Installation Guide - Page 8
CPU/Chassis/Power FAN connector - 24 pin ATX power connector - 8 pin 12V power connector - Front panel audio connector - 4 x USB 2.0 headers (support 8 USB 2.0 ports) - 1 x Dr. Debug (7-Segment Debug LED) Smart Switch - 1 x Clear CMOS Switch with LED - 1 x Power Switch with LED - 1 x Reset - ASRock Z68 Extreme3 Gen3 | Quick Installation Guide - Page 9
CPU/Chassis/Power Fan Tachometer - CPU/Chassis Quiet Fan (Allow Chassis Fan Speed Auto-Adjust by CPU Temperature) - CPU/Chassis Fan Multi-Speed Control - Voltage Monitoring: +12V, +5V, +3.3V, CPU for possible damage caused by overclocking. English 9 ASRock Z68 Extreme3 Gen3 Motherboard - ASRock Z68 Extreme3 Gen3 | Quick Installation Guide - Page 10
number of output phases to improve efficiency when the CPU cores are idle without sacrificing computing performance. Please visit our website for the operation procedures of ASRock Extreme Tuning Utility (AXTU). ASRock website: http://www.asrock.com 10 ASRock Z68 Extreme3 Gen3 Motherboard English - ASRock Z68 Extreme3 Gen3 | Quick Installation Guide - Page 11
key to BIOS setup menu to access ASRock Instant Flash. Just launch this tool and save the new BIOS file to your USB flash drive, floppy disk or hard drive, then you can update your BIOS only in a GPU and advanced media features of Intel® HD graphics. 11 ASRock Z68 Extreme3 Gen3 Motherboard English - ASRock Z68 Extreme3 Gen3 | Quick Installation Guide - Page 12
different CPU cooler types, Socket LGA 775, LGA 1155 and LGA 1156. Please be noticed that not all the 775 and 1156 CPU Fan can standard, an EuP ready motherboard and an EuP ready power supply are required. According to Intel's suggestion, the EuP ready ASRock Z68 Extreme3 Gen3 Motherboard English - ASRock Z68 Extreme3 Gen3 | Quick Installation Guide - Page 13
insert the 1155-Pin CPU into the socket, please check if the CPU surface is unclean or if there is any bent pin on the socket. Do not force to insert the CPU into the socket if above situation is found. Otherwise, the CPU will be seriously damaged. English 13 ASRock Z68 Extreme3 Gen3 Motherboard - ASRock Z68 Extreme3 Gen3 | Quick Installation Guide - Page 14
notches. orientation key notch alignment key Pin1 Pin1 orientation key notch 1155-Pin CPU alignment key 1155-Pin Socket For proper inserting, please ensure to match the two orientation key notches of the CPU with the two alignment keys of the socket. 14 ASRock Z68 Extreme3 Gen3 Motherboard - ASRock Z68 Extreme3 Gen3 | Quick Installation Guide - Page 15
. Please be noticed that this motherboard supports Combo Cooler Option (C.C.O.), which provides the flexible option to adopt three different CPU cooler types, Socket LGA 775, LGA 1155 and LGA 1156. The white throughholes are for Socket LGA 1155/1156 CPU fan. 15 ASRock Z68 Extreme3 Gen3 Motherboard - ASRock Z68 Extreme3 Gen3 | Quick Installation Guide - Page 16
to install a DDR or DDR2 memory module into DDR3 slot; otherwise, this motherboard and DIMM may be damaged. 5. Some DDR3 1GB double-sided DIMMs with 16 chips may not work on this motherboard. It is not recommended to install them on this motherboard. English 16 ASRock Z68 Extreme3 Gen3 Motherboard - ASRock Z68 Extreme3 Gen3 | Quick Installation Guide - Page 17
damage to the motherboard and the DIMM if you force the DIMM into the slot at incorrect orientation. Step 3. Firmly insert the DIMM into the slot until the retaining clips at both ends fully snap back in place and the DIMM is properly seated. 17 ASRock Z68 Extreme3 Gen3 Motherboard English - ASRock Z68 Extreme3 Gen3 | Quick Installation Guide - Page 18
a chassis fan to motherboard chassis fan connector (CHA_FAN1, CHA_FAN2 or CHA_FAN3) when using multiple graphics cards for better thermal environment. 4. To run the PCI Express in Gen 3 speed, please must install the Ivy Bridge CPU which supports PCI Express Gen3. If you install the Sandy Bridge CPU - ASRock Z68 Extreme3 Gen3 | Quick Installation Guide - Page 19
® certified. 2. Make sure that your graphics card driver supports NVIDIA® SLITM technology (driver version 270.61 and later). Download the driver from NVIDIA website (www.nvidia.com). 3. Make sure power source to the PCI Express graphics cards. 19 ASRock Z68 Extreme3 Gen3 Motherboard English - ASRock Z68 Extreme3 Gen3 | Quick Installation Guide - Page 20
fingers on each graphics card. Make sure ASRock SLI_Bridge_2S Card is firmly in place. ASRock SLI_Bridge_2S Card Step4. Connect a VGA cable or a DVI cable to the monitor connector or the DVI connector of the graphics card that is inserted to PCIE2 slot. 20 ASRock Z68 Extreme3 Gen3 Motherboard English - ASRock Z68 Extreme3 Gen3 | Quick Installation Guide - Page 21
Set SLI and PhysX configuration. In Set PhysX GPU acceleration item, please select Enabled. In Select an SLI configuration item, please select Enable SLI. And click Apply. C. Reboot your system. D. You can freely enjoy the benefit of SLITM feature. 21 ASRock Z68 Extreme3 Gen3 Motherboard English - ASRock Z68 Extreme3 Gen3 | Quick Installation Guide - Page 22
Panel tab. D. Select Control Panel tab. E. From the pop-up menu, select Set SLI and PhysX configuration. In Set PhysX GPU acceleration item, please select Enabled. In Select an SLI configuration item and to the owners' benefit, without intent to infringe. 22 ASRock Z68 Extreme3 Gen3 Motherboard English - ASRock Z68 Extreme3 Gen3 | Quick Installation Guide - Page 23
the future, please refer to AMD graphics card manuals for detailed installation guide. Step 1. Insert one Radeon graphics card into PCIE2 slot and the other Radeon graphics card to PCIE4 slot. Make sure that the cards are properly seated on the slots. 23 ASRock Z68 Extreme3 Gen3 Motherboard English - ASRock Z68 Extreme3 Gen3 | Quick Installation Guide - Page 24
CrossFire Bridge on CrossFire Bridge Interconnects on the top of Radeon graphics cards. (CrossFire Bridge is provided with the graphics card you purchase, not bundled with this motherboard. Please D-Sub monitor cable to the DVI to D-Sub adapter.) English 24 ASRock Z68 Extreme3 Gen3 Motherboard - ASRock Z68 Extreme3 Gen3 | Quick Installation Guide - Page 25
"2 GPUs" and click "Apply" (if you install two Radeon graphics cards). Select "3 GPUs" and click "OK" (if you install three Radeon graphics cards). English 25 ASRock Z68 Extreme3 Gen3 Motherboard - ASRock Z68 Extreme3 Gen3 | Quick Installation Guide - Page 26
identification or explanation and to the owners' benefit, without intent to infringe. * For further information of AMD CrossFireXTM technology, please check AMD website for updates and details. 26 ASRock Z68 Extreme3 Gen3 Motherboard English - ASRock Z68 Extreme3 Gen3 | Quick Installation Guide - Page 27
. If you haven't installed onboard VGA driver yet, please install onboard VGA driver from our support CD to your system and restart your computer. D-Sub, DVI-D and HDMI monitors cannot be enabled at the same time. You can only choose two of them. English 27 ASRock Z68 Extreme3 Gen3 Motherboard - ASRock Z68 Extreme3 Gen3 | Quick Installation Guide - Page 28
"Attached", if necessary. F. Set the "Screen Resolution" and "Color Quality" as appropriate for the second monitor. Click "Apply" or "OK" to apply these new values. G. Repeat steps C through E for the diaplay icon identified by the number one to six. 28 ASRock Z68 Extreme3 Gen3 Motherboard English - ASRock Z68 Extreme3 Gen3 | Quick Installation Guide - Page 29
HDTV set-top-boxes, as well as few entertainment PCs requires a secure connection to a compliant display. Due to the increase in manufacturers employing HDCP in their equipment, it is highly recommended that the HDTV or LCD monitor you purchase is compatible. 29 ASRock Z68 Extreme3 Gen3 Motherboard - ASRock Z68 Extreme3 Gen3 | Quick Installation Guide - Page 30
down your system and install Multi-Angle CIR Receiver to the other front USB port then try again. Step5. Enter Windows. Execute ASRock support CD and install CIR Driver. (It is listed at the bottom of driver list.) English 3 CIR sensors in different angles 30 ASRock Z68 Extreme3 Gen3 Motherboard - ASRock Z68 Extreme3 Gen3 | Quick Installation Guide - Page 31
you do the clear-CMOS action. Please be noted that the password, date, time, user default profile, 1394 GUID and MAC address will be cleared only if the CMOS battery is removed. The Clear CMOS Switch has the same function as the Clear CMOS jumper. English 31 ASRock Z68 Extreme3 Gen3 Motherboard - ASRock Z68 Extreme3 Gen3 | Quick Installation Guide - Page 32
SATA3) connectors support SATA data hard disk or the SATAII / SATA3 connector on this motherboard. Either end of the 3.5mm audio cable can be connected to the portable audio devices, such as MP3 player and mobile phone or the Line-in port of your PC. English 32 ASRock Z68 Extreme3 Gen3 Motherboard - ASRock Z68 Extreme3 Gen3 | Quick Installation Guide - Page 33
the panel wire on the chassis must support HDA to function correctly. Please follow the instruction in our manual and chassis manual to install your system. 2. If you use AC'97 audio panel, please install it to the front panel audio header as below: 33 ASRock Z68 Extreme3 Gen3 Motherboard English - ASRock Z68 Extreme3 Gen3 | Quick Installation Guide - Page 34
module mainly consists of power switch, reset switch, power LED, hard drive activity LED, speaker and etc. When connecting your chassis front panel module to this header, make sure the wire assignments and the pin assign-ments are matched correctly. 34 ASRock Z68 Extreme3 Gen3 Motherboard English - ASRock Z68 Extreme3 Gen3 | Quick Installation Guide - Page 35
successfully even without the fan speed control function. If you plan to connect the 3-Pin CPU fan to the CPU fan connector on this motherboard, please connect it to Pin 1-3. Pin 1-3 Connected 3-Pin Fan Installation (3-pin CPU_FAN2) (see p.2 No. 7) English 35 ASRock Z68 Extreme3 Gen3 Motherboard - ASRock Z68 Extreme3 Gen3 | Quick Installation Guide - Page 36
(2-pin HDMI_SPDIF1) (see p.2 No. 32) HDMI_SPDIF header, providing SPDIF audio output to HDMI VGA card, allows the system to connect HDMI Digital TV/ projector/LCD devices. Please connect the HDMI_SPDIF connector of HDMI VGA card to this header. English 36 ASRock Z68 Extreme3 Gen3 Motherboard - ASRock Z68 Extreme3 Gen3 | Quick Installation Guide - Page 37
Reset Switch (RSTBTN) (see p.2 No. 17) Reset Switch is a smart switch, allowing users to quickly reset the system. Clear CMOS Switch (CLRCBTN) (see p.3 No. 13) Clear CMOS Switch is a smart switch, allowing users to quickly clear the CMOS values. English 37 ASRock Z68 Extreme3 Gen3 Motherboard - ASRock Z68 Extreme3 Gen3 | Quick Installation Guide - Page 38
. Cache initialization CPU post-memory initialization. Application Processor(s) (AP) initialization CPU post-memory initialization. Boot Strap Processor (BSP) selection CPU post-memory initialization. System Management Mode (SMM) initialization ASRock Z68 Extreme3 Gen3 Motherboard English - ASRock Z68 Extreme3 Gen3 | Quick Installation Guide - Page 39
image is found Recovery firmware image is loaded Reserved for future AMI progress codes Recovery PPI is not available Recovery capsule is not found Invalid recovery capsule Reserved for future AMI error codes DXE Core is started NVRAM initialization 39 ASRock Z68 Extreme3 Gen3 Motherboard English - ASRock Z68 Extreme3 Gen3 | Quick Installation Guide - Page 40
connect Console input devices connect Super IO Initialization USB initialization is started USB Reset USB Detect USB Enable Reserved for future AMI codes IDE initialization is started IDE Reset IDE Detect IDE Enable SCSI initialization is started SCSI Reset ASRock Z68 Extreme3 Gen3 Motherboard - ASRock Z68 Extreme3 Gen3 | Quick Installation Guide - Page 41
ROM No Console Output Devices are found No Console Input Devices are found Invalid password Error loading Boot Option (LoadImage returned error) Boot Option is failed (StartImage returned error) Flash update is failed Reset protocol is not available English 41 ASRock Z68 Extreme3 Gen3 Motherboard - ASRock Z68 Extreme3 Gen3 | Quick Installation Guide - Page 42
XP 64-bit OS. Using SATA / SATAII / SATA3 HDDs without NCQ function STEP 1: Set Up UEFI. A. Enter UEFI SETUP UTILITY Advanced screen SATA Configuration. B. Set the option "SATA Mode" to [IDE]. STEP 2: Install Windows® XP / XP 64-bit OS on your system. 42 ASRock Z68 Extreme3 Gen3 Motherboard English - ASRock Z68 Extreme3 Gen3 | Quick Installation Guide - Page 43
/ SATAII / SATA3 HDDs with NCQ function STEP 1: Set Up UEFI. A. Enter UEFI SETUP UTILITY Advanced screen SATA Configuration. B. Set the option "SATA Mode" to [AHCI]. STEP 2: Install Windows® 7 / 7 64-bit / VistaTM / VistaTM 64-bit OS on your system. 43 ASRock Z68 Extreme3 Gen3 Motherboard English - ASRock Z68 Extreme3 Gen3 | Quick Installation Guide - Page 44
drive. It will display the Main Menu automatically if "AUTORUN" is enabled in your computer. If the Main Menu does not appear automatically, locate and double-click on the file "ASSETUP.EXE" from the BIN folder in the Support CD to display the menus. 44 ASRock Z68 Extreme3 Gen3 Motherboard English - ASRock Z68 Extreme3 Gen3 | Quick Installation Guide - Page 45
tigen, besuchen Sie bitte unsere Webseite: www.asrock.com/support/index.asp 1.1 Kartoninhalt ASRock Z68 Extreme3 Gen3 Motherboard (ATX-Formfaktor: 30.5 cm x 21.8 cm; 12.0 Zoll x 8.6 Zoll) ASRock Z68 Extreme3 Gen3 Schnellinstallationsanleitung ASRock Z68 Extreme3 Gen3 Support-CD Zwei Serial ATA (SATA - ASRock Z68 Extreme3 Gen3 | Quick Installation Guide - Page 46
10.1 mit Intel® Sandy Bridge-Prozessor - Maximal gemeinsam genutzter Speicher 1759MB (siehe VORSICHT 5) - Drei VGA-Ausgangsoptionen: D-Sub, DVI-D sowie HDMI (siehe VORSICHT 6) - Unterstützt HDMI 1.4a mit einer maximalen Auflösung von 1920 x 1200 bei 60 Hz ASRock Z68 Extreme3 Gen3 Motherboard Deutsch - ASRock Z68 Extreme3 Gen3 | Quick Installation Guide - Page 47
und Intel Smart Response-Technologie), NCQ-, AHCI-und „Hot Plug" (Hot-Plugging)-Funktionen (SATA3_1-Anschluss wird mit dem eSATA3-Port geteilt) - 2 x USB 3.0-Ports an der Rückseite durch ASMedia ASM1042, unterstützt USB 1.0/2.0/3.0 mit bis zu 5 Gb/s 47 ASRock Z68 Extreme3 Gen3 Motherboard Deutsch - ASRock Z68 Extreme3 Gen3 | Quick Installation Guide - Page 48
-ATX-Netzteil - Anschluss für Audio auf der Gehäusevorderseite - 4 x USB 2.0-Anschlüsse (Unterstützung 8 zusätzlicher USB 2.0-Anschlüsse) - 1 x Dr. Debug (Debug-LED mit 7 Segmenten) - 1 x CMOS löschen-Schalter mit LED - 1 x Netzschalter mit LED - 1 x Rücksetzschalter (Reset) mit LED - 64Mb AMI BIOS - ASRock Z68 Extreme3 Gen3 | Quick Installation Guide - Page 49
berwachung der CPU-Temperatur - Motherboardtemperaturerkennung - Drehzahlmessung für CPU/Gehäuse/Stromlüfter - Geräuscharmer CPU-/Gehäusel www.asrock.com WARNUNG Beachten Sie bitte, dass Overclocking, einschließlich der Einstellung im BIOS, wurden. 49 ASRock Z68 Extreme3 Gen3 Motherboard Deutsch - ASRock Z68 Extreme3 Gen3 | Quick Installation Guide - Page 50
CPU-Kerne die Anzahl an Ausgangsphasen zur Steigerung der Effizienz reduzieren - ohne die Rechenleistung zu beeinträchtigen. Hinweise zur Bedienung der ASRock Extreme Tuning Utility (AXTU) finden Sie auf unserer Webseite. ASRock-Webseite: http://www.asrock.com 50 ASRock Z68 Extreme3 Gen3 Motherboard - ASRock Z68 Extreme3 Gen3 | Quick Installation Guide - Page 51
Explorer ab Version 8 nutzen. ASRock-Website: http:// www.asrock.com/Feature/SmartView/index.asp 13. ASRocks XFast USB dient der Steigerung der Leistungsfähigkeit Ihrer USB-Speichergeräte. Die Leistung kann je nach Eigenschaften des Gerätes variieren. 51 ASRock Z68 Extreme3 Gen3 Motherboard Deutsch - ASRock Z68 Extreme3 Gen3 | Quick Installation Guide - Page 52
erweiterten Medienfunktionen der Intel® HD-Grafikkarte profitieren. 16. Durch die ASRock ein/aus-Wiedergabetechnologie CPU-Kühlertypen, Socket LGA 775, LGA 1155 und LGA 1156. Beachten Sie bitte, dass nicht alle 775 und 1156 CPU-Lüfter verwendet werden können. 52 ASRock Z68 Extreme3 Gen3 Motherboard - ASRock Z68 Extreme3 Gen3 | Quick Installation Guide - Page 53
zu entsprechen, sind ein EuP-fähiges Motherboard und eine EuP-fähige Stromversorgung erforderlich. Gemäß einer Empfehlung von Intel muss eine EuP-fähige Stromversorgung dem Standard Ihnen, weitere Details beim Hersteller der Stromversorgung abzufragen. 53 ASRock Z68 Extreme3 Gen3 Motherboard Deutsch - ASRock Z68 Extreme3 Gen3 | Quick Installation Guide - Page 54
üsse sind KEINE Jumper. Setzen Sie KEINE Jumperkappen auf diese Header und Anschlüsse. Wenn Sie Jumperkappen auf Header und Anschlüsse setzen, wird das Motherboard unreparierbar beschädigt! Deutsch 54 ASRock Z68 Extreme3 Gen3 Motherboard - ASRock Z68 Extreme3 Gen3 | Quick Installation Guide - Page 55
des 3,5-mm-Klin kenaudiokabels können an portable Audiogeräte, wie z. B. MP3-Player und Mobiltelefone, oder den Line-in-Port Ihres PCs angeschlossen werden. Deutsch 55 ASRock Z68 Extreme3 Gen3 Motherboard - ASRock Z68 Extreme3 Gen3 | Quick Installation Guide - Page 56
(4-pin CIR1) (siehe S.2 - No. 30) 1 GND IRTX IRRX ATX+5VSB Anschluss für Audio auf der Gehäusevorderseite (9-Pin Audio-Panel auf der Vorder seite Ihres Gehäuses, ermöglicht Ihnen eine bequeme Anschlussmöglichkeit und Kontrolle über Audio-Geräte. Deutsch 56 ASRock Z68 Extreme3 Gen3 Motherboard - ASRock Z68 Extreme3 Gen3 | Quick Installation Guide - Page 57
finition Audio unterst Hinweise zur Pinbelegung. Beachten Sie die positiven und negativen Pins, bevor Sie die Kabel anschließen. PWRBTN (Ein nnen soll. RESET (Reset-Taste): Zum Anschließen der Reset-Taste an der Frontblende des Gehäuses. Mit der Reset-Taste können ASRock Z68 Extreme3 Gen3 Motherboard - ASRock Z68 Extreme3 Gen3 | Quick Installation Guide - Page 58
ächlich aus einer Ein-/Austaste, einer Reset-Taste, einer Betriebs-LED, einer Festplattenaktivit pin CHA_FAN1) (siehe S.2 - No. 23) FAN_SPEED_CONTROL GND +12V CHA_FAN_SPEED (3-pin CHA_FAN2) (siehe S.2 - No. 9) (3-pin CHA_FAN3) (siehe S.2 - No. 41) (3-pin ASRock Z68 Extreme3 Gen3 Motherboard - ASRock Z68 Extreme3 Gen3 | Quick Installation Guide - Page 59
Sie einen traditionellen 4-Pin ATX 12V Energieversorgung adoptieren. Um die 4-Pin ATX Energieversorgung zu verwenden, stecken Sie bitte Ihre Energieversorgung zusammen mit dem Pin 1 und Pin 5 ein. 8 5 Installation der 4-Pin ATX 12V Energieversorgung 4 ASRock Z68 Extreme3 Gen3 Motherboard 1 59 - ASRock Z68 Extreme3 Gen3 | Quick Installation Guide - Page 60
COM1) (siehe S.2 - No. 31) HDMI_SPDIF-Anschluss (2-pin HDMI_SPDIF1) (siehe S.2 - No. 32) Dieser COM-AnschlussHeader wird verwendet, um ein COM-Anschlussmodul zu Bitte verbinden Sie den HDMI_SPDIF-Anschluss der HDMI-VGA-Karte mit diesem Anschluss. Deutsch 60 ASRock Z68 Extreme3 Gen3 Motherboard - ASRock Z68 Extreme3 Gen3 | Quick Installation Guide - Page 61
Reset) ist ein Schnellschalter, mit dem Benutzer das System schnell zurücksetzen können. CMOS löschen-Schalter (CLRCBTN) (siehe S.3 - No. 13) Der CMOS löschen-Schalter ist ein Schnellschalter, mit dem Benutzer die CMOS-Werte schnell löschen können. Deutsch 61 ASRock Z68 Extreme3 Gen3 Motherboard - ASRock Z68 Extreme3 Gen3 | Quick Installation Guide - Page 62
der Support-CD, um die Menüs aufzurufen. Das Setup-Programm soll es Ihnen so leicht wie möglich machen. Es ist menügesteuert, d.h. Sie können in den verschiedenen Untermenüs Ihre Auswahl treffen und die Programme werden dann automatisch installiert. 62 ASRock Z68 Extreme3 Gen3 Motherboard Deutsch - ASRock Z68 Extreme3 Gen3 | Quick Installation Guide - Page 63
modèle que vous utilisez. www.asrock.com/support/index.asp 1.1 Contenu du paquet Carte mère ASRock Z68 Extreme3 Gen3 (Facteur de forme ATX: 12.0 pouces x 8.6 pouces, 30.5 cm x 21.8 cm) Guide d'installation rapide ASRock Z68 Extreme3 Gen3 CD de soutien ASRock Z68 Extreme3 Gen3 Deux câbles de données - ASRock Z68 Extreme3 Gen3 | Quick Installation Guide - Page 64
Vector Extensions (AVX) - Pixel Shader 4.1, DirectX 11 avec CPU Intel® Ivy Bridge, DirectX 10.1 avec CPU Intel® Sandy Bridge - mémoire partagée max 1759MB (voir ATTENTION 5) - Trois options de sortie VGA: D-Sub, DVI-D et HDMI (voir ATTENTION 6) 64 ASRock Z68 Extreme3 Gen3 Motherboard Français - ASRock Z68 Extreme3 Gen3 | Quick Installation Guide - Page 65
faut - 1 x port LAN RJ-45 avec LED (ACT/LED CLIGNOTANTE et LED VITESSE) - 1 x interrupteur d'effacement du CMOS avec LED - Prise HD Audio: Haut-parleur arrière / Central / Basses / Entrée Ligne / Haut-parleur frontal / Microphone (voir ATTENTION 8) Français 65 ASRock Z68 Extreme3 Gen3 Motherboard - ASRock Z68 Extreme3 Gen3 | Quick Installation Guide - Page 66
, VTT, VCCSA Tension Multi-ajustement - Pilotes, utilitaires, logiciel anti-virus (version d'évaluation), CyberLink MediaEspresso 6.5 Trial, Suite logicielle ASRock (CyberLink DVD Suite et Version OEM et d'essai; Suite multimédia ASRock MAGIX - OEM) Français 66 ASRock Z68 Extreme3 Gen3 Motherboard - ASRock Z68 Extreme3 Gen3 | Quick Installation Guide - Page 67
ASRock l'Instant Boot - ASRock Instant Flash (voir ATTENTION 10) - Chargeur ASRock APP (voir ATTENTION 11) - ASRock SmartView (voir ATTENTION 12) - ASRock XFast USB (voir ATTENTION 13) - ASRock ) - Commande de ventilateur CPU/boîtier à plusieurs vitesses BIOS ASRock Z68 Extreme3 Gen3 Motherboard - ASRock Z68 Extreme3 Gen3 | Quick Installation Guide - Page 68
lire le guide d'installation Veuillez verifier la Intel® website pour les informations supporte les deux modes stéréo et mono. Pour la sortie audio, cette carte mère supporte CPU ne sont pas utilisées, sans diminuer les performances de l'ordinateur. 68 ASRock Z68 Extreme3 Gen3 Motherboard Français - ASRock Z68 Extreme3 Gen3 | Quick Installation Guide - Page 69
IE8. Site Internet ASRock : http://www.asrock.com/Feature/SmartView/ index.asp 13. ASRock XFast USB permet d'améliorer les performances de votre périphérique de stockage USB. Les performances réelles dépendent des propriétés du périphérique. 69 ASRock Z68 Extreme3 Gen3 Motherboard Français - ASRock Z68 Extreme3 Gen3 | Quick Installation Guide - Page 70
Le Combo Cooler Option (C.C.O.) offre un choix flexible pour adopter trois types différents de refroidisseur sde CPU, les sockets LGA 775, LGA 1155 et LGA 1156. Veuillez noter que tous les ventilateurs de CPU 775 et 1156 ne peuvent pas être utilisés. 70 ASRock Z68 Extreme3 Gen3 Motherboard Français - ASRock Z68 Extreme3 Gen3 | Quick Installation Guide - Page 71
conforme à la norme EuP, une carte mère EuP et une alimentation EuP sont requises. Selon les suggestions d'Intel', l'alimentation électrique EuP doit correspondre à la norme, qui est que l'efficacité électrique de 5v de courant pour plus de détails. 71 ASRock Z68 Extreme3 Gen3 Motherboard Français - ASRock Z68 Extreme3 Gen3 | Quick Installation Guide - Page 72
. Le fait de placer les capuchons de cavalier sur les en-têtes et connecteurs causera à la carte mère des dommages irréversibles! Français 72 ASRock Z68 Extreme3 Gen3 Motherboard - ASRock Z68 Extreme3 Gen3 | Quick Installation Guide - Page 73
/ SATAII / SATA3 ou au connecteur SATAII / SATA3 sur la carte mere. L'une des extrémités du câble audio 3,5mm peut être branchée sur des appareils audio portatifs comme un lecteur MP3 ou un téléphone portable, ou le port Entrée Ligne de votre PC. Français 73 ASRock Z68 Extreme3 Gen3 Motherboard - ASRock Z68 Extreme3 Gen3 | Quick Installation Guide - Page 74
à infrarouges grand public (CIR1 br.4) (voir p.2 No. 30) 1 GND IRTX IRRX ATX+5VSB Connecteur audio panneau (HD_AUDIO1 br. 9) (voir p.2 No. 34) GND avant audio en façade qui permet le branchement et le contrôle commodes de périphériques audio. Français 74 ASRock Z68 Extreme3 Gen3 Motherboard - ASRock Z68 Extreme3 Gen3 | Quick Installation Guide - Page 75
instructions dans notre manuel et le manuel de châssis afin installer votre système. 2. Si vous utilisez le panneau audio AC'97, installez-le sur l'adaptateur audio avec l'interrupteur d'alimentation. RESET (Interrupteur de réinitialisation): Connectez ASRock Z68 Extreme3 Gen3 Motherboard Français - ASRock Z68 Extreme3 Gen3 | Quick Installation Guide - Page 76
-tête du haut-parleur de châssis (SPEAKER1 br. 4) (voir p.2 No. 21) LED di accensione (3-pin PLED1) (vedi p.2 Nr. 18) 1 PLEDPLED+ PLED+ Connecteur pour châssis et ventilateur (CHA_FAN1 br. le fil (voir p.2 No. 4) noir sur la broche de terre. 1 2 3 4 76 ASRock Z68 Extreme3 Gen3 Motherboard - ASRock Z68 Extreme3 Gen3 | Quick Installation Guide - Page 77
un support de (Ventilateur silencieux ventilateur de CPU à 4 broches , le ventilateur de CPU à ATX 12V 4 1 En-tête de port COM (COM1 br.9) (voir p.2 No. 31) Cette en-tête de port COM est utilisée pour prendre en charge un module de port COM. Français 77 ASRock Z68 Extreme3 Gen3 Motherboard - ASRock Z68 Extreme3 Gen3 | Quick Installation Guide - Page 78
Connecteur HDMI_SPDIF (HDMI_SPDIF1 2-pin) (voir p.2 No. 32) Connecteur HDMI_SPDIF, fournissant une sortie audio SPDIF vers la carte VGA HDMI, de CMOS est un interrupteur rapide qui permet à l'utilisateur d'effacer rapidement les valeurs du CMOS. Français 78 ASRock Z68 Extreme3 Gen3 Motherboard - ASRock Z68 Extreme3 Gen3 | Quick Installation Guide - Page 79
détaillées sur le BIOS, veuillez consulter le Guide de l'utilisateur (fichier PDF) dans le CD technique. 3. Informations sur le CD de support Cette carte mère supporte divers systèmes d'exploitation BIN et doublecliquez dessus pour afficher les menus. 79 ASRock Z68 Extreme3 Gen3 Motherboard Français - ASRock Z68 Extreme3 Gen3 | Quick Installation Guide - Page 80
.com/support/index.asp 1.1 Contenuto della confezione Scheda madre ASRock Z68 Extreme3 Gen3 (ATX Form Factor: 12.0-in x 8.6-in, 30.5 cm x 21.8 cm) Guida di installazione rapida ASRock Z68 Extreme3 Gen3 CD di supporto ASRock Z68 Extreme3 Gen3 Due cavi dati Serial ATA (SATA) (opzionali) Un cavo audio - ASRock Z68 Extreme3 Gen3 | Quick Installation Guide - Page 81
Bridge - Memoria massima condivisa 1759MB (vedi ATTENZIONE 5) - Tre opzioni d'output VGA: D-Sub, DVI-D e HDMI (vedi ATTENZIONE 6) - Supporta HDMI 1.4a con risoluzione massima fino a 1920x1200 @ 60Hz - Supporta DVI con risoluzione massima fino a 1920x1200 @ 60Hz 81 ASRock Z68 Extreme3 Gen3 Motherboard - ASRock Z68 Extreme3 Gen3 | Quick Installation Guide - Page 82
e tecnologia Intel Smart Response) e delle funzioni NCQ, AHCI e "Hot Plug" (il connettore SATA3_1 è condiviso con la porta eSATA3) - 2 x porte USB 3.0 posteriori amministrate dal controller ASMedia ASM1042, supporto di USB 1.0/2.0/3.0 fino a 5Gb/s Italiano 82 ASRock Z68 Extreme3 Gen3 Motherboard - ASRock Z68 Extreme3 Gen3 | Quick Installation Guide - Page 83
- 8-pin connettore ATX 12V - Connettore audio sul pannello frontale - 4 x Collettore USB 2.0 (supporta 8 porte USB 2.0) - 1 x Dr. Debug (LED debug con 7 segmenti) - 1 x interruttore pulizia CMOS con LED - 1 x interruttore di alimentazione con LED - 1 x interruttore di reset con LED - 64Mb AMI BIOS - ASRock Z68 Extreme3 Gen3 | Quick Installation Guide - Page 84
automatica della ventola dello chassis in base alla temperatura della CPU) - Ventola CPU/chassis con controllo di varie velocità - Voltaggio: + come anche la regolazione delle impostazioni del BIOS, l'applicazione della tecnologia Untied Overclocking Technology ASRock Z68 Extreme3 Gen3 Motherboard - ASRock Z68 Extreme3 Gen3 | Quick Installation Guide - Page 85
migliorare l'efficienza quando i core CPU sono inattivi senza sacrificare le prestazioni di computazione. Vistare il nostro per informazioni sulle procedure operative dell'utilità AXTU (ASRock Extreme Tuning Utility). Sito ASRock: http://www.asrock.com 85 ASRock Z68 Extreme3 Gen3 Motherboard Italiano - ASRock Z68 Extreme3 Gen3 | Quick Installation Guide - Page 86
menu BIOS per accedere ad ASRock Instant Flash. Avviare questo strumento e salvare il nuovo file BIOS nell'unità Flash USB, dischetto (disco floppy) o disco rigido; poi si può aggiornare il BIOS con à quali dati si stanno trasferendo in streaming. 86 ASRock Z68 Extreme3 Gen3 Motherboard Italiano - ASRock Z68 Extreme3 Gen3 | Quick Installation Guide - Page 87
Intel®. 16. La tecnologia ASRock On/Off Play consente agli utenti di godere di una esperienza audio eccezionale tramite i dispositivi audio di calore CPU, Socket LGA 775, LGA 1155 e LGA 1156. Notare che non possono essere usate tutte le ventole CPU 775 e ASRock Z68 Extreme3 Gen3 Motherboard Italiano - ASRock Z68 Extreme3 Gen3 | Quick Installation Guide - Page 88
installare cappucci per jumper su questi collettori e connettori. L'installazione di cappucci per jumper su questi collettori e connettori provocherà danni permanenti alla scheda madre! Italiano 88 ASRock Z68 Extreme3 Gen3 Motherboard - ASRock Z68 Extreme3 Gen3 | Quick Installation Guide - Page 89
SATA / SATAII / SATA3 o al connettore di SATAII / SATA3 su questa cartolina base. Una delle estremità del cavo audio da 3,5 mm può essere collegata ai dispositivi audio portatili come lettori MP3 o cellulari, oppure alla porta Line-in del computer. Italiano 89 ASRock Z68 Extreme3 Gen3 Motherboard - ASRock Z68 Extreme3 Gen3 | Quick Installation Guide - Page 90
Connettore modulo infrarosso consumer (4-pin CIR1) (vedi p.2 Nr. 30) 1 GND IRTX IRRX ATX+5VSB Connettore audio sul pannello frontale (9-pin HD_AUDIO1) (vedi p.2 Nr pannello audio. Che consente connessione facile e controllo dei dispositivi audio. Italiano 90 ASRock Z68 Extreme3 Gen3 Motherboard - ASRock Z68 Extreme3 Gen3 | Quick Installation Guide - Page 91
alle istruzioni del nostro manuale e del manuale del telaio per installare il sistema. 2. Se si utilizza un pannello audio AC'97, installarlo nell'intestazione audio del pannello anteriore, come stato di sospensione /ibernazione S3/S4 oppure spento (S5). 91 ASRock Z68 Extreme3 Gen3 Motherboard - ASRock Z68 Extreme3 Gen3 | Quick Installation Guide - Page 92
) (3-pin PWR_FAN1) (vedi p.2 Nr. 3) Connettore ventolina CPU (4-pin CPU_FAN1) (vedi p.2 Nr. 4) FAN_SPEED_CONTROL CPU_FAN_SPEED +12V GND 1 2 3 4 Collegare il cavo della ventolina CPU a questo connettore e far combaciare il filo nero al pin terra. 92 ASRock Z68 Extreme3 Gen3 Motherboard Italiano - ASRock Z68 Extreme3 Gen3 | Quick Installation Guide - Page 93
pin ATX 12V, prego collegare la presa elettrica al Pin 1 e Pin 5. 8 5 Installazione elettrica 4-Pin ATX 12V 4 1 Collettore porta COM (9-pin COM1) (vedi p.2 Nr. 31) Questo collettore porta COM è utilizzato per supportare il modulo porta COM. Italiano 93 ASRock Z68 Extreme3 Gen3 Motherboard - ASRock Z68 Extreme3 Gen3 | Quick Installation Guide - Page 94
) (vedi p.2 Nr. 32) Header HDMI_SPDIF, con uscita audio SPDIF su scheda HDMI VGA, consente al sistema di collegare dispositivi per TV digitale HDMI/proiettori/ LCD . Collegare il connettore HDMI_SPDIF della scheda VGA HDMI a questo header. Italiano 94 ASRock Z68 Extreme3 Gen3 Motherboard - ASRock Z68 Extreme3 Gen3 | Quick Installation Guide - Page 95
il sistema. L'interruttore di reset è un interruttore rapido che consente agli utenti di resettare rapidamente il sistema. L'interruttore di pulizia CMOS è un interruttore rapido che consente agli utenti di cancellare velocemente i valori CMOS. Italiano 95 ASRock Z68 Extreme3 Gen3 Motherboard - ASRock Z68 Extreme3 Gen3 | Quick Installation Guide - Page 96
Alt> + , o premi il tasto di reset sullo chassis del sistema. Per informazioni più dettagliate circa il Setup del BIOS, fare riferimento al Manuale dell'Utente (PDF file) contenuto nel cd supporto e cliccare due volte per visualizzare i menù. 96 ASRock Z68 Extreme3 Gen3 Motherboard Italiano - ASRock Z68 Extreme3 Gen3 | Quick Installation Guide - Page 97
.com/support/index.asp 1.1 Contenido de la caja Placa base ASRock Z68 Extreme3 Gen3 (Factor forma ATX: 30,5 cm x 21,8 cm, 12,0" x 8,6") Guía de instalación rápida de ASRock Z68 Extreme3 Gen3 CD de soporte de ASRock Z68 Extreme3 Gen3 Dos cables de datos Serial ATA (SATA) (Opcional) Una Cable de audio - ASRock Z68 Extreme3 Gen3 | Quick Installation Guide - Page 98
CPU Intel® Sandy Bridge - 1759MB de Memoria máxima compartida (vea ATENCIÓN 5) - Tres opciones de salida VGA: D-Sub, DVI-D y HDMI (ver ATENCIÓN 6) - Admite HDMI 1.4a con una resolución máxima de 1920x1200 a 60 Hz - Admite DVI con una resolución máxima de 1920x1200 a 60 Hz ASRock Z68 Extreme3 Gen3 - ASRock Z68 Extreme3 Gen3 | Quick Installation Guide - Page 99
Intel Rapid Storage y tecnología Intel Smart Response), NCQ, AHCI y de "Hot Plug" (conexión en caliente) (los puertos SATA3_1 y eSATA3 son compartidos) - 2 x puertos USB 3.0 traseros de ASMedia ASM1042, compatible con USB 1.0/2.0/3.0 de hasta 5 GB/s Español 99 ASRock Z68 Extreme3 Gen3 Motherboard - ASRock Z68 Extreme3 Gen3 | Quick Installation Guide - Page 100
de CPU / chasis / alimentación - 24-pin cabezal de alimentación ATX - 8-pin conector de ATX 12V power - Conector de audio de panel frontal - 4 x Cabezal USB 2.0 (admite 8 puertos USB 2.0 adicionales) - 1 x Dr. Debug (indicador LED de avería de 7 segmentos) - 1 x conmutador de borrado de memoria CMOS - ASRock Z68 Extreme3 Gen3 | Quick Installation Guide - Page 101
temperatura del procesador) - Control de ajuste de la velocidad del ventilador de la CPU y el chasis - Monitor de Voltaje: +12V, +5V, +3.3V, Vcore de la velocidad del reloj, incluido el ajuste del BIOS, aplicando la tecnología de aumento de velocidad liberada ASRock Z68 Extreme3 Gen3 Motherboard - ASRock Z68 Extreme3 Gen3 | Quick Installation Guide - Page 102
CPU de 64-bit, no existe dicha limitación. 5. El tamaño de la memoria compartido máximo es definido por el vendedor del chipset y está conforme al cambio. Por favor compruebe el Web site de Intel de audio, este CPU están inactivos sin que el rendimiento de cálculo ASRock Z68 Extreme3 Gen3 Motherboard - ASRock Z68 Extreme3 Gen3 | Quick Installation Guide - Page 103
de su explorador es IE8. Sitio Web de ASRock: http://www.asrock.com/Feature/SmartView/index.asp 13. ASRock XFast USB puede aumentar el rendimiento de los dispositivos de almacenamiento USB. El rendimiento depende de las propiedades del dispositivo. 103 ASRock Z68 Extreme3 Gen3 Motherboard Español - ASRock Z68 Extreme3 Gen3 | Quick Installation Guide - Page 104
(C.C.O.) representa una opción flexible que puede adaptarse a tres tipos de disipador de CPU diferentes, correspondientes a los zócalos LGA 775, LGA 1155 y LGA 1156. Recuerde que no es posible el uso de todos los ventiladores para CPU 775 y 1156. 104 ASRock Z68 Extreme3 Gen3 Motherboard Español - ASRock Z68 Extreme3 Gen3 | Quick Installation Guide - Page 105
placa base y una fuente de alimentación que cumplan con la directiva EuP. Según las directrices de Intel, una fuente de alimentación que cumpla con la directiva EuP debe satisfacer el estándar, es fuente de alimentación para obtener más detalles. 105 ASRock Z68 Extreme3 Gen3 Motherboard Español - ASRock Z68 Extreme3 Gen3 | Quick Installation Guide - Page 106
en cuenta que la contraseña, la fecha, la hora, el perfil predeterminado del usuario, el GUID 1394 y la dirección MAC solamente se borrará si la batería CMOS se quita. El conmutador Borrar CMOS tiene la misma función que el puente Borrar CMOS. Español 106 ASRock Z68 Extreme3 Gen3 Motherboard - ASRock Z68 Extreme3 Gen3 | Quick Installation Guide - Page 107
de (Opcional) audio de 3,5 mm se puede conectar a los dispositivos de audio portátiles, como por ejemplo reproductores MP3 y teléfonos móviles, o al puerto Entrada de línea de su PC. conexión de alimentación de la fuente de alimentación. 107 ASRock Z68 Extreme3 Gen3 Motherboard Español - ASRock Z68 Extreme3 Gen3 | Quick Installation Guide - Page 108
de infrarrojos para el consumidor (4-pin CIR1) (vea p.2, N. 30) 1 GND IRTX IRRX ATX+5VSB Conector de audio de panel frontal (9-pin HD_AUDIO1) (vea p.2, N. de audio de panel frontal que permite conexión y control conveniente de apparatos de Audio. Español 108 ASRock Z68 Extreme3 Gen3 Motherboard - ASRock Z68 Extreme3 Gen3 | Quick Installation Guide - Page 109
Audio de Alta Definición soporta la detección de conector, pero el cable de panel en el chasis debe soportar HDA para operar correctamente. Por favor, siga las instrucciones en nuestro manual y en el manual Cabezal de panel de sistema (9-pin PANEL1) (vea p.2, N. 20 ASRock Z68 Extreme3 Gen3 Motherboard - ASRock Z68 Extreme3 Gen3 | Quick Installation Guide - Page 110
(3-pin CHA_FAN2) (vea p.2, N. 9) Por favor, conecte los cables del ventilador a los conectores de ventilador, haciendo coincidir el cable negro con la patilla de masa. (3-pin CHA_FAN3) (vea p.2, N. 41) (3-pin PWR_FAN1) (vea p.2, N. 3) Español 110 ASRock Z68 Extreme3 Gen3 Motherboard - ASRock Z68 Extreme3 Gen3 | Quick Installation Guide - Page 111
12V power (8-pin ATX12V1) 8 5 (vea p.2, N. 1) 4 1 Tenga en cuenta que es necesario conectar este conector a una toma de corriente con el enchufe ATX 12V, de modo que proporcione suficiente electricidad. De lo contrario no se podrá encender. Español 111 ASRock Z68 Extreme3 Gen3 Motherboard - ASRock Z68 Extreme3 Gen3 | Quick Installation Guide - Page 112
pin ATX 12V. Para usar el fuente de energía de 4-pin ATX 12V, por favor conecte su fuente de energía junto con Pin 1 y Pin 5. 8 5 Instalación de Fuente de Energía de 4-Pin ATX 12V 4 1 Cabezal del puerto COM (9-pin VGA HDMI a esta cabecera. Español 112 ASRock Z68 Extreme3 Gen3 Motherboard - ASRock Z68 Extreme3 Gen3 | Quick Installation Guide - Page 113
la memoria CMOS. Conmutador CMOS es un conmutador rápido que permite al usuario borrar rápidamente el contenido de la memoria CMOS. El conmutador de encendido es un conmutador rápido que permite al usuario encender / apagar rápidamente el sistema. Español 113 ASRock Z68 Extreme3 Gen3 Motherboard - ASRock Z68 Extreme3 Gen3 | Quick Installation Guide - Page 114
Reset en el panel del ordenador. Para información detallada sobre como configurar la BIOS, por favor refiérase al Manual del Usuario (archivo PDF) contenido en el CD. 3.Información de Software Support archivo "ASSETUP.EXE" para iniciar la instalación. 114 ASRock Z68 Extreme3 Gen3 Motherboard Español - ASRock Z68 Extreme3 Gen3 | Quick Installation Guide - Page 115
1 ASRock Z68 Extreme3 Gen3 ASRock ASRock BIOS ASRock ASRock. ASRock http://www.asrock.com www.asrock.com/support/index.asp 1.1 ASRock Z68 Extreme3 Gen3 ATX: 12,0 x 8,6 30,5 x 21,8 см) ASRock Z68 Extreme3 Gen3 ASRock Z68 Extreme3 Gen3 2 x - ASRock Z68 Extreme3 Gen3 | Quick Installation Guide - Page 116
Shader 4.1, DirectX 11 Intel® Ivy Bridge, DirectX 10.1 Intel® Sandy Bridge 1759 5) - Три VGA D-Sub, DVI-D и HDMI 6 HDMI 1.4a 1920х1200 @ 60 DVI 1920х1200 @ 60 D-Sub 2048х1536 @ 75 Auto Lip Sync, xvYCC и HBR (High Bit Rate Audio HDMI HDMI 7) ASRock Z68 Extreme3 Gen3 Motherboard - ASRock Z68 Extreme3 Gen3 | Quick Installation Guide - Page 117
- 4 x SATA2 3,0 RAID плате (RAID 0, RAID 1, RAID 10, RAID 5, Intel Rapid Storage Intel Smart Response), NCQ, AHCI - 2 x SATA3 6,0 Гбит/с - 1 x - 1 x - 1 x COM - 1 x HDMI_SPDIF - 1 x Power LED CPU/Chassis/Power FAN - 24 ATX 117 ASRock Z68 Extreme3 Gen3 Motherboard - ASRock Z68 Extreme3 Gen3 | Quick Installation Guide - Page 118
BIOS 118 - 8 ATX 12 4 x USB 2.0 8 USB 2.0 - 1 x Dr. Debug (7 1 x Clear CMOS 1 x Power Switch 1 x Reset Switch 64Mb AMI BIOS - AMI UEFI Legal BIOS Plug and Play" - ACPI 1.1 SMBIOS 2.3.1 CPU Core, IGPU, DRAM PCH, CPU PLL, VTT, VCCSA CyberLink MediaEspresso 6.5 ASRock - ASRock Z68 Extreme3 Gen3 | Quick Installation Guide - Page 119
Microsoft® Windows® 7 / 7 64-bit / VistaTM / 64 VistaTM / XP / XP 64-bit ные - FCC, CE, WHQL ErP/EuP Ready ErP/EuP 20) ты http://www.asrock.com BIOS Untied Overclocking 119 ASRock Z68 Extreme3 Gen3 Motherboard - ASRock Z68 Extreme3 Gen3 | Quick Installation Guide - Page 120
Windows® 7 / VistaTM / XP Windows® OS с 64-bit 5 Intel 6 D-Sub, DVI-D и HDMI DVI-to-HDMI порт DVI-D HDMI ASRock Extreme Tuning Utility (AXTU Hardware Monitor Fan Control Overclocking OC DNA and IES Hardware Monitor Fan Control Overclocking OC DNA ASRock Z68 Extreme3 Gen3 Motherboard - ASRock Z68 Extreme3 Gen3 | Quick Installation Guide - Page 121
com/Feature/AppCharger/index.asp 12. SmartView IE Facebook ASRock SmartView SmartView Windows® 7 / 7 64 bit / VistaTM / VistaTM 64 bit IE8 ASRock: http://www.asrock. com/Feature/SmartView/index.asp 13 ASRock XFast USB USB 14. ASRock XFast LAN 121 ASRock Z68 Extreme3 Gen3 Motherboard - ASRock Z68 Extreme3 Gen3 | Quick Installation Guide - Page 122
Youtube 15 Lucid Virtu 3D HD Intel®. 16 ASRock MP3 ACPI S5 3,5 17 18 19. Combo Cooler Option (C.C.O Socket LGA775, LGA1155 или LGA1156 LGA775 или LGA1156 20. EuP Energy Using Product EuP 1 EuP Intel EuP 50 5V 100 EuP. 122 ASRock Z68 Extreme3 Gen3 Motherboard - ASRock Z68 Extreme3 Gen3 | Quick Installation Guide - Page 123
1.3 short open 3 1 и 2 CMOS (CLRCMOS1, 3 2, п. 26) CMOS CLRCMOS1 CMOS 15 5 2 и 3 CLRCMOS1 CMOS BIOS CMOS BIOS CMOS 1394 GUID и MAC CMOS. Clear CMOS Clear CMOS. 123 ASRock Z68 Extreme3 Gen3 Motherboard - ASRock Z68 Extreme3 Gen3 | Quick Installation Guide - Page 124
ATA (SATA 3,5 SATA3_1 SATA3_0 SATA2_5 SATA2_3 SATA2_4 SATA2_2 Serial ATAII SATAII SATA 3,0 Serial ATA3 SATA3 SATA 6,0 eSATA SATA3_1 SATA / SATAII / SATA3 SATAII / SATA3 3,5 MP3 124 ASRock Z68 Extreme3 Gen3 Motherboard - ASRock Z68 Extreme3 Gen3 | Quick Installation Guide - Page 125
5 IR1 2, п. 33) IRTX +5VSB DUMMY 1 GND IRRX (4 CIR1 2, п. 30) 1 GND IRTX IRRX ATX+5VSB 9 HD_AUDIO1) (см. cтр. 2, п.34) GND PRESENCE# MIC_RET OUT_RET 1 OUT2_L J_SENSE OUT2_R MIC2_R MIC2_L USB 2.0 USB 2.0 USB 2.0 USB 2.0. 125 ASRock Z68 Extreme3 Gen3 Motherboard - ASRock Z68 Extreme3 Gen3 | Quick Installation Guide - Page 126
1 High Definition Audio Jack Sensing p HDA 2 AC'97 A Mic_IN (MIC MIC2_L. B Audio_R (RIN OUT2_R Audio_L (LIN OUT2_L. C 7 / 7 64-бита, VistaTM / VistaTM 64 FrontMic Realtek Recording Volume 9 PANEL1 2, п. 20) 126 PWRBTN RESET ASRock Z68 Extreme3 Gen3 Motherboard - ASRock Z68 Extreme3 Gen3 | Quick Installation Guide - Page 127
LED (3 PLED1 2, п. 18) 1 PLEDPLED+ PLED+ Power LED S1 S3/S4 или S5 Chassis и Power Fan (4 CHA_FAN1) 2, п. 23) (3 CHA_FAN2) FAN_SPEED_CONTROL GND +12V CHA_FAN_SPEED 2, п. 9) (3 CHA_FAN3 2, п. 41) (3 PWR_FAN1 2, п. 3) 127 ASRock Z68 Extreme3 Gen3 Motherboard - ASRock Z68 Extreme3 Gen3 | Quick Installation Guide - Page 128
3 4 4 3 3 1-3. 1-3 3 (3 CPU_FAN2 2, п. 7) ATX (24 ATXPWR1 2, п. 8) 12 24 ATX. 1 13 12 24 ивает 24 ATX 20 ATX 20 ATX 1 13. 20 ATX 1 13 12V-ATX (8 ATX12V1 2, п. 1) 8 5 4 1 ATX 12 128 ASRock Z68 Extreme3 Gen3 Motherboard - ASRock Z68 Extreme3 Gen3 | Quick Installation Guide - Page 129
ATX с 8 12V ATX с 4-Pin 12V ATX с 4-Pin 1 5. 8 5 ATX С 4-Pin 12V 4 1 COM 9 COM1 2, п. 31) COM COM. HDMI_SPDIF (2 HDMI_SPDIF1 2, п. 32) HDMI_SPDIF VGA-карту HDMI HDMI HDMI_SPDIF на VGAкарте HDMI. 129 ASRock Z68 Extreme3 Gen3 Motherboard - ASRock Z68 Extreme3 Gen3 | Quick Installation Guide - Page 130
1.5 CMOS CMOS Power Switch (PWRBTN 2, п. 19) Power Switch Reset Switch (RSTBTN 2, п. 17) Reset Switch Clear CMOS Switch (CLRCBTN 3, п. 13) Clear CMOS Switch CMOS. 130 ASRock Z68 Extreme3 Gen3 Motherboard - ASRock Z68 Extreme3 Gen3 | Quick Installation Guide - Page 131
Ctrl> + + - ASRock Z68 Extreme3 Gen3 | Quick Installation Guide - Page 132
için lütfen web sitemizi ziyaret edin. www.asrock.com/support/index.asp 1.1 Paket İçindekiler ASRock Z68 Extreme3 Gen3 Anakart (ATX Form Faktörü: 12,0-inç x 8,6-inç, 30,5 cm x 21,8 cm) ASRock Z68 Extreme3 Gen3 Hızlı Takma Kılavuzu ASRock Z68 Extreme3 Gen3 Destek CD'si 2 x Seri ATA (SATA) Veri - ASRock Z68 Extreme3 Gen3 | Quick Installation Guide - Page 133
CPU Yonga seti Bellek Genişletme Yuvası Grafikler - ATX Form Faktörü: 12,0-inç x 8,6-inç, 30,5 cm x 21,8 cm - Birinci Sınıf Altın Kapasitör tasarımı (%100 Japon malı yüksek kaliteli İletken Polimer Kapasitörler) - Nesil Intel® CoreTM i7 / i5 / i3 in LGA1155 133 ASRock Z68 Extreme3 Gen3 Motherboard - ASRock Z68 Extreme3 Gen3 | Quick Installation Guide - Page 134
Portu - 1 x RJ-45 LAN Portu, LED'li (AKT/LЭNK LED'i ve HIZ LED'i) - 1 x CMOS'u Temizleme Anahtarı - HD Intel Rapid Storage ve Intel Smart Response Teknolojisini), NCQ, AHCI ve "Sistem Açıkken Bileşen Takma" işlevlerini - 2 x SATA3 6.0 Gb/sn konektör - 1 x KÖ fişi ASRock Z68 Extreme3 Gen3 Motherboard - ASRock Z68 Extreme3 Gen3 | Quick Installation Guide - Page 135
HDMI_SPDIF fişi - 1 x Güç LED'i fişi - CPU/Kasa/Güç FAN konektörü - 24 pin ATX güç konektörü - 8 pin 12V güç konektörü - Ön panel ses konektörü - 4 x USB 2.0 fiş (8 USB 2.0 portu destekler) - 1 x Dr. Debug (7 Segmentli Hata Ayıklama LED'i) - 1 x LED'li CMOS'u Temizleme Anahtarı - 1 x LED'li Güç Anahtar - ASRock Z68 Extreme3 Gen3 | Quick Installation Guide - Page 136
CPU/Kasa/Güç Fan Takometresi - İşlemci/Kasa Sessiz Fanı (Kasa Fan Hızı'nın İşlemci sıcaklığı ile Otomatik Ayar'ına izin verir) - CPU/Kasa Fan Çoklu-Hız Kontrolü - Voltaj İzleme: +12V, +5V, +3,3V, CPU http://www.asrock.com UYARI Lütfen, ayarı BIOS'da ayarlama, ASRock Z68 Extreme3 Gen3 Motherboard - ASRock Z68 Extreme3 Gen3 | Quick Installation Guide - Page 137
ından ödün vermeden gerilim düzenleyicisi çıkış fazlarının sayısını düşürerek verimliliği iyileştirir. ASRock Extreme Tuning Utility (AXTU)'nun çalışma prosedürleri için lütfen web sitemizi ziyaret ediniz. ASRock web sitesi: http://www.asrock.com 137 ASRock Z68 Extreme3 Gen3 Motherboard Türkçe - ASRock Z68 Extreme3 Gen3 | Quick Installation Guide - Page 138
ığınız hangi verilerin akışının yapıldığını kolaylıkla yapılandırabilirsiniz. 15. Saydam Görüntü teknolojisi ile, hem ayrık Grafik İşlemci Ünitesi'nin 3D performansının hem de Intel® HD grafik kartlarının gelişmiş ortam özelliklerinden faydalanabilirsiniz. ASRock Z68 Extreme3 Gen3 Motherboard - ASRock Z68 Extreme3 Gen3 | Quick Installation Guide - Page 139
. Intel'in önerisine göre, EuP hazır güç kaynağının 100 mA akım tüketiminde 5v beklemede güç etkinliği %50'den yüksektir standardını karşılaması gerekir. EuP hazır güç kaynağı seçimi için, daha fazla ayrıntı için güç kaynağı üreticisine başvurmanızı öneririz. 139 ASRock Z68 Extreme3 Gen3 Motherboard - ASRock Z68 Extreme3 Gen3 | Quick Installation Guide - Page 140
ız gereklidir. Parola, tarih, saat, kullanıcı varsayılan profili, 1394 GUID ve MAC adresinin yalnızca CMOS pili çıkarıldığında temizleneceğini lütfen aklınızda bulundurunuz. CMOS Devresini Temizle, CMOS Ayarı'nı Temizle ile aynı işleve sahiptir. Türkçe 140 ASRock Z68 Extreme3 Gen3 Motherboard - ASRock Z68 Extreme3 Gen3 | Quick Installation Guide - Page 141
ucuda MP3 çalar ve cep telefonu gibi taşınabilir ses aygıtlarına veya bilgisayarın Line-in (Hat Giriş) yuvasına bağlanabilir. Türkçe 141 ASRock Z68 Extreme3 Gen3 Motherboard - ASRock Z68 Extreme3 Gen3 | Quick Installation Guide - Page 142
ıcısı destekler. Ön Panel Ses Fişi (9-pinli HD_SES1) (bkz. s.2 No. 34) GND PRESENCE# MIC_RET OUT_RET 1 OUT2_L J_SENSE OUT2_R MIC2_R MIC2_L Bu, panel ses kablosu için uygun bağlantı sağlayan ve ses cihazlarını kontrol etmeyi sağlayan bir arayüzdür. Türkçe 142 ASRock Z68 Extreme3 Gen3 Motherboard - ASRock Z68 Extreme3 Gen3 | Quick Installation Guide - Page 143
zerindeki güç anahtarını, sıfırlama anahtarını ve sistem durumu göstergesini aşağıdaki pin atamalarına göre bu bağlantıya bağlayın. Kabloları ba kullanarak sisteminizi kapatma şeklinizi yapılandırabilirsiniz. RESET (Sıfırlama Anahtarı): Kasa üzerindeki sıfırlama ASRock Z68 Extreme3 Gen3 Motherboard - ASRock Z68 Extreme3 Gen3 | Quick Installation Guide - Page 144
fan (Sessiz Fan) desteği sağlasa da, 3-Pinli CPU fan hızı kontrol işlevi olmadan bile hala başarılı bir şekilde çalışabilir. 3-Pinli CPU fanı bu konektördeki CPU fan konektörüne bağlamayı planlıyorsanız, lütfen Pin 1-3'e bağlayın. Pin 1-3 Bağlı 3-Pinli Fanı Takma ASRock Z68 Extreme3 Gen3 Motherboard - ASRock Z68 Extreme3 Gen3 | Quick Installation Guide - Page 145
HDMI_SPDIF Fişi (2-pinli HDMI_SPDIF1) (bkz. s.2 No. 32) HDMI_SPDIF fişi, SPDIF ses çıkışını HDMI VGA kartına sağlar, sistemin HDMI Dijital TV/projektör/LCD cihazlarını bağlamasına izin verir. Lütfen HDMI VGA kartının HDMI_SPDIF konektörünü bu fişe bağlayın. 145 ASRock Z68 Extreme3 Gen3 Motherboard - ASRock Z68 Extreme3 Gen3 | Quick Installation Guide - Page 146
ı bir şekilde sistemi sıfırlamalarını sağlayan akıllı bir anahtardır. CMOS'u Temizleme Anahtarı (CLRSBTN) (bkz. s.3 No.13) CMOS'u Temizleme Anahtarı, kullanıcıların hızlı bir şekilde CMOS değerlerini temizlemelerini sağlayan akıllı bir anahtardır. Türkçe 146 ASRock Z68 Extreme3 Gen3 Motherboard - ASRock Z68 Extreme3 Gen3 | Quick Installation Guide - Page 147
Flash Bellek BIOS Ayarları Yardımcı Programını içerir. Bilgisayarı başlattığınızda, lütfen Otomatik Güç Sınaması (POST) sırasında BIOS Ayarları yardımcı programına girmek için veya tuşuna basın; aksi halde, POST test rutinlerine devam eder. BIOS ASRock Z68 Extreme3 Gen3 Motherboard Türkçe - ASRock Z68 Extreme3 Gen3 | Quick Installation Guide - Page 148
ATX 12.0" x 8.6", 30.5 x 21.8 cm) ASRock Z68 Extreme3 Gen3 ASRock Z68 Extreme3 Gen3 지원 CD 시리얼 ATA (SATA 2 3.5mm 1 I/O 차폐 1 개 ASRock SLI 2S 카드 1 개 ASRock Windows® 7 / 7 64-비트 / VistaTM / VistaTM 64 Storage Configuration BIOS 옵션을 AHCI BIOS CD 148 ASRock Z68 Extreme3 Gen3 Motherboard - ASRock Z68 Extreme3 Gen3 | Quick Installation Guide - Page 149
, Intel® Sandy Bridge CPU DirectX 10.1 1759MB ( 주의 5 참조 ) - 3 개의 VGA D-Sub, DVI-D 및 HDMI ( 주의 6 1920x1200 @ 60Hz 까지 HDMI 1.4a 1920x1200 @ 60Hz 까지 DVI 2048x1536 @ 75Hz 까지 D-Sub Auto Lip Sync), xvYCC, HBR HDMI 지원 (HDMI 7 참조 ) - DVI 및 HDMI HDCP 한국어 149 ASRock Z68 Extreme3 Gen3 Motherboard - ASRock Z68 Extreme3 Gen3 | Quick Installation Guide - Page 150
RJ-45 LAN 포트 - 1 개 CMOS 8 참조 ) - SATA3 6.0Gb/s 커넥터 2 RAID (RAID 0, RAID 1, RAID 10, RAID 5, Intel Rapid Storage 및 Intel Smart Intel Rapid Storage 및 Intel Smart Response NCQ,AHCI 2 개 의 SATA3 6.0Gb/s 1 1 개 - COM 1 개 - HDMI_SPDIF 헤더 1 LED 헤더 1 개 - CPU ASRock Z68 Extreme3 Gen3 Motherboard - ASRock Z68 Extreme3 Gen3 | Quick Installation Guide - Page 151
BIOS 지원 CD - 24 핀 ATX 8 핀 ATX 12V USB 2.0 헤더 4 개 (8 USB 2.0 2개 ) - Dr. Debug (7 LED) 1 개 - LED 가 달린 CMOS 1 개 - LED 1 개 - LED 1 개 - 64Mb AMI BIOS - GUI AMI UEFI 적합형 BIOS ACPI 1.1 SMBIOS 2.3.1 지원 - CPU Core, IGPU, DRAM, PCH, CPU PLL, VTT, VCCSA CyberLink MediaEspresso 6.5 ASRock - ASRock Z68 Extreme3 Gen3 | Quick Installation Guide - Page 152
- CPU 12V,+5V,+3.3V,Vcore OS Windows® 7/7 64 비트 /VistaTM/ VistaTM 64 비트 / XP/XP 64 인증서 - FCC, CE, WHQL - ErP/EuP 지원 (ErP/EuP ( 주의 20 참조 ) http://www.asrock.com BIOS Untied Overclocking Technology 한 국 어 152 ASRock Z68 Extreme3 Gen3 Motherboard - ASRock Z68 Extreme3 Gen3 | Quick Installation Guide - Page 153
/ 7 / VistaTM 64-bit / VistaTM 8 2 채널 , 4 채널 , 6 채널 및 8 3 9. AXTU (ASRock Extreme Tuning Utility OC DNA, IES CPU OC DNA 에서는 OC OS OS IES (Intelligent Energy Saver CPU ASRock 의 AXTU (Extreme Tuning Utility ASRock http://www.asrock.com 153 ASRock Z68 Extreme3 Gen3 Motherboard 한 국 어 - ASRock Z68 Extreme3 Gen3 | Quick Installation Guide - Page 154
/ 7 64 비트 / VistaTM / VistaTM 64 IE8 ASRock http://www.asrock.com/ Feature/SmartView/index.asp 13. ASRock XFast USB 는 USB 14. ASRock XFast LAN LAN Youtube HD 15. Lucid Virtu GPU 의 3D 성능과 Intel® HD 16. ASRock On/Off Play MP3 PC PC ACPI S5 3.5 mm ASRock Z68 Extreme3 Gen3 Motherboard - ASRock Z68 Extreme3 Gen3 | Quick Installation Guide - Page 155
17 CPU CPU 18 CPU PC CPU 19 C.C.O.) 은 3 CPU LGA 775, LGA 1155 와 LGA 1156 775 와 1156 CPU 20. EuP 는 Energy Using Product EuP AC 1.00W EuP EuP EuP Intel EuP 5V 100 mA 50 EuP 155 ASRock Z68 Extreme3 Gen3 Motherboard 한 국 어 - ASRock Z68 Extreme3 Gen3 | Quick Installation Guide - Page 156
1.3 3 1-2 점퍼 CMOS 초기화 (CLRCMOS1, 3 2 26 세팅 CMOS 삭제 참고 : CLRCMOS1 CMOS 15 CLRCMOS1 의 핀 2 와 핀 3 을 5 BIOS CMOS BIOS CMOS CMOS CMOS 1394 GUID, MAC Clear CMOS Switch는 Clear CMOS 한 국 어 156 ASRock Z68 Extreme3 Gen3 Motherboard - ASRock Z68 Extreme3 Gen3 | Quick Installation Guide - Page 157
: 2 11 SATA3_1 SATA3_0 2 ATA3 (SATA3 SATA SATA SATA3 6.0 Gb/s I/O 에 있는 eSATA 포트 에 HDD SATA3_1 시리얼 ATA(SATA 3.5mm SATA SATA / SATAII / SATA3 SATAII / SATA3 3.5 mm MP3 PC 한국어 157 ASRock Z68 Extreme3 Gen3 Motherboard - ASRock Z68 Extreme3 Gen3 | Quick Installation Guide - Page 158
33 (4 핀 CIR1) (2 30 IRTX +5VSB DUMMY 1 GND IRRX 1 GND IRTX IRRX ATX+5VSB (9 핀 HD_AUDIO1) ( 2 34 GND PRESENCE# MIC_RET OUT_RET 1 OUT2_L J_SENSE OUT2_R MIC2_R MIC2_L I/O 4 USB 2.0 USB 2.0 헤더가 4 USB 2.0 헤더 는 2 개의 USB 2.0 한 국 어 158 ASRock Z68 Extreme3 Gen3 Motherboard - ASRock Z68 Extreme3 Gen3 | Quick Installation Guide - Page 159
1. High Definition Audio HAD 2. AC'97 A. Mic_IN (MIC) 을 MIC2_L B. Audio_R (RIN) 을 OUT2_R Audio_L (LIN) Volume (9 핀 PANEL1) (2 20 한 국 어 PWRBTN RESET PLED LED LED S1 LED S3/S4 S5 LED HDLED LED LED LED 159 ASRock Z68 Extreme3 Gen3 Motherboard - ASRock Z68 Extreme3 Gen3 | Quick Installation Guide - Page 160
FAN_SPEED_CONTROL GND +12V CHA_FAN_SPEED (3 핀 CHA_FAN3) (2 41 (3 핀 PWR_FAN1) (2 3 CPU (4 핀 CPU_FAN1) (2 4 FAN_SPEED_CONTROL CPU_FAN_SPEED +12V GND CPU 1 2 3 4 4 핀 CPU 3 핀 CPU CPU 3 핀 CPU 1-3 1-3 3 한 국 어 160 ASRock Z68 Extreme3 Gen3 Motherboard - ASRock Z68 Extreme3 Gen3 | Quick Installation Guide - Page 161
핀 ATX 12 24 종래의 20 핀 ATX 20 핀 ATX Pin 1 과 Pin 13 20 핀 ATX 1 13 ATX 12V (8 핀 ATX12V1) (2 1 8 5 4 1 ATX 12V 8- 핀 ATX 12V 4- 핀 ATX 12V 용하여 4- 핀 ATX 1 과 핀 5 8 5 4- 핀 ATX 12V 4 1 (9 핀 COM1) (2 31 한국어 161 ASRock Z68 Extreme3 Gen3 Motherboard - ASRock Z68 Extreme3 Gen3 | Quick Installation Guide - Page 162
HDMI_SPDIF 헤더 (2 핀 HDMI_SPDIF1) (2 32 HDMI VGA 카드에 SPDIF HDMI_SPDIF HDMI 디지털 TV LCD HDMI VGA 카드의 HDMI_SPDIF 한 국 어 162 ASRock Z68 Extreme3 Gen3 Motherboard - ASRock Z68 Extreme3 Gen3 | Quick Installation Guide - Page 163
1.5 CMOS CMOS (PWRBTN) (2 19 (RSTBTN) (2 17 CMOS (CLRCBTN) (3 13 CMOS CMOS 한국어 163 ASRock Z68 Extreme3 Gen3 Motherboard - ASRock Z68 Extreme3 Gen3 | Quick Installation Guide - Page 164
2 POST F2> 또는 ++ - ASRock Z68 Extreme3 Gen3 | Quick Installation Guide - Page 165
ASRock Z68 Extreme3 Gen3 CD BIOS VGA CPU サ ASRock http://www.asrock.com Web サイト い。 www.asrock.com/support/index.asp 1.1 ASRock Z68 Extreme3 Gen3 ATX 12.0-in x 8.6-in, 30.5 cm x 21.8 cm) ASRock Z68 Extreme3 Gen3 ASRock Z68 Extreme3 Gen3 CD 2 x ATA (SATA - ASRock Z68 Extreme3 Gen3 | Quick Installation Guide - Page 166
Intel® HD Graphics 2000/3000、Intel® Advanced Vector Extensions (AVX) - Pixel Shader 4.1、Intel® Ivy Bridge CPU DirectX 11、Intel® Sandy Bridge CPU DirectX 10.1 1759MB ( 注意 5 3 つの VGA D-Sub、DVI-D、HDMI ( 注意 6 1920x1200 @ 60Hz HDMI 1.4a 1920x1200 @ 60Hz DVI ASRock Z68 Extreme3 Gen3 Motherboard - ASRock Z68 Extreme3 Gen3 | Quick Installation Guide - Page 167
802.3az PXE I/O Panel - PS/2 x 1 - D-Sub ポート x 1 - DVI-D ポート x 1 - HDMI ポート x 1 - 光学 SPDIF x 1 - Ready-to-Use USB 2.0 ポート x 4 - eSATA3 x 1 - Ready-to-Use USB 3.0 ポート x 2 - LED(ACT/LINK LED および SPEED LED)付き RJ-45 LAN ポート x 1 CMOS x 1 8 参照 ) 167 ASRock Z68 Extreme3 Gen3 Motherboard 日本語 - ASRock Z68 Extreme3 Gen3 | Quick Installation Guide - Page 168
SMBIOS 2.3.1 CPU Core, IGPU, DRAM, PCH, CPU PLL, VTT, VCCSA 電 AntiVirus CyberLink MediaEspresso 6.5 ASRock CyberLink DVD OEM ASRock MAGIX Multimedia Suite - OEM) - ASRock Extreme AXTU) ( 注意 9 参照 ) - ASRock ASRock Instant Flash ( 注意 10 参照 ) ASRock Z68 Extreme3 Gen3 Motherboard - ASRock Z68 Extreme3 Gen3 | Quick Installation Guide - Page 169
CPU - CPU 12V, +5V, +3.3V, Vcore OS - Microsoft® Windows® 7 / 7 64-bit / VistaTM / VistaTM 64-bit / XP / XP 64-bit compliant 認証 - FCC, CE, Microsoft® WHQL - ErP/EuP 対応(ErP/EuP ( 注意 20 を参照 ) http://www.asrock.com BIOS 日本語 169 ASRock Z68 Extreme3 Gen3 Motherboard - ASRock Z68 Extreme3 Gen3 | Quick Installation Guide - Page 170
/ 7 EDID で 12bpc HBR は Windows® 7 64-bit / 7 / VistaTM 64-bit / VistaTM 2 4 6 8 3 ASRock Extreme Tuning Utility (AXTU OC DNA、ES CPU OC DNA OC OC OC IES CPU ASRock Extreme Tuning Utility (AXTU Web ASRock Web サイト :http://www.asrock.com 日本語 170 ASRock Z68 Extreme3 Gen3 Motherboard - ASRock Z68 Extreme3 Gen3 | Quick Installation Guide - Page 171
bit / VistaTM / VistaTM 64 bit IE8 ASRock http://www.asrock.com/Feature/ SmartView/index.asp 13. ASRock XFast USB は USB 14. ASRock XFast LAN LAN Youtube HD ます。 15. Lucid Virtu Intel® HD GPU と最新 3D 日本語 171 ASRock Z68 Extreme3 Gen3 Motherboard - ASRock Z68 Extreme3 Gen3 | Quick Installation Guide - Page 172
CPU 冷 PC ル時に、CPU です。 19. C.C.O.) では、Socket LGA 775、LGA 1155 と LGA 1156 の 3 CPU 775 と 1156 CPU 20. Energy Using Product EuP EuP に従っ AC 1.00W EuP EuP EuP 対応電 Intel EuP 5v 100 mA 50 EuP 日本語 172 ASRock Z68 Extreme3 Gen3 Motherboard - ASRock Z68 Extreme3 Gen3 | Quick Installation Guide - Page 173
1.3 1-2 CMOS CLRCMOS1 26 参照) 設定 説明 CMOS の消去 注 : CLRCMOS1 CMOS 15 CLRCMOS1 のピン 2 とピン 3 を 5 BIOS CMOS BIOS CMOS CMOS 1394 GUID と MAC CMOS クリアCMOS CMOS 日本語 173 ASRock Z68 Extreme3 Gen3 Motherboard - ASRock Z68 Extreme3 Gen3 | Quick Installation Guide - Page 174
を参照 SATA3_1: ページ 2 11 を参照 ATA(SATA 3.5mm SATA3_1 SATA3_0 これら 2 ATA3 (SATA3 SATA SATA3 6.0 Gb/s I/O の eSATA HDD SATA3_1 SATA SATA /SATAII / SATA3 SATAII / SATA3 3.5mm MP3 PC 日本語 174 ASRock Z68 Extreme3 Gen3 Motherboard - ASRock Z68 Extreme3 Gen3 | Quick Installation Guide - Page 175
1 GND IRRX 4 ピン CIR1 30 を参照 1 GND IRTX IRRX ATX+5VSB I/O 4 つの USB 2.0 4 つの USB 2.0 USB 2.0 2 つの USB 2.0 日本語 9 ピン HD_AUDIO1 34 を参照 GND PRESENCE# MIC_RET OUT_RET 1 OUT2_L J_SENSE OUT2_R MIC2_R MIC2_L 1. HAD い。 ASRock Z68 Extreme3 Gen3 Motherboard 175 - ASRock Z68 Extreme3 Gen3 | Quick Installation Guide - Page 176
64-bit OS の場合 : "Mixer Recorder FrontMic Windows® 7 / 7 64-bit / VistaTM / VistaTM 64-bit OS の場合 : Realtek FrontMic Recording Volume 9 ピン PANEL1 20 を参照 PWRBTN RESET PLED LED LED LED S1 S3 または S4 S5 LED 日本語 176 ASRock Z68 Extreme3 Gen3 Motherboard - ASRock Z68 Extreme3 Gen3 | Quick Installation Guide - Page 177
S3/S4 S5 LED (4 ピン CHA_FAN1) 23 を参照 (3 ピン CHA_FAN2 9 を参照 FAN_SPEED_CONTROL GND +12V CHA_FAN_SPEED (3 ピン CHA_FAN3 41 を参照 (3 ピン PWR_FAN1 3 を参照 日本語 CPU 4 ピン CPU_FAN1 4 を参照 FAN_SPEED_CONTROL CPU_FAN_SPEED +12V GND 1 2 3 4 CPU 177 ASRock Z68 Extreme3 Gen3 Motherboard - ASRock Z68 Extreme3 Gen3 | Quick Installation Guide - Page 178
従来の 20 ピン ATX 12 24 20 ピン ATX 1 13 ATX 12V 8 ピン ATX12V1 1 を参照 20 ピン ATX 1 13 8 5 4 1 CPU に Vcore ATX 12V 8-pin ATX 12V 4-pin ATX 12V 4-pin ATX Pin 1 と Pin 5 8 5 4-Pin ATX 12V 4 1 9 ピン COM1 31 を参照 この COM1 日本語 178 ASRock Z68 Extreme3 Gen3 Motherboard - ASRock Z68 Extreme3 Gen3 | Quick Installation Guide - Page 179
HDMI_SPDIF ヘッダ (2- ピン HDMI_SPDIF1 32 を参照 HDMI_SPDIF SPDIF HDMI VGA HDMI TV LCD HDMI VGA HDMI_SPDIF 1.5 CMOS 3 CMOS PWRBTN 19 を参照 RSTBTN 17 を参照 クリア CMOS CLRCBTN) ページ 3 13 を参照 クリア CMOS CMOS 日本語 179 ASRock Z68 Extreme3 Gen3 Motherboard - ASRock Z68 Extreme3 Gen3 | Quick Installation Guide - Page 180
2.BIOS 情報 BIOS POST F2 Del BIOS POST BIOS POST Ctrl〉+〈Alt〉+〈Delete BIOS BIOS CD PDF 3 CD 情報 Microsoft® Windows® 7 / 7 64-bit / VistaTM / VistaTM 64bit / XP / XP 64-bit CD CD CDROM CD AUTORUN AUTORUN CD 内の BIN ASSETUP.EXE 180 ASRock Z68 Extreme3 Gen3 Motherboard 日本語 - ASRock Z68 Extreme3 Gen3 | Quick Installation Guide - Page 181
主板 (ATX 規格 : 12.0 英吋 X 8.6 英吋 , 30.5 厘米 X 21.8 厘米 ) 華擎 Z68 Extreme3 Gen3 Z68 Extreme3 Gen3 Serial ATA(SATA 3.5mm I/O SLI_Bridge_2S 橋接卡 ASRock 為了在 Windows® 7 / 7 64-bit / VistaTM / VistaTM 64-bit BIOS中將Storage Configuration AHCI BIOS User Manual 181 ASRock Z68 Extreme3 Gen3 Motherboard - ASRock Z68 Extreme3 Gen3 | Quick Installation Guide - Page 182
Bridge CPU 支持 DirectX 10.1 1759MB 5 VGA D-Sub、DVI-D 和 HDMI 6 HDMI 1.4a 1920x1200 @ 60Hz - 支持 DVI 1920x1200 @ 60Hz - 支持 D-Sub 2048x1536 @ 75Hz - 支持 HDMI, 可支持 Auto Lip Sync、xvYCC 與 HBR HDMI 7 DVI 和 HDMI HDCP DVI 和 HDMI 10800 BD) / HD-DVD 光盤 ASRock Z68 Extreme3 Gen3 Motherboard 簡體中文 - ASRock Z68 Extreme3 Gen3 | Quick Installation Guide - Page 183
ASM1042 的后置 USB 3.0 USB 1.0/2.0/3.0 到 5Gb/s - 4 x SATA2 3.0Gb/s RAID (RAID 0, RAID 1, RAID 10, RAID 5, Intel Rapid Storage 和 Intel Smart Response 技術 ), NCQ, AHCI 2 x SATA3 6.0Gb/s 1 x 1 x 1 x 1 x HDMI_SPDIF 接頭 - 1 x CPU 24 針 ATX 8 針 12V 183 ASRock Z68 Extreme3 Gen3 Motherboard 簡體中文 - ASRock Z68 Extreme3 Gen3 | Quick Installation Guide - Page 184
SmartView 12 XFast USB 13 XFast LAN 14) - Lucid Virtu 15 16) - Hybrid Booster CPU 17) - ASRock U-COP 18) - Boot Failure Guard (B.F.G C.C.O 19 CPU CPU CPU CPU CPU 12V, +5V, +3.3V Microsoft® Windows® 7/7 64 位元 /VistaTM/VistaTM 64 位元 / XP/XP 64 ASRock Z68 Extreme3 Gen3 Motherboard - ASRock Z68 Extreme3 Gen3 | Quick Installation Guide - Page 185
認證 - FCC, CE, WHQL - 支持 ErP/EuP ErP/EuP 20) http://www.asrock.com BIOS 簡體中文 185 ASRock Z68 Extreme3 Gen3 Motherboard - ASRock Z68 Extreme3 Gen3 | Quick Installation Guide - Page 186
Overclocking CPU OC DNA OC O C OC IES CPU ASRock Extreme Tuning Utility (AXTU http://www.asrock.com 10、華擎 Instant Flash Flash ROM 的 BIOS BIOS MS-DOS 或 Windows B I O S F6> 鍵或在 B I O S F2 Instant Flash B I O S U B I O S U FAT32/64 186 ASRock Z68 Extreme3 Gen3 Motherboard 簡體中文 - ASRock Z68 Extreme3 Gen3 | Quick Installation Guide - Page 187
16 M P3 P C P C ACPI S5 3.5mm 17 CPU CPU 18 CPU C P U PC CPU 19 C . C . O C P U L G A775, L G A1155 與 L G A1156 775 和 1156 CPU 20、EuP, 全稱 Energy Using Product E u P 1.00W EuP EuP EuP Intel EuP 100m A 5V s b 50 E u P 187 ASRock Z68 Extreme3 Gen3 Motherboard 簡體中文 - ASRock Z68 Extreme3 Gen3 | Quick Installation Guide - Page 188
1.3 3 1 和針腳 2 CMOS (CLRCMOS1, 3 2 頁第 26 項 ) 設定 默認設置 清除 CMOS 注意: C L R C M O S1 C M O S 15 C L R C M O S1 2 和插針 3 短接 5 B I O S C M O S B I O S C M O S C M O S C M O S 1394 GUID 和 MAC 清除CMOS CMOS 簡體中文 188 ASRock Z68 Extreme3 Gen3 Motherboard - ASRock Z68 Extreme3 Gen3 | Quick Installation Guide - Page 189
項 ) SATA3_1 SATA3_0 Serial ATA3 (SATA3 Serial (SATA SATA3 6.0Gb/s I/O 的 eSATA SATA3_1 Serial ATA (SATA) 數據線 ( 選配 ) 3.5mm 音頻線 ( 選配 ) SATA SATA/SATAII/SATA3 SATAII/ SATA3 接口。 3.5mm MP3 PC 簡體中文 189 ASRock Z68 Extreme3 Gen3 Motherboard - ASRock Z68 Extreme3 Gen3 | Quick Installation Guide - Page 190
I/O USB 2.0 USB 2.0 USB 2.0 USB 2.0 接口。 簡體中文 (9 針 HD_AUDIO1) ( 見第 2 頁第 34 項 ) GND PRESENCE# MIC_RET OUT_RET 1 OUT2_L J_SENSE OUT2_R MIC2_R MIC2_L 1 High Definition Audio, HDA Jack Sensing HDA 2 AC'97 A. 將 Mic_IN(MIC) 連接到 MIC2_L。 190 ASRock Z68 Extreme3 Gen3 Motherboard - ASRock Z68 Extreme3 Gen3 | Quick Installation Guide - Page 191
" FrontMic"。 在 Windows® 7 / 7 64 位元 / VistaTM / VistaTM 64 統中 : 在 Realtek FrontMic"。調節"Recording Volume"。 (9 針 PANEL1) ( 見第 2 頁第 20 項 ) PWRBTN RESET PLED S1 S3/S4 S5 HD LED (4 針 SPEAKER1) ( 見第 2 頁第 21 項 ) 191 ASRock Z68 Extreme3 Gen3 Motherboard 簡體中文 - ASRock Z68 Extreme3 Gen3 | Quick Installation Guide - Page 192
見第 2 頁第 4 項 ) FAN_SPEED_CONTROL CPU_FAN_SPEED +12V GND 請將 CPU 1 2 3 4 4-Pin CPU 風扇 (Quiet Fan 3-Pin CPU 3-Pin CPU CPU Pin 1-3。 Pin 1-3 連接 3-Pin (3 針 CPU_FAN2) ( 見第 2 頁第 7 項 ) ATX (24 針 ATXPWR1) ( 見第 2 頁第 8 項 ) 12 24 1 13 請將 ATX 簡體中文 192 ASRock Z68 Extreme3 Gen3 Motherboard - ASRock Z68 Extreme3 Gen3 | Quick Installation Guide - Page 193
8-pin ATX 12V 4-pin ATX 12V 4-pin ATX 12V Pin 1 和 Pin 5 插上電 源接頭。 8 5 4-Pin ATX 12V 4 1 (9 針 COM1) ( 見第 2 頁第 31 項 ) 這個 COM1 HDMI_SPDIF 接頭 (2 針 HDMI_SPDIF1) ( 見第 2 頁第 32 項 ) HDMI_SPDIF SPDIF HDMI HDMI HDMI 顯卡的 HDMI_SPDIF 簡體中文 193 ASRock Z68 Extreme3 Gen3 Motherboard - ASRock Z68 Extreme3 Gen3 | Quick Installation Guide - Page 194
1.5 C M O S CMOS 電源開關 (PWRBTN) ( 見第 2 頁第 19 項 ) 復位開關 (RSTBTN) ( 見第 2 頁第 17 項 ) CMOS (CLRCBTN) ( 見第 3 頁第 13 項 ) CMOS CMOS 簡體中文 194 ASRock Z68 Extreme3 Gen3 Motherboard - ASRock Z68 Extreme3 Gen3 | Quick Installation Guide - Page 195
2. BIOS 信息 Flash Memory 存儲了 BIOS POST F2> 或 < D e l B I O S P O S T P O S T B I O S Ctrl>++ - ASRock Z68 Extreme3 Gen3 | Quick Installation Guide - Page 196
SJ/T 11364-2006 10 年。 圖一 部件名稱 鉛 (Pb) 鎘 (Cd) 汞 (Hg Cr(VI PBB PBDE) X O O O O O X O O O O O O SJ/T 11363-2006 X SJ/T 11363-2006 2002/95/EC 簡體中文 196 ASRock Z68 Extreme3 Gen3 Motherboard - ASRock Z68 Extreme3 Gen3 | Quick Installation Guide - Page 197
1 Z68 Extreme3 Gen3 BIOS CPU http://www.asrock.com www.asrock.com/support/index.asp 1.1 華擎 Z68 Extreme3 Gen3 主機板 (ATX 規格 : 12.0 英吋 x 8.6 英吋 , 30.5 公分 x 21.8 公分 ) 華擎 Z68 Extreme3 Gen3 Z68 Extreme3 Gen3 Serial ATA(SATA 3.5mm I/O SLI_Bridge_2S 卡 ASRock提醒您... 若要在Windows® 7 / 7 64位元 / - ASRock Z68 Extreme3 Gen3 | Quick Installation Guide - Page 198
Bridge CPU 支援 DirectX 10.1 1759MB 5 VGA D-Sub、DVI-D 和 HDMI 6 HDMI 1.4a 1920x1200 @ 60Hz - 支援 DVI 1920x1200 @ 60Hz - 支援 D-Sub 2048x1536 @ 75Hz - 支援 HDMI, 可支援 Auto Lip Sync、xvYCC 與 HBR HDMI 7) - DVI 和 HDMI HDCP 功能 - DVI 和 HDMI 1080p BD) / HD-DVD 光碟 繁體中文 198 ASRock Z68 Extreme3 Gen3 - ASRock Z68 Extreme3 Gen3 | Quick Installation Guide - Page 199
的後置 USB 3.0 USB 1.0 /2.0/3.0 到 5Gb/s - 4 x SATA2 3.0Gb/s RAID (RAID 0, RAID 1, RAID 10, RAID 5, Intel Rapid Storage 和 Intel Smart Response 技術 ), NCQ, AHCI 2 x SATA3 6.0Gb/s 接頭 - 1 x 1 x 1 x 1 x HDMI_SPDIF 接頭 - 1 x CPU 24 針 ATX 8 針 12V 199 ASRock Z68 Extreme3 Gen3 Motherboard 繁體中文 - ASRock Z68 Extreme3 Gen3 | Quick Installation Guide - Page 200
USB 13 XFast LAN 14) - Lucid Virtu 15 On/Off Play 16) - Hybrid Booster CPU 17) - ASRock U-COP 18) - Boot Failure Guard (B.F.G C.C.O 19 LED CPU CPU CPU CPU CPU 12V, +5V, +3.3V Microsoft® Windows® 7/7 64 位元 /VistaTM/VistaTM 64 位元 / XP/XP 64 位元 ASRock Z68 Extreme3 Gen3 Motherboard - ASRock Z68 Extreme3 Gen3 | Quick Installation Guide - Page 201
認證 - FCC, CE, WHQL - 支援 ErP/EuP ErP/EuP 20) http://www.asrock.com BIOS 繁體中文 201 ASRock Z68 Extreme3 Gen3 Motherboard - ASRock Z68 Extreme3 Gen3 | Quick Installation Guide - Page 202
.com 10、華擎 Instant Flash Flash ROM 的 BIOS BIOS MS-DOS 或 Windows BIOS F6 BIOS F2 Instant Flash B I O S B I O S FAT32/64 11 i P h o n e / i P a d / i P o d touch APP Charger APP Charger iPhone 40%。華擎 APP Charger S1 S3 S4 S5 APP Charger ASRock Z68 Extreme3 Gen3 Motherboard - ASRock Z68 Extreme3 Gen3 | Quick Installation Guide - Page 203
Intel® HD 16、華擎 On/Off Play PC 的 MP3 PC ACPI S5 3.5m m 17 C P U C P U 18 C P U C P U PC CPU 19 C.C.O CPU LGA775,LGA1155 與 LGA1156 775 和 1156 CPU 20、EuP, 全稱 Energy Using Product EuP 1.00W EuP EuP EuP Intel EuP 100mA 5Vsb 50 EuP 203 ASRock Z68 Extreme3 Gen3 Motherboard - ASRock Z68 Extreme3 Gen3 | Quick Installation Guide - Page 204
1.3 3 1 和針腳 2 CMOS (CLRCMOS1, 3 2 頁第 26 項 ) 設定 默認設置 清除 CMOS 註: C L R C M O S1 C M O S 15 CLRCMOS1 的 pin2 及 pin3 短路 5 BIOS CMOS BIOS CMOS CMOS C M O S 1394 GUID 及 MAC Clear CMOS Clear CMOS 繁體中文 204 ASRock Z68 Extreme3 Gen3 Motherboard - ASRock Z68 Extreme3 Gen3 | Quick Installation Guide - Page 205
SATA3_0 Serial ATA3 (SATA3 SATA SATA3 6.0Gb/s I/O 的 eSATA SATA3_1 Serial ATA (SATA) 數據線 ( 選配 ) 3.5mm 音訊線 ( 選配 ) SATA SATA/SATAII/SATA3 SATAII/ SATA3 接口。 3.5mm MP3 PC Line-in 繁體中文 205 ASRock Z68 Extreme3 Gen3 Motherboard - ASRock Z68 Extreme3 Gen3 | Quick Installation Guide - Page 206
) ( 見第 2 頁第 30 項 ) USB_PWR P-9 P+9 ATX+5VSB 繁體中文 (9 針 HD_AUDIO1) ( 見第 2 頁第 34 項 ) GND PRESENCE# MIC_RET OUT_RET 206 1 OUT2_L J_SENSE OUT2_R MIC2_R MIC2_L 1 High Definition Audio, HDA Jack Sensing HDA 2 AC'97 A. 將 Mic_IN(MIC) 連接到 MIC2_L。 ASRock Z68 Extreme3 Gen3 Motherboard - ASRock Z68 Extreme3 Gen3 | Quick Installation Guide - Page 207
在 Windows® XP / XP 64 選擇"Mixer Recorder" FrontMic"。 在 Windows® 7 / 7 64 位元 / VistaTM / VistaTM 64 統中 : 在 Realtek FrontMic Recording Volume"。 PWRBTN RESET PLED S1 S3/S4 S5 HD LED (4 針 SPEAKER1) ( 見第 2 頁第 21 項 ) 207 ASRock Z68 Extreme3 Gen3 Motherboard 繁體中文 - ASRock Z68 Extreme3 Gen3 | Quick Installation Guide - Page 208
見第 2 頁第 4 項 ) FAN_SPEED_CONTROL CPU_FAN_SPEED +12V GND 請將 CPU 1 2 3 4 4-Pin CPU 風扇 (Quiet Fan 3-Pin CPU 3-Pin CPU CPU Pin 1-3。 Pin 1-3 連接 3-Pin (3 針 CPU_FAN2) ( 見第 2 頁第 7 項 ) ATX (24 針 ATXPWR1) ( 見第 2 頁第 8 項 ) 12 24 1 13 請將 ATX 208 ASRock Z68 Extreme3 Gen3 Motherboard 繁體中文 - ASRock Z68 Extreme3 Gen3 | Quick Installation Guide - Page 209
12V 8-pin ATX 12V 4-pin ATX 12V 4-pin ATX 12V 順著 Pin 1 和 Pin 5 8 5 4-Pin ATX 12V 4 1 序列埠 (9 針 COM1) ( 見第 2 頁第 31 項 ) COM1 HDMI_SPDIF 接頭 (2 針 HDMI_SPDIF1) ( 見第 2 頁第 32 項 ) HDMI_SPDIF SPDIF H D M I HDMI HDMI HDMI_SPDIF 繁體中文 209 ASRock Z68 Extreme3 Gen3 Motherboard - ASRock Z68 Extreme3 Gen3 | Quick Installation Guide - Page 210
1.5 C M O S CMOS 電源開關 (PWRBTN) ( 見第 2 頁第 19 項 ) 重置開關 (RSTBTN) ( 見第 2 頁第 17 項 ) CMOS (CLRCBTN) ( 見第 3 頁第 13 項 ) CMOS CMOS 繁體中文 210 ASRock Z68 Extreme3 Gen3 Motherboard - ASRock Z68 Extreme3 Gen3 | Quick Installation Guide - Page 211
2. BIOS 訊息 Flash Memory BIOS POST F2> 或 + + - ASRock Z68 Extreme3 Gen3 | Quick Installation Guide - Page 212
in, 30.5 cm x 21.8 cm) Pemimpin Instalasi Cepat Z68 Extreme3 Gen3 ASRock Support CD Z68 Extreme3 Gen3 ASRock 2 x Kabel satu serial Data ATA (SATA) (bebas-pilih) 1 x Kabel 3.5mm audio (bebas-pilih) 1 x Satu Pelindung I/O 1 x Kartu ASRock SLI_Bridge_2S 212 ASRock Z68 Extreme3 Gen3 Motherboard Bahasa - ASRock Z68 Extreme3 Gen3 | Quick Installation Guide - Page 213
Intel® Quick Sync Video, Intel® InTruTM 3D, Intel® Clear Video HD Technology, Intel® HD Graphics 2000/3000, Intel® Advanced Vector Extensions (AVX) - Pixel Shader 4.1, DirectX 11 dengan Intel® Ivy Bridge CPU, DirectX 10.1 dengan Intel® Sandy Bridge CPU 213 ASRock Z68 Extreme3 Gen3 Motherboard - ASRock Z68 Extreme3 Gen3 | Quick Installation Guide - Page 214
USB 1.0/2.0/3.0 hingga 5Gb/s - 4 x penghubung SATA2 3.0Gb/s, dapat menggunakan RAID (RAID 0, RAID 1, RAID 10, RAID 5, Intel Rapid Storage dan Intel Smart Response Technology), NCQ, AHCI dan fungsi "Hot Plug" - 2 x penghubung SATA3 6.0Gb/s - 1 x IR header ASRock Z68 Extreme3 Gen3 Motherboard - ASRock Z68 Extreme3 Gen3 | Quick Installation Guide - Page 215
KIPAS CPU/casis/power - Penghubung power 24 pin ATX - Penghubung power 8 pin 12V - Penghubung audio panel dapan - 4 x USB 2.0 header (menggunakan 8 port USB 2.0) - 1 x Dr. Debug - 1 x Clear CMOS LED - 1 x kuasa beralih LED - 1 x ulang beralih LED - 64Mb AMI Legal BIOS - AMI UEFI Legal BIOS dengan - ASRock Z68 Extreme3 Gen3 | Quick Installation Guide - Page 216
Pengukur Kipas CPU/casis/power - Kipas CPU/Sasis Senyap (Kecepatan Kipas Sasis Otomatis Disesuaikan Berdasarkan Temperatur CPU) - Kontrol Multi-Kecepatan Kipas CPU - Penjagaan silakan kunjungi website kami: http://www.asrock.com Bahasa Indonesia 216 ASRock Z68 Extreme3 Gen3 Motherboard - ASRock Z68 Extreme3 Gen3 | Quick Installation Guide - Page 217
not remove your USB flash until the OS installation process is finished. 6. If you install Windows® 7 64-bit OS, OS will be formatted by GPT (GUID Partition Table). Please install the hotfix file from Microsoft®: http://support.microsoft.com/kb/979903 217 ASRock Z68 Extreme3 Gen3 Motherboard English
-
 1
1 -
 2
2 -
 3
3 -
 4
4 -
 5
5 -
 6
6 -
 7
7 -
8
-
9
-
10
-
11
-
12
-
13
-
14
-
15
-
16
-
17
-
18
-
19
-
20
-
21
-
22
-
23
-
24
-
25
-
26
-
27
-
28
-
29
-
30
-
31
-
32
-
33
-
34
-
35
-
36
-
37
-
38
-
39
-
40
-
41
-
42
-
43
-
44
-
45
-
46
-
47
-
48
-
49
-
50
-
51
-
52
-
53
-
54
-
55
-
56
-
57
-
58
-
59
-
60
-
61
-
62
-
63
-
64
-
65
-
66
-
67
-
68
-
69
-
70
-
71
-
72
-
73
-
74
-
75
-
76
-
77
-
78
-
79
-
80
-
81
-
82
-
83
-
84
-
85
-
86
-
87
-
88
-
89
-
90
-
91
-
92
-
93
-
94
-
95
-
96
-
97
-
98
-
99
-
100
-
101
-
102
-
103
-
104
-
105
-
106
-
107
-
108
-
109
-
110
-
111
-
112
-
113
-
114
-
115
-
116
-
117
-
118
-
119
-
120
-
121
-
122
-
123
-
124
-
125
-
126
-
127
-
128
-
129
-
130
-
131
-
132
-
133
-
134
-
135
-
136
-
137
-
138
-
139
-
140
-
141
-
142
-
143
-
144
-
145
-
146
-
147
-
148
-
149
-
150
-
151
-
152
-
153
-
154
-
155
-
156
-
157
-
158
-
159
-
160
-
161
-
162
-
163
-
164
-
165
-
166
-
167
-
168
-
169
-
170
-
171
-
172
-
173
-
174
-
175
-
176
-
177
-
178
-
179
-
180
-
181
-
182
-
183
-
184
-
185
-
186
-
187
-
188
-
189
-
190
-
191
-
192
-
193
-
194
-
195
-
196
-
197
-
198
-
199
-
200
-
201
-
202
-
203
-
204
-
205
-
206
-
207
-
208
-
209
-
210
-
211
-
212
-
213
-
214
-
215
-
216
-
217
 |
 |

1
ASRock
Z68 Extreme3 Gen3
Motherboard
English
Copyright Notice:
No part of this installation guide may be reproduced, transcribed, transmitted, or trans-
lated in any language, in any form or by any means, except duplication of documentation
by the purchaser for backup purpose, without written consent of ASRock Inc.
Products and corporate names appearing in this guide may or may not be registered
trademarks or copyrights of their respective companies, and are used only for identi
fi
ca-
tion or explanation and to the owners’ bene
fi
t, without intent to infringe.
Disclaimer:
Speci
fi
cations and information contained in this guide are furnished for informational use
only and subject to change without notice, and should not be constructed as a commit-
ment by ASRock. ASRock assumes no responsibility for any errors or omissions that may
appear in this guide.
With respect to the contents of this guide, ASRock does not provide warranty of any kind,
either expressed or implied, including but not limited to the implied warranties or condi-
tions of merchantability or
fi
tness for a particular purpose. In no event shall ASRock, its
directors, of
fi
cers, employees, or agents be liable for any indirect, special, incidental, or
consequential damages (including damages for loss of pro
fi
ts, loss of business, loss of
data, interruption of business and the like), even if ASRock has been advised of the pos-
sibility of such damages arising from any defect or error in the guide or product.
This device complies with Part 15 of the FCC Rules. Operation is subject to the following
two conditions:
(1) this device may not cause harmful interference, and
(2) this device must accept any interference received, including interference that
may cause undesired operation.
CALIFORNIA, USA ONLY
The Lithium battery adopted on this motherboard contains Perchlorate, a toxic substance
controlled in Perchlorate Best Management Practices (BMP) regulations passed by the
California Legislature. When you discard the Lithium battery in California, USA, please
follow the related regulations in advance.
“Perchlorate Material-special handling may apply, see
www.dtsc.ca.gov/hazardouswaste/perchlorate”
ASRock Website: http://www.asrock.com
Published July 2011
Copyright
©
2011 ASRock INC. All rights reserved.