ASRock Z87 Extreme6/ac Intel Smart Response Installation Guide
ASRock Z87 Extreme6/ac Manual
 |
View all ASRock Z87 Extreme6/ac manuals
Add to My Manuals
Save this manual to your list of manuals |
ASRock Z87 Extreme6/ac manual content summary:
- ASRock Z87 Extreme6/ac | Intel Smart Response Installation Guide - Page 1
Installation Guide This motherboard supports Intel Smart Response Technology. You can find the UI setup instruction and the step by step instructions below. UI setup instruction: 1. Complete initial system setup, including installing the OS to a RAID mode system, then install all required drivers - ASRock Z87 Extreme6/ac | Intel Smart Response Installation Guide - Page 2
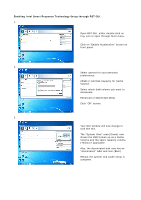
Enabling Intel Smart Response Technology Setup through RST GUI: 1. Open RST GUI, either double-click on tray icon or open through Start menu. Click on "Enable Acceleration" button on front panel. 2. Select options for your personal preferences: 20GB or Full Disk Capacity for Cache Volume. Select - ASRock Z87 Extreme6/ac | Intel Smart Response Installation Guide - Page 3
Disabling Intel Smart Response Technology Setup through RST GUI: 1. Open RST GUI and click on the "Accelerate" tab. Click on the "Disable Acceleration" button. 2. A pop-up window will appear, click "Yes" RST Cache is now DISABLED. Smart Response Technology is now DISABLED and all data is guaranteed - ASRock Z87 Extreme6/ac | Intel Smart Response Installation Guide - Page 4
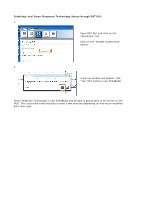
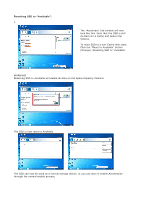
Resetting SSD to "Available": 1. The "Accelerate" tab window will now look like this. Note that the SSD is still divided into a Cache and Spare Cap Volume. To reset SSD to a non-Cache-disk state, Click the "Reset to Available" button (Orange). Resetting SSD to "Available". WARNING! Resetting SSD
-
 1
1 -
 2
2 -
 3
3 -
 4
4
 |
 |

Intel Smart Response Technology Installation Guide
This motherboard supports Intel Smart Response Technology. You can find the UI setup
instruction and the step by step instructions below.
UI setup instruction:
1.
Complete initial system setup, including installing the OS to a RAID mode system, then install
all required drivers, including RST storage driver version 10.5 or later.
2.
You MUST have both the HDD you intend to accelerate AND the SSD in system at this point!
3.
Boot system to desktop, open RST GUI from either Start Menu or by double-clicking RST
Storage icon in Icon tray, lower right-hand corner of the screen.
4.
Once open, click on the “Enable Acceleration” button on the GUI panel.
5.
When pop-up menu appears, chose which SSD you wish to use as the Cache device, which
HDD you wish to Accelerate, if you want to use the full SSD as Cache device or only 20GB,
and if you want to use Enhanced or Maximized Mode.
6.
For all performance testing, chose “Maximized” mode.
7.
After clicking OK button, SRT will enable automatically, and the RST GUI will refresh to show
the newly accelerated system configuration.
* Intel
®
will update the new version RST driver in the near future. For the new version RST
driver, please check our website for the latest information:
* Before you use RST function, you just need to set the UEFI option “SATA Mode” to [RAID
Mode]. It is not necessary to build RAID 0 or RAID 1 in RAID ROM.