ASRock Z87 Pro4 Quick Installation Guide
ASRock Z87 Pro4 Manual
 |
View all ASRock Z87 Pro4 manuals
Add to My Manuals
Save this manual to your list of manuals |
ASRock Z87 Pro4 manual content summary:
- ASRock Z87 Pro4 | Quick Installation Guide - Page 1
not be constructed as a commitment by ASRock. ASRock assumes no responsibility for any errors or and HDMI High-Definition Multimedia Interface, and the HDMI logo are trademarks or registered trademarks of HDMI Licensing Lithium battery adopted on this motherboard contains Perchlorate, a toxic - ASRock Z87 Pro4 | Quick Installation Guide - Page 2
- ASRock Z87 Pro4 | Quick Installation Guide - Page 3
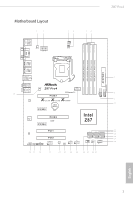
Motherboard Layout 1 2 34 56 Z87 Pro4 USB 2.0 T: Z87 Pro4 CHA_FAN2 USB3_8 Vertical Type A USB 3.0 Top: Center: FRONT Bottom: MIC IN USB3_4_5 PCI Express 3.0 8 29 PCIE1 LAN X X X Fast LAN Fast USB Fast RAM 9 10 CMOS Battery PCIE2 Super I/O PCIE4 PCIE3 RoHS Intel Z87 Audio - ASRock Z87 Pro4 | Quick Installation Guide - Page 4
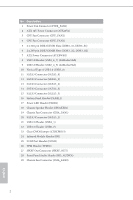
ATX 12V Power Connector (ATX12V1) 3 CPU Fan Connector (CPU_FAN1) 4 CPU Fan Connector (CPU_FAN2) 5 2 x 240-pin DDR3 DIMM Slots (DDR3_A1, DDR3_B1) 6 2 x 240-pin DDR3 DIMM Slots (DDR3_A2, DDR3_B2) 7 ATX (USB4_5) 22 USB 2.0 Header (USB6_7) 23 Clear CMOS Jumper (CLRCMOS1) 24 Infrared Module Header (IR1) - ASRock Z87 Pro4 | Quick Installation Guide - Page 5
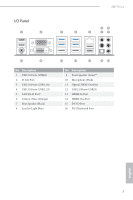
I/O Panel 1 2 Z87 Pro4 68 3 4 5 79 16 15 No. Description 1 USB 2.0 Ports (USB01) 2 D-Sub Port 3 USB 3.0 Ports (USB3_01) 4 USB 3.0 Ports 10 Microphone (Pink) 11 Optical SPDIF Out Port 12 USB 2.0 Ports (USB23) 13 HDMI-In Port 14 HDMI-Out Port 15 DVI-D Port 16 PS/2 Keyboard Port English 3 - ASRock Z87 Pro4 | Quick Installation Guide - Page 6
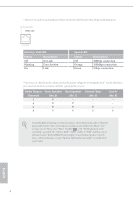
Speaker (No. 7) -V V V Central / Bass (No. 6) --V V Line In (No. 8) ---V To enable Multi-Streaming, you need to connect a front panel audio cable to the front panel audio header. After restarting your computer, you will find the "Mixer" tool on your system. Please select "Mixer ToolBox" , click - ASRock Z87 Pro4 | Quick Installation Guide - Page 7
. You may find the latest VGA cards and CPU support list on ASRock's website as well. ASRock website http://www.asrock.com. 1.1 Package Contents • ASRock Z87 Pro4 Motherboard (ATX Form Factor) • ASRock Z87 Pro4 Quick Installation Guide • ASRock Z87 Pro4 Support CD • 2 x Serial ATA (SATA) Data Cables - ASRock Z87 Pro4 | Quick Installation Guide - Page 8
Polymer Capacitors) CPU • Supports 4th Generation Intel® CoreTM i7 / i5 / i3 / Xeon® / Pentium® / Celeron® in LGA1150 Package • Digi Power Design • 6 Power Phase Design • Supports Intel® Turbo Boost 2.0 Technology • Supports Intel® K-Series unlocked CPU Chipset • Intel® Z87 Memory • Dual - ASRock Z87 Pro4 | Quick Installation Guide - Page 9
Z87 Pro4 • Max. shared memory 1792MB • Three VGA Output options: D-Sub, DVI-D and HDMI • Supports Triple Monitors • Supports HDMI Technology with max. resolution up to 1920x1200 @ 60Hz • Supports DVI-D with max. resolution up to 1920x1200 @ 60Hz • Supports D-Sub with max. resolution up to 1920x1200 - ASRock Z87 Pro4 | Quick Installation Guide - Page 10
4 USB 3.0 ports) (ASMedia Hub) • 64Mb AMI UEFI Legal BIOS with Multilingual GUI support • ACPI 1.1 Compliance Wake Up Events • SMBIOS 2.3.1 Support • CPU, DRAM, PCH 1.05V, PCH 1.5V Voltage Multi-adjust- ment • Drivers, Utilities, AntiVirus Software (Trial Version), CyberLink MediaEspresso 6.5 Trial - ASRock Z87 Pro4 | Quick Installation Guide - Page 11
Z87 Pro4 OS Certifications • CPU/Chassis Fan Multi-Speed Control • Voltage Monitoring: +12V, +5V, +3.3V, CPU Vcore • Microsoft® Windows® 8 / 8 64-bit / 7 / 7 64-bit compliant • FCC, CE, WHQL • ErP/EuP Ready (ErP/EuP ready power supply is required) * For detailed product information, please visit - ASRock Z87 Pro4 | Quick Installation Guide - Page 12
improved utilities, including XFast RAM, Dehumidifier, Good Night LED, FAN-Tastic Tuning, OC Tweaker and a whole lot more. ASRock Instant Flash ASRock Instant Flash is a BIOS flash utility embedded in Flash ROM. This convenient BIOS update tool allows you to update the system BIOS in a few clicks - ASRock Z87 Pro4 | Quick Installation Guide - Page 13
of ASRock XFast RAM is that it reduces the frequency of accessing your SSDs or HDDs in order to extend their lifespan. ASRock Crashless BIOS ASRock Crashless BIOS allows users to update their BIOS without fear of failing. If power loss occurs during the BIOS updating process, ASRock Crashless BIOS - ASRock Z87 Pro4 | Quick Installation Guide - Page 14
motherboard also provides a free 3.5mm audio cable (optional) that ensures users the most convenient computing environment. ASRock Good Night LED ASRock Good as well. ASRock USB Key In a world where time is money, why waste precious time everyday typing usernames to log in to Windows? Why should we - ASRock Z87 Pro4 | Quick Installation Guide - Page 15
Z87 Pro4 ASRock Home Cloud This motherboard supports remote wake with the onboard Intel LAN, so you can connect with your PC from anywhere in the world. You will be able to power your PC on or turn it off, monitor and take control of it remotely with another smartphone, tablet or computer. ASRock - ASRock Z87 Pro4 | Quick Installation Guide - Page 16
is an ATX form factor motherboard. Before you install the motherboard, study the configuration of your chassis to ensure that the motherboard fits into it. Pre-installation Precautions Take note of the following precautions before you install motherboard components or change any motherboard settings - ASRock Z87 Pro4 | Quick Installation Guide - Page 17
Z87 Pro4 2.1 Installing the CPU 1. Before you insert the 1150-Pin CPU into the socket, please check if the PnP cap is on the socket, if the CPU surface is unclean, or if there are any bent pins in the socket. Do not force to insert the CPU into the socket if above situation is found. Otherwise, the - ASRock Z87 Pro4 | Quick Installation Guide - Page 18
4 5 16 3 English - ASRock Z87 Pro4 | Quick Installation Guide - Page 19
Z87 Pro4 Please save and replace the cover if the processor is removed. The cover must be placed if you wish to return the motherboard for after service. 17 English - ASRock Z87 Pro4 | Quick Installation Guide - Page 20
2.2 Installing the CPU Fan and Heatsink 1 18 2 CPU_FAN English - ASRock Z87 Pro4 | Quick Installation Guide - Page 21
Z87 Pro4 2.3 Installing Memory Modules (DIMM) This motherboard provides four 240-pin DDR3 (Double Data Rate 3) DIMM slots, and supports Dual Channel Memory Technology. 1. For dual channel configuration, you always need to install identical (the same brand, speed, size and chip-type) DDR3 DIMM - ASRock Z87 Pro4 | Quick Installation Guide - Page 22
1 2 3 20 English - ASRock Z87 Pro4 | Quick Installation Guide - Page 23
Z87 Pro4 2.4 Expansion Slots (PCI and PCI Express Slots) There are 2 PCI slots and 4 PCI Express slots on the motherboard. Before installing an expansion card, please make sure that the power supply is switched off or the power cord is unplugged. Please read the documentation of the - ASRock Z87 Pro4 | Quick Installation Guide - Page 24
clear the CMOS right after you update the BIOS. If you need to clear the CMOS when you just finish updating the BIOS, you must boot up the system first, and then shut it down before you do the clear-CMOS action. Please be noted that the password, date, time, and user default profile will be cleared - ASRock Z87 Pro4 | Quick Installation Guide - Page 25
Z87 Pro4 2.6 Onboard Headers and Connectors Onboard headers and connectors are NOT jumpers. Do NOT place jumper caps over these headers and connectors. Placing jumper caps over the headers and connectors will cause permanent damage to the motherboard of power switch, reset switch, power LED, - ASRock Z87 Pro4 | Quick Installation Guide - Page 26
No. 22) USB_PWR PP+ GND DUMMY 1 GND P+ PUSB_PWR Besides four USB 2.0 ports on the I/O panel, there are two headers on this motherboard. Each USB 2.0 header can support two ports. USB 3.0 Header (19-pin USB3_4_5) (see p.1, No. 9) (19-pin USB3_6_7) (see p.1, No. 8) (USB3_8) (see p.1, No. 10) Vbus - ASRock Z87 Pro4 | Quick Installation Guide - Page 27
Sensing, but the panel wire on the chassis must support HDA to function correctly. Please follow the instructions in our manual and chassis manual to install your system. 2. If you use an AC'97 audio panel, please install it to the front panel audio header by the steps below: A. Connect Mic_IN (MIC - ASRock Z87 Pro4 | Quick Installation Guide - Page 28
DDCD#1 This motherboard provides a 24-pin ATX power connector. To use a 20-pin ATX power supply, please plug it along Pin 1 and Pin 13. This motherboard provides an 8-pin ATX 12V power connector. To use a 4-pin ATX power supply, please plug it along Pin 1 and Pin 5. This header supports an optional - ASRock Z87 Pro4 | Quick Installation Guide - Page 29
TPM Header (17-pin TPMS1) (see p.1, No. 26) 1 Z87 Pro4 This connector supports Trusted Platform Module (TPM) system, which can securely store keys, digital certificates, passwords, and data. A TPM system also helps enhance network security, protects digital identities, - ASRock Z87 Pro4 | Quick Installation Guide - Page 30
Liste unterstützter VGA-Karten und Prozessoren auf der ASRock-Webseite: ASRock-Webseite http://www.asrock.com. 1.1 Lieferumfang • ASRock Z87 Pro4-Motherboard (ATX-Formfaktor) • ASRock Z87 Pro4-Schnellinstallationsanleitung • ASRock Z87 Pro4-Support-CD • 2 x Serial-ATA- (SATA) Datenkabel (optional - ASRock Z87 Pro4 | Quick Installation Guide - Page 31
Z87 Pro4 1.2 Technische Daten Plattform Prozessor • ATX-Formfaktor • Premium Gold-Kondensatordesign (100 % in Japan gefertigt, hochqualitative leitfähige Polymer-Kondensatoren) • Unterstützt Intel® CoreTM i7 / i5 / i3 / Xeon® / Pentium® / Celeron® der 4. Generation im LGA1150-Paket • Digipower- - ASRock Z87 Pro4 | Quick Installation Guide - Page 32
Wiedergabe (Full HD/1080p) mit DVI-D- und HDMI-Ports Audio • 7.1-Kanal-HD-Audio mit Inhaltsschutz (Realtek ALC892Audiocodec) • Erstklassige Blu-ray-Audiounterstützung LAN • Gigabit LAN 10/100/1000 Mb/s • Giga PHY Intel® I217V • Unterstützt Intel® Remote Wake Technology • Unterstützt Wake-On-LAN - ASRock Z87 Pro4 | Quick Installation Guide - Page 33
Z87 Pro4 • HD-Audioanschluss: Hintere Lautsprecher / Zentral / Bass / Line-in / Vorderer Lautsprecher / Mikrofon Speicher • 6 x SATA-III-6,0-Gb/s-Anschlüsse, unterstützt RAID (RAID 0, RAID 1, RAID 5, RAID 10, Intel Rapid Storage Technology 12 und Intel Smart Response Technology), NCQ, AHCI und „ - ASRock Z87 Pro4 | Quick Installation Guide - Page 34
ächlich für die Systemnutzung reservierten Speichers unter Windows®-Betriebssystemen mit 32 Bit weniger als 4 GB betragen. Windows®-Betriebssysteme mit 64 Bit haben keine derartigen Beschränkungen. Mit ASRock XFast RAM können Sie den Speicher einsetzen, den Windows® nicht nutzen kann. Deutsch 32 - ASRock Z87 Pro4 | Quick Installation Guide - Page 35
Z87 Pro4 1.3 Jumpereinstellung Die Abbildung zeigt, wie die Jumper eingestellt werden. lang mit einer Jumper-Kappe kurz. Löschen Sie den CMOS jedoch nicht direkt nach der BIOS-Aktualisierung. Falls Sie den CMOS direkt nach Abschluss der BIOS-Aktualisierung löschen müssen, starten Sie das System zunä - ASRock Z87 Pro4 | Quick Installation Guide - Page 36
Jumper-Kappen an diesen Stiftleisten und Anschlüssen können Sie das Motherboard dauerhaft beschädigen. Systemblende-Stiftleiste (9-polig, PANEL1) (siehe S. 1, Nr. 16) Verbinden Sie Netzschalter, Reset-Taste und Systemstatusanzeige am Gehäuse entsprechend der nachstehenden Pinbelegung mit dieser - ASRock Z87 Pro4 | Quick Installation Guide - Page 37
Z87 Pro4 Betrieb-LED-Stiftleiste (3-polig, PLED1) (siehe S. 1, Nr. 17) siehe S. 1, Nr. 22) Neben vier USB 2.0-Ports an der E/A-Blende befinden sich zwei Stiftleisten an diesem Motherboard. Jede USB 2.0-Stiftleiste kann zwei Ports unterstützen. USB 3.0-Stiftleiste (19-polig, USB3_4_5) (siehe S. 1, - ASRock Z87 Pro4 | Quick Installation Guide - Page 38
Anschließen von Audiogeräten an der Frontblende. 1. High Definition Audio unterstützt Anschlusserkennung, der Draht am Gehäuse muss dazu uselautsprecher mit dieser Stiftleiste. Bitte verbinden Sie den SPDIF_OUT-Anschluss einer HDMI-VGA-Karte über ein Kabel mit dieser Stiftleiste. Bitte verbinden - ASRock Z87 Pro4 | Quick Installation Guide - Page 39
Z87 Pro4 (3-polig, PWR_FAN1) (siehe S. 1, Nr. 1) CPU-Lüfteranschlüsse (4-polig, CPU_FAN1) (siehe S. 1, Nr. 3) (3-polig, CPU_FAN2) (siehe S. 1, Nr. 4) ATX-Netzanschluss (24-polig, ATXPWR1) (siehe S. 1, Nr. 7) 12 24 1 13 ATX an. Dieses Motherboard bietet einen 8-poligen ATX-12V-Netzanschluss. - ASRock Z87 Pro4 | Quick Installation Guide - Page 40
TPM-Stiftleiste (17-polig, TPMS1) (siehe S. 1, Nr. 26) Dieser Anschluss unterstützt das Trusted Platform Module- (TPM) System, das Schlüssel, digitale Zertifikate, Kennwörter und Daten sicher aufbewahren kann. Ein TPM-System hilft zudem bei der Stärkung der Netzwerksicherheit, schützt digitale - ASRock Z87 Pro4 | Quick Installation Guide - Page 41
est également disponible sur le site Internet de ASRock. Site Internet ASRock http://www.asrock.com. 1.1 Contenu de l'emballage • Carte mère ASRock Z87 Pro4 (facteur de forme ATX) • Guide d'installation rapide ASRock Z87 Pro4 • CD d'assistance ASRock Z87 Pro4 • 2 x câbles de données Serial ATA (SATA - ASRock Z87 Pro4 | Quick Installation Guide - Page 42
/ i5 / i3 / Xeon® / Pentium® / Celeron® en package LGA1150 • Conception Digi Power • Alimentation à 6 phases • Prend en charge la technologie Intel® Turbo Boost 2.0 • Prend en charge les processeurs débloqués de la série K Intel® • Intel® Z87 • Technologie mémoire double canal DDR3 • 4 x fentes DIMM - ASRock Z87 Pro4 | Quick Installation Guide - Page 43
Z87 Pro4 Audio Réseau Connectique du panneau arrière • Mémoire partagée max. 1792Mo • Trois options de sortie VGA : D-Sub, DVI-D et HDMI • Prend en charge la configuration à triple moniteurs • Prend en charge la technologie HDMI avec une résolution maximale de 1920x1200 @ 60Hz • Prend en charge le - ASRock Z87 Pro4 | Quick Installation Guide - Page 44
du BIOS CD inclus Surveillance du matériel • Connecteurs jack audio HD : Haut-parleur arrière / central / basses / entrée ligne / haut-parleur avant / microphone • 6 x connecteurs SATA3 6,0 Go/s, compatibles RAID (RAID 0, RAID 1, RAID 5, RAID 10, technologies Intel Rapid Storage 12 et Intel Smart - ASRock Z87 Pro4 | Quick Installation Guide - Page 45
Z87 Pro4 • Contrôle simultané des vitesse du ventilateur processeur/ châssis • Surveillance de la tension d'alimentation : +12V, +5V, +3,3V, CPU Vcore Système • Compatible Microsoft® Windows® 8 / 8 64-bit / 7 / 7 64-bits d'exploitation Certifications • FCC, CE, WHQL • ErP/EuP Ready ( - ASRock Z87 Pro4 | Quick Installation Guide - Page 46
Si le capuchon du cavalier n'est pas installé sur les broches, le cavalier est 'ouvert'. L'illustration représente un cavalier à 3 broches dont les broches 1 et 2 sont « court-circuitées » si un capuchon de cavalier est posé sur ces 2 broches. Cavalier Clear CMOS (CLRCMOS1) (voir p.1, No. 23) Par - ASRock Z87 Pro4 | Quick Installation Guide - Page 47
Z87 Pro4 1.4 Embases et connecteurs de la carte mère Les embases et connecteurs situ configurer la façon dont votre système doit s'arrêter à l'aide du bouton de mise en marche. RESET (bouton de réinitiélisation): pour brancher le bouton de réinitialisation du panneau frontal du châssis. Appuyez sur - ASRock Z87 Pro4 | Quick Installation Guide - Page 48
Embase LED d'alimentation (PLED1 à 3 broches) (voir p.1, No. 17) Veuillez brancher le LED d'alimentation du châssis sur cette embase pour indiquer l'état d'alimentation du système. Connecteurs Serial ATA3 (SATA3_0: SATA3_0 voir p.1, No. 11) (SATA3_1: (voir p.1, No. 20) (SATA3_2: SATA3_1 ( - ASRock Z87 Pro4 | Quick Installation Guide - Page 49
la HDA pour fonctionner correctement. Veuillez suivre les instructions figurant dans notre manuel et dans le manuel du châssis pour installer votre système. 2. Si vous utilisez un panneau audio AC'97, veuillez le brancher sur l'embase audio du panneau frontal en procédant comme suit : A. branchez - ASRock Z87 Pro4 | Quick Installation Guide - Page 50
un ventilateur de processeur à 3 broches, veuillez le brancher sur la Broche 1-3. Cette carte mère est dotée d'un connecteur d'alimentation ATX à 24 broches. Pour utiliser une alimentation ATX à 20 broches, veuillez effectuer les branchements sur la Broche 1 et la Broche 13. Cette carte mère est dot - ASRock Z87 Pro4 | Quick Installation Guide - Page 51
Embase TPM (TPMS1 à 17 broches) (voir p.1, No. 26) Z87 Pro4 Ce connecteur prend en charge un module TPM (Trusted Platform Module - Module de plateforme sécurisée), qui permet de sauvegarder clés, certificats numériques, mots de - ASRock Z87 Pro4 | Quick Installation Guide - Page 52
VGA più recenti e di supporto di CPU anche sul sito Web di ASRock. Sito Web di ASRock http://www.asrock.com. 1.1 Contenuto della confezione • Scheda madre ASRock Z87 Pro4 (Form Factor ATX) • Guida all'installazione rapida di ASRock Z87 Pro4 • CD di supporto ASRock Z87 Pro4 • 2 x cavi dati Serial ATA - ASRock Z87 Pro4 | Quick Installation Guide - Page 53
Z87 Pro4 1.2 Specifiche Piattaforma CPU Chipset Memoria Slot di espansione Grafica • Fattore di forma ATX • Design condensatore Premium Gold (condensatori a conduttore in polimero di alta qualità realizzati al 100% in Giappone) • Supporta CPU 4th Generation Intel® CoreTM i7 / i5 / i3 / Xeon® / - ASRock Z87 Pro4 | Quick Installation Guide - Page 54
(BD) Full HD 1080p, riproduzione con porte DVI-D e HDMI • Audio HD a 7.1 canali con Content Protection (codec audio Realtek ALC892) • Supporto audio Blu-ray Premium • LAN Gigabit 10/100/1000 Mb/s • Giga PHY Intel® I217V • Supporta la tecnologia Intel® Remote Wake • Supporta Wake-On-LAN • Supporta - ASRock Z87 Pro4 | Quick Installation Guide - Page 55
Z87 Pro4 Archiviazione Connettore Caratteristiche del BIOS CD di supporto Hardware Monitor • Jack audio HD: altoparlante posteriore/centrale/basso/ ingresso linea/altoparlante anteriore/microfono • 6 x connettori SATA3 6,0 Gb/s, supporto RAID (RAID 0, RAID 1, RAID 5, RAID 10, tecnologia Intel - ASRock Z87 Pro4 | Quick Installation Guide - Page 56
da overclocking. A causa della limitazione, l'effettiva dimensione della memoria può essere inferiore a 4 GB per riservare l'uso del sistema ai sistemi operativi di Windows® a 32 bit. I sistemi operativi Windows® a 64 bit non possiedono tali limitazioni. È possibile utilizzare la RAM XFast di ASRock - ASRock Z87 Pro4 | Quick Installation Guide - Page 57
Z87 Pro4 1.3 Impostazione jumper L'illustrazione mostra in che modo vengono impostati i jumper. Quando il per 5 secondi. Tuttavia, non azzerare la CMOS subito dopo aver aggiornato il BIOS. Se è necessario azzerare la CMOS dopo l'aggiornamento del BIOS, è necessario riavviare prima il sistema e in - ASRock Z87 Pro4 | Quick Installation Guide - Page 58
anteriore può cambiare a seconda dello chassis. Un modulo di pannello anteriore è composto principalmente da interruttore di alimentazione, interruttore di reset, LED di alimentazione, LED di attività disco rigido, altoparlante, ecc. Quando si collega il modulo del pannello anteriore dello chassis - ASRock Z87 Pro4 | Quick Installation Guide - Page 59
Z87 Pro4 Header LED di alimentazione (PLED1 a 3 pin) (vedere pag. 1, n. 17) Collegare il LED di alimentazione chassis a questo header per indicare lo stato di alimentazione del sistema. - ASRock Z87 Pro4 | Quick Installation Guide - Page 60
manuale e nel manuale dello chassis per installare il sistema. 2. Se si utilizza un pannello audio AC'97, installarlo sull'header audio dello chassis a questo header. Collegare il connettore SPDIF_OUT di una scheda VGA HDMI a questo header con un cavo. Collegare i cavi della ventola ai connettori - ASRock Z87 Pro4 | Quick Installation Guide - Page 61
Z87 Pro4 (PWR_FAN1 a 3 pin) (vedere pag. 1, n. 1) Connettori della ventola della CPU (CPU_FAN1 a 4 pin) (vedere pag. 1, n. 3) (CPU_FAN2 a 3 pin) (vedere pag. 1, n. 4) Connettore di alimentazione ATX (ATXPWR1 a 24 pin) (vedere pag. 1, n. 7) 12 24 1 13 Connettore di alimentazione ATX da 12 V ( - ASRock Z87 Pro4 | Quick Installation Guide - Page 62
Header TPM (TPMS1 a 17 pin) (vedere pag. 1, n. 26) Questo connettore supporta il sistema Trusted Platform Module (TPM), che può archiviare in modo sicuro chiavi, certificati digitali, password e dati. Un sistema TPM permette anche di potenziare la sicurezza della rete, di proteggere identità - ASRock Z87 Pro4 | Quick Installation Guide - Page 63
la lista de compatibilidad de la CPU, en el sitio web de ASRock. Sitio web de ASRock http://www.asrock.com. 1.1 Contenido del paquete • Placa base ASRock Z87 Pro4 (Factor de forma ATX) • Guía de instalación rápida de ASRock Z87 Pro4 • CD de soporte de ASRock Z87 Pro4 • 2 cables de datos Serie ATA - ASRock Z87 Pro4 | Quick Installation Guide - Page 64
i7 / i5 / i3 / Xeon® / Pentium® / Celeron® en paquete LGA1150 • Diseño Digi Power • Diseño de 6 fases de alimentación • Compatible con la Tecnología de Intel® Turbo Boost 2.0 • Compatible con CPU serie K desbloqueada de Intel® • Intel® Z87 • Tecnología de memoria de Doble Canal DDR3 • 4 ranuras DDR3 - ASRock Z87 Pro4 | Quick Installation Guide - Page 65
Z87 Pro4 Audio LAN Panel trasero I/O • Memoria compartida máxima: 1792MB • Tres opciones de salida VGA: D-Sub, DVI-D y HDMI • Compatible con monitores triples • Compatible con Tecnología HDMI con máxima resolución hasta 1920x1200 @ 60Hz • Compatible con DVI-D con máxima resolución hasta 1920x1200 - ASRock Z87 Pro4 | Quick Installation Guide - Page 66
ventilador de la CPU (1 de 4 pines y 1 de 3 pines) • 2 conectores de ventilador del chasis (1 de 4 pines y 1 de 3 pines) • 1 conector de ventilador de alimentación (de 3 pines) • 1 conector de alimentación ATX de 24 pines • 1 conector de alimentación de 12V de 8 pines • 1 conector de audio del panel - ASRock Z87 Pro4 | Quick Installation Guide - Page 67
Z87 Pro4 • Control multivelocidad del ventilador de la CPU/Chasis • Control del voltaje: +12V, +5V, +3,3V, CPU Vcore SO • Compatible con Microsoft® Windows® 8 / 8 de 64 bits / 7 / 7 de 64 bits Certificaciones • FCC, CE, WHQL • Compatible con ErP/EuP (requiere toma de alimentación compatible - ASRock Z87 Pro4 | Quick Installation Guide - Page 68
el pin2 y el pin3 en el CLRCMOS1 durante 5 segundos. Sin embargo, no borre el CMOS justo después de que haya actualizado el BIOS. Si necesita borrar el CMOS cuando acabe de actualizar el BIOS, deberá arrancar el sistema primero y, a continuación, deberá apagarlo antes de que realice el borrado - ASRock Z87 Pro4 | Quick Installation Guide - Page 69
Z87 Pro4 1.4 Conectores y cabezales incorporados Los cabezales y conectores incorporados NO son puentes. configurar la forma en la que su sistema se apagará mediante el interruptor de alimentación. RESET (Interruptor de reseteo): Conéctelo al interruptor de reseteo del panel frontal del chasis. Pulse - ASRock Z87 Pro4 | Quick Installation Guide - Page 70
Cabezal de indicador LED de alimentación (PLED1 de 3 pines) (consulte la pág.1, N.º 17) Conecte el indicador LED de alimentación del chasis a este cabezal para indicar el estado de alimentación del sistema. Conectores Serie ATA3 SATA3_0 (SATA3_0: consulte la pág.1, N.º 11) (SATA3_1: SATA3_1 - ASRock Z87 Pro4 | Quick Installation Guide - Page 71
Z87 Pro4 Este cabezal se utiliza para conectar dispositivos de audio al panel de audio frontal. 1. El Audio manual y en el manual del chasis para instalar su sistema. 2. Si utiliza un panel de audio AC'97, colóquelo en el cabezal de audio SPDIF_OUT de una tarjeta VGA HDMI a este cabezal con un cable - ASRock Z87 Pro4 | Quick Installation Guide - Page 72
un conector de ventilador (ventilador silencioso) de CPU de 4 pines. Si tiene pensando conectar un ventilador de CPU de 3 pines, conéctelo al Pin 1-3. Esta placa base contiene un conector de alimentación ATX de 24 pines. Para utilizar una toma de alimentación ATX de 20 pines, conéctela en los Pines - ASRock Z87 Pro4 | Quick Installation Guide - Page 73
Cabezal TPM (TPMS1 de 17 pines) (consulte la pág.1, N.º 26) Z87 Pro4 Este conector es compatible con el sistema Módulo de Plataforma Segura (TPM, en inglés), que puede almacenar de forma segura claves, certificados digitales, contraseñas y - ASRock Z87 Pro4 | Quick Installation Guide - Page 74
1 ASRock Z87 Pro4 ASRock ASRock BIOS ASRock ASRock VGA ASRock http://www.asrock.com. 1.1 ASRock Z87 Pro4 ATX ASRock Z87 Pro4 ASRock Z87 Pro4 • 2 Serial ATA (SATA 1 72 - ASRock Z87 Pro4 | Quick Installation Guide - Page 75
Z87 Pro4 1.2 ATX Premium Gold Capacitor 4 Intel® CoreTM i7 / i5 / i3 / Xeon® / Pentium® / Celeron LGA1150 • Digi Power Design 6 Intel® Turbo Boost 2.0 Intel K с Чипсет • Intel® Z87 Память DDR3 • 4 DDR3 DIMM DDR3 2933+(OC)/2800(OC)/ 2400(OC)/2133(OC)/1866(OC)/1600/ - ASRock Z87 Pro4 | Quick Installation Guide - Page 76
, Deep Color (12bpc), xvYCC и HBR (High Bit Rate Audio) по HDMI HDMI HDCP DVI-I и HDMI Full HD 1080p Blu-ray (BD DVI-D и HDMI • 7.1 HD Audio Realtek ALC892) Premium Blu-ray Audio • Gigabit LAN 10/100/1000 Giga PHY Intel® I217V Intel® Remote Wake Technology Wake-On-LAN Energy Efficient - ASRock Z87 Pro4 | Quick Installation Guide - Page 77
Z87 Pro4 HD Audio • 6 x SATA3 6,0 RAID (RAID 0, RAID 1, RAID 5, RAID 10, Intel Rapid Storage Technology 12 и Intel Smart Response Technology), NCQ, AHCI • 1 x IR • 1 x USB 3.0 4 USB 3.0) ASMedia) BIOS • 64 Мб AMI UEFI Legal BIOS ACPI 1.1 SMBIOS 2.3.1 DRAM, PCH 1,05 - ASRock Z87 Pro4 | Quick Installation Guide - Page 78
12 В, +5 В, +3,3 В, ЦП Vcore ОС • Microsoft® Windows® 8 / 8 64 7 / 7 64 • FCC, CE, WHQL ErP/EuP ErP/EuP) http://www.asrock.com BIOS Untied Overclocking Technology 32 Windows 4 64 Windows Windows ASRock XFast RAM. 76 - ASRock Z87 Pro4 | Quick Installation Guide - Page 79
Z87 Pro4 1.3 3 1 и 2 CMOS (CLRCMOS1 1, № 23) CMOS CLRCMOS1 CMOS 15 2 и 3 на CLRCMOS1 на 5 CMOS BIOS CMOS BIOS CMOS CMOS. 77 - ASRock Z87 Pro4 | Quick Installation Guide - Page 80
1.4 9 PANEL1 1, № 16) PWRBTN RESET PLED S1/S3 S4 S5 HDLED 78 - ASRock Z87 Pro4 | Quick Installation Guide - Page 81
Z87 Pro4 3 PLED1 1, № 17) Serial ATA3 (SATA3_0 1, № 11) (SATA3_1 1, № 20) (SATA3_2 1, № 12) (SATA3_3 1, № 15) SATA3_0 SATA3_1 (SATA3_4 1, № 13) (SATA3_5 1, № 14) SATA3_2 SATA3_3 SATA3_4 SATA3_5 SATA3 SATA 6,0 Гб/с. - ASRock Z87 Pro4 | Quick Installation Guide - Page 82
. C GND GND). D MIC_RET и OUT_RET AC'97 E FrontMic Realtek Recording Volume 4 SPEAKER1 1, № 18) SPDIF (2 SPDIF_ OUT1 1, № 27) 4 CHA_ FAN1 1, № 19) (3 CHA_ FAN2 1, № 29) SPDIF_ OUT карты HDMI VGA 80 - ASRock Z87 Pro4 | Quick Installation Guide - Page 83
Z87 Pro4 (3 PWR_ FAN1 1, № 1) 4 CPU_ FAN1 1, № 3) (3 CPU_ FAN2 1, № 4) 24 ATXPWR1 1, № 7) 12 В (8 ATX12V1 1, № 2) 12 24 1 13 5 IR1 1, № 24) 9 COM1 1, № 25) 4 3 1-3. 24 20 ATX 1 13. 8 12 4 ATX 1 5. COM1 81 - ASRock Z87 Pro4 | Quick Installation Guide - Page 84
17 TPMS1 1, № 26) Trusted Platform Module (TPM 82 - ASRock Z87 Pro4 | Quick Installation Guide - Page 85
a lista de placas VGA e CPU mais recentes suportadas no Web site da ASRock. Web site da ASRock http://www.asrock.com. 1.1 Conteúdo da embalagem • Placa principal ASRock Z87 Pro4 (Formato ATX) • Guia de instalação rápida do ASRock Z87 Pro4 • CD de suporte da placa ASRock Z87 Pro4 • 2 x Cabos de dados - ASRock Z87 Pro4 | Quick Installation Guide - Page 86
i7 / i5 / i3 / Xeon® / Pentium® / Celeron® de 4ª geração em socket LGA1150 • Design Digi Power • Design com 6 fases de alimentação • Suporta a tecnologia Intel® Turbo Boost 2.0 • Suporta CPU desbloqueado da série K da Intel® • Intel® Z87 • Tecnologia de memória DDR3 de dois canais • 4 x ranhuras - ASRock Z87 Pro4 | Quick Installation Guide - Page 87
Z87 Pro4 Português Áudio LAN E/S do painel traseiro • Memória partilhada máxima de 1792MB • Três opções de saída VGA: D-Sub, DVI-D e HDMI • Suporta configuração com três monitores • Suporta tecnologia HDMI com resolução máxima de até 1920x1200 @ 60Hz • Suporta DVI-D com resolução máxima de até - ASRock Z87 Pro4 | Quick Installation Guide - Page 88
tecnologia Intel Rapid Storage 12 e tecnologia Intel CPU (1 x 4 pinos, 1 x 3 pinos) • 2 x Conectores da ventoinha do chassis (1 x 4 pinos, 1 x 3 pinos) • 1 x Conector da ventoinha de alimentação (3 pinos) • 1 x conector de alimentação de 24 pinos ATX ) Funcionalidades do BIOS • BIOS UEFI oficial da - ASRock Z87 Pro4 | Quick Installation Guide - Page 89
Z87 Pro4 Sistema Operativo Certificações • Controlo de velocidade da ventoinha de CPU/Chassis • Monitorização da tensão: +12V, +5V, +3,3V, CPU Vcore • Compatível com Microsoft® Windows® 8 / 8 64-bits / 7 / 7 64bits • FCC, CE, WHQL • Preparada para ErP/EuP (é necessária uma fonte de alimentação - ASRock Z87 Pro4 | Quick Installation Guide - Page 90
para ligar o pino2 e o pino3 no CLRCMOS1 durante 5 segundos. No entanto, não limpe o CMOS logo após ter efectuado a actualização da BIOS. Se precisar de limpar o CMOS logo após ter terminado uma actualização da BIOS, deverá primeiro iniciar o sistema e voltar a encerrá-lo antes de efectuar a ac - ASRock Z87 Pro4 | Quick Installation Guide - Page 91
os terminais e conectores irá causar danos permanentes à placa principal. Z87 Pro4 Terminal do painel de sistema (PAINEL1 de 9 pinos) (consultar p.1, a forma para desligar o seu sistema através do botão de alimentação. RESET (Botão de reposição): Ligue ao botão de reposição no painel frontal - ASRock Z87 Pro4 | Quick Installation Guide - Page 92
Conector do LED de alimentação (PLED1 de 3 pinos) (consultar p.1, N.º 17) Ligue o LED de alimentação do chassis a este terminal para indicar o estado de alimentação do sistema. Conectores ATA3 de série (SATA3_0: SATA3_0 consultar p.1, N.º 11) (SATA3_1: consultar p.1, N.º 20) SATA3_1 (SATA3_2: - ASRock Z87 Pro4 | Quick Installation Guide - Page 93
28) Z87 Pro4 Este terminal destina-se à ligação de dispositivos áudio ao painel de áudio frontal. Português 1. O Áudio de alta definição suporta Detecção de ficha, mas o cabo de painel no chassis deverá suportar HDA para funcionar correctamente. Siga as instruções no nosso manual e no manual do - ASRock Z87 Pro4 | Quick Installation Guide - Page 94
silenciosa) de 4 pinos. Se pretender ligar uma ventoinha de CPU de 3 pinos, ligue-a ao Pino 1-3. Esta placa principal inclui um conector de alimentação de 12V ATX de 24 pinos. Para utilizar uma fonte de alimentação ATX de 20 pinos, introduza-a no Pino 1 e Pino 13. Esta placa principal inclui - ASRock Z87 Pro4 | Quick Installation Guide - Page 95
Terminal TPM (TPMS1 de 17 pinos) (consultar p.1, N.º 26) Z87 Pro4 Este conector suporta um sistema com Módulo de Plataforma Confiável (TPM), que pode armazenar com segurança chaves, certificados digitais, palavras-passe e dados. Um sistema - ASRock Z87 Pro4 | Quick Installation Guide - Page 96
edin. En güncel VGA kartları ve CPU destek listelerini de ASRock'ın web sitesinden bulabilirsiniz. ASRock'ın web sitesi http://www.asrock.com. 1.1 Ambalaj İçeriği • ASRock Z87 Pro4 Anakartı (ATX Form Faktörü) • ASRock Z87 Pro4 Hızlı Kurulum Kılavuzu • ASRock Z87 Pro4 Destek CD'si • 2 x Seri ATA - ASRock Z87 Pro4 | Quick Installation Guide - Page 97
Z87 Pro4 1.2 Özellikler Platform CPU • ATX Form Faktörü • Premium Gold Sığa tasarımı (%100 Japon-malı kaliteli İletken Polimer Sığalar) • 4ncü Nesil Intel® CoreTM i7 / i5 / i3 / Xeon® / Pentium® / Celeron®, LGA1150 Paketinde desteklemektedir • Dijital Güç Tasarımı • 6 Güç Safhası Tasarımı • Intel - ASRock Z87 Pro4 | Quick Installation Guide - Page 98
-D, ve HDMI bağlantı noktalarıyla, Full HD 1080p Bluray (BD) kayıttan yürütme özelliklerini destekler Ses • İçerik Koruma Özelliği ile 7.1 CH HD Ses (Realtek ALC892 Ses Codec Bileşeni) • Üstün Blu-ray ses desteği LAN • Gigabit LAN 10/100/1000 Mb/s • Giga PHY Intel® I217V • Intel® Uzaktan Uyand - ASRock Z87 Pro4 | Quick Installation Guide - Page 99
Z87 Pro4 Türkçe • HD Ses Jakı: Arka Hoparlör / Merkezi / Bas / Hat Girişi / Ön Hoparlör / Mikrofon Depolama • 6 x SATA3 6,0 Gb/s bağlayıcıları, RAID (RAID 0, RAID 1, RAID 5, RAID 10, Intel Hızlı Depolama Teknolojisi 12 ve Intel Akıllı Yanıt Teknolojisi), NCQ, AHCI ve "Hot Plug" işlevlerini - ASRock Z87 Pro4 | Quick Installation Guide - Page 100
+12V, +5V, +3,3V, CPU Vcore • Microsoft® Windows® 8 / 8 64-bit / 7 / 7 64-bit ile uyumlu • FCC, CE, WHQL • ErP/EuP için hazır (ErP/EuP için hazır güç beslemesi gereklidir) * Detaylı ürün bilgisi için, lütfen web sitemizi ziyaret edin: http://www.asrock.com Lütfen, BIOS ayarlarını düzenleme, Bağıms - ASRock Z87 Pro4 | Quick Installation Guide - Page 101
Z87 Pro4 1.3 Bağlantı Teli Kurulumu Çizim, bağlantı tellerinin kurulumunu göstermektedir. Tel kapa kullanın. Ancak, CMOS'u lütfen BIOS'u güncelledikten hemen sonra temizlemeyin. BIOS'u güncelledikten hemen sonra CMOS'u temizlemeniz gerekirse, önce sistemi başlatın ve ardından CMOS temizleme işlemi ö - ASRock Z87 Pro4 | Quick Installation Guide - Page 102
rlama Anahtarı): Sıfırlama anahtarını kasa ön paneline bağlayın. Bilgisayarın kilitlenmesi ve normal şekilde yeniden başlatılamaması halinde reset (sıfırla) düğmesine basın. PLED (Sistem Güç LED'i): Güç durumu göstergesini kasa ön paneline bağlayın. Sistem çalışırken LED ışığı yanacaktır. Sistem - ASRock Z87 Pro4 | Quick Installation Guide - Page 103
Z87 Pro4 Türkçe Güç LED Bağlantısı (3-pin PLED1) (bkz. sf.1, No. 17) Sistemin güç durumunun belirtilmesi için lütfen güç LED'ini bu bağlantıya takın. Seri ATA3 Bağ - ASRock Z87 Pro4 | Quick Installation Guide - Page 104
sf.1, No. 19) (3-pin CHA_FAN2) (bkz sf.1, No. 29) Lütfen kasa hoparlörünü bu bağlantıya takın. Lütfen kablo ile bu bağlantıya bir HDMI VGA kartının SPDIF_ OUT bağlayıcı takın. Lütfen fan kablolarını fan bağlayıcılarına takın ve siyah teli topraklama pinine bağlayın. 102 - ASRock Z87 Pro4 | Quick Installation Guide - Page 105
Z87 Pro4 (3-pin PWR_FAN1) (bkz sf.1, No. 1) CPU Fan Bağlayıcıları (4-pin CPU_FAN1) (bkz sf.1, No. 3) (3-pin CPU_FAN2) (bkz sf.1, No. 4) ATX Güç Bağlayıcısı (24-pin ATXPWR1) (bkz. sf.1, No. 7) ATX 12V Güç Bağlayıcısı (8-pin ATX12V1) (bkz. sf.1, No. 2) 12 24 1 13 Kızılötesi Modül Bağlantısı (5- - ASRock Z87 Pro4 | Quick Installation Guide - Page 106
TPM bağlantısı (17-pin TPMS1) (bkz. sf.1, No. 26) Bu bağlayıcı, anahtarlar, dijital sertifikalar, parolalar ve verileri güvenli bir şekilde saklama özelliği bulunan Güvenilir Platform Modülü (TPM) sistemini destekler. TPM sistemleri, aynı zamanda ağ güvenliğinin artırılması, dijital kimliklerin - ASRock Z87 Pro4 | Quick Installation Guide - Page 107
한국어 Z87 Pro4 1 개요 ASRock Z87 Pro4 ASRock ASRock BIOS ASRock ASRock VGA 카드와 CPU ASRock http://www.asrock.com. 1.1 • ASRock Z87 Pro4 ATX ASRock Z87 Pro4 ASRock Z87 Pro4 지원 CD ATA (SATA 2 I/O 1 개 105 - ASRock Z87 Pro4 | Quick Installation Guide - Page 108
CPU 그래픽 106 • ATX 100 • LGA1150 4 세대 Intel® CoreTM i7 / i5 / i3 / Xeon® / Pentium® / Celeron® 지원 • Digi 6 Intel® Turbo Boost 2.0 Intel®K CPU 지원 • Intel® Z87 DDR3 DDR3 DIMM 슬롯 4 개 • DDR3 2933+(OC)/2800(OC)/2400(OC)/2133(OC)/1866 (OC)/1600/1333/1066 비 -ECC 32GB Intel® Extreme - ASRock Z87 Pro4 | Quick Installation Guide - Page 109
Z87 Pro4 한 국 어 1792MB • VGA D-Sub, DVI-D 및 HDMI HDMI 1920x1200 @ 60Hz) • DVI-D 1920x1200 @ 60Hz) • D-Sub 1920x1200 @ 60Hz) • Auto Lip Sync, Deep Color (12bpc), xvYCC 및 HBR (High Bit Rate Audio)(HDMI HDMI DVI-D 및 HDMI HDCP DVI-D 및 HDMI Full HD 1080p Blu-ray (BD) 오디오 7.1 CH HD - ASRock Z87 Pro4 | Quick Installation Guide - Page 110
한 국 어 BIOS CD • HD • SATA3 6.0 Gb/s 커넥터 6 개가 RAID (RAID 0, RAID 1, RAID 5, RAID 10, Intel 12 및 Intel NCQ, AHCI • IR 헤더 1 개 • COM 1 LED 헤더 1 개 • TPM 헤더 1 개 • CPU 2 개 (1 x 4 핀 , 1 x 3 2 개 (1 x 4 핀 , 1 x 3 1 개 (3 핀 ) • 24 핀 ATX 1 개 • 8 핀 12V 1 1 개 • SPDIF 1 개 • USB 2.0 헤더 2 개 ( - ASRock Z87 Pro4 | Quick Installation Guide - Page 111
Z87 Pro4 OS 인증 • CPU 12V, +5V, +3.3V, CPU Vcore • Microsoft® Windows® 8 / 8 64 비트 / 7 / 7 64 • FCC, CE, WHQL • ErP/EuP ErP/EuP http://www.asrock.com BIOS Untied Overclocking Technology Windows® 32 4GB Windows® 64 ASRock XFast RAM Windows 한 국 어 109 - ASRock Z87 Pro4 | Quick Installation Guide - Page 112
1.3 3 1 과 핀 2 Clear CMOS 점퍼 (CLRCMOS1) (1 23 기본값 Clear CMOS CLRCMOS1 CMOS 15 CLRCMOS1 의 핀 2 와 핀 3 을 5 BIOS CMOS BIOS CMOS CMOS CMOS 한 국 어 110 - ASRock Z87 Pro4 | Quick Installation Guide - Page 113
Z87 Pro4 1.4 9 핀 PANEL1) (1 16 PWRBTN RESET PLED LED LED S1/S3 LED S4 S5 LED HDLED LED LED LED LED LED 한국어 111 - ASRock Z87 Pro4 | Quick Installation Guide - Page 114
한 국 어 전원 LED 헤더 (3 핀 PLED1) (1 17 LED 시리얼 ATA3 커넥터 (SATA3_0: SATA3_0 1 11 번 항 목 참조 ) (SATA3_1: SATA3_1 (1 20 (SATA3_2: (1 12 (SATA3_3: 1 15 (SATA3_4: 1 13 (SATA3_5: 1 14 SATA3_2 SATA3_3 SATA3_4 SATA3_5 이들 6 개의 SATA3 6.0 Gb/s SATA USB 2.0 헤더 (9 핀 - ASRock Z87 Pro4 | Quick Installation Guide - Page 115
9 핀 HD_AUDIO1) (1 28 Z87 Pro4 한국어 111 HDA 222 AC'97 A. Mic_IN (MIC) 를 MIC2_L B. Audio_R (RIN) 을 OUT2_R Audio_L FrontMic Recording Volume 4 핀 SPEAKER1) (1 18 SPDIF 2 핀 SPDIF_OUT1) (1 27 4 핀 CHA_FAN1) (1 19 (3 핀 CHA_FAN2) (1 29 HDMI VGA 카드의 SPDIF_OUT 113 - ASRock Z87 Pro4 | Quick Installation Guide - Page 116
(3 핀 PWR_FAN1) (1 1 CPU 4 핀 CPU_FAN1) (1 3 (3 핀 CPU_FAN2) (1 4 4 핀 CPU 3 핀 CPU 1-3 한 국 어 ATX 24 핀 ATXPWR1) (1 7 12 24 1 13 ATX 12V 8 핀 ATX12V1) (1 2 5 핀 IR1) (1 24 24 핀 ATX 20 핀 ATX 1 과 핀 13 8 핀 ATX 12V 4 핀 ATX 1 과 핀 5 9 핀 COM1) (1 25 - ASRock Z87 Pro4 | Quick Installation Guide - Page 117
TPM 헤더 (17 핀 TPMS1) (1 26 Z87 Pro4 TPM(Trusted Platform Module TPM 한국어 115 - ASRock Z87 Pro4 | Quick Installation Guide - Page 118
日本語 1 ͡Ίʹ ASRock Z87 Pro4 ASRock Z87 Pro4 ASRock BIOS VGA CPU http://www.asrock.com. 1.1 • ASRock Z87 Pro4 ATX ASRock Z87 Pro4 ASRock Z87 Pro4 αϙʔτ CD • 2 x γϦΞϧ ATAʢSATA 1 x I/O 116 - ASRock Z87 Pro4 | Quick Installation Guide - Page 119
Z87 Pro4 日本語 1.2 仕様 • ATX 100 CPU • LGA1150 4 ੈͷ Intel® CoreTM i7 / i5 / i3 / Xeon® / Pentium® / Celeron® ʹରԠ • 6 • Intel 2.0 • Intel®K CPU Λαϙʔτ νοϓηοτ • Intel®Z87 ϝϞϦ DDR3 4 x DDR3 DIMM DDR3 2933+(OC)/2800(OC)/2400(OC)/2133(OC)/ 1866(OC)/1600/1333/1066 ϊϯ ECC - ASRock Z87 Pro4 | Quick Installation Guide - Page 120
• 3 ͭͷ VGA D-SubɺDVI-DɺHDMI • 3 HDMI 1920x1200 @60Hz • DVI-D 1920x1200 @60Hz • D-Sub 1920x1200 @60Hz • HDMIʢHDMI 12bpcʣɺxvYCCɺHBR DVI-D ͱ HDMI ϙʔτͰɺHDCP DVI-D ͱ HDMI HD 1080p BD Ի • 7.1 CH HD Realtek ALC892 LAN LAN 10/100/1000 Mb PHY Intel® I217V • Intel 802.3az PXE - ASRock Z87 Pro4 | Quick Installation Guide - Page 121
日本語 Z87 Pro4 BIOS CD • HD • 6 x SATA3 6.0 Gb RAID (RAID 0ɺRAID 1ɺ RAID 5ɺRAID 10ɺ Intel 12ɺIntel NCQɺAHCI • 1 x IR 1 x COM 1 x LED 1 x TPM 2 x CPU 1 x 4 ϐϯɺ1 x 3 ϐϯʣ • 2 x 1 x 4 ϐϯɺ1 x 3 ϐϯʣ • 1 x 3 ϐϯʣ • 1 x 24 ϐϯ ATX 1 x 8 ϐϯ 12V 1 x 1 x SPDIF Out 2 x USB 2.0 ϔομʔʢ4 ͭͷ - ASRock Z87 Pro4 | Quick Installation Guide - Page 122
OS ೝূ • CPU 12Vɺ+5Vɺ+3.3VɺCPU Vcore • Microsoft® Windows® 8 / 8 64 Ϗοτ / 7 / 7 64 • FCCɺCEɺWHQL • ErP/EuP ReadyʢErP/EuP ready http://www.asrock.com BIOS Windows® 32 4GB Windows® 64 Windows ASRock XFast RAM 日本語 120 - ASRock Z87 Pro4 | Quick Installation Guide - Page 123
Z87 Pro4 1.3 3 1 ͱϐϯ 2 CMOS CLRCMOS1) ʢp.1ɺNo. 23 ࢀরʣ σϑΥϧτ CMOS ͷΫϦΞ CLRCMOS1 ɺCMOS 15 CLRCMOS1 ͷ ϐϯ 2 ͱϐϯ 3 5 BIOS CMOS BIOS CMOS CMOS CMOS 日本語 121 - ASRock Z87 Pro4 | Quick Installation Guide - Page 124
日本語 1.4 9 ϐϯύωϧ 1ʣ ʢp.1ɺNo. 16 ࢀরʣ PWRBTN RESET PLED LED LED S1/S3 LED S4 S5 LED HDLED LED LED LED LED LED 122 - ASRock Z87 Pro4 | Quick Installation Guide - Page 125
Z87 Pro4 日本語 ి ݯLED ϔομʔ ʢ3 ϐϯ PLED1ʣ ʢp.1ɺNo. 17 ࢀরʣ LED γϦΞϧ ATA3 ίωΫλʔ ʢSATA3_0ɿ p.1ɺNo. 11 ࢀরʣ SATA3_0 (SATA3_1: p.1ɺNo. 20 ࢀরʣ ʢSATA3_2ɿ SATA3_1 p.1ɺNo. 12 ࢀরʣ ʢSATA3_3ɿ p.1ɺNo. 15 ࢀরʣ ʢSATA3_4ɿ p.1ɺNo. 13 ࢀরʣ ʢSATA3_5ɿ p.1ɺNo. - ASRock Z87 Pro4 | Quick Installation Guide - Page 126
) Λ OUT2_L C. Ξʔε (GND) ΛΞʔε (GND D. MIC_RET ͱ OUT_RET ɺHD AC`97 E Realtek FrontMic 4 ϐϯ SPEAKER1ʣ ʢp.1ɺNo. 18 ࢀরʣ SPDIF Out 2 ϐϯ SPDIF_OUT1ʣ ʢp.1ɺNo. 27 ࢀরʣ 4 ϐϯ CHA_FAN1ʣ ʢp.1ɺNo. 19 ࢀরʣ ʢ3 ϐϯ CHA_FAN2ʣ ʢp.1ɺNo. 29 ࢀরʣ 124 HDMI VGA Χʔυͷ SPDIF_OUT - ASRock Z87 Pro4 | Quick Installation Guide - Page 127
日本語 Z87 Pro4 ʢ3 ϐϯ PWR_FAN1ʣ ʢp.1ɺNo. 1 ࢀরʣ CPU 4 ϐϯ CPU_FAN1ʣ ʢp.1ɺNo. 3 ࢀরʣ ʢ3 ϐϯ CPU_FAN2ʣ ʢp.1ɺNo. 4 ࢀরʣ ATX 24 ϐϯ ATXPWR1ʣ ʢp.1ɺNo. 7 ࢀরʣ ATX12V 8 ϐϯ ATX12V1ʣ ʢp.1ɺNo. 2 ࢀরʣ 12 24 1 13 5 ϐϯ IR1ʣ ʢp.1ɺNo. 24 ࢀরʣ 4 ϐ ϯ CPU 3 ϐϯͷ CPU 1-3 24 ϐ ϯ ATX 20 ϐϯͷ ATX 1 ͱ 13 8 - ASRock Z87 Pro4 | Quick Installation Guide - Page 128
TPM ϔομʔ ʢ17 ϐϯ TPMS1ʣ ʢp.1ɺNo. 26 ࢀরʣ TPM TPM 日本語 126 - ASRock Z87 Pro4 | Quick Installation Guide - Page 129
简体中文 Z87 Pro4 1 简介 ASRock Z87 Pro4 ASRock ASRock BIOS ASRock ASRock VGA 卡和 CPU ASRock 网站 http://www.asrock.com。 1.1 • ASRock Z87 Pro4 主板(ATX ASRock Z87 Pro4 ASRock Z87 Pro4 2 x 串行 ATA (SATA 1 x I/O 面板 127 - ASRock Z87 Pro4 | Quick Installation Guide - Page 130
平台 CPU 扩充槽 图形 • ATX 100 容器) • 支持 LGA1150 封装第 4 代 Intel® CoreTM i7 / i5 / i3 / Xeon® / Pentium® / Celeron® • Digi Power 6 Intel® Turbo Boost 2.0 Intel® K CPU • Intel® Z87 DDR3 4 x DDR3 DIMM DDR3 2933+(OC)/2800(OC)/2400(OC)/2133(OC)/1866 (OC)/1600/1333/1066 非 ECC 32GB Intel® Extreme - ASRock Z87 Pro4 | Quick Installation Guide - Page 131
Z87 Pro4 简体中文 音频 LAN 后面板 I/O 1792MB • 三个 VGA D-Sub、DVI-D 和 HDMI HDMI 技术,60Hz 1920x1200 • 支持 DVI-D,60Hz 1920x1200 • 支持 D-Sub,60Hz 1920x1200 • 通过 HDMI HDMI Auto Lip Sync、Deep Color (12bpc), xvYCC 和 HBR DVI-D and HDMI HDCP DVI-D 和 HDMI 1080p Blu-ray (BD) 播放。 7.1 CH Realtek ALC892 • - ASRock Z87 Pro4 | Quick Installation Guide - Page 132
0、RAID 1、 RAID 5、RAID 10、Intel Rapid Storage Technology 12 和 Intel Smart Response Technology)、NCQ、AHCI 接口 • 1 x IR 接脚 • 1 x COM 1 x 电源 LED 接脚 • 1 x TPM 接脚 • 2 x CPU 1 x 4 针 , 1 x 3 针 ) • 2 x 1 x 4 针 , 1 x 3 针 ) • 1 x 3 针 ) • 1 x 24 针 ATX 1 x 8 针 12V 1 x 1 x SPDIF 2 x USB 2.0 4 个 USB - ASRock Z87 Pro4 | Quick Installation Guide - Page 133
Z87 Pro4 • CPU 12V、+5V、+3.3V、CPU Vcore • Microsoft® Windows® 8 / 8 64-bit / 7 / 7 64-bit 兼容 • FCC、CE、WHQL • ErP/EuP ErP/EuP http://www.asrock.com BIOS 4GB Windows® 32-bit Windows® 64-bit ASRock XFast RAM 来利用 Windows 简体中文 131 - ASRock Z87 Pro4 | Quick Installation Guide - Page 134
简体中文 1.3 3 1 和 针脚 2 清除 CMOS 跳线 (CLRCMOS1) (见第 1 页,第 23 个) 默认 清除 CMOS CLRCMOS1 CMOS 15 CLRCMOS1 2 和针脚 3 短接 5 BIOS CMOS BIOS CMOS CMOS CMOS 132 - ASRock Z87 Pro4 | Quick Installation Guide - Page 135
简体中文 1.4 Z87 Pro4 9 针 PANEL1) 见第 1 页,第 16 个) PWRBTN RESET PLED LED LED S1/S3 LED S4 S5) 时,此 LED 熄灭。 HDLED LED LED LED 亮起。 LED LED 133 - ASRock Z87 Pro4 | Quick Installation Guide - Page 136
简体中文 电源 LED 接脚 (3 针 PLED1) (见第 1 页,第 17 个) LED 串行 ATA3 接口 (SATA3_0: SATA3_0 见第 1 页,第 11 个) (SATA3_1: 见第 1 页,第 20 个) SATA3_1 (SATA3_2: 见第 1 页,第 12 个) (SATA3_3: 见第 1 页,第 15 个) (SATA3_4: 见第 1 页,第 13 个) (SATA3_5: 见第 1 页,第 14 个) SATA3_2 SATA3_3 SATA3_4 这六个 SATA3 6.0 Gb/s SATA - ASRock Z87 Pro4 | Quick Installation Guide - Page 137
9 针 HD_AUDIO1) (见第 1 页,第 28 个) Z87 Pro4 简体中文 111 HDA 222 AC'97 A. 将 Mic_IN (MIC) 连接到 MIC2_L。 B. 将 Audio_R (RIN) 连接到 OUT2_R,将 SPEAKER1) 见第 1 页,第 18 个) SPDIF 2 针 SPDIF_OUT1) 见第 1 页,第 27 个) 4 针 CHA_FAN1) 见第 1 页,第 19 个) (3 针 CHA_FAN2) 见第 1 页,第 29 个) HDMI VGA 卡的 SPDIF_OUT 135 - ASRock Z87 Pro4 | Quick Installation Guide - Page 138
1 页,第 1 个) CPU 4 针 CPU_FAN1) 见第 1 页,第 3 个) (3 针 CPU_FAN2) 见第 1 页,第 4 个) 4 针 CPU 3 针 CPU 1-3。 ATX 24 针 ATXPWR1) (见第 1 页,第 7 个) ATX 12V 8 针 ATX12V1) (见第 1 页,第 2 个) 5 针 IR1) (见第 1 页,第 24 个) 9 针 COM1) (见第 1 页,第 25 个) 12 24 1 13 24 针 ATX 20 针 ATX 1 和 针脚 13 8 针 ATX 12V 4 针 ATX - ASRock Z87 Pro4 | Quick Installation Guide - Page 139
TPM 接脚 (17 针 TPMS1) (见第 1 页,第 26 个) Z87 Pro4 Trusted Platform Module TPM TPM 简体中文 137 - ASRock Z87 Pro4 | Quick Installation Guide - Page 140
SJ/T 11364-2006 10 年。 简体中文 圖一 鉛 (Pb) 鎘 (Cd) 汞 (Hg Cr(VI PBB PBDE) X O O O O O X O O O O O O SJ/T 11363-2006 X SJ/T 11363-2006 2002/95/EC 138 - ASRock Z87 Pro4 | Quick Installation Guide - Page 141
繁體中文 Z87 Pro4 1 簡介 ASRock Z87 Pro4 ASRock ASRock BIOS ASRock ASRock VGA 卡及 CPU ASRock 網 站 http://www.asrock.com 1.1 • ASRock Z87 Pro4 ATX ASRock Z87 Pro4 ASRock Z87 Pro4 2 x Serial ATA (SATA 1 x I/O 139 - ASRock Z87 Pro4 | Quick Installation Guide - Page 142
規格 平台 CPU 擴充插槽 顯示卡 • ATX 100 4 代 Intel® CoreTM i7 / i5 / i3 / Xeon® / Pentium® / Celeron®(LGA1150 封裝) 6 Intel® Turbo Boost 2.0 Intel® K-Series unlocked CPU • Intel® Z87 DDR3 4 x DDR3 DIMM DDR3 2933+(OC)/2800(OC)/2400(OC)/2133(OC)/1866 (OC)/1600/1333/1066 非 ECC 32GB Intel® Extreme - ASRock Z87 Pro4 | Quick Installation Guide - Page 143
Z87 Pro4 繁體中文 音訊 LAN 後面板 I/O 1792MB • 三個 VGA D-Sub、DVI-D 及 HDMI 1920x1200 @ 60Hz HDMI 1920x1200 @ 60Hz DVI-D 1920x1200 @ 60Hz D-Sub HDMI HDMI Auto Lip Sync、Deep Color (12bpc)、xvYCC 及 HBR DVI-D 及 HDMI HDCP DVI-D 及 HDMI Full HD 1080p Blu-ray (BD) 播放 • 7.1 CH HD Realtek ALC892 - ASRock Z87 Pro4 | Quick Installation Guide - Page 144
繁體中文 BIOS CD • HD • 6 x SATA3 6.0 Gb/s RAID(RAID 0、RAID 1、 RAID 5、RAID 10、Intel 12 及 Intel NCQ、AHCI • 1 x IR 排針 • 1 x COM 1 x 電源 LED 排針 • 1 x TPM 標頭 • 2 x CPU 1 x 4-pin、1 x 3-pin) • 2 x 1 x 4-pin、1 x 3-pin) • 1 x 3-pin) • 1 x 24 pin ATX 1 x 8 pin 12V 1 x 1 x SPDIF 2 x USB 2.0 - ASRock Z87 Pro4 | Quick Installation Guide - Page 145
繁體中文 Z87 Pro4 • CPU 12V、+5V、+3.3V、CPU Vcore • 相容 Microsoft® Windows® 8 / 8 64 位元 / 7 / 7 64 位元 • FCC、CE、WHQL • ErP/EuP Ready ErP/EuP ready http://www.asrock.com BIOS 在 Windows® 32 4GB。Windows® 64 ASRock XFast RAM 運用 Windows 143 - ASRock Z87 Pro4 | Quick Installation Guide - Page 146
繁體中文 1.3 3-pin pin1 及 pin2 清除 CMOS 跳線 (CLRCMOS1 1 23) 預設 清除 CMOS CLRCMOS1 清除 CMOS 15 CLRCMOS1 上的 pin2 及 pin3 短路約 5 BIOS CMOS BIOS CMOS CMOS CMOS 144 - ASRock Z87 Pro4 | Quick Installation Guide - Page 147
繁體中文 1.4 Z87 Pro4 (9-pin PANEL1 1 16) PWRBTN RESET PLED LED LED S1/S3 LED S4 S5) 時, LED HDLED LED LED LED LED LED 145 - ASRock Z87 Pro4 | Quick Installation Guide - Page 148
繁體中文 電源 LED 排針 (3-pin PLED1 1 17) LED Serial ATA3 接頭 SATA3_0 (SATA3_0: 1 11) (SATA3_1: SATA3_1 1 20) (SATA3_2: 1 12) (SATA3_3: 1 15) (SATA3_4: 1 13) (SATA3_5: 1 14) SATA3_2 SATA3_3 SATA3_4 SATA3_5 這六組 SATA3 SATA 6.0 Gb/s USB 2.0 排針 (9-pin USB4_5 1 - ASRock Z87 Pro4 | Quick Installation Guide - Page 149
(9-pin HD_AUDIO1 1 28) Z87 Pro4 繁體中文 111 Jack Sensing HDA 222 AC'97 A. 將 Mic_IN (MIC) 連接至 MIC2_L。 B. 將 Audio_R (RIN) 連接至 OUT2_R 且將 4-pin SPEAKER1 1 18) SPDIF 2-pin SPDIF_OUT1 1 27) 4-pin CHA_FAN1 1 19) (3-pin CHA_FAN2 1 29) HDMI VGA 卡的 SPDIF_OUT 147 - ASRock Z87 Pro4 | Quick Installation Guide - Page 150
pin CPU_FAN1 1 3) (3-pin CPU_FAN2 1 4) 4-Pin CPU 3-Pin CPU Pin 1-3。 ATX 24-pin ATXPWR1 1 7) ATX 12V 8-pin ATX12V1 1 2) 12 24 1 13 (5-pin IR1 1 24) 24pin ATX 20-pin ATX Pin 1 及 Pin 13。 8-pin ATX 12V 4-pin ATX Pin 1 及 Pin 5。 (9-pin COM1 1 25) 此 COM1 148 - ASRock Z87 Pro4 | Quick Installation Guide - Page 151
TPM 標頭 (17-pin TPMS1 1 26) Z87 Pro4 TPM TPM 繁體中文 149 - ASRock Z87 Pro4 | Quick Installation Guide - Page 152
dapat menemukan kartu VGA dan daftar dukungan CPU terkini di situs web ASRock. Situs web ASRock http://www.asrock.com. 1.1 Isi Kemasan • Motherboard ASRock Z87 Pro4 (Bentuk dan Ukuran ATX) • Panduan Pemasangan Ringkas ASRock Z87 Pro4 • CD Dukungan ASRock Z87 Pro4 • 2 x Kabel Data SATA (Serial ATA - ASRock Z87 Pro4 | Quick Installation Guide - Page 153
Z87 Pro4 Bahasa Indonesia 1.2 Spesifikasi Platform CPU • Bentuk dan Ukuran ATX • Desain Premium Gold Capacitor (100% Kapasitor Polimer Konduktif berkualitas tinggi buatan Jepang) • Mendukung Intel® CoreTM i7 / i5/ i3/ Xeon®/ Pentium®/ Celeron® Generasi Ke-4 dalam Paket LGA1150 • Desain Digi - ASRock Z87 Pro4 | Quick Installation Guide - Page 154
Full HD 1080p Blu-ray (BD) dengan port DVI-D dan HDMI • Audio HD 7.1 CH dengan Perlindungan Konten (Realtek ALC892 Audio Codec) • Mendukung audio Blu-ray premium • Gigabit LAN 10/100/1000 Mb/s • Giga PHY Intel® I217V • Mendukung Teknologi Intel® Remote Wake • Mendukung Wake-On-LAN • Mendukung Energy - ASRock Z87 Pro4 | Quick Installation Guide - Page 155
Z87 Pro4 Bahasa Indonesia • Soket Audio HD: Speaker Belakang/Tengah/Bas/Saluran masuk/Speaker Depan/Mikrofon Penyimpanan • 6 x Konektor SATA3 6,0 Gb/s, mendukung RAID (RAID 0, RAID 1, RAID 5, RAID 10, Teknologi Intel Rapid Storage 12, dan Teknologi Intel Smart Response), NCQ, AHCI, dan "Hot Plug - ASRock Z87 Pro4 | Quick Installation Guide - Page 156
karena overclocking. Karena keterbatasan, ukuran memori sebenarnya mungkin kurang dari 4GB karena akan digunakan sistem berdasarkan sistem operasi Windows® 32-bit. Sistem operasi Windows® 64-bit tidak memiliki keterbatasan tersebut. Anda dapat menggunakan ASRock XFast RAM untuk memanfaatkan - ASRock Z87 Pro4 | Quick Installation Guide - Page 157
Bahasa Indonesia Z87 Pro4 1.3 Konfigurasi Jumper Gambar menunjukkan cara mengkonfigurasi jumper. Bila kosongkan CMOS tepat setelah Anda meng-update BIOS. Jika Anda harus mengosongkan CMOS setelah selesai meng-update BIOS, boot up dulu sistem, lalu matikan sebelum melakukan tindakan clear-CMOS. - ASRock Z87 Pro4 | Quick Installation Guide - Page 158
penutup jumper pada header dan konektor akan mengakibatkan kerusakan permanen pada motherboard. Header Panel Sistem (PANEL1 9-pin) (lihat hal. 1, chassis. Anda dapat mengkonfigurasi cara mematikan sistem menggunakan switch daya. RESET (Switch Atur Ulang): Sambungkan ke switch atur ulang pada panel - ASRock Z87 Pro4 | Quick Installation Guide - Page 159
Z87 Pro4 Bahasa Indonesia Header LED Daya (PLED1 3-pin) (lihat hal. USB3_8) (lihat hal. 1, No. 10) Selain empat port USB 2.0 pada panel I/O, terdapat dua header pada motherboard ini. Masingmasing header USB 2.0 dapat mendukung dua port. Selain empat port USB 3.0 pada panel I/O, terdapat dua soket - ASRock Z87 Pro4 | Quick Installation Guide - Page 160
menginstal sistem. 2. Jika Anda menggunakan panel audio AC'97, pasang ke header audio panel depan dengan melakukan langkah-langkah di 158 Sambungkan speaker chassis ke header ini. Sambungkan konektor SPDIF_OUT kartu VGA HDMI ke header ini menggunakan kabel. Sambungkan kabel kipas ke konektor kipas, - ASRock Z87 Pro4 | Quick Installation Guide - Page 161
Bahasa Indonesia Z87 Pro4 (PWR_FAN1 3-pin) (lihat hal. 1, No. 1) Konektor Kipas CPU (CPU_FAN1 4-pin) (lihat hal. 3, No. 1) (CPU_FAN2 3-pin) (lihat hal. 4, No. 1) Konektor Daya ATX (ATXPWR1 24-pin) (lihat hal. 1, No. 7) Konektor Daya ATX 12V (ATX12V1 8-pin) (lihat hal. 1, No. 2) Header Modul - ASRock Z87 Pro4 | Quick Installation Guide - Page 162
Bahasa Indonesia Header TPM (TPMS1 17-pin) (lihat hal. 1, No. 26) Konektor ini mendukung sistem TPM (Trusted Platform Module), yang dapat menyimpan kode kunci, sertifikat digital, sandi, dan data secara aman. Sistem TPM juga membantu meningkatkan keamanan jaringan, melindungi identitas digital, - ASRock Z87 Pro4 | Quick Installation Guide - Page 163
or want to know more about ASRock, you're welcome to visit ASRock's website at http://www.asrock.com; or you may contact your dealer for further information. For technical questions, please submit a support request form at http://www.asrock.com/support/tsd.asp ASRock Incorporation 2F., No.37, Sec
-
 1
1 -
 2
2 -
 3
3 -
 4
4 -
 5
5 -
 6
6 -
 7
7 -
8
-
9
-
10
-
11
-
12
-
13
-
14
-
15
-
16
-
17
-
18
-
19
-
20
-
21
-
22
-
23
-
24
-
25
-
26
-
27
-
28
-
29
-
30
-
31
-
32
-
33
-
34
-
35
-
36
-
37
-
38
-
39
-
40
-
41
-
42
-
43
-
44
-
45
-
46
-
47
-
48
-
49
-
50
-
51
-
52
-
53
-
54
-
55
-
56
-
57
-
58
-
59
-
60
-
61
-
62
-
63
-
64
-
65
-
66
-
67
-
68
-
69
-
70
-
71
-
72
-
73
-
74
-
75
-
76
-
77
-
78
-
79
-
80
-
81
-
82
-
83
-
84
-
85
-
86
-
87
-
88
-
89
-
90
-
91
-
92
-
93
-
94
-
95
-
96
-
97
-
98
-
99
-
100
-
101
-
102
-
103
-
104
-
105
-
106
-
107
-
108
-
109
-
110
-
111
-
112
-
113
-
114
-
115
-
116
-
117
-
118
-
119
-
120
-
121
-
122
-
123
-
124
-
125
-
126
-
127
-
128
-
129
-
130
-
131
-
132
-
133
-
134
-
135
-
136
-
137
-
138
-
139
-
140
-
141
-
142
-
143
-
144
-
145
-
146
-
147
-
148
-
149
-
150
-
151
-
152
-
153
-
154
-
155
-
156
-
157
-
158
-
159
-
160
-
161
-
162
-
163
 |
 |
Version 1.0
Published March 2013
Copyright©2013 ASRock INC. All rights reserved.
Copyright Notice:
No part of this documentation may be reproduced, transcribed, transmitted, or
translated in any language, in any form or by any means, except duplication of
documentation by the purchaser for backup purpose, without written consent of
ASRock Inc.
Products and corporate names appearing in this documentation may or may not
be registered trademarks or copyrights of their respective companies, and are used
only for identification or explanation and to the owners’ benefit, without intent to
infringe.
Disclaimer:
Specifications and information contained in this documentation are furnished for
informational use only and subject to change without notice, and should not be
constructed as a commitment by ASRock. ASRock assumes no responsibility for
any errors or omissions that may appear in this documentation.
With respect to the contents of this documentation, ASRock does not provide
warranty of any kind, either expressed or implied, including but not limited to
the implied warranties or conditions of merchantability or fitness for a particular
purpose.
In no event shall ASRock, its directors, officers, employees, or agents be liable for
any indirect, special, incidental, or consequential damages (including damages for
loss of profits, loss of business, loss of data, interruption of business and the like),
even if ASRock has been advised of the possibility of such damages arising from any
defect or error in the documentation or product.
°e terms HDMI
TM
and HDMI High-Definition Multimedia Interface, and the HDMI
logo are trademarks or registered trademarks of HDMI Licensing LLC in the United
States and other countries.
°is device complies with Part 15 of the FCC Rules. Operation is subject to the following
two conditions:
(1)
this device may not cause harmful interference, and
(2)
this device must accept any interference received, including interference that
may cause undesired operation.
CALIFORNIA, USA ONLY
°e Lithium battery adopted on this motherboard contains Perchlorate, a toxic substance
controlled in Perchlorate Best Management Practices (BMP) regulations passed by the
California Legislature. When you discard the Lithium battery in California, USA, please
follow the related regulations in advance.
“Perchlorate Material-special handling may apply, see www.dtsc.ca.gov/hazardouswaste/
perchlorate”
ASRock Website: http://www.asrock.com