Acer AL1515 AL1515 User's Guide
Acer AL1515 Manual
 |
View all Acer AL1515 manuals
Add to My Manuals
Save this manual to your list of manuals |
Acer AL1515 manual content summary:
- Acer AL1515 | AL1515 User's Guide - Page 1
(For AL1515 m and AL1515 bm 6 Power Management System ...6 Chapter 2 Display Controls 7 General Instructions ...7 Front Panel Control...8 How To Adjust A Setting...9 Adjusting The Picture ...9 Chapter 3 Technical Information 11 Specifications...11 Standard Timing Table...13 Troubleshooting ...15 - Acer AL1515 | AL1515 User's Guide - Page 2
Preface This manual is designed to assist users in setting up and using the LCD Monitor. Information in this document has been carefully frequency energy, and if not installed and used in accordance with the instruction, may cause harmful interference to radio communications. However, there is no - Acer AL1515 | AL1515 User's Guide - Page 3
following instructions carefully. This manual should be retained for future use. 1. To clean LCD Monitor screen; -- Power off LCD Monitor and or attempt to service this unit by yourself. Servicing of any nature should be performed by an authorized technician. 5. Store LCD Monitor in a room with - Acer AL1515 | AL1515 User's Guide - Page 4
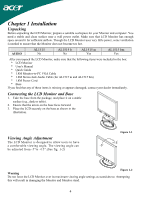
is needed to ensure that the Monitor does not become too hot. AUDIO AL1515 No AL1515 b No AL1515 m Yes AL1515 bm Yes After you unpack the LCD Monitor, make sure that the following items were included in the box: * LCD Monitor * User's Manual * Quick Guide * 1.8M Monitor-to-PC VGA Cable * 1.8M - Acer AL1515 | AL1515 User's Guide - Page 5
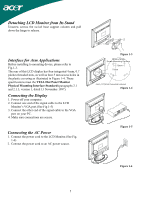
Detaching LCD Monitor from Its Stand Unscrew screws the swivel base support column and pull down the hinge to dated 13 November 1997). Connecting the Display 1. Power off your computer. 2. Connect one end of the signal cable to the LCD Monitor's VGA port.(See Fig 1-5) 3. Connect the other end of - Acer AL1515 | AL1515 User's Guide - Page 6
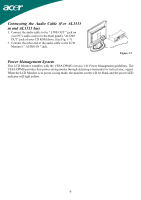
the Audio Cable (For AL1515 m and AL1515 bm) 1. Connect the audio cable to the " LINE OUT " jack on your PC's audio card or to the front panel's "AUDIO OUT" jack of your CD ROM drive. (See Fig. 1-7) 2. Connect the other end of the audio cable to the LCD Monitor's " AUDIO IN " jack. Figure - Acer AL1515 | AL1515 User's Guide - Page 7
Chapter 2 Display Controls General Instructions Press the power button to turn the monitor on or off. The other control buttons are located at front panel of the monitor (See Figure 2-1). By changing these settings, the picture can be adjusted to your personal preferences. The power cord should be - Acer AL1515 | AL1515 User's Guide - Page 8
activate the Auto Adjustment function. The Auto Adjustment function is used to set the HPos, VPos, Clock and Focus. NOTES ‧ Do not install the monitor in a location near heat sources such as radiators or air ducts, or in a place subject to direct sunlight, or excessive dust or mechanical vibration - Acer AL1515 | AL1515 User's Guide - Page 9
How To Adjust A Setting 1. Press the MENU-button to activate the OSD window. 2. Press < or > to select the desired function. 3. Press the MENU-button to select the function that you want to adjust. 4. Press < or > to change the settings of the current function. 5. To exit and save, select the exit - Acer AL1515 | AL1515 User's Guide - Page 10
N/A English N/A N/A Deutsch N/A Français N/A Español N/A Italiano N/A N/A 日本語 H. Position Multi-language selection. Adjust the horizontal position of the OSD. V. Position Adjust the vertical position of the OSD. OSD Timeout Adjust the OSD timeout. N/A Auto Config Auto Adjust the H/V Position - Acer AL1515 | AL1515 User's Guide - Page 11
16.7M with FRC or Dithering Video Input Signal Input Impedance Polarity Amplitude Multi-mode Supported Analogue RGB 0.7Vp-p 75 Ohm ± 2% Positive, Negative 0 - 0.7 ± 0. Power switch On/Off switch with LED indicator Audio (AL1515 m/AL1515 bm) Input 500mVrms Output 1W+1W OSD Brightness - Acer AL1515 | AL1515 User's Guide - Page 12
AC Input end of AC power cord. Sync Input Signal Polarity Plug & Play Separate TTL compatible horizontal and vertical synchronization Positive and negative Supports VESA DDC2B functions External Connection Power Input (AC input) Video Cable Audio Cable AC socket 1.8M with 15-pin D-sub connector - Acer AL1515 | AL1515 User's Guide - Page 13
Standard Timing Table If the selected timing is NOT included in table below, this LCD monitor will use the most suitable available timing. TIMING FH(KHZ) SYNC TOTAL FV(HZ) POLARITY (DOT/ LINE) ACTIVE (DOT/ LINE) SYNC WIDTH (DOT/LINE) FRONT - Acer AL1515 | AL1515 User's Guide - Page 14
TIMING FH(KHZ) SYNC TOTAL ACTIVE SYNC FRONT BACK PIXEL FV(HZ) POLARITY (DOT/ (DOT/ WIDTH PORCH PORCH FOREQ LINE) LINE) (DOT/LINE) (DOT/LINE) (DOT/LINE) (MHZ) 800x600 46.875 + 1056 800 80 VESA-600-75Hz 75 + 625 600 3 1024x768 48.363 - 1344 1024 136 XGA 60.004 - 806 - Acer AL1515 | AL1515 User's Guide - Page 15
Troubleshooting This LCD Monitor has pre-adjusted using factory standard VGA timings. Due card is selected. Attention This LCD Monitor Supports Multiple VGA Modes. Refer to the Standard Timing Table for a listing of modes supported by this LCD Monitor. PROBLEM Picture is unclear and unstable The
-
 1
1 -
 2
2 -
 3
3 -
 4
4 -
 5
5 -
 6
6 -
 7
7 -
8
-
9
-
10
-
11
-
12
-
13
-
14
-
15
 |
 |

1
Table of Contents
Preface
...............................................................................................................................
2
FCC Statement Warning
.......................................................................................................................
2
Canadian DOC Notice
..........................................................................................................................
2
Important Safety Instructions
................................................................................................................
3
Chapter 1 Installation
.......................................................................................................
4
Unpacking
.............................................................................................................................................
4
Connecting the LCD Monitor and Base
................................................................................................
4
Viewing Angle Adjustment
...................................................................................................................
4
Detaching LCD Monitor from Its Stand
................................................................................................
5
Interface for Arm Applications
.............................................................................................................
5
Connecting the Display
.........................................................................................................................
5
Connecting the AC Power
.....................................................................................................................
5
Connecting the Audio Cable (For AL1515 m and AL1515 bm)
...........................................................
6
Power Management System
..................................................................................................................
6
Chapter 2 Display Controls
...............................................................................................
7
General Instructions
..............................................................................................................................
7
Front Panel Control
...............................................................................................................................
8
How To Adjust A Setting
......................................................................................................................
9
Adjusting The Picture
...........................................................................................................................
9
Chapter 3 Technical Information
...................................................................................
11
Specifications
......................................................................................................................................
11
Standard Timing Table
........................................................................................................................
13
Troubleshooting
..................................................................................................................................
15
English