Acer AL1717 AL1717 User's Guide
Acer AL1717 Manual
 |
View all Acer AL1717 manuals
Add to My Manuals
Save this manual to your list of manuals |
Acer AL1717 manual content summary:
- Acer AL1717 | AL1717 User's Guide - Page 1
LCD monitors 1 Introduction 2 Features 2 Unpacking 3 Attaching/Removing the base 4 Screen position adjustment 4 Connecting the power cord 5 Safety precaution 5 Cleaning your monitor 5 Preset modes 6 Power saving 7 DDC ...7 Installation 8 User controls 9 Troubleshooting 13 Specification - Acer AL1717 | AL1717 User's Guide - Page 2
with LCD monitor and do not indicate a problem. NOTES · Due to the nature of the fluorescent light, the screen may flicker during initial use. Turn off the Power Switch and then turn it on again to make sure the flicker disappears. · You may find slightly uneven brightness on the screen depending - Acer AL1717 | AL1717 User's Guide - Page 3
color TFT LCD monitor. The AL1717 monitor provides flicker-free and color images at optional resolutions. Through this user guide, we will introduce you step-by-step all the features, functions and technical specifications of the LCD monitor. Surely you will have a refreshing experience working with - Acer AL1717 | AL1717 User's Guide - Page 4
items are present when you unpack the box, and save the packing materials in case you will need to ship or transport the monitor in future. · LCD Monitor · AC Power Cord Speakers · 15-pin D-Sub Cable · DVI Cable · Audio Cable (Only Dual-Input Model) · User Manual · Quick Start Guide E-3 - Acer AL1717 | AL1717 User's Guide - Page 5
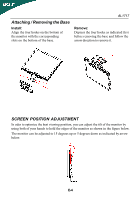
four hooks on the bottom of the monitor with the corresponding slots on the bottom of the base. AL1717 Remove: Depress the four hooks as indicated first before removing the base and follow the arrow direction to remove it. SCREEN POSITION ADJUSTMENT In oder to optimize the best viewing position - Acer AL1717 | AL1717 User's Guide - Page 6
AL1717 CONNECTING THE POWER CORD · Check first to make sure that the power cord you use is the correct type required for your area. · This monitor has a universal power supply that allows operation in either 100/120V AC or 220/240 V AC voltage area. No user-adjustment is required. · Plug one end of - Acer AL1717 | AL1717 User's Guide - Page 7
AL1717 PRESET MODES To reduce the need for adjustment for different modes, the monitor has default setting modes that are most commonly used as given in the table below. For optimum adjustment, the user is suggested to perform the Auto Setup under Windows "Full Screen" pattern. If the mode in use - Acer AL1717 | AL1717 User's Guide - Page 8
AL1717 POWER SAVING The monitor will be driven into "Power Saving" mode by the control signal from the display controller, as indicated by the amber-color power LED. State ON Active OFF Powe r Consumption Normal < 3 W LED Light Green Amber The power saving states will be kept until a control - Acer AL1717 | AL1717 User's Guide - Page 9
grounded AC outlet. 3. Connect the Audio Cable. 4. Power-ON Monitor and Computer Power-ON the monitor first, then power-ON the computer. This sequence is very important. 5. If the monitor still does not function properly, please refer to the troubleshooting section to diagnose the problem. E-8 - Acer AL1717 | AL1717 User's Guide - Page 10
USER CONTROLS AL1717 3 4 5 6 12 Front Panel Controls 1. Power Switch: To turn ON or OFF the power. 2. Power LED: Lights up to indicate the power is turned ON. 3. Auto Adjust button / Exit: 1)When OSD menu is in active status, this button will act as EXIT-KEY (EXIT OSD menu). 2)When OSD menu - Acer AL1717 | AL1717 User's Guide - Page 11
control LEDS Main Menu Icon Sub Menu Icon Sub Menu Item Description Contrast Adjusts the contrast between the foreground and background of the screen image. Brightness Adjusts the background brightness of the screen image. Focus Adjusts picture Focus. (available in Analog mode only) Clock - Acer AL1717 | AL1717 User's Guide - Page 12
AL1717 Main Menu Icon Sub Menu Icon Sub Menu Item Description H. Position Adjust the horizontal position. (available in Analog mode only) V. Position N/A Warm N/A Cool Adjust the vertical position. (available in Analog mode only) Set the color temperature to warm white. Set the color - Acer AL1717 | AL1717 User's Guide - Page 13
Reset N/A Exit Select input signal from analog (D-Sub) Select input signal from digital (DVI) Show the resolution, H/V frequency and input port of current input timing. Clear each old status of Auto-configuration and set the color temperature to Cool. Save user adjustment and OSD disappear. E-12 - Acer AL1717 | AL1717 User's Guide - Page 14
AL1717 TROUBLESHOOTING Before sending your LCD monitor for servicing, please check the troubleshooting list below to see if you can self-diagnose the problem. Problems Current Status Remedy LED ON · Using OSD, adjust brightness and contrast to maximum or reset to their default settings. LED OFF - Acer AL1717 | AL1717 User's Guide - Page 15
Resolution 1280 x 1024 @75Hz Plug & Play VESA DDC/DDC2B ON Mode EPA ENERGY STAR OFF Mode < 45W < 3W Input Connector D-Sub 15pin DVI-D 24pin (Only Dual-Input Model) Input Video Signal Analog:0.7Vp-p(standard), 75 OHM, Positive Digital signal (Only Dual-Input Model) Maximum Screen Size Power - Acer AL1717 | AL1717 User's Guide - Page 16
4kg Unit (net) Switch Auto Adjust Key >/ Volume
-
 1
1 -
 2
2 -
 3
3 -
 4
4 -
 5
5 -
 6
6 -
 7
7 -
8
-
9
-
10
-
11
-
12
-
13
-
14
-
15
-
16
 |
 |

Special notes on LCD monitors
................................................................
1
Introduction
.............................................................................................
2
Features
..................................................................................................
2
Unpacking
...............................................................................................
3
Attaching/Removing the base
..................................................................
4
Screen position adjustment
.......................................................................
4
Connecting the power cord
......................................................................
5
Safety precaution
....................................................................................
5
Cleaning your monitor
..............................................................................
5
Preset modes
..........................................................................................
6
Power saving
..........................................................................................
7
DDC
.......................................................................................................
7
Installation
...............................................................................................
8
User controls
...........................................................................................
9
Troubleshooting
.....................................................................................
13
Specification
..........................................................................................
14
TABLE OF CONTENTS