Acer AL1916W User Guide
Acer AL1916W - Ab - 19" LCD Monitor Manual
 |
UPC - 099802664817
View all Acer AL1916W manuals
Add to My Manuals
Save this manual to your list of manuals |
Acer AL1916W manual content summary:
- Acer AL1916W | User Guide - Page 1
Cleaning Safety SPECIAL NOTES ON LCD MONITORS Components and Accessories Usage Installation Guide Adjustment of Display Operation Adjustment of Screen Attachment Plug and Play Power Saver Troubleshooting Technical Specifications Display Mode 1 1 1 1 1 2 2 2 3 4 6 6 7 7 7 8 9 - Acer AL1916W | User Guide - Page 2
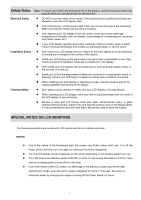
exclusively used to clean the display. SPECIAL NOTES ON LCD MONITORS The following symptoms are normal with LCD monitor and do not indicate a problem. NOTES Due to the nature of the fluorescent light, the screen may flicker during initial use. Turn off the Power Switch and then turn it on again to - Acer AL1916W | User Guide - Page 3
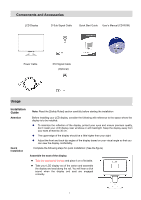
LCD Display D-Sub Signal Cable Quick Start Guide User's Manual (CD-ROM) Power Cable DVI Signal Cable (Optional) Usage Installation Guide Attention Quick Installation Note: Read the [Safety Rules] section carefully before starting the installation Before installing your LCD display - Acer AL1916W | User Guide - Page 4
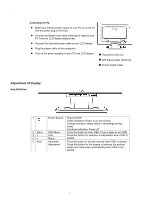
off and the power plug is removed. Connect and fasten both ends of the signal cable to your PC host and LCD display respectively. Connect the attached power cable to your LCD display. Plug the power cable to the receptacle. Turn on the power supplies of your PC and LCD display. X Transformer DC end - Acer AL1916W | User Guide - Page 5
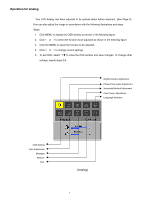
function to be adjusted. 4. Click < or > to change current settings. 5. To exit OSD, select " " to close the OSD window and save changes. To change other settings, repeat steps 2-4. Bright/Contract Adjustment Phase/Clock pulse Adjustment Horizontal/Vertical Adjustment Color Temp. Adjustment Language - Acer AL1916W | User Guide - Page 6
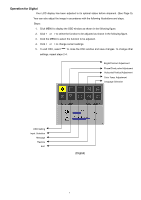
exit OSD, select " " to close the OSD window and save changes. To change other settings, repeat steps 2-4. Bright/Contract Adjustment Phase/Clock pulse Adjustment Horizontal/Vertical Adjustment Color Temp. Adjustment Language Selection OSD Setting Input Selection Message Restore Exit (Digital) 5 - Acer AL1916W | User Guide - Page 7
and focus automatically (for analog input only) N/A Analog Digital Select the input source you want (for DVI Input only) N/A Message N/A Restore N/A Exit Display resolution, H/V frequency and the input port used for current input timing function Restore to factory settings Close the OSD window - Acer AL1916W | User Guide - Page 8
, turn off the LCD display power supply when it is not used or when remaining idle for a long time. Check that the power switch is turned on. Make sure that the power cable is connected. Check that the power switch is turned on. Make that the power cable is connected. Ensure that the signal cable is - Acer AL1916W | User Guide - Page 9
Technical Specifications LCD Panel (Back Light Source) Panel Dimension Max. Resolution Max. Pixel Pixel Span Brightness Contrast LC Response Time Visual Angle Effective Display Diagonal 484mm (19 inch) LCD display 1,440 x 900/ WXGA+ Up to 16.2M true color Horizontal 0.285mm x Vertical 0.285mm 300 - Acer AL1916W | User Guide - Page 10
same as one of the following reference signal modes, the screen will be adjusted automatically. If not, the screen will not display or only the LED lights will display. For more information about the adjustment mode, refer to the instructions of your display card. Hor. Vert. Pixel SYNC Polarity
-
 1
1 -
 2
2 -
 3
3 -
 4
4 -
 5
5 -
 6
6 -
 7
7 -
8
-
9
-
10
 |
 |

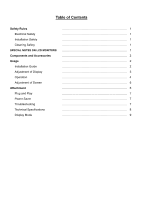
Table of Contents
Safety Rules
……………………………………………………………
1
Electrical Safety
……………………………………………………………
1
Installation Safety
……………………………………………………………
1
Cleaning Safety
……………………………………………………………
1
SPECIAL NOTES ON LCD MONITORS
……………………………………………………………
1
Components and Accessories
……………………………………………………………
2
Usage
……………………………………………………………
2
Installation Guide
……………………………………………………………
2
Adjustment of Display
……………………………………………………………
3
Operation
……………………………………………………………
4
Adjustment of Screen
……………………………………………………………
6
Attachment
……………………………………………………………
6
Plug and Play
……………………………………………………………
7
Power Saver
……………………………………………………………
7
Troubleshooting
……………………………………………………………
7
Technical Specifications
……………………………………………………………
8
Display Mode
……………………………………………………………
9