Acer AL2017 AL2017 User's Guide
Acer AL2017 Manual
 |
View all Acer AL2017 manuals
Add to My Manuals
Save this manual to your list of manuals |
Acer AL2017 manual content summary:
- Acer AL2017 | AL2017 User's Guide - Page 1
1 Special notes on LCD monitors 2 Package contents 2 Installation instructions 3 Placement 3 Installation 3 External controls 4 Image adjustment 5 Screen adjustment 7 Attachments 8 Plug and play 8 Power saver 8 Troubleshooting 8 Technical specifications - Acer AL2017 | AL2017 User's Guide - Page 2
and contact your authorized dealer or service center. Installation safety Don't touch your LCD monitor with your fingers or any hard object structure supporting the LCD monitor. Cleaning safety Don't spray cleanser or water onto your LCD monitor or its case. When cleaning your LCD monitor, - Acer AL2017 | AL2017 User's Guide - Page 3
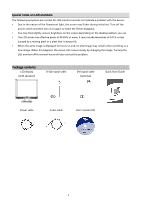
. When this happens, the screen will recover slowly by changing the image. Turning the LCD monitor off for several hours will also correct this problem. Package contents LCD display (with speakers) D-Sub signal cable DVI signal cable (optional) Quick Start Guide Power cable Audio cable User - Acer AL2017 | AL2017 User's Guide - Page 4
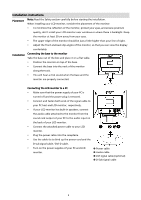
instructions Placement Note: Read the Safety section carefully before starting the installation. When installing your LCD monitor, consider the placement of the monitor: To minimize the reflection of the monitor, protect your eyes, and ensure premium quality, don't install your LCD monitor - Acer AL2017 | AL2017 User's Guide - Page 5
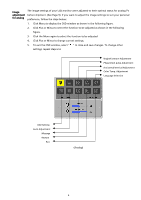
this button and click < and > to adjust volume when OSD is not started (for the model with speakers only). Press this button to exit the manual when OSD is started. Press this button for the display to optimize the position, phase and clock pulse automatically when OSD is not started. 6 Speaker - Acer AL2017 | AL2017 User's Guide - Page 6
Image adjustment for analog The image settings of your LCD monitor were adjusted to their optimal status for analog TV before shipment. (See Page 9). If you want to adjust the image settings to suit your personal - Acer AL2017 | AL2017 User's Guide - Page 7
Image adjustment for digital The image settings of your LCD monitor were adjusted to their optimal status for digital TV before shipment. (See Page 9). If you want to adjust the image settings to suit your personal - Acer AL2017 | AL2017 User's Guide - Page 8
Screen adjustment Function Definition Primary directory symbol Secondary directory symbol N/A N/A Secondary directory items Description Contrast Adjusts the contrast between the foreground and background of an image on the screen. Brightness Adjusts the background brightness of the screen. - Acer AL2017 | AL2017 User's Guide - Page 9
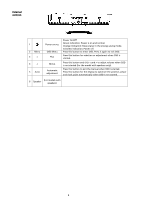
Attachments Plug and play Power saver Troubleshooting Power LED does not light Icon off Color your computer can use the self-setting function of the LCD monitor. The LCD monitor has a built-in Power Control System (Power Saver). When the LCD monitor is not operated for a period of time, the Power - Acer AL2017 | AL2017 User's Guide - Page 10
Technical specifications Panel dimension Diagonal 510.3 mm (20.1 inch) LCD monitor Max. resolution 1,400 x 1,050 / SXGA Max. pixel Up to 16.2 M true color LCD panel (backlight source) Pixel span Brightness Contrast Horizontal 0.291mm x Vertical 0.291mm 300 cd/m2 600 : 1 LC response time 8 - Acer AL2017 | AL2017 User's Guide - Page 11
not, the screen will not display or only the LED lights will display. For more information about the adjustment mode, refer to the instructions of your display card. Display Mode Hor. Frequency Vert. Frequency Pixel Frequency SYNC Polarity (kHz) (Hz) (MHz) (H/V) VESA VGA 640x480 31.469 59
-
 1
1 -
 2
2 -
 3
3 -
 4
4 -
 5
5 -
 6
6 -
 7
7 -
8
-
9
-
10
-
11
 |
 |

Table of Contents
Safety
………………………………………………………………
1
Electrical safety
………………………………………………………………
1
Installation safety
………………………………………………………………
1
Cleaning safety
………………………………………………………………
1
Special notes on LCD monitors
………………………………………………………………
2
Package contents
………………………………………………………………
2
Installation instructions
………………………………………………………………
3
Placement
………………………………………………………………
3
Installation
………………………………………………………………
3
External controls
………………………………………………………………
4
Image adjustment
………………………………………………………………
5
Screen adjustment
………………………………………………………………
7
Attachments
………………………………………………………………
8
Plug and play
………………………………………………………………
8
Power saver
………………………………………………………………
8
Troubleshooting
………………………………………………………………
8
Technical specifications
………………………………………………………………
9
Display modes
………………………………………………………………
10