Acer AL532 AL532 User Guide
Acer AL532 Manual
 |
View all Acer AL532 manuals
Add to My Manuals
Save this manual to your list of manuals |
Acer AL532 manual content summary:
- Acer AL532 | AL532 User Guide - Page 1
List 1 Chapter 2 Installation 2.1 Connect your monitor to computer 2 Chapter 3 Over view of your monitor 3.1 Front Panel over view 3 3.2 Rear Preset modes timing chart 7 Chapter 5 Technical information 5.1 Products Specifications 8 5.2 Signal Connector Pin Assignment 9 5.3 Troubleshooting 10 - Acer AL532 | AL532 User Guide - Page 2
installation. This equipment generates, uses and can radiate radio frequency energy and, if not installed and used in accordance with the instructions, may cause harmful interference to radio communications. However, there is no guarantee that interference will not occur in a particular installation - Acer AL532 | AL532 User Guide - Page 3
recommended by the manufacturer or sold with monitor. Wall or shelf mounting should follow the manufacturer's instructions, and should use a mounting kit all servicing to qualified service personnel. 9.Unplug this monitor from the wall outlet and refer servicing to qualified service personnel - Acer AL532 | AL532 User Guide - Page 4
9x/2000 compatible & VESA Display Data Channel (DDC)1/2B compatible. 1.2 Checking List Please make sure the following items are included with your LCD monitor: RYour monitor RAC Adapter RAC Power cord RSignal cable Raudio cable If any of these items are missing ,please contact with your dealer for - Acer AL532 | AL532 User Guide - Page 5
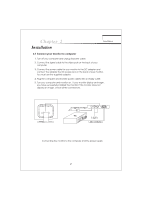
jack on the back of your monitor. You must use the supplied adapter. 4. Plug the computer and monitor power cables into a nearby outlet. 5. Turn your computer and monitor on , if your monitor display an image , you have successfully installed the monitor. If the monitor does not display an image - Acer AL532 | AL532 User Guide - Page 6
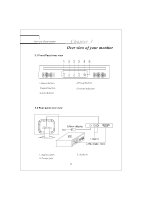
Over view of your monitor Chapter 3 Over view of your monitor 3.1 Front Panel over view 1 223 45 MENU 1.Menu Button 2.Select Button 3.Auto Button AUTO 4.Power Button 5.Power indicator 3.2 Rear panel over view 1. Signal cable 2. Power jack 3. Audio in 3 - Acer AL532 | AL532 User Guide - Page 7
. This feature adjust the button to increase the volume and adjust button to decrease the volume . The following features can all be accessed using your monitors on screen menu system. Once are finished. Making adjustments to a feature, pushing the exit button to turn off the menu Please follow the - Acer AL532 | AL532 User Guide - Page 8
OPERATION Direct - Access Features 1. Main menu OSD main menu of controls gives you an overview of the selection of controls available. When you want to make adjustment of the screen Image , press and release button Menu BRIGHTNESS 2. Brightness Adjust the overall image and background screen - Acer AL532 | AL532 User Guide - Page 9
OPERATION Direct - Access Features RED Select user mode User color you can adjust to individual color gum intensity by yourself. Increase or decrease red .green or blue depending upon Which color is selected . This control adjusts the color temperature of the screen image this item are preset by - Acer AL532 | AL532 User Guide - Page 10
OPERATION Direct - Access Features 4.6 Preset Modes Timing Chart Resolution 720X400 640X480 640X480 640X480 800X600 800X600 800X600 1024X768 1024X768 1024X768 Horizontal 31.47KHz 31.47KHz 37.86KHz 37.5KHz 37.88KHz 48.08KHz 46.87KHz 48.36KHz 56.48KHz 60.02KHz Ver tical 70Hz 60Hz 72.8Hz 75Hz 60. - Acer AL532 | AL532 User Guide - Page 11
OPERATION Direct - Access Features 5.1 Products Specifications Inch Size 15 Max. Resolution 1024*768@75Hz Recommend Resolution 1024*768@60Hz Horizontal Freq. 31-60KHz Vertucal Freq. 56-75Hz Active Display Area 304*228mm DOT Pitch 0.297*0.297mm Display Color 16.7M Contrast Ratio ( - Acer AL532 | AL532 User Guide - Page 12
Chapter 5 Technical Information Technical Information 5.2 Signal connector pin assignment PIN SSiiggnnaal l((DD--ssuubb)) PPIN SSiiggnnaal l((DD--ssuubb)) 1 Red 9 N5 oVcDoCnnection 2 Green 10 Ground 3 Blue 11 Ground 4 Ground 12 SDA (FOR DDC) 5 Self Test 13 H. Sync 6 Red Ground 14 V. - Acer AL532 | AL532 User Guide - Page 13
5.3 Troubleshooting Before calling for service , check the information in this section to see if you can remedy any problems by yourself. If you need assistance, please call the dealer where you purchased the LCD monitor. There is no SCREEN image u The power cord is securely connected the monitor
-
 1
1 -
 2
2 -
 3
3 -
 4
4 -
 5
5 -
 6
6 -
 7
7 -
8
-
9
-
10
-
11
-
12
-
13
 |
 |

CONTENT
Chapter 1 Introduction
Chapter 2 Installation
Chapter 3 Over view of your monitor
Chapter 4 Operation
1.1 Features
...............................................................................
1
1.2 Checking List
........................................................................
1
2.1 Connect your monitor to computer
.....................................
2
4.1 Power ON/OFF switch
........................................................
4
4.2
Power
indicator
................................................................
4
4.3
Volume
...........................................................................
4
4.4
Menu
features
.................................................................
4
4.5
OSD menu
...........................................................................
5
4.6
Preset modes timing chart
................................................
7
F.C.C. statement
Important safeguards
3.1 Front Panel over view
....................................................
3
3.2 Rear panel over view
....................................................
3
Chapter 5 Technical information
5.1 Products Specifications
5.2 Signal Connector Pin Assignment
......................................
9
5.3 Troubleshooting
...................................................................
10
........................................................
8