Acer AL707 User Guide
Acer AL707 Manual
 |
View all Acer AL707 manuals
Add to My Manuals
Save this manual to your list of manuals |
Acer AL707 manual content summary:
- Acer AL707 | User Guide - Page 1
ANGLE 6 OPERATING INSTRUCTIONS 7 GENERAL INSTRUCTIONS 7 HOW TO ADJUST A SETTING 9 ADJUSTING THE PICTURE 10 PLUG AND PLAY 11 TECHNICAL SUPPORT(FAQ 12-13 ERROR MESSAGE & POSSIBLE SOLUTION -------- 14 APPENDIX 15 SPECIFICATIONS 15-16 FACTORY PRESET TIMING TABLE 17 CONNECTOR PIN ASSIGNMENT - Acer AL707 | User Guide - Page 2
monitor, please read this manual thoroughly. This manual accordance with the instructions, may cause harmful 2. Shielded interface cables and AC power cord, if any, must be monitor to rain or moisture. Dangerously high voltages are present inside the monitor. Do not open the cabinet. Refer servicing - Acer AL707 | User Guide - Page 3
operation, use the monitor only with UL listed computers which have appropriate configured receptacles marked between 100 - 240V AC, Min. 5A. z The wall socket shall be installed near the equipment and shall be easily accessible. z For use only with the attached power adapter (Output 12Vdc) which - Acer AL707 | User Guide - Page 4
Resolutions: 1280 X 1024 @60Hz • EPA ENERGY STAR® • Ergonomic Design (TCO'99 Approved) • Space Saving, Compact Case Design CHECKING THE CONTENTS OF THE PACKAGE The product package should include the following items: 1. LCD Monitor 2. Owner's Manual 3. Power Cord 4. External Adapter 41L1700 - Acer AL707 | User Guide - Page 5
plug the other end of External adapter to LCD monitor's DC-power-input. The AC-power cord may be connected to either a wall power outlet or the power outlet socket on your PC, depending on the type of power cord supplied with your LCD monitor. NOTES A certified power supply cord has to be used with - Acer AL707 | User Guide - Page 6
Connecting the Signal Cable: the LCD monitor comes with a built-in signal cable. Plug the signal cable′s 15-pin connector into the computer's VGA port and tighten the two screws on the cable connector. Connecting the Power Cord: Plug the AC-power cord into the External Adapter. Then plug the DC-jack - Acer AL707 | User Guide - Page 7
the full face of the monitor, then adjust the monitor's angle to your own preference. • Hold the stand so you do not topple the monitor when you change the monitor's angle. • You are able to adjust the monitor's angle from -5° to 25°. Figure 3 NOTES • Do not touch the LCD screen when you change the - Acer AL707 | User Guide - Page 8
OPERATING INSTRUCTIONS GENERAL INSTRUCTIONS Press the power button to turn the monitor on or off. The other control buttons are located at front panel of the monitor (See Figure 4). By changing these settings, the picture can be adjusted to your personal preferences. • The power cord should be - Acer AL707 | User Guide - Page 9
Button: Press this button to switch ON/OFF of monitor's power. • MENU / ENTER : Active OSD menu or function adjust confirm or Exit OSD menu when in Brightness/Contrast OSD status. • Contrast / : Adjust contrast or function adjust. • - Acer AL707 | User Guide - Page 10
these will damage the cabinet. As a safety precaution, always unplug the monitor before cleaning it. HOW TO ADJUST A SETTING 1. Press the MENU-button the current function. 5. When the OSD window is active, it shows the input signal timing. The "H" stands for the horizontal frequency and "V" for the - Acer AL707 | User Guide - Page 11
8. Language Multi-Language selection. 9. Dos-mode selected Dos-mode resolution selection for 720x400 @70Hz and 640x400 @70Hz 10. Red Adjusts Red to 720x400 or 640x400 , press MENU again to confirm and then press POWER button off then on for activate the setup (for general, most of the Dos - Acer AL707 | User Guide - Page 12
This reduces the monitor's internal power supply consumption. After the video input signal is restored, full power is restored and CSA labeled. The voltage rating for the power cord shall be 125 volts AC. Supplied with units intended for connection to power outlet of personal computer: Please use a - Acer AL707 | User Guide - Page 13
TECHNICAL SUPPORT (FAQ) Problem & Question Power LED is not on No Plug & Play Picture is fuzzy Picture bounces or a wave pattern is present in the picture The power LED is ON (orange) the CAPS LOCK key. *Inspect the monitor's video cable and make sure that none of the pins are bent. 41L1700-786- - Acer AL707 | User Guide - Page 14
is limited.In 10000 Hours the luminance of the light has been reduced to half of its original value. Please send the monitor to an authorized service Agent for service. Horizontal or vertical disturbances *Use win 95/98 shut-down mode Adjust on the screen CLOCK and FOCUS or perform hot- key - Acer AL707 | User Guide - Page 15
-cable is properly connected , If the connector is loose, tighten the connector's screws. 2. Check the signal-cable's connection pins for damage. INPUT NOT SUPPORT : Your computer has been set to unsuitable display mode ,set the computer to display mode given in the following table. 41L1700-786-1B - Acer AL707 | User Guide - Page 16
APPENDIX SPECIFICATIONS LCD Panel Input Display Colors Dot Clock Max. Resolution Plug & Play EPA ENERGY STAR® Input Connector Input Video Signal Driving system Size Pixel pitch Brightness Contrast Viewable angle Tr Tf Video H-Frequency V-Frequency ON Mode OFF Mode Maximum Screen Size Power - Acer AL707 | User Guide - Page 17
( Maximum ) Regulatory Compliance • Auto Adjust Key • / Brightness • / Contrast • Power Button • MENU/ Exit • Contrast • Brightness • Focus • Clock • H. Position • V. Position • Auto Center • Language • Dos-mode resolution selected • (Warm)Color • (Cool)Color • RGB Color temperature • Reset • Exit - Acer AL707 | User Guide - Page 18
Preset Display Modes STANDARD Dos-mode Dos-mode Dos-mode VGA SVGA XGA SXGA RESOLUTION 640 × 400 640 × 350 720 × 400 640 × 480 640 × 480 640 × 480 640 × 480 800 × 600 800 × 600 800 × 600 800 DOS was 720x400 @70Hz, user can change to Dos 640x400 @70Hz by selected OSD- ICON. 41L1700-786-1B 英文 17 - Acer AL707 | User Guide - Page 19
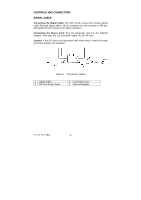
CONNECTOR PIN ASSIGNMENT 1 5 6 10 11 15 PIN NO. 1. 2. 3. 4. 5. 6. 7. 8. 15 - Pin Color Display Signal Cable DESCRIPTION Red Green Blue Ground Ground R-Ground G-Ground B-Ground PIN NO. 9. 10. 11. 12. 13. 14. 15. DESCRIPTION +5V Detect Cable Ground DDC-Serial Data H-Sync V-Sync DDC-Serial
-
 1
1 -
 2
2 -
 3
3 -
 4
4 -
 5
5 -
 6
6 -
 7
7 -
8
-
9
-
10
-
11
-
12
-
13
-
14
-
15
-
16
-
17
-
18
-
19
 |
 |

41L1700-786-1B 英文
0
TABLE OF CONTENTS
FOR YOUR SAFETY --------------------------------------------------
1
SAFETY PRECAUTIONS --------------------------------------
2
SPECIAL NOTES ON LCD MONITORS -------------------
3
BEFORE YOU OPERATE THE MONITOR ---------------------
3
FEATURES --------------------------------------------------------
3
PACKING LIST ---------------------------------------------------
3
INSTALLATION INSTRUCTIONS ---------------------------
4
CONTROLS AND CONNECTORS --------------------------
5
ADJUSTING THE VIEWING ANGLE -----------------------
6
OPERATING INSTRUCTIONS -------------------------------------
7
GENERAL INSTRUCTIONS ----------------------------------
7
HOW TO ADJUST A SETTING ------------------------------
9
ADJUSTING THE PICTURE ---------------------------------
10
PLUG AND PLAY -----------------------------------------------
11
TECHNICAL SUPPORT(FAQ) --------------------------------
12-13
ERROR
MESSAGE & POSSIBLE
SOLUTION --------
14
APPENDIX --------------------------------------------------------------
15
SPECIFICATIONS ------------------------------------------
15-16
FACTORY PRESET TIMING TABLE ----------------------
17
CONNECTOR PIN ASSIGNMENT -------------------------
18