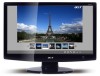
Acer D240H User Manual
Acer D240H - Bmidp Widescreen Photo Frame LCD Monitor Manual
 |
UPC - 884483872954
View all Acer D240H manuals
Add to My Manuals
Save this manual to your list of manuals |
Acer D240H manual content summary:
- Acer D240H | User Manual - Page 1
Acer LCD Monitor User Guide - Acer D240H | User Manual - Page 2
. Acer Incorporated. All Rights Reserved. Acer LCD Monitor User Guide Original Issue: 08/2008 Changes may be made periodically to the information in this publication without obligation to notify any person of such revisions or changes. Such changes will be incorporated in new editions of this manual - Acer D240H | User Manual - Page 3
. Follow all warnings and instructions marked on the product. Special notes on LCD monitors The following are normal with the LCD monitor and do not indicate a problem. • Due to the nature of the fluorescent light, the screen may flicker during initial use. Turn off the power switch and then turn it - Acer D240H | User Manual - Page 4
as close to the equipment operator as possible. When you need to disconnect power from the equipment, be sure to unplug the power cord from the electrical outlet. Safe listening To protect your hearing, follow these instructions. • Gradually increase the volume until you can hear it clearly and - Acer D240H | User Manual - Page 5
Refer all servicing to qualified service personnel. Unplug this product from the wall outlet and refer servicing to qualified service personnel when: • the power cord or in performance, indicating a need for service • the product does not operate normally after following the operating instructions - Acer D240H | User Manual - Page 6
only those controls that are covered by the operating instructions, since improper adjustment of other controls may acer-group.com/public/Sustainability/sustainability01.htm Visit www.acer-group.com for further information on the features and benefits of our other products. Disposal instructions - Acer D240H | User Manual - Page 7
by the U.S. Environmental Protection Agency. Acer is committed to offer products and services worldwide that help customers save money, Acer LCD monitor with an ENERGY STAR logo. This product has been shipped enabled for power management: • Activate display's Sleep mode within 15 minutes of user - Acer D240H | User Manual - Page 8
Computer users may complain of eyestrain and headaches after prolonged use. Users are Give your eyes regular breaks by looking away from the monitor and focusing on a distant point. • Blink frequently middle of the display. • Adjust the display brightness and/or contrast to a comfortable level for - Acer D240H | User Manual - Page 9
to an awkward viewing angle. • Avoid looking at bright light sources, such as open windows, for extended acer.com.tw Hereby declare that: Product: 24" LCD Monitor Trade Name: Acer or eMachines or Gateway or packard bell Model Number: D240H SKU Number: D240H xxx ("x" =0~9, a~ z, orA ~Z) or blank - Acer D240H | User Manual - Page 10
name: Model number: SKU number: Name of responsible party: Address of responsible party: Contact person: Tel: Fax: LCD Monitor D240H ("x" = 0 - 9, a - z, or A - Z or blank) D240Hxxx ("x" = 0 - 9, a - z, or A - Z or blank) Acer America Corporation 333 West San Carlos St. San Jose, CA 95110 USA - Acer D240H | User Manual - Page 11
safety and comfort iii Safety instructions iii Special notes on LCD monitors iii Cleaning your monitor iii Connecting/disconnecting the device iii Accessibility iv Safe listening iv Warnings iv Using electrical power iv Product servicing v Additional safety information vi IT - Acer D240H | User Manual - Page 12
Troubleshooting 15 VGA mode 15 DVI/HDMI* mode 16 - Acer D240H | User Manual - Page 13
English 1 Unpacking Please check that the following items are present when you unpack the box, and save the packing materials in case you need to ship or transport the monitor in the future. LCD monitor User guide Quick start guide D-sub cable DVI cable AC power cord Audio Cable USB Cable - Acer D240H | User Manual - Page 14
English 2 Attaching the base (for selected models) Note: Remove the monitor and monitor base from its packaging. Carefully place the monitor face-down on a stable surface -- use a cloth to avoid scratching the screen. 1 1 Attach the the monitor stand arm to the base. 2 Ensure that the base is - Acer D240H | User Manual - Page 15
country in which the equipment will be installed. Power saving The monitor will be switched to "power saving" mode by the control signal from the display controller, as indicated by the amber-colored power LED. Mode On Power saving LED light White Amber The power saving mode will be kept until - Acer D240H | User Manual - Page 16
plug-and-play. The DDC is a communication protocol through which the monitor automatically informs the host system about its capabilities; for example, supported resolutions and corresponding timing. The monitor supports the DDC2B standard. Connector pin assignment 15-pin color display signal cable - Acer D240H | User Manual - Page 17
shield 12 NC PIN No. Description 13 NC 14 +5 V power 15 GND (return for +5 V hsync.vsync) 16 Hot-plug detection 17 TMDS data 0- 18 TMDS data 0+ 19 TMDS data 0/5 shield 20 NC 21 NC 22 TMDS clock shield 23 TMDS clock+ 24 DDC TMDS clock- 19-pin color display signal cable* 1917151311 - Acer D240H | User Manual - Page 18
1280x1024 75 Hz 19 1280x720 60 Hz 20 1280x768 60 Hz VESA 21 1280x768 75 Hz 22 1280x800 60 Hz 23 WXGA 1360x768 60 Hz 24 1440x900 75 Hz 25 WXGA+ 1440x900 60 Hz 26 SXGA+ 1440x1050 60 Hz 27 UXGA 1600x1200 60 Hz 28 1680x1050 60 Hz 29 WSXGA+ 1680x1050 - Acer D240H | User Manual - Page 19
the power cord to the monitor, then to a properly grounded AC outlet. 3 Turn on the monitor and computer Turn on the monitor first, then the computer. This sequence is very important. 4 If the monitor does not function properly, please refer to the troubleshooting section to diagnose the problem - Acer D240H | User Manual - Page 20
DPF (Digital Photo Frame) mode. For DPF mode detail, please refer to "Acer D240H DPF" on page i . Please refer to "Acer eColor Management" on page 9 for more details. INPUT Input Key Use Input key to select between three different video source that may be connected to your monitor. (a) VGA input - Acer D240H | User Manual - Page 21
external storage device directly. Use this quick guide to: • Set up the monitor as a DPF • Review parts of the monitor • Install the Acer PhotoFit Management software • Use the Acer PhotoFit Management software • Use the control icons • View images in photo mode or slideshow mode Getting started You - Acer D240H | User Manual - Page 22
. Using the software The main user interface of Acer PhotoFit Management lists all the preloaded images in the monitor's built-in storage, as well as images on inserted removable devices. When you launch Acer PhotoFit Management, the main UI features: • A file browser on the left. • A thumbnail - Acer D240H | User Manual - Page 23
be displayed as thumbnails. * Note: Images will automatically be resized to fit the LCD screen, but the original files on the memory card or USB flash drive will not be affected. Viewing modes Photo show mode - Shows a single photo at a time. In this mode, you can rotate pictures. Slideshow mode - Acer D240H | User Manual - Page 24
Auto-adjust button to confirm the mode and exit Acer eColor Management. Features and benefits Main menu Sub menu item Description icon User mode User-defined. Settings can be fine-tuned to suit any situation. Text mode Optimal balance of brightness and contrast to prevent eyestrain. The most - Acer D240H | User Manual - Page 25
Actual product specifications may vary. The OSD can be used for adjusting the settings of your LCD Monitor. Press the Menu key to open the OSD. You can use the OSD to adjust menu can be used to adjust the current Brightness, Contrast, Colour Temp, Auto Config and other image-related qualities. - Acer D240H | User Manual - Page 26
11 Adjusting the OSD position English 1 Press the Menu key to bring up the OSD. 2 Using the directional keys, select OSD from the onscreen display. Then navigate to the feature you wish to adjust. - Acer D240H | User Manual - Page 27
12 Adjusting the setting English 1 Press the Menu key to bring up the OSD. 2 Using the / keys, select feature you wish to adjust. Setting from the OSD. Then navigate to the 3 The Setting menu can be used to adjust the screen Menu Language and other important settings. - Acer D240H | User Manual - Page 28
13 Product information English 1 Press the Menu key to bring up the OSD. 2 Using the / keys, select Information from the OSD. Then the basic information of LCD monitor will show up for current input. - Acer D240H | User Manual - Page 29
your LCD monitor for servicing, please check the troubleshooting list below to see if you can self-diagnose the problem. VGA mode Problem No picture visible LED status White Off Remedy Using the OSD, adjust brightness and contrast to maximum or reset to their default settings. Check the power - Acer D240H | User Manual - Page 30
15 English DVI/HDMI* mode Problem No picture visible LED status White Off Remedy Using the OSD, adjust brightness and contrast to maximum or reset to their default settings. Check the power switch. Amber Check if the AC power cord is properly connected to the monitor. Check if the video
-
 1
1 -
 2
2 -
 3
3 -
 4
4 -
 5
5 -
 6
6 -
 7
7 -
8
-
9
-
10
-
11
-
12
-
13
-
14
-
15
-
16
-
17
-
18
-
19
-
20
-
21
-
22
-
23
-
24
-
25
-
26
-
27
-
28
-
29
-
30
 |
 |

Acer LCD Monitor
User Guide