Acer G236HL User Manual
Acer G236HL Manual
 |
View all Acer G236HL manuals
Add to My Manuals
Save this manual to your list of manuals |
Acer G236HL manual content summary:
- Acer G236HL | User Manual - Page 1
and comfort 2 Unpacking 5 Attaching/Removing the base 6 Screen position adjustment 6 Connecting the power cord 7 Safety precaution 7 Cleaning your monitor 7 Power saving 8 DDC 8 Connector Pin Assignment 9 Standard Timing Table 11 Installation 14 User controls 15 Troubleshooting 21 - Acer G236HL | User Manual - Page 2
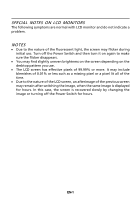
SPECIAL NOTES ON LCD MONITORS The following symptoms are normal with LCD monitor and do not indicate a problem. NOTES · Due to the nature of the fluorescent light, the screen may flicker during initial use. Turn off the Power Switch and then turn it on again to make sure the flicker disappears. · - Acer G236HL | User Manual - Page 3
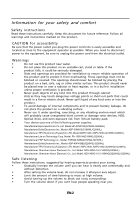
warnings and instructions marked on the product. CAUTION for accessibility Be sure that the power outlet you plug the power cord into is easily . • Your device uses one of the following power supplies: Safe listening Follow these instructions, suggested by hearing experts,to protect your earing. - Acer G236HL | User Manual - Page 4
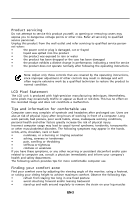
may expose you to dangerous voltage points or other risks. Refer all servicing to qualified service personnel. Unplug this product from the wall outlet and refer servicing to qualified service person- nel when: • the power cord or plug is damaged, cut or frayed • liquid was spilled into the - Acer G236HL | User Manual - Page 5
and mouse properly and within comfort able reach • if you view your monitor more than your documents, place the display at the center of your desk : Worldwide: http://www.acer-group.com/public/Sustainability/sustainability01.htm http://www.acer-group.com/public/Sustainability/sustainability04 - Acer G236HL | User Manual - Page 6
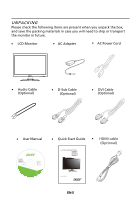
need to ship or transport the monitor in future. LCD Monitor AC Adapter AC Power Cord · Audio Cable (Optional) D-Sub Cable (Optional) DVI Cable (Optional) User Manual G196WL G206HL G226HQL G236HL LCD monitor MU.LUZ00.001 Quick Start Guide HDMI cable (Optional) G196WL EN-5 - Acer G236HL | User Manual - Page 7
/Removing the Base Note: Remove the monitor and monitor base from its packaging. Carefully place the monitor face-down on a stable surface -- use a cloth to avoid scratching the screen. Attaching the Base Removing the Base 1 2 2 1 SCREEN POSITION ADJUSTMENT In oder to optimize the best - Acer G236HL | User Manual - Page 8
you use is the correct type required for your area. · This monitor has a universal power supply that allows operation in either 100/120V AC or 220/240 V AC voltage area. No user-adjustment is required. · Plug one end of the power cord to the AC Inlet, plug another end to a proper AC outlet. · For - Acer G236HL | User Manual - Page 9
system if your system also supports DDC protocol. The DDC (Display Data Channel) is a communication protocol through which the monitor automatically informs the host system about its capabilities, for example, supported resolutions and corresponding timing. The monitor supports DDC2B standard. EN-8 - Acer G236HL | User Manual - Page 10
G-Ground B-Ground PIN NO. 9. 10. 11. 12. 13. 14. 15. DESCRIPTION +5V Logic Ground Monitor Ground DDC-Serial Data H-Sync V-Sync DDC-Serial Clock 19-pin Color Display Signal Cable* 1917151311 9 7 5 12 TMDS Clock- 14 Reserved (N.C. on device) 16 SDA 18 +5V Power * only for certain models EN-9 - Acer G236HL | User Manual - Page 11
PIN Meaning 1. TMDS Data2- 13. NC 2. TMDS Data2+ 14. +5V Power 3. TMDS Data 2/4 Shield 15. Logic Ground 4. NC 16. Hot Plug 6. DDC Clock 18. TMDS Data0+ 7. DDC Data 19. TMDS Data 0/5 Shield 8. NC 20. NC 9. TMDS Data1- 21. NC 10. TMDS Data1+ 22. TMDS Clock Shield 11 - Acer G236HL | User Manual - Page 12
Standard Timing Table EN-11 - Acer G236HL | User Manual - Page 13
Standard Timing Table EN-12 - Acer G236HL | User Manual - Page 14
Standard Timing Table EN-13 - Acer G236HL | User Manual - Page 15
grounded, AC outlet . 3. Power-ON Monitor and Computer Power-ON the monitor first, then power-ON the computer. This sequence is very important. 4. If the monitor still does not function properly, please refer to the troubleshooting section to diagnose the problem. HDMI DVI HDMI D-SUB AUDIO OUT - Acer G236HL | User Manual - Page 16
USER CONTROLS Power Switch / Power LED: To turn the monitor ON or OFF. Lights up to indicate the power is turned ON. Using the Shortcut Menu Press the function button to open the shortcut menu. The shortcut menu lets you quickly select the most - Acer G236HL | User Manual - Page 17
eColor Management Operation instructions Step 1: Press " " Key to open the Acer eColor Management OSD and access the item Description N/A User mode User defined. Settings can be fine-tuned to suit any situation N/A ECO mode Adjusts the settings to reduce power consumption. N/A Standard - Acer G236HL | User Manual - Page 18
Adjusting the OSD settings Note: The following content is for general reference only. Actual product specifications may vary. The OSD can be used for adjusting the settings of your LCD Monitor. Press the MENU key to open the OSD. You can use the OSD to adjust the picture quality, OSD position and - Acer G236HL | User Manual - Page 19
Adjusting the OSD position 1 Press the MENU key to bring up the OSD. 2 Using the directional keys, select OSD from the on screen display. Then navigate to the feature you wish to adjust. EN-18 - Acer G236HL | User Manual - Page 20
Adjusting the setting 1 Press the MENU key to bring up the OSD. 2 Using the / keys, select Setting from the OSD. Then navigate to the feature you wish to adjust. 3 The Setting menu can be used to adjust the screen Menu Language and other important settings. EN-19 - Acer G236HL | User Manual - Page 21
Product information 1 Press the MENU key to bring up the OSD. 2 Using the / keys, select Information from the OSD. Then the basic information of LCD monitor will show up for current input. EN-20 - Acer G236HL | User Manual - Page 22
your LCD monitor for servicing, please check the troubleshooting list below to see if you can self-diagnose the problem. (VGA Mode) Problems Current Status Remedy LED ON · Using OSD, adjust brightness and contrast to maximum or reset to their default settings. LED OFF · Check the power switch - Acer G236HL | User Manual - Page 23
(DVI mode) Problems No Picture Current Status Remedy LED ON · Using OSD, adjust brightness and contrast to maximum or reset to their default settings. LED OFF · Check the power switch. · Check if AC power cord is properly connected to the monitor. LED displays blinking blue · Check if video - Acer G236HL | User Manual - Page 24
20020 Lainate (MI) Italy Tel: +39-02-939-921 ,Fax: +39-02 9399-2913 www.acer.it Hereby declare that: Product: LCD Monitor Trade Name: Acer Model Number: G196WL;G206HL;G226HQL;G236HL SKU Number: G196WL xxxxxx;G206HLxxxxxx; G226HQL xxxxxx;G236HLxxxxxx; ("x" = 0~9, a ~ z, A ~ Z, or blank) Is - Acer G236HL | User Manual - Page 25
is responsible for this declaration: Product: LCD Monitor Model Number: G196WL; G206HL ;G226HQL;G236HL SKU Number: Name of Responsible Party: G196WL xxxxxx ;G206HL xxxxxx G226HQL xxxxxx ;G236HL xxxxxx ("x" = 0~9, a ~ z, A ~ Z or Blank) Acer America Corporation Address of Responsible Party
-
 1
1 -
 2
2 -
 3
3 -
 4
4 -
 5
5 -
 6
6 -
 7
7 -
8
-
9
-
10
-
11
-
12
-
13
-
14
-
15
-
16
-
17
-
18
-
19
-
20
-
21
-
22
-
23
-
24
-
25
 |
 |

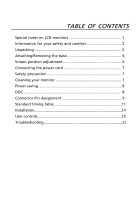
TABLE OF CONTENTS
Special notes on LCD monitors
..................................................
1
Information for your safety and
comfort
..................................
2
Unpacking
...................................................................................
5
Attaching/Removing the base
....................................................
6
Screen position adjustment
........................................................
6
Connecting the power cord
.......................................................
7
Safety precaution
.......................................................................
7
Cleaning your monitor
...............................................................
7
Power saving
...............................................................................
8
DDC
..............................................................................................
8
Connector Pin Assignment
.........................................................
9
Standard Timing Table
..................................................................
11
Installation
.....................................................................................
User controls
..................................................................................
Troubleshooting
............................................................................
14
15
21