Acer G247HYU User Manual
Acer G247HYU Manual
 |
View all Acer G247HYU manuals
Add to My Manuals
Save this manual to your list of manuals |
Acer G247HYU manual content summary:
- Acer G247HYU | User Manual - Page 1
Acer LCD Monitor User Guide - Acer G247HYU | User Manual - Page 2
. Acer Incorporated. All Rights Reserved. Acer LCD Monitor User Guide Original Issue: 08/2014 Changes may be made periodically to the information in this publication without obligation to notify any person of such revisions or changes. Such changes will be incorporated in new editions of this manual - Acer G247HYU | User Manual - Page 3
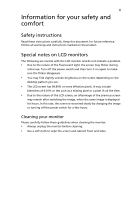
carefully. Keep this document for future reference. Follow all warnings and instructions marked on the product. Special notes on LCD monitors The following are normal with the LCD monitor and do not indicate a problem. • Due to the nature of the fluorescent light, the screen may flicker during - Acer G247HYU | User Manual - Page 4
from the electrical outlet. Safe listening To protect your hearing, follow these instructions. • Gradually increase the volume until you can hear it clearly and or damage internal devices. • The adapter is only used for this monitor ,do not be used for other purposes. • Your device uses one - Acer G247HYU | User Manual - Page 5
type SPT-2, rated 7 A 125 V minimum, VDE approved or its equivalent, 4.6 meters (15 feet) maximum length. Product servicing Do not attempt to service this product change in performance, indicating a need for service • the product does not operate normally after following the operating instructions - Acer G247HYU | User Manual - Page 6
or even death. Switch off the device near gas pumps at service stations. Observe restrictions on the use of radio equipment in fuel depots acer-group.com/public/Sustainability/ Visit www.acer-group.com for further information on the features and benefits of our other products. Disposal instructions - Acer G247HYU | User Manual - Page 7
section provides tips for more comfortable computer use. Finding your comfort zone Find your comfort zone by adjusting the viewing angle of the monitor, using a footrest, or raising your sitting height to achieve maximum comfort. Observe the following tips: • refrain from staying too long in one - Acer G247HYU | User Manual - Page 8
sections provide suggestions on how to reduce eyestrain. Eyes • Rest your eyes frequently. • Give your eyes regular breaks by looking away from the monitor and focusing on a distant point. • Blink frequently to keep your eyes from drying out. Display • Keep your display clean. • Keep your head at - Acer G247HYU | User Manual - Page 9
OF CONTENTS UNPACKING 1 ATTACHING / REMOVING THE BASE 2 SCREEN POSITION ADJUSTMENT 2 CONNECTING THE POWER CORD 3 SAFETY PRECAUTION 3 CLEANING YOUR MONITOR 3 POWER SAVING 4 DDC...4 CONNECTOR PIN ASSIGNMENT 5 STANDARD TIMING TABLE 8 INSTALLATION 10 MHL (Mobile High-Definition Link) (Only for - Acer G247HYU | User Manual - Page 10
when you unpack the box, and save the packing materials in case you will need to ship or transport the monitor in future. LCD Monitor Quick Start Guide Audio Cable (Optional) AC Power Cord AC Adapter DP Cable (Optional) DVI Cable (Optional) HDMI Cable (Optional) MHL Cable - Acer G247HYU | User Manual - Page 11
ADJUSTMENT In order to optimize the best viewing position, you can adjust the tilt of the monitor by using both of your hands to hold the edges of the monitor as shown in the figure below. The monitor can be adjusted to 15 degrees up or 5 degrees down as indicated by arrow below - Acer G247HYU | User Manual - Page 12
of U.S.): Use a Cord Set consisting of H05VV-F cord and plug rated 10 A, 250 V. The cord set should have the appropriate safety approvals for the country in which the equipment will be installed. SAFETY PRECAUTION Avoid placing the monitor, or any other heavy object, on the power cord to avoid - Acer G247HYU | User Manual - Page 13
. The recovery time from Active OFF state back to ON state is around 3 seconds. DDC To make your installation easier, the monitor is able to Plug and Play with your system if your system also supports DDC protocol. The DDC (Display Data Channel) is a communication protocol through which the - Acer G247HYU | User Manual - Page 14
CONNECTOR PIN ASSIGNMENT 24-Pin Color Display Signal Cable* PIN Meaning PIN Meaning 1. TMDS Data2- 13. NC 2. TMDS Data2+ 14. +5V Power 3. TMDS Data 2/4 Shield 15. Logic Ground 4. NC 16. Hot Plug Detect 5. NC 17. TMDS Data0- 6. DDC Clock 18. TMDS Data0+ 7. DDC Data 19. - Acer G247HYU | User Manual - Page 15
19-Pin Color Display Signal Cable* PIN Meaning 1. TMDS Data2+ 2. TMDS Data2 Shield 3. TMDS Data2- 4. TMDS Data1+ 5. TMDS Data1 Shield 6. TMDS Data1- 7. TMDS Data0+ 8. TMDS Data0 Shield 9. TMDS Data0- * only for certain models 19-Pin Color Display Signal Cable* PIN Meaning 10. - Acer G247HYU | User Manual - Page 16
20-Pin Color Display Signal Cable* PIN Description 1. Lane0(p) 2. GND 3. Lane0(n) 4. Lane1(p) 5. GND 6. Lane1(n) 7. Lane2(p) 8. GND 9. Lane3(n) 10. Lane3(p) * only for certain models PIN Description 11. GND 12. Lane3(n) 13. Config1 14. Config2 15. AUX_CH (n) 16. - Acer G247HYU | User Manual - Page 17
832 x 624 74.55 Hz 11 XGA 1024 x 768 60 Hz 12 XGA 1024 x 768 70 Hz 13 XGA 1024 x 768 75 Hz 14 MAC 1152 x 870 75 Hz 15 VESA 1152 x 864 75 Hz 16 VESA 1280 x 960 60 Hz 17 SXGA 1280 x1024 60 Hz 18 SXGA 1280 x1024 75 Hz 19 VESA 1280 x 720 60 Hz 20 WXGA 1280 x 800 - Acer G247HYU | User Manual - Page 18
* Only for MHL models Mode 1 2 3 4 5 6 7 8 9 10 11 12 Resolution 640 x 480 @60Hz 720 x 480p @60Hz 720 x 576p @50Hz 800 x 600 @60Hz 1024 x 768 @60Hz 1280 x 720p @60Hz 1280 x 720p @50Hz 1920 x 1080i @60Hz 1920 x 1080i @50Hz 1920 x 1080p @30Hz 720 (1440) x 480i @60Hz 720 (1440) x 576i @50Hz EN-9 - Acer G247HYU | User Manual - Page 19
, then power-ON the computer. This sequence is very important. 5. If the monitor still does not function properly, please refer to the troubleshooting section to diagnose the problem. DC-IN AUDIO-IN DP DVI-D IN HDMI DC DC-IN AUDIO-IN DP HDMI DVI DP DVI-D IN HDMI DC-IN AUDIO-IN DP - Acer G247HYU | User Manual - Page 20
Using MHL MHL-certified portable devices will automatically display content on the monitor, provided the output display and audio formats are supported by the portable device. When the portable device is in standby mode, the monitor will show a black screen or turn to standby mode, depending on the - Acer G247HYU | User Manual - Page 21
USER CONTROLS Base Controls Icon / Item Power button/ indicator Description To turn the monitor ON or OFF. Lights up to indicate the power is turned ON. OSD to exit the OSD. Empowering Press the Empowering key to open the Acer eColor key Management OSD and access the scenario modes. EN-12 - Acer G247HYU | User Manual - Page 22
eColor Management Operation instructions Step 1: Press " " Key to open the Acer eColor Management OSD and access the scenario modes Step 2: Press "" or "" to select the mode Features and Benefits Main Sub Menu Sub Menu Menu icon - Acer G247HYU | User Manual - Page 23
: The following content is for general reference only. Actual product specifications may vary. The OSD can be used for adjusting the settings of your LCD Monitor. Press the MENU key to open the OSD. You can use the OSD to adjust the picture quality, OSD position and general settings. For advanced - Acer G247HYU | User Manual - Page 24
Adjusting picture quality 1. Press the MENU key to bring up the OSD. 2. Using the / keys, select Picture from the OSD. Then navigate to the picture element you wish to adjust. 3. Use the / keys to adjust the sliding scales. 4. The Picture menu can be used to adjust the Brightness, Contrast, - Acer G247HYU | User Manual - Page 25
Adjusting OSD settings 1. Press the MENU key to bring up the OSD. 2. Using the directional keys, select OSD from the on screen display. Then navigate to the feature you wish to adjust. EN-16 - Acer G247HYU | User Manual - Page 26
Adjusting miscellaneous settings 1. Press the MENU key to bring up the OSD. 2. Using the / keys, select setting you want to adjust. Setting from the OSD, then navigate the 3. The setting menu can be used to adjust the screen Menu Language and other important settings. EN-17 - Acer G247HYU | User Manual - Page 27
Product information 1. Press the MENU key to bring up the OSD. 2. Using the / keys, select Information from the OSD. Then the basic information of LCD monitor will show up for current input. EN-18 - Acer G247HYU | User Manual - Page 28
Before sending your LCD monitor for servicing, please check the troubleshooting list below to see if you can self-diagnose the problem. (DVI/HDMI/DP Mode) Problems No Picture Abnormal Sound (Only Audio-Input model) (Optional) Current Status Remedy LED ON Using OSD, adjust brightness - Acer G247HYU | User Manual - Page 29
G247HYU G247HYU Aug. 20, 2014 EN-20 - Acer G247HYU | User Manual - Page 30
local Manufacturer /Importer is responsible for this declaration: Product: LCD Monitor Model Number: G247HYU SKU Number: G247HYU xxxxxx ("x" = 0~9, a ~ z, or A ~ Z) Name of Responsible Party: Address of Responsible Party: Acer America Corporation 333 West San Carlos St. Suite 1500 San Jose - Acer G247HYU | User Manual - Page 31
by the U.S. Environmental Protection Agency. Acer is committed to offer products and services worldwide that help customers save money, "computer sleep" mode after 15 and 30 minute of inactivity respectively. • Wake the monitor when it is in Active Off mode, move the mouse or press any keyboard key.
-
 1
1 -
 2
2 -
 3
3 -
 4
4 -
 5
5 -
 6
6 -
 7
7 -
8
-
9
-
10
-
11
-
12
-
13
-
14
-
15
-
16
-
17
-
18
-
19
-
20
-
21
-
22
-
23
-
24
-
25
-
26
-
27
-
28
-
29
-
30
-
31
 |
 |

User Guide
Acer LCD Monitor