Acer HN274H User Manual
Acer HN274H Manual
 |
View all Acer HN274H manuals
Add to My Manuals
Save this manual to your list of manuals |
Acer HN274H manual content summary:
- Acer HN274H | User Manual - Page 1
on LCD monitors 1 Information for your safety and comfort 2 Unpacking 5 Attaching/Removing the base 6 Screen position adjustment 6 Connecting the power cord 7 Safety precaution 7 Cleaning your monitor 7 Power saving 8 DDC 8 Power adaptor 8 Connector Pin Assignment 9 Standard/3D Timing - Acer HN274H | User Manual - Page 2
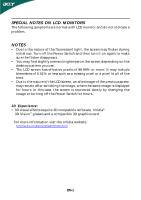
the same image is displayed for hours. In this case, the screen is recovered slowly by changing the image or turning off the Power Switch for hours. 3D Experience: • 3D visual effects require 3D compatible software, nVidia® 3D Vision™ glasses and a compatible 3D graphics card. For more information - Acer HN274H | User Manual - Page 3
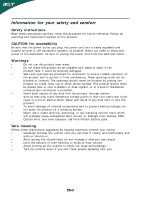
all warnings and instructions marked on the product. CAUTION for accessibility Be sure that the power outlet you plug the power cord into is until you can hear it clearly and comfortably and without distortion. • After setting the volume level, do not increase it afteryour ears adjust. • Limit - Acer HN274H | User Manual - Page 4
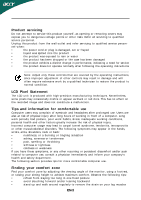
may expose you to dangerous voltage points or other risks. Refer all servicing to qualified service personnel. Unplug this product from the wall outlet and refer servicing to qualified service person- nel when: • the power cord or plug is damaged, cut or frayed • liquid was spilled into - Acer HN274H | User Manual - Page 5
keyboard and mouse properly and within comfort able reach • if you view your monitor more than your documents, place the display at the center of your desk to minimize neck strain Taking care of your vision Long viewing hours, wearing incorrect glasses or contact lenses, glare, excessive room - Acer HN274H | User Manual - Page 6
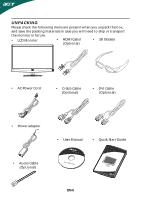
save the packing materials in case you will need to ship or transport the monitor in future. • LCD Monitor • HDMI Cabel (Optional) • 3D Glasses • AC Power Cord • D-Sub Cable (Optional) • DVI Cable (Optional) • Power adaptor • User Manual • Quick Start Guide • Audio Cable (Optional) EN-5 - Acer HN274H | User Manual - Page 7
face-down on a stable surface -- use a cloth to avoid scratching the screen. Install: Remove: Align the release button on the Depress the release button as bottom of the monitor with the indicated first before removing the corresponding base and follow the arrow direction slots on the - Acer HN274H | User Manual - Page 8
consisting of H05VV-F cord and plug rated 10 A, 250 V. The cord set should have the appropriate safety approvals for the country in which the equipment will be installed. SAFETY PRECAUTION • Avoid placing the monitor, or any other heavy object, on the power cord to avoid damage to the cable. • Do - Acer HN274H | User Manual - Page 9
saving The monitor will be driven into Power Saving" mode by the control signal from the display controller, as indicated by the amber-color power LED. State ON P o w e r S a v in g Mode 3D Mode LED Lig h t W h ite A mber G reen The power saving states will be kept until a control signal has - Acer HN274H | User Manual - Page 10
PIN ASSIGNMENT 5 1 10 6 15 11 15-Pin Color Display Signal Cable PIN NO. 1. 2. 3. 4. 5. 6. 7. 8. DESCRIPTION Red Green Blue Monitor Ground Self Test R-Ground G-Ground B-Ground PIN NO. 9. 10. 11. 12. 13. 14. 15. DESCRIPTION +5V Logic Ground Monitor Ground DDC-Serial Data H-Sync V-Sync DDC - Acer HN274H | User Manual - Page 11
. 11. TMDS Data GND 23. 12. TMDS Date 3- 24. 19-Pin color display signal cable* PIN Meaning PIN 1. TMDS Data2+ 10. 2. TMDS Data2 Shield 11. . 19. * only for certain models EN-10 Signal TMDS Date 3+ +5V Power Self Test Hot Plug Detect TMDS Data 0TMDS Data 0+ TMDS Data GND TMDS Date - Acer HN274H | User Manual - Page 12
60 Hz 10 SXGA 1280x1024 60 Hz 11 WXGA+ 1440x900 60 Hz 12 UXGA 1920x1080 60 Hz * *Modes that require a dual link DVI cable and compatible graphic card. HDMI 3DTiming Table Mode Resolution 1 1920x2205p 24 Hz 2 1280x1470p 60 Hz 3 1280x1470p 50 Hz 4 1920x1080i 60 Hz 5 1920x1080i 50 Hz - Acer HN274H | User Manual - Page 13
to the monitor, then to a properly grounded AC outlet. 4. Power-ON Monitor and Computer Power-ON the monitor first, then power-ON the computer. This sequence is very important. 5. If the monitor still does not function properly, please refer to the troubleshooting section to diagnose the problem. EN - Acer HN274H | User Manual - Page 14
/ Power LED: To turn the monitor ON or OFF. Lights up to indicate the power is turned ON. Using the Shortcut Menu Press the function button to open the shortcut menu. The shortcut menu lets you quickly select the most commonly accessed settings. Empowering: Press the Empowering Key to open the Acer - Acer HN274H | User Manual - Page 15
eColor Management Operation instructions Step 1: Press " " Key to open the Acer eColor Management OSD and access the scenario modes Step N /A ECO mode Adjusts the settings to reduce powerconsumption N /A S ta n d a rd mode Default Setting. Reflects native display capability N /A G rahpic mode - Acer HN274H | User Manual - Page 16
may vary. The OSD can be used for adjusting the settings of your LCD Monitor. Press the MENU key to open the OSD. You can use the OSD to adjust the picture quality, OSD Timeout and general settings. For advanced settings, please refer to following page: Adjusting the picture quality 1 Press - Acer HN274H | User Manual - Page 17
Adjusting the OSD Timeout 3D Notification Off 1 Press the MENU key to bring up the OSD. 2 Using the directional keys, select OSD from the on screen display. Then navigate to the feature you wish to adjust. EN-16 - Acer HN274H | User Manual - Page 18
Adjusting the setting Setting wide Mode DDC/CI ACM Input La ng u a ge IR Mode Reset Full On O FF VGA English Norma l 1 Press the MENU key to bring up the OSD. 2 Using the / keys, select Setting from the OSD. Then navigate to the feature you wish to adjust. Use the to Enter to the item - Acer HN274H | User Manual - Page 19
Product information 1 Press the MENU key to bring up the OSD. 2 Using the / keys, select Information from the OSD. Then the basic information of LCD monitor will show up for current input. EN-18 - Acer HN274H | User Manual - Page 20
your LCD monitor for servicing, please check the troubleshooting list below to see if you can self-diagnose the problem. (VGA Mode) Problems Current Status Remedy LED ON · Using OSD, adjust brightness and contrast to maximum or reset to their default settings. LED OFF · Check the power switch - Acer HN274H | User Manual - Page 21
default settings. LED OFF · Check the power switch. · Check if AC power cord is properly connected to the monitor. LED displays amber color · Check if video signal cable is properly connected at the back of monitor. · Check if the power of computer system is ON. (HDMI Mode) Problems Current - Acer HN274H | User Manual - Page 22
Fax: +39-02 9399-2913 www.acer.i t Hereby declare that: P roduct : T rade Name: M odel Number: SKU Nu mb er: LCD Monitor Acer HN 2 74H HN274H xxxxxx; ("x" = 0~9, a ~ z, 125/EC with regard to establishing a framework for the setting of ecodesign requirements for energy-related product. Year to - Acer HN274H | User Manual - Page 23
/Importer is responsible for this declaration: P roduct: Trade N ame: Model Number: SKU Number: LCD Monitor Acer H N2 7 4H HN274H xxxxxx; ("x" = 0~9, a ~ z, A ~ Z, or blank) Na me of Responsible Party: Acer America Corporation Address of Responsible Party: 333 West San Carlos St. San Jose, CA - Acer HN274H | User Manual - Page 24
3D Monitor User Guide - Acer HN274H | User Manual - Page 25
3D Monitor User Guide Original Issue: 11/2010 Changes may be made periodically to the information in this publication without obligation to notify any person of such revisions or changes. Such changes will be incorporated in new editions of this manual of Acer Incorporated. Model number Serial number - Acer HN274H | User Manual - Page 26
. To minimize the potential for experiencing visual problems or any adverse symptoms: • Take the stereoscopic 3D medical test to verify your ability so see stereoscopic 3D images. • Maintain a distance no closer than 2 to 2.5 feet away from the display. Viewing from too close a distance can strain - Acer HN274H | User Manual - Page 27
LIGHT PATTERNS MAY INDUCE SEIZURES IN PERSONS WITH NO PRIOR HISTORY OF EPILEPSY. DISCONTINUE STEREOSCOPIC 3D USE IF YOU EXPERIENCE ANY OF THE FOLLOWING SYMPTOMS WHILE VIEWING STEREOSCOPIC 3D IMAGES: • Involuntary movements or eye or muscle twitching • Muscle cramps • Nausea, dizziness or queasiness - Acer HN274H | User Manual - Page 28
, keyboard and mouse properly and within comfortable reach • If you view your monitor more than your documents, place the display at the center of your desk to minimize neck strain Taking care of your vision Long viewing hours, wearing incorrect glasses or contact lenses, glare, excessive room - Acer HN274H | User Manual - Page 29
Give your eyes regular breaks by looking away from the monitor and focusing on a distant point. • Blink frequently to keep your eyes from drying out. Display • Keep your display clean. • Keep your head at a higher level than the top edge of the display so your eyes point downward when looking at the - Acer HN274H | User Manual - Page 30
2 Changing the nose piece 2 Hardware Installation 3 Setting up 3D Vision (Dual DVI to PC) 3 Connecting the display 3 Setting up HDMI 3D 5 Frequently asked questions 6 3D Vision is not working 6 Excessive flickering 6 Eyestrain/headache 7 3D content isn't shown correctly on the - Acer HN274H | User Manual - Page 31
3D technology The Acer 3D monitor you have purchased supports NVIDIA 3D Vision technology to deliver a fully immersive stereoscopic 3D experience. And, with the use of high-tech wireless glasses, the 3D Vision . You can also use a USB wall adapter to charge your glasses. Charge your glasses until - Acer HN274H | User Manual - Page 32
, you can use a USB wall charging device to charge the glasses directly from your wall power outlet without connecting to the PC. You can use your glasses while they are charging. Using the glasses It is a good idea to keep the glasses in the protective pouch when you are not using them - Acer HN274H | User Manual - Page 33
English 3 Hardware Installation Setting up 3D Vision (Dual DVI to PC) Connecting the display Connect your 3D Vision Ready display to your NVIDIA graphics card. Use the dual-link DVI-to-DVI cable supplied with the display. Note: Connect ONLY the display now. The driver and software must be installed - Acer HN274H | User Manual - Page 34
English 4 Note: LCD monitors with built-in IR Emitters do not require additional USB connectors from the PC to the monitor. 3D LCD DVI PC IR Emitter USB DVI DO NOT MAKE THIS CONNECTION UNTIL TOLD TO DO SO BY THE INSTALL WIZARD USB Cable Dual Link DVI cable (supplied with the display) - Acer HN274H | User Manual - Page 35
English 5 Setting up HDMI 3D Connect your Acer 3D monitor to your HDMI compatible PC or Blu-ray player. Note: Compatible graphic cards include: NVIDIA GT300 Series, NVIDIA GTX400 Series, For more information, please visit: http://www.nvidia.com/object/3d-vision-requirements.html 3D LCD PC HDMI - Acer HN274H | User Manual - Page 36
can be caused by differences in frequencies at which 3D Vision operates and the lighting in your room. This type of flicker can be avoided by turning off the lights or changing the stereoscopic 3D refresh rate. To see the refresh rates, run the Setup Wizard from the NVIDIA Control Panel. When you - Acer HN274H | User Manual - Page 37
to verify the new refresh rate which also helps reduce flickering. Once you have found the best setting, click Next to continue. Eyestrain/headache If you are experiencing eyestrain or headaches, it could be due to excessive depth amount set to view the stereoscopic 3D. Warning: If eyestrain and
-
 1
1 -
 2
2 -
 3
3 -
 4
4 -
 5
5 -
 6
6 -
 7
7 -
8
-
9
-
10
-
11
-
12
-
13
-
14
-
15
-
16
-
17
-
18
-
19
-
20
-
21
-
22
-
23
-
24
-
25
-
26
-
27
-
28
-
29
-
30
-
31
-
32
-
33
-
34
-
35
-
36
-
37
 |
 |

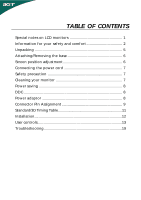
TABLE OF CONTENTS
Special notes on LCD monitors
..................................................
1
Information for your safety and
comfort
..................................
2
Unpacking
...................................................................................
5
Attaching/Removing the base
....................................................
6
Screen position adjustment
........................................................
6
Connecting the power cord
.......................................................
7
Safety precaution
.......................................................................
7
Cleaning your monitor
...............................................................
7
Power saving
...............................................................................
8
DDC
..............................................................................................
8
Power adaptor
............................................................................
8
Connector Pin Assignment
.........................................................
9
Standard/3D Timing Table
..................................................................
11
Installation
.....................................................................................
12
User controls
..................................................................................
13
Troubleshooting
............................................................................
19